
Karaboom CD - Karaoke system Auna - Free user manual and instructions
Find the device manual for free Karaboom CD Auna in PDF.

| Product type | Karaoke system with CD player |
| Brand | Auna |
| Model | Karaboom CD |
| Article number | 10032105 / 10032106 |
| Power supply | 230 V~ 50 Hz |
| Total power | 65 W |
| RMS power | 60 W |
| Bluetooth frequency | 2402-2480 MHz |
| Bluetooth transmission power | 2 dBm |
| Speaker impedance | 8 Ohm |
| Signal-to-noise ratio | 75 dB |
| Playback formats | CD, CD-R, CD-RW, CD+G, USB, SD, Bluetooth, AUX |
| Number of microphones included | 2 |
| Microphone jack | 2 × jack connector (MIC1/MIC2) |
| Echo effect | Adjustable (ECHO control) |
| USB charging port | Yes (on top of the device) |
| Video output | Yes (RCA yellow socket) |
| Sleep timer | 10 to 90 minutes |
| Alarm function | Yes (on CD or USB) |
| Remote control | Included |
| Included accessories | 2 microphones, 2 microphone stands, remote control, RCA cable, Line-In cable, user manual, 4 screws |
| Recycling | Do not dispose with household waste |
Frequently Asked Questions - Karaboom CD Auna
User questions about Karaboom CD Auna
0 question about this device. Answer the ones you know or ask your own.
Ask a new question about this device
Download the instructions for your Karaoke system in PDF format for free! Find your manual Karaboom CD - Auna and take your electronic device back in hand. On this page are published all the documents necessary for the use of your device. Karaboom CD by Auna.
USER MANUAL Karaboom CD Auna
www.auna.multimedia.com

Congratulations on purchasing this equipment. Please read this manual carefully and take care of the following hints on installation and use to avoid technical damages. Any failure caused by ignoring the items and cautions mentioned in the operation and installation instructions are not covered by our warranty and any liability. Scan the QR code to get access to the latest user manual and more product information.

CONTENTS
Safety Instructions 18
Scope of Supply 19
Product Overview 19
Getting Started 22
Play 23
Play from external audio 24
Using the USB/SD input 24
BT Mode 25
Karaoke Mode 26
Connecting to your TV 26
Disposal Considerations 27
Declaration of Conformity 27
TECHNICAL DATA
| Item number 10032105 10032106 | |
| Power supply 230 V~ 50 Hz | |
| Total consumption 65 W | |
| RMS power 60 W | |
| BT frequency Radio-frequency power | 2402-2480 MHz2 dBm |
| Speakers impedance 8 Ω | |
| S/N (A) 75 dB |
SAFETY INSTRUCTIONS
- Read these instructions. Keep these instructions. Heed all warnings. Follow all instructions.
- Do not use this apparatus near water.
- Clean only with dry cloth.
- Do not block any ventilation openings. Install in accordance with the manufacturer's instructions.
- Do not install near any heat sources such as radiators, heat registers, stoves, or other apparatus (including amplifiers) that produce heat.
- Protect the power cord from being walked on or pinched, particularly at plugs, convenience receptacles, and the Point where they exit from the apparatus.
- Only use attachments/accessories specified by the manufacturer.
- Use only with the cart, stand, tripod, bracket, or table specified by the manufacturer or sold with the apparatus. When a cart is used, use caution when moving the cart/apparatus combination to avoid injury from tip-over.
- Unplug this apparatus during lightning storms or when unused for long periods of time.
- Refer all servicing to qualified service personnel. Servicing is required when the apparatus has been damaged in anyway, such as power-supply cord or plug is damaged, liquid has been spilled or objects have fallen into the apparatus, the apparatus has been exposed to rain or moisture, does not operate normally, or has been dropped.
- Apparatus shall not be exposed to dripping or splashing.
- Do not place any sources of danger on the apparatus (e.g. liquid filled objects, lighted candles).
- Where the MAINS plug or an appliance coupler is used as the disconnect device, the disconnect device shall remain readily operable.
- Make sure there is enough free space around the product for ventilation.
- Batteries (battery pack or batteries installed) shall not be exposed to excessive heat such as sunshine, fire or the like.
- Do not use this unit in wet or damp conditions.
- Always disconnect the unit from the mains power supply before cleaning. Clean the appliance with a soft, damp, lint free cloth. Do not use abrasives or harsh cleaners.
SCOPE OF SUPPLY
- 1x main unit
- 1x line in cable
1x remote control - 2 × 6.5 ~mm microphone
- 1x user manual
- 2x microphone holder
- 1x RCA cable
4xscrew
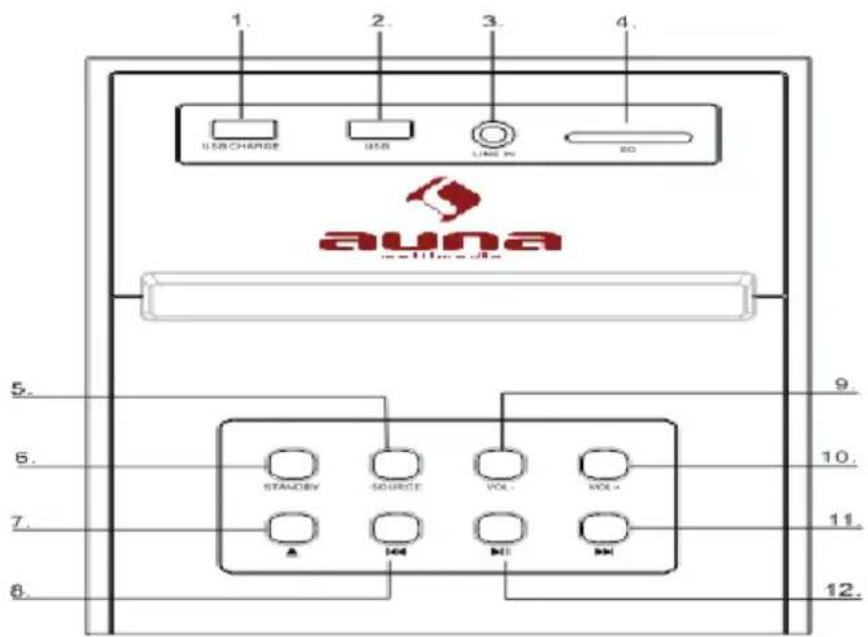
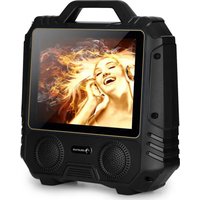
PRODUCT OVERVIEW
Front
Rear
1 USBCharge
2 USBsocket
3 Audiooin
Connect an external audio device
4 SDslot
5 Source
Select a source: CD, Bluetooth, USB, or AUDIO IN
6 Standby
Turn on the unit, switch to Standby mode
7 Eject
Eject the disc
8
Skip to the previous track
Press and hold the key to search within a track / USB
9 VOL-
Adjust the Volume
10 VOL +
Adjust the Volume+
11 1
Skip to the next track
12
Play/pause
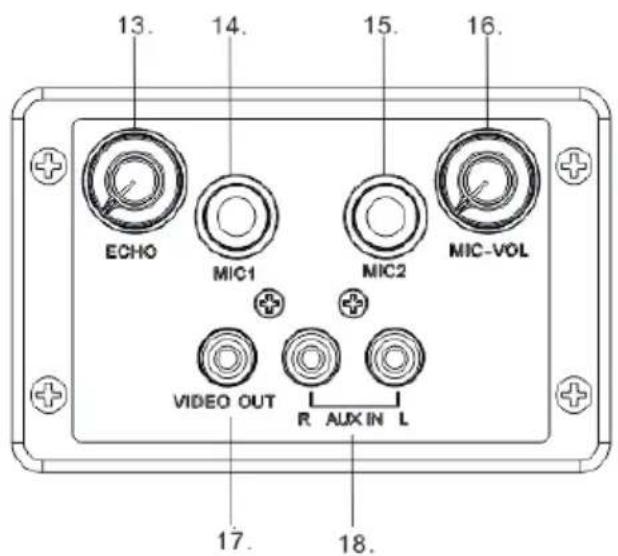
13 ECHO
Adjust the ECHO volume
14 MIC1
15 MIC2
16 MIC Volume knob
17VIDEOout
18 RCAjack
Connect an external audio device
Overview of Remote Control
1 SLEEP
Press repeatedly to set a sleep timer to turn the tower of after a set amount of time has passed
2 POWER
Press to power the tower off and on
3 EJECT
Eject the disc
4 FOLDER +/- PAIRING
5 Select the repeat play in CD mode
6 VOLUME+
7
Skip to the previous track
8 11
Start or pause play
9 VOLUME
Press to adjust the volume
10 ALARM
Press to set alarm on standby mode
11 MUTE
Press to Mute or restore volume
12 SOURCE
Stelect a source: CD, Bluetooth, USB, or Audio in
13 RANDOM
Select the random play mode in CD mode
14
Stop play
15
Skip to the next track
Use: Use: The remote control operates on 1 pc CR2025 lithium battery
(included).to power up the remote control; remove the insulation tab from
the back unit
GETTING STARTED

Caution: Danger of electric shock.
When you unplug the AC power cord always pull the plug from the socket. Never pull the cord. Before connecting the AC power cord, ensure you have completed all other connections.
Place the unit in the desired position and unravel the mains cable. Insert the cable into the supply socket and switch on if applicable.
Auto-Standby
When playing media from a connected device, the Tower automatically switches to standby if
- No button is pressed for 10 minutes,
- No audio from a connected device for 10 minutes.
Setting Clock
After the unit is plugged into a mains supply or mains power failure, the display will show the "0:00" on the LED display. The unit should be in standby mode to set the current clock.
- Press TIME/ALARM button, the digits for the display will blink.
- Press the button repeatedly until correct hour is set. Press the TIME/ALARM to confirm the hour setting.
- The minute digits on the display will blink.
- Press the button repeatedly until correct minute is set. Press the TIME/ALARM to confirm the minute setting.
Setting Alarm
This unit can be used as an alarm clock, CD /USB is activated to play at a preset time.
- Press the Standby switch to switch the unit to standby mode.
- Make sure that you have set the clock correctly.
- Press and hold TIME/ALARM button in shutdown state, the display will flash ON to select setting alarm and the display will blink.
- Press the TIME/ALARM confirm, the time display will blink.
- Press dbbutton repeatedly to set hour. Press TIME/ALARM to confirm.
- Press to set minute.
-
Press ALARM to confirm, and then press to select CD/USB status. Press TIME/ALARM to confirm.
-
The volume would turn up from 0 to 20 gradually.
- Press TIME/ALARM button in shutdown state, the display will flash ON to select setting alarm, and the display will blink.
- Press the OFF to select OFF to cancel alarm.
Sleep Mode
Press and hold the SLEEP button, the display will blink. Press the button repeatedly until the display shows the minute you want to set. You can set 10 to 90 minutes.
It blinks three times to confirm, and then return to the interface before. If you want to cancel the sleep mode, press to OFF, after blanking three times, the sleep mode will cancel.
PLAY
Play a disc (CD,CD-R,CDR/W,CD+G)
- Press SOURCE repeatedly to select DISC source
- Put on a disc with the printed side facing upward
- Play starts automatically, if not, Press II .
- Press to adjust the volume.
Pause / resume play
- During play, press to pause/resume play
- During play, long press button to fast forward/fast rewind
Skip to a track
For CD:
- Press / to select another track.
- Press the VOL+/VOL - to adjust the volume
For MP3 disc and USB/SD
- Press / to select a track or a file.
- Press the VOL+/VOL- to adjust the volume.
Search within a track
- During play, press and hold
- Release to resume normal play.
PLAY FROM EXTERNAL AUDIO
You can play from an external audio device such as MP3 player through this unit.
Line in Jack (Requires a 3.5mm cable)
- Connect a 3.5mm cable to the Line jack on top panel. Connect the other end of the 3.5mm cable to an Mp3 player or other audio device.
- Press the button to turn the unit on.
- Press the SOURCE button to switch to Line In mode.
- Use the controls on the connected device to begin playing audio routed through the unit.
Auxiliary Input RCA (Requires an RCA cable)
- Connect an RCA cable to the Auxiliary Input. Connect the other end of the RCA cable to the audio output on your DVD player, stereo system, gaming system or television.
- Press the power button to turn the unit on.
- Press the SOURCE button to switch to Aux In mode.
- Use the controls on the connected device to begin playing audio routed through the unit.
USING THE USB/SD INPUT
- Plug your USB flash drive or SD card to the USB socket or SD slot
- Press SOURCE button to select USB or SD mode, the unit can play automatically. If not, press
- Press the / to select track
- Press the VOL+/VOL - to adjust the volume
Remarks: USB/SD port is easy to sensitive equipment, will cause the equipment work is not stable
USB charging
There is a USB charger on the top of the unit to charge small devices such as smartphones that can be charged via USB.
Output power: 5V/2.1A max
BT MODE
- Press SOURCE button to select BT mode. The LED indicator turns blue.
- Turn on BT functionality on your BT device. Typically, BT controls are found on the device's tools or setting menu (see your user manual).
- Turn on BT connectivity and make your device 'discoverable'. Choose 'add a new BT device' or 'setup BT device' on your device. It will start to search. Once "CZT-1713" shows on your device, select it. If your device prompts you for a pass code, please enter 0000. If the pairing attempt fails or times out, please start pairing procedure again (see steps above).
- After your device and the tower speaker have connected each other, a sound can be heard.
- Make sure the BT connection between the unit and the device is active.
- Press the Play/Pause button to pause playback, press again to resume playback and press button to skip forward to next track and to skip backward to previous track.
KARAOKE MODE
- You can plug the microphone (included) in the back MIC JACK 1 or 2. Make sure the VOLUME control is turned to a low setting
- Slide the microphone switch to the ON position. To turn the microphone off, simply side the switch to the OFF position.
- Adjust the mic volume with the knobs on the back.
- Rotate the ECHO control left to decrease the echo and right to increase it
- Choose your preferred device mode and start play.
- Sing.
- When you have finished using the karaoke, remember to turn the microphone off by sliding the switch to the OFF position.
CONNECTING TO YOUR TV
You can connect your karaoke tower to the TV and play special CD+G (Graphics) discs so you read the lyrics on screen.
Check your special karaoke compact disc has the CD+G mark on it Connect the video jacks (yellow RCA plugs) to the karaoke player and TV.
Note: your TV player must have an RCA type VIDEO Input jack, you cannot connect it to the TV'S aerial terminal
DISPOSAL CONSIDERATIONS

If there is a legal regulation for the disposal of electrical and electronic devices in your country, this symbol on the product or on the packaging indicates that this product must not be disposed of with household waste. Instead, it must be taken to a collection point for the recycling of electrical and electronic equipment. By disposing of it in accordance with the rules, you are protecting the environment and the health of your fellow human beings from negative consequences. For information about the recycling and disposal of this product, please contact your local authority or your household waste disposal service.
This product contains batteries. If there is a legal regulation for the disposal of batteries in your country, the batteries must not be disposed of with household waste. Find out about local regulations for disposing of batteries. By disposing of them in accordance with the rules, you are protecting the environment and the health of your fellow human beings from negative consequences.
DECLARATION OF CONFORMITY

Manufacturer:
Chal-Tec GmbH, Wallstrasse 16, 10179 Berlin, Germany.
Importer for Great Britain:
Berlin Brands Group UK Ltd PO Box 1145 Oxford, OX1 9UW United Kingdom
Hereby, Chal-Tec GmbH declares that the radio equipment type Karaboom is in compliance with Directive 2014/53/EU. The full text of the EU declaration of conformity is available at the following internet address: use.berlin/10032105
For Great Britain: Hereby, Chal-Tec GmbH declares that the radio equipment type Karaboom is in compliance with the relevant statutory requirements. The full text of the declaration of conformity is available at the following internet address: use.berlin/10032105
Chere cliente, cher client,
Berlin Brands Group UK Ltd
PO Box 1145
Oxford, OX1 9UW
United Kingdom
- CONTENTS
- TECHNICAL DATA
- SAFETY INSTRUCTIONS
- SCOPE OF SUPPLY
- PRODUCT OVERVIEW
- Front
- Rear
- Overview of Remote Control
- SLEEP
- POWER
- EJECT
- FOLDER +/- PAIRING
- Select the repeat play in CD mode
- VOLUME+
- 7
- 11
- VOLUME
- ALARM
- MUTE
- SOURCE
- RANDOM
- 14
- 15
- GETTING STARTED
- Caution: Danger of electric shock.
- Auto-Standby
- Setting Clock
- Setting Alarm
- Sleep Mode
- PLAY
- Pause / resume play
- Skip to a track
- Search within a track
- PLAY FROM EXTERNAL AUDIO
- Auxiliary Input RCA (Requires an RCA cable)
- USING THE USB/SD INPUT
- USB charging
- BT MODE
- KARAOKE MODE
- CONNECTING TO YOUR TV
- DISPOSAL CONSIDERATIONS
- DECLARATION OF CONFORMITY
- Manufacturer:
- Importer for Great Britain:
Brand : Auna
Model : Karaboom CD
Category : Karaoke system