
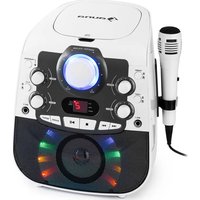
StarMaker 2.0 - Karaoke system Auna - Free user manual and instructions
Find the device manual for free StarMaker 2.0 Auna in PDF.

| Brand | Auna |
| Model | StarMaker 2.0 |
| Product type | Karaoke system |
| Power supply | Input: 230 V~ 50 Hz, Output: 5 V, 1.5 A |
| Compatible discs | CD, CD+G, CD-R, CD-RW |
| Connections | Line in (3.5 mm), 2 x mic jack 6.3 mm, RCA audio output (L/R), RCA video output |
| Main functions | CD player, Bluetooth connection, echo, balance, AVC (automatic voice control), disco lighting, playlist programming (20 tracks) |
| Package contents | Karaoke system, microphone, RCA audio/video cable, power adapter |
| Maintenance and cleaning | Unplug before cleaning, use a dry soft cloth. Do not use liquid or abrasive products. |
| Safety | Do not overload sockets, do not insert objects into openings, do not expose to water or heat, entrust repairs to qualified personnel. |
| Spare parts and repairability | Only use spare parts approved by the manufacturer or having the same characteristics as the original. |
| General information | Article numbers: 10035822, 10035823. Input voltage 230 V~. Consumption: adapter 5 V, 1.5 A. |
Frequently Asked Questions - StarMaker 2.0 Auna
User questions about StarMaker 2.0 Auna
0 question about this device. Answer the ones you know or ask your own.
Ask a new question about this device
Download the instructions for your Karaoke system in PDF format for free! Find your manual StarMaker 2.0 - Auna and take your electronic device back in hand. On this page are published all the documents necessary for the use of your device. StarMaker 2.0 by Auna.
USER MANUAL StarMaker 2.0 Auna
www.auna.multimedia.com

Unit 6 Riverside Business Centre
Brighton Road
Shoreham-by-Sea
BN436RE
United Kingdom
Congratulations on purchasing this equipment. Please read this manual carefully and take care of the following hints to avoid damages. Any failure caused by ignoring the items and cautions mentioned in the instruction manual are not covered by our warranty and any liability. Scan the QR code to get access to the latest user manual and other information about the product.

CONTENTS
Contents 13
Technical Data 13
Safety Instructions 14
Control Overview 16
Getting Started and Use 18
CD-Player 18
BT Connection 19
Using Audio Input 20
Connecting a Microphone 20
AVC/Echo/Balance Function 20
Connecting to external Devices 21
Disposal Considerations 22
TECHNICAL DATA
| Item number 10035822, | 10035823 |
| Power supply adapter Input: 230 V~ 50 Hz Output: 5 V, 1.5 A | |
| Playable Disks CD, CD+G, CD-R, CD-RW | |
| Connections Line in, 2 x 6.3-mm microphone jack | |
In the box:
Karaoke system, microphone, RCA audio/video cable, power adapter, instruction manual.
SAFETY INSTRUCTIONS
General instructions
- Lightning - If you are not going to use the unit for a longer period of time or if there is a thunderstorm, pull the plug out of the socket or disconnect the unit from the antenna connection. This will prevent damage to the unit due to lightning and overvoltage.
- Overload - Do not overload sockets, extension cords or integral sockets as this may result in a fire or electric shock.
- Foreign objects and liquid ingress - Never push objects of any kind into the unit through openings as they may touch dangerous voltage points or short out parts that could result in a fire or electric shock. Never spill liquids of any kind on the unit.
- Repair and maintenance - Do not attempt to service this unit yourself as opening or removing covers may expose you to dangerous voltages or other hazards. Refer all servicing to qualified service personnel..
- Damage requiring service - Unplug the appliance from the mains and refer servicing to qualified service personnel if any of the following occurs:
(a) If the power cord or plug is damaged.
(b) If liquid has been spilled or objects have fallen on the unit.
(c) If the unit has been exposed to rain or water.
(d) If the unit has been dropped or damaged.
(e) If the performance of the unit is significantly reduced.
- Spare parts - If spare parts are required, ensure that the specialist company replacing the parts only uses spare parts that are approved by the manufacturer or have the same characteristics as the original part. Unauthorised replacement may result in fire, electric shock or other hazards.
- Heat - Do not install near any heat sources such as radiators, heat registers, stoves, or other apparatus (including amplifiers).
Special notes on operation
Children from the age of 8, mentally, sensory and physically impaired persons may only use the appliance if they have been familiarised in detail with the functions and safety precautions by a supervisor responsible for them beforehand and understand the risks involved.
- Before use, check that the mains cable is undamaged. If the mains cable or plug are damaged, they must be replaced by the manufacturer, an authorised specialist company or a similarly qualified person. Children should be supervised to ensure that they do not play with the appliance. Make sure that children and babies do not play with plastic bags or other packaging materials.
- Make sure that the mains plug/mains adapter always remains easily accessible so that the appliance can be quickly disconnected from the mains in an emergency.
- When you are no longer using the appliance, switch it off and unplug it from the mains.
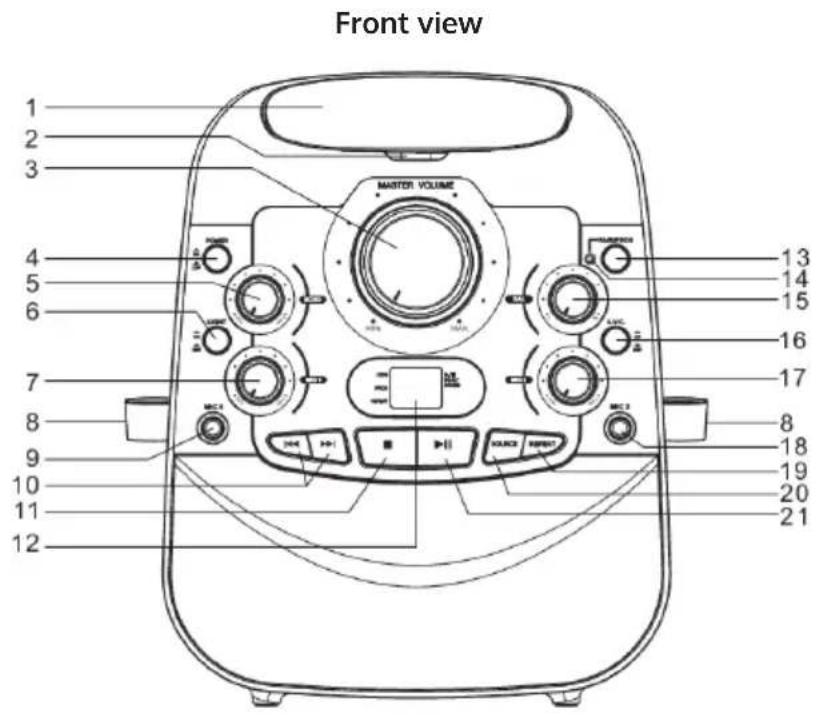
1 CD door
2 Door open/close
3 Master volume control
4 Power on/off button
5 Echo control
6 Speaker light on/off button
7 Microphone volume control
8 Microphone holder
9 Microphone jack 1
10 Skip / search button
11 CD stop button
12 LED display
13 BT pair / CD program button
14 BT pair indicator
15 Balance control
16AVC on/off button
17 Microphone volume control 2
18 Microphone jack 2
19 CD repeat button
20 Source button
21 Play/pause button
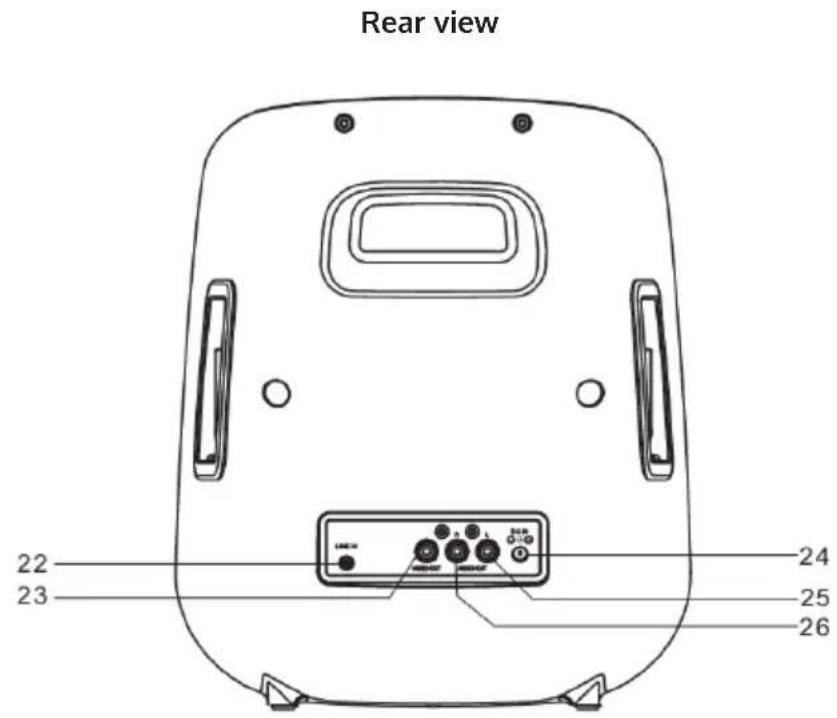
22 Line in jack
23 Video output jack
24 DC input jack
25 Audio output jack (l)
26 Audio output jack (r)
GETTING STARTED AND USE
Setup power
- Plug the included AC adapter into the standard AC power outlet to power your Karaoke System.
- Connect small end to DC INPUT JACK of your Karaoke System.
- After adapter connection, press POWER ON/OFF button to turn on your Karaoke System.
- The LED DISPLAY and Master Volume light will be light up.
- Press SOURCE button to select CD or BT mode.
Disco light
When your Karaoke System is turn on, disco LED light surround the speaker will be flashed. Press SPEAKER LIGHT ON/OFF button to turn on or off the disco light.
CD-PLAYER
Loading a Disc
- Press POWER ON/OFF button to turn on your Karaoke System.
- Open the CD DOOR.
- Place a CDG or CD disc into the CD compartment.
- Close the CD DOOR.
Playing a Disc
- Total tracks of the CDG or CD disc will be shown on the LED display after loading and CDG indicator will be light up on the LED display for CDG disc playback.
- Press the button to begin playing the loaded disc. The indicator will light up on the LED display.
- Rotate MASTER VOLUME button to adjust the sound level.
- To temporarily stop playing, press button once. The indicator will blink on the LED display.
- To resume play, press button one more time.
- Press the / buttons to skip between next or previous tracks.
- Press and hold the / buttons for fast search through the track.
(Note: The fast-forward / fast-rewind functions not working on CDG disc.)
- Press the button to stop play.
Repeat Function
- Follow the instructions for Loading a Disc and Playing a Disc.
- When disc playback, press REPEAT button once and REPEAT indicator on the LED display will be flashed. The unit will play the current track repeatedly.
- When disc playback, press the REPEAT button twice and REPEAT indicator will be light up on the LED display. The unit will play all tracks repeatedly.
- To cancel the repeat function: press REPEAT button repeatedly until REPEAT indicator light off on the LED display.
Program Function
- When disc playback, press the button to stop mode.
- Press CD PROGRAM button.
- PROG indicator on the LED display will blink.
- Press the / buttons to select the track from the loaded disc you wish to program.
- Press CD PROGRAM button to confirm.
- Repeat steps 5 and 6 to program the next track. It can be programmed up to 20 tracks.
- Press the button to start the program playing, PROG and indicators on the LED display will be light up.
- Press the button twice to cancel the program.
BT CONNECTION
- Press POWER ON/OFF button to turn on the Karaoke System.
- Press SOURCE button to BT mode. The BT indicator will be blinking.
- On your Smartphone / Tablet, turn on BT function and enable device scanning.
- When "StarMaker 2.0" shows on the BT scan, select it to connect it to your device.
- When both devices are successfully connected and PAIR/PROG indicator will be light up, you are ready to play music wirelessly from your device.
- Press the button of your Karaoke System or your external BT device to start music playback.
- Press the / buttons of your Karaoke System or press the next /
previous of your external BT device to play the next / previous music.
- To disconnect your external BT device or press POWER ON/OFF button to turn off your Karaoke System for stop playing.
USING AUDIO INPUT
- Press POWER ON/OFF switch to turn on the Karaoke System.
- Plug a 3.5 mm audio input cable (cable not included) into the LINE IN JACK and connect the other end to your external audio device.
- Turn on and play your external audio device.
Your Karaoke System will be automatically played on your external audio device.
CONNECTING A MICROPHONE
Require a microphone (one microphone included).
- Plug the microphone into the MIC1 INPUT or MIC 2 INPUT.
- Slide Microphone ON/OFF switch to on position.
- Press the POWER ON/OFF button to turn on Karaoke system
- Use MASTER VOLUME CONTROL / MICROPHONE VOLUME CONTROL of your Karaoke system to adjust microphone sound level.
AVC/ECHO/BALANCE FUNCTION
AVC
Turn on your Karaoke system and connect microphone. Adjust the AVC (Automatic Voice Control) button to adjust the volume of the unit to compensate for varying levels of volume from the connected microphone. Turn the dial to adjust the degree to which the Automatic Voice Control compensates for variations in volume.
Echo
Turn on your Karaoke system and connect microphone. Rotate ECHO knob to adjust your Karaoke system to enhance your voice for a concert hall effect.
Balance
Turn on your Karaoke system, play with a CDG format disc and rotate BALANCE button to select to hear only the music or only vocals. During CD playback, rotate BALANCE button to select the left and right channel for RCA output.
CONNECTING TO EXTERNAL DEVICES
RCA Audio Output
Requires RCA audio cables (Red/white colour) included.
- Plug the RCA audio cables to AUDIO OUTPUT JACK and the other end connect to the audio input of your external stereo system.
- Adjust the external stereo system to accept input from your Karaoke System.
- The connected stereo system will be heard the audio sound through your Karaoke System.
RCA Video Output
Requires an RCA video cable (Yellow colour) included.
- Plug the RCA video cable to the VIDEO OUTPUT JACK and the other end connect to the video input of your external video system.
- Adjust the external video system to accept input from the Karaoke System.
- The connected external video system will be seen the video through your Karaoke System.
- If playing with CDG disc, the lyrics text will show on the connected external video system.
DISPOSAL CONSIDERATIONS
If there is a legal regulation for the disposal of electrical and electronic devices in your country, this symbol on the product or on the packaging indicates that this product must not be disposed of with household waste. Instead, it must be taken to a collection point for the recycling of electrical and electronic equipment. By disposing of it in accordance with the rules, you are protecting the environment and the health of your fellow human beings from negative consequences. For information about the recycling and disposal of this product, please contact your local authority or your household waste disposal service.
DECLARATION OF CONFORMITY

Manufacturer:
Chal-Tec GmbH, Wallstrasse 16, 10179 Berlin, Germany.
Importer for Great Britain:
Chal-Tec UK limited
Unit 6 Riverside Business Centre
Brighton Road
Shoreham-by-Sea
BN436RE
United Kingdom
The complete declaration of conformity of the manufacturer can be found at the following link: https://use.berlin/10035822
Chere cliente, cher client,
Unit 6 Riverside Business Centre
Brighton Road
Shoreham-by-Sea
BN43 6RE
United Kingdom
https://use.berlin/10035822
Estimado cliente:
Unit 6 Riverside Business Centre
Brighton Road
Shoreham-by-Sea
BN436RE
United Kingdom
Unit 6 Riverside Business Centre
Brighton Road
Shoreham-by-Sea
BN43 6RE
United Kingdom
- CONTENTS
- TECHNICAL DATA
- In the box:
- SAFETY INSTRUCTIONS
- General instructions
- Special notes on operation
- GETTING STARTED AND USE
- Setup power
- Disco light
- CD-PLAYER
- Loading a Disc
- Playing a Disc
- Repeat Function
- Program Function
- BT CONNECTION
- USING AUDIO INPUT
- CONNECTING A MICROPHONE
- AVC/ECHO/BALANCE FUNCTION
- AVC
- Echo
- Balance
- CONNECTING TO EXTERNAL DEVICES
- RCA Audio Output
- RCA Video Output
- DISPOSAL CONSIDERATIONS
- DECLARATION OF CONFORMITY
- Manufacturer:
- Importer for Great Britain:
- Chere cliente, cher client,
- Estimado cliente:
Brand : Auna
Model : StarMaker 2.0
Category : Karaoke system