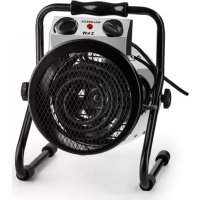
Strato - Heating Waldbeck - Free user manual and instructions
Find the device manual for free Strato Waldbeck in PDF.


| Brand | Waldbeck |
| Model | Strato |
| Product type | Fan heater |
| Power supply | 220-240 V ~ 50-60 Hz |
| Rated power | 2000 W |
| Current | 8.7 A |
| Required fuse | 10 A |
| Article number | 10031344 |
| Temperature setting | Mechanical thermostat |
| Fan control | Rotary knob with fan-only and heat+fan positions |
| Thermal protection | Built-in thermal cutout |
| Heating element material | Stainless steel |
| Recommended use | Well-insulated rooms or occasional use |
| Installation location | On a flat surface, away from flammable materials |
| Maintenance | Clean with a damp sponge and dish soap, then dry |
| Storage | In a clean, well-ventilated place, after cooling down |
| Child safety | Do not leave children under 3 years old unattended nearby |
| Repairability | Power cord and plug must be replaced by the manufacturer or a qualified professional |
| Manufacturer | Chal-Tec GmbH, Wallstraße 16, 10179 Berlin, Germany |
Frequently Asked Questions - Strato Waldbeck
User questions about Strato Waldbeck
0 question about this device. Answer the ones you know or ask your own.
Ask a new question about this device
Download the instructions for your Heating in PDF format for free! Find your manual Strato - Waldbeck and take your electronic device back in hand. On this page are published all the documents necessary for the use of your device. Strato by Waldbeck.
USER MANUAL Strato Waldbeck
Note: This product is only suitable for well insulated spaces or occasional use.
natural_image
Abstract green circular logo with three curved segments (no text or symbols)
natural_image
Abstract green circular logo with two leaf-like shapes on opposite sides (no text or symbols)
natural_image
Abstract green circular logo with three leaf-like shapes forming a Y-shape (no text or symbols)INHALTSVERZEICHNIS
natural_image
Simple diagram with circular shapes and a central black circle, no text or symbols presentnatural_image
Symbol of a trash bin crossed with a diagonal line, no text or numbers presentCongratulations on purchasing this device. Please read the following instructions carefully and follow them to prevent possible damages. We assume no liability for damage caused by disregard of the instructions and improper use. Scan the QR code to get access to the latest user manual and more product information.
CONTENT
Safety Instructions 12
Product Data Sheet 14
Operation 15
Commissioning and Operation 16
Cleaning and Care 16
Troubleshooting 17
Hints on Disposal 18
Producer 18
TECHNICAL DATA
| Item number 10031344 | |
| Power supply 220-240 V ~ 50-60 Hz | |
| Power consumption 2000 W | |
| Current 8.7 A | |
| Required fuse 10 A |
SAFETY INSTRUCTIONS
- Children over 8 years of age, physically and physically restricted persons should only use the device if they have been thoroughly familiarized with the functions and safety precautions by a supervisor.
- Make sure that children do not play with the device.
• Children may only clean the device under supervision. - Keep children under 3 years of age away from the appliance and use the appliance in the presence of children only under supervision.
Notes on location and operation
- The device can become very hot during operation. Therefore, place it at a sufficient distance from easily flammable objects such as curtains or furniture.
- Do not cover the unit.
- Do not place the unit directly under a power outlet.
- Do not connect the unit to an external timer or remote controlled power outlet to prevent the unit from turning on automatically.
- Do not place the device in rooms where highly flammable or explosive liquids are stored.
- If you use the device together with an extension cable, make sure that the cable is fully unrolled.
- Do not connect the device to sockets where other devices are already connected.
- Do not place the unit near a bathtub, shower or swimming pool.
- If the power cord or plug is damaged, it must be replaced by the manufacturer, an authorised service centre or a similarly qualified person.
- Do not leave the appliance out of sight during operation and keep children and pets away from the appliance.
- Do not place the appliance on trolleys or on surfaces from which it can easily fall.
- If you do not use the appliance for a long period of time, unplug the appliance from the power outlet. Do not leave the appliance unattended for long periods during operation. Do not pull the plug out of the outlet by the cord, but hold it with your hand when unplugging it.
- Position the appliance so that the airflow is not blocked by other objects.
- The power plug is waterproof when not in use. To avoid electric shock or leakage current, never use the appliance with wet hands or operate the appliance if there is water on the power cord.
Special safety precautions
Check the marking on the power cord before use. Depending on the power cord, this unit may operate in different environmental conditions:
| Labeling Can be used in: Do not use in: | |
| H07RN-F Household, warehouses, workshops, construction sites and greenhouses. | |
| H05RN-F Household, warehouses, workshops and greenhouses. | Construction sites |
| H05RR-F Household, warehouses and workshops | Construction sites and greenhouses |
PRODUCT DATA SHEET
| Model identifier(s): 10031344 | ||||||
| Item Symbol Value Unit Item Unit | ||||||
| Heat output Type of heat input, for electric storage local space | heaters only | |||||
| Nominal heat output P | nom | 2.0 kW | manual heat | heat | charge control, with integrated thermostat | N/A |
| Minimum heat output (indicative) | P_min | N/A kW | manual heat | heat | charge control with room and/or outdoor temperature feedback | N/A |
| Maximum continuous heat output | P_max,c | 2.0 kW | electronic heat | heat | charge control with room and/or outdoor temperature feedback | N/A |
| Auxiliary electricity consumption fan assisted heat output | N/A | |||||
| At nominal heat output | el_max | N/A kW | Type of heat | heat | output/room temperature control | |
| At minimum heat output el | min | N/A kW | single stage | heat | output and no room temperature control | no |
| In standby mode | el_SB | N/A W | Two or more manual stages, no room temperature control | no | ||
| with mechanic thermostat room temperature control | yes | |||||
| with electronic room temperature control no | ||||||
| electronic room temperature control plus day timer | no | |||||
| electronic room temperature control plus week timer | no | |||||
| Other control options (multiple selections possible) | ||||||
| room temperature control, with presence detection | no | |||||
| room temperature control, with open window detection | no | |||||
| with distance control option | no | |||||
| with adaptive start control | no | |||||
| with working time limitation | no | |||||
| with black bulb sensor | no | |||||
| Contact details | Chal-Tec GmbH, Wallstraße 16, 10179, Berlin, Germany | |||||
OPERATION
Depending on the type of power cord, the unit may only be used in households, warehouses and workshops, construction sites or greenhouses. It has a thermostat and a thermal switch. The thermostat measures the air temperature and controls the ambient temperature. The fan is not controlled by the thermostat, it continues to operate when the thermostat switches off the heating element. The thermo-switch automatically switches the unit off if it overheats.
When you use the unit for the first time, slight smoke may be produced. This is normal and only lasts a short time. The heating element is made of stainless steel and was coated with protective oil during manufacture. The smoke is caused by the oil, but will evaporate during further use.
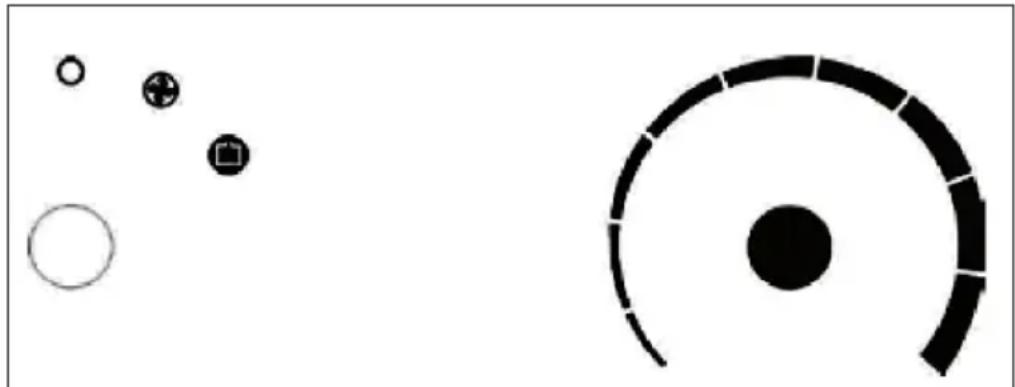
Control panel
natural_image
Simple diagram with circular and concentric shapes, no text or symbols present- Left controller: Selector button for fan and heater.
- Right controller: Temperature controller.
COMMISSIONING AND OPERATION
- Place the unit upright on a level surface, at a safe distance from flammable materials.
- Insert the plug into the power outlet.
- Turn the temperature control knob to MAX, the appliance heats at maximum output.
- The fan starts as soon as you select one of the settings with the left-hand control.
- As soon as the requested temperature in the room is reached, the heating goes off, but the fan continues to run. As soon as the room temperature drops again, the heating starts again. The fan and heater will now alternately switch on and off to ensure a constant room temperature.
- Before pulling the plug, first turn the right-hand control to MIN and turn the left-hand control to fan. Let the unit cool down for 2 minutes and then switch it off. Then remove the plug from the power outlet.
CLEANING AND CARE
- Before cleaning the appliance, unplug the appliance from the power outlet and leave it
- Cool down the unit. The housing is very susceptible to dust. Wipe it with a warm, damp cloth and a little washing-up liquid. Then wipe with a dry cloth. Make sure that no water enters the appliance. Never pour water over the appliance or clean it with solvents or petrol.
- Clean the power cord and plug. Then pack the appliance in a plastic bag before stowing it away.
- Allow the appliance to cool down before storing. Store the appliance in a clean, well-ventilated place.
TROUBLESHOOTING
| Problem Possible cause Solution | ||
| The unit does not run even though the plug is plugged in and the heater and fan are on. | The plug is loose or does not fit properly. | Remove the plug from the socket, check the connection and the socket. Insert the plug into another functional power outlet. |
| No power. Insert the plug into another functional power outlet. | ||
| The heating element is glowing. | The input current is too high. | Only connect the machine to sockets that correspond to the specified voltage. |
| The air intake grille is blocked. | Make sure that the air inlet is not covered or blocked. Keep the unit away from curtains and similar objects. | |
| The unit is not heating, only the fan is running. | The switch is not turned to heat. | Turn the left knob to Heat. |
| The thermal switch has turned off the unit. | Turn off the appliance, unplug the power cord and allow the appliance to cool for 10 minutes before starting it again. | |
| Abnormal Noise The unit is not standing upright. | Place the appliance on a level surface. | |
HINTS ON DISPOSAL
natural_image
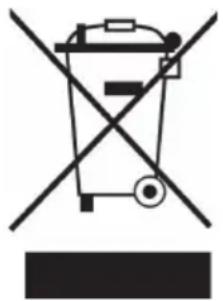
Symbol of a trash bin crossed with a diagonal line, no text or numbers presentAccording to the European waste regulation 2012/19/EU this symbol on the product or on its packaging indicates that this product may not be treated as household waste. Instead it should be taken to the appropriate collection point for the recycling of electrical and electronic equipment. By ensuring this product is disposed of correctly, you will help prevent potential negative consequences for the environment and human health, which could otherwise be caused by inappropriate waste handling of this product. For more detailed information about recycling of this product, please contact your local council or your household waste disposal service.
PRODUCER
Chal-Tec GmbH, Wallstraße 16, 10179 Berlin, Germany.
Estimado cliente,
ÍNDICE
natural_image
Simple diagram with circular shapes and a partial circular target-like shape, no text or symbols present.natural_image
Symbol of a trash bin crossed with a diagonal line, no text or numbers presentSOMMAIRE
FICHE DE DONNÉES PRODUIT
natural_image
Simple diagram with circular and concentric shapes, no text or symbols presentnatural_image
Symbol of a trash bin crossed with a diagonal line, no text or numbers presentINDICE
natural_image
Simple diagram with circular shapes and a central black circle, no text or symbols presentnatural_image
Symbol of a trash bin crossed with a diagonal line, representing no waste or discharge (no text or labels)natural_image
Abstract green leaf-like shapes arranged vertically on a beige background (no text or symbols)
Brand : Waldbeck
Model : Strato
Category : Heating