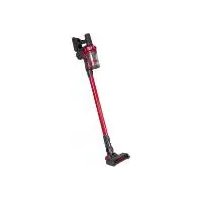
USER MANUAL IAN 359294 SILVERCREST
Assembly, operating and safety instructions
NL BE
2-IN-1 CORDLESS VACUUM CLEANER
Before reading, unfold both pages containing illustrations and familiarise yourself with all functions of the device.
FR BE
GB / IE Assembly, operating and safety instructions Page 27

Crevice nozzle:
Intended use....Page 28
Parts description Page 29
Scope of delivery Page 29
Technical data......Page 29
Safety instructions......Page 30
Safety instructions for batteries / rechargeable batteries ......Page 33
Before first use......Page 34
Installing the wall bracket....Page 34
Charging the rechargeable battery....Page 35
Meaning of the rechargeable battery control display Page 36
Initial use Page 36
Selecting, assembling and disassembling accessories....Page 36
Vacuuming......Page 39
After use......Page 39
Cleaning, care and maintenance Page 40
Emptying the dust collector....Page 40
Cleaning the filters and dust collector ....Page 41
Cleaning the accessory parts....Page 42
Storage Page 43
Troubleshooting / Problem solving Page 44
Disposal Page 45
Warranty / Service centre Page 46
Declaration of conformity Page 46
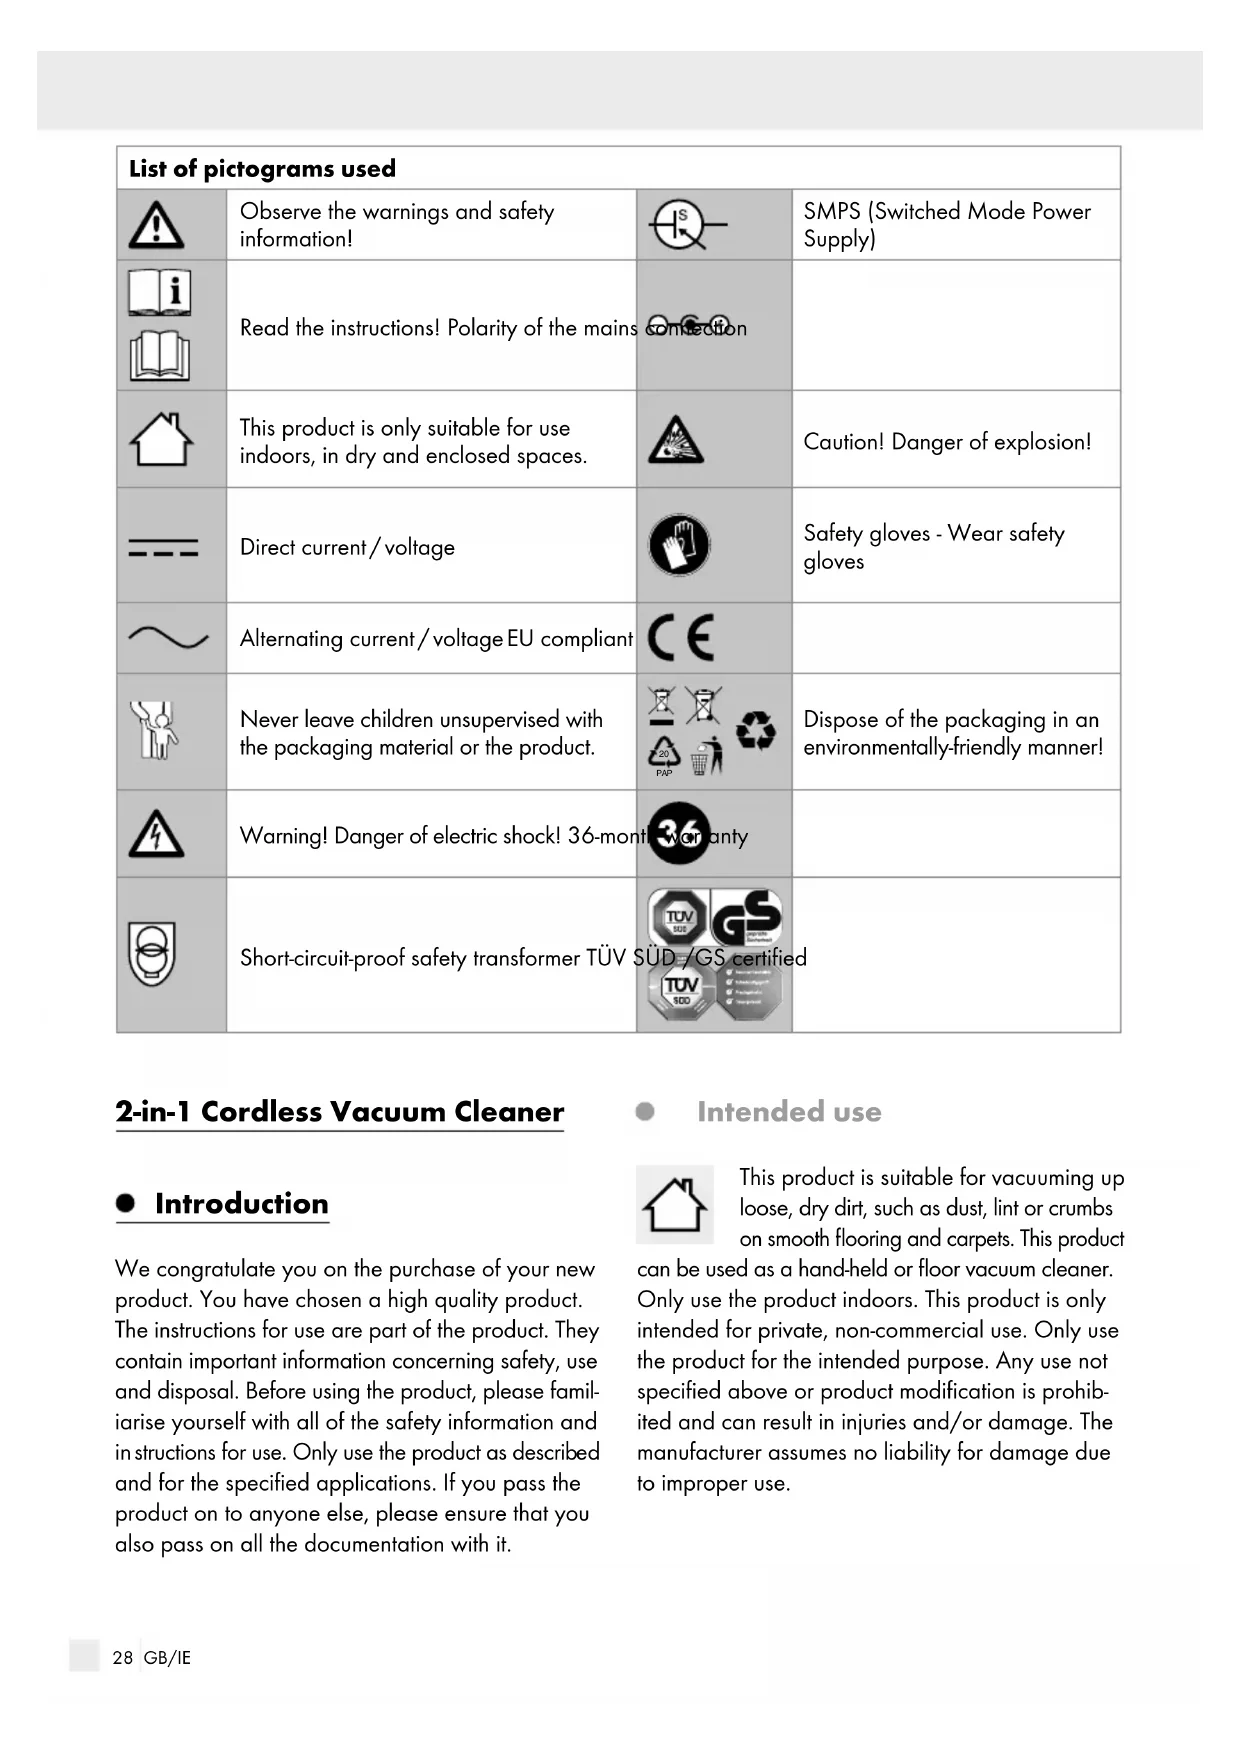
| List of pictograms used |
 | Observe the warnings and safety information! |  | SMPS (Switched Mode Power Supply) |
 | Read the instructions! Polarity of the mains connection | | |
 |
 | This product is only suitable for use indoors, in dry and enclosed spaces. |  | Caution! Danger of explosion! |
 | Direct current/voltage |  | Safety gloves - Wear safety gloves |
 | Alternating current/voltage EU compliant |  | |
 | Never leave children unsupervised with the packaging material or the product. |   | Dispose of the packaging in an environmentally-friendly manner! |
 | Warning! Danger of electric shock! 36-month |  | anty |
 | Short-circuit-proof safety transformer TÜV S |  | ed |
2-in-1 Cordless Vacuum Cleaner
- Introduction
We congratulate you on the purchase of your new product. You have chosen a high quality product. The instructions for use are part of the product. They contain important information concerning safety, use and disposal. Before using the product, please familiarise yourself with all of the safety information and instructions for use. Only use the product as described and for the specified applications. If you pass the product on to anyone else, please ensure that you also pass on all the documentation with it.
Intended use

This product is suitable for vacuuming up loose, dry dirt, such as dust, lint or crumbs on smooth flooring and carpets. This product
can be used as a hand-held or floor vacuum cleaner. Only use the product indoors. This product is only intended for private, non-commercial use. Only use the product for the intended purpose. Any use not specified above or product modification is prohibited and can result in injuries and/or damage. The manufacturer assumes no liability for damage due to improper use.
- Parts description
1 Handle 2 Rechargeable battery 2a Release button (rechargeable battery) 2b Rechargeable battery control display 3 Charging socket (rechargeable battery) 4 Main unit 4a Opening on the main unit (for connecting the accessory parts directly to the main unit) 5 Wall bracket 6 Screw 7 Wall plug 8 Mains adapter 9 Mains cable connector plug 10 Accessory holder (for attaching to the aluminium suction tube) 11 Small brush 12 Dust brush (2-in-1 brush) 12a Release button (dust brush) 13 Crevice nozzle 14 Electric floor brush 14a Rotating brush roller 14b Locking mechanism (rotating brush roller) 14c Fixing screw (locking mechanism for the rotating brush roller) 15 Release button (aluminium suction tube) 16 Aluminium suction tube 16a Opening on the aluminium suction tube (for connecting the accessory parts on the bottom of the aluminium suction tube) 17 ECO button 18 MAX button 19 On/Off button 20 Release button (main unit) 21 Dust collector 21b Base flap (dust collector) 22 Release button (to disconnect dust collector from main unit) 23 Release lever (to open the base flap on the dust collector) 24 Cover (dust collector) 25 HEPA filter 26 Filter carrier 27 Stainless steel filter
- Scope of delivery
Immediately after unpacking, check that all the items are present and that the product is in perfect condition.
1 main unit with dust collector 1 aluminium suction tube 1 mains adapter with mains cable 1 rechargeable battery 1 electric floor brush 1 crevice nozzle 1 dust brush (2-in-1 brush) 1 small brush 1 wall bracket incl. mounting materials (2 wall plugs, 2 screws) 1 accessory holder 1 set of assembly instructions and instructions for use
- Technical data
Model: SHAZ 22.2 D5
Rated voltage: 22.2 V ===
Input: 100-240V \~ 50/60 Hz
Output: 26V ===, 500 mA
Power: max. 130 W
Rechargeable battery: Li-ion rechargeable battery (22.2 V, 2500 mAh), removable
Charging time: 4–5 hours
Suction levels: MAX mode and ECO mode
Runtime 25 minutes in MAX mode, 45 minutes in ECO mode
Volume
Dust collector: 0.6 l
Noise level: max. 75 dB

Safety instructions
KEEP ALL SAFETY INFORMATION AND INSTRUCTIONS FOR FUTURE REFERENCE!
WARNING!
DANGER TO LIFE
AND RISK OF ACCIDENTS FOR INFANTS AND CHIL-
DREN! Never leave children unsupervised with the packaging material. There is a danger of suffocation. Keep children away from the product.
This product may be used by children aged 8 years and up, as well as by persons with reduced physical, sensory or mental capacities or lacking experience and knowledge, so long as they are supervised or instructed in the safe use of the product and understand the associated risks. - Do not let children play with the product. Cleaning and user maintenance must not be performed by children without supervision. - Do not leave the product or packaging material lying unattended. Plastic film or bags, polystyrene foam etc. can turn into dangerous toys for children.

Avoid the risk of fatal injury from electric shock
- Regularly check all parts of the product for any damage before use. Never use the product if you identify damage to the housing, mains adapter with mains cable or the rechargeable battery.
- Ensure that the power supply voltage matches that specified in the chapter "Technical data".
- Only plug the mains adapter into a properly installed, easy to access mains socket. The mains socket must also be easily accessible after the product has been plugged in. ■ Never open any of the electrical equipment or insert any objects into this equipment. Such interferences pose a risk of fatal injury from electric shock.
- Do not insert any objects (except the accessory parts provided for this purpose) into the openings on the product.
- Handle the power cable with care to avoid damage. ■ Protect the mains cable from sharp edges, mechanical loads and hot surfaces.
- Immediately remove the mains adapter from the mains socket in the event of the mains cable becoming damaged. ■ Always pull on the mains adapter and never on the mains cable to avoid disconnecting the product from the power supply.
- Do not use the mains cable to move or pull the product. Never use the mains cable as a carrying handle. Keep the mains cable away from heat sources. If the mains cable is damaged, it must be replaced by a qualified service technician to avoid dangers.
- Do not use the product if it can't work properly due to
- falls,
- damage,
- ingress water,
- outdoor use. Have the product repaired by the manufacturer or its customer service department.
- Do not use the product if it has been dropped or has visible damage. ■ Discontinue using the product if the plastic parts are cracked or deformed. Always replace damaged parts with genuine spare parts.
- Do not immerse the product, the mains cable or the mains adapter in water or other liquids. ■ Ensure that the mains cable never becomes wet or moist. ■ Protect the appliance from moisture, droplets or spraying water. ■ Only use the product in dry rooms, never outdoors or in damp environments.
- Do not use the product on wet or damp floors.
- Do not allow any liquids or damp dirt to be vacuumed up. If liquids get into the product, immediately switch it off and pull out the mains adapter. Have the product checked for damage before using it again. ■ Never touch the mains adapter with moist or wet hands, especially when you plug it into the socket or pull it out of the socket.
- Do not use the product with wet hands.
- Do not place objects filled with liquids, e.g. vases on or near the product. ■ Switch off the product and remove the mains adapter from the mains socket,
- if there is a malfunction,
- when you are not charging the rechargeable battery,
- during thunder,
- before assembling or disassembling the device,
- before changing the filters,
- before removing blockages and before cleaning the product.
■ Only use the original mains adapter with mains cable to charge the rechargeable battery. ■ Remove the rechargeable battery from the product before cleaning.

Prevent fire and injury hazards
Do not cover the product with any objects while it is in use or when charging the rechargeable battery. Excessive heat build-up can result in fire. - Do not use the product near open fire. - Do not expose the product to direct sunlight or heat. - Do not install the wall bracket near hot surfaces, e.g. radiators. ■ Store the product and install the wall bracket in an easy to reach location and ensure that the product is not covered by objects. ■ Always leave a minimum distance of 10 cm around the product to ensure it is sufficiently ventilated.
Do not allow the product to vacuum up flammable materials, for example fuel or toner from printers or photocopiers.
- Do not allow the product to vacuum up burning items, for example cigarettes, matches, ashes or other objects which could cause a fire.
- Do not use the product in temperatures over +40 °C or below +10 °C.
- Keep hair, clothing and fingers away from the openings and moving operating parts of the product. Risk of injury!
Electrical products may pose a hazard to animals. Animals can also damage the product. Always keep animals away from electrical products.
■ Lay the mains cable in such a way that nobody will step on, get caught on or trip over it.
■ Switch the product off before changing the accessory parts which move during operation.

Danger of damage to property
Do not use the product if the suction opening is blocked. Remove dust, hair, cotton wool, etc., to
allow air to flow freely in the suction opening.
- Do not allow the product to vacuum up items which could clog the product, for example stones, paper waste, etc.
- Do not allow the product to vacuum up hard or sharp objects, for example glass shards, nails, screws or coins. This could damage the product. Remove any obstacles prior to use, for example power cables, toys and other objects.
- Regularly check and clean the filters and the dust collector to extend the life of your product. Discontinue using the product if you detect damage or deformations to the filters. Please contact customer service if this happens. Failure to do so may cause damage to the product, for example due to the motor overheating as a result of blocked or defective filters. Never use the product without filters to prevent damaging the motor and shortening the life of the product. Always switch off the product before transporting it. Fully charge the product at least once a month to prevent deep
discharge and thus battery damage.
- Install the wall bracket securely on the wall. Check whether the mounting material included is suitable for the chosen wall. If necessary, consult a professional to procure suitable mounting material. Before drilling, check that there are no water pipes or power cables where you intend to drill. Do not use harsh or aggressive cleaning agents (see chapter "Cleaning, care and maintenance"). This could damage the product. Only use the original accessories.

Safety instructions for batteries / rechargeable batteries
DANGER TO LIFE! Keep batteries/rechargeable batteries out of reach of children. If accidentally swallowed seek immediate medical attention. DANGER OF EXPLOSION! Never recharge
non-rechargeable batteries. Do not short-circuit
batteries/rechargeable batteries and/or open them. Overheating, fire or bursting can be the result.
Never throw batteries/rechargeable batteries into fire or water. Do not exert mechanical loads to batteries/rechargeable batteries.
Risk of leakage of batteries / rechargeable batteries
- Avoid extreme environmental conditions and temperatures, which could affect batteries / rechargeable batteries, e.g. radiators / direct sunlight. If batteries/rechargeable batteries have leaked, avoid contact with skin, eyes and mucous membranes with the chemicals! Flush immediately the affected areas with fresh water and seek medical attention!

WEAR PROTECTIVE GLOVES! Leaked or
damaged batteries/rechargeable batteries can cause burns on contact with the skin. Wear suitable protective gloves at all times if such an event occurs.
In the event of a leakage of batteries/rechargeable batteries, immediately remove them from the product to prevent damage.
Remove batteries / rechargeable batteries if the product will not be used for a longer period. This product has a built-in rechargeable battery which cannot be replaced by the user. The removal or replacement of the rechargeable battery may only be carried out by the manufacturer or his customer service or by a similarly qualified person in order to avoid hazards. When disposing of the product, it should be noted that this product contains a rechargeable battery.
Before first use
Installing the wall bracket

WARNING! DANGER OF ELECTRIC SHOCK! Before drilling, ensure there are no electrical lines or pipes in the area where you will be drilling.
TRIC SHOCK! Before drilling, ensure there are no electrical lines or pipes in the area where you will be drilling.
- Read the operating and safety instructions for your drill carefully.
- When choosing your installation site, make sure that a properly installed and easy-to-access plug socket is located in close proximity.
Before assembly, check whether the assembly material provided is suitable for your circumstances (e.g. wall condition). If necessary, consult a professional to procure suitable mounting material.
Mark the drill holes using the holes in the wall bracket 5 intended for the screws 6. Now drill the fastening holes in the wall and put the wall plugs 7 into the holes. Mount the wall bracket 5 with the screws 6 included in the delivery (see Fig. B). Ensure that the wall bracket 5 is securely tightened. Hang the main unit 4 with the back on the hook on the wall bracket 5 intended for this purpose (see Fig. C). - Charging the rechargeable battery
Note: Charge the rechargeable battery 2 fully (approx. 4 to 5 hours) prior to first use.
- Hang up the main unit 4 with aluminium suction tube 16 to charge on the wall bracket 5 or place it out of the reach of children and pets in a protected location where no one can trip over or step on the main unit 4 with aluminium suction tube or the mains cable. Insert the connection plug of the mains cable 9 into the charging socket 3 on the rechargeable battery 2 (see Fig. D). Insert the mains adapter into the mains socket. The LEDs on the rechargeable battery control display 2b show the charge level of the rechargeable battery 2 (see chapter "Meaning of the rechargeable battery control display").
Note: During the charging process, the mains adapter 8 may warm up. This is normal and does not indicate that the product is defective.
Remove the mains adapter 8 from the mains socket and the mains cable connector plug 9 from the charging socket 3 when the rechargeable battery 2 is fully charged. The LEDs on the rechargeable battery control display 2b go out.
Charge the rechargeable battery 2 in a protected location and outside the reach of children and pets.
- Charge the rechargeable battery 2 in a protected location and outside the reach of children and pets.
You can remove the rechargeable battery 2 to charge it outside of the main unit 4. Press the release button 2a and pull the rechargeable battery 2 out of the holder on the handle 1 of the main unit 4 (see Fig. E). Insert the mains cable connector plug 9 into the charging socket 3 of the rechargeable battery 2 (see Fig. F). Insert the mains adapter into the mains socket. The LEDs on the rechargeable battery control display 2b show the charge level of the rechargeable battery 2 (see chapter "Meaning of the rechargeable battery control display"). Once the rechargeable battery 2 is fully charged, the LEDs on the rechargeable battery control display 2b light up continuously. Remove the mains adapter 8 from the mains socket and the mains cable connector plug 9 from the charging socket 3 of the rechargeable battery 2. The LEDs on the rechargeable battery control display 2b go out. Put the charged rechargeable battery 2 back in the main unit 4 by pushing it into the holder in the handle 1 of the main unit 4 until it locks into place.
Meaning of the rechargeable battery control display
The 4 LEDs on the rechargeable battery control display 2b show the charge level of the rechargeable battery 2.
Display in operation:
- When the rechargeable battery 2 is fully charged, the LEDs on the rechargeable battery control display 2b light up continuously.
- If the LEDs go out during operation, this shows that the rechargeable battery 2 is gradually running out of charge.
- The rechargeable battery 2 is almost completely out of charge when only one LED is illuminated.
Charge the rechargeable battery 2 immediately. The main unit 4 automatically switches off when the level of charge in the rechargeable battery is too low for continued operation.
Display during the charging process:
- The lit LEDs show the charging progress (already charged proportion).
- Once all the LEDs are continuously lit, the rechargeable battery 2 is fully charged.
The rechargeable battery control display 2b goes out when the charging process is complete and you remove the mains adapter 8 from the mains socket or pull the mains cable connector plug 9 out of the charging socket 3 of the rechargeable battery 2.
Once the main unit 4 is switched on using the On / Off button 19, the LEDs on the rechargeable battery control display 2b light up and show the charge level of the rechargeable battery 2.
Initial use
Selecting, assembling and disassembling accessories
Aluminium suction tube:
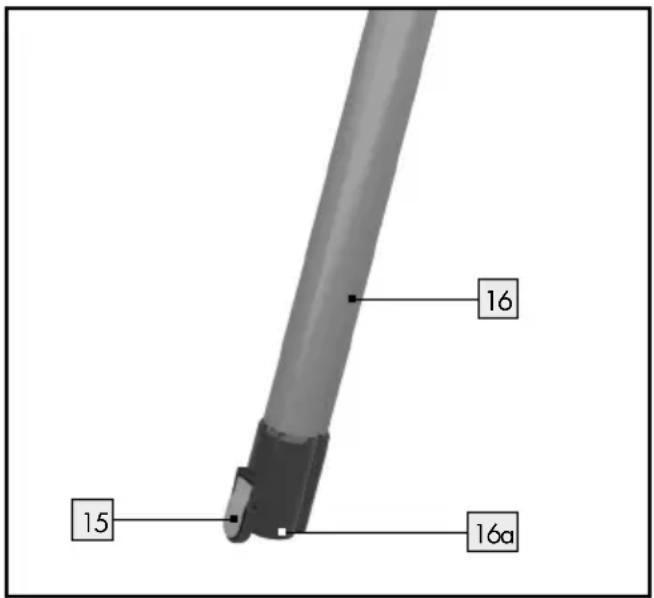
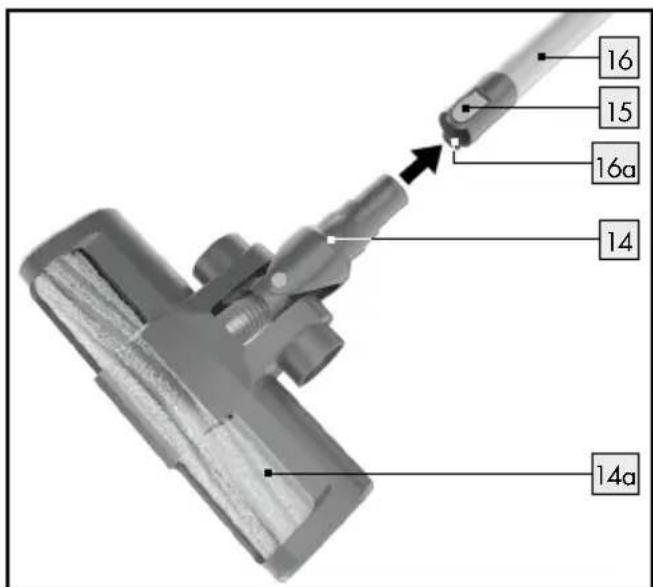
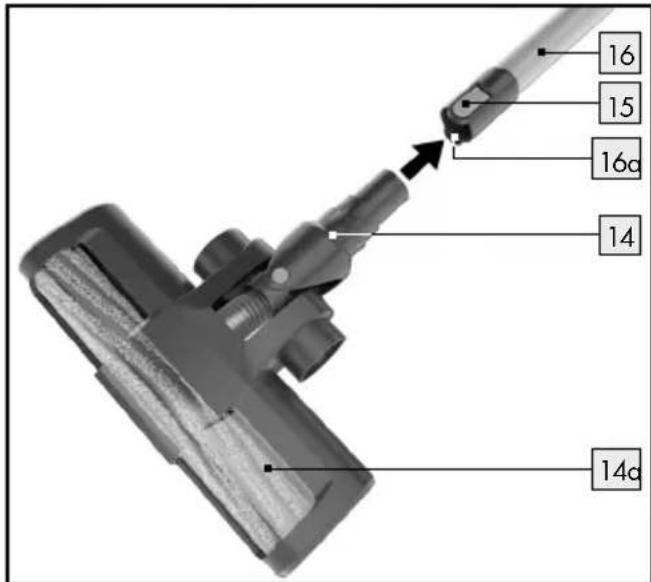
The aluminium suction tube 16 serves as an extension, for example, to access hard-to-reach spots with the crevice nozzle 13 and as a connection piece between the electric floor brush 14 and the main unit 4.
You can attach all the included accessory parts at the bottom end of the aluminium suction tube 16.
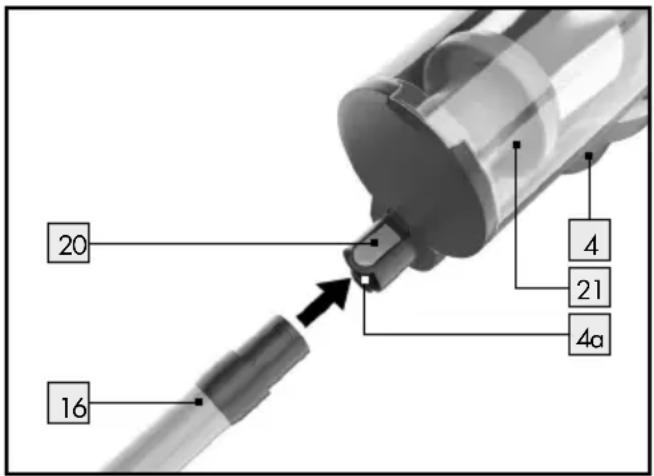
☐ Insert the aluminium suction tube 16 from below into the opening on the main unit 4a intended for this purpose until it audibly clicks into place. ☐ Remove the aluminium suction tube 16 from the main unit 4 by pushing the upper release button 20 and removing the aluminium suction tube 16 from the main unit 4.
Electric floor brush:
The electric floor brush 14 is suitable both for vacuuming smooth floors and carpets. It has a rotating brush roller 14d for taking in hair and fluff.
☐ Attach the aluminium suction tube 16 to the main unit 4 as previously described. ☐ Insert the electric floor brush 14 into the opening on the aluminium tube 16a intended for this purpose or alternatively directly into the opening on the main unit 4a intended for this purpose. The electric floor brush 14 must audibly click into place; only then is it properly attached. ☐ Press the release button 15 (aluminium suction tube 16) or 20 (main unit 4) to remove the electric floor brush and pull the electric floor brush 14 out of the aluminium suction tube 16/ the main unit 4.


Crevice nozzle:
The crevice nozzle 13 is suitable for vacuuming hard-to-reach spots, e.g. corners, cracks, seams, recesses, crevices in upholstered furniture and for cleaning the inside of cars.
☐ Insert the crevice nozzle 13 into the opening on the aluminium suction tube 16a intended for this purpose, for example to access hard-to-reach spots when vacuuming, or directly into the opening on the main unit 4a intended for this purpose. The crevice nozzle 13 must audibly click into place when installing it on the aluminium suction tube 16/main unit 4. ☐ Remove the crevice nozzle 13 from the aluminium suction tube 16 / main unit 4 by pushing the release button 15 (aluminium suction tube 16) or 20 (main unit 4) and removing the crevice nozzle 13 from the aluminium suction tube / main unit 4.

Dust brush:
The dust brush 12 is suitable for vacuuming upholstery and other textiles, but also for dusting sensitive objects, e.g. keyboards, picture frames, books etc.
☐ Insert the upper end of the dust brush 12 into the opening on the aluminium suction tube 16a intended for this purpose or the opening on the main unit 4d intended for this purpose until it audibly clicks into place.
Remove the dust brush 12 from the aluminium suction tube 16 / main unit 4 by pushing the release button 15 (aluminium suction tube 16) or 20 (main unit 4) and removing the dust brush 12 from the aluminium suction tube 16 / main unit 4.

The dust brush 12 has two functions:
You can use the dust brush 12 either with the brush attachment or with the corner nozzle attachment.
Press the release button 12a to push the brush attachment of the dust brush 12 downwards to vacuum upholstered furniture, for example.

Press the release button 12a again to push the brush attachment of the dust brush 12 upwards. The corner nozzle attachment of the dust brush 12 is suitable for vacuuming picture frames or books, for example.

Small brush:
The small brush 11 is suitable for vacuuming upholstery and other textiles, but also for dusting sensitive objects, e.g. keyboards, picture frames, books etc.
Insert the upper end of the small brush 11 into the opening on the aluminium suction tube 16a intended for this purpose or the opening on the main unit 4a intended for this purpose until it audibly clicks into place.
Remove the small brush 11 from the aluminium suction tube 16 / main unit 4 by pushing the release button 15 (aluminium suction tube 16) or 20 (main unit 4) and removing the small brush 11 from the aluminium suction tube 16 / main unit 4.

- Vacuuming
Before vacuuming, ensure that the dust collector 21 with the filters (HEPA filter 25 and stainless steel filter 27) is correctly installed (see chapter "Emptying the dust collector" / "Cleaning the filters and dust collector"). - Ensure that the rechargeable battery 2 is charged and installed before use (see chapter "Charging the rechargeable battery"). Before vacuuming, ensure that no large, sharp or pointed objects are lying on the surface to be cleaned. Make sure that the surface to be cleaned is dry.
Note: Switch the main unit off after cleaning each surface to conserve the operating time of the rechargeable battery 2. Charge the rechargeable battery 2 after use (see chapter "Charging the rechargeable battery").
- When vacuuming, be aware of your surroundings to avoid damage to the product and other objects.
Choose the suitable accessory if needed (see chapter "Selecting, assembling and disassembling accessories").
- Press and hold down the On / Off button 19 for approx. 2-3 seconds (see Fig. A) and start vacuuming.
- Now select one of the two vacuuming levels by pressing the MAX button 18 or the ECO button 17 (see Fig. A).
MAX mode: full vacuuming power, runtime approx. 25 minutes.
ECO mode: reduced vacuuming power, runtime approx. 45 minutes.
Press the On / Off button 19 again to switch the product off (see Fig. A).
- After use
Store the main unit after use either by hanging it on the wall bracket 5 (see Fig. C) or lying it out of the reach of children and pets in a protected location where no one can trip over or step on the main unit 4 with aluminium suction tube 16 or the mains cable.
☐ Charge the rechargeable battery 2 again after use (see chapter "Charging the rechargeable battery"). ☐ The aluminium suction tube 16 and the electric floor brush 14 can be left attached to the main unit 4 during storage.
Storing the accessories:
☐ Insert the small brush 11, dust brush 12 and crevice nozzle 13 in the accessory holder 10 for storage (see figure). ☐ Put the accessory holder 10 on the aluminium suction tube 16.


☐ Then either hang the main unit 4 on the wall bracket 5 (see Fig. C) or place it out of the reach of children and pets in a protected location.
Note: Before vacuuming, remove the accessory holder 10 from the aluminium suction tube 16 to prevent the accessory parts coming loose from the accessory holder 10 unintentionally during operation.
☐ Put the accessory holder 10 back on the aluminium suction tube 16 after vacuuming.
● Cleaning, care and maintenance
● Emptying the dust collector
To empty the dust collector 21, it must be removed from the main unit 4.
First remove the aluminium suction tube 16 or the accessory part you were using (see chapter "Selecting, assembling and disassembling accessories").
Proceed as follows to empty the dust collector 21:
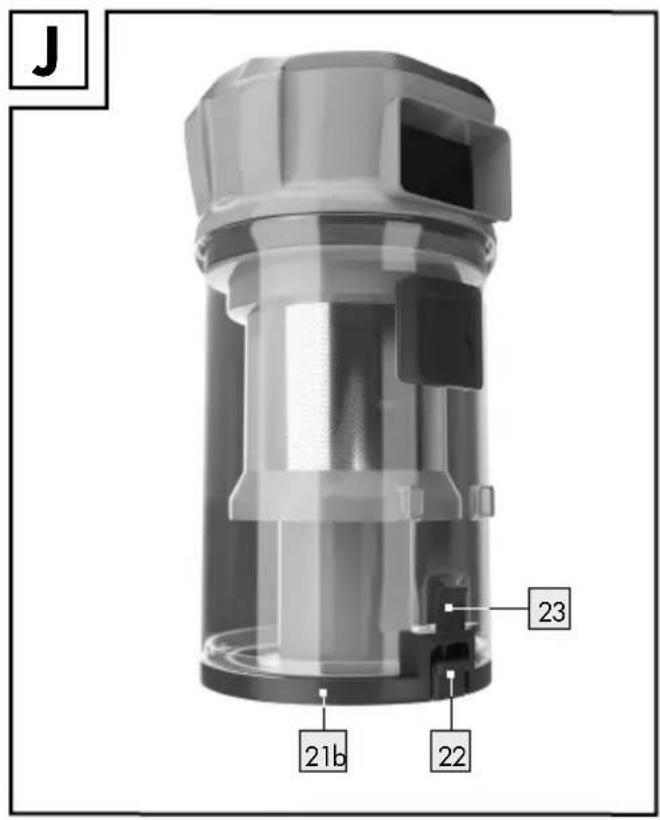
□ Switch the product off using the On / Off button ⏻ 19 (see Fig. A). Remove the dust collector 21 from the main unit 4 by pushing the release button 22 on the base of the dust collector 21 (see Fig. G) and carefully removing the dust collector 21 as shown in figure H. ☐ Hold the dust collector 21 over a waste bin. The distance to the dust collector should be as small as possible so that the dust does not unnecessarily shake out and distribute itself in the surrounding area. ☐ Pull the release lever 23 downwards (towards the user) to open the base flap 21b on the dust collector 21 (see Figure I). ☐ If needed, remove hair and dust, which have become stuck to the dust collector 21 by hand. ☐ Close the base flap 21b again by pushing it back into the opening of the dust collector 21 and pushing the release lever 23 upwards (towards the dust collector 21) until it audibly clicks into place (see Fig. J). ☐ Replace the dust collector 21 on the main unit 4 by lining up the dust collector 21 and the cover 24 precisely in the corresponding recesses in the main unit 4 (see Fig. K). The dust collector 21 must audibly click into place, it is only properly installed if it does so (see Fig. L).
● Cleaning the filters and dust collector - Clean the filters (HEPA filter 25 and stainless steel filter 27) after every two or three uses. Otherwise the vacuum function will be reduced and the product could be damaged. Do not wash the filters (HEPA filter 25 and stainless steel filter 27) in the dishwasher or washing machine. - Do not clean the HEPA filter 25 under running water. Do not clean the dust collector 21 in the dishwasher. - Allow the stainless steel filter 27 to air dry thoroughly after cleaning. Do not put the stainless steel filter 27 in the dryer or on the stove to dry.
IMPORTANT: Allow all parts of the product to dry thoroughly after cleaning. If the stainless steel filter 27 is not fully dry, water may seep into the product and damage it!
To clean the filters, follow these steps:
☐ Switch the product off using the On / Off button ⏻ 19 (see Fig. A). ☐ Remove the aluminium suction tube 16 from the main unit 4 by pushing the upper release
button 20 and removing the aluminium suction tube 16 from the main unit 4.
☐ Remove the dust collector 21 from the main unit by pushing the release button 22 on the base of the dust collector 21 and carefully removing the dust collector 21 (see Fig. H). ☐ Ensure that the dust collector 21 is empty (see chapter "Emptying the dust collector"). Tap the dust collector 21 out again over a waste bin if needed. ☐ Remove the cover 24 of the dust collector 21 by turning it to the right until the marking on the cover 24 is above the symbol. Remove the cover 24, pulling it upwards.

Take the entire filter unit out of the dust collector 21. ☐ Remove the HEPA filter 25 from the filter carrier 26 by pulling it out upwards on the flap.
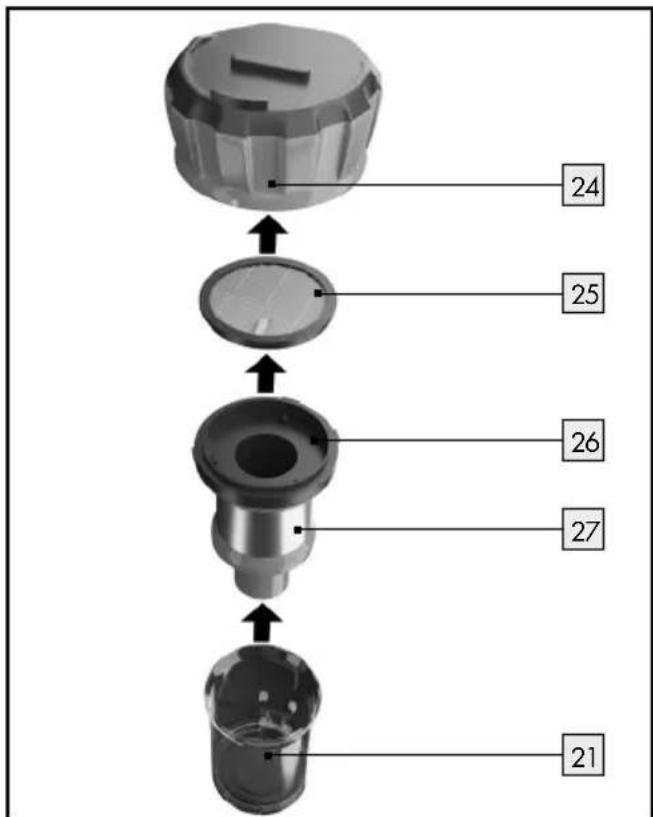
□ Clean the HEPA filter 25 by tapping it out. Only clean with a paintbrush or soft brush. ■ Do not clean the HEPA filter 25 with water! ☐ Rinse the stainless steel filter 27 with the filter carrier 26 under clear water. □ Clean the dust collector thoroughly using a damp cloth. Leave the dust collector 21 and the stainless steel filter 27 with filter carrier 26 to dry thoroughly before you put all the parts back in the reverse order. Replace the cover 24 of the dust collector 21 and secure it by turning it to the left until the marking on the cover 24 is above the 🔒 symbol.

Note: Check the filters (HEPA filter 25 and stainless steel filter 27) regularly when cleaning for damage or deformations. Filters which indicate damage or deformations or which can no longer be cleaned must be replaced. Please contact customer service if this happens.
- Cleaning the accessory parts
WARNING! DANGER OF ELECTRIC SHOCK! Always switch off the product before cleaning and remove the mains adapter 8 from the mains socket.
WARNING! DANGER OF ELECTRIC SHOCK! Do not im-
merse the product, the rechargeable battery 2, the mains cable or the mains adapter 8 in water or other liquids to clean it.
- Do not clean the product when it is charging. Let the product cool before you clean it. Remove the rechargeable battery ② before cleaning.
Do not use solvents, petrol, etc. These would damage the product.
Empty the dust collector 21 before cleaning (see chapter "Emptying the dust collector") and thoroughly tap it out.
Cleaning the surface of the product:
When cleaning the surfaces, e.g. of the main unit 4, rechargeable battery 2 or electric floor brush 14, use a feather duster or soft, slightly moistened cloth for persistent dirt.
Cleaning the accessories:
Regularly remove any hair and dirt from the accessory parts. Clean the crevice nozzle 13, the dust brush 12 and the brush 11 under running water. Allow all accessory parts to dry thoroughly before using or storing them again.
Cleaning the rotating brush roller:
Remove the electric floor brush 14 from the aluminium suction tube 16. To do so, press the release button 15 on the aluminium suction tube 16 and remove the electric floor brush 14. Turn the electric floor brush 14 around. Use a flat-tip screwdriver to turn the fixing screw 14c of the locking mechanism 14b anticlockwise towards the - symbol.

Carefully fold up the locking mechanism 14b
and then remove the rotating brush roller 14q from the housing of the electric floor brush 14.

Clean the rotating brush roller 14a by removing any hair or dirt. Also remove any dirt from the housing of the electric floor brush 14. Then replace the rotating brush roller 14d in the housing of the electric floor brush 14. Then carefully press the locking mechanism 14b down again. Attach the rotating brush roller 14a by turning the fixing screw 14c using a flat-tip screwdriver clockwise in the direction of the 🔒 symbol. Check that it is positioned correctly.
Storage
Disconnect the power supply if the product will not be used for an extended period. Remove the rechargeable battery 2 from the holder in the handle 1 of the main unit 4 (see chapter "Charging the rechargeable battery") and store it outside of the main unit 4.
Always store the product dry and at room temperature together with all the accessory parts.
- Do not expose the product to direct sunlight or heat.
● Troubleshooting / Problem solving
| Problem Reason Solution | | |
| The main unit 4 won't switch on. | The rechargeable battery 2 is not charged. | Charge the rechargeable battery 2 (see chapter “Charging the rechargeable battery”). |
| The rechargeable battery 2 is not inserted. | Put the rechargeable battery 2 in the main unit 4 by pushing it into the holder on the handle 1 of the main unit 4 until it locks into place. |
| The main unit 4 switches itself off during operation and the LEDs of the rechargeable battery control display 2b flash. | The rechargeable battery 2 is not charged. | Charge the rechargeable battery 2 (see chapter “Charging the rechargeable battery”). |
| The suction power is too weak. | The rechargeable battery 2 is too weak. | Fully charge the rechargeable battery 2 (see chapter “Charging the rechargeable battery”). |
| The filters 25, 27 or filter carrier 26 are blocked or damaged. | Clean the filters 25, 27 and the filter carrier 26 (see chapter “Cleaning the filters and dust collector”). Replace damaged filters. |
| The accessory is not properly installed. | Check whether the accessory parts are correctly installed / locked into place (see chapter “Selecting, assembling and disassembling accessories”). |
| The suction opening of the aluminium suction tube 16 or an accessory part is blocked. | Check the aluminium suction tube 16 and the accessory part you are using for blockages. Clean the accessory (see chapter “Cleaning the accessory parts”). |
| The product is releasing dust / dirt when vacuuming. | The dust collector 21 / filters 25, 27 are not inserted correctly. | Check whether the dust collector 21 and the filters 25, 27 are correctly installed (see chapter "Emptying the dust collector" / "Cleaning the filters and dust collector"). |
| The dust collector 21 is not closed properly. | Check whether the base flap 21b on the dust collector 21 is closed properly (see chapter "Emptying the dust collector"). |
| The filters 25, 27 or filter carrier 26 are blocked or damaged. | Clean the filters 25, 27 and the filter carrier 26 (see chapter "Cleaning the filters and dust collector"). Replace damaged filters. |
| The rechargeable battery 2 is not charged and the rechargeable battery control display has gone out. | The mains cable is not connected. | Insert the mains cable connector plug 9 into the charging socket 3 on the rechargeable battery 2 (see chapter "Charging the rechargeable battery"). |
| The mains adapter 8 is not connected to the mains socket. | Plug the mains adapter 8 into a properly installed mains socket (see chapter "Charging the rechargeable battery"). |
| The rechargeable battery 2 or the mains adapter 8 with mains cable is defective. | Please contact customer service. |
● Disposal
The packaging is made entirely of recyclable materials, which you may dispose of at local recycling facilities.

Observe the marking of the packaging materials for waste separation, which are marked with abbreviations (a) and numbers (b) with following meaning: 1-7: plastics / 20-22: paper and fibre-board / 80-98: composite materials.

The product and packaging materials are recyclable, dispose of them separately for better waste treatment. The Triman logo is valid in France only.
Contact your local refuse disposal authority for more details of how to dispose of your worn-out product.

To help protect the environment, please dispose of the product properly when it has reached the end of its useful life and not in the household waste. Information on collection points and their opening hours can be obtained from your local authority.
Faulty or used batteries / rechargeable batteries must be recycled in accordance with Directive 2006/66/EC and its amendments. Please return the batteries/rechargeable batteries and/or the product to the available collection points.

Environmental damage through incorrect disposal of the batteries / rechargeable batteries!
Batteries / rechargeable batteries may not be disposed of with the usual domestic waste. They may contain toxic heavy metals and are subject to hazardous waste treatment rules and regulations. The chemical symbols for heavy metals are as follows: Cd = cadmium, Hg = mercury, Pb = lead. That is why you should dispose of used batteries / rechargeable batteries at a local collection point.
● Warranty / Service centre
Dear customer,
Our products are subject to strict quality control. If this device does not work properly despite these controls, we apologise and we ask that you contact our customer service centre as specified below. Please feel free to phone us on the service hotline specified. Without limiting your legal rights, warranty claims are subject to
the following:
- Warranty claims must be filed within a period of max. 3 years from the date of purchase. Our warranty services are limited to correcting defects in material and manufacture, or replacement of the device. Our warranty service is free of charge to you.
- Warranty claims must always be filed immediately upon discovery.
- Warranty claims will not be accepted after the warranty period has expired.
- Please keep your receipt as proof of purchase.
Not covered by warranty:
- improper or incorrect care
- failure to observe the safety precautions applicable to the device
- use of force
- changes not performed by an authorised service centre
- damage due to return in packaging not safe for transport (the sales packaging of this product is not suitable for separate shipping)
- inflicted damage due to impact, shock, drops, for example
- failure to observe the instructions for use
- normal wear and tear
- unauthorised attempts at repair You may request the instructions for use in PDF format from our Customer Service Department.
Service GB / IE
Tel.: 00800-83300000
E-Mail: support.lidl@ksr-group.com
IAN 359294_2010
Please have your receipt and item number (e.g. IAN 123456_7890) ready as your proof of purchase when enquiring about the product.
Hotline hours:
This product fulfils the requirements of the applicable European and national directives. This is confirmed by the CE mark. The relevant declarations are held by the manufacturer.

Mount the wall bracket....Page 55
- Mount the wall bracket
WARNING! DANGER OF ELECTRIC SHOCK

Suction nozzle:
2-in-1 cordless vacuum cleaner
- Introduction

Joint nozzle:
Joint nozzle:
WEAR PROTECTIVE GLOVES! Leaked
Joint nozzles:
WEAR PROTECTIVE
GLOVES! Leaked


Joint nozzle:



KSR GROUP GMBH