
SHSS 18 B1 - Vacuum Cleaner SILVERCREST - Free user manual and instructions
Find the device manual for free SHSS 18 B1 SILVERCREST in PDF.
| Product type | 2-in-1 cordless handheld and stick vacuum |
| Brand | SilverCrest |
| Model | SHSS 18 B1 |
| Power supply | Rechargeable lithium-ion battery, 25.2 V, 2200 mAh |
| Charger input voltage | 100-240 V~, 50/60 Hz |
| Charger output voltage | 30 V (direct current), 0.4 A |
| Rated power (portable part) | 120 W |
| Rated power (floor nozzle) | 5 W |
| Runtime in normal mode | Approx. 25 minutes |
| Runtime in ECO mode | Approx. 42 minutes |
| Charging time | 5 to 6 hours |
| Filter type | HEPA filter and coarse filter |
| Included accessories | Crevice tool and 2-in-1 brush attachment, wand, charging base with charging port, power adapter |
| Suction modes | Normal and ECO (energy saving) |
| LED lighting | Yes, on the floor nozzle |
| Warranty | 3 years |
| After-sales service | Available by phone and email (see manual) |
Frequently Asked Questions - SHSS 18 B1 SILVERCREST
User questions about SHSS 18 B1 SILVERCREST
0 question about this device. Answer the ones you know or ask your own.
Ask a new question about this device
Download the instructions for your Vacuum Cleaner in PDF format for free! Find your manual SHSS 18 B1 - SILVERCREST and take your electronic device back in hand. On this page are published all the documents necessary for the use of your device. SHSS 18 B1 by SILVERCREST.
USER MANUAL SHSS 18 B1 SILVERCREST
2-IN-1 CORDLESS VACUUM CLEANER 2-IN-1 AKKU-HAND- UND -BODENSTAUBSAUGER ASPIRATEUR SANS FIL POLYVALENT 2 EN 1 SHSS 28 A1
GB IE
2-IN-1 CORDLESS VACUUM CLEANER
Operating instructions
FR BE
ASPIRATEUR SANS FIL POLYVALENT 2 EN 1
Mode d'emploi
CZ
2 V 1 - AKU RUCNI A PODLAHOVY VYSAVAC
Návod k obsluze
SK
AKU RUCNY A PODLAHOVY VYSAVAC 2 V 1
Návod na obsluhu
DK
211 Händ-OG GULVSTØVSUGER MED GENOPLADELIGT BATTERI
Before reading, unfold the page containing the illustrations and familiarise yourself with all functions of the device.
DE AT CH
GB/IE Operating instructions Page 1
Technical specifications 3
Safety information 4
Before first use 7
Charging the appliance 7
Assembly/disassembly 7
Fitting the handle rod 7
Connecting/removing the hand element to/from the handle rod 8
Operation 8
Using the hand element with the handle rod 8
Using the 2-in-1 crevice and brush attachment. 9
Using the hand element 9
Cleaning and maintenance 9
Emptying the dirt container and cleaning the filter 10
Cleaning the appliance 10
Cleaning the rotary brush 10
Storage 11
Troubleshooting 11
Disposal 11
Disposal of the device 11
Disposal of the packaging 12
Kompernass Handels GmbH warranty 12
Service 13
Importer 13
Ordering replacement parts 14
Introduction
Congratulations on the purchase of your new appliance.
You have selected a high-quality product.
The operating instructions are part of this product.
They contain important information about safety, usage and disposal.Before using the product, please familiarise yourself with all operating and safety instructions.
Use the product only as described and for the specified range of applications. Please also pass these operating instructions on to any future owner.
Intended use
This appliance has been designed exclusively for vacuum cleaning dry surfaces and dry residues. This appliance is intended solely for use in private households. The appliance must not be used to vacuum people or animals. Any other usage or modification of the appliance is deemed to be improper and carries a significant risk of accidents. The manufacturer accepts no liability for damages caused by improper use or incorrect operation of the appliance. The appliance is not intended for commercial use.
Package contents
- 2-in-1 cordless handheld/floor vacuum cleaner
2-in-1 crevice and brush attachment - Handle rod
- Cradle (with charging socket)
- Mains adapter
- Operating instructions
NOTE
- Check the package for completeness and signs of visible damage.
If the delivery is incomplete or damage has occurred as a result of defective packaging or during transport, contact the Service hotline (see section Service).
Appliance description
Figure A:
Grip of the hand element
On/Off switch 1/Charge indicator lamp
3 Handelement
4 Release button (dirt container)
HEPAAfilter
Coarse filter
Dirt container
Figure B:
On/Off switch
ECO button
10 Handle rod
16 Screw (rear)
12 Release buttons
13 Hand element recess
14 Rotary brush
15 LED light
Figure C:
16 2-in-1 crevice and brush attachment
17 Mains adapter
18 Barrel plug mains adapter
15 Cradle (with charging socket)
Charging socket (bottom)
Accessory compartment
Accessories holder
Technical specifications
| Floor nozzle | |
| Rated power | 5 W |
| Polarity | ◇-◇-◇ |
| Hand element | |
| Input voltage/ current | 30 V---(DC)/0.4 A |
| Rated power 120 W | |
| Polarity | ◇-◇-◇ |
| Rechargeable batteries | |
| Capacity 2,200 mAh | |
| Rechargeable batteries | 25.2 V--- (DC) (7 x 3.6V lithium-ion batteries) |
| Operating time with full battery charge (depending on floor covering) | Level 1, normal mode: approx. 25 min. Level 2 (ECO mode): approx. 42 min. |
| Mains adapter | |
| Manufacturers | KOMPERNASS H. GMBH BURGSTRASSE 21 44867 BOCHUM GERMANY Commercial register number: HRB 4598 |
| Model SHSS 28 A1-1 | |
| Input voltage 100-240 V ~ (AC) | |
| Input AC frequency | 50/60 Hz |
| Output voltage 30 V ~ (DC) | |
| Output current 0.4 A | |
| Output power 12 W | |
| Average operating efficiency | 83.9 % |
| Low load efficiency (10%) | 77.1 % |
| No-load power consumption | 0.08 W |
| Power consumption | 0.3 A |
| Polarity | ◇◇◇ |
| Protection class | II/回 (double insulation) |
| Efficiency class | 6① |
NOTE
No user action is required to switch the product between 50 and 60Hz . The product switches automatically to either 50 or 60Hz .
Safety information

- Never use the handheld vacuum cleaner if the cable, plug or casing are damaged.
- To prevent accidents, have defective plugs and/or mains cables replaced immediately by an authorised specialist, our customer service or a similarly qualified person.
- Have all repairs carried out by a specialist workshop. Under no circumstances should you open the appliance yourself. Repairs that are not carried out by a specialist workshop could lead to physical injuries.
Before charging the appliance, make sure that the mains voltage corresponds to the voltage indicated in the technical specifications for the mains adapter. - Never touch the mains adapter or the appliance with wet or damp hands.
- Do not use the mains adapter with an extension cable; connect the mains adapter directly to a mains socket.

Do not charge or use the appliance outdoors.

WARNING! RISK OF INJURY!
- Do not change any accessories while the appliance is switched on.
- Do not use the handheld vacuum cleaner for vacuuming up water or other liquids.
- Do not use the handheld vacuum for vacuuming up sharp objects or glass shards.
Never vacuum up burning matches, glowing ashes or cigarette butts.
WARNING! RISK OF INJURY!
- Do not use the handheld vacuum for vacuuming up chemical products, stone dust, gypsum, cement or similar particles.
- This appliance is not suitable for use with inflammable and explosive substances or chemical and aggressive liquids.
Always store the appliance indoors. To prevent accidents, keep the appliance in a dry location when not in use.
Under extreme conditions, leaks in the battery cells may occur. In the event that battery fluid comes into contact with skin or eyes, the affected area must be rinsed off with water immediately. Contact a physician. - This appliance may be used by children aged 8 years and above and by persons with limited physical, sensory or mental capabilities or lack of experience and knowledge, provided that they are under supervision or have been told how to use the appliance safely and are aware of the potential risks. Do not allow children to use the appliance as a toy. Cleaning and user maintenance tasks may not be carried out by children unless they are supervised.
- Use only accessories recommended by the manufacturer.
The mains adapter must not be used for other purposes.
Always grip the power plug to disconnect the appliance from the power supply.
Always be sure to keep the hand vacuum away from heating elements, ovens or other heated appliances and surfaces.
WARNING! RISK OF INJURY!
Always make certain that the ventilation slits are not obstructed. A blocked ventilation circuit can result in overheating and damage to the appliance.
Take special care when using the hand vacuum on stairs. Risk of falling!
- This product contains rechargeable batteries. Do not throw the appliance into a fire and do not subject it to high temperatures. There is a risk of an explosion!
Always remove the hand element from the handle rod before cleaning the rotary brush to avoid accidental starting of the rotary brush.
ATTENTION! PROPERTY DAMAGE!
The product is equipped or supplied with a lithium-ion battery. Do not throw the batteries into a fire and do not subject them to high temperatures. There is a risk of an explosion!
- Do not use the hand vacuum cleaner without the HEPA filter inserted.
- Do not use the mains adapter for a different product and do not attempt to charge this appliance using a different mains adapter. Use only the mains adapter supplied with this appliance.
The batteries in this appliance cannot be replaced.
Never charge non-rechargeable batteries!

The mains adapter is intended for indoor use only.
Before first use
Remove all packaging materials and protective stickers from the appliance, especially the protective sticker on the contacts on the back of the hand element 3.
Place the cradle 9 onto the stand until the cradle 19 clicks into place.
NOTE
The appliance batteries are not charged upon delivery. The batteries must be charged for 5-6 hours before using the appliance for the first time.
Charging the appliance
NOTE
- Ensure that the appliance is switched off before starting to charge the batteries.
To charge the appliance, connect the mains adapter 17 to a mains socket. Plug the barrel plug 18 into the charging socket 20 on the underside of the cradle 19. Feed the cable through the recess on the rear of the cradle 19 so that the cradle 19 is not resting on the cable.
Place the handle rod with the attached hand element 3 onto the cradle 19. The charge indicator lamp 2 lights up red. When the appliance is fully charged, the charge indicator lamp 2 lights up blue.
Do not recharge the batteries until the suction power of the appliance has become noticeably weaker.
NOTE
When the batteries are weak, the charge indicator lamp 2 starts flashing blue. When this happens, the appliance can be operated for another 3 to 5 minutes.
Once the batteries are completely discharged, the charge indicator lamp ② flashes red five times and the appliance switches off.
Assembly/disassembly
Fitting the handle rod
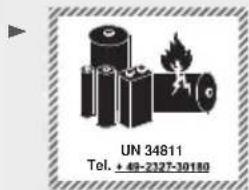
1) Loosen the screw 11 at the back of the handle rod with a screwdriver in anticlockwise direction. Pull the screw 11 out of the screw hole on the handle rod 10.
2) Attach the handle rod to the handle rod bracket of the appliance. Push the handle rod all the way onto the handle rod bracket until it is firmly seated on the appliance. (Fig. 1).
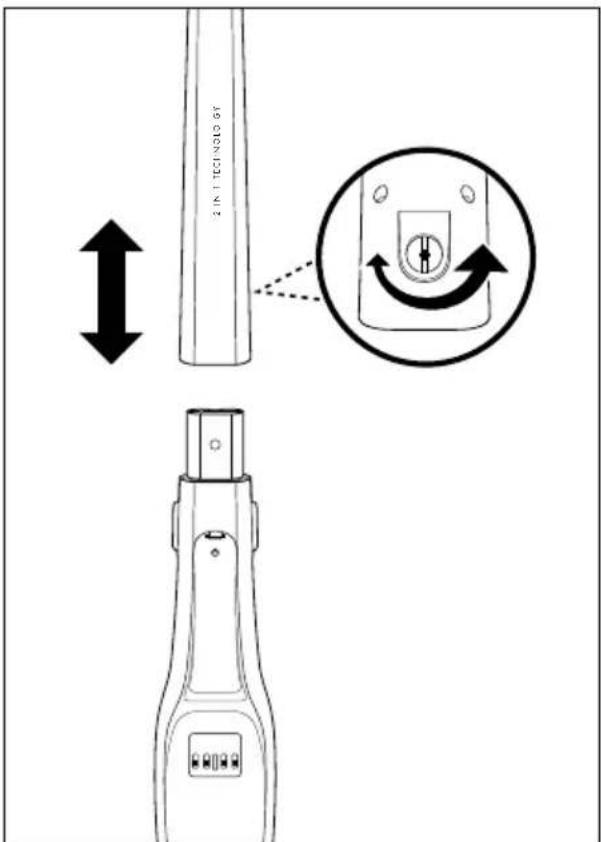
Fig. 1
3) Insert the screw into the screw hole at the back of the handle rod. Tighten the screw clockwise with a screwdriver (Fig. 1).
Connecting/removing the hand element to/from the handle rod
Fig. 2 Fig. 3
1) To connect the hand element 3 to the handle rod 10, push the tip of the hand element 3 into the opening in the hand element recess 13.
2) Then press the grip 1 of the hand element 3 into the handle rod 10 until the hand element 3 clicks firmly into place (Fig. 2).
3) To remove the hand element 3 from the handle rod 10, press both release buttons 12.
4) Then pull the hand element upwards and forwards out of the hand element recess (Fig. 3).
Operation
ATTENTION! PROPERTY DAMAGE!
The suction opening must always be open and may not be blocked. Blockages lead to overheating and damage to the motor.
Do not vacuum shag pile carpet with the floor nozzle. The rotary brush 14 can get caught in the carpet and jam!
NOTE
Make sure that the HEPA filter 5 and the coarse filter 6 are always inserted before using the appliance.
As soon as the suction power of the appliance begins to diminish noticeably and the charge indicator lamp ② flashes blue, connect the appliance to the mains adapter ⑦.
Using the hand element with the handlerod
1) Insert the hand element into the hand element recess as described in the section Assembly/disassembly.
2) Switch on the appliance using the On/Off switch ① ⑧. The charge indicator lamp ② lights up blue, the LED light ⑤ on the floor nozzle lights up and the rotary brush ⑭ starts rotating.
NOTE
Press the ECO button to switch to the energy-saving ECO mode. The appliance now uses a lower suction power but can run for longer.
Press the ECO button again to work with full suction power.
3) Guide the floor nozzle over the area to be vacuumed. Hold the handle rod 10 so that the floor nozzle moves smoothly over the floor.
4) Press the On/Off switch ① ⑧ when you have finished vacuuming. The rotary brush ⑭ stops and the charge indicator lamp ② as well as the LED light ⑮ switch off.
Using the 2-in-1 crevice and brush attachment
NOTE
- Switch the appliance off before attaching or removing the 2-in-1 crevice and brush attachment 16.
The appliance's 2-in-1 crevice and brush attachment has two different nozzles for different applications. Choose the appropriate nozzle depending on your needs:
Brush nozzle
Use the brush nozzle to clean soft and/or delicate surfaces.
Crevice nozzle
Use the crevice nozzle to clean narrow and hard to reach locations.
- Attach the 2-in-1 crevice and brush attachment 16 to the hand element 3.
Alternatively, you can attach only the brush nozzle or only the crevice nozzle to the hand element 3.
When you are done using it, pull the 2-in-1 crevice and brush attachment ⑥ or the single nozzle off the hand element ③
Using the hand element
1) Remove the hand element 3 from the hand element recess 13 as described in the section Assembly/disassembly.
2) If necessary, attach the 2-in-1 crevice and brush attachment to the hand element. Alternatively, you can attach only the brush nozzle or only the crevice nozzle to the hand element.
3) Press the On/Off switch ① ② on the hand element ③ to start vacuuming the desired areas. The charge indicator lamp ② lights up blue during operation.
4) When you are finished vacuuming, press the On/Off switch 12 again. The charge indicator lamp 2 switches off.
Cleaning and maintenance
WARNING! RISK OF INJURY!
Always unplug the mains adapter from the mains power socket. Pull the barrel plug 18 out of the charging socket 20 on the cradle 19 before cleaning the cradle 19.
Always remove the hand element 3 from the hand element recess 13 on the handle rod 10 before cleaning -the hand element 3, -the handle rod 10, or -the rotary brush 14.
ATTENTION! PROPERTY DAMAGE!
- Do not use abrasive or aggressive cleaning materials. They can damage the surface of the appliance!
NOTE
The LED light is maintenance-free. The LEDs cannot be replaced!
Emptying the dirt container and cleaning the filter
NOTE
To achieve the best results, empty the dirt container 7 and clean the HEPA filter 5 regularly.
If you need a new HEPA filte, please contact our customer service department (see section Ordering replacement parts).
1) To open the dirt container 7, remove the hand element 3 from the hand element recess 13.
2) Press the release button 4 and, at the same time, pull the dirt container 7 forwards and off.
3) Start by pulling the HEPA filter 5 and then the coarse filter 6 out of the dirt container 7 (Fig.4). Tap out both parts over a rubbish bin or similar. If necessary, you can rinse out the HEPA filter 5 with fresh water. Allow it to air dry fully afterwards.
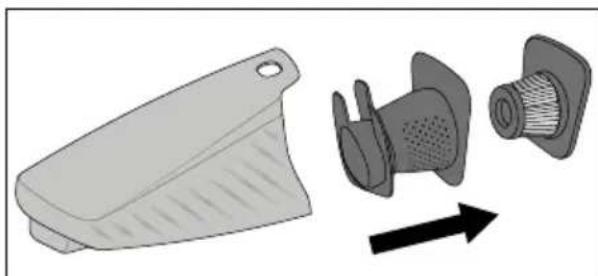
Fig. 4
4) Empty the dirt container ⑦ into the rubbish bin or similar.
5) First re-insert the coarse filter and then the dry HEPA filter
6) Replace the dirt container 7 onto the hand element 3 by first pushing the lower catch on the hand element 3 into the recess on the dirt container 7. Then, press the upper part of the dirt container 7 onto the hand element 3 until the dirt container 7 clicks into place and sits firmly.
Cleaning the appliance
Wipe the appliance with a damp cloth. For stubborn dirt, add a little mild detergent to the cloth. Ensure that the appliance is completely dry before using it again.
Cleaning the rotary brush
The rotary brush 14 should be checked regularly for blockages; any hair, threads or dirt should be removed. Remove the rotary brush 14 as follows:
1) Turn the floor nozzle upside down.
2) Push the catch on the cover plate towards the symbol and remove the cover plate (Fig. 5).
3) Remove the rotary brush 14.
4) Remove any dirt (on both sides of the brush bristles) and clean the rotary brush 14. To do this, take a damp cloth and wipe the individual bristle bundles from the inside to the outside.
5) To replace the rotary brush 14, first push the broad end onto the drive shaft so that the rotary brush 14 hooks into place.
6) Then, push the other end into the mount so that the rotary brush 14 sits straight in the floor nozzle.
7) Reattach the cover plate until it clicks firmly into place. The cover plate locks automatically as the latch moves towards the symbol (Fig. 5).
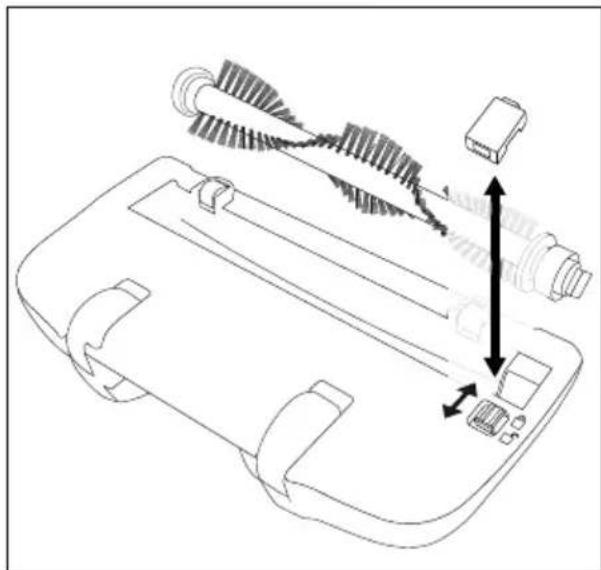
Fig. 5
Storage
When you are not using the appliance, place it on the cradle 19.
Store the 2-in-1 crevice and brush attachment in the accessory compartment 21.
Alternatively, you can put the brush nozzle and crevice nozzle into the accessories holder 22 individually or together.
Store the appliance in a dust-free and dry location.
Troubleshooting
The appliance is not working.
The battery is not charged.
Charge the appliance (see section Charging the appliance).
The appliance is defective.
- Contact the customer service department (see section Service).
The appliance is running but hardly sucking up any dirt.
The battery is not sufficiently charged.
Charge the appliance (see section Charging the appliance).
The dirt contains 7 is full.
Empty the dirt container (see section Cleaning and maintenance).
The HEPA filte5 is blocked.
Clean the HEPA filter (see section Cleaning and maintenance).
The appliance will not charge.
The mains adapt is not correctly connected to the charging socket or the mains socket.
Check the connections of the mains adapter 17.
The mains adapt is defective.
Contact the customer service department (see section Service).
NOTE
The appliance is equipped with a temperature monitor to protect the batteries. At high ambient temperatures (in rare cases) the charging process may be interrupted or the appliance may switch off automatically:
The charge indicator lamp 2 flashes red at one second intervals during charging. The charging process is interrupted and resumes automatically as soon as the temperature of the appliance has dropped.
The charge indicator lamp② flashes red five times during operation. The appliance switches off automatically. Allow the appliance to cool for 20-30 minutes before switching it on again.
Disposal
Disposal of the device
The symbol showing a crossed-out dustbin means that this appliance is subject to Directive 2012/19/EU. This directive states that this appliance may not be disposed of in the normal
household waste at the end of its useful life, but must be handed over to specially set-up collection locations, recycling depots or disposal companies. This disposal is free of charge for the user. Protect the environment and dispose of this appliance properly.

Your local community or municipal authorities can provide information on how to dispose of the worn-out product.

The product is recyclable, subject to extended producer responsibility and is collected separately.
NOTE
The appliance contains batteries that cannot be removed by the user. To prevent risks, the removal or replacement of the batteries may only be carried out by the manufacturer, the manufacturer's customer service department or a similarly qualified person. When disposing of the appliance, indicate that the appliance contains batteries.
Disposal of the packaging

The packaging is made from environmentally friendly material and can be disposed of at your local recycling plant.
Dispose of the packaging in an environmentally friendly manner. Note the labelling on the packaging and separate the packaging material components for disposal, if necessary.
The packaging materials are labelled with abbreviations (a) and numbers (b) with the following meanings:
1-7: plastics, 20-22: paper and cardboard, 80-98: composites.
This appliance has a 3-year warranty valid from the date of purchase. If this product has any faults, you, the buyer, have certain statutory rights. Your statutory rights are not restricted in any way by the warranty described below.
Warranty conditions
The warranty period starts on the date of purchase. Please keep your receipt in a safe place. This will be required as proof of purchase.
If any material or manufacturing fault occurs within three years of the date of purchase of the product, we will either repair or replace the product for you or refund the purchase price (at our discretion).
This warranty service requires that you present the defective appliance and the proof of purchase (receipt) within the three-year warranty period, along with a brief written description of the fault and of when it occurred.
If the defect is covered by the warranty, your product will either be repaired or replaced by us. The repair or replacement of a product does not signify the beginning of a new warranty period.
Warranty period and statutory claims for defects
The warranty period is not prolonged by repairs effected under the warranty. This also applies to replaced and repaired components. Any damage and defects present at the time of purchase must be reported immediately after unpacking. Repairs carried out after expiry of the warranty period shall be subject to a fee.
Scope of the warranty
This appliance has been manufactured in accordance with strict quality guidelines and inspected meticulously prior to delivery.
The warranty covers material faults or production faults. The warranty does not extend to product parts subject to normal wear and tear or to fragile parts which could be considered as consumable parts such as switches, batteries or parts made of glass.
The warranty does not apply if the product has been damaged, improperly used or improperly maintained. The directions in the operating instructions for the product regarding proper use of the product are to be strictly followed. Uses and actions that are discouraged in the operating instructions or which are warned against must be avoided.
This product is intended solely for private use and not for commercial purposes. The warranty shall be deemed void in cases of misuse or improper handling, use of force and modifications / repairs which have not been carried out by one of our authorised Service centres.
Warranty claim procedure
To ensure quick processing of your case, please observe the following instructions:
Please have the till receipt and the item number (IAN) 394516_2201 available as proof of purchase.
You will find the item number on the type plate on the product, an engraving on the product, on the front page of the operating instructions (below left) or on the sticker on the rear or bottom of the product.
If functional or other defects occur, please contact the service department listed either by telephone or by e-mail.
You can return a defective product to us free of charge to the service address that will be provided to you. Ensure that you enclose the proof of purchase (till receipt) and information about what the defect is and when it occurred.
You can download these instructions along with many other manuals, product videos and installation software at www.lidl-service.com.
This QR code will take you directly to the Lidl service page (www.lidl-service.com) where you can open your operating instructions by entering the item number (IAN) 394516_2201.
Service
GB Service Great Britain
Tel.: 0800 404 7657
E-Mail: kompernass@lidl.co.uk
IE Servicelreland
Tel.: 1800 101010
E-Mail: kompernass@lidl.ie
IAN 394516_2201
Importer
Please note that the following address is not the service address. Please use the service address provided in the operating instructions.
KOMPERNASS HANDELS GMBH
BURGSTRASSE 21
44867 BOCHUM
GERMANY
www.kompernass.com
Ordering replacement parts
You can order replacement parts for this product on the internet at www.kompernass.com.

Scan this QR code with your smartphone or tablet.
You can use this QR code to navigate directly to our website (www.kompernass.com)
where you can view and order the available spare parts.
NOTE
If you have problems with your online order, you can contact our customer service centre by phone or email (see section Service).
- Please always quote the article number (e.g. 123456_7890) when ordering. You can find it on the title page of these operating instructions.
- Please note that online ordering of replacement parts is not possible for all countries.
Inhaltsverzeichnis
Einleitung 16
KOMPERNASS HANDELS GMBH
BURGSTRASSE 21
44867 BOCHUM
DEUTSCHLAND
www.kompernass.com
Chere cliente, cher client,
Chere cliente, cher client,
KOMPERNASS HANDELS GMBH
BURGSTRASSE 21
44867 BOCHUM
ALLEMAGNE
www.kompernass.com
Commander des pieces de rechange
WAARSCHUWING! LETSELGEVAAR!
WAARSCHUWING! LETSELGEVAARI!
WAARSCHUWING! LETSELGEVAAR!
WAARSCHUWING! LETSELGEVAAR!
De netvoedin is defect.
KOMPERNASS HANDELS GMBH
BURGSTRASSE 21
44867 BOCHUM
DUITSLAND
www.kompernass.com
POZORI HMOTNÉ SKODYI
Saci otvor musi byt neustale volny a nesmi byt ucpany. Ucpani vedou k prehrati a poskozeni motoru.
- Nevysávejte podlahovou hubici koberce s y-sokým vlasem. Rotačni kartáč 14 se v koberci zachyti a zablokujé!
UPOZORNÉNÍ
POZORI HMOTNÉ SKODYI
KOMPERNASS HANDELS GMBH
BURGSTRASSE 21
44867BOCHUM
NÉMECKO
www.kompernass.com
KOMPERNASS HANDELS GMBH
BURGSTRASSE 21
44867 BOCHUM
NIEMCY
www.kompernass.com
KOMPERNASS HANDELS GMBH
BURGSTRASSE 21
44867 BOCHUM
NEMECKO
www.kompernass.com
Objednávanie nahradnych dielov
Náhradné diely pre除去Vyrobok si moźete trvalo pohodne doobjednat na internete na stranke www.kompernass.com.

SHSS 28 A1
Naskenujte si tento QR kód pomocou smartfónu alebo tabletu. Pomocou QR kódu sa dostanete priamo na nasu webovú stránku www.kompernass.com a možete si prezriet' a objednat náhradné diely dostupné pretento prisroj.
UPOZORNENIE
KOMPERNASS HANDELS GMBH
BURGSTRASSE 21
44867 BOCHUM
ALEMANIA
www.kompernass.com
Pedido de recambios
Bestilling of reservedele 127
Indledning
KOMPERNASS HANDELS GMBH
BURGSTRASSE 21
44867 BOCHUM
TYSKLAND
www.kompernass.com
Bestilling af reservedele
KOMPERNASS HANDELS GMBH
BURGSTRASSE 21
44867 BOCHUM
GERMANIA
www.kompernass.com
KOMPERNASS HANDELS GMBH
BURGSTRASSE 21
44867 BOCHUM
NÉMETORSZÁG
www.kompernass.com
KOMPERNASS HANDELS GMBH
BURGSTRASSE 21
44867 BOCHUM
NEMCIJA
www.kompernass.com
Pooblasceni serviser
SI
ServisSlovenija
Tel.: 080 080 917
E-Mail: kompernass@lidl.si
IAN 394516_2201
Garancijski list
KOMPERNASS HANDELS GMBH
BURGSTRASSE 21
44867 BOCHUM
GERMANY
www.kompernass.com
