HLC 8440 C ST - Oven TEKA - Free user manual and instructions
Find the device manual for free HLC 8440 C ST TEKA in PDF.
User questions about HLC 8440 C ST TEKA
0 question about this device. Answer the ones you know or ask your own.
Ask a new question about this device
Download the instructions for your Oven in PDF format for free! Find your manual HLC 8440 C ST - TEKA and take your electronic device back in hand. On this page are published all the documents necessary for the use of your device. HLC 8440 C ST by TEKA.
USER MANUAL HLC 8440 C ST TEKA
Before using your oven for the first time, please carefully read the installation and maintenance instructions that come with it. Depending on the model, the accessories included in your oven may vary from those shown in the pictures.
PORTUGUES
Description of the appliance. 5
Control panel. 5
Function selector symbols.. 6
Oven Functions 6
Oven Functions 6
Display description 7
Setting the time 7
Hiding and un-hiding the clock 8
Oven use. 8
Oven functions 8
Oven timer operation 8
Microwave 10
Quick start 10
Defrost by time 10
Defrost by weight 11
Combined functions 11
Safety instructions 12
Safety block. 12
Showroom mode 12
TEKA HYDROCLEAN® FUNCTION. 12
Programming the Teka Hydroclean® function. 12
Modo Showroom 22
Mode démonstration 42
Ausstellungs-Modus 52
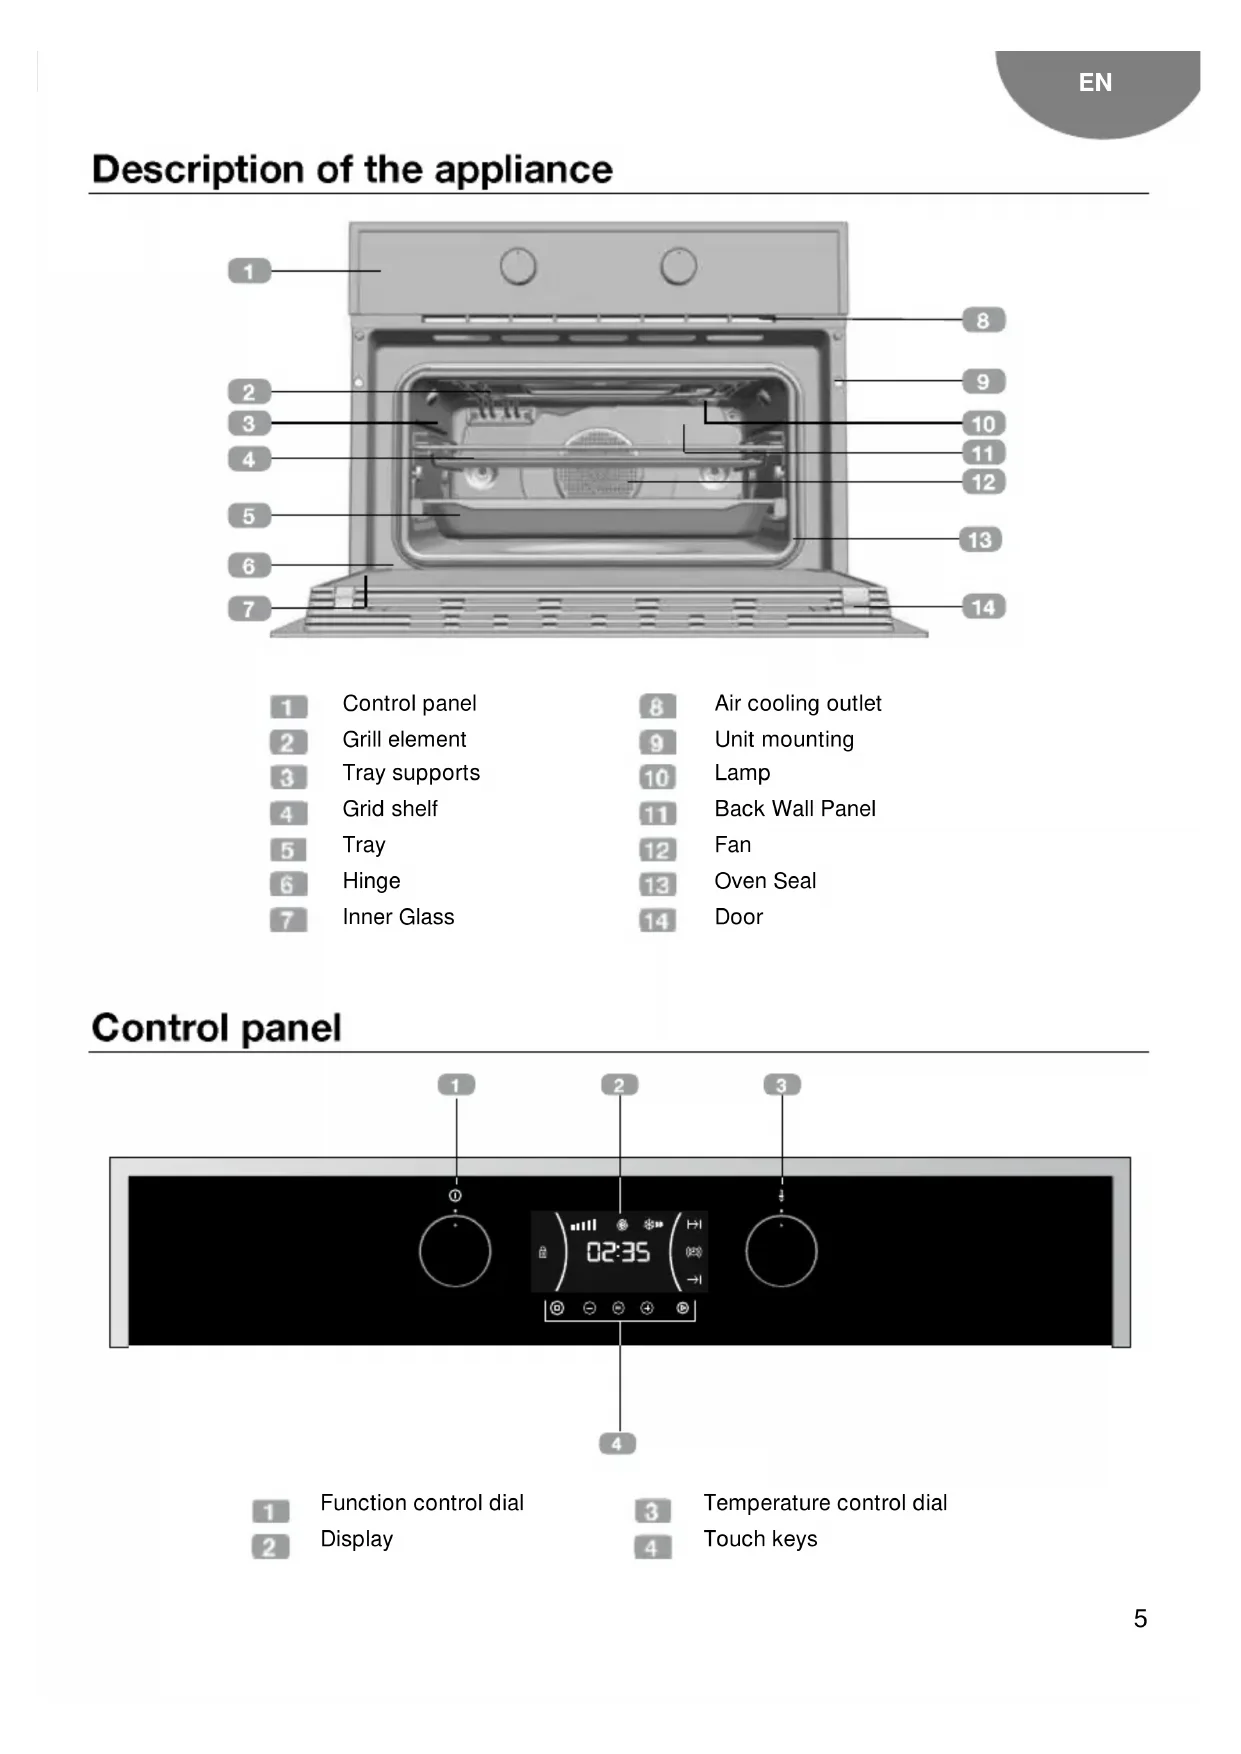
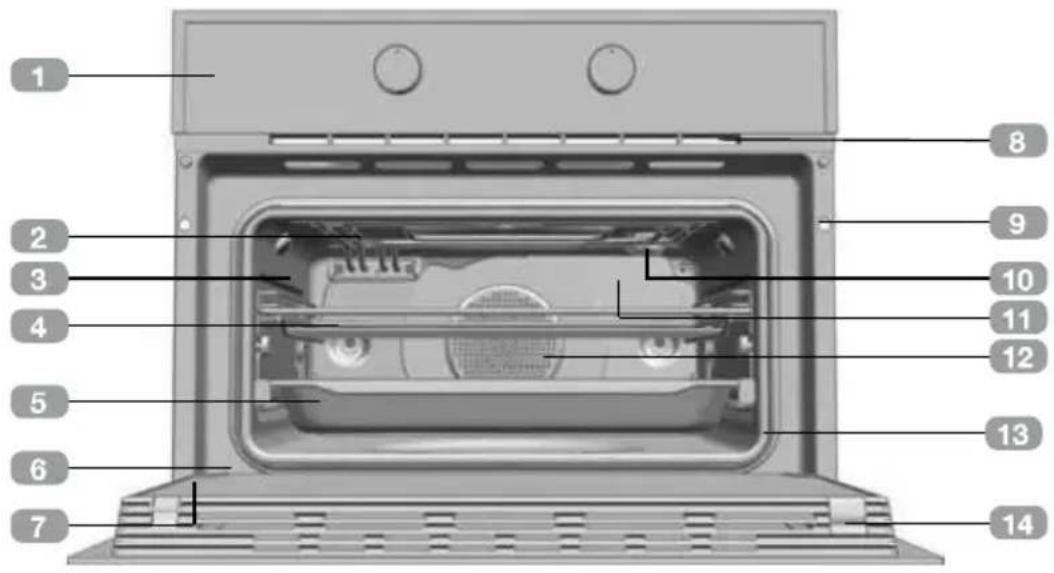
Description of the appliance
1 Control panel
2 Grill element
3 Tray supports
4 Grid shelf
5 Tray
6 Hinge
7 Inner Glass
Air cooling outlet
Unit mounting
10 Lamp
Back Wall Panel
Fan
13 Oven Seal
14 Door
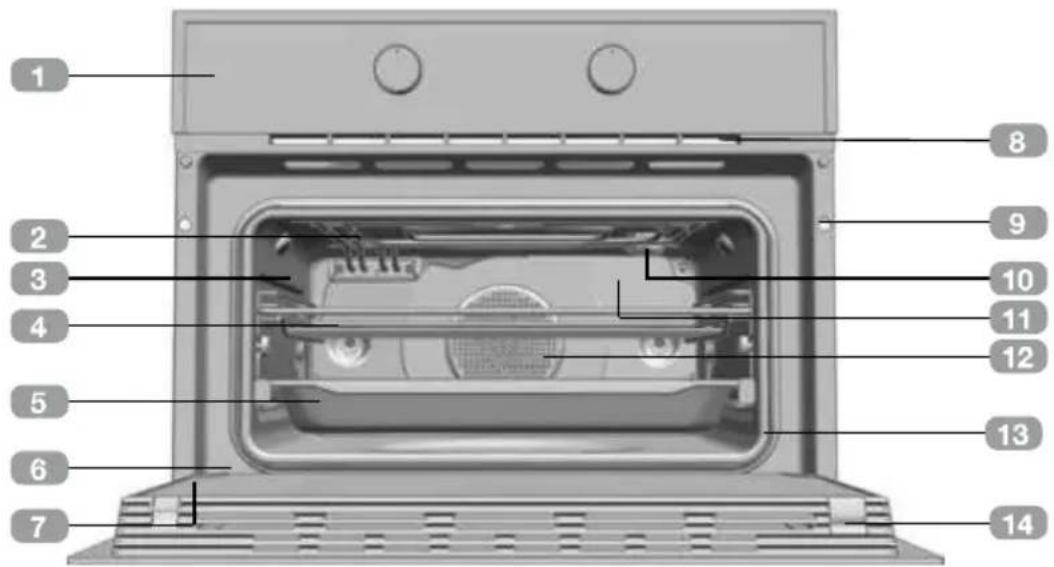
Control panel
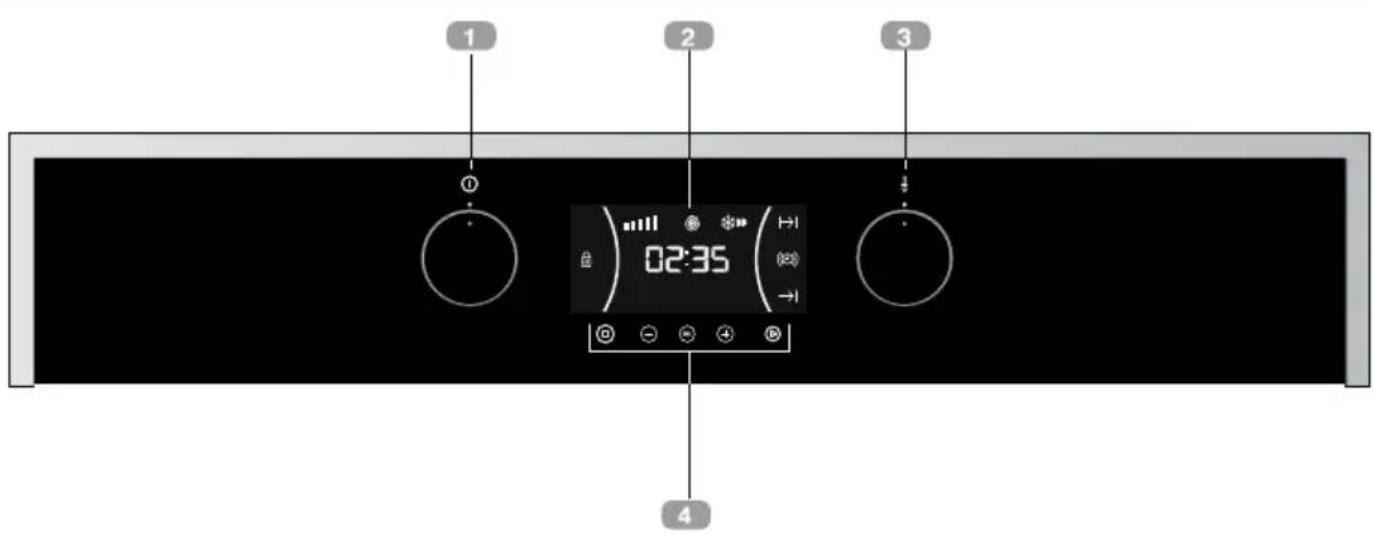
Function control dial
2 Display
3 Temperature control dial
4 Touch keys
Function selector symbols

HLC 844 C Model


ECO


Oven Functions

INFORMATION
For a description of how to use each of the features, see the cooking guide that comes with your oven.

。
OVEN SWITCH-OFF

CONVENTIONAL

MAXIGRILL

CONVENTIONAL WITH FAN

MAXIGRILL WITH FAN

LOWER ELEMENT

TURBO + LOWER ELEMENT

TURBO

ECO

MICROWAVE + HOT AIR

MICROWAVE + GRILL

MICROWAVE
Microwaves Power Levels
| Microwave power output | Foods |
| 200 | Slow defrosting for delicate foods; keeping food hot |
| 400 | Cooking with little heat; boiling rice Rapid defrosting, heating baby food |
| 600 | Heating and cooking food |
| 800 | Cooking vegetables and food Cooking and heating carefully, Heating and cooking small portions of food |
| 1000 | Rapidly heating liquids |
Display description
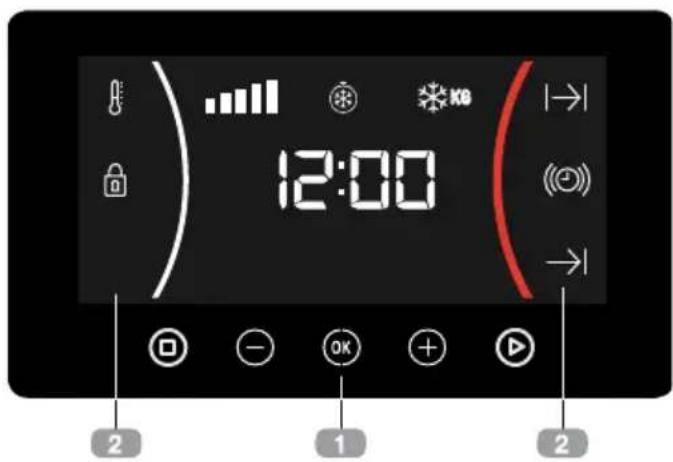
KEYS
and: Enable you to program the functions.
: Enable you to start the cooking functions.
: Enable you to stop the cooking functions.
2 SYMBOLS
WARNING TIMER: Lights up when the clock/timer is selected. Generates an acoustic signal when the time is up. The oven does not turn off at the end of the timer period. This function can also be used while the oven is cooking.
and PROGRAMING: Lights up to indicate that the oven is programed (cooking time, stop time or total).
- Cooking Time: This program allows you to program the cooking time, after which the oven will turn off automatically.
-
Cooking Stop Time: This setting allows you to program the time for cooking to stop, after which the oven will turn off automatically.
-
and Cooking Time and Cooking Stop Time: This setting allows you to program the cooking time and cooking stop time. The oven switches on automatically at the set time and operates for the selected cooking time (Cooking Time). It then switches off automatically at the indicated time (Cooking Stop Time).
SAFETY BLOCK: Indicates that the touch keys are blocked, preventing modifications by small children.
Other functions
HEATING: Indicates that the oven is transmitting heat to the food.
DEFROSTING BY TIME: Lights up while the defrosting by time function is on.
DEFROSTING BY WEIGHT: Lights up while the defrosting by weight function is on.
WARNING
The sensitivity of the touch keys adapts continually to environmental conditions. Make sure the surface of the control panel is clean and free of obstacles when plugging in the oven.
If the display does not respond correctly when you touch the keys, unplug the over for a few seconds and then plug it in again. Doing this causes the sensors to adjust automatically so that they will react once more to fingertip control.
SETTING THE TIME
- When you plug the oven, you will see the clock flashing 12:00.
Press or to adjust the hours.
Press to confirm the hours.
- Press or to adjust the minutes.
Press OK to confirm the minutes.
If you wish to modify the time, press or until the time starts flashing. Press OK and follow the instructions in the previous points.
WARNING
In the event of power failure, the clock settings will be erased and 12:00 will flash on the clock display. Reset it and program again.
If you wish to hide the clock press 5 seconds.

If you wish to see the clock on the display again, press for 5 seconds.
Oven use
OVEN FUNCTIONS
- After setting the clock, the oven is ready for use. Select a cooking function with the function selector dial and temperature with the temperature control dial.

INFORMATION
In models with an electronic temperature control, when the selector switch is turned, the display will show the temperature.
After selecting the temperature, the clock will automatically reappear.
- You will notice that the symbol lights up during cooking to indicate that heat is being transmitted to the food. This symbol disappears when the selected temperature has been reached.
- Set the controls to to turn off the oven.
INFORMATION
When a cooking cycle begins, the oven will automatically display the total the time for the cycle progress, if the cooking time or cooking stop time have not been set.
OVENTIMER OPERATION
Programming the buzzer
- Touch or until the symbol on the display starts flashing, then press OK The indication "0_00" will appear on the display.
- Select the time after which you want the alarm to sound by pressing or . You will hear 2 beeps to confirm that the time has been set and the clock will start counting down from the selected time. The symbol will flash slowly.
- Once the time has expired, an acoustic signal will sound for 90 seconds and the symbol will flash quickly.

NOTE
With the Buzzer function, the oven will not turn off when the time expires.
- Touch any key to stop the alarm. The symbol will then disappear.
If you wish to modify the time on the buzzer, press or until the flash and the hours are not flashing; then press and repeat the steps shown. Upon entering the timer control, the time currently remaining will appear which you will be able to adjust.

NOTE
With the Buzzer function, the remaining time will show permanently on the display. With this programed function, it is not possible to view the time or the total programmed cooking time.
Programming Cooking Time
- Select a function and a cooking temperature using the oven commands.
- Press or ④ until the | | symbol on the display starts flashing, then press OK The indication "0_00" will appear on the display.
- Select the time after which you want the alarm to sound by pressing or .
- Press OK to select the option. You will hear 2 beeps to confirm that the time has been set and the clock will start counting down from the selected time. The symbol will flash slowly.
-
Once the cooking time is up, the oven will turn off, an alarm will sound and the symbol will flash.
-
Press to stop the alarm and turn off the | | symbol. The oven will switch on again.
- Set the controls to ① position to turn off the oven.
You can change the remaining cooking time at any time by touching or until the symbol starts to flash quickly. Press OK to change the time.
Programming the Cooking Stop Time
- Select a cooking function and a temperature.
- Press or + until the symbol on the display starts flashing, then press OK. The current time will appear on the display.
- Select the time after which you want the alarm to sound by pressing or +
- Press OK to confirm. You will hear 2 beeps to confirm that the time has been set and the selected cooking stop time appears on the display. The symbol will flash slowly.
- When the cycle is finished, the oven will turn itself off, an alarm will sound and the symbol will flash quickly.
6 Press to stop the alarm and turn off the symbol. The oven will switch on again. - Set the controls to position to turn off the oven.
You can change the remaining cooking time at any time by touching or until the symbol starts to flash quickly. Press OK to change the time.
Programming the Cooking Time and Cooking Stop Time
- Select a cooking function and a temperature.
- Press or until the symbol on the display starts flashing, then press OK The indication "0_00" will appear on the display.
- Select the cooking time by touching or +. You will hear 2 beeps, the remaining time will appear on the display and the symbol will flash.
- Press to select the option.
- Press or until the symbol on the display starts flashing, then press OK The current time will appear on the display.
- Select the cooking end time by pressing or
- Press OK to select the option.
- The oven will remain disconnected with the | | and symbols lit up. The oven is now programed.
- When it is time to start cooking, the oven will turn on and will operate for the programmed time.
- While cooking, the remaining cooking time will be displayed and the | | symbol will flash.
- When the cooking time is up, the oven will turn off, a buzzer will sound, and the symbol will flash.
- Press any key to stop the buzzer and turn off the | | symbol. The oven will switch on again.
- Set the controls to position to turn off the oven.
You can change the remaining cooking time at any time by touching or until the
symbol starts to flash quickly. Press change the time.
MICROWAVE
- Select the microwave function.
-
The display shows 00:30 (Quick start function) by default. Press or until the display shows 1:00.
-
Press OK confirm.
-
The display shows the default cooking time. Select the desired cooking time by pressing or
- Press OK to confirm.
- The display shows the default Power setting. Select the desired power setting by pressing or +
- Press OK to confirm.
- Press to start the microwave function with the desired parameters.
QUICK START
- Select the microwave function.
- Press and the microwave starts immediately to operate in the Microwave function at maximum power for 30 seconds.
- If you want to increase the operating time press again. Each time you press this key the operating time will be increased by 30 seconds.
DEFROST BY TIME
- Select the microwave function.
- Press or until the symbol appears on the display.
- Press OK to select the option.
-
The display shows the default defrost time. Select the desired cooking time by pressing or +
-
Press to start the defrost by time function with the desired parameters.

NOTE
See Cooking Guide for advice on defrosting times.

INFORMATION
When the display shows the word "Turn", open the door, turn the food and press to continue.
DEFROST BY WEIGHT
- Select the microwave function.
- Press or ④ until the symbol appears on the display.
- Press select the option.
- The display Fehovas " ” blinking default. Select the desired defrost option by pressing or .
- Press OK to confirm.
- The display shows default weight blinking. Select the desired weight by pressing or
- Press OK to confirm.
- Press to start the defrost by weight function with the desired parameters.
The following table shows the defrosting by weight function programs, indicating weight intervals, and defrosting and standing times (in order to ensure the food is of a uniform temperature):
| Prog. | Food | Weight (kg) | Time (min) | Standing time (min) |
| F01 | Meat | 0.10 – 2.00 | 2:10 – 43 | 20 – 30 |
| Prog. | Food | Weight (kg) | Time (min) | Standing time (min) |
| F02 | Poultry | 0.10–2.50 | 2:20–58 | 20–30 |
| F03 | Fish | 0.10–2.00 | 2–40 | 20–30 |
| F04 | Fruit | 0.10–0.50 | 2:36–13 | 10–20 |
| F05 | Bread | 0.10–0.80 | 2:25–19 | 10–20 |

INFORMATION
When the display shows the word "Turn", open the door, turn the food and press to continue.
COMBINED FUNCTIONS
- Select a microwave + conventional oven function with the function selector.
- The display shows the default cooking time. Select the desired cooking time by pressing or +
- Press OK to confirm.
- The display shows the default Power setting. Select the desired power setting by pressing or +
- Press confirm.
- Press to start the function with the desired parameters.

NOTE
The temperature can be changed anytime rotating the temperature control dial.

NOTE
The maximum power that can be selected is 600 W.
Safety instructions
SAFETY BLOCK
This function can be selected at any time while using the oven.
To activate the function, press or a few seconds until you hear a beep and the symbol appears on the display. The oven is locked.
If the oven is off and you activate the safety block function, the oven will not work even if a cooking function is selected.
If this function is activated while you are cooking, it will only lock the display and keys.
To deactivate the safety block function, press for a few seconds until you hear a beep.
SHOWROOM MODE
The showroom mode is used in showrooms, to show the clients how the oven works as described in every function, but there's no activation of the heating loads.
To activate the showroom mode press and OK
To deactivate the function press and OK again.
Teka Hydroclean® function
This function makes it easy to remove grease and other food debris that may have stuck to the sides of the oven.
For easier cleaning, do not allow dirt to accumulate. Clean the oven frequently.
PROGRAMING THE TEKA HYDROCLEAN® FUNCTION

WARNING
Do not pour water into a hot oven as this can damage the enamel of the oven.
Always run the cycle on a cold oven. The result could be affected and the varnish damaged if it is run when the oven is too hot.
First remove the trays and all accessories from the oven interior, including the tray supports and telescopic guide rails.
To do this, follow the instructions in the installation and maintenance guide accompanying the oven.
- With the oven cold, spread a cloth out on the bottom of the oven.
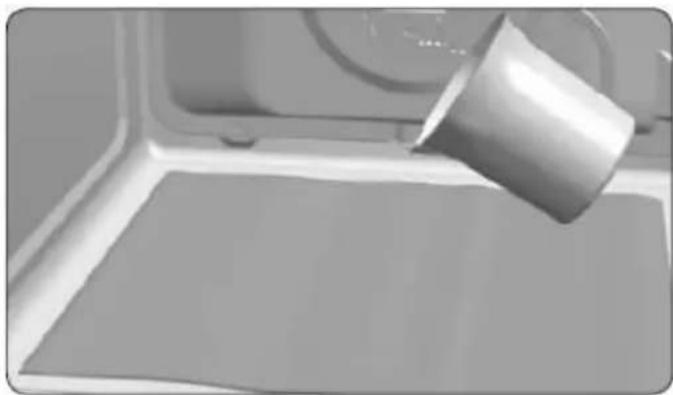
- Gently pour 200ml of water into the bottom of the oven cavity.

INFORMATION
For best results, add a teaspoon of mild washing up detergent to the glass of water before pouring onto the cloth
-
Turn the control dial to position
-
Set the temperature to 90^
-
Program a duration of 4 minutes on the timer.
-
After 4 minutes, an alarm will sound and the oven will stop heating.

- Turn the control dial to position
- Wait for about 20 minutes for the interior of the oven to cool.

IMPORTANT
Do not open the oven until the coolin phase is complete.
This is necessary for the Hydroclean function to work properly.
- Any traces of dirt and excess water can now be removed from the oven with the damp cloth.
The Hydroclean® function takes place at a low temperature. However, cooling times can vary depending on the room temperature.

WARNING
Before touching the inside surface of the oven, make sure that it has cooled
If a deeper clean is required after using the Hydroclean® function, use neutral detergents and non-abrasive sponges.
Indices
Descrição doorno 15
Painel de commandos 15
FUNÇA O TEKA HYDROCLEAN® 22
programar a funcao teka Hydroclean® . 22
Descrição doorno
PROGRAMAR A FUNCão TEKA HYDROCLEAN®

ATENÇAO
For a description of how to use each of the features, see the cooking guide that comes with your oven.

SOLERA

TURBO + SOLERA

DESCONEXION DEL HORNO

CONVENCIONAL

TURBO

ECO

MAXIGRILL

MICROONDAS + AIRE CALIENTE

CONVENCIONAL CON TURBINA

MICROONDAS + GRILL

MAXIGRILL CON TURBINA

MICROONDAS
PROGRAMAR HYDROCLEAN®
LA FUNCION
TEKA

ATENCLON
FONCTIONNEMENT MANUEL
TEKA HYDROCLEAN® FUNCTIE 62
gill 1i jll gii . wjll g
4
15 biai. 2000 2000 2000 2000 2000 2000 2000 2000 2000 2000 2000 2000 2000 2000 2000 2000 2000 2000 2000 2000 200
国
J 12 J 12 12 12 12 12 12 12 12 12 12 12 12 12 12 12 12 12 12 12 12 12 12 12 12 12 12 12 12 12 12 12 12 12
gabll 1
1
gag>1 jyj+ gbi2
OK 0
bi 00
a00"0.00" ygall
biaill aaiiill cgs ggl 3
OK 4
a 1 a 1 1 1 1 1 1 1 1 1 1 1
1
2
00
: (o 0 0 0 0 0 0 0 0 0 0 0 0 0 0 0 0 0 0 0 0 0 0 0 0 0
| العربية العربية (العربية) | العربية العربية (العربية) | العربية العربية (العربية) | PLEAES | العربية العربية |
| 30-20 | 2:10-43 | 2.00-0.10 | ↓ | F01 |
| 30-20 | 2:20-58 | 2.50-0.10 | ↓↓↓ | F02 |
| 30-20 | 2-40 | 2.00-0.10 | ↓↓↓ | F03 |
| 20-10 | 2:36-13 | 0.50-0.10 | ↓↓↓ | F04 |
| 20-10 | 2:25-19 | 0.80-0.10 | ↓↓ | F05 |
国
"Turn 1000" a1s 2000000000000000000000000000000000000000000000
0
is jiuall palell
a 1
ai a ai 分母最小值为 k .
2
0j+
OK 3
1 4
-+
OK bai.5
aagabll cllcyl pluily aeggl 6
国
.
国
600 1a jnnn nn nnnn
Jal 1
j
.
0K
"g 1
1 1
1 1
Baa 1a
OK
Lg.
Jg 1
OK
0K
5