Blank Canvas AE2502 - Vacuum Cleaner SOLAC - Free user manual and instructions
Find the device manual for free Blank Canvas AE2502 SOLAC in PDF.

User questions about Blank Canvas AE2502 SOLAC
0 question about this device. Answer the ones you know or ask your own.
Ask a new question about this device
Download the instructions for your Vacuum Cleaner in PDF format for free! Find your manual Blank Canvas AE2502 - SOLAC and take your electronic device back in hand. On this page are published all the documents necessary for the use of your device. Blank Canvas AE2502 by SOLAC.
USER MANUAL Blank Canvas AE2502 SOLAC
natural_image
Line drawing of a vertical mechanical device with a base and handle, no text or symbols present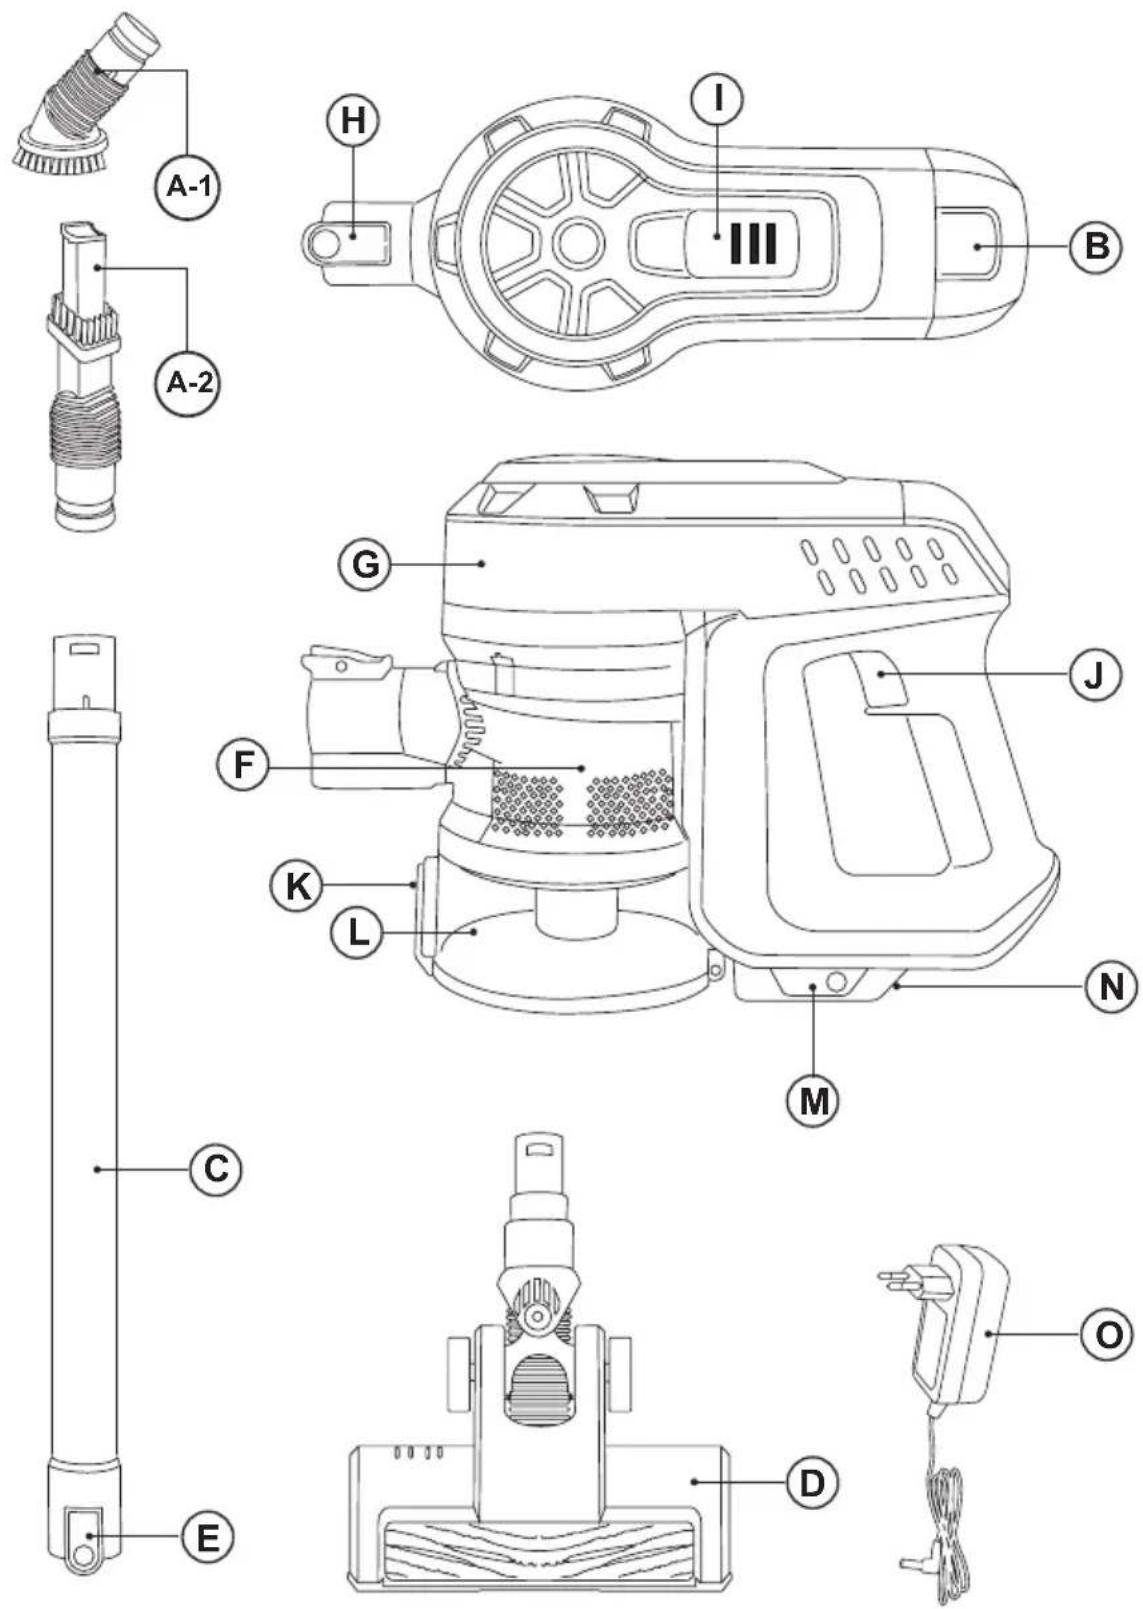
Fig.1
natural_image
Technical line drawing of a two-part electric shaver with an inset showing the internal structure (no text or symbols)Fig.2
flowchart
graph TD
    A["Component 1: Disassembly"] --> B["Component 2: Disassembly"]
    B --> C["Component 3: Disassembly"]
    C --> D["Component 4: Disassembly"]
    D --> E["Final Assembly"]

    subgraph Component 1
        F["Component 1: Disassembly"] --> G["Component 2: Disassembly"]
    end

    subgraph Component 2
        H["Component 1: Disassembly"] --> I["Component 2: Disassembly"]
    end

    style A fill:#f9f,stroke:#333
    style B fill:#ccf,stroke:#333
    style C fill:#cfc,stroke:#333
    style D fill:#fcc,stroke:#333
    style E fill:#cff,stroke:#333
Fig.3

natural_image
Line drawings of a two-stage cleaning machine with granular material and particle dispersion (no text or symbols)Fig.4 Fig 5/6 | 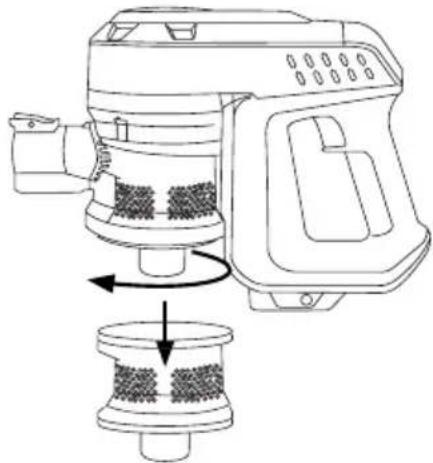 |
Fig.7 | |
Fig.8 | |
Aspirador vertical
Blank Canvas
DESCRIPCIÓN
A Accesorio 2 en 1:
Stick vacuum cleaner
Blank Canvas
DESCRIPTION
A Accessory 2 in 1:
A-1 Accessory for furniture and upholstery
A-2 Lance and brush
B Outlet filter lid
E Brush release button
F Cyclon filter + HEPA filter inside the dust tank
G Main body
H Accessories release button
I Battery status indicator
J ON/OFF Button
K Empty tank button
L Dust tank
M Lithium batteries
N Batteries release button
O Power supply
If the model of your appliance does not have the accessories described above, they can also be bought separately from the Technical Assistance Service.
USE AND CARE:
- Do not use the appliance without its filter(s) correctly in place.
- Do not use the appliance if its accessories are not properly fitted.
- Do not use the appliance to gather up water or any other liquid.
- Do not use the appliance if the on/off switch does not work.
- Remove the batteries from the appliance if you are not going to use it for some time.
- Store this appliance out of reach of children and/or persons with physical, sensory or reduced mental or lack of experience and knowledge.
- Keep the appliance in a dry, dust-free place, out of direct sunlight.
- Do not work on areas where there are metal
objects, such as nails and/or screws.
- Never vacuum hot or sharp objects (cigarette butts, ashes, nails, etc.).
- Do not open the battery/ies under any circumstances whatsoever.
- When the battery/ies is not in use, keep it away from other metal objects like paper clips, coins, keys, screws ... that could connect a terminal to another.
- Do not short-circuit the battery terminals as this may cause an explosion or fire.
- The battery/ies should be stored at a temperature of below 40^ C.
- Never leave the appliance connected and unattended if is not in use. This saves energy and prolongs the life of the appliance.
- Do not use the appliance with pets or animals.
- Recharge the battery/ies only with the charger supplied by the manufacturer. A charger that is suitable for one type of battery may cause explosion or fire hazard when used with other battery/ies.
- Use the device only with the battery/ies for which has been specifically designed. The use of any other battery/ies can cause an explosion or fire hazard.
INSTALLATION
- Be sure to remove all packaging material from inside the appliance.
- Place the battery in the device.
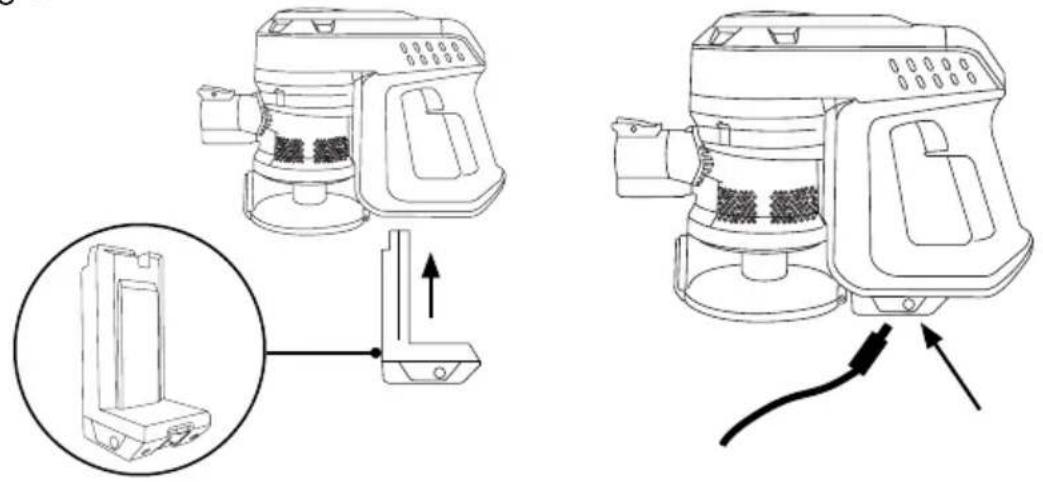
CHARGING THE BATTERY
- Caution: A new battery is not fully charged and must therefore be charged before the appliance is used for the first time.
- Charge the battery at an atmospheric temperature of between 4 and 40°C.
- Be sure to place the battery correctly located on the bottom of the handle.
- Plug the charger (O) into the mains.
- A pilot light will come on to indicate that the charger is ready to begin charging the battery.
- Approximately 4 to 5 hours are needed for a complete charge of the battery. Never attempt to over-charge the battery (although it is recommended that the first charge of the battery be of 6 hours in duration).
- Connect the charger to the jack using the
socket on the appliance. The socket is located at the lower part of the handle where you can find the battery. (Fig. 1)
- The pilot light will come on to indicate that the charger is charging the battery.
- When the battery is charged disconnect the charger from the mains supply.
- NB: Do not use the appliance while it is connected to the charger.
HOW TO CHECK THE BATTERY'S CHARGE LEVEL:
- Turn on the vacuum cleaner with the ON / OFF button during 1 second.
- If no pilot light lights up, this means that the battery is completely flat.
- NB: For a long battery life, it is advisable to charge the battery, only, when it has run out completely.
INSTRUCTIONS FOR USE
BEFORE USE:
- Make sure that product's packaging has been removed.
- Before using this product for the first time, it is important to make a full charge of batteries.
- Prepare the appliance according to the function you wish to use:
USE:
- Turn the appliance on, by using the on/off button during 1 second.
- The pilot light comes on.
- To select the TURBO speed press twice on the ON / OFF button
- IMPORTANT: To turn the appliance on, press the ON / OFF button for 1 second.
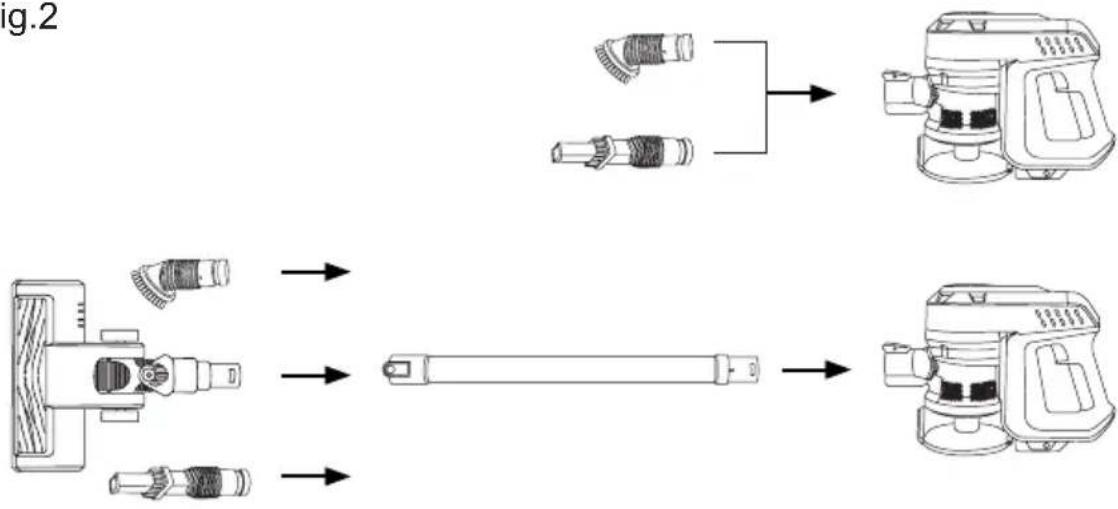
FITTING AN ACCESSORY TO THE HAND VACUUM OR TO THE ALUMINIUM EXTENSION TUBE:
- The hand vacuum is designed in such a way that it allows the following accessories to be fitted: (use the combination that best meets your requirements). (Fig.2).
- Brush nozzle: equipped with a brush on its tip that allows brushing the surface while acting.
- Nozzle 2 in 1 lance / brush: Especially indicated for slots and corners of difficult access.
- Motorized brush: You can use any type of surface: parquet, tiles, carpets and carpets.
ONCE YOU HAVE FINISHED USING THE APPLIANCE:
- Stop the appliance by pressing the ON / OFF button twice if you are using the vacuum cleaner at ECO speed or once if you are using the vacuum cleaner at TURBO speed.
- Remove the battery from the appliance if you are not intending to use the appliance during an extended period.
- Clean the appliance.
CLEANING
- Disconnect the battery charger from the mains and allow it to cool before undertaking any cleaning task.
- Clean the equipment with a damp cloth with a few drops of washing-up liquid and then dry.
- Do not use solvents, or products with an acid or base pH such as bleach, or abrasive products, for cleaning the appliance.
- Never submerge the appliance in water or any other liquid or place it under running water.
- Empty the dust box when it is full (observation facilitated by transparent windows), or when vacuuming power is notably reduced.
- Open the lid of the dust box and empty the contents into the appropriate waste disposal receptacle. (Fig.3)
- Check the condition of the cyclone.
- Close the lid of the dust box.
CHANGING THE FILTERS:
- Dust tank HEPA filter (high efficiency air filter that efficiently retains spores, ash, sawdust, pollen...), it is advisable to change it a least once a year or after every 50 hours of use, or if its potency diminishes remarkably.
- Air outlet filter, it is advisable to be changed at least once a year or every 100 hours of the appliance's use.
TO REMOVE THE FILTERS:
- Turn the lower part of the tank clockwise and pull outwards. (Fig.4)
- Remove the cyclone located inside the tank by
turning it to the left as indicated by the arrows and extract. (Fig.5)
- Remove the filter from its housing, clean it and if necessary change it. (Fig.6).
- To reassemble the filter, proceed with the above instructions, in reverse order.
CLEANING THE ROTARY BRUSH:
- To remove the brush:
- At the bottom of the shoe, turn the rotary knob to the left to unclog the brush. (Fig.7).
- Remove the brush and clean.
- To reassemble, follow the above instructions but in reverse.
SUPPLIES
- Supplies can be acquired from distributors and authorised establishments (such as filters, etc...) for your appliance model.
- Always use original supplies, designed specifically for your appliance model.
- These supplies are available in specialist shops.
HOW TO REMOVE THE BATTERIES FROM THE INTERIOR OF THE DEVICE:
- CAUTION: It is important that the batteries are fully discharged prior to its withdrawal from the apparatus.
- CAUTION: the appliance must be disconnected from the supply mains when removing the batteries.
TO REMOVE THE BATTERIES, ONCE THE LIFE OF THE APPLIANCE, PROCEED AS FOLLOWS:
- Press the battery removal button and stretch the battery out of the vacuum cleaner body. (Fig. 8)
Aspirateur vertical
Blank Canvas
DESCRIPTION
A Accessorio 2 in 1:
M Akumulatory litowe
J ON/OFF (BE/KI) gomb
This product enjoys the recognition and protection of the legal guarantee in accordance with current legislation. To enforce your rights or interests you must go to any of our official technical assistance services.
You can find the closest one by accessing the following web link: http://solac.com
You can also request related information by contacting us by phone.
You can download this instruction manual and its updates at http://solac.com
DE) GARANTIE UND TECHNIS- CHER SERVICE
Unit 25 & 26, San Croy Office Park, Die Agora Road, Croydon, Kempton Park, 1619
Johannesburg
(+27) 011 392 5652
sOlac
what we do, we do well
Español / ES
English / EN
Français / FR
Deutsch / DE
Português / PT
Italiano / IT
Català / CA
Nederlands / NL
Česky / CS
Polski / PL
Slovenský / SK
Magyar / HU
българск / BG
Română / RO
العربيya / AR