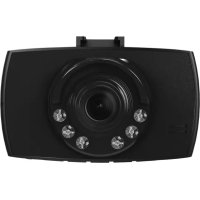
Dashcam 60 - Dashcam HAMA - Free user manual and instructions
Find the device manual for free Dashcam 60 HAMA in PDF.

| Product type | Dashcam |
| Brand | Hama |
| Model | Dashcam 60 |
| Dimensions (L x H x D) | 47 x 58 x 30 mm |
| Screen | 1.5 inches |
| Maximum video resolution | 1080p (1440 x 1080) |
| Maximum photo resolution | 12 megapixels |
| File formats | Video: AVI; Photo: JPEG |
| Memory card | microSD up to 32 GB |
| Power supply | Car charger 12-24 V, output 5 V / 1 A, cable 2 m |
| Built-in battery | Lithium polymer 3.7 V / 130 mAh |
| Battery life | Approximately 2-3 minutes (buffer function) |
| Loop recording | Yes (1, 2, 3 or 5 minutes) |
| Motion detection | Yes |
| G-sensor (shock detection) | Yes (sensitivity 2G, 4G, 8G or off) |
| Audio recording | Yes (activatable) |
| Date/time stamp | Yes |
| Photo burst mode | Yes (5 shots) |
| Screen saver | Yes (3, 5 or 10 minutes) |
| Automatic power off | Yes (1 or 3 minutes of inactivity) |
| Included accessories | Suction cup mount, miniUSB charger, microSD card reader |
| Maintenance | Slightly damp lint-free cloth; avoid harsh detergents |
| Safety | Do not open, use only in vehicle, obey traffic laws |
Frequently Asked Questions - Dashcam 60 HAMA
User questions about Dashcam 60 HAMA
0 question about this device. Answer the ones you know or ask your own.
Ask a new question about this device
Download the instructions for your Dashcam in PDF format for free! Find your manual Dashcam 60 - HAMA and take your electronic device back in hand. On this page are published all the documents necessary for the use of your device. Dashcam 60 by HAMA.
USER MANUAL Dashcam 60 HAMA
natural_image
Line drawing of a camera with concentric rings and a handle (no text or symbols)OperatingInstructions
Bedienungsanleitung
Moded'emploi
Instruccionesdeuso
Návodk p oužití
Návodnapoužitie
Manualdeinstruções
Manualdeutilizare
C
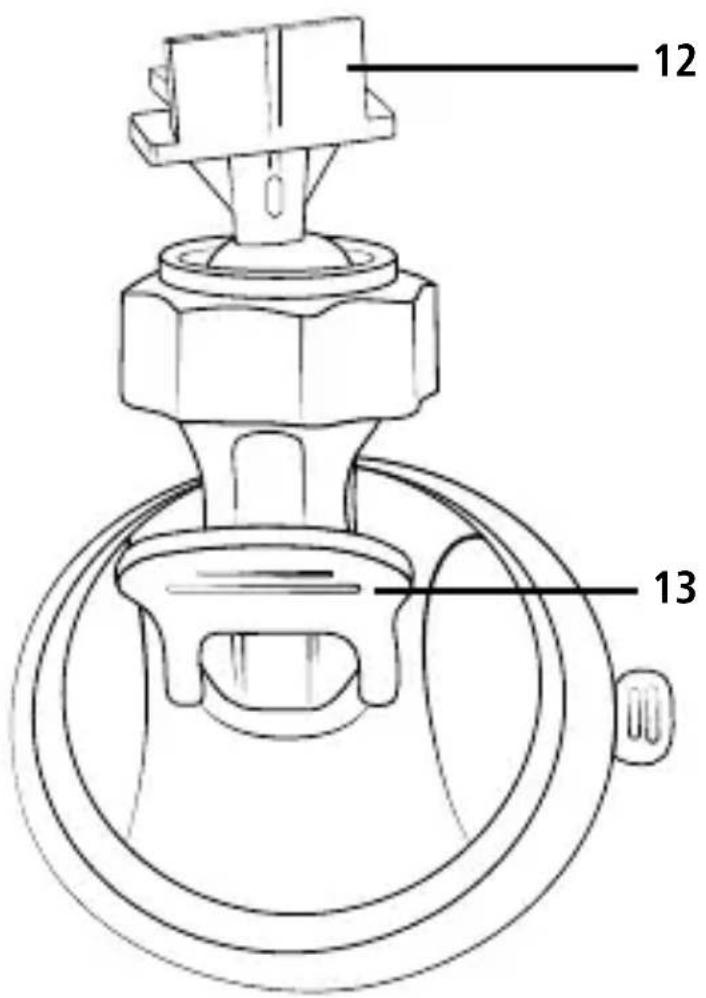
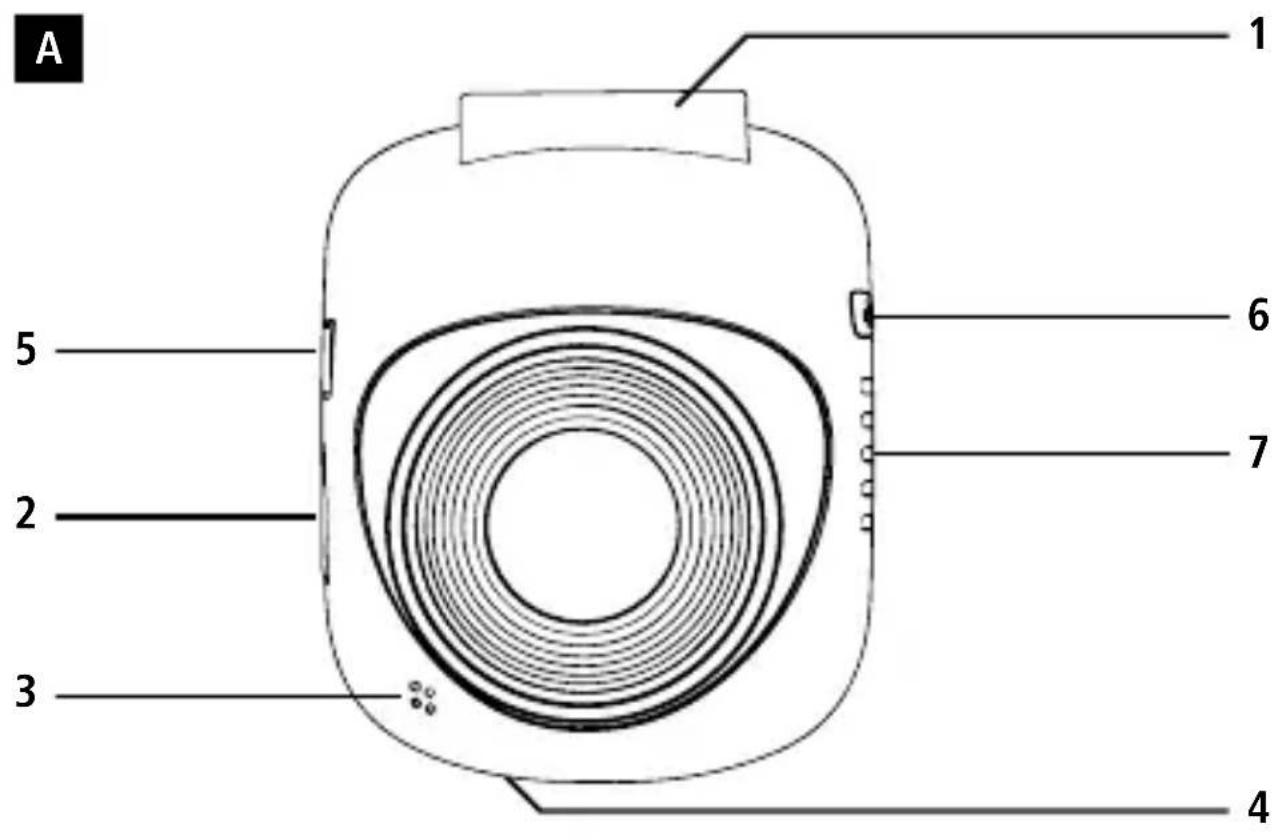
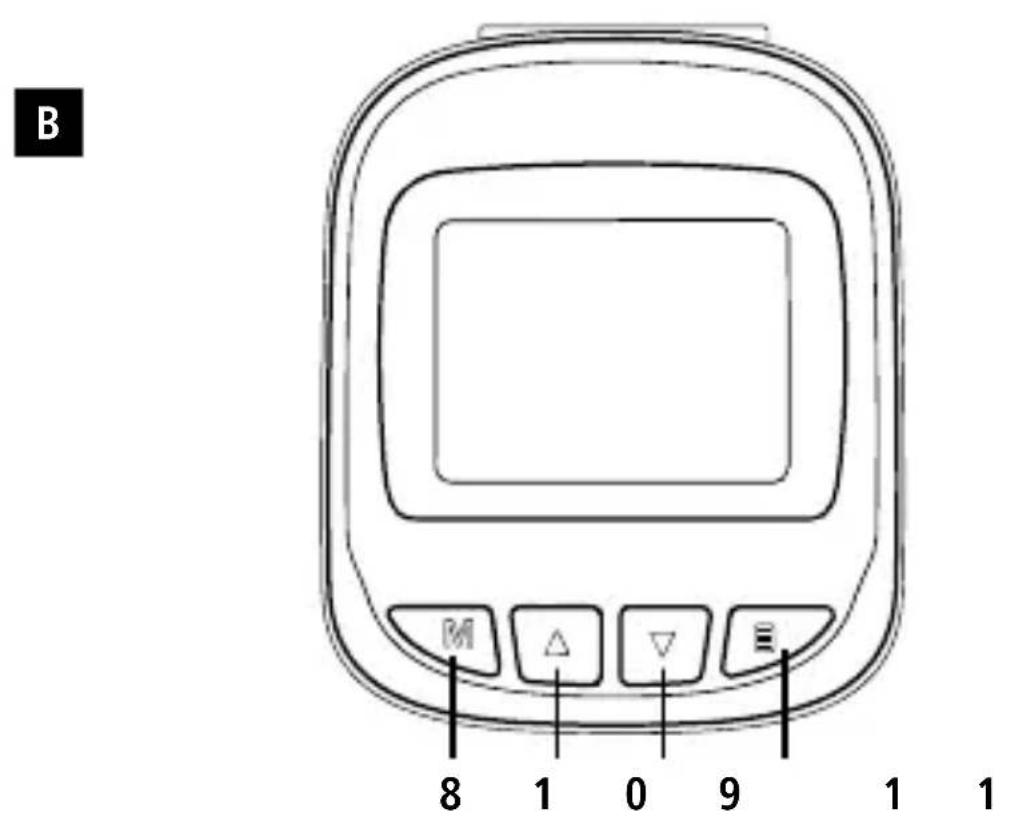
Controlsanddisplays
| A | 1.Attachmentpointforsuctioncupholder2.microSDcard s l o t3.Microphone4.Reset5.Mini-USBchargingsocket6.Power 7.Speaker |
| B | 8.Mode9. Navigationbutton ▼10. Navigationbutton ▲11. O K |
| C | 12. D ashcamholder13. L ockinglever |
Overviewofsymbols
 | Video mode |
 | Photomode |
 | Playbackmode |
 | Generalsettings |
 | Battery indicator |
 | Remainingstoragetime |
 | |
 | Contrast |
 | Selectedphoto/ v ideoquality |
Video mode:
| Timeloop | |
| Motiondetectorisactivated | |
| Memory card recognised | |
| Memorycard n otrrecognised | |
| Video recording in progress |
Photo mode:
 | Whitebalance |
 | Continuous shooting is activated |
 | Memory card recognised |
 | Memorycard n otrrecognised |
Thankyouforchoosinga H amaproduct.
Take your time and read the following instructions and information completely. Please keep these instructions in a safe place for future reference. If you sell the device, please pass these operating instructions onto thenewowner.
1. ExplanationofWarningSymbolsandNotes
Riskofelectricshock

This symbol indicates product parts energized with a dangerous voltage of sufficient magnitude to constitute a riskofelectricshock.
Warning

This symbol is used to indicate safety instructions or to draw your attention to specific hazards and risks.
Note

This symbol is used to indicate additional information or important notes.
2.PackageContents
- D ashcam60
• M ini-USBvehiclecharger - S uctioncupholder
- m icroSDcard reader
• T heseoperatinginstructions
3.SafetyNotes
- Thisproductisintendedforprivate,non-commercialuseonly.
- Usetheproductforitsintendedpurposeonly.
- Protect the product from dirt, moisture and overheating, and only use it in a dry environment.
- Donotdroptheproductanddonotexposeittoanymajorshocks.
- Do not operate the product outside the power limits given in the specifications.
- Donotbendorcrushthecable.
- Since the battery is integrated and cannot be removed, you will need to dispose of the product as a whole. Do this incompliance with the legal requirements.
- Donotopenthedeviceorcontinuetooperateitifitbecomesdamaged.
- Keep this product, as all electrical products, out of the reach of children!
- When using this product, observe the applicable local traffic laws and regulations.
• Take care that components such as airbags, safety areas, controls, instruments, etc. and visibility are notblocked or restricted. - Do not allow yourself to be distracted by the product when driving a vehicle. Always pay attention to the surrounding traffic and you're environment.
- Check that the product is safely mounted before beginning your journey.
- Disposeofpackagingmaterialimmediatelyaccordingtolocallyapplicableregulations.
- Do not modify the product in any way. Doing so voids the warranty.
- Do not throw the battery or the product into fire.
- Donottamperwithordamage/heat/disassemblethebatteries/rechargeablebatteries.
Riskofelectricshock

- Donotopenthedeviceorcontinuetooperateitifitbecomesdamaged.
- Donotusetheproductifthechargingcable,adaptercableorpowercableisdamaged.
- Do not attempt to service or repair the device yourself. Leave any service work to qualified experts.
4. Legal regulations/limitations when operating dashcams
Note

- The information on legal regulations set out in these instructions covered only the German regulations and laws at the time of printing. Before using the product in other countries, find out about the applicable regulations!
- When using the product on the road, different regulations can apply depending on the law of the respective country.
- In some jurisdictions, the use of dashcams is regulated separately or prohibited. Get to know the lawsandguidelinesbefore u singthedashcam.
- Pay attention to the applicable data protection regulations before installing and using the product.
- Observe the applicable regulations for recording and storing video and image files.
5. Properuse
• T hisproductisintendedforuseonlyinvehicles.
- Respect the personal and property rights of others. Do not make recordings of other people with theDashcam.
- Observe the right to one's own image and spoken word when recording.
- If the product will not be used for a long period of time, remove it from the windscreen to avoid sun and temperature-related damage.
6. Getting Started
Warning- R iskofinjury!

- When using this product, observe the applicable local traffic laws and regulations.
- Take care that components such as airbags, safety areas, controls, instruments, etc. and visibility are not blocked or restricted.
- Do not allow yourself to be distracted by the product when driving a vehicle. Always pay attention to the surrounding traffic and your environment.
Note

- Before mounting the holder, check the installation options in your vehicle. If in doubt, consult the manualforyourvehicleorcontactthemanufacturer.
- Neverapplyforcewhenusingtheproductorduringinstallation.
- Check that the product is safely mounted before beginning your journey
6.1 Mountingthesuctioncupholder
- Removetheprotectivefilmfromthesuctioncup.
- Openthelockinglever(13)ofthesuctioncup.
- Position the holder with the suction cup on a clean, even mounting surface (e.g. glass pane).
- Lightly press the holder onto the desired mounting surface and close the locking lever (13) to fasten theholder.
• After mounting, always check to ensure the suction cup is securely attached. - To remove the suction cup from the surface, open the locking lever. Then gently pull the flap to completely releasethesuctioncup.
6.2Settingangleandtilt
The viewing angle and tilt of the holder can be continuously adjusted using a ball head.
- Alwayssettheangleandtiltwithouttheterminaldeviceinserted.
- Loosentheclampingscrewoftheballhead.
- Settheangleandtiltasdesiredandtightentheclampingscrew.
6.3 Inserting/removingtheDashcam
Note

ContinuallycheckthatthesuctioncupholderissecurelyseatedandtheDashcamissecurelyheld.
- SlidetheDashcamintotheholder(12)ofthesuctioncupholder.
- PulltheDashcamoutoftheholderbycarefullymovingtheDashcamtoandfro.
7.Operation
7.1. Connection to the vehicle's electrical system
Warning – rechargeable battery

- OnlyusesuitablechargingdeviceswithUSBconnectionsforcharging.
- As a rule, do not use charging devices or USB connections that are defective and do not try to repair them yourself.
- Donotoverchargetheproductorallowthebatterytocompletelydischarge.
- Avoid storing, charging or using the device in extreme temperatures and extremely low atmospheric pressure (forexample, athighaltitudes).
- When stored over a long period of time, batteries should be charged regularly (at least every three months).
- Connect the included Mini-USB charging cable to the Mini-USB charging socket (5) on the Dashcam and tothe vehiclesocketofthe electrical system.
- TheDashcamautomaticallyswitchesonwhentheengineisstarted.
Note- B atterycapacity

The battery has a limited life of about 2–3 minutes. This buffer function is used for continuation of the time, for example. Longer operation is possible only with a connected vehicle adapter.
Note- Constantbatteryoperation

The device is not intended for constant battery operation. This can lead to irreparable damage.
7.2.Switchingon/off
Note- A utomaticswitchingon/off

If the Dashcam is connected to a power source by means of the vehicle charger, it automatically switches on/off when the vehicle is started or switched off.
Note- C arbattery

With some vehicles, it can happen that power continues to be supplied even though the ignition has been switched off. In this case, switch off the camera manually to protect your car battery from discharge.
Press and hold Power [ ⏻] (6) for about 3 seconds to manually switch on/off the Dashcam.
7.3. Insertinga m icroSDcard
- Insert a microSD card into the microSD card slot (2) on the Dashcam.
- issownonthedisplay.
Note- M emorycard f u l l

Once the memory of the microSD card is full, the oldest video recording will be overwritten.
8.Modes
8.1 Videomode

- After switching on, the camera is in Video operating mode. 📄 appearsattheupper-leftedgeof thescreen.
• Alternatively, enable Video operating mode by repeatedly pressing [MODE] (8). - Press [OK] (11) to start/stop video recording.
- Therecordingdurationisdisplayedattheupper-leftedgeofthescreen.
8.2Photomode

- Repeatedly press [MODE] (8) to activate Photo mode. 📄 appears at the upper-left edge of the screen.
- Press [OK] (11) to take a picture.
8.3Playbackmode

- Repeatedly press [MODE] (8) to activate Playback mode. ▶ appears at the upper-left edge of the screen.
- Use the navigation buttons [▼] (9) / [▲] (10) to select the file you would like to play.
- Confirm your selection by pressing [OK] (11).
- Press [OK] (11) to start playing the video.
- Press and hold [MODE] (8) for about 3 seconds to delete a video file.
- Confirm the subsequent confirmation prompt with Delete.
- Press and hold [MODE] (8) for about 3 seconds to protect a video file.
- Confirm the subsequent confirmation prompt with Protect video.
9.Settings
9.1 Videomodesettings
- Switch to Video mode as described in section 8.1 Video mode.
- Press and hold [MODE] (8) for about 3 seconds to access video settings.
- isshownattheupper-rightedgeofthescreen.
- Use the navigation buttons [▼] (9) / [▲] (10) to navigate through the menu.
- Confirm your selection by pressing [OK] (11).
9.1.1 Resolution

Select the desired resolution (1080P 1440X1080/720P 1280X720/WVGA 848X480) of the recordedvideomaterial.
- Navigate to the Resolution menu item and confirm your selection by pressing [OK] (11). A new overviewwindowopens.
- Use the navigation buttons [▼] (9) / [▲] (10) to select the desired setting.
- Confirm your selection by pressing [OK] (11).
9.1.2 Loopfunction

Select the time interval (1/2/3/5 minutes) after which a new video recording should begin.
Select Off to deactivate this function. Now only one file will be created.
- Navigate to the Loop functionmenu item and confirm your selection by pressing [OK] (11). A new overviewwindowopens.
- Use the navigation buttons [▼] (9) / [▲] (10) to select the desired setting.
- Confirm your selection by pressing [OK] (11).
• isshownonthevideodisplay.
9.1.3 Contrast

Improvethequalityofthevideorecordingthroughcontrastadjustment(-2to+2).
- Navigate to the Contrast menu item and confirm your selection by pressing [OK] (11). A new overviewwindowopens.
- Use the navigation buttons [▼] (9) / [▲] (10) to select the desired setting.
- Confirm your selection by pressing [OK] (11).
• [EV] isshownonthevideodisplay.
9.1.4 Motiondetection

With motion detection activated, videorecording is automatically started when the camera sense vibrations (forexample, in the case of an accident).
- Navigate to the Motion detectionmenu item and confirm your selection by pressing [OK] (11). A newoverviewwindowopens.
- Use the navigation buttons [▼] (9) / [▲] (10) to select the desired setting.
- Confirm your selection by pressing [OK] (11).
- isshownonthevideodisplay.
9.1.5Watermark

With the mode activated, a time and date stamp is added to every video file.
- Navigate to the Watermark menu item and confirm your selection by pressing [OK] (11). A new overviewwindowopens.
- Use the navigation buttons [▼] (9) / [▲] (10) to select the desired setting.
- Confirm your selection by pressing [OK] (11).
9.1.6 Audiorecording

With themodeactivated, soundisrecorded in addition to the videomaterial.
- Navigate to the Audio recordingmenu item and confirm your selection by pressing [OK] (11). A newoverviewwindowopens.
- Use the navigation buttons [▼] (9) / [▲] (10) to select the desired setting.
- Confirm your selection by pressing [OK] (11).
9.1.7G-sensor

With the G-sensor activated, the video file is automatically saved when vibrations occur (for example, in the case of an accident). Here you set the sensor's sensitivity (2G/4G/8G) to vibrations.
SelectOfftodeactivatethisfunction.
- Navigate to the G-sensor menu item and confirm your selection by pressing [OK] (11). A new overviewwindowopens.
- Use the navigation buttons [▼] (9) / [▲] (10) to select the desired setting.
- Confirm your selection by pressing [OK] (11).
9.2 Photomodesettings

- Switch to Photo mode as described in section 8.2 Photo mode.
- Press and hold [MODE] (8) for about 3 seconds to access photo settings.
- iss by nattheupper-leftedgeofthescreen.
- Use the navigation buttons [▼] (9) / [▲] (10) to navigate through the menu.
- Confirm your selection by pressing [OK] (11).
9.2.1 Resolution

Select the desired resolution (VGA - 12 megapixels) of the recorded photo material.
- Navigate to the Resolution menu item and confirm your selection by pressing [OK] (11). A new overviewwindowopens.
- Use the navigation buttons [▼] (9) / [▲] (10) to select the desired setting.
- Confirm your selection by pressing [OK] (11).
- isshownonthephotodisplay.
9.2.2 Continuousshooting

When Continuous shooting is activated, a series of five shots will be taken in quick succession.
- Navigate to the Continuous shooting menu item and confirm your selection by pressing [OK] (11). A new overview window opens.
- Use the navigation buttons [▼] (9) / [▲] (10) to select the desired setting.
- Confirm your selection by pressing [OK] (11).
• isshownonthephotodisplay.
9.2.3 Whitebalance

Improve the quality of the photo by adapting to the prevailing light conditions (Sunny, Cloudy, Tungsten, Neonlight).
If you select Auto, the camera automatically adjusts the settings to the light conditions.
- Navigate to the White balance menu item and confirm your selection by pressing [OK] (11). A new overviewwindowopens.
- Use the navigation buttons [▼] (9) / [▲] (10) to select the desired setting.
- Confirm your selection by pressing [OK] (11).
- isshownonthephotodisplay.
9.2.4Contrast

Improvethequalityofthephotothroughcontrastadjustment(-2to+2).
- Navigate to the Contrast menu item and confirm your selection by pressing [OK] (11). A new overviewwindowopens.
- Use the navigation buttons [▼] (9) / [▲] (10) to select the desired setting.
- Confirm your selection by pressing [OK] (11).
- isshownonthephotodisplay.
9.2.5Imagedisplay

When the picture display is activated, the picture taken is shown on the display for a short time (2/5 seconds). A new picture can only be taken after this time has elapsed.
SelectOfftodeactivatethisfunction.
- Navigate to the Image display menu item and confirm your selection by pressing [OK] (11). A new overviewwindowopens.
- Use the navigation buttons [▼] (9) / [▲] (10) to select the desired setting.
- Confirm your selection by pressing [OK] (11).
9.2.6Watermark

With the mode activated, a time and date stamp is added to every photo file.
- Navigate to the Watermark menu item and confirm your selection by pressing [OK] (11). A new overviewwindowopens.
- Use the navigation buttons [▼] (9) / [▲] (10) to select the desired setting.
- Confirm your selection by pressing [OK] (11).
9.3 Generalsettings

- Press and hold [MODE] (8) for about 3 seconds to access the Settings menu of the camera.
• Alternatively, briefly press [MODE] (8) while in the Video/Photo menu.
- isshn attheupper-leftedgeofthescreen.
- Use the navigation buttons [▼] (9) / [▲] (10) to navigate through the menu.
- Confirm your selection by pressing [OK] (11).
9.3.1 Date/time

- Navigate to the Date/time menu item and confirm your selection by pressing [OK] (11). A new overviewwindowopens.
- Use the navigation buttons [▼] (9) / [▲] (10) to set the year and confirm your entry by pressing [OK] 1 1).
- Afterwards, adjust the following information in succession following the same procedure: month, day.
- Confirm your selection by pressing [MODE] (8).
9.3.20ffollowinginactivity

Select the time interval (1 minute/3 minutes) after which the camera automatically switches off if notinuse.
SelectOfftodeactivatethisfunction.
- Navigate to the Off following inactivity menu item and confirm your selection by pressing [OK] (11). A new overview window opens.
- Use the navigation buttons [▼] (9) / [▲] (10) to select the desired setting.
- Confirm your selection by pressing [OK] (11).
9.3.3 Screensaver

Select the time interval (3 minutes / 5 minutes / 10 minutes) after which the screen saver is activated. If you do not press a button during this time interval, the display switches off. Video recording continues, however.
SelectOfftodeactivatethisfunction.
- Navigate to the Screen saver menu item and confirm your selection by pressing [OK] (11). A new overviewwindowopens.
- Use the navigation buttons [▼] (9) / [▲] (10) to select the desired setting.
- Confirm your selection by pressing [OK] (11).
9.3.4Beep

Activate/deactivatetheBeepofyourDashcam.
- Navigate to the Beep menu item and confirm your selection by pressing [OK] (11). A new overview windowopens.
- Use the navigation buttons [▼] (9) / [▲] (10) to select the desired setting.
- Confirm your selection by pressing [OK] (11).
9.3.5Language

Selectthelanguageforthemenunavigation.
- Navigate to the Language menu item and confirm your selection by pressing [OK] (11). A new overviewwindowopens.
- Use the navigation buttons [▼] (9) / [▲] (10) to select the desired setting.
- Confirm your selection by pressing [OK] (11).
9.3.6 Formatmemorycard

Deleteallfileslocatedontheinsertedmemorycard.
- Navigate to the Format memory card menu item and confirm your selection by pressing [OK] (11). A new overview window opens.
- Confirm the formatting by pressing [OK] (11).
9.3.7 Factorysettings

- Navigate to the Factory settings menu item and confirm your selection by pressing [OK] (11). A newoverviewwindowopens.
- Confirm the reset by pressing [OK] (11).
9.3.8Version

- Navigate to the Version menu item and confirm your selection by pressing [OK] 11). A new overviewwindowopens.
• The current camera version is displayed.
10. Retrieving therecorded material
Note

Do not remove the microSD card with the Dashcam switched on. This can result in data loss or cause damagethedevice.
- Switch off the Dashcam as described in 7.2 Switching on/off.
-
Remove the camera's microSD card.
-
Connect the microSD card to your PC using the SD card reader (included in delivery).
• Transfer the stored data to your PC to free up space on the memory card.
11. Lockingfunction
Note

In the event of an accident, the administering of first aid and the safety of all involved have priority.
Note

- With the G-sensor activated – as described in Section 9.1.7 G-sensor – the video file is automatically saved and overwriting of this data is prevented when the camera senses vibrations (forexample,inthecaseofanaccident).
- If the sensor's vibration sensitivity setting is too low, it can happen that the data is not saved despitevibration.Tobeonthesafeside,saveyourdatamanuallywiththeSavebutton.
To be sure your data is permanently stored, proceed as follows:
- Press [MODE] (8). 🔒 appears on the display.
- Press and hold Power [⏻] (6) for about 3 seconds to switch off the camera.
- Now remove the camera's microSD card.
Note

- Videos stored after pressing the Save button are stored under the designation 'LOKXXXXX'.
- Normal video files are stored under the designation 'MOV' and a consecutive number.
12. Factorysettings
To reset the Dashcam to the factory default settings, proceed as follows:
- Switch off the Dashcam as described in 7.2 Switching on/off.
- Press and hold [Reset] (4) for about 3 seconds using a pointed object.
• Alternatively, you can restore the factory settings as described in Section 9.3.7 Factory settings. - Allsettingsyoumadeare d eleted.
Note

- Resettingtothefactorydefaultsettingscansolvesomeproblemsandmalfunctions.
• However, all settings made previously are permanently deleted.
13. Care and Maintenance
- Only clean this product with a slightly damp, lint-free cloth and do not use aggressive cleaning agents.
• Make sure that water does not get into the product.
14.WarrantyDisclaimer
Hama GmbH & Co KG assumes no liability and provides no warranty for damage resulting from improper installation/mounting, improper use of the product or from failure to observe the operating instructionsand/orsafetynotes.
15.TechnicalData
| Max.resolution47 x 58x 30 m m | |
| Screen size: | 1.5" |
| Max. Resolution | Photo: 12 megapixels | Video: 1080p |
| Data format | Photo: JPEG | Video: AVI |
| Memory card | Supports microSD memory cards up to 32 GB |
| Power supply | Input: 12 V-24V=0,5A; Output: 5V=1A, cable length: 2 m |
| Battery | Input: 5V=290 mA; Type: 3,7 V/LiPo;Min.capacity:130mAh/0,48Wh |
All listed brands are trademarks of the corresponding companies. Errors and omissions excepted, and subject to technical changes. Our general terms of delivery and payment are applied.