
Optra T610 - Printer Accessory LEXMARK - Free user manual and instructions
Find the device manual for free Optra T610 LEXMARK in PDF.
| Product Type | 2000-sheet paper feeder tray |
| Brand | Lexmark |
| Model | Optra T610 |
| Paper capacity | 2000 sheets (80 g/m²) |
| Supported paper sizes | Letter, A4, Legal, Executive, etc. (rotary knob selection) |
| Supported paper types | Xerographic paper 60-135 g/m² (long grain) |
| Power supply | 100-127 V (16 AWG cord included) or 200-240 V (printer cord) |
| Approximate dimensions | 500 x 400 x 200 mm |
| Approximate weight | 10 kg |
| Main functions | Automatic feeding, elevator tray, automatic detection by printer |
| Installation | Attaching stabilizer feet (if without cabinet), connection via interface cable to printer |
| Paper type configuration | Via the printer control panel (Paper Menu > Tray Type x) |
| Paper size change | Rotary selection knob, repositioning paper guides according to color code |
| Maintenance | Clearing paper jams, cleaning rollers, checking connections |
| Safety | Use only with compatible printer, do not open during printing, unplug before servicing |
| Spare parts available | Paper guides, 16 AWG cord, stabilizer feet, selection knob |
| General information | PDF manual included, compatible with Optra T series, first edition June 1999 |
Frequently Asked Questions - Optra T610 LEXMARK
User questions about Optra T610 LEXMARK
0 question about this device. Answer the ones you know or ask your own.
Ask a new question about this device
Download the instructions for your Printer Accessory in PDF format for free! Find your manual Optra T610 - LEXMARK and take your electronic device back in hand. On this page are published all the documents necessary for the use of your device. Optra T610 by LEXMARK.
USER MANUAL Optra T610 LEXMARK
First Edition (June 1999)
The following paragraph does not apply to any country where such provisions are inconsistent with local law: LEXMARK INTERNATIONAL, INC., PROVIDES THIS PUBLICATION "AS IS" WITHOUT WARRANTY OF ANY KIND, EITHER EXPRESS OR IMPLIED, INCLUDING, BUT NOT LIMITED TO, THE IMPLIED WARRANTYES OF MERCHANTABILITY OR FITNESS FOR A PARTICULAR PURPOSE. Some states do not allow disclaimer of express or implied warranties in certain transactions; therefore, this statement may not apply to you.
This publication could include technical inaccuracies or typographical errors. Changes are periodically made to the information herein; these changes will be incorporated in later editions. Improvements or changes in the products or the programs described may be made at any time.
References in this publication to products, programs, or services do not imply that the manufacturer intends to make these available in all countries in which it operates. Any reference to a product, program, or service is not intended to state or imply that only that product, program, or service may be used. Any functionally equivalent product, program, or service that does not infringe any existing intellectual property right may be used instead.
Evaluation and verification of operation in conjunction with other products, programs, or services, except those expressly designated by the manufacturer, are the user's responsibility.
Lexmark and Optra are trademarks of Lexmark International, Inc., registered in the United States and/or other countries.
Other trademarks are the property of their respective owners.
© Copyright 1999 Lexmark International, Inc. All rights reserved.
UNITED STATES GOVERNMENT RESTRICTED RIGHTS. This software and documentation are provided with RESTRICTED RIGHTS. Use, duplication or disclosure by the Government is subject to restrictions as set forth in subparagraph (c)(1)(ii) of the Rights in Technical Data and Computer Software clause at DFARS 252.227-7013 and in applicable FAR provisions: Lex-mark International, Inc., Lexington, KY 40550.
Table of Contents
Introduction 1
Unpacking the 2000-Sheet Drawing 2
Attaching Stabilizer Feet 3
Installing the 2000-Sheet Printer. 6
Verifying Installation. 10
Setting the Paper Type 11
Changing the Paper Size 12
Selecting Paper 15
Loading Paper 16
Troubleshooting 19
Clearing a Paper Jam 20
Introduction
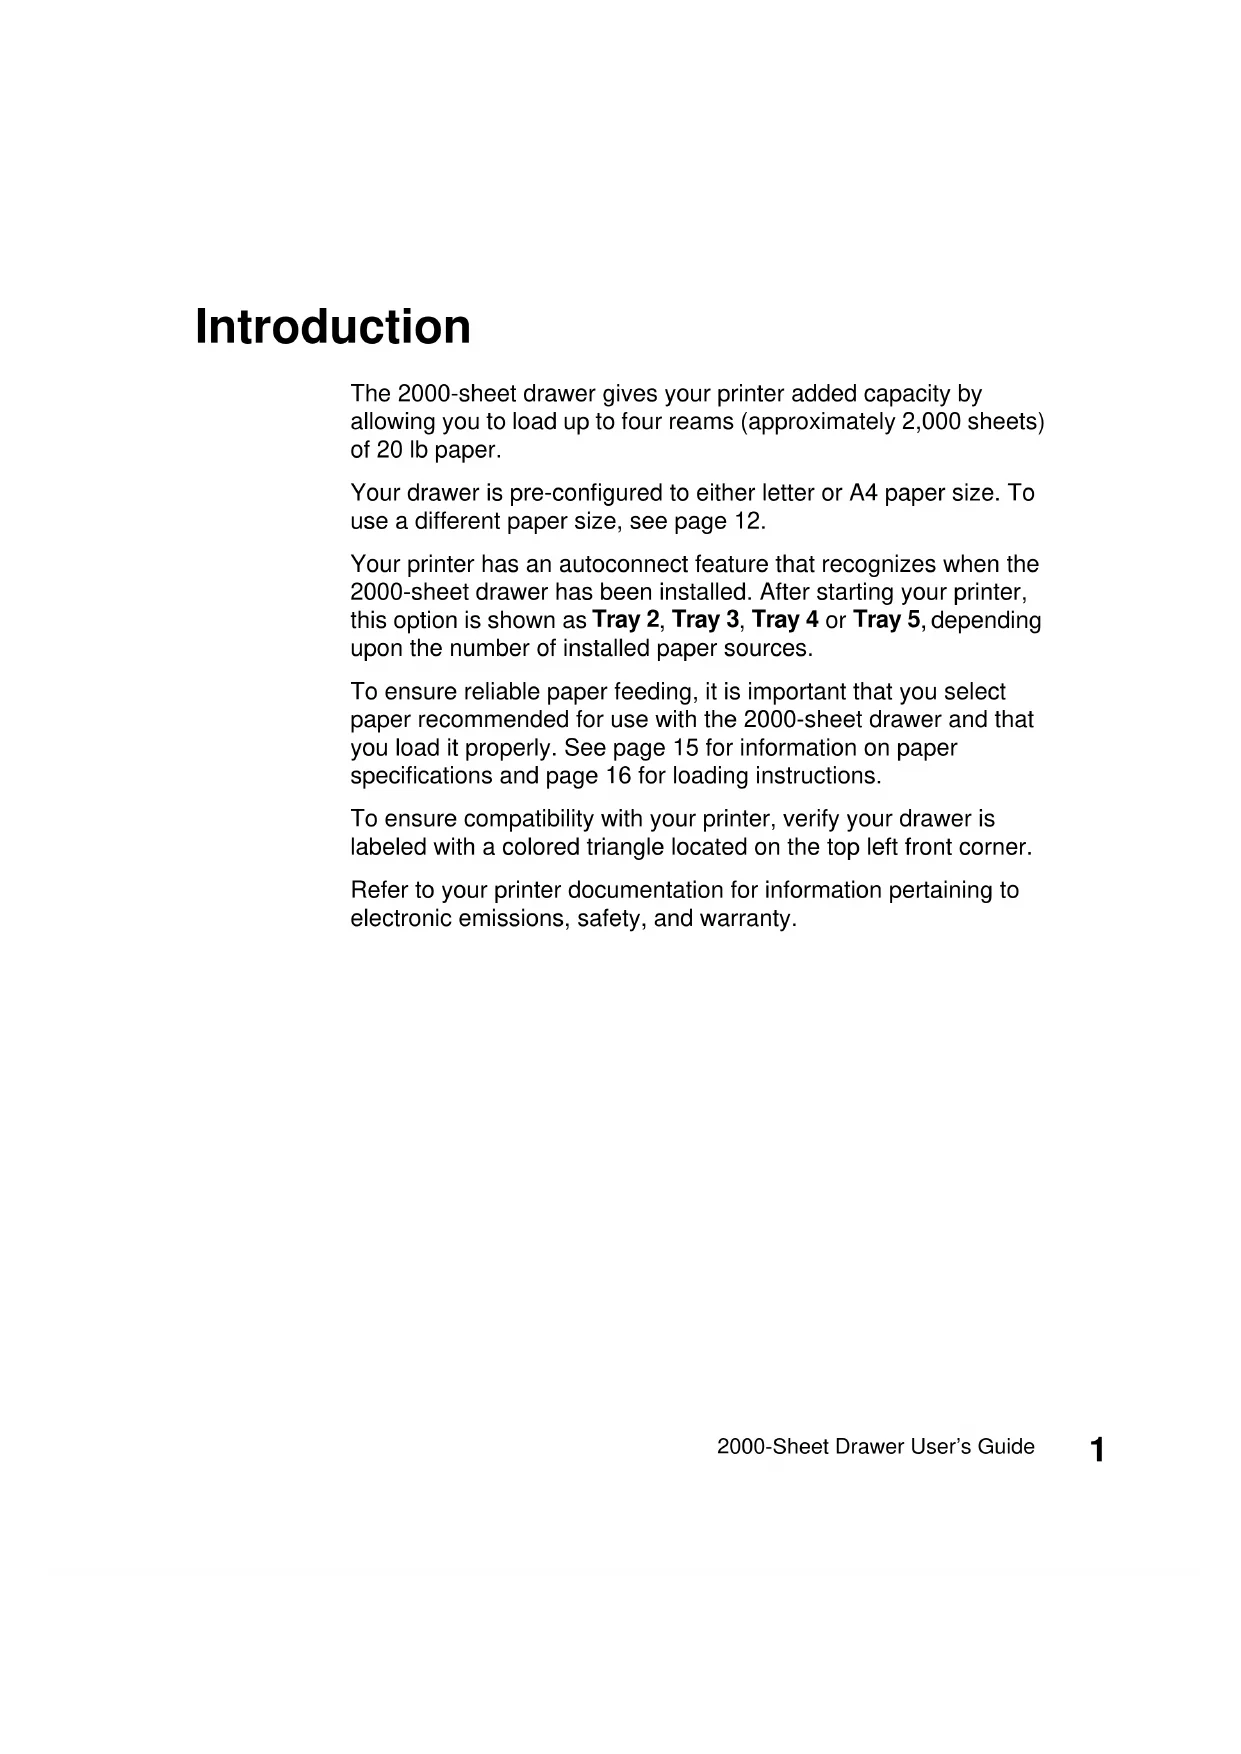
The 2000-sheet drawer gives your printer added capacity by allowing you to load up to four reams (approximately 2,000 sheets) of 20 lb paper.
Your drawer is pre-configured to either letter or A4 paper size. To use a different paper size, see page 12.
Your printer has an autoconnect feature that recognizes when the 2000-sheet drawer has been installed. After starting your printer, this option is shown as Tray 2, Tray 3, Tray 4 or Tray 5, depending upon the number of installed paper sources.
To ensure reliable paper feeding, it is important that you select paper recommended for use with the 2000-sheet drawer and that you load it properly. See page 15 for information on paper specifications and page 16 for loading instructions.
To ensure compatibility with your printer, verify your drawer is labeled with a colored triangle located on the top left front corner.
Refer to your printer documentation for information pertaining to electronic emissions, safety, and warranty.
Unpacking the 2000-Sheet Printer
1 Remove all items shown in the illustration from the carton. If any items are missing, contact the place where you bought the 2000-sheet drawer.
Note: The 16 AWG power cord is included only with units intended to operate at 100 - 127V power.
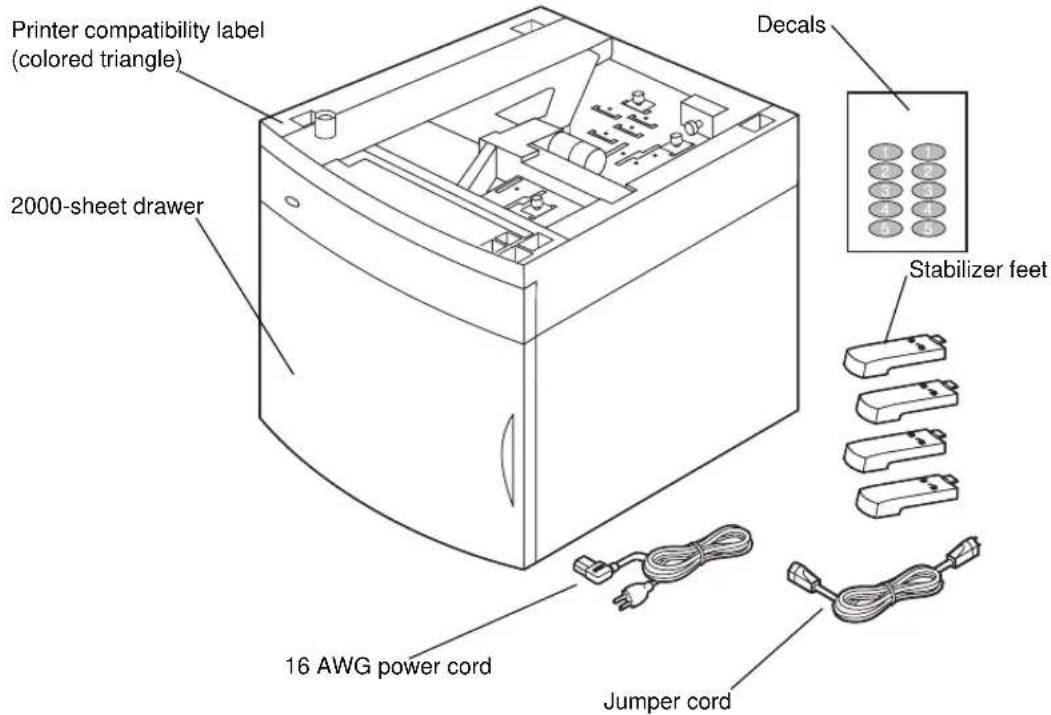
2 Remove all packing material and tape from each item.
Note: Save the carton and packing material in case you need to repack the 2000-sheet drawer for service or storage.
3 Peel the appropriately numbered decals from the sheet and attach them to the recessed areas on the drawer. Choose the number that corresponds to the number of paper options you are attaching, including the standard output tray.
Attaching Stabilizer Feet
CAUTION: If you are not using an optional printer stand, the four stabilizer feet must be attached to the drawer.
1 Carefully invert the 2000-sheet drawer so the bottom faces up.
2 Remove the screws securing the rubber feet to the drawer. Save the screws and rubber feet for use in step 5 on page 5.
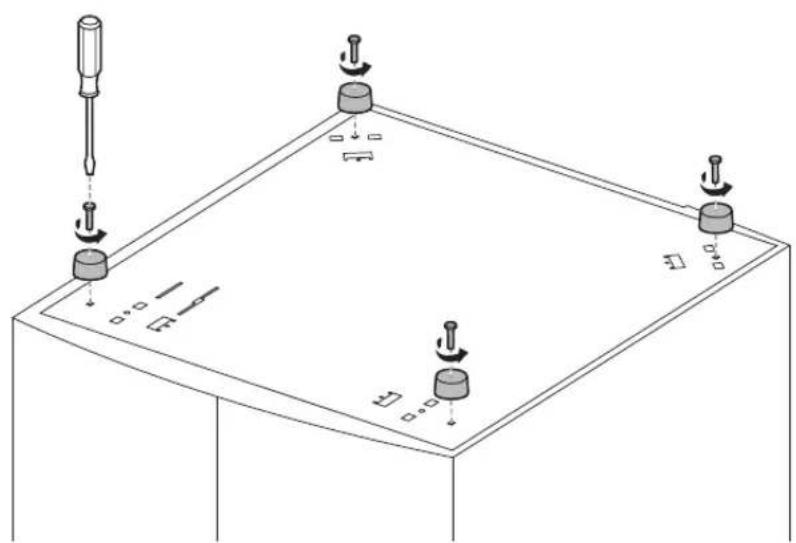
Note: If you later choose to use the drawer with the printer stand, you must remove the stabilizer feet and re-attach the rubber feet.
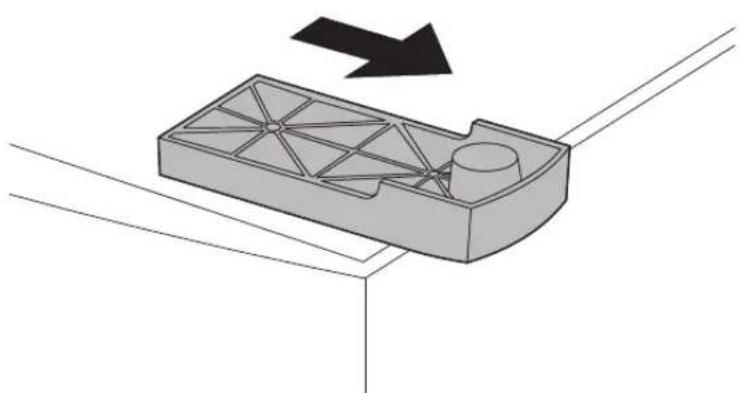
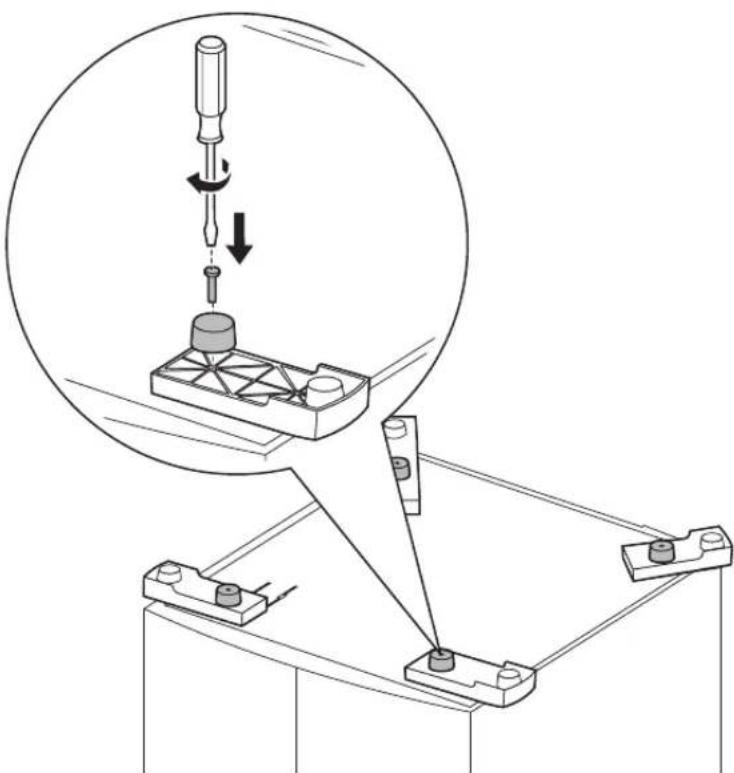
3 Insert the tab on the end of the stabilizer foot into the slot on the bottom of the drawer. Rotate the stabilizer foot down until it is aligned with the bottom of the drawer.

4 Slide the foot away from the center of the tray until it locks into place.
5 Using one of the rubber feet removed in step 2 on page 3, align the openings of the rubber and stabilizer feet and attach the screw as shown.
6 Repeat step 3 on page 4 through step 5 on page 5 for the remaining rubber and stabilizer feet.
Installing the 2000-Sheet Printer
Decide on an installation location for the 2000-sheet drawer. The printer, and possibly other options, will be placed on top of the drawer, so allow a maximum of 137.16cm (412ft) for clearance.
Note: Your drawer is pre-configured to either letter or A4 paper size. To use a different paper size, see page 12 before placing any options or the printer on the 2000-sheet drawer.
1 Turn the printer power off and unplug the power cord.
2 Disconnect any other cables attached to the printer.
3 Place any options you may have on top of the drawer one at a time. Refer to your printer documentation for proper installation instructions.
4 Ask someone to help you lift the printer and position it above the drawer and any options you may have installed in step 3.
CAUTION: Make sure your fingers are not under the printer when you set it down. Use the handholds on the printer or ask someone to help you lift it.
5 Place the printer on top of the drawer and any options installed. The openings on top of the drawer will help you set the printer so the edges are aligned properly. Make sure the printer is securely in place.

6 Plug the jumper cord into the printer. Plug the other end of the jumper cord into the drawer.
7 Reconnect any disconnected cables.
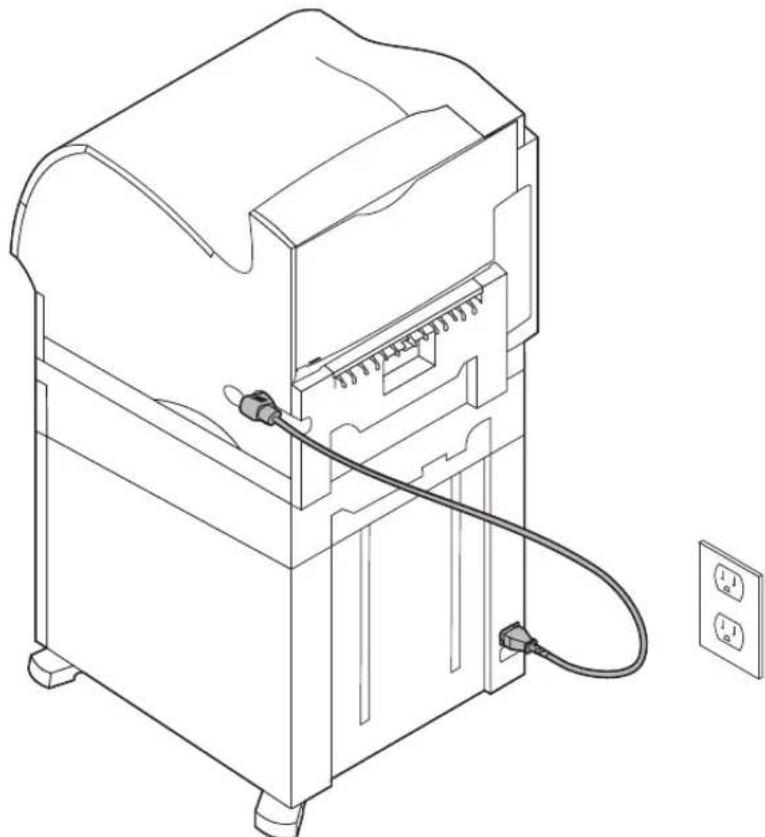
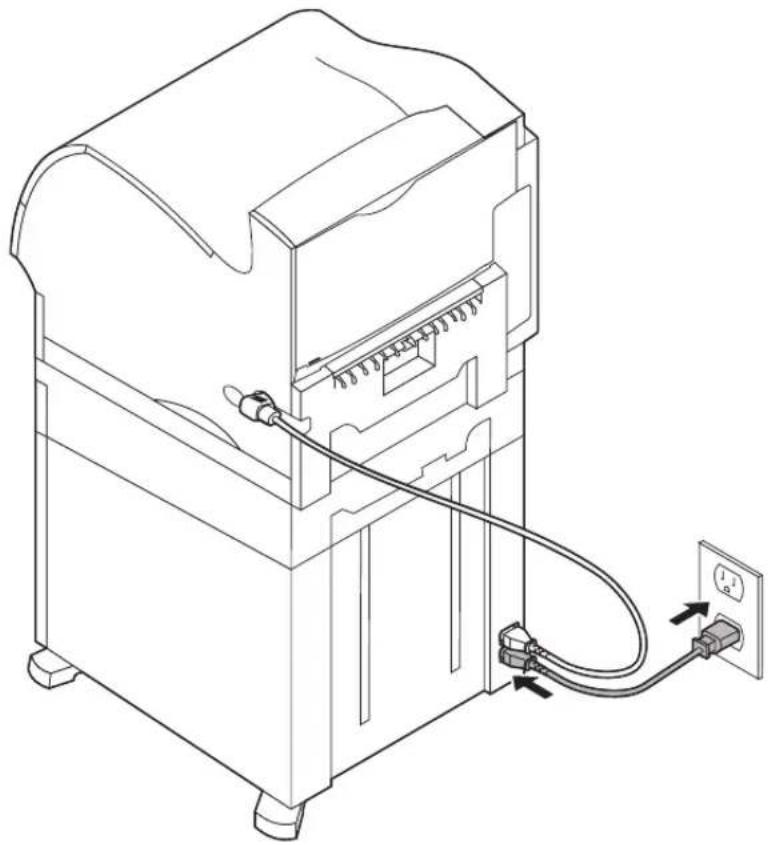
8 If you intend to operate your 2000-sheet drawer at 100 - 127V power, you must use the 16 AWG power cord provided with the unit. Plug the 16 AWG power cord into the back of the drawer and then into a properly grounded electrical outlet. Do not use the power cord provided with the printer; however, you may retain it for possible future use. For example, if you later decide to detach the current printer from the 2000-sheet drawer, and use the printer with other paper options, you should use the original power cord provided with the printer. The 16 AWg power cord should always remain with the 2000-sheet drawer.
If you intend to operate your 2000-sheet drawer at 200 - 240V power, use the power cord provided with the printer. Plug the power cord into the back of the drawer and then into a properly grounded electrical outlet.
Verifying Installation
Once the 2000-sheet drawer has been installed, verify that it is installed properly by printing a menu settings page.
To print a menu settings page:
1 Make sure the printer power is on and the Ready status message appears on the display.
2 Press Menu> or
3 Continue to press and release Menu> or <Menu until Utilities Menu appears on the display.
4 Press Select to show the list of available menu items for the Utilities Menu.
Utilities Menu now appears on the first line of the display.
5 Press and release Menu> until Print Menus appears on the second line of the display.
6 Press Select to select Print Menus. The message Printing Menu Settings is displayed.
The menu settings page prints.
Installed Features on the menu settings page lists all options that have been installed.
Look for 2000-sheet drawer on the printed page. If the drawer is listed, you are ready to begin using it.
If the drawer is not listed on the page, the printer or other options may not be seated securely or aligned properly. Return to page 6 of this guide and carefully follow all installation instructions. Print the menu settings page again to verify installation.
Setting the Paper Type
Once the drawer is installed, you should set the paper type. To set the paper type, go to the printer operator panel, and then follow these steps:
1 Make sure the printer power is on and the Ready status message appears on the display.
2 Press Menu> or
3 Continue to press and release Menu> until Paper Menu appears on the display.
4 Press Select to access the Paper Menu.
5 Continue to press and release Menu> until Paper Type appears on the display.
6 Press Select to show the list of available menu items for the Paper Type menu.
7 Continue to press and release Menu> until Tray x Type (where x represents the tray number of the 2000-sheet drawer) appears on the display.
8 Press Select to show the list of available menu items for Tray x Type .
9 Continue to press and release Menu> until the paper type you are using in the 2000-sheet drawer appears on the display.
10 Press Select to select the paper type.
Note: You may select any operator panel feature available except Paper Type = Transparency.
11 Press Go to display the Ready status message.
Changing the Paper Size
Your 2000-sheet drawer comes pre-configured for either letter or A4 paper size.
To change the paper size prior to installation, proceed to step 7 of the following instructions now. If you are changing the paper size for a unit that is already attached to a printer and a power source, proceed with step 1:
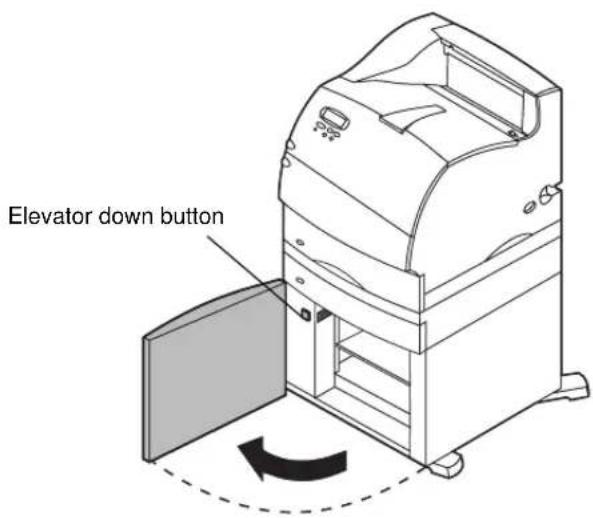
1 Open the loading door.
2 Push the elevator down button located on the left side of the door opening. See illustration on page 17.
3 Remove paper from the elevator tray and close the loading door.
4 Re-open the door. The printer elevator tray should be approximately halfway up.
5 Unplug the power cord.
6 Remove the printer and all attached options from the 2000-sheet drawer.
CAUTION: Remove the attached options one at a time. Make sure your fingers are not under the printer when you set it down. Use the handholds on the printer or ask someone to help you lift it.
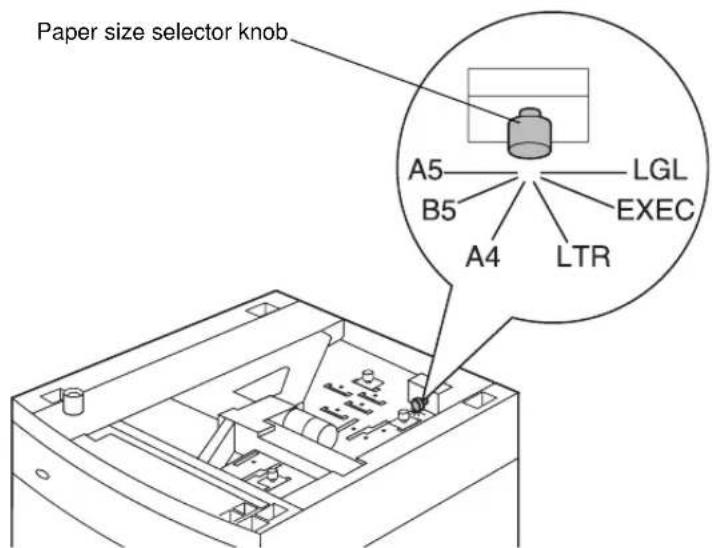
7 Locate the paper size selector knob on top of the drawer. See page 13 for an illustration and location of the knob.
Note: Six paper selections are available. Each paper selection is color-coded. A new paper size is displayed on the operator panel after the paper elevator tray is in the up position.
8 To make a selection, turn the knob completely in a counterclockwise direction. This action sets the paper size to legal (LGL).
9 Count the clicks as you turn the knob clockwise to find the correct paper size. For example, one click sets the paper size to executive (EXEC).
Note: Make a note of the color associated with the paper size you select.
10 Pull each locking pin up to unlock it, and then pull up on the guides to remove them.
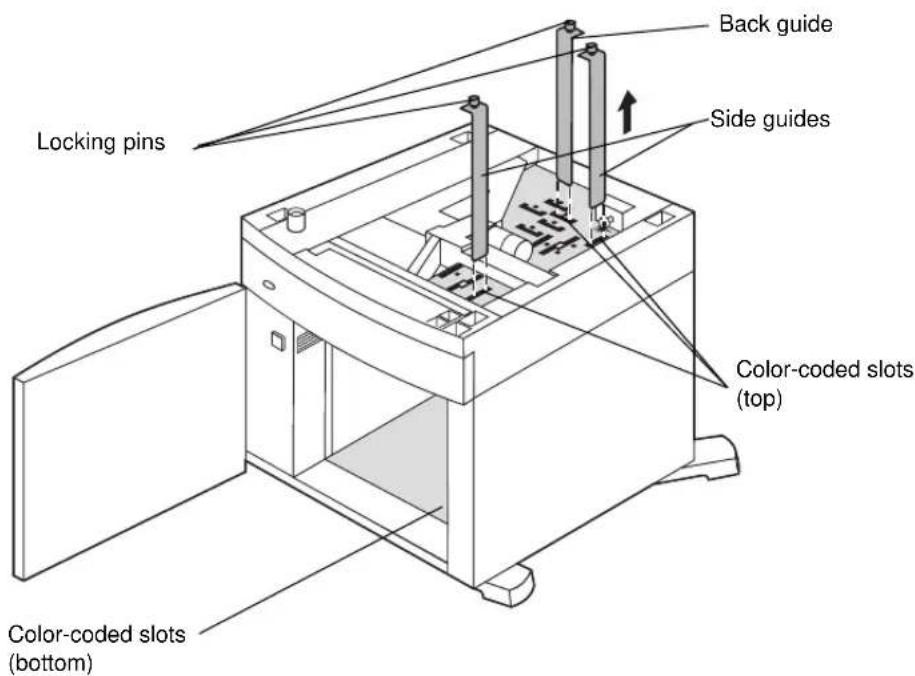
11 Reposition the paper guides in the color-coded slots, located at the top of the unit, corresponding to the paper size you selected.
12 Insert the paper guides into the matching colored slots located on the inside bottom of the unit. The guides should now be seated flush against the top of the unit.
13 Push each pin down to lock the guides in place.
Selecting Paper
The print quality and feeding reliability of your printer can vary with the type of paper you use. For more detailed information about paper specifications, refer to your printer documentation.
To ensure the best print quality, use 75g / m^2 (20 lb) grain long xerographic paper. Business papers are designed for general business use and provide acceptable print quality.
Note: Always print samples on the print materials you are considering before buying large quantities.
The following table shows the paper recommended for use with the 2000-sheet drawer.
Paper Specifications
| Material Type | Weight | |
| Paper Xerographic | oric or business paper | 60 to 135 g/m2grain long (16 to 36 lb) |
Do not use the following print materials in the drawer:
- Envelopes
- Labels
Card Stock - Transparencies
- Preprinted forms that require exact registration
Loading Paper
Proper paper loading can prevent paper jams and help to ensure trouble-free printing.
To avoid paper jams:
- Do not load print material above the paper capacity mark. See page 18 to locate the paper capacity mark.
- Do not fold or crease the paper.
- Align paper to the back of the drawer.
- Do not mix paper sizes or weights in the same paper source.
- Do not open the loading door or remove any paper while a job is printing or Busy is displayed on the operator panel.
Note: When loading more than one ream of paper, we recommend you remove the top and bottom sheet.
Before loading paper in the tray, you should know the recommended print side of the paper you're using. This information is usually indicated on the paper package. To load the paper follow these steps:
1 If you are loading paper for the first time, proceed to step 2 on page 17 now. If not, note the paper size previously loaded. If you are unsure of the paper size, go to the printer operator panel and follow these steps:
a Make sure the printer power is on and the Ready status message appears on the display.
b Select Menus.
C Select Paper Menu.
d Select Paper Size.
e Select Tray x Size (where x represents the tray number of the 2000-sheet drawer).
If you want to load a paper size different from the one selected see page 12 for instructions, and then proceed with step 2 on page 17.
2 Open the loading door. If the elevator tray is not already in the lowered position, push the elevator down button to lower.
3 Flex each stack of paper back and forth. Do not fold or crease the paper. Straighten the edges on a level surface.
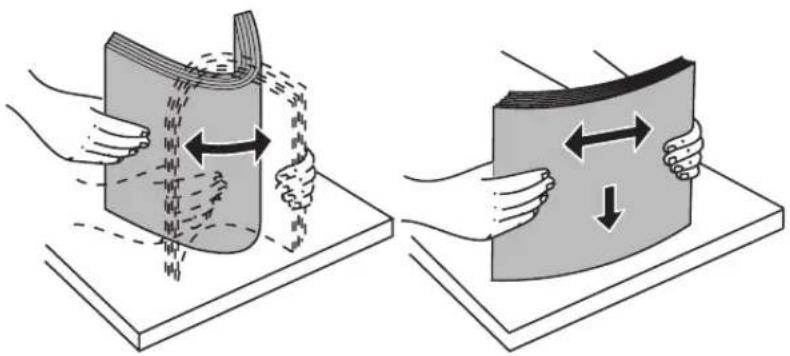
4 Slightly bend the stack of paper as shown and place it on the elevator tray with the preferred print side facing down. Align the stack of paper to the back of the drawer.
Carefully align each stack of paper as you load it to ensure a smooth edge where the stacks meet. Do not load print material above the paper capacity mark.
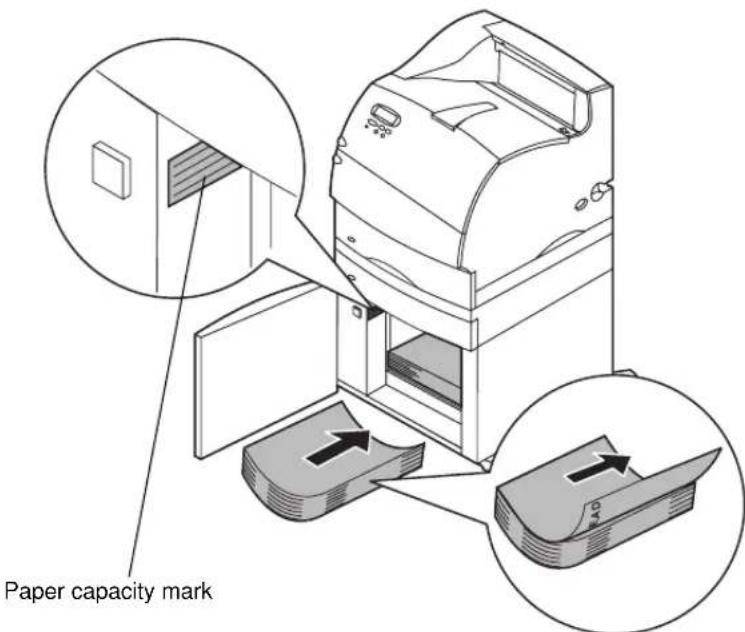
This illustration shows the correct orientation for loading paper for simplex printing. Letterhead paper should be loaded with the printed side face down and the page top to the front of the drawer. Do not mix weights of paper.
For duplex printing on letterhead paper, place the printed side face up with the page top to the rear of the drawer.
5 Close the loading door.
Note: If you need to return your 2000-sheet drawer, please make sure that all paper has been removed from the unit before packing.
Troubleshooting
| Problem Action | |
| The elevator tray does not raise when the loading door is closed, or the elevator tray does not lower when the door is opened and the elevator down button is pushed. | Check the following: ·The printer is properly attached to the 2000-sheet drawer. ·The printer is powered on. ·The power cord is plugged firmly into the back of the 2000-sheet drawer. ·The power cord is plugged into an outlet. ·The outlet has power to it. |
| The elevator tray lowers unexpectedly. | Check to see if your printer is out of paper or has a paper jam. |
| More than one sheet of paper is fed or a sheet is fed improperly. | Remove the paper in the printer paper path and check the paper stack to ensure the paper has been loaded properly. Be sure to remove the top and bottom sheets of each ream of paper that is loaded. See page 20. |
| A paper jam occurs. | |
| Rubber feed rollers do not turn to advance paper. | Check the following: ·The power cord is plugged firmly into the back of the 2000-sheet drawer. ·The power cord is plugged into an outlet. ·The outlet has power to it. |
| Consistent misfeeds or jams in the drawer. | Try the following: ·Flex the paper. ·Turn the paper over. Check the following: ·Paper drawer is properly installed. ·Paper is loaded correctly. ·Paper is not damaged. ·Paper meets specifications. ·Paper guides are positioned correctly for the paper size selected. See page 12. |
| Service Messages A service message | indicates printer failure that may require service. Turn the printer off, wait about 10 seconds, and then turn the printer on. If the error recurs, write down the error number, the problem, and a detailed description. Call service. |
| Short Paper Error Make sure the paper | size selector knob is set to the correct paper size. See page 12. |
Clearing a Paper Jam
1 Open the loading door.
2 Press the elevator down button.

3 Remove the paper jam and clear all paper from the paper path of the drawer and printer.
4 Check to see if the stack of paper is neat and aligned.
5 Close the door.
6 Allow a few seconds for the elevator to reach the top.
7 Select Go to resume printing.
For additional information on clearing paper jams, refer to your printer documentation.