Cosmic Beam Plus - Heating Blumfeldt - Free user manual and instructions
Find the device manual for free Cosmic Beam Plus Blumfeldt in PDF.
User questions about Cosmic Beam Plus Blumfeldt
0 question about this device. Answer the ones you know or ask your own.
Ask a new question about this device
Download the instructions for your Heating in PDF format for free! Find your manual Cosmic Beam Plus - Blumfeldt and take your electronic device back in hand. On this page are published all the documents necessary for the use of your device. Cosmic Beam Plus by Blumfeldt.
USER MANUAL Cosmic Beam Plus Blumfeldt
Note: This product is only suitable for well insulated spaces or occasional use.
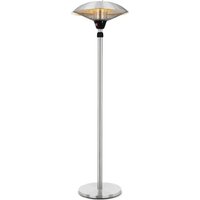
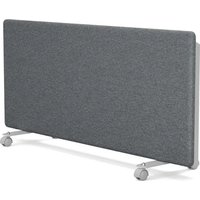
Patio Heater
Berlin Brands Group UK Ltd
PO Box 1145
Oxford,OX19UW
United Kingdom
English 19
Espanol 33
Français 47
Italiano 61
Nederlands 77
SICHERHEITSHINWEISE
Congratulations on purchasing this equipment. Please read this manual carefully and take care of the following hints to avoid damages. Any failure caused by ignoring the items and cautions mentioned in the instruction manual is not covered by our warranty and any liability. Scan the QR code to get access to the latest user manual and other information about the product:

CONTENT
Safety instructions 20
Device overview 22
Installation 23
Operation 26
Cleaning and care 28
Hints on disposal 29
Product Data Sheet 30
TECHNICAL DATA
| Item Cosmic Beam | Plus XXL Cosmic Beam Plus | ||
| Item number 10033 | 698 | 10033699 10 | 033700 |
| Power supply 220-2 | 40 V ~ 50/60 Hz | ||
| Power (Watt) 3000 | W | 2400 W | |
MANUFACTURER & IMPORTER (UK)
Manufacturer:
Chal-Tec GmbH, Wallstrasse 16, 10179 Berlin, Germany.
Importer for Great Britain:
Berlin Brands Group UK Ltd
PO Box 1145
Oxford,OX19UW
United Kingdom
SAFETY INSTRUCTIONS
- Read all instructions before using this unit.
- Do not leave this unit unattended when in use.
- This heater will get hot when in use. Do not touch hot surfaces.
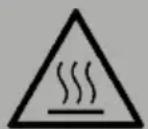
CAUTION
Risk of burns! Some parts of this product can become very hot and cause burns. Particular attention has to be given when children and vulnerable people are present.
- Do not move the unit when in use. Wait until the heater is completely cool before moving and check that it has been unplugged from the power supply.
- Position the unit at least 1m away from highly combustible materials such as furniture, trees, leaves, dry grass and bushes.
- The heater must not face with the heating element pointing upwards towards a ceiling. The heater element must be facing the area it is to heat.
Note: In order to avoid overheating do not cover the heater. It is not for drying clothes.
- Keep children and pets at a safe distance from the unit.
- This appliance can be used by children aged from 8 years and above and persons with reduced physical, sensory or mental capabilities or lack of experience and knowledge if they have been given supervision or instruction concerning use of the appliance in a safe way and understand the hazards involved.
- Children shall not play with the appliance. Cleaning and user maintenance shall not be made by children without supervision.
- Do not operate the heater if any signs of damage or malfunction manifest themselves.
- Do not attempt to repair or adjust any electrical or mechanical functions on this unit. The unit does not contain any user serviceable parts. Only a qualified electrician should perform servicing or repairs.
-
If the power cable is damaged, it must be replaced by the manufacturer, its service agent or similarly qualified persons in order to avoid a hazard.
-
Do not handle the element with bare hands. If it is inadvertently touched, remove finger marks with a soft cloth and methylated spirits or alcohol, otherwise the marks will burn into the element causing premature heater failure.
- Do not replace or attempt to replace the element in this product.
- This product is suitable for indoor and outdoor use. Do not use this heater in the immediate surroundings of a bath, shower or swimming pool.
- This product must not be left outdoors exposed to the elements for long periods of time.
- Do not touch the plug with wet or damp hands.
- Do not run the power cable under carpeting. Do not cover the power cable with rugs, runner, or similar coverings. Arrange the power cable away from foot traffic and where it will not be tripped over.
- Do not wind the power cable around the unit.
- Do not insert or allow foreign objects to enter any ventilation or opening on the heater, as this may result in electric shock, fire, or damage to the heater.
- To prevent a possible fire, do not block the air vents.
- A heater has hot and arcing or sparking parts inside. Do not use in areas where petrol, paint, explosive and/or flammable liquids are used or stored. Keep unit away from heated surfaces and open flames.
- Where possible, avoid the use of an extension cable as this may overheat and cause a fire. However, if you have to use an extension cable, ensure it is suitable for the purpose, has been tested for outdoor use and preferably has an RCD device fitted or attached.
- Always ensure the heater is plugged into a suitable socket, one that is tested for outdoor use.
- Always unplug the unit and ensure the unit is completely cold before moving, cleaning or storing.
- This heater is intended for domestic use only and should not be used commercially for contract purposes. Any alternative use, not recommended by the manufacturer, may result in fire, electric shock, or injury to persons.
- The use of attachments on the heater is not recommended.
- Do not use this heater with a programmer, timer, separate remote control system or any other device that switches the heater on automatically, since a fire risk exists if the heater is covered or positioned incorrectly.
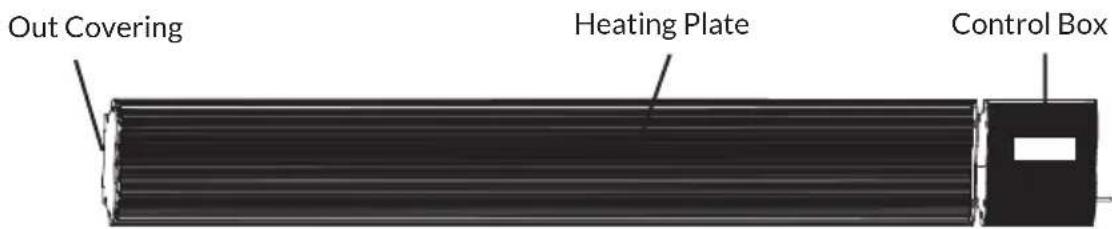
DEVICE OVERVIEW
Dimensions:
| Modell Power Length Width Height | ||||
| Cosmic Beam Plus 2400 W | 1540 mm 15 | 0 mm 65 mm | ||
| Cosmic Beam Plus XXL 3000 | W 1840 mm | 150 mm 6 | 5 mm | |
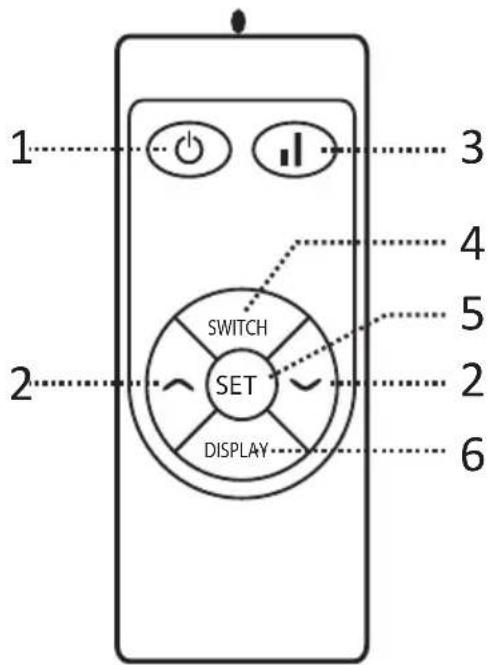
Remote Control
1 ON/OFF button
2 UP/DOWN button
3 HIGH/LOW switch button (Heating level)
4 SWITCH button
5 SET button
6 DISPLAY button
INSTALLATION
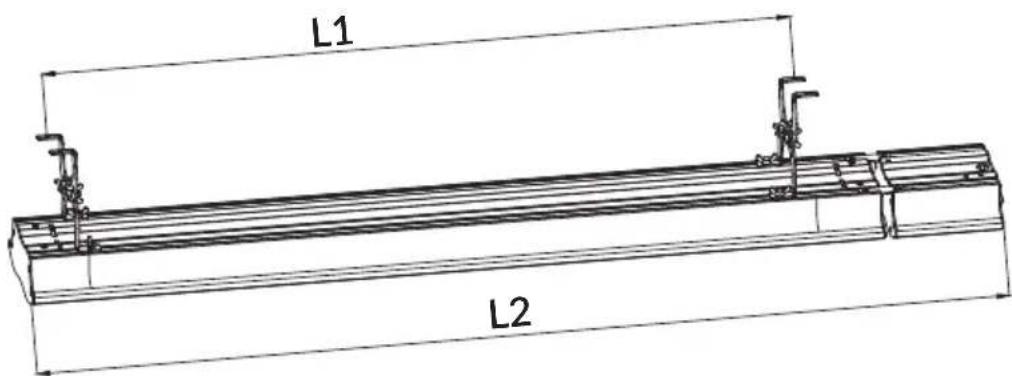
| Modell Length 1 Length 2 | ||
| Cosmic Beam Plus 1307 mm 1540 mm | ||
| Cosmic Beam Plus XXL 1607 mm 1840 mm | ||
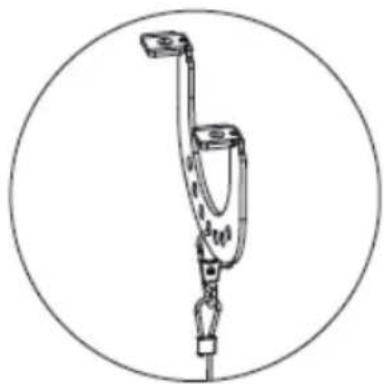
A
B
C
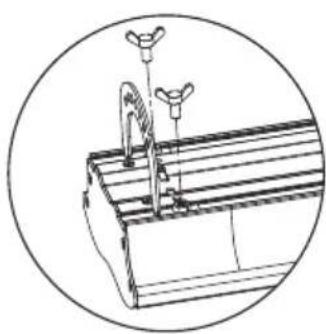
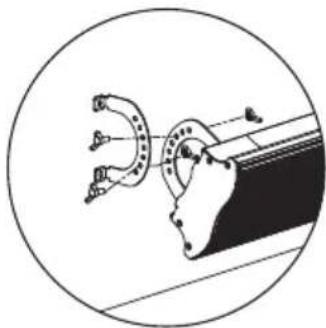
Step 1:
Use the screws to install two of the mounting brackets to the top part of the appliance, as shown in figure A.
Step 2:
Use the screws to install two of the mounting brackets on the wall or ceiling, as shown in figure B.
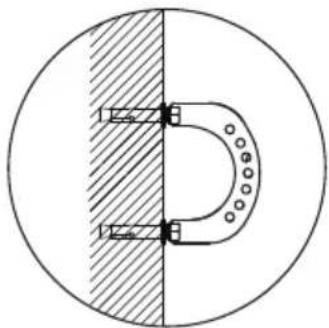
Step 3:
Connect the mounting bracket of the appliance and the mounting bracket on the wall or ceiling with a screw, as shown in figure C.
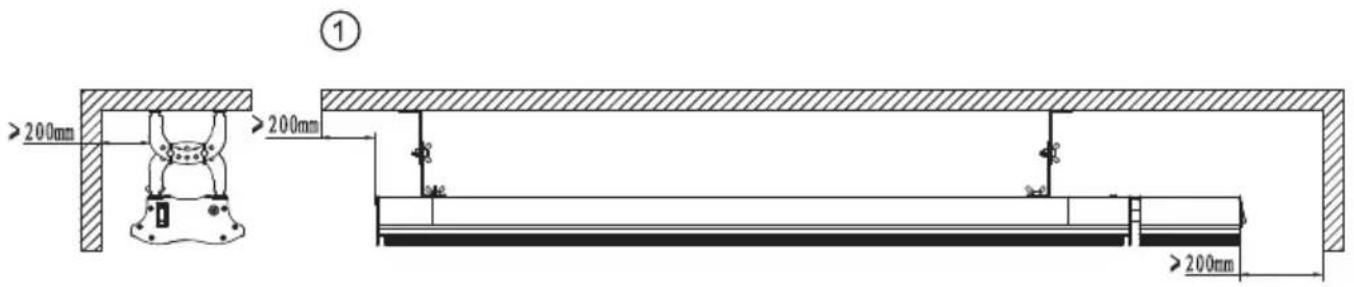
1. Ceiling installation:
The distance from the electrical appliance to the surrounding walls should be at least 200mm , as shown in figure 1.
2. Double hanging ceiling installation:
Two electrical appliances are connected through a connecting frame installed on the ceiling, as shown in Figure 2.
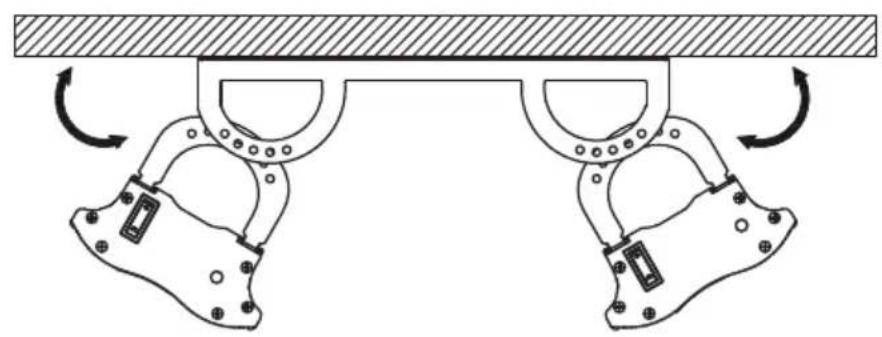
(2)
Note: The parts required for double installation are not included and must be purchased separately.
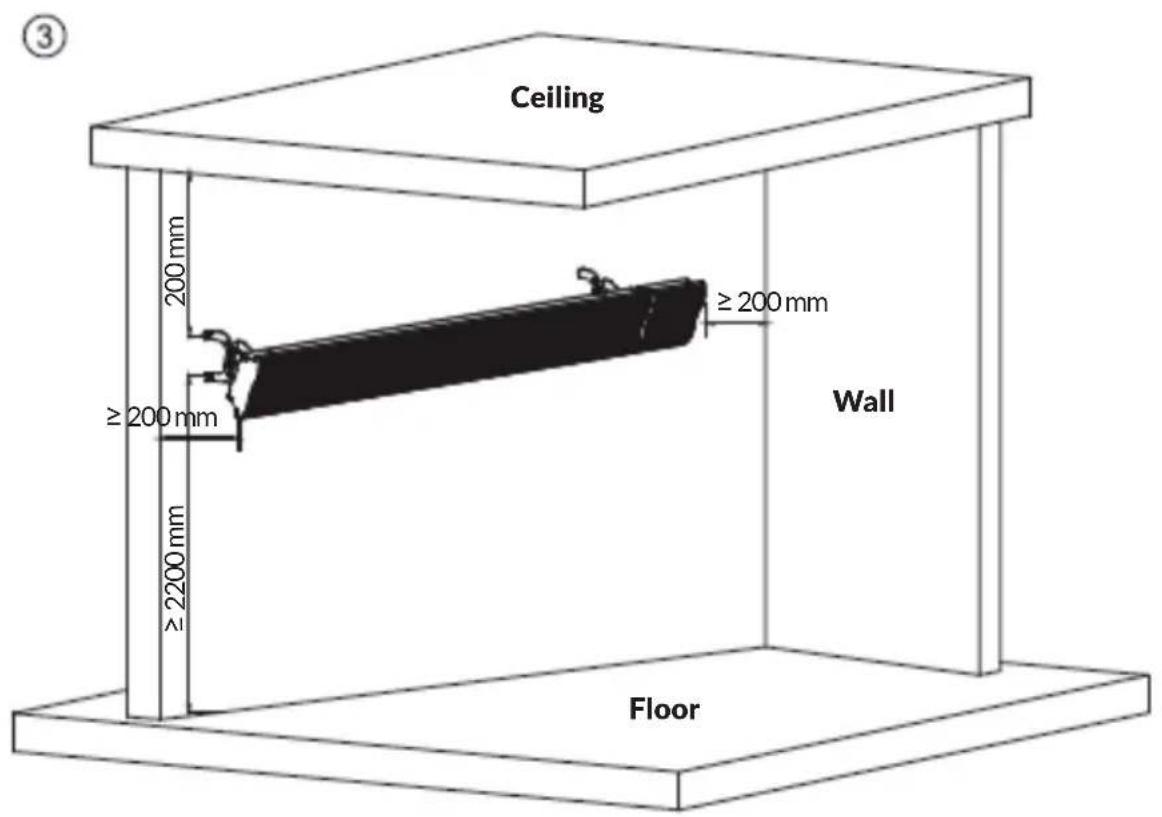
3. Wall mounted appliances:
As shown in Figure 3, the distance to the floor must be at least 220~cm . The minimum distance to the ceiling should be 20~cm .
4. Extended installation:
The slings will be hooked in and are hanging from the ceiling, as shown in figure 4.
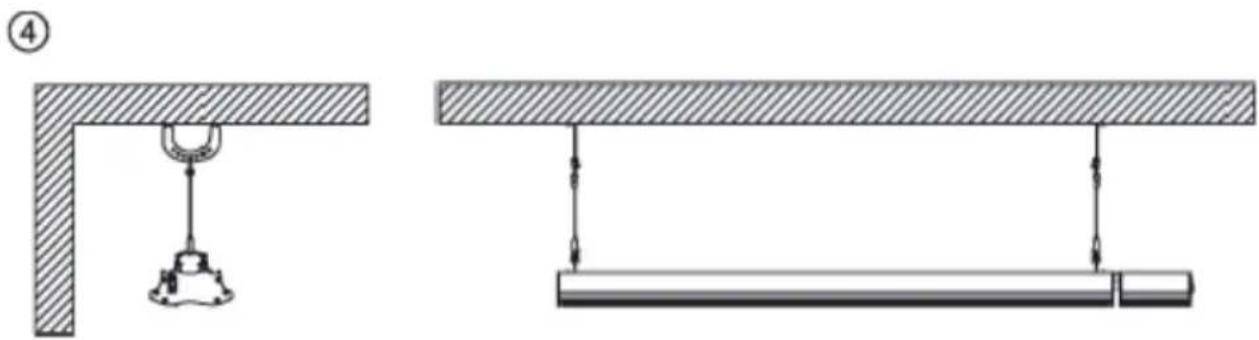

Note: The parts required for the installation extension are not included and must be purchased separately.
OPERATION
Before first use, please read this manual thoroughly.
- Take out the heater from the carton carefully. Please save the carton for off-season storage,
- Firmly fix the heater according to the installation instructions.
- Make sure that you do not use the same socket for the heater and other high-power appliances, as this could lead to mains overload.
Switch on
- The power light flashes when the heater is connected with power.
- Press the ON/OFF button, to turn on the heater. The screen shows the temperature of the room. If it is lower than the preset temperature, the heating function will be activated and the indicator light will blink.
Lock function
- During operation, first press the SWITCH button switch and then the ON/OFF button the indicator light lights up. All keys are deactivated when the lock function is enabled.
Display screen ON/OFF function
If you press the DISPLAY button (Display), the screen turns off but the indicator light remains on.
- Press the DISPLAY button (Display) again to turn the screen back on.
Temperature setting
- First press the SET button Set, than press the UP button or the DOWN button to adjust the temperature. Each time the button is pressed, the temperature is increased or decreased by 1^ .
- The maximum temperature setting is 45^ and the minimum temperature setting is 5^ . Finally, set the desired temperature and the system will automatically save the set temperature and will return to operating mode, displaying the room temperature.
Timing switch setting
- If you press the SET button Set, the display "00" will flash.
- Press the UP button or DOWN button to set the time to auto power off. Each time the button is pressed, the set time period increases or decreases by 1 hour. The minimum time setting is 1 hour, the maximum time setting 24 hours. Once you have set the time, the system will automatically save it and return to the operating status. The temperature and time to power off are displayed on the screen.
Function "Open window detection"
- If the room temperature decreases by 3^ or more during heating operation within 2 minutes, window open detection is activated and heating operation is stopped. Meanwhile, the LED indicator flashes accompanied by signal tones. The heating can only be put back into operation manually.
Heating level setting
- During operation, press the HIGH/LOW button and select one of the two heating levels (high or low).
Switch OFF
- Press the ON/OFF button, to switch off the appliance. The indicator light will remain on even after switching off if the appliance is connected to the socket.
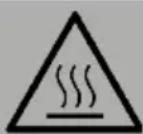
CAUTION
Danger of burns! This heater heats up strongly when in use. Do not touch the hot surface to avoid burns.
Maintenance and repair
If you require maintenance or repair of the appliance, please contact customer service or qualified personnel.
Replacement of power cord
If the power cord is damaged, it must be replaced by the manufacturer or a qualified technician in order to prevent a hazard.
Child supervision
Do not leave children and infirm persons unattended when operating the appliance.
CLEANING AND CARE
- Before cleaning, remove the plug from the socket and allow the unit to cool completely.
- Do not use scouring agents or solvents for cleaning and never immerse the unit in water.
- Clean the outside with a soft, damp cloth.
- The device contains parts that are not accessible to the user. Repairs may only be carried out by qualified specialists.
HINTS ON DISPOSAL
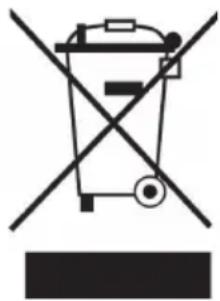
If there is a legal regulation for the disposal of electrical and electronic devices in your country, this symbol on the product or on the packaging indicates that this product must not be disposed of with household waste. Instead, it must be taken to a collection point for the recycling of electrical and electronic equipment. By disposing of it in accordance with the rules, you are protecting the environment and the health of your fellow human beings from negative consequences. For information about the recycling and disposal of this product, please contact your local authority or your household waste disposal service.
PRODUCT DATA SHEET
| Model identifier(s): 10033698 10033699 | ||||||
| Item Symbol Value Unit Item | Unit | |||||
| Heat output Type of heat input, for electric storage local space heaters only | ||||||
| Nominal heat output P | nom | 3.0 kW | manual heat | charge control, with integrated thermostat | no | |
| Minimum heat output (indicative) | Pmin | 1.5 kW | manual heat | charge control with room and/or outdoor temperature feedback | no | |
| Maximum continuous heat output | Pmax,c | 3.0 kW | electronic heat | heat charge control with room and/or outdoor temperature feedback | no | |
| Auxiliary electricity consumption fan assisted heat output | no | |||||
| At nominal heat output el | max | 2.912 kW | Type of heat | heat output/room temperature control | ||
| At minimum heat output el | min | 1.457 kW | single stage | heat output and no room temperature control | no | |
| In standby mode | eSB | 0.17 W | Two or more manual stages, no room temperature control | no | ||
| with mechanic thermostat room temperature control | no | |||||
| with electronic room temperature control | no | |||||
| electronic room temperature control plus day timer | yes | |||||
| electronic room temperature control plus week timer | no | |||||
| Other control options (multiple selections possible) | ||||||
| room temperature control, with presence detection | no | |||||
| room temperature control, with open window detection | yes | |||||
| with distance control option | no | |||||
| with adaptive start control | no | |||||
| with working time limitation | no | |||||
| with black bulb sensor | yes | |||||
| Contact details | Chal-Tec GmbH, Wallstraße 16, 10179, Berlin, Germany | |||||
| Note: For electric local space heaters, the measured seasonal space heating energy efficiency % cannot be worse than the declared value at the nominal heat output of the unit. | ||||||
PRODUCT DATA SHEET
| Model identifier(s): 1003370 | ||||||
| Item Symbol Value Unit Item | Unit | |||||
| Heat output Type of heat input, for electric storage local | space heaters only | |||||
| Nominal heat output P | nom | 2.4 kW | manual heat | charge control, with integrated thermostat | no | |
| Minimum heat output (indicative) | Pmin | 1.2 kW | manual heat | charge control with room and/or outdoor temperature feedback | no | |
| Maximum continuous heat output | Pmax,c | 2.4 kW | electronic heat | heat charge control with room and/or outdoor temperature feedback | no | |
| Auxiliary electricity consumption fan assisted heat output | no | |||||
| At nominal heat output el | max | 2.283 kW | Type of | heat output/room temperature control | ||
| At minimum heat output el | min | 1.125 kW | single stage | heat output and no room temperature control | no | |
| In standby mode | eSB | 0.17 W | Two or more manual stages, no room temperature control | no | ||
| with mechanic thermostat room temperature control | no | |||||
| with electronic room temperature control | no | |||||
| electronic room temperature control plus day timer | yes | |||||
| electronic room temperature control plus week timer | no | |||||
| Other control options (multiple selections possible) | ||||||
| room temperature control, with presence detection | no | |||||
| room temperature control, with open window detection | yes | |||||
| with distance control option | no | |||||
| with adaptive start control | no | |||||
| with working time limitation | no | |||||
| with black bulb sensor | yes | |||||
| Contact details | Chal-Tec GmbH, Wallstraße 16, 10179, Berlin, Germany | |||||
| Note: For electric local space heaters, the measured seasonal space heating energy efficiency ns cannot be worse than the declared value at the nominal heat output of the unit. | ||||||
Estimado cliente,
Berlin Brands Group UK Ltd
PO Box 1145
Oxford,OX19UW
United Kingdom
Chere cliente, cher client,
Berlin Brands Group UK Ltd
PO Box 1145
Oxford,OX19UW
United Kingdom
CONSIGNES DE SECURITE
FICHE DE DONNÉES PRODUIT
FICHE DE DONNÉES PRODUIT
PRODUTTORE IMPORTATORE (UK)
Produtlore:
Chal-Tec GmbH, Wallstraße 16, 10179 Berlin, Germania.
Berlin Brands Group UK Ltd
PO Box 1145
Oxford,OX19UW
United Kingdom