
Vibe VX - Weight bench Klarfit - Free user manual and instructions
Find the device manual for free Vibe VX Klarfit in PDF.

| Product type | Vibration platform |
| Brand | Klarfit |
| Model | Vibe VX |
| Item number | 10033197, 10033198 |
| Power supply | 220-240 V ~ 50/60 Hz |
| Maximum user weight | 100 kg |
| Vibration frequency | 1 Hz to 11.5 Hz (20 levels) |
| Session duration | 1 to 10 minutes (adjustable in 1-minute increments) |
| Training modes | Manual (20 speeds) and automatic (4 programs P1-P4) |
| Connectivity | Built-in Bluetooth (speaker for music playback) |
| Remote control | Infrared, range 2.5 meters, requires battery |
| Included accessories | Resistance bands (Power Ropes), rubber mat, remote control |
| Material | Steel and plastic |
| Maintenance | Clean with damp cloth; regularly check and tighten screws; lubricate moving parts |
| Safety | Automatic shutdown after session; key lock possible; minimum safety distance of 0.5 m |
| Contraindications | Acute thrombosis, pacemaker, high-grade osteoporosis, untreated hypertension, severe diabetes, pregnancy |
| Usage | Household use only, on a flat and stable surface |
| Device weight | Approximately 25 kg (estimate) |
| Dimensions (L x W x H) | Approximately 60 x 40 x 20 cm (estimate) |
Frequently Asked Questions - Vibe VX Klarfit
User questions about Vibe VX Klarfit
0 question about this device. Answer the ones you know or ask your own.
Ask a new question about this device
Download the instructions for your Weight bench in PDF format for free! Find your manual Vibe VX - Klarfit and take your electronic device back in hand. On this page are published all the documents necessary for the use of your device. Vibe VX by Klarfit.
USER MANUAL Vibe VX Klarfit
Thank you for choosing this product from Klarfit.
Your exclusive e-book „Klarfit Healthy Fitness Kitchen" will provide you with delicious recipes for every sports enthusiast.
Get your e-book now by scanning the following QR code with your smartphone.
Congratulations on purchasing this equipment. Please read this manual carefully and take care of the following hints to avoid damages. Any failure caused by ignoring the items and cautions mentioned in the instruction manual is not covered by our warranty and any liability. Scan the QR code to get access to the latest user manual and other information about the product:

CONTENT
Safety Instructions 24
Assembly of the Power Ropes 26
Product Overview 27
Control Panel and indicators 28
Remote Control Functions 28
Listen to music via BT 29
Move the device 29
Warming Up before a Workout 30
Vibration Training at a Glance 32
Frequency ranges and
training effects 32
Training and Practices 35
Care and Maintenance 39
Troubleshooting 40
Hints on Disposal 41
TECHNICAL DATA
| Item number | 10033197, 10033198 |
| Power supply | 220-240 V ~ 50/60 Hz |
DECLARATION OF CONFORMITY
Producer:

This product is conform to the following European
Directives:
2011/65/EU (RoHS)
2014/53/EU (RED)
SAFETY INSTRUCTIONS
Before operating this unit, please read this manual carefully to ensure optimum performance and safety. This is manual should be kept available for future reference. For product improvement, the company reserves the right to change the design and specification at any time without prior notice. Pictures are for reference use only and may differ from the actual product.
- Please keep this manual in a safe place for your reference when necessary.
- Please do not assembly or use this equipment until you read this manual thoroughly & carefully. The safety and efficiency only can be achieved when the equipment is assembled, maintained and used properly. It is your responsibility to ensure that all the users are informed of all the warnings and precautions.
- For totally safe use, a stable, leveled surface is required. Protect your floor with a mat. Do not use the equipment in a damp areas such as swimming pool sauna, etc. For safety space, the equipment must have at least 0.5 meter of free space all around it.
- Before starting any exercise program you must consult your doctor to determine if you have any physical or health conditions that could create a risk to your health and safety, or prevent you from using the equipment properly. Your doctor's advice is essential if you are taking medication that affects your heart rate, blood pressure or cholesterol level.
- Be aware of your body's signals. Incorrect or excessive exercise can damage your health. Stop exercising if you experienced any of the following symptoms: pain, tightness in your chest, irregular heartbeat, extreme shortness of breath, feeling light headed, dizzy or nauseous. If you do experience any of these conditions you must consult your doctor before continuing with your exercise program.
- Do not workout immediately after meals.
- Keep children and pets away from the equipment, the equipment must be assembled and used by adults only.
- The equipment is designed for home use only.
Note: Maximum weight of the user is 100kg
- The equipment is not suitable for therapeutic use, may only be used for exercises indicated in the training instructions
- Wearing proper clothing and athletic shoes while using the equipment, Avoid wearing loose clothing that may get caught in the equipment or that may restrict or prevent movements.
- Keep your back straight while exercising.
- Always use the equipment as indicated. If you find any defective components while assembling or checking the equipment, or if you hear any unusual noises coming from the equipment during use, stop immediately. Do not use the equipment until the problem has been solved.
- Care must be taken when lifting or moving the equipment so as not to injure your back. always use proper lifting techniques and /or seek assistance if necessary.
- Keep power cord away from heat sources.
- Do not insert or drop any object into any opening.
- Unplug exercise bike before moving or cleaning it. To clean, wipe surfaces down with mild detergents and a slightly damp cloth only; never use solvents.
- Do not use the exercise bike in any location that is not temperature controlled, such as, but not limited to, garages, porches, pool rooms, bathrooms, car ports or outdoors.
- Use the bike only as described in this manual.
- Incorrect repair and structural modifications (e.g. removal or replacement of original parts) may endanger the safety of the user.
- If you are unsure whether vibration training is suitable for you for health reasons, please consult a doctor first. Avoid vibrations in the head. If these still occur, change your position on the vibration plate or reduce the vibration frequency or amplitude of your vibration plate if necessary. Never place your head and abdomen directly on the plate.
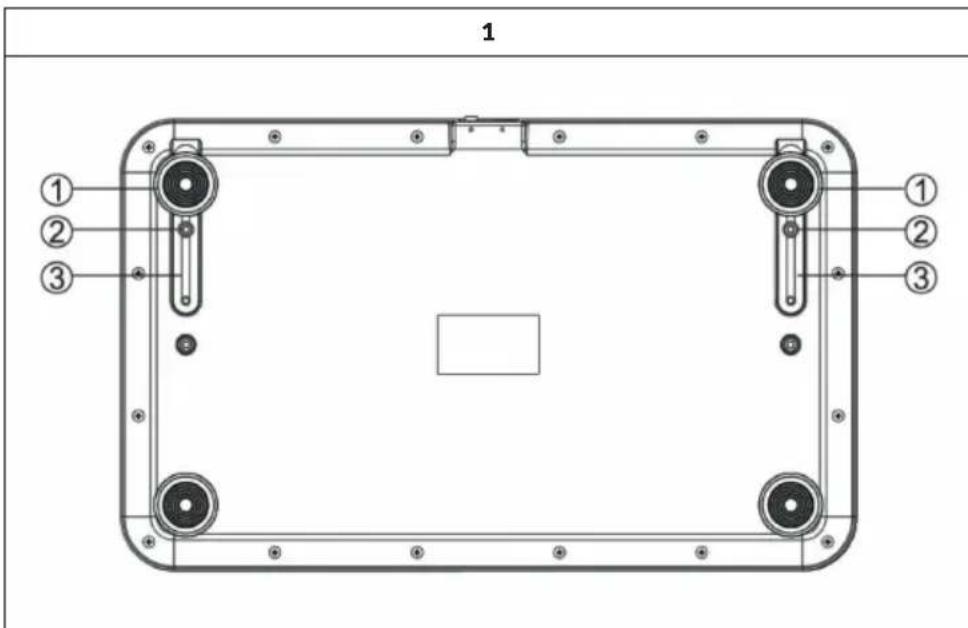
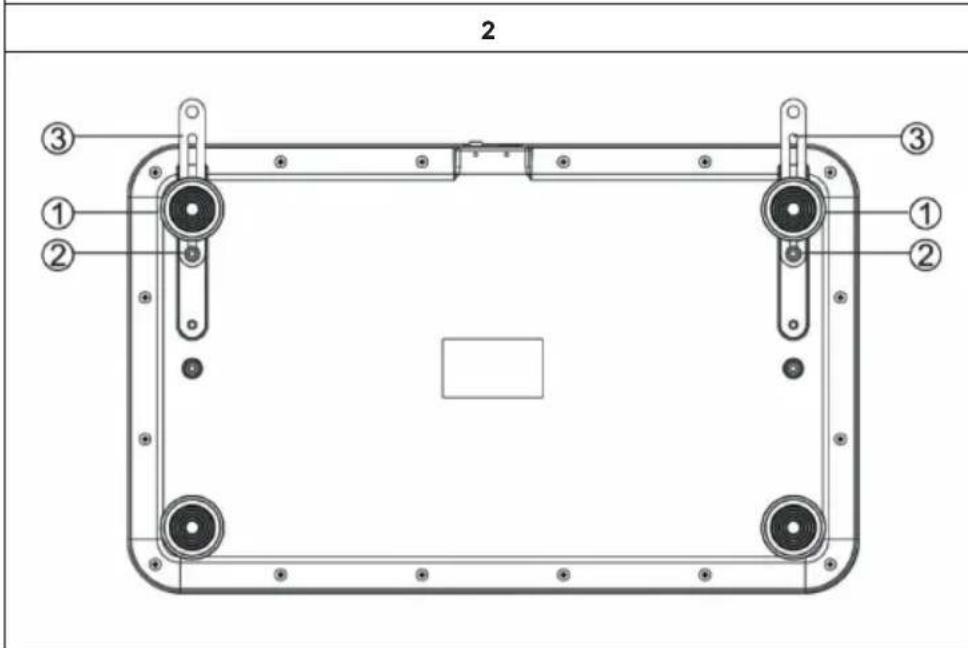
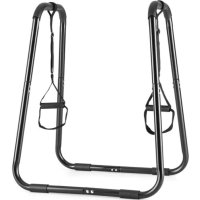
ASSEMBLY OF THE POWER ROPES
Loosen the foot pads. Loosen the screws (2) with a spanner (see figure 1). Pull the metal straps outwards (see Fig. 2). Tighten the foot pads and the screws (2) again. You can now attach the Power Ropes to the metal straps.
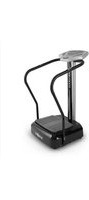
PRODUCT OVERVIEW
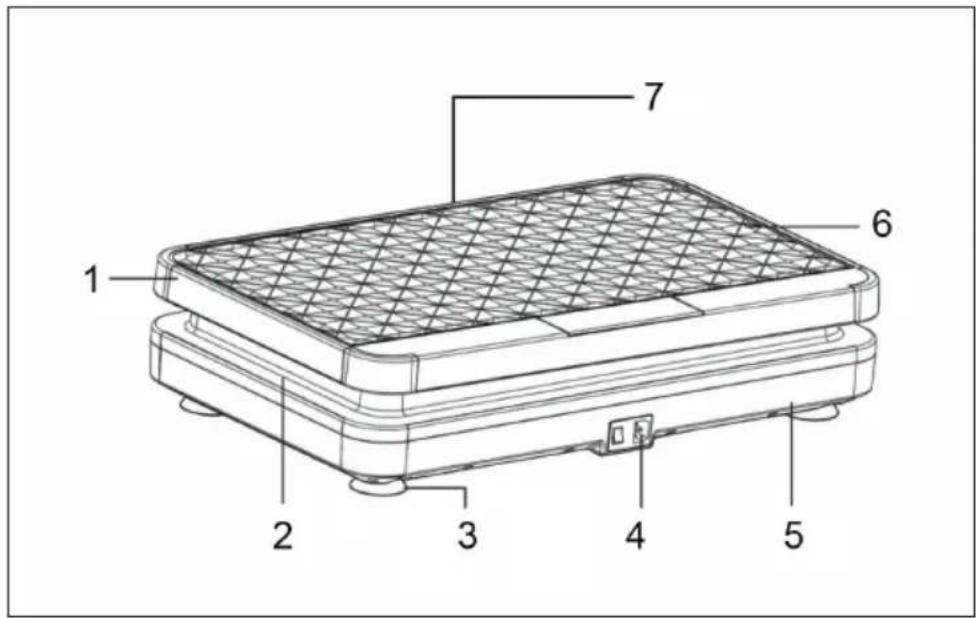
| 1 | Upper cover | 5 | Base |
| 2 | Middle cover | 6 | Rubber pedal |
| 3 | Foot pad | 7 | Built-in BT player |
| 4 | AC socket |
EN
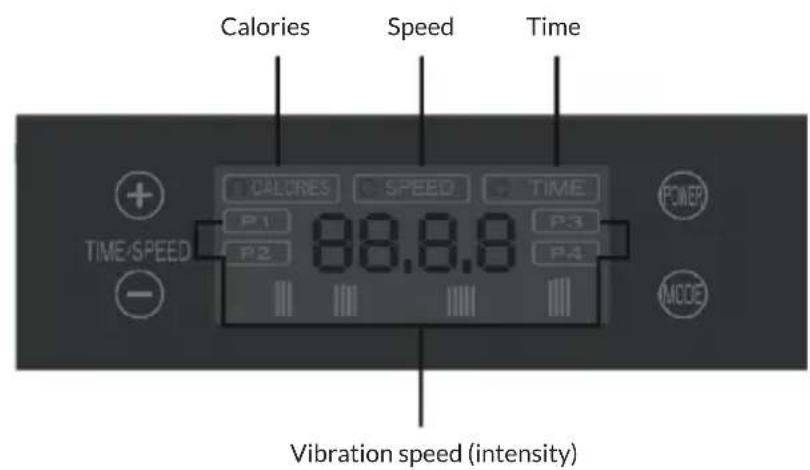
CONTROL PANEL AND INDICATORS
REMOTE CONTROL FUNCTIONS
Start/Stop
After you have connected the device and switched it on, press this start button to put it into operation. Press the Stop button when the unit is running to stop it.
Time+
The default setting is 10 minutes. The time can be increased in 10 steps.
Time-
The default setting is 10 minutes. The time can be reduced in 10 steps.
Speed high
Press the button in manual mode to increase the vibration speed (intensity) in 20 steps.
Speed low
Press the button in manual mode to reduce the vibration speed (intensity) in 20 steps.
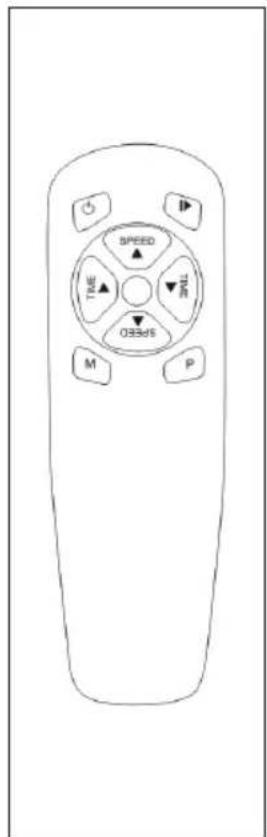
Speed rapid
Press one of the speed buttons (10 or 20) to quickly increase the vibration speed to level 10 or 20.
PRG Fashion
Manual mode is set by default. Press the PRG button to switch to automatic mode. Press the button repeatedly to select programs P1, P2, P3 or P4 (automatic) or 88 (manual). The speed levels and times are preset in programs 1-3. In program 4 you cannot change the speed and time. In program 88 (manual) you can change either the speed or the time (but not both at the same time).
Note: The effective range of the remote control is 2.5 meters. The remote control's infrared transmitter must be pointed at the infrared receiver on the vibration plate during operation.
LISTEN TO MUSIC VIA BT
Start BT on your smart device and then start the search for other BT devices. In the BT list, search for the device with the name [Klarfit] and connect both devices. You can now listen to music via the integrated loudspeaker of the vibration plate.
Note: When you switch on the vibration plate, BT is automatically activated.
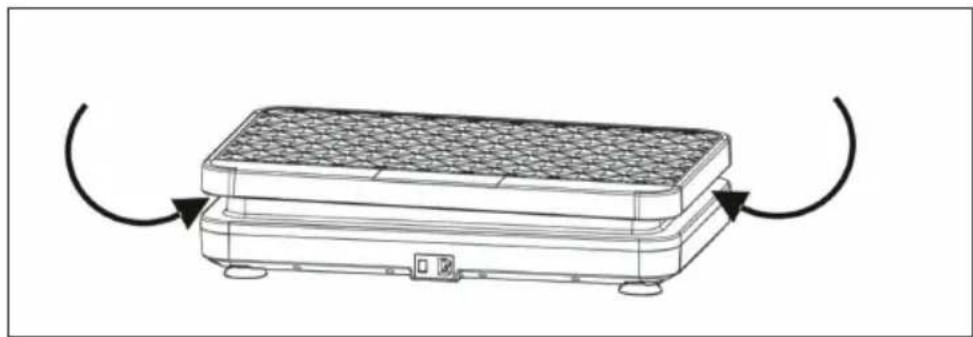
MOVE THE DEVICE
If you need to move the unit, hold it in the middle of the side as shown in the picture.
WARMING UP BEFORE A WORKOUT
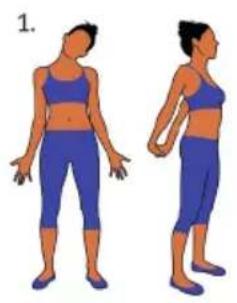


Perform the movements before each workout to mobilize your joints and activate your muscles.
Should a movement be uncomfortable or painful, skip this movement and consult your doctor or fitness instructor about suitable warm-up movements.
Each movement should be repeated (right and left) so that you can start the cardio training relaxed.
Take about 5 minutes to do the following Klarfit training routine:
- Tilt the head sideways, slowly alternating from right to left. Then mobilize your shoulders (circular movements and shrugging the shoulders).
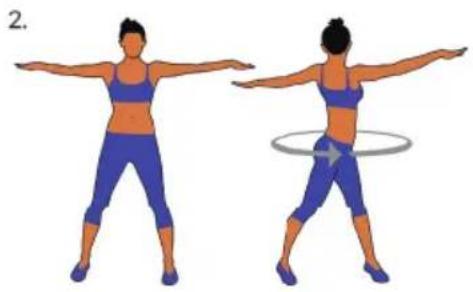
- Turn the hips while the arms are stretched out. The feet are not firmly fixed to the ground (the ankles follow the body's rotation).
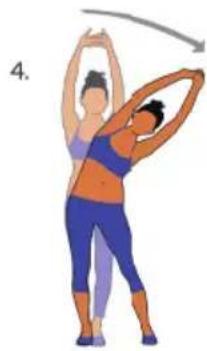
- Bend to the side and raise one arm straight up. Stay in this position for several seconds on each side.
- Bend to the side and raise both arms above your head with palms together. Again, remain on each side for several seconds. The exercise is now a bit more intense with the second arm joining.
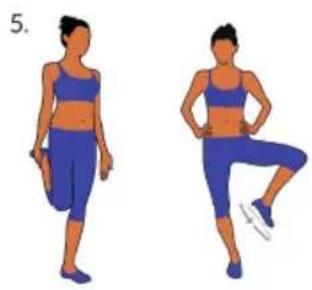
- Stand on one leg and hold the instep of the other foot with your hand. Mobilize it so as to stretch the thigh lightly. If necessary, hold onto something to keep your balance. Stand on one leg and trace a circle with your foot in the air in both directions (counter clockwise and clockwise).
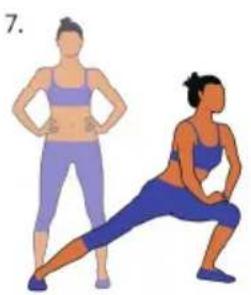
- Put one leg forward and with your arms support the weight of your upper body on your thigh. Position your legs so as to provide a stretch for the rear leg's calf muscles.
- Repeat the previous exercise with more distance between your feet. The stretch will now be more intense.
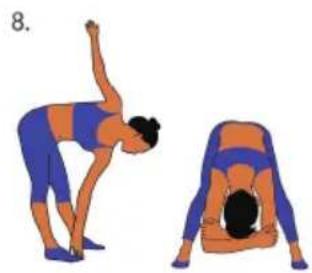
- Bend forward while keeping your legs straight and alternatingly touch each hand to the opposite foot. Finally, let yourself hang down and relax.
Advantages of vibration training
Calm and high-frequency vibrations and oscillations, combined with a range of exercises, stimulate the muscular tissue and reduce fat accumulation. In addition, the elasticity of the muscles will be increased, the body shaped and the general well-being positively influenced.
Possible contra indications
Your practitioner and the Physiotherapist Berlin point out that the training on the vibration plate is not suitable when the following diagnoses have been made:
- Acute thrombosis
Cardiac and brain pacemakers
High degree of osteoporosis
Untreated hypertension - Severe diabetes
Pregnancy
FREQUENCY RANGES AND TRAINING EFFECTS
Low frequencies (approx. 1 - 12 Hz)
Low frequencies between 5 and 12Hz are used for the mobilisation. At low frequencies, the movement of the training platform is not fast enough to cause stretch reflexes. Due to the intended compensation of the rocking movement, low frequencies are therefore particularly used for the mobilisation and are expressed by a clearly increased movement of the hip.
Positive effects:
Relaxation of muscles, "cool-down".
- Improvement of proprioception / balance
- Agility
Equilibriumtraining
Medium frequencies (approx. 10-20 Hz)
The training goal at medium frequencies of 10 to 20 Hertz (oscillations per second) is the training of the muscle function as such. At a training frequency of 15 Hertz, for example, the time between two reflex cycles is approx. 67 milliseconds (thousandths of a second). After the reflex-controlled contraction, the remaining time until the next contraction is sufficient for the muscle to relax again. The average physiological time for a complete contraction/relaxation cycle is only about 50 milliseconds. This is particularly important when the basic functions of the muscle, namely the ability to contract and relax as well as coordination, are to be trained effectively. Due to the large number of repetitions (e.g. 3 minutes Galileo training at 18 Hertz = 3,240 cycles) the improvement of the muscle functions can be achieved considerably faster than with most other training methods such as machine training in the fitness centre. Another decisive factor is that the muscle activity in the Galileo Training does not have to be deliberately controlled, but can be reflex-based and therefore largely uninfluenced by the will of the user. This ensures that the control cycles consisting of muscle bands / tendons / cartilage nerves can be improved independently. At the same time, the entire muscle chain and thus its coordination can always be trained to a large extent. The decisive factor for this coordination training is that the entire muscle chain can be stimulated in a physiologically appropriate pattern similar to the human gait. This is why we also speak of mechano-stimulation of the muscles.
Positive effects:
- Improvement of muscle function and coordination
Muscle relaxation - Stretching of the muscular and tendon apparatus
- Improvement of flexibility
Relaxation of the back muscles - Muscle length training
Fascia training
12-14 Hz: Reduction of sore muscles
High frequencies (approx. 20 - 36 Hz)
At high frequencies, the muscle does not have enough time to achieve complete relaxation within the short time between two cycles. Rather, the muscle is forced to contract again when it is about to relax or is already partially relaxed. As a result, inter- and intramuscular coordination in particular is trained with greater forces and within very short periods of time, which ultimately leads to an increase in the muscular performance.
Positive effects:
Tone increase
Increase of muscle performance
Restoration of muscle strength
Models
10032162,
100321063
Frequency table for the vibration plate
| Level | Frequency | |
| 1/min Hz | ||
| 1420 7.00 | ||
| 2429 7.16 | ||
| 3439 7.31 | ||
| 4448 7.47 | ||
| 5457 7.62 | ||
| 6467 7.78 | ||
| 7476 7.93 | ||
| 8485 8.09 | ||
| 9494 8.24 | ||
| 10504 8.40 | ||
| 11513 8.55 | ||
| 12522 8.71 | ||
| 13532 8.86 | ||
| 14541 9.02 | ||
| 15550 9.17 | ||
| 16560 9.33 | ||
| 17569 9.48 | ||
| 18578 9.64 | ||
| 19588 9.79 | ||
| 20597 9.95 | ||
| 21606 10.10 | ||
| 22616 10.26 | ||
| 23625 10.41 | ||
| 24634 10.57 | ||
| 25643 10.72 | ||
| 26653 10.88 | ||
| 27662 11.03 | ||
| 28671 11.19 | ||
| 29681 11.34 | ||
| 30690 11.50 | ||
TRAINING AND PRACTICES
Please read the Operating Instructions section of this instruction manual before using the machine. In order to improve your posture and balance, you should ideally not hold on to anything while standing on the machine; nevertheless, even though the vast majority of people need no support, we recommend that you place the machine next to a chair at least for the first time that you stand on it.
Select which exercises you prefer from the options below. We suggest you start a session in a standing or squatting position, and finish a session with a mix of stretch positions and a calf massage. If you are standing on the machine when it stops, then stay on the platform for 20 seconds until you regain your equilibrium.
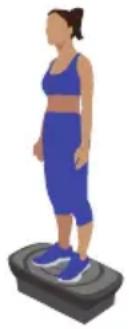
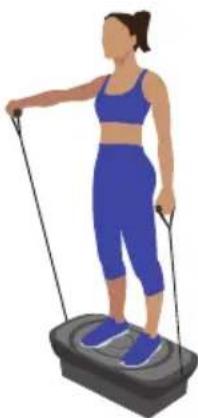
Standing - Exercises Legs, Buttocks & Core Muscles
Simply stand on the platform and have your knees slightly bent. This position exercises the legs, buttocks, and all of the core muscles. As you increase the speed, you will feel increased movement through your pelvis, abdominal muscles, lower lumbar muscles, and up into the lateral muscles in your back. Just relax, do not push against the platform, the machine does all the work for you.
Maximum Time: 10 minutes
Recommended Use: 3 minutes
If you prefer, you can hold the upper body resistance bands which aids stability and gives you the opportunity to exercise the upper torso and arms.

Squatting
Stand on the platform with your knees bent. This will lessen the stimulation of the upper body and concentrate the effects more on the calves, thighs and buttocks.
Maximum Time: 10 minutes
Recommended Use: 3 minutes
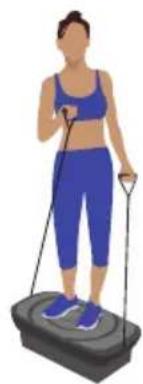
Chest Exerciser
Holding the bands, and with a minimum of waist movement, pull one hand across your torso to target the pectoral muscles for toning the chest. Alternate arms.
Maximum Time: 10 minutes
Recommended Use: 3 sets of 10 repetitions, (one rep includes both a left and right movement), over 5 to 10 minutes.
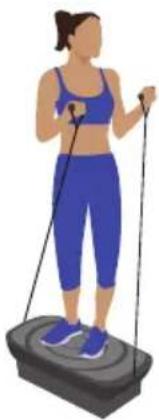
Torso Twist
With your feet facing forward, twist from the waist while holding both bands near the chest. Unless under instruction, do not do this exercise if you have suffered knee problems.
Maximum Time: 10 minutes Maximum Speed: 5
Recommended Use: 3 sets of 10 repetitions, (one rep includes both a left and right movement), over 5 to 10 minutes.
Arm Curls
One of the best exercises for toning the arms and usually done with both arms at the same time. Start with both hands by your sides, and bending at the elbow raise your hands with your palms facing up.
Maximum Time: 10 minutes
Recommended Use: 3 sets of 10 reps, over 3 to 10 minutes.
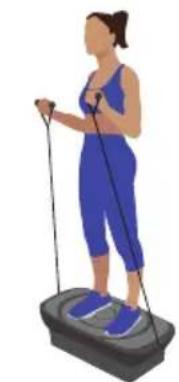
Front Raise
Usually done one arm at a time, this exercises the whole of the upper body, the shoulders in particular. Lateral Raise Pull the bands out to the side to form a cross, this will exercise the shoulder muscles and the lateral muscles in your upper back.
Maximum Time: 10 minutes
Recommended Use: 3 sets of 10 repetitions of each exercise, to be done over a 5 to 10 minute period.
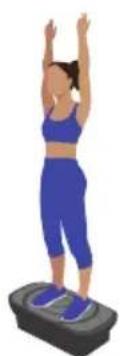
Stretch & Hold
Raise you hands above your head and hold the position for 5 seconds. Relax and repeat. These can be done with or without the machine running.
Maximum Time: 1 minute
Recommended Use: 1 minute
Maximum Speed: 8
Hamstring & Calf Stretch
Gently stretch the hamstrings and hold for 5 seconds. Relax and repeat. These can be done with or without the machine running.
Maximum Time: 1 minute Recommended Use: 1 minute Maximum Speed: 8
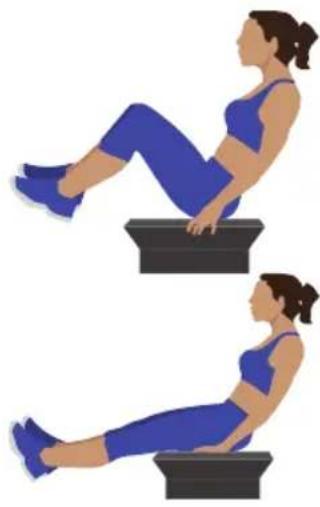
Abdominals
Simply standing on the machine exercises your abdominals but for an additional exercise you can switch between these two positions. Try to keep your back straight.
Maximum Time: 2 minutes
Recommended Use: 1 minute
Maximum Speed: 8
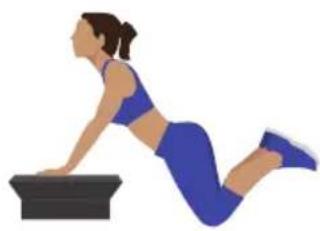
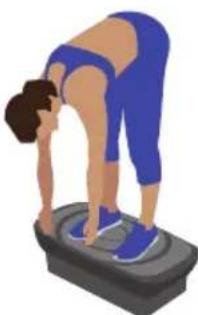
Arm & Shoulder Massage
With your knees on the floor, place your hands on the platform. To increase the intensity of the exercise you can lower your body closer to the platform (keep your back straight).

Maximum Time: 2 minutes
Recommended Use: 1 minute
Maximum Speed: 8

Leg Massage
Rest your calves on the platform. Turn your feet outward for a deeper massage.
Maximum Time: 5 minutes
Recommended Use: 2 minutes
Maximum Speed: 8
CARE AND MAINTENANCE
Note: As with all training machines with mechanical, moving components, screws may loosen due to frequent use. We therefore recommend that you check them regularly and, if necessary, retighten them with a suitable key. Clean your training device regularly with a damp cloth to clean the surfaces from sweat and dust.
- Often clean the exercise bike with clean cloth to keep the clean appearance.
- The safety level of the equipment only can be maintained if it is regularly examined for damage and or /wear and tear.(e.g. handle bar, pedals and seat ...etc.). It is vital that any faulty parts are replaced and the it is not used until completed repaired.
- Regularly check that the elements fastened with nuts and bolts are correctly tightened.
- Remember regularly to grease moving parts.
- Special attention to the component, most of them are susceptible to wear like brake system, foot pad etc.
- As sweat is very corrosive, do not allow it to come into contact with the enameled or chromed parts of the equipment, particularly the computer. Immediately wipe the equipment after using. The enameled parts can be cleaned using a damp sponge. All aggressive or corrosive products must be avoided.
- Storing the equipment in a clean and dry environment away from children.
TROUBLESHOOTING
| Problem Possible cause | Possible solutions | |
| The device cannot be started. | The power plug is not plugged in. | Plug the power plug into the socket. |
| The device is not switched on. | Turn the device on. | |
| The fuse is blown. Check | your fuses. | |
| The machine makes noises during training. | Normal noises generated by the motor or the abrasion between the mechanical units. | Noises during training are normal and do not constitute a defect in the product. |
| The remote control does not work. | The batteries are empty. | Replace the batteries. |
| The remote control is too far away from the unit. | Move the remote control closer to the unit. | |
| The device stops suddenly. | The training time has expired. | Wait 10 minutes and then restart. |
| The device does not work. | Too many commands were sent to the device by the remote control. | Turn the unit off and restart it. |

According to the European waste regulation 2012/19/EU this symbol on the product or on its packaging indicates that this product may not be treated as household waste. Instead it should be taken to the appropriate collection point for the recycling of electrical and electronic equipment. By ensuring this product is disposed of correctly, you will help prevent potential negative consequences for the environment and human health, which could otherwise be caused by inappropriate waste handling of this product. For more detailed information about recycling of this product, please contact your local council or your household waste disposal service.
Your product contains batteries covered by the European Directive. 2006/66/EC, which cannot be disposed of with normal household waste. Please check local rules on separate collection of batteries. The correct disposal of batteries helps prevent potentially negative consequences on the environment and human health.
Estimado cliente:
Chal-Tec GmbH, Wallstraße 16, 10179 Berlin, Germany.
Basse frequence (circa 1-12 Hz)

- CONTENT
- TECHNICAL DATA
- DECLARATION OF CONFORMITY
- SAFETY INSTRUCTIONS
- ASSEMBLY OF THE POWER ROPES
- PRODUCT OVERVIEW
- CONTROL PANEL AND INDICATORS
- REMOTE CONTROL FUNCTIONS
- Start/Stop
- Time+
- Time-
- Speed high
- Speed low
- Speed rapid
- PRG Fashion
- LISTEN TO MUSIC VIA BT
- MOVE THE DEVICE
- WARMING UP BEFORE A WORKOUT
- Take about 5 minutes to do the following Klarfit training routine:
- Advantages of vibration training
- Possible contra indications
- FREQUENCY RANGES AND TRAINING EFFECTS
- Low frequencies (approx. 1 - 12 Hz)
- Medium frequencies (approx. 10-20 Hz)
- Positive effects:
- High frequencies (approx. 20 - 36 Hz)
- TRAINING AND PRACTICES
- Standing - Exercises Legs, Buttocks & Core Muscles
- Squatting
- Chest Exerciser
- Torso Twist
- Arm Curls
- Front Raise
- Stretch & Hold
- Hamstring & Calf Stretch
- Abdominals
- Arm & Shoulder Massage
- Leg Massage
- CARE AND MAINTENANCE
- TROUBLESHOOTING
- Estimado cliente:
- Basse frequence (circa 1-12 Hz)
Brand : Klarfit
Model : Vibe VX
Category : Weight bench