Drive - Hi-fi system Numan - Free user manual and instructions
Find the device manual for free Drive Numan in PDF.

User questions about Drive Numan
0 question about this device. Answer the ones you know or ask your own.
Ask a new question about this device
Download the instructions for your Hi-fi system in PDF format for free! Find your manual Drive - Numan and take your electronic device back in hand. On this page are published all the documents necessary for the use of your device. Drive by Numan.
USER MANUAL Drive Numan
https://use.berlin/10034537

We are very pleased you've chosen to purchase a NUMAN product. A spectrum of pure sound, fun and satisfaction!
Before using your product, please take some time to read through the user manual to become familiar with all the great features this product has to offer. Be sure to retain the manual in a safe location for future reference.
If you have any questions or suggestions, please don't hesitate to contact us via our website www.hifi-tower.co.uk.
We will gladly help you as quickly as possible.
Best Regard from Berlin
Your NUMAN Team
CONTENTS
Technical Data and Packing Content 22
Safety Instructions 24
Product Overview and Controls. 26
Commissioning and Operation 29
Inputs and Outputs 33
Cleaning and Care 34
Troubleshooting 35
Disposal 36
Declaration of Conformity 37

TECHNICAL DATA AND PACKING CONTENT
| Item number 10034537, 10034538, 10034539 | |
| Stromversorgung AC 220-240 V ~ 50/60 Hz | |
| Power consumption Rated: ≤ 400 W @ 1/8 RMS power | |
| Standby: ≤ 0.5 W | |
| Power output 170 W x 2 (4 Ohm,THD 1%,1 kHz), 85 x 4 (8 Ohm,THD 1%,1 kHz)180 W x 2 (4 Ohm,THD 10%,1 kHz), 90 x 4 (8 Ohm,THD 10%,1 kHz) | |
| Impedance 4 Ω (speaker mode A or B), 8 Ohm (speaker mode A+B) | |
| Input sensitivity LINE 1: 700 ± 100 mV | |

| THD 0,01 % | |
| Frequency response 20 Hz - 20 kHz ± 3 dB | |
| Tuning settings Bass: ± 8 dB @ 80 Hz | |
| Treble: ± 8 dB @10 kHz | |
| Max. Input ≥2 V @ RCA input | |
| ≥ 20 mV @ PHONO input | |
| Crossover frequency of subwoofer out | 20 Hz - 1 kHz |
| Net weight 5.9 kg | |
| Dimension 380 mm (W) x 330 mm (D) x 124 mm (H) | |
PACKING CONTENT
- Amplifier (1x)
Power cord (1x) - Instruction manual (1x)
Gloves (1 pair) - RCA cable (1x)
Remote control (1x) - AAA batteries for remote control (2x)

SAFETYINSTRUCTIONS
Read all instructions carefully before use and keep the manual in a safe place for future reference.
- Observe all warnings.
- Follow all instructions for use.
- Never use this device near water.
- Only clean the device with a dry cloth.
- Do not block the ventilation openings of the device.
- Install the unit according to the manufacturer's installation instructions.
- Do not install near heat sources such as radiant heaters, heat lamps, stoves, or other equipment (including other amplifiers) that produce heat.
- Do not defeat the safety purpose of the polarized or grounding-type plug. A polarized plug has two blades with one wider than the other. A grounding type plug has two blades and a third grounding prong. The wide blade or the third prong are provided for your safety. If the provided plug does not fit into your outlet, consult an electrician for replacement of the obsolete outlet.
- Ensure that the power cord is positioned so that it cannot be tripped over or pinched. Particular attention should be paid to the power plug, the point of entry into the outlet, and the point where the cable exits the unit.

- Only use accessories recommended by the manufacturer.
- Only use scales, stands, tripods, brackets, or tables recommended by the manufacturer or sold for the equipment. Be careful when moving the cart when transporting the product with a cart to prevent the product from falling.
- Unplug this appliance from the wall outlet during lightning storms or when it will not be used for an extended period of time.
- Refer all repairs and maintenance to qualified service personnel. Repair will be necessary if the product has been damaged in any other way. For example, if the power plug or cord is damaged, water has been spilled or objects have fallen into the apparatus, the apparatus has been exposed to rain or moisture, the apparatus has been dropped, or does not operate normally.
- Do not expose the apparatus to splash water or place objects filled with liquids, such as vases, on the apparatus.
- Do not expose the batteries to heat, such as direct sunlight, fire, etc.
- The mains plug should always be easily accessible so that it can be quickly removed in an emergency.
- This equipment should be placed out of the reach of children.

PRODUCT OVERVIEW AND CONTROLS
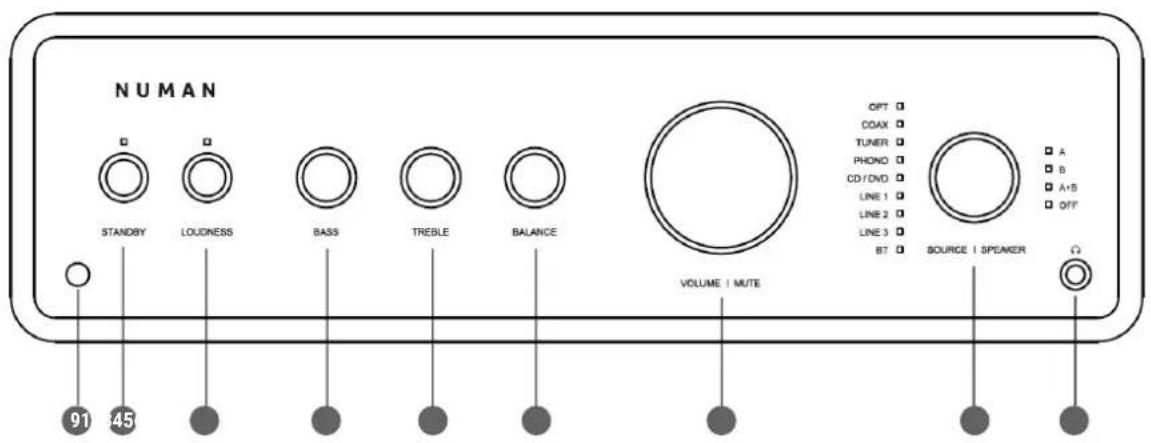
1 STANDBY
2 LOUDNESS
BASS
4 TREBLE
5 BALANCE
6 VOLUME & MUTE
7 SOURCE & SPEAKER
14"headphone jack (3,5 mm)
Remote sensor

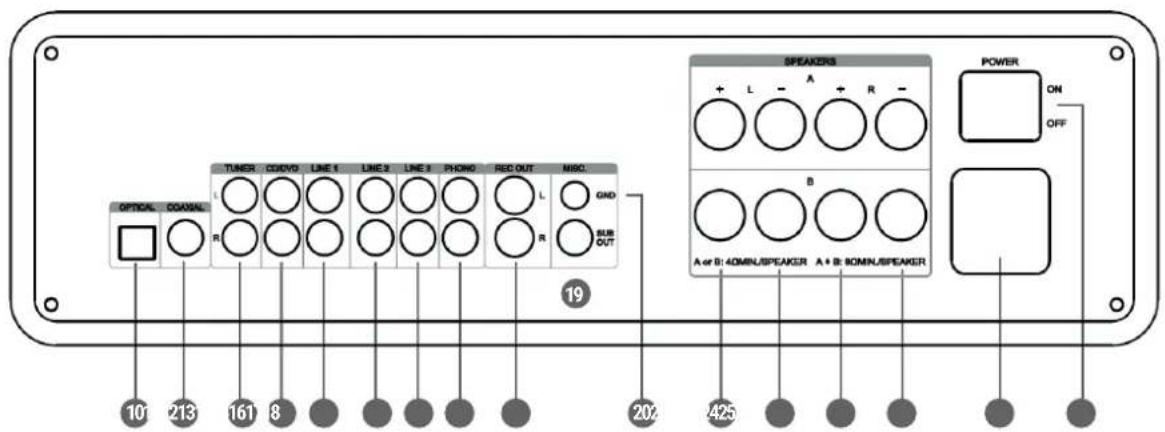
10 OPTICAL INPUT
11 COAXIAL INPUT
12 TUNER INPUT
CD/DVD INPUT RCA INPUT
14 LINE 1 INPUT
LINE2INPUT
16 LINE 3 INPUT
17 PHONO INPUT
18 RECORD OUTPUT
19 SUBWOOFER OUTPUT
GROUND CONNECTOR
21-24 Speaker terminals
25 Electrical connection
26 On/Off button


1 Standby
2 MUTE
3 Increase volume
Decrease volume
Previous title (only in BT mode)
Next track (only in BT mode)
Play/Pause (only in BT mode)
8 HIGH: Scroll speaker selection up
9 DOWN: Scroll speaker selection down
PAIR (the current BT connection is disconnected and a new connection is established)
11 LOUD (bass and treble are improved at low volume)
UP: Increase spaker volume
13 DOWN: Decrease spaker volume

COMMISSIONING AND OPERATION
CONNECTING THE POWER
Connect one end of the power cord to the amplifier and the other end to a wall outlet. Move the power button to the "ON" position. The LED indicator will turn red and the amplifier is in standby mode.
TURING ON
- Activate the amplifier by pressing the STANDBY button on the unit or the standby button on the remote control.
- When the amplifier is active, the LED indicator will turn white.

INPUT AND OUTPUT SOURCE SELECTION
- Input source selection: Turn the SOURCE/SPEAKER knob on the front of the unit or press and hold the INPUT UP/DOWN buttons on the remote control until the LED next to the desired input source lights.
| OPT Optical digital audio output apparatus | |
| COAX Coaxial digital audio output apparatus | |
| TUNER Radio | |
| PHONO Turntable | |
| CD/DVD CD/DVD Player | |
| LINE 1 | External source with AUX connectionLINE 2 |
| LINE 3 | |
| BT BT device | |
- Output source selection: Press the VOLUME/MUTE button once to switch to the output source. Then, turn the SOURCE/SPEAKER knob on the front of the unit or press the SPEAKER UP/DOWN buttons on the remote until the LED next to the desired output source lights.

BASS SETTING
- Turn the BASS knob on the front of the unit.
The adjustment range is ± 8 dB.
TREBLE ADJUSTMENT
- Turn the TREBLE knob on the front of the unit.
The adjustment range is ± 8 dB.
SOUND
- Volume adjustment: Turn the VOLUME/MUTE knob on the front panel or press the volume buttons on the remote control to adjust the volume. The volume is displayed on the LED indicator.
- Press VOLUME/MUTE on the front panel of the unit or press the MUTE button on the remote control. The LED indicator will turn red. Press the corresponding button again to turn the volume back on.

BT CONNECTION
- Turn the SOURCE/SPEAKER knob on the front panel of the unit, or press the buttons INPUT UP/DOWN of the remote control until the BT indicator lights up.
- After a few seconds, the BT LED will flash. This means that the unit is in search mode and can detect other BT units.
- Activate BT on the mobile device you want to connect to the amplifier. The device is displayed in the device list of the mobile device as "NUMAN Drive". Select this from the device list to establish a connection.
- If you need to enter a password, enter "0000" to agree to the connection.
- After the connection has been successfully established, the BT LED will light permanently white and stop flashing.

INPUTS AND OUTPUTS
AUX INPUT
Connect a source device with analogue audio (e.g. A cassette or CD player to RCA jack). A cable with RCA plugs is required to make this connection (sold separately).
| TUNER Radio | |
| PHONO Turntable | |
| CD/DVD CD/DVD Player | |
| LINE 1 | External source with AUX connectionLINE 2 |
| LINE 3 |
OPTICAL & COAXIAL INPUT
Connect the digital sound output of a source device to the optical/ coaxial jack with a optical (with TOSLINK plug) / coaxial cable.

SPEAKER OUTPUT
If possible, using high-quality twin-core speaker single wire with a diameter of at least 1mm^2 to connect the speaker output terminal.
Note: Make sure the polarity is correct! Otherwise, the sound quality will suffer.
- Connect the similar colored terminal.
- The strands of the speaker cables are marked with different colors or shapes Split the single wire down to approx. 30mm and remove approx. 10mm of the insulation on each strand. Twist the single wire so that no strands are protruding. Tin coating is not necessary. Turn the respective connector terminal out and insert the end of the cable in the corresponding opening. And then, turn the connector terminal in opposite direction to clamp the cable in place.
CLEANING AND CARE
Unplug the mains lead before cleaning the product. Clean the product using a soft, moist cloth. Use a mild detergent and never use solvents or strong, abrasive cleaning agents for cleaning the product.

TROUBLESHOOTING
| Problem Possible cause Resolution | ||
| The device does not work No power Make sure that the device is plugged in. | Check the function of the socket outlet with another device. | |
| No sound Incorrect input source selected Select the correct input source | ||
| Volume set too low Gradually increase the volume of the amplifier and the mobile device | ||
| Incorrect connection Check all cable connections | ||
| No sound in BT mode No BT connection Established a BT connection | ||
| The device was not selected as the output source. | Select the device as output source | |
| BT connection is affected by another radio device | Move the device to another location and check the BT connection again. | |
| Interfering noises System overload Turn down the output level of the external | playback device. | |
| Poor sound quality Check the unit again by selecting a higher quality source. | ||

DISPOSAL

According to the European waste regulation 2002/96/EC this symbol on the product or on its packaging Indicates that this product may not be treated as household waste. Instead it should be taken to the appropriate Collection point for the recycling of electrical and electronic equipment. By ensuring this product is disposed of correctly, you will help prevent potential negative consequences for the environment and Human health, which could otherwise be caused by inappropriate waste handling of this product. For more Detailed information about recycling of this product, please contact your local council or your household Waste disposal service.
Your product contains batteries covered by the european directive. 2006/66/EC, which cannot be disposed of with normal Household waste. Please check local rules on separate collection of batteries. The correct disposal of batteries helps prevent Potentially negative consequences on the environment and human health.

DECLARATION OF CONFORMIRY

Producer: Chal-Tec GmbH, Wallstraße 16, 10179 Berlin, Germany.
This product is conform to the following European Directives:
2011/65/EU (RoHS)
2014/53/EU (RED)
The complete declaration of conformity of the manufacturer can be found at the following link:
https://use.berlin/10034537

https://use.berlin/10034537

https://use.berlin/10034537

https://use.berlin/10034537
Chal-Tec GmbH
Wallstraße 16
10179 Berlin, Germany