
DPL 2243 - Digital photo frame Trevi - Free user manual and instructions
Find the device manual for free DPL 2243 Trevi in PDF.
| Product type | Digital photo frame |
| Brand | Trevi |
| Model | DPL 2243 |
| Screen | LED 13.3 inches (16:9) |
| Display area | 284 × 178 mm |
| Image formats | JPG, BMP, GIF |
| Audio formats | MP3, WMA, WAV, OGG, AAC, APE, FLAC |
| Video formats | AVI, MPG, MP4, 3GP, VOB, FLV, RMVB, MKV |
| Text format | TXT |
| Inputs | USB 2.0, SD card reader |
| Power supply | AC adapter 230V-50Hz / 12V =A |
| Remote control battery | 1 × CR2025 3V |
| Main functions | Photo, music, video playback, e-books, calendar, alarm |
| Slideshow speed | Adjustable |
| Repeat | Single, continuous or off |
| Auto play | Adjustable (photos, music, video) |
| Alarm | Yes, with settings for time, frequency, ringtone, volume, duration, repeat |
| Calendar | Analog/digital display with date |
| OSD languages | Adjustable |
| Brightness | Adjustable |
| Factory settings | Restorable |
| Cleaning | Soft cloth slightly damp, avoid solvents |
| Safety | Do not expose to water, heat sources, dust, vibrations |
Frequently Asked Questions - DPL 2243 Trevi
User questions about DPL 2243 Trevi
0 question about this device. Answer the ones you know or ask your own.
Ask a new question about this device
Download the instructions for your Digital photo frame in PDF format for free! Find your manual DPL 2243 - Trevi and take your electronic device back in hand. On this page are published all the documents necessary for the use of your device. DPL 2243 by Trevi.
USER MANUAL DPL 2243 Trevi
FOTO FRAME DIGITALE
Manuale d'uso e collegamento
DIGITAL PHOTO FRAME
Instruction Manual
ENGITADEUFRAESP
DPL 2243
13.3" 16:9
This device is a high precision electronic instrument, avoid using it in the following cases:
- Near magnetic fields.
- Near sources of heat such as radiators and heaters.
- In very damp places like bathrooms, swimming pools, etc.
• In very dusty places.
• In places subject to strong vibrations. - Keep your ear to the speaker during development and volume settings, and in particular to keep the volume to minimum when lighting.
- Position the device so that its sides there is enough space for the free air circulation (at least 5 cm).
- If liquids penetrate into the appliance immediately disconnect the mains plug from the socket and allow the appliance to the nearest authorized TREVI service center.
- If the system fails to function properly, unplug the power cord from the wall outlet. Reconnect the power cord, then power on the system.
- No naked flame source, such as lighted candles, should be placed on the apparatus.
- The apparatus shall not be exposed to dripping or splashing and no objects filled with liquids, such as vases, shall be placed on the apparatus.
- Keep this manual for future reference.
CARE AND MAINTENANCE
For cleaning we recommend using a soft, slightly damp cloth. Avoid solvents or abrasives.
IMPORTANT
This device is designed for home use. The good construction of this equipment ensures proper function for a long time. If however arise some inconvenience, you should consult your nearest authorized TREVI service center. TREVI follows a policy of continuous research and development. Therefore, the products may show different characteristics from those described.
1. PRODUCT SPECIFICATIONS
1.1 Features
• Supports JPG, PNG format picture browsing; supports image rotation, scaling; supports auto play with multiple special effects, supports background music playback;
- Clock and calendar display: supports calendar, month calendar and clock display; supports MP3 and WMA audio file format playback; supports AVI, MP4, MKV, RMVB, MOV video file format playback;
• Can set for system parameters and functions;
• Supports a large variety of cards, including: SD, MMC, etc., and supports software upgrading via SD card;
• Supports USB2.0, can be configured as USB OTG; supports a large variety of U disk, MP3 and other USB devices;
• Support infrared remote control.
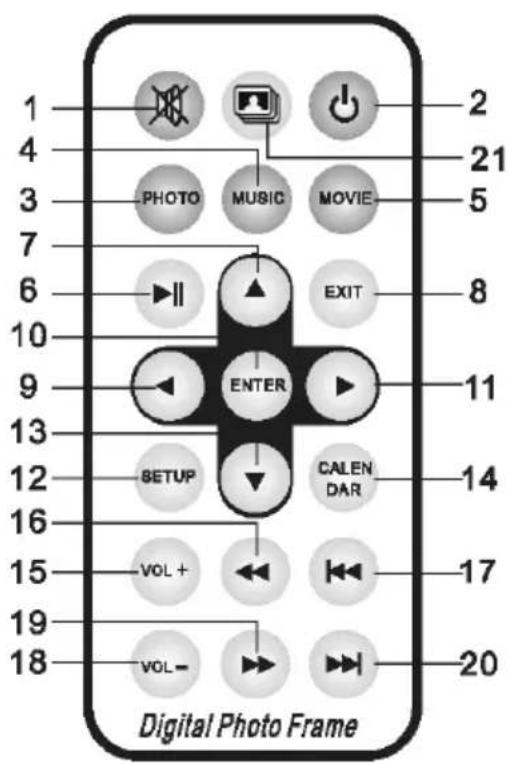
2. KEY DEFINITIONS IN THE REMOTE CONTROL
Users can use the remote control to achieve full functions. Key definitions in the remote control are as below:
- MUTE: Press to turn off the sound when playing; press again to re-open the sound.
- STANDBY: Press to enter into standby mode when playing; press again to return.
- PHOTO: Picture playback shortcuts.
- MUSIC: Music playback shortcuts.
- MOVIE: Movie Playback shortcuts,
- PLAY/PAUSE: Play / Pause.
- UP: Cursor up key.
- EXIT: Return key.
- LEFT: Cursor left key.
- ENTER: Confirm key.
- RIGHT: Cursor right key.
- SETUP: Setting Shortcuts.
- DOWN: Cursor down key.
- CALENDAR: Clock and calendar shortcuts.
- VOL+: The button to increase the sound volume.
- ◀◀: Rewind key.
- PREVIOUS: Move to previous picture, song or video.
- VOL-: The button to decrease the sound volume.
- ▶▶: Fast forward key.
- NEXT: Move to next picture, song or video.
- Slid show: Play photos+music

3. INSTRUCTIONS
3.1 Power On I Off
After plug in, it shows the main menu screen, as shown below:
Press "POWER" button on the remote for 2 second to turn off the power. Or switch the button on the machine "ON/OFF" to power on/off
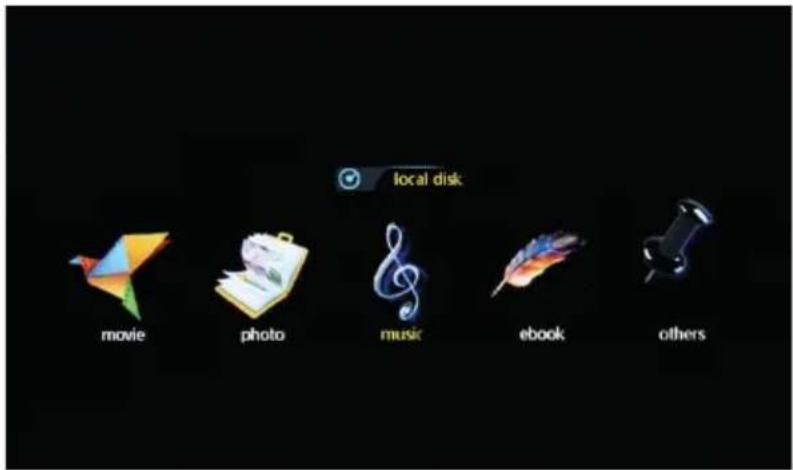
3.2 Main Menu Screen
Main menu screen consists five icons: movie, photo, music, e-book, others.
4. MOVIE PLAYBACK
4.1 Auto play the video when power on
If "Autoplay" option of the Main Menu is designated for "Off", or with no SD and USB inserting, it will show the main menu screen when power on.
If "Autoplay" option of the Main Menu is designated for other options, and with USB or SD inserting, it will auto play the designed options. When SD and USB are inserted simultaneously, it will play the connect in USB by default.
4.2 Video browsing and playback screen
![相簿老化视频文件.avi • 韩雷 - 维起[mtvz.cnj].avi • ttpim4.mp4 • RMVB_720p.mwrb • guardiansofthegalaxyvol2_tnspot2_1280.mp4 • baywatch-trailer-1_h720p.mov • Taylor Swift、Kendrick Lamar - Bad Blood.mkv • captain-underpants-trailer-1_h1080p.avi • justice-league-trailer-1_h1080p.avi • 变形金刚:最后的骑士 超级版加长版预告.avi • WPSettings.dat](/content/2026/03/549015/images/a56064d46e2b6c3c8c0c0fa599d15febdb518b4a43d2097928b2e809829eeab6.jpg)
- Select "movie" icon in the main menu screen to enter info video playlist. Move "▲" or "▼" cursor key to select video file, then press the "ENTER" for confirm and start playing.
2 Press "MOVIE" button in the remote control, fast and directly start the video playback. - If in system setting "Autoplay" is designated for "Movie", screen will auto play the videos kept in the internal memory, USB device or SD card when power on.
- During video playback, the user can select to play previous or next video files by pressing “▲” or “▼” key in the remote control or button behind the machine. Volume can be adjusted by pressing “◀” or “▶” key in the remote control or button behind the machine.
Press “◀◀” or “▶▶” key in the remote control to achieve fast forward or rewind of the video playback.
Press "EXIT" key in the remote control to return to the previous menu; press again to return to the main menu screen.
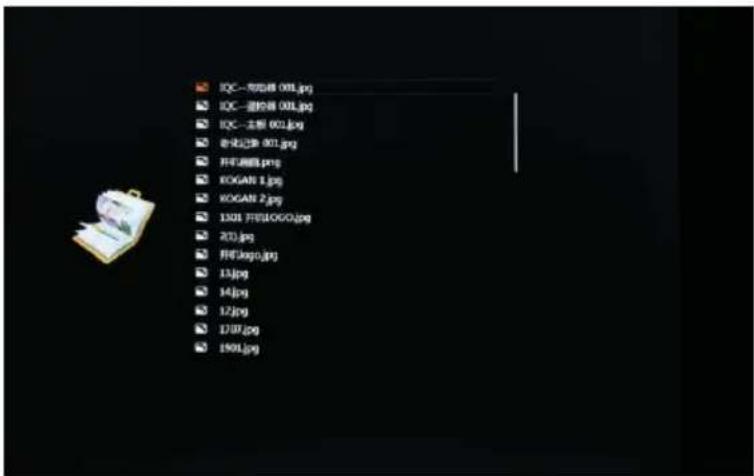
5. PHOTO BROWSING AND PLAYBACK
-
Select "photo" icon in the main menu screen to enter into photo playlist. Press "▲" or "▼" cursor key to select the photo file, then press "ENTER" for confirm and start playing.
2 Press "PHOTO" button in the remote control, fast and directly start the photo playback. -
If the system setting "Autoplay" is designated for "Photo", screen will auto play the photos kept in the internal memory, USB device or SD card when power on.
5.1 Special effect settings for photo playback

During photo playback, long press "EXIT" key in the remote control or "EXIT" button behind the machine will pop up a dialog box for special effect settings of the photo slideshow, as shown above.
- Set Bg: Means to set a designated photo as machine's desktop background. In the pop-up dialog box, the user will be asked if you are sure to set the designated photo as desktop background. Move the cursor to select "YES" or "NO", then press "ENTER" to save the setting.
- Zoom: Choose "Zoom" then press" ENTER" to zoom the picture 1X,2X,3X,4X.
- Rotate: Press option with 90^ , 180^ , 270^ rotation and then recovery.
- Slideshow: Refers to slideshow effect. There are eleven special effect options: default, Persian Blinds H, Persian Blinds V, Slide up, Slide down, Slide left, Slide right, Mosaic, Zoom out, Zoom in, Random. Select a special effect, then press "ENTER" to save the setting. The system defaults "default".
- Scale: Refers to the photo display ratio. There are four ratio options: Auto, Original, Crop, Stretch. Select the display ratio, then press "ENTER" to save the setting. The system defaults "Auto".
6. MUSIC PLAYBACK
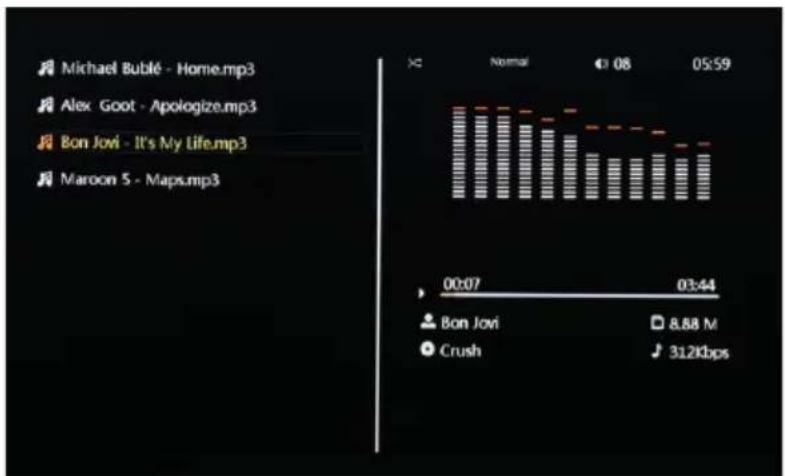
- Select "music" icon in the main menu to enter into music playlist. Move "▲" or "▼" cursor key to select music file, then press the "ENTER" for confirm and start playing.
2 Press "MUSIC" button in the remote control, fast and directly start the music playback. - If in system setting "Auto play" is designated for "Music", screen will auto play the music kept in the internal memory, USB device or SD card when power on.
- Right bottom two lines of information are the names of artist and album.
7. E-BOOK PLAYER
Press "Up" or "Down" to choose the test file and "Enter" to play.
During e-book playback, long press "EXIT" key in the remote control or "EXIT" button behind the machine will pop up a dialog box for special effect settings of the txt, as shown below.
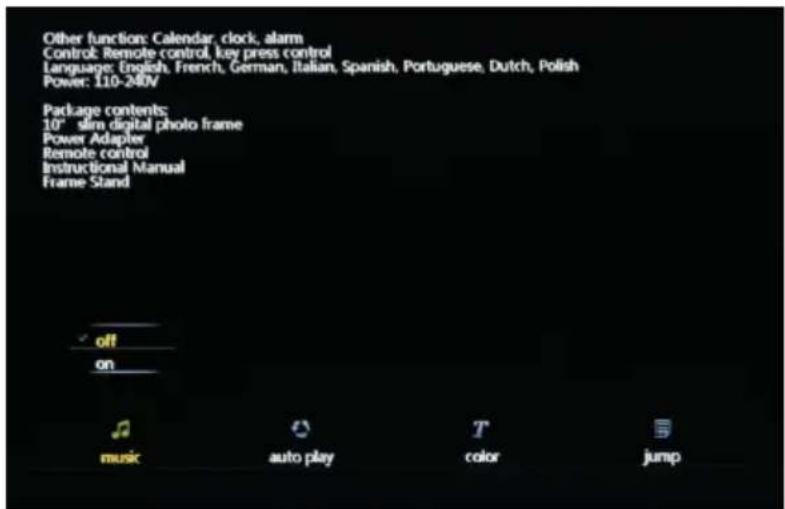
- Music: to play or cut off the music
- Auto play: Refers to the switching speed of play. There are four options: Fast, Middle, Slow, Off. Select the speed, then press "ENTER" to save the setting. The system defaults "Off".
- Color: to set up the script color, there are three options: "black, white, yellow". Select the color, then press "ENTER" to save the setting. The system defaults is "White"
- Jump: to jump to the required page directly.
8. OTHERS
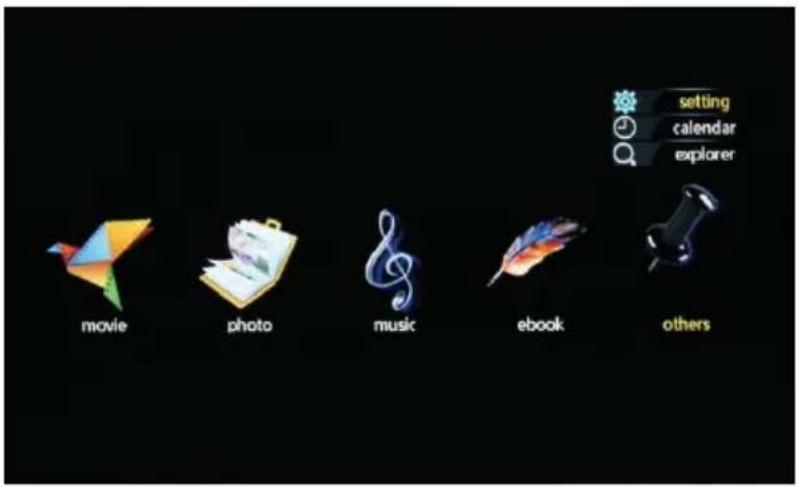
8.1 System Setting:
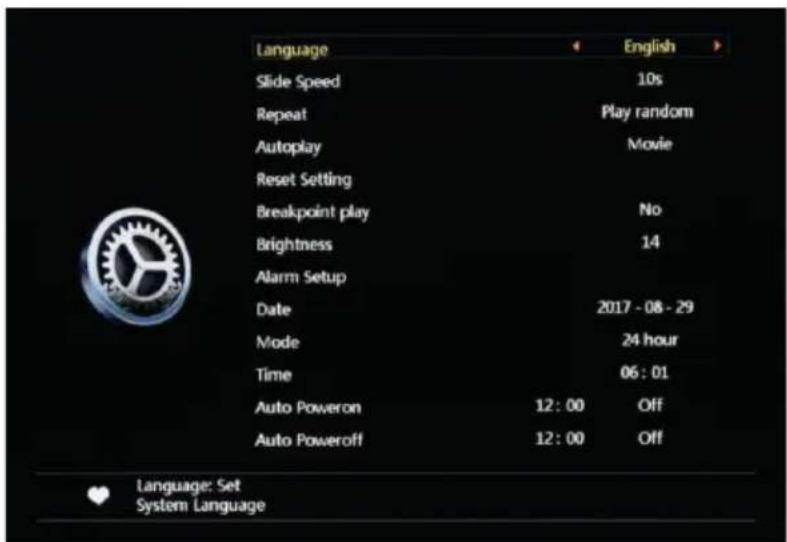
- Language: System pre-configures 16 languages, including English, French, German, Russian, Spanish, Portuguese, Italian, Turkish, Dutch, Danish, Czech, Slovak, Hungary, Polish, Japanese, Chinese. Move “◀” ”▶” cursor to switch languages. After select, press “ENTER” to save the setting. The system defaults” English”.
- Slid Speed: Choose the speed of the pictures automatically played, there are "5s,10s,15s,1min,15min,30min" options.
- Repeat: Four repeat modes for option: repeat all, repeat off, repeat one, play random Move “◀” ”▶” cursor to switch between different modes. After select, press “ENTER” to save the setting. The system defaults “repeat all”.
- Autoplay: Specify what kind of files should be played automatically when power on. There are seven options: Photo, Music, Movie, Music+Photo, Custom, Off, Mixed Play. Move “◀”▶ cursor to switch between different options. After select, press “ENTER” to save the setting. The system defaults” Movie”.
-
Reset setting: Refers to when some system parameters are set incorrectly or an unusual circumstance happens, the user can resume to default settings and back to normal status.
-
Breakpoint Play: Means, if the machine suddenly loses power during file playback or operation, the user can resume playback from the breakpoint after rebooting. Select "Yes" or "No" to open or close this function.
- Brightness: Means the brightness of the machine, ranges 1 to 15. The system defaults "14".
- Alarm Setup: Press "ENTER" to set up the Alarm status and time.
- Date: Press "ENTRE" to set up date, Move "◀" "▶" cursor to switch between years and month. Move "▲" "▼" cursor to adjust the data for increasing or decreasing.
- Mode: Press "ENTER" to choose the time mode. There are "12 hour" and "24 hour" options.
- Time: Press "ENTER" to set up the time. Move "◀" "▶" cursor to switch between hours and minutes. Move "▲" "▼" cursor to adjust the data for increasing or decreasing.
- Auto Power On: The user can program the machine auto boot in a certain time of his choosing. Move “◀” ”▶” cursor to switch between hours and minutes. Move“▲” ”▼” cursor to adjust the data for increasing or decreasing. Similarly select “Off”, “Once” or Every Time” as desired. Press “ENTER” to save the setting.
- Auto Power Off: The user can program the machine automatically shut down in a certain time of his choosing. Move “◀” ”▶” cursor to switch between hours and minutes. Move“▲” ”▼” cursor to adjust the data for increasing or decreasing. Similarly select “Off”, “Once” or “Every Time” as desired. Press “ENTER” to save the setting.
8.2 Clock and Calendar Settings
1. Clock and calendar mode:
In main menu screen or file playing screen, press the "CALENDAR" button in the remote control to enter into clock and calendar screen directly. There are four basic modes, as shown above: Digital Clock + Simple Calendar, Digital Clock + Detailed Calendar, Analog Clock + Simple Calendar, Analog Clock + Detailed Calendar. Press "ENTER" button to switch between different modes.
12:05:36
2014/01/01 Wed.
Figure I
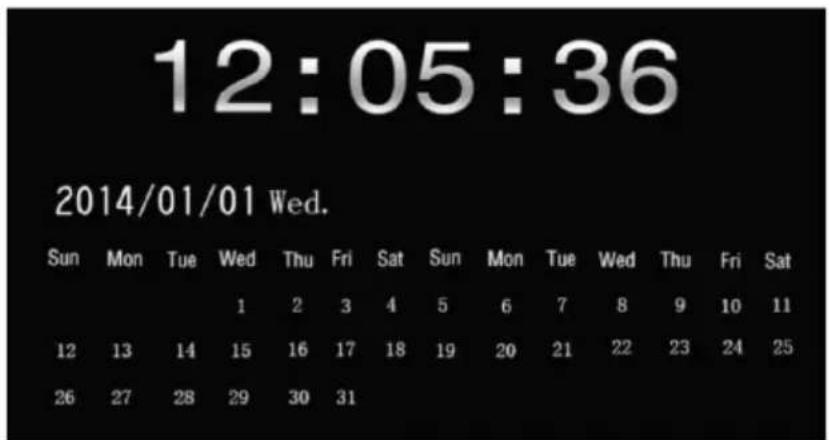
Figure II
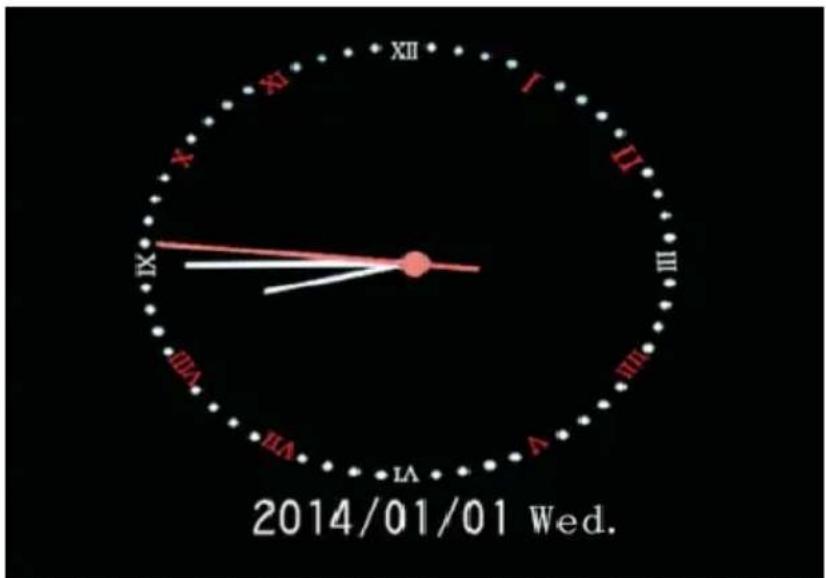
Figure III
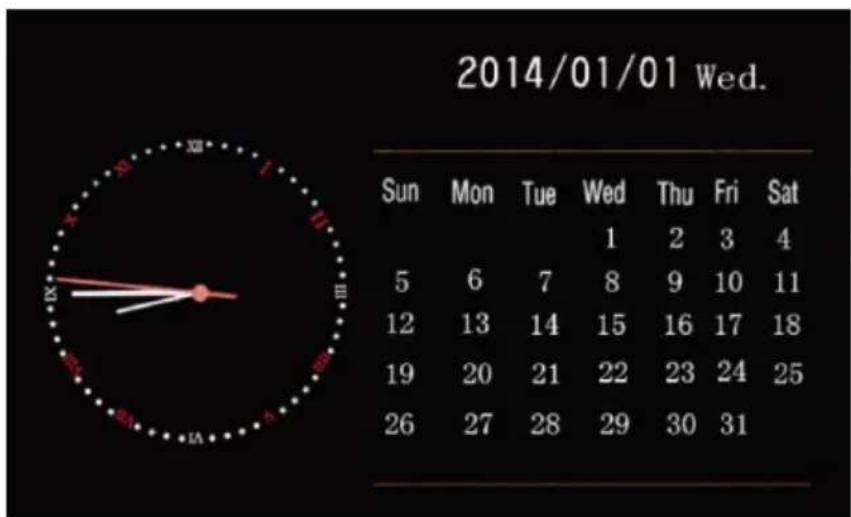
Figure IV
2. Clock and calendar setting
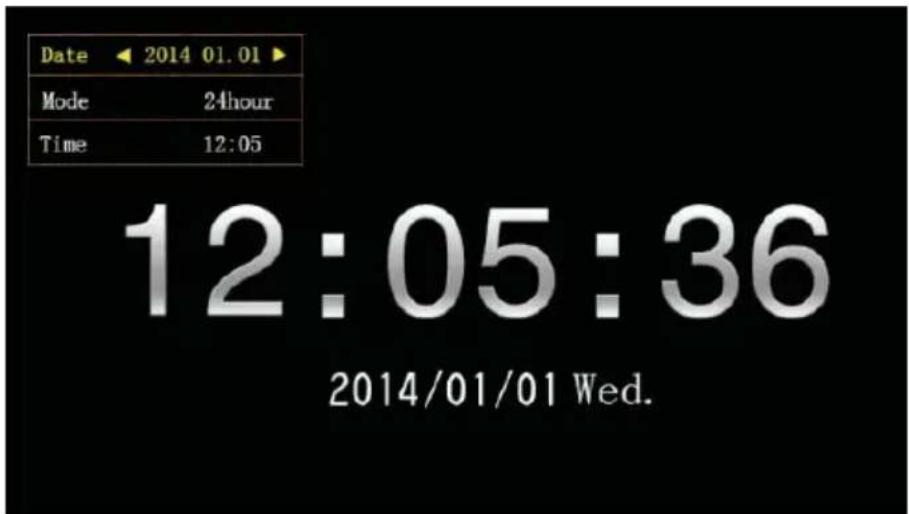
In clock and calendar screen, long press "EXIT" button to pop up the setting dialog box. Move the "◀" "▶" "▲""▼" cursor keys to select or set year/month/date/12-hour/24-hour/time, as shown above.
- Year/month/date setting: In the pop-up dialog box, first line with "Date", move "◀" "▶" cursor key to switch between year/month/date. Move "▲" "▼" cursor key to adjust the data for increasing or decreasing. Then press "ENTER" to save the setting.
2 12-hour and 24-hour setting: In the pop-up dialog box, second line with "Mode", move "◀" "▶" cursor key to switch between 12-hour and 24-hour. After select, press "ENTER" to save the setting. - Clock setting: In the pop-up dialog box, third line with "Time", move "◀" "▶" cursor key to switch between hours and minutes. Move "▲" "▼" cursor key to adjust the data for increasing or decreasing. Then press "ENTER" to save the setting.
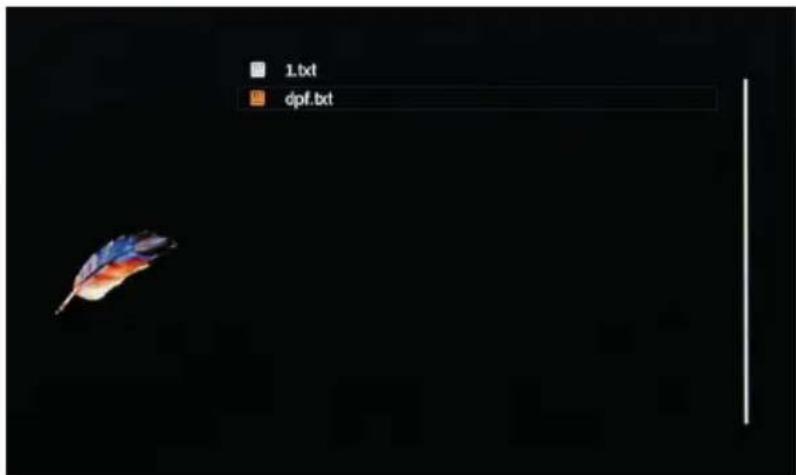
8.3 Explorer
- Select "explorer" icon in the main menu screen to enter info file management. You can look through the files kept in the internal memory, USB or SD card.
-
Unnecessary files can be deleted by long pressing "EXIT" key. Select "YES" or "NO" in the pop-up dialog box, to decide delete or not delete the file.
-
TECHNICAL SPECIFICATION
| Model: | DPL 2243 |
| AC power adapter: | AC100-240 V~50/60 Hz |
| Working temperature: | 0°~40° |
| Resolution: | 1280 x 800 pixel |
| Connect Port: | USB 2.0, USB1.0,SD, earphone |
| Support format | Picture: JPEG, PNGAudio: MP3, WMAVideo: MP4, MKV, VOB, MPG, AVI, RMVB, MOV |
| Built-in speaker: | 2 x 2 W |
| Panel Size: | 13.3 inch |
| Body size: | 318 x 224 x 25 mm |
| Weight: | 1.1 Kg |
| Power supply: | DC 12 V/1 A |
NOTES D'EMPLOI
Alimentation : = 12V 1A
Dimensions : 318x224x25mm (sans support)
318x224x25mm (sin pedestal)
LED
13.3"
16:9
Pantalla:
Precautions for correct disposal of the product.
The symbol shown on the equipment indicates that waste must be disposed of in “separate collection” and so the product must not be disposed of together with urban waste.
The user must take the product to special “separate waste collection centres” provided by local government, or deliver it to the retailer against the purchase of a new product.
Separate collection of waste and subsequent treatment, recycling and disposal operations promotes the production of equipment with recycled materials and limits negative effects on the environment and on health caused by improper handling of waste.
Illegal disposal of the product leads to the enforcement of administrative penalties.


- FOTO FRAME DIGITALE
- DIGITAL PHOTO FRAME
- DPL 2243
- CARE AND MAINTENANCE
- IMPORTANT
- PRODUCT SPECIFICATIONS
- Features
- KEY DEFINITIONS IN THE REMOTE CONTROL
- INSTRUCTIONS
- Power On I Off
- Main Menu Screen
- MOVIE PLAYBACK
- Auto play the video when power on
- Video browsing and playback screen
- PHOTO BROWSING AND PLAYBACK
- Special effect settings for photo playback
- MUSIC PLAYBACK
- E-BOOK PLAYER
- OTHERS
- System Setting:
- Clock and Calendar Settings
- Clock and calendar mode:
- Clock and calendar setting
- Explorer
- NOTES D'EMPLOI
- Precautions for correct disposal of the product.
Brand : Trevi
Model : DPL 2243
Category : Digital photo frame