
Oliboard Touch - Interactive whiteboard OLIVETTI - Free user manual and instructions
Find the device manual for free Oliboard Touch OLIVETTI in PDF.
| Product Type | Interactive Whiteboard |
| Brand | Olivetti |
| Model | Oliboard Touch |
| Detection Technology | Infrared |
| Outer Area (diagonal) | 84" (2141 mm) |
| Outer Area (dimensions) | 1720 x 1275 mm |
| Active Area (width x height) | 1630 x 1185 mm |
| Aspect Ratio | 4:3 |
| Net Weight | 20 kg |
| Gross Weight (packaged) | 28 kg |
| Interface and Power | USB (bus powered) |
| Power Consumption | Less than 1 W |
| Operating Temperature | -10°C to +50°C |
| Operating Humidity | 10% to 95% |
| Required Operating System | Windows 7/8/8.1 |
| Minimum Configuration | Dual Core 2.0 GHz processor, 2 GB RAM, USB port |
| Recommended Configuration | Dual Core 2.4 GHz processor or higher, 4 GB RAM |
| Included Accessories | Extendable stylus, pen holder, 5 m USB cable, installation CD, wall mounting kit |
| Main Software Functions | Writing, annotation, partial zoom, reflector, screen capture, geometric tools (compass, ruler, set square, protractor), screen recording |
| Surface Cleaning | Damp cloth (well wrung) or alcohol for stubborn marks |
| Safety Precautions | Do not use in a humid environment; do not look at the projector beam; do not touch the hot projector; do not hang objects on the board |
| Disposal | Do not dispose with household waste; follow WEEE directive (2002/96/EC) |
Frequently Asked Questions - Oliboard Touch OLIVETTI
User questions about Oliboard Touch OLIVETTI
0 question about this device. Answer the ones you know or ask your own.
Ask a new question about this device
Download the instructions for your Interactive whiteboard in PDF format for free! Find your manual Oliboard Touch - OLIVETTI and take your electronic device back in hand. On this page are published all the documents necessary for the use of your device. Oliboard Touch by OLIVETTI.
USER MANUAL Oliboard Touch OLIVETTI
PUBLICATION ISSUED BY:
Olivetti S.p.A.
Copyright © 2014, Olivetti
All rights reserved
EDITION 1.0
The label applied to the product certifies that the product satisfies the basic quality requirements.

The manufacturer reserves the right to carry out modifications to the product described in this manual at any time and without any notice.
Your attention is drawn to the following actions which could compromise the conformance guaranteed above, as well as the technical features of the product:
- incorrect electrical power supply;
- incorrect installation, incorrect or improper use or use not in compliance with the warnings provided in the User's Manual supplied with the product;
- replacement of original components or accessories with others of a type not approved by the manufacturer, or performed by unauthorised personnel.
All rights reserved. No part of this material may be reproduced or transmitted in any form or by any means, electronic or mechanical, including photocopying, recording or similar, without prior permission in writing from Olivetti S.p.A.
The content of this manual can be modified without warning. Every care has been set in the creation, realization, verification and documentation of the software related to the Oliboard whiteboard and of the documentation written in this manual; nevertheless Olivetti S.p.A. disclaims any liability of any kind for any damages whatsoever resulting from the use of the software and of the manual. The same thing can be said for any person or company involved in the creation, realization, production and verification of the software and of the manual.
The registered trademarks are the property of their respective owners.

INSTRUCTION: provides additional software instructions.

NOTE: describes problems that could occur when using the whiteboard and how to avoid and resolve them.

WARNING: draws attention to the danger of personal injury or product damage if improperly used.
Caution Warning

- In order to avoid electric shocks, do not install the interactive whiteboard in damp or smoky environments.
- After the interactive whiteboard is installed, avoid touching its power and data cables.
- Keep the interactive whiteboard away from open flames, electrical contacts and direct sunlight.
- After the interactive whiteboard is installed, make sure that it is fixed securely.
- Avoid looking directly at the beam of light emitted by the projector onto the whiteboard.
- Do not touch the projector because it could be hot even after only a few minutes of operation. Refer to the projector manual for all warnings and rules relating to its use.
- Do not hang onto the support stand of the projector.
- When the whiteboard is mounted on a pedestal, be careful not to trip over the pedestal.

Important notes
- The interactive whiteboard can be used with fingers, hand and with the pens equipping the whiteboard. Do not use marker pens, pencils or other types of pen. If necessary, clean the whiteboard using alcohol.
- Make sure that the whiteboard is correctly connected to the computer and to the electrical mains. The decision to lay the connection and power cables in a hidden way is preferable, so as to avoid them being pulled and disconnected. Do not leave the cables lying on the floor to avoid any possibility of them being tripped over.
- Do not scratch the surface or the frame of the whiteboard with sharp or hard objects.
- When fixed onto a wall, the whiteboard must be vertical to the wall surface.
- Do not hang objects or weights onto the whiteboard and, if present, the pedestal.
- When it is installed on the pedestal, use caution whenever you move it to avoid it tipping over.
This manual relates exclusively to the Oliboard whiteboard and the software provided with it. Although references are made to the computer connected to the whiteboard (notebook, PC and so on) and to the video-projector, for these devices you should refer to the original documentation provided by their manufacturers.

FURTHER WARNINGS FOR INSTALLATIONS IN SCHOOL ENVIRONMENTS
The warnings and precautions for using the whiteboard and projector must be recommended to students as well. The following in particular must be stressed:
- Do not look directly at the beam of light emitted by the projector onto the whiteboard.
- Do not touch the projector because it could be hot, even after only a few minutes of operation.
- Pay attention to the connection cables and, if the whiteboard is mounted on a pedestal, be careful not to trip over it. In any case, it is recommended not to run near the whiteboard and the pedestal.
- Do not hang onto the support stand of the projector and, if present, the pedestal.
Page left intentionally blank
TABLE OF CONTENTS
TABLE OF CONTENTS 1
INTRODUCTION 2
Overview 2
System Requirements 2
Unpacking the Interactive Whiteboard and accessories 3
Technical Specifications 4
Hardware Installation 4
WINDOWS SOFTWARE INSTALLATION 5
Express Installation 5
Step-by-step Installation 6
Removing the Oliboard Software 6
Running the Software 7
Starting the Driver of the Interactive Whiteboard 7
Orienting the Interactive Whiteboard (Windows 7/8) 8
Starting the Whiteboard Application Software 9
Setting Up the Oliboard Functions 9
Creating a Personal Account and Password 10
SCREENRECORDER 10
SOFTWARE REGISTRATION 11
TROUBLESHOOTING 12
INTRODUCTION
OVERVIEW
The Interactive Whiteboard is an input peripheral device that, connected to a computer with a video-projector, allows an interactive environment to be created and used for teaching and demos.
The Oliboard whiteboard is furnished with a hard surface to ensure resilience to wear and a protection against acts of vandalism; featuring high tracing precision, rapid response and operational sensitivity it allows intuitive use by even less expert users.
The software provided offers sophisticated functions such as partial magnification, searchlight, replay, camera, customised background, specialized tools (compass, ruler, set square, etc),
With the touch of a finger, or by using the pen provided with Oliboard, it is possible to send command to the computer, as with a mouse, and write, take notes, erase, trace geometrical figures, copy, run and save files.
SYSTEM REQUIREMENTS
The whiteboard must be connected to a computer that displays images on the whiteboard by means of a video-projector.
| Minimum Configuration | Recommended Configuration | |
| Hardware Configuration | CPU: Dual Core processor 2.0 GHz | CPU: Dual Core Processor 2.4 GHz or higher |
| RAM: 2 GB | RAM: 4 GB or higher | |
| USB port (for connecting whiteboard) | USB port (for connecting whiteboard) | |
| VGA port (female, type SUB-D15) or HDMI for connecting the video-projector. | VGA port (female, type SUB-D15) or HDMI for connecting the video-projector. | |
| Software Configuration | Windows 7/8/8.1 | Windows 7/8/8.1 |
While using the whiteboard, the computer connected could enter "stand-by" mode. To avoid this, it is advisable to deactivate the screen-saver and energy-saving functions.
UNPACKING THE INTERACTIVE WHITEBOARD AND ACCESSORIES
The standard Interactive Whiteboard kit contains the following components:
| Description | Quantity | Purpose | Image |
| Wand | 1 | ||
| Whiteboard pen | 1 | ||
| Pen holder | 1 | ||
| USB special cable, about 755 meters | 1 | Cable for connecting the computer to the Interactive Whiteboard | |
| Oliboard Installation Disk | 1 | Drivers and application software for Windows | |
| User Manual | 1 | User Guide | |
| Installation brackets and accessories for wall fixing | 1 | Wall fixing kit | Various mechanical parts |
TECHNICAL SPECIFICATIONS
| Hardware Platform | Peripheral device for computer, notebook. |
| Operating Principle | Infrared |
| Interface and Power Supply | USB |
| Operating Temperature | -10 °C ÷ +50 °F |
| Operating Humidity | RH 10% ÷ 95% |
| Power capability | < 1 W |
Models
| OLIBOARD 80T | |
| External area | |
| - diagonal | 84" (2141 mm) |
| - dimensions | 1720 x 1275 mm |
| Active area | |
| - width | 79 1/3" (2015 mm) |
| - height | 1630 x 1185 mm |
| Aspect ratio | 4:3 |
| Net weight (+/- 1 kg) | 20 Kg |
| Packaging | |
| - dimensions (+/- 5 mm.) | 1800 x 1455 x 125 mm |
| - gross weight (+/- 2 Kg) | 28 Kg |
HARDWARE INSTALLATION
Wall or stand installation must be carried out by authorised personnel according to the requirements stated in the Olivetti documentation.
The cable for connecting the whiteboard must be connected to the USB port of the computer. The VGA (or HDMI) cable of the video-projector must be connected to the VGA (or HDMI) port of the computer.
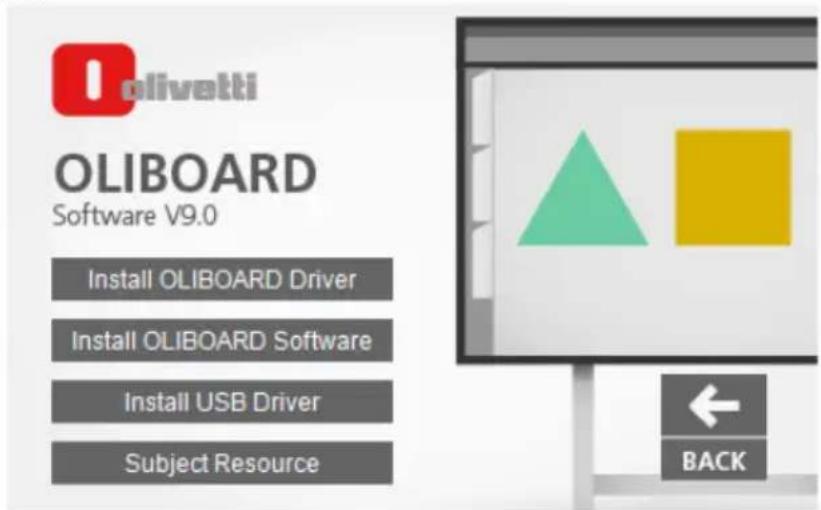
WINDOWS SOFTWARE INSTALLATION
The Oliboard software provides two types of installation: "Express installation" and "Step-by-step installation".

Express installation is suggested the first time. Step-by-step installation allows the software to be installed one step at a time.
EXPRESS INSTALLATION
Do not connect the cable of the whiteboard to the computer (if the USB cable is already connected to the computer, disconnect it).
- Insert the Oliboard Software disk.
- Click on the program logo (this is equivalent to running the "autorun" program).
- The Installation Guide window opens.
- Click "Install All" to perform the express installation.
- Choose the language you want to install and confirm with "Next".
- Select the complete installation and confirm with "Next". The "custom" installation is suggested to expert users.
- At the end, a message is displayed asking you the installation of the FTDI or Silicon driver. Clear any default options and confirm with "Finish".
- Follow the instructions in the paragraph "Running the Software".
STEP-BY-STEP INSTALLATION
This type of installation is recommended only when upgrading the software provided with the whiteboard.
REMOVING THE OLIBOARD SOFTWARE
Click on "Start" "Control Panel" "Add or Remove Programs", select "Oliboard" then click on "Add/Remove".
Select the option for removing all the features installed and follow the instructions shown on the screen.
At the end of removal, it is recommended that you restart the computer.
RUNNING THE SOFTWARE
The whiteboard cable must be connected to the USB port of the computer.
To run the software, first of all the software driver of the whiteboard must be started, the orientation operation performed if necessary, after which the whiteboard software can be started.
Starting the Driver of the Interactive Whiteboard
Click "Start" "All programs" "Oliboard Software" and start the Oliboard
Driver. The driver icon appears in the lower right corner of the Status bar on the desktop.

NOTE: If the message "Start device failed", make sure that the cable of the whiteboard is connected correctly between the computer and the whiteboard.

NOTE: After having started the driver, click on the icon of the Oliboard driver to activate or deactivate the autostart parameter, depending on whether or not you want the Oliboard driver to be run automatically the next time the computer is powered on. If the computer is permanently connected to the whiteboard, it is advisable to activate the autostart. On the other hand, if the computer could be disconnected from the whiteboard, it is advisable to deactivate the autostart to avoid an error message appearing the next time the computer is powered on which indicates that no whiteboard is connected.
Orienting the Interactive Whiteboard (Windows 7/8)
This function serves to tune the whiteboard for the image to be projected onto it. Execute the "orientation" the first time you install the Oliboard Driver or if the position of the projector or the Interactive Whiteboard changes, or if the display mode changes (e.g. the image size or resolution).
1. Click "Start" → Control Panel" → "Tablet PC setting".
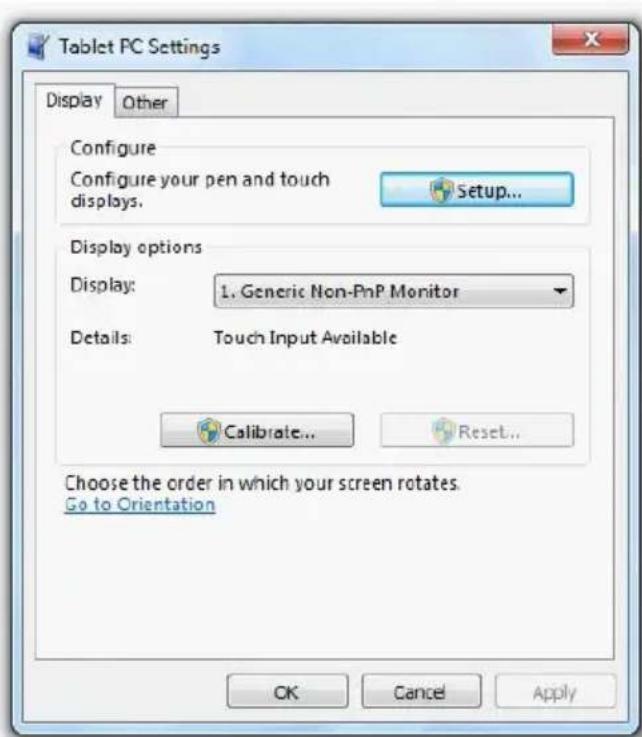
- Select the calibration function in the displayed window. A window will be displayed.
- With the finger or the whiteboard pen, click on the mid-point of the cross "+" on the whiteboard. Repeat this same operation for all the other orientation points, being careful to canter well the mid-point of the flashing cross with the electronic pen.
- Save orientation.
Starting the Whiteboard Application Software
- Click "Start" → "All programs" → "Oliboard Software" and start the application program. A Logon window opens in which you can enter the user name and the password.
- To start the software using the default account, click simply on the "Login" button without entering any data, otherwise you can enter your own personal account. When a personal account is used, the user can customise the tool bar, resources and templates.

NOTE: Before starting the application software, make sure that the Interactive Whiteboard is connected correctly to the computer and that the Interactive Whiteboard driver is running.

NOTE: For how to operate the software, refer to the instructions in the ONLINE HELP selectable from main menu of the Oliboard software.
Setting Up the Oliboard Functions
First time Oliboard software is started, it is suggested to check all the default options, by clicking the Options function in the Tool menu.
As option, it is suggested to set the language for the handwriting recognition option in the "Draw" command.
Creating a Personal Account and Password
- Click "Start" → "All Programs" → "Oliboard Software" → "User Manager"
- Key-in the administrator account data to access the software. The default administrator account is Administrator and the Password is olioboard.
- The User Manager window is displayed.
- Select "Edit" "New User" to create a personal account.
- Key-in the user name and password and select "Create".
- When the process completes, the new user appears in the window.
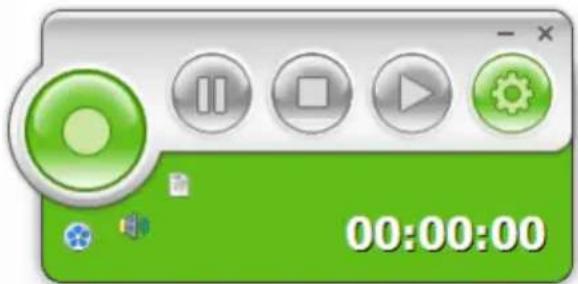
SCREEN REORDER
Oliboard software includes a recording tool that allows you to record what happens on the screen, including the recording of audio associated with the operations performed and/or what captured via the computer's microphone, if present.
Click "Start" "Allprograms" "Oliboard Software" "ScreenRecorder"
SOFTWARE REGISTRATION
First time Oliboard software runs on a computer not connected to the whiteboard, the registration of the software is requested.
It is possible to immediately execute the procedure, or it is possible to postpone the registration.
When the number of execution without registration is finished, it is necessary to remove the software.
In order to execute the registration process, it is necessary a direct connection to Internet and to insert the activation code (normally included in the CD-ROM).
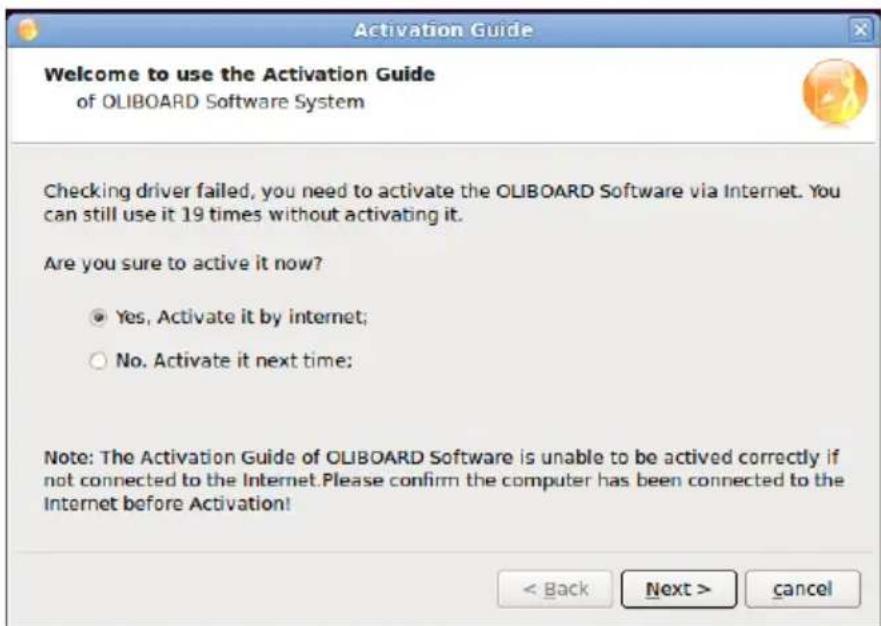

NOTE: Registration is not requested if whiteboard is connected to the computer.
TROUBLESHOOTING
-
If a message is displayed: "Failed to verify the whiteboard, the program can't run further!", check whether there is a good connection between whiteboard and the computer.
-
Make sure that the special-purpose connection cable of the whiteboard has been used, and that the cable has been connected correctly.
- Check that the software driver of the whiteboard is running.
- Check that the software driver of the USB cable has been correctly installed.
-
If this message appears when the computer should not be connected to the whiteboard, make sure that the "autostart" parameter of the Oliboard driver has been deactivated (click on the icon to deactivate the parameter).
-
Only certain parts of whiteboard can be written on. Carry out the procedure for orienting the whiteboard.
-
How to exit from the Oliboard software?
-
Click on the Operation Round Plate in "Control Mode", then on "Exit" in the popup menu.
-
Click "File" (in the main menu), then "Exit".
-
Why is the image projected in the shape of a trapezium? Why must it be adjusted, and how to do so?
It sometimes happens that the projector is not level (for example, because the front is higher than the back, or vice-versa) and consequently the image projected is trapezoidal in shape. For information, refer to the User Manual provided with the projector.
- What to do when an indelible colour pen has been used to write on the whiteboard?
Never use colour pens to write on the Oliboard! Should this happen, clean the whiteboard lightly using cotton-wool dampened with alcohol.
- How to clean the panel of the whiteboard?
Clean the panel passing over it lightly with a damp cloth.
CAUTION: After wetting the cloth, you must wring it out to remove any excess water. This is to avoid water penetrating inside the whiteboard.
PUBLICATION EMISE PAR :
Olivetti S.p.A.
Copyright © 2014, Olivetti
Copyright © 2014, Olivetti
Copyright © 2014, Olivetti
Copyright © 2014, Olivetti
DIRECTIVE 2002/96/CE ON THE TREATMENT, COLLECTION, RECYCLING AND DISPOSAL OF ELECTRIC AND ELECTRONIC DEVICES AND THEIR COMPONENTS
1. FOR COUNTRIES IN THE EUROPEAN UNION (EU)
The disposal of electric and electronic devices as solid urban waste is strictly prohibited: it must be collected separately. The dumping of these devices at unequipped and unauthorized places may have hazardous effects on health and the environment.
Offenders will be subjected to the penalties and measures laid down by the law.
TO DISPOSE OF OUR DEVICES CORRECTLY:
a) Contact the Local Authorities, who will give you the practical information you need and the instructions for handling the waste correctly, for example: location and times of the waste collection centres, etc.
b) When you purchase a new device of ours, give a used device similar to the one purchased to our dealer for disposal.
The crossed dustbin symbol on the device means that:
- When it to be disposed of, the device is to be taken to the equipped waste collection centres and is to be handled separately from urban waste;
- Olivetti guarantees the activation of the treatment, collection, recycling and disposal procedures in accordance with Directive 2002/96/CE (and subsequent amendments).
2. FOR OTHER COUNTRIES (NOT IN THE EU)
The treatment, collection, recycling and disposal of electric and electronic devices will be carried out in accordance with the laws in force in the country in question.
DIRECTIVE 2002/96/CE SUR LE TRAITEMENT, LA COLLECTE, LE RECYCLAGE ET LA MISE AU REBUT DES EQUIPEMENTS ELECTRIQUES ET ELECTRONIQUES ET DE LEURS COMPOSANTS
1. POUR LES PAYS DE L'UNION EUROPEENNE (UE)
- PUBLICATION ISSUED BY:
- Important notes
- FURTHER WARNINGS FOR INSTALLATIONS IN SCHOOL ENVIRONMENTS
- TABLE OF CONTENTS
- INTRODUCTION
- OVERVIEW
- SYSTEM REQUIREMENTS
- UNPACKING THE INTERACTIVE WHITEBOARD AND ACCESSORIES
- HARDWARE INSTALLATION
- WINDOWS SOFTWARE INSTALLATION
- EXPRESS INSTALLATION
- STEP-BY-STEP INSTALLATION
- REMOVING THE OLIBOARD SOFTWARE
- RUNNING THE SOFTWARE
- Starting the Driver of the Interactive Whiteboard
- Orienting the Interactive Whiteboard (Windows 7/8)
- Click "Start" → Control Panel" → "Tablet PC setting".
- Starting the Whiteboard Application Software
- Setting Up the Oliboard Functions
- Creating a Personal Account and Password
- SCREEN REORDER
- SOFTWARE REGISTRATION
- TROUBLESHOOTING
- PUBLICATION EMISE PAR :
- DIRECTIVE 2002/96/CE ON THE TREATMENT, COLLECTION, RECYCLING AND DISPOSAL OF ELECTRIC AND ELECTRONIC DEVICES AND THEIR COMPONENTS
- FOR COUNTRIES IN THE EUROPEAN UNION (EU)
- TO DISPOSE OF OUR DEVICES CORRECTLY:
- FOR OTHER COUNTRIES (NOT IN THE EU)
- DIRECTIVE 2002/96/CE SUR LE TRAITEMENT, LA COLLECTE, LE RECYCLAGE ET LA MISE AU REBUT DES EQUIPEMENTS ELECTRIQUES ET ELECTRONIQUES ET DE LEURS COMPOSANTS
- POUR LES PAYS DE L'UNION EUROPEENNE (UE)
Brand : OLIVETTI
Model : Oliboard Touch
Category : Interactive whiteboard