
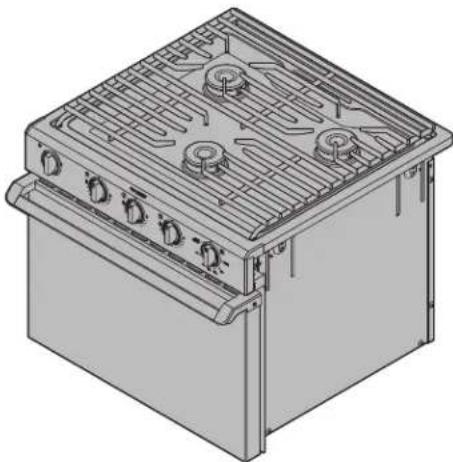
R31 - Cooker DOMETIC - Free user manual and instructions
Find the device manual for free R31 DOMETIC in PDF.

User questions about R31 DOMETIC
0 question about this device. Answer the ones you know or ask your own.
Ask a new question about this device
Download the instructions for your Cooker in PDF format for free! Find your manual R31 - DOMETIC and take your electronic device back in hand. On this page are published all the documents necessary for the use of your device. R31 by DOMETIC.
USER MANUAL R31 DOMETIC
Installation and Operation Manual. 1
FR
CUISINIÈRE ET PLAQUE DE CUISSON
WARNING: If the information in this manual is not followed exactly, a fire or explosion may result causing property damage, personal injury, or death.
-
Do not store or use gasoline or other flammable vapors and liquids in the vicinity of this or any other appliance.
WHAT TO DO IF YOU SMELL GAS -
Do not try to light any appliance.
- Do not touch any electrical switch.
- Do not use any phone in your recreational vehicle.
- Clear the recreational vehicle of all occupants.
- Turn off the gas supply tank valve(s) or main gas supply.
- Immediately call your gas supplier for instructions.
-
If you cannot reach your gas supplier, call the fire department.
-
Have the gas system checked and leakage source corrected by a qualified installer, service agency, manufacturer or dealer, or the gas supplier.
NORTH AMERICAN ADDRESS INFORMATION
USA & CANADA
Service Office
Dometic Corporation
1120 North Main Street
Elkhart, IN 46514
Service Center & Dealer Locations
Visit: www.dometic.com
REVISION F | Form No. 50467 01/19 | ©2019 Dometic Corporation
Read these instructions carefully. These instructions MUST stay with this product.
| ! | TO THE INSTALLER: LEAVE THIS MANUAL WITH THE APPLIANCE |
| TO THE CONSUMER RETAIN THIS MANUAL FOR FUTURE REFERENCE |
CONTENTS
1 Important Safety Instructions and Document Symbols 3
2 General Information 4
3 Intended Use. 4
4Pre-Installation 5
5 Installation. 8
6Operation 10
7 Maintenance. 15
8 Storage 17
9 Disposal. 17
10 Replacement Parts 17
11 Limited 2-Year Warranty . 17
1 IMPORTANT SAFETY INSTRUCTIONS AND DOCUMENT SYMBOLS
This manual has safety information and instructions to help you eliminate or reduce the risk of accidents and injuries.
1.1 Recognize Safety Information

This is the safety alert symbol. It is used to alert you to potential physical injury hazards. Obey all safety messages that follow this symbol to avoid possible injury or death.
1.2 Understand Signal Words
A signal word will identify safety messages and property damage messages, and will indicate the degree or level of hazard seriousness.

WARNING indicates a hazardous situation that, if not avoided, could result in death or serious injury.

CAUTION indicates a hazardous situation that, if not avoided, could result in minor or moderate injury.
NOTICE
is used to address practices not related to physical injury.
Indicates additional information that is not related to physical injury.
1.3 Supplemental Directives

Read and follow all safety information and instructions to avoid possible injury or death.
Read and understand these instructions before installation, use, or maintenance of this product.
Incorrect installation, operation, or maintenance of this product can lead to serious injury or death.
The installation must comply with all applicable local or national codes, including the latest edition of the following standards:
U.S.A.
CANADA
ANSI/NFPA70, National Electrical Code (NEC)
ANSI/NFPA 1192,Recreational Vehicles Code
ANSI Z21.57, Recreational Vehicles Code
ANSI/NFPA 70, National Electrical Code
- CSA C22.1, Parts I & II, Canadian Electrical Code
- CSA Z240 RV Series, Recreational Vehicles
Models with an oven light will utilize an external electrical source. When installed, these models must be electrically grounded in accordance with state or other codes. In the absence of such codes, refer to the National Electrical Code, ANSI/NFPA 70.
1.4 General Safety Messages
WARNING Failure to obey the following warnings could result in property damage, death, or serious injury:
- This product must be installed and serviced by a qualified service technician.
- Dometic gas-operated cooking units are for use with liquid propane (LP) gas only and for installation in recreational vehicles only (e.g. travel trailers, motor homes, tent campers, etc.).
- Do not store or use gasoline or other flammable vapors and liquids in the vicinity of this or any other appliance.
- Do not modify this product in any way. Modifi cation can be extremely hazardous.
- Improper installation, adjustment, service, or maintenance can cause injury, property damage, or death. Refer to this manual. For assistance or additional information, consult a qualified installer, service agency, manufacturer, or gas supplier.
- Do not install this cooking unit if any part has been underwater.
- CARBON MONOXIDE HAZARD. This product can produce carbon monoxide, which has no odor and can be life-threatening. Gas flames consume oxygen, which must be replaced to assure proper combustion. A window or air vent should be open slightly while using any cooking appliance. Failure to provide fresh air during combustion can lead to carbon monoxide poisoning and could result in serious injury or death.
WARNING BURN HAZARD, FIRE, EXPLOSION, AND/OR CARBON MONOXIDE HAZARD. Never use the range or slide-in as a space heater to heat or warm the room or as a storage space. Doing so may result in a burn, a fire or explosion, and/or carbon monoxide poisoning and overheating of the room.
2 GENERAL INFORMATION
Recommended Tools
Phillips Screwdriver Drill
Optional Parts* Reference Number
Bi-Fold Covers See www.dometic.com
*Available as accessory (not included).
3 INTENDED USE
This range or slide-in is designed and intended for use inside the recreational vehicle (hereinafter referred to as "RV") for which it is supplied. Use the instructions to ensure correct installation, operation, and maintenance of the range or slide-in. This range or slide-in is not designed for installation adjacent to another range or slide-in.
Dometic Corporation accepts no liability for damage in the following cases:
- Faulty assembly or connection.
- Damage to the product resulting from mechanical influences and excess voltage.
- Alterations to the product without express permission from the manufacturer.
- Use for purposes other than those described in the operating manual.
Dometic Corporation reserves the right to modify appearances and specifications without notice.
EN
4 PRE-INSTALLATION
WARNING FIRE HAZARD. Failure to obey the warnings or pre-installation instructions in this section could result in property damage, death, or serious injury.
4.1 Preparing The Cabinet
The minimum vertical distance to combustible material is 18 in. (46 cm) above the top of the range or slide-in. The range or slide-in must be installed in accordance with Clause 5.6 of ANSI 1192.
For proper range or slide-in operation, the cabinet must:
- Be properly constructed.
- Be squared to the counter top and cabinet face.
For proper range or slide-in operation, the cabinet opening must:
- Be level from side-to-side and from front-to-rear.
- Be positioned so that combustible material cannot be placed next to the range or slide-in sides.
- Be free from gaps between the range or slide-in and any adjacent cabinet.
- Meet the minimum clearances to combustibles as described in "Cutting The Opening" on page 6.
- Provide direct current electrical supply conductors with strain relief at the range or slide-in.
- Be framed-in or guarded to prevent the creation of storage space around the recessed portion of the appliance, except for the vent thimble.
- Have closed openings around the gas and electrical service outlets at the time of installation, except when the construction of the range or slide-in provides the necessary closure.
4.2 Cutting The Opening
- Verify the cutout location and dimensions. Refer to "Cutout Dimensions" on page 6.
- Cut the hole for the range or slide-in. The cutout is open; no front edge remains on the counter.
- Confirm a propane-certified gas line is in place that meets the appropriate RV and gas codes.
Cutout Dimensions
If using a recessed bi-fold cover, follow the instructions included with the cover for cutout dimensions, installation, and use.
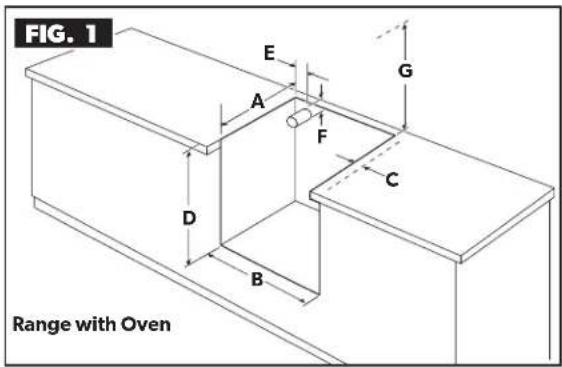
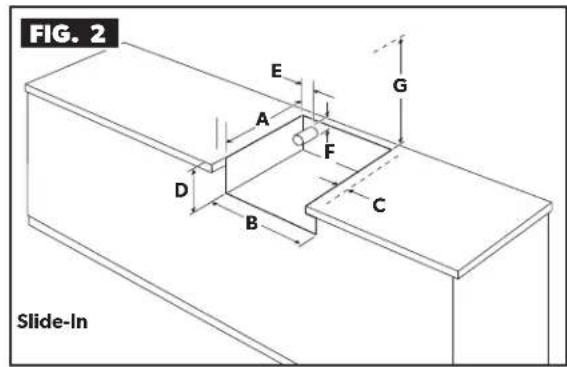
| ABC*DEFG* | |||||||
| 17" Ranges 17.75" | (45 cm) | 20.25" (51 cm) | 1.13" (3 cm) | 16" (41 cm) | 1.75" (4 cm) | 1.5 (4 cm) | 19.5" (50 cm) |
| 21" Ranges 17.75" | (45 cm) | 20.25" (51 cm) | 1.13" (3 cm) | 20" (41 cm) | 1.75" (4 cm) | 1.5" (4 cm) | 19.5" (50 cm) |
| Slide-in 17.75" | (45 cm) | 20.25" (51 cm) | 1.13" (3 cm) | 3.125" (41 cm) | 1.75" (4 cm) | 1.5" (4 cm) | 19.5" (50 cm) |
*The minimum clearance to combustible materials allowed from the surface of the range or slide-in to a combustible object (curtains, board wall, floor, etc.). Consider both sides, the back side, and above the cabinet when determining clearances. These measurements do not apply to a side-by side installation. The range or slide-in is not intended for side-by side installations with another range or slide-in.
The maximum depth of cabinets installed above the range or slide-in is 13 in (33 cm). Do not install any structure directly above the stove (for the width of the stove) except a range hood.
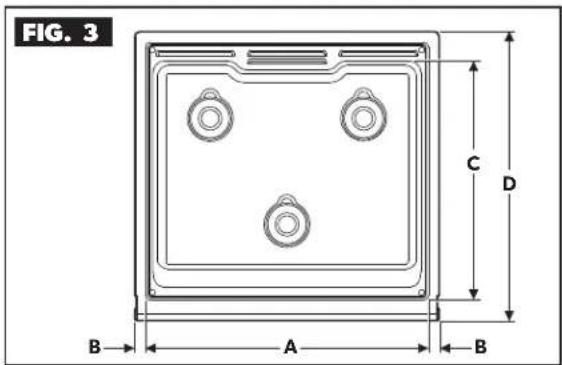
Range Top Mounting Dimensions
| ABCD | ||||
| Range Top 19-3/8" | (49 cm) | |||
| Mounting Trim 3/4" | (2 cm) | |||
| Range Top Depth 16-1/2" | (42 cm) | |||
| Range Top Plus Oven Vent 20" | (51 cm) | |||
5 INSTALLATION
AWARNING ELECTRICAL SHOCK, FIRE, EXPLOSION, AND/OR CARBON MONOXIDE HAZARD. Failure to obey the warnings or installation instructions in this section could result in property damage, death, or serious injury:
- The range or slide-in must be completely separated and/or sealed from other air moving or air-consuming devices such as, but not limited to, furnaces, microwave ovens, clothes dryers, cooling fans, and doors or drawers in common cabinets. Failure to do so can affect the appliance(s) combustion air supply by creating either a negative or positive draft.
- Do not use matches, candles, or other sources of ignition to test fittings and gas lines for leaks.
- Do not use a ventilation system that blows air downward toward the range or slide-in, as ignition and combustion problems with the gas cooking appliance could occur.
- Direct current electrical supply conductors must be provided with strain relief at the range or slide-in.
5.1 Installing The Range Or Slide-In
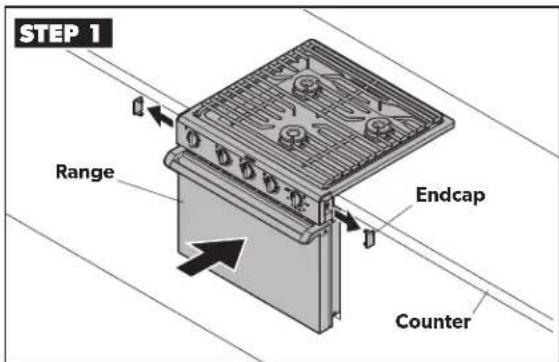
- Remove the endcaps and place the range or slide-in within the cutout.
- Verify the range or slide-in is level on all sides.
If using a recessed bi-fold cover, the endcaps remain attached to the range or slide-in.
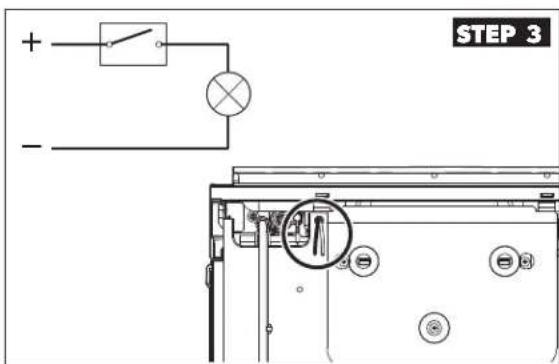
- For ranges with an oven light, connect the two wire leads at the back of the range to a 12 VDC circuit that is fuse protected with a max rating of no more than 5 A.
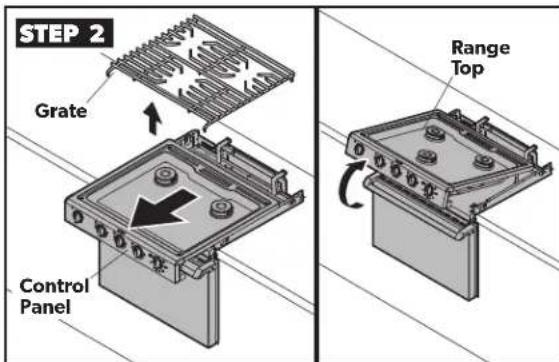
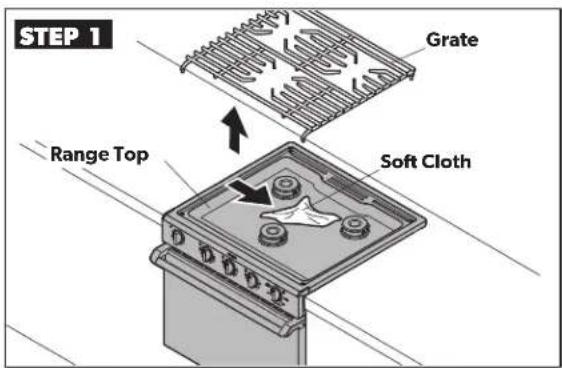
- Remove the grate and pull the range or slide-in forward.
- Lift up the range or slide-in top.
Do not remove the range or slide-in top by pulling on the grate.
- Connect the black wire to positive and the white striped wire to negative.
CAUTION ELECTRICAL SHOCK/FIRE HAZARD. Be sure to label all wires before removing or servicing the range. Wiring errors can cause improper and dangerous operation of the range. Failure to obey this caution could result in minor or moderate injury. - Verify proper operation of the range after servicing.
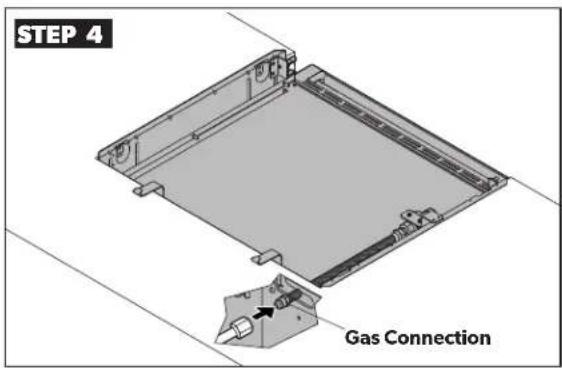
- Connect all gas connections on the range or slide-in and tighten according to the appropriate RV and gas codes.
All openings in the cabinetry around the gas line must be closed at the time of installation.
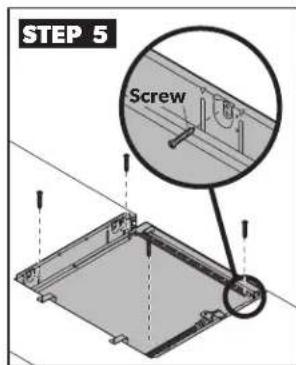
- Secure the range or slide-in by placing wood screws (not provided) through the designated holes and into the cabinet. Do not force the mounting flanges to bend.
-
Turn on the gas supply.
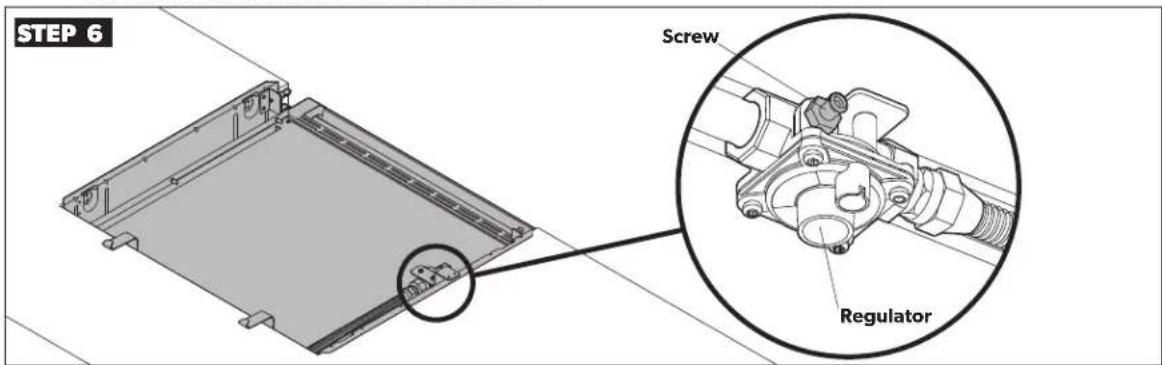
Conduct the range or slide-in leak testing: -
Loosen the leak check fitting screw on the regulator by one turn.
-
Place the gauge on the fitting.
Check for leaks: -
Leak testing shall be conducted according to the manufacturer's instructions.
- Use a non-corrosive leak detection fluid. Do not use soap and water.
-
Leak tests in excess of 0.5 PSI of air pressure will invalidate warranty.
-
Retighten the leak check fitting screw upon completion of the leak test.
-
Conduct the range or slide-in gas pressure testing prior to operation.
When conducting the range or slide-in gas pressure testing prior to operation:
- The range or slide-in, and any individual shut-off valves, must be disconnected from the gas supply piping system when pressure testing the system at pressures exceeding 0.5 PSI.
-
The gas supply pressure for checking the regulator setting shall be at least 1 in. W.C. (249 Pa) above the manufacturer's specified manifold pressure. The maximum gas supply pressure is 14 in. W.C.
-
Turn off the gas supply.
-
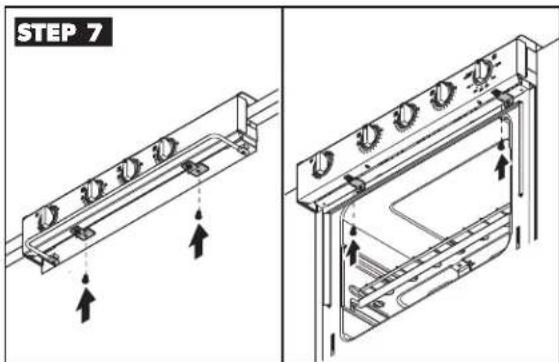
Slide the range or slide-in back into the cutout.
-
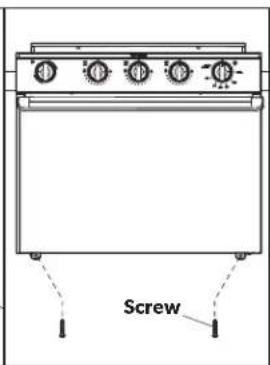
Secure the range or slide-in:
RANGE: Secure the two brackets with the provided sheet metal screws.
- SLIDE-IN: Attach the bracket to the burner box with the provided sheet metal screws.
- Replace the grate.
6 OPERATION
WARNING BURN, FIRE, EXPLOSION, AND/OR CARBON MONOXIDE HAZARD Failure to obey the following warnings could result in damage, a burn hazard, possible explosion, carbon monoxide buildup, serious injury, or death:
- Do not place more than 40 lbs (18 kg) on the grate while cooking.
- Do not place more than 20 lbs (9 kg) on the oven rack while cooking.
- Do not operate the range or slide-in during excessively windy conditions as this may cause a negative or positive draft, which is air moving across the range or slide-in top that may blow out the burner flame during use or move the flame inside of the range or slide-in.
- Use care when lighting a burner by hand. Burns could occur if the burner lights unexpectedly.
- Verify that there is a sufficient gas supply before attempting to light any burner. Air in the line will significantly delay the burner ignition and a burner may light unexpectedly as the air in the line clears out and is replaced by LP gas; this unexpected ignition may cause an explosion or burns.
- If any burner or the oven pilot should unexpectedly extinguish, turn all knobs off and wait five minutes before attempting to re-light the burner or oven pilot.
- Do not attempt to light more than one burner at a time.
- Do not use the oven as a storage area or space heater.
- Extinguish all pilots when refueling or traveling.
- Do not store flammable or combustible material on, in, or near the range or slide-in or in the cabinets above, or above and adjacent to, the range or slide-in. Do not use the oven as a storage area. While using the range or slide-in, frequently check the temperature of contents within the cabinet areas above the range or slide-in.
- To avoid a carbon monoxide poisoning hazard, do not cover the oven vent openings while the oven is in operation. Do not cover the ventilation holes in the oven broiler shelf (above oven burner) or cooking times will vary from normal and food may become burned or undercooked.
- Do not operate the range or slide-in if it is damaged or not working properly.
- Do not touch burners, burner grates, areas near burners, inner surfaces of the oven, the oven door, the wire rack, or any utensils inside the oven, during and after use, as burns may occur. Do not let clothing or other flammable materials contact these areas until they have had sufficient time to cool, as they may ignite.
- Never leave burners unattended when in use, as pan contents may boil over, resulting in smoke or a grease spill that may ignite.
- Because grease is flammable, never allow grease to collect around top burners or on the range or slide-in surface. Wipe up any grease spills immediately. Never use water on grease fires, and never pick up a flaming pan. Smother a flaming pan with a tight-fitting lid or cookie sheet. Flaming grease outside of the pan can be extinguished with baking soda or a multipurpose dry chemical or foam-type fire extinguisher.
-
Do not heat unopened containers as they could explode.
-
Use pans that are large enough to cover the burner area and contain the cooked food but that do not exceed 10 in. (25 cm) in size. This will reduce or eliminate heavy splattering or spills that can ignite and cause an explosion or burns and any excessive heat build-up that would result in damage to the range or slide-in top.
- Turn pan handles inward, but not over other burners. This reduces the chance of burns due to bumping a pan.
- Do not drop pans on the porcelain surface. Cracks or chips in the porcelain surface may result.
- Be sure that all cooking utensils are safe for use on the range or slide-in surface. Only certain kinds of utensils are suitable for surface or burner use without breaking due to sudden changes in temperature. Do not adjust the burner flames to extend beyond the edge of the cooking utensil or the flame could cause burns or poor cooking results.
- Use only dry potholders as moist or damp potholders on hot surfaces may result in steam burns. Do not let the potholder touch an open flame or use a towel or bulky cloth for a potholder as fire could result.
Control knobs must be turned off when not cooking. Fire and/or a burning hazard my occur if a burner is accidentally left on. - Do not apply excessive weight against the range or slide-in door, as it could spring the hinges; in this event, any such damage would not be covered under warranty.
6.2 Preparing The Range Or Slide-In For Use
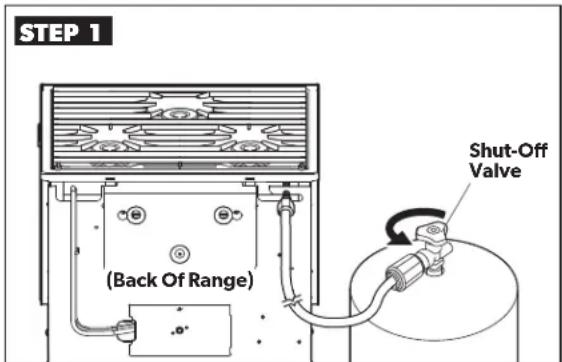
- Turn the gas on at the shut-off valve.
If your unit is equipped with a bi-fold cover, raise the cover before using the range or slide-in.
6.3 Using The Range Top Or Slide-In
All burner controls operate counterclockwise and must be pressed inward when turning to light.
Lighting The Burners
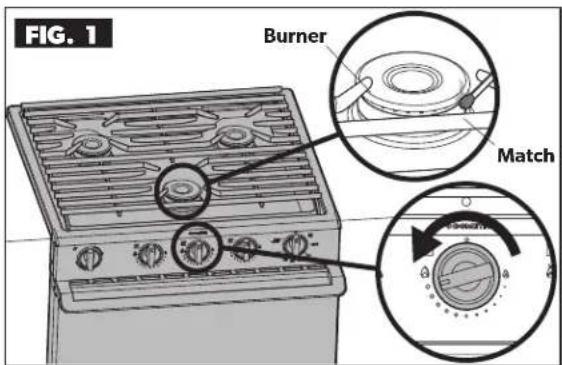
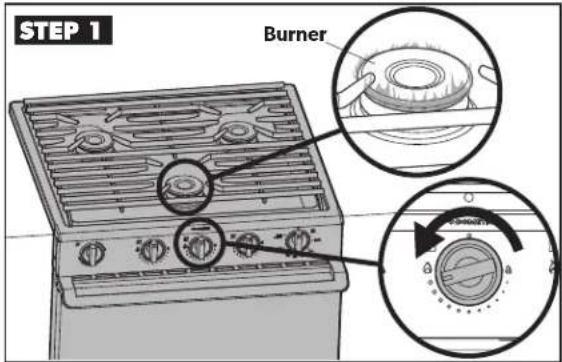
- To light the burner with a match, turn the knob approximately 90^ until it points to the large flame decal.
- Hold a lit match near the burner to ignite the flame.
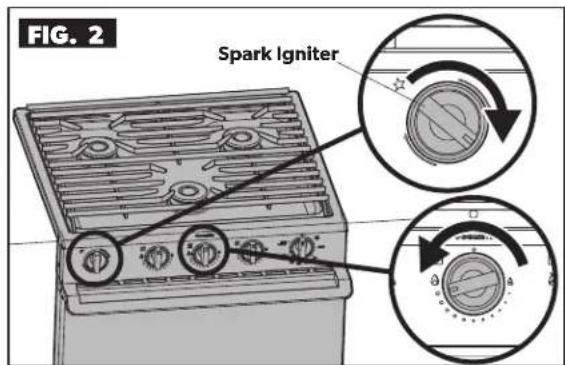
- To light the burner using a spark igniter, turn the knob approximately 90^ until it points to the large flame decal.
- Turn the spark igniter knob clockwise until it clicks. Continue turning the knob until the burner ignites.
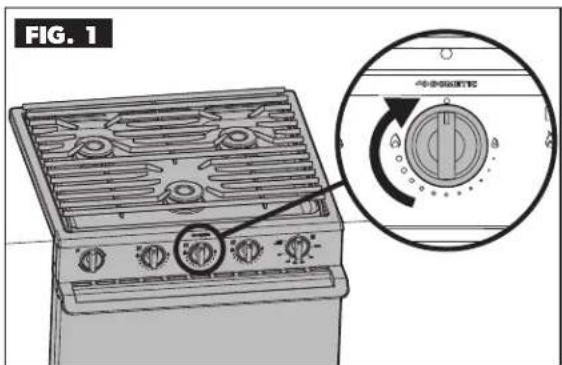
Extinguishing The Burner Flame
- Turn the knob clockwise until it points to the solid circle at the top of the knob.
6.4 Using The Oven
Setting The Oven Pilot
Range Or Slide-In Knob Settings
Setting Recommended Use

Light the burner
- Start food cooking
- Bring liquids to a boil

- Hold liquids at a boil
Cook food at different temperature levels

- Keep food warm
- Turn the burner off
After top burners have been on for a period of time, a popping sound may occur when the burner is turned off. This is normal and does not create a safety hazard.
Top Burner Models
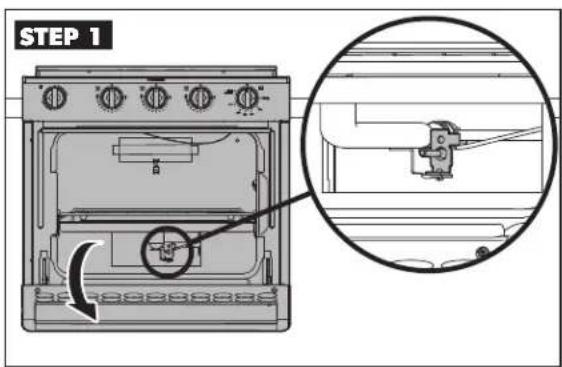
- For top burner models, push in and rotate the oven control knob until it points to pilot - push/ hold.
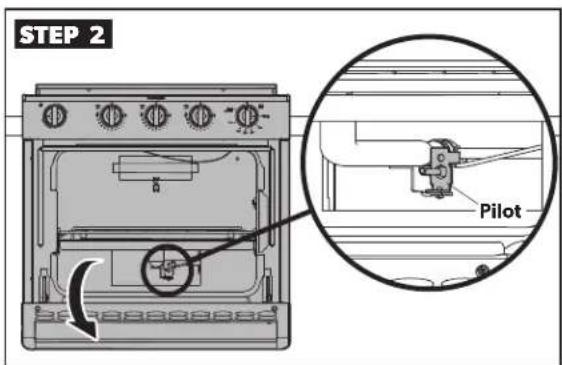
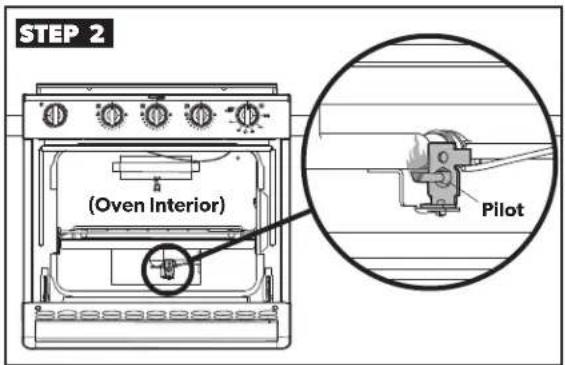
- Push in and hold the knob while holding a lit match under the oven pilot located at the back of the oven, under the broiler shelf.
Piezo Ignitor Models
- For models with the Piezo Ignitor, push in and rotate the oven control knob until it points to pilot - push/hold.
- Turn the spark ignitor knob clockwise until it an audible click is heard. Continue to repeat this step until the burner ignites.
All Models
- Release knob and verify that the pilot stays lit. Repeat the process if the pilot does not stay lit.
The oven pilot has been factory set and requires no further adjustment. - To extinguish the oven pilot, push in the oven control knob and rotate clockwise to off.

(Oven Pan)
1^ - 2^ (2-5cm)
Broiler Area
- Place the food to be baked in the center of the oven allowing 1 in. -2 in. (2 - 5cm) space from the oven walls on all sides of the container.
Cooking times will be longer at higher attitudes (+4000 feet (1219m)
Oven Knob Settings
Setting Recommended Use
Pilot Push/Hold
Starting point for lighting the oven pilot
- Keeps the oven pilot lit for continued use of the oven
Broil - Sets the oven temperature to broil
300-500 Sets the oven to a particular temperature
Turns the oven pilot off
Oven Light Operation
- To turn the oven light ON, turn the switch on the control panel to the ON position.
7 MAINTENANCE
WARNING BURN, FIRE, EXPLOSION, AND/OR CARBON MONOXIDE HAZARD. Failure to obey the following warnings could result in damage, a burn hazard, possible explosion, carbon monoxide buildup, serious injury, or death:
- Keep range or slide-in top area clear of combustible cleaning materials, gasoline, and other flammable vapors and liquids.
- Do not obstruct the flow of combustion and ventilation air.
- Leak testing shall be conducted according to the manufacturer's instructions.
- Make sure all controls are OFF and the range or slide-in surfaces, burner grates, burners, and oven surfaces are cool before cleaning or disassembling the range or slide-in.
- Do not use oven cleaners, bleach, or rust removers on the range or slide-in top or burner grates.
- Clean oven with oven cleaner only. Follow directions on the cleaning product container.
- Never use a wire brush or metallic item for cleaning burner ports or orifices. Brush may "shed" bristles, that may lodge in the orifice or burner ports and cause a fire or explosion.
ACAUTION BURN AND/OR DAMAGE HAZARD. Failure to obey the following cautions could result in damage or injury:
- Clean all surfaces as soon as possible after boil overs or spillovers. Do not allow foods containing acids (such as lemon juice, tomato juice, or vinegar) to remain on porcelain or painted surfaces. Acids may remove the glossy finish. Pitting and discoloration will result if spills are allowed to remain for any length of time on stainless steel. Do not allow spills to remain on burner caps. Caps could be permanently stained if spills are not cleaned up promptly.
- Do not use steel wool, or abrasive cleaners, or acid type cleaners such as chlorine bleach on your range top, slide-in, or grate systems. They will damage your range or slide-in. Use only non-abrasive plastic scrubbing pads.
- Do not use abrasive cleaning materials, oven cleaner, or harsh chemicals on the control panel as these may damage or remove the operating instructions printed on the front of the unit.
- The grate and surface of the cooktop is covered with porcelain coating. Porcelain is a glass/ceramic coating glazed to the surface of the metal. Porcelain is designed to provide a surface that can withstand high temperatures and maintain an attractive appearance and make it easier to clean. Do not wash warm porcelain surfaces. Allow these areas to cool before cleaning. Burns can occur or the porcelain could crack.
- When cleaning around the burners, use care to prevent damage to the electrode (if so equipped). If a sponge or cloth should catch the metal igniter electrode, it could damage or break the electrode. If this occurs, the burner will not light.
- Use warm soapy water only to clean the burner grates, burner box, painted surfaces, porcelain surfaces, stainless steel surfaces, and plastic items on your range top or slide-in. Do not use gritty or acid-type cleaners. Do not use steel wool or abrasive cleaners, as they will damage your range top or slide-in. Use only non-abrasive plastic scrubbing pads.
Proper installation and care will help keep your range or slide-in operating properly. Most cleaning can be performed using normal household items.
7.1 Checking The Burner Flames And Oven Pilot
Light the burners, one at a time. Refer to "Lighting The Burners" on page 12, for more information.
- Confirm that the burner flame is present and adjusts when the control knob is turned.
7.2 Cleaning The Range Or Slide-In
Cleaning the range top or slide-in:
- Remove the grate.
Clean with warm, soapy water. - Rinse with clean water.
- Dry with soft cloth.
Heavy burned on soil may require repeated cleaning steps until the soil is completely removed.
Light the oven pilot. Refer to "Setting The Oven Pilot" on page 13, for more information.
- Confirm the pilot flame is present.
Additional Cleaning Methods
| Item Cleaning Method | |
| Control knobs Pull the knobs straight off of the stems to clean. Use a mild liquid cleaner or glass cleaner. | |
| Control Panel Use a spray glass cleaner, applying the cleaner to a paper towel. Do not spray glass cleaner directly on the panel. Do not use oven cleaner on the control panel. | |
| Range Top Surface | Use a mild liquid cleaner or glass cleaner. |
| Surface Burner Grates | Clean area as soon as it becomes dirty. Use a non-abrasive, plastic, scrubbing pad, as necessary. |
| Surface Burners, Burner Ports, or Orifices | If clogged, gently brush perforated areas with a lightweight brush (toothbrush) or carefully clean the holes out using a toothpick. |
| Oven Use warm, soapy water. For heavy soil, use an oven-cleaning spray and follow the manufacturer directions on the label. Use a non-abrasive, plastic, scrubbing pad, as necessary. | |
8 STORAGE
8.1 Preparing The Range Or Slide-In For Storage

- Dry all surfaces.
- Spray surfaces with vegetable oil or a similar product to prevent rust during storage.
- Clean oil off the surface of the range or slide-in before reinstalling and operating.
9 DISPOSAL
Place packaging material only in the appropriate recycling waste bins, whenever possible. Do not dispose of the range or slide-in without consulting a local recycling center or specialist dealer for details about how to dispose of the range or slide-in in accordance with the applicable national and local regulations.
10 REPLACEMENT PARTS
For the most current parts information, visit www.dometic.com.
11 LIMITED 2-YEAR WARRANTY
LIMITED 2-YEAR WARRANTY AVAILABLE AT WWW.DOMETIC.COM/WARRANTY.
IF YOU HAVE QUESTIONS, OR TO OBTAIN A COPY OF THE LIMITED WARRANTY FREE OF CHARGE, CONTACT:
DOMETIC CORPORATION
CUSTOMER SUPPORT CENTER
1120 NORTH MAIN STREET
ELKHART, INDIANA, USA 46514
1-800-544-4881 OPT 3
DOMETIC
APPAREILS DE CUISSON
PLAQUE DE CUISSON
SERIES S31 ET R31

CUISINIÈRE ET PLAQUE DE CUISSON
1120 North Main Street
Elkhart, IN 46514
Listedescentredeserviceetdesrevendeurs
Visitez: www.dometic.com
RéVISIONF | Document n° 50506 01/19 | ©2019 Dometic Corporation
GARANTIE LIMITEE DISPONIBLE A WWW.DOMETIC.COM/WARRANTY.
POUR TOUTE QUESTION OU POUR OBTENIR UNE COPIE Gratis DE LA GARANTIE LIMITEE, CONTACTER :
DOMETIC CORPORATION
CUSTOMER SUPPORT CENTER
1120 NORTH MAIN STREET
ELKHART,INDIANA,ETATS UNIS 46514
1-800-544-4881 OPT.3


