
SOTF1510B - Cooker SCHOLTES - Free user manual and instructions
Find the device manual for free SOTF1510B SCHOLTES in PDF.

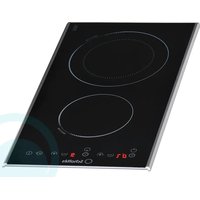
| Product type | Built-in induction hob |
| Brand | Scholtès |
| Model | SOTF1510B |
| Number of cooking zones | 4 (including 1 flexible zone) |
| Power supply | 220-240 V ~ 50/60 Hz |
| Total power | 7.2 kW (estimated) |
| Cut-out dimensions | See installation manual (not provided here) |
| Boost function | Yes, on each zone |
| Flexible zone | Yes, usable as single zone or 2 zones |
| Timer | Independent per zone, from 1 to 99 minutes |
| Child safety | Control lock |
| Pan detection | Yes, automatic |
| Automatic shut-off | Yes, depending on power level (2 to 8 h) |
| Residual heat indicator | Yes, display "H" |
| Overflow protection | Yes, automatic shut-off if wet keys |
| Cleaning | Damp sponge, scraper for burnt-on residue |
| Compatible cookware type | Flat and magnetic bottom (steel, cast iron, etc.) |
| After-sales service | Approved by Scholtès |
| Warranty | See terms (excluding wear parts) |
Frequently Asked Questions - SOTF1510B SCHOLTES
User questions about SOTF1510B SCHOLTES
0 question about this device. Answer the ones you know or ask your own.
Ask a new question about this device
Download the instructions for your Cooker in PDF format for free! Find your manual SOTF1510B - SCHOLTES and take your electronic device back in hand. On this page are published all the documents necessary for the use of your device. SOTF1510B by SCHOLTES.
USER MANUAL SOTF1510B SCHOLTES
natural_image
Pure geometric shapes including rectangles, circles, and squares without any text or symbols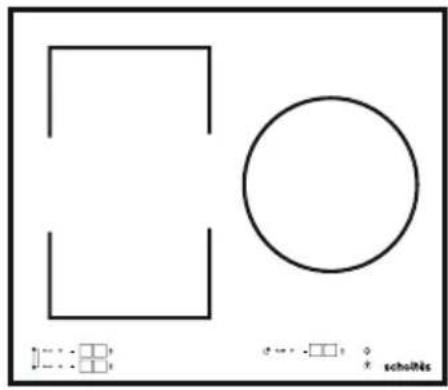
natural_image
Pure geometric shapes including a rectangle, circle, and crosshairs without any text or symbolsSOTF1810B
natural_image
Pure geometric shapes (rectangles, circles) with no text or symbols, numbers, or symbols present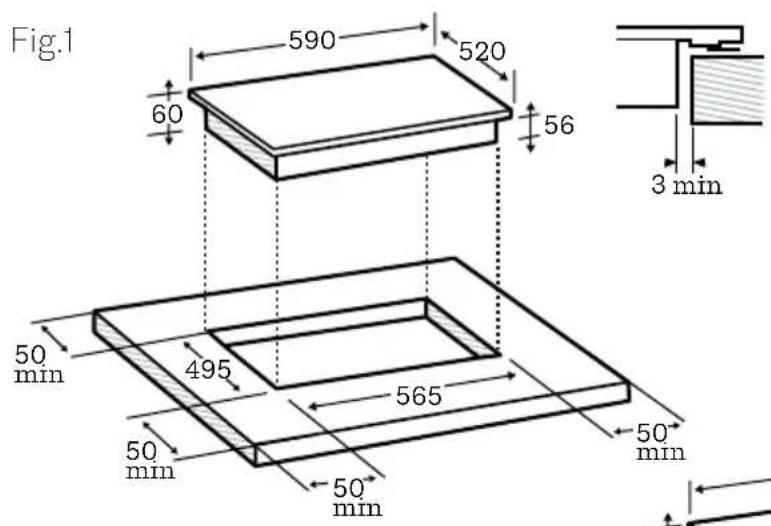
Fig.2
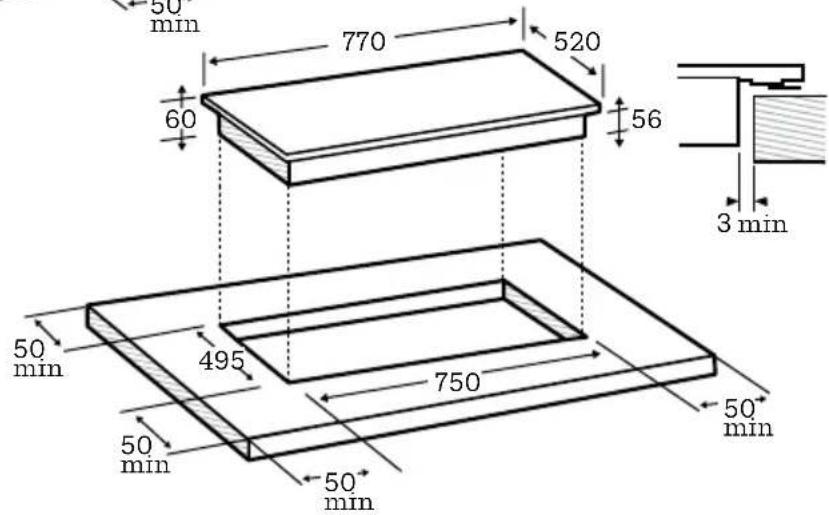
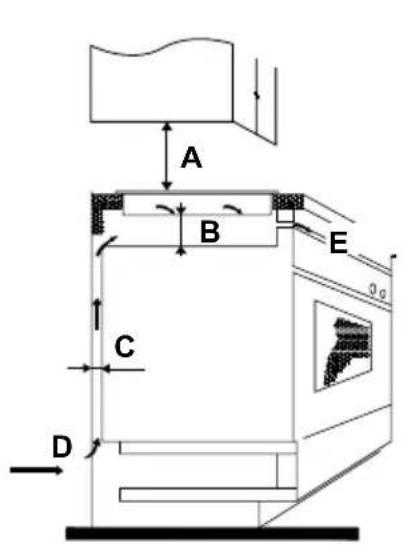
Fig.3
| A (mm) B | (mm) C (nm) D E | ||
| 760 50m | ini 20mini Air Intake / | Prise d'air Air exit 5mm/sortie d'air |
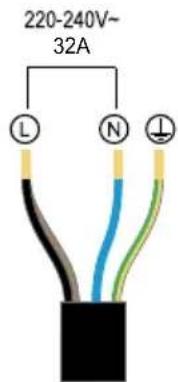
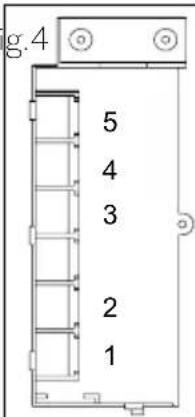
Fig.5 Fig.4
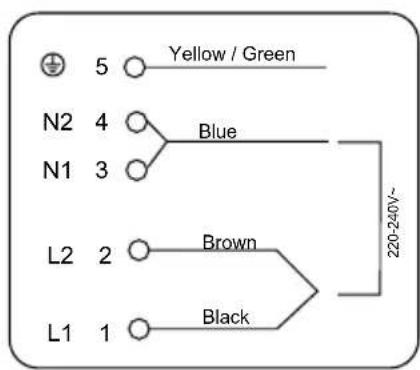

EN - If you need you can also connect your hob as shown below: this should be done by a certifiod technician.
For nearly a century SchoItès has been developing state of the art products to the service of each chef.
Because cooking is a passion, our technology offers you a wide range of options and invites you to explore your culinary creativity.
We hope you will enjoy using your new appliance and we thank you for your trust.
CONTENT
1 - Safety information
2 - Installation
3 - Use
4 - Cleaning & maintenance
5 - Care for environment
Important safety instructions read carefully and keep for future use.
1. SAFETY INFORMATION
BEFORE THE INSTALLATION AND USE OF THE APPLIANCE, PLEASE READ THESE INSTRUCTIONS CAREFULLY.
THE MANUFACTURER IS NOT RESPONSIBLE OF ANY INJURIES OR DAMAGES THAT ARE THE RESULT OF INCORRECT INSTALLATION OR USAGE. ALWAYS KEEP INSTRUCTIONS IN A SAFE AND ACCESSIBLE LOCATION FOR FUTURE REFERENCE.
1.1 Children and vulnerable people safety
This appliance can be used by children aged from 8 years and above and persons with reduced physical, sensory or mental capabilities or lack of experience and knowledge if they have been given supervision or instruction concerning use of the appliance in a safe way and understand the hazards involved.
Children shall not play with the appliance.
Cleaning and user maintenance shall not be made by children without supervision.
Children under 8 years old must be kept away from the hob unless they are supervised at all times.
Caution: The accessible parts of this appliance may become hot when used with cooking appliances.
Precautions must be taken to avoid touching the heating elements.
1.2 General safety
Check if the appliance gets any damage after unpacking it. Do not connect the appliance if it has been damaged. Only a licensed professional may install this appliance and replace the cable.
The electrical plug must remain accessible after installation.
Damages caused by incorrect connection is not covered under warranty.
Before carrying out any maintenance, disconnect the appliance from the power supply.
The appliance can be disconnected by using an accessible power outlet or by incorporating a switch in the fixed lines, in accordance with installation rules.
If the main power supply cable is damaged, it must be replaced by the manufacturer, its authorized service center or similar qualified persons to avoid an electrical hazard.
Ensure that the power cables of any electrical appliances plugged in close to the hob are not in contact with the cooking zones.
Metallic objects such as knives, forks, spoons and lids should not be placed on the hob surface as they can get hot.
Never use steam or high-pressure tools to clean your appliance.
The appliance is not designed to be switched on using an external timer or a separate remote-control system.
WARNING: leaving oil or fat to cook unattended on a hob can be dangerous and could cause a fire.
Never try to extinguish a fire with water but switch off the appliance, then cover the flame with a lid or a fire blanket.
WARNING: fire risk: do not store any items on the cooking surfaces.
If the surface is cracked, turn off the appliance to avoid the risk of electric shock.
Do not use your hob until you have replaced the glass top.
Avoid hard shocks from cookware: although the vitroceramic glass worktop is very sturdy, it is not unbreakable. Do not place hot lids flat on your cooking hob. A suction effect may damage the vitroceramic surface. Avoid dragging cookware across the surface, which could damage the decorative finish on the vitroceramic top in the long term.
Never use aluminum foil for cooking. Never place items wrapped in aluminum foil or packaged in aluminum dishes on your cooking hob. The aluminum will melt and permanently damage your appliance.
Do not store cleaning products or inflammable products in the cabinet underneath the hob.
After use, turn off the hob using its control device and do not rely on the pan detector when removing the pans.
WARNING: Only use hob protectors designed by the manufacturer of the cooking appliance or included with the appliance. The use of unsuitable protectors could cause accidents.
Do not place or leave any magnetizable objects (e.g. credit cards, memory cards) or electronic devices (e.g. computers, MP3 players) near the appliance, as they may be affected by its electromagnetic field.
Your appliance complies with applicable European Directives and regulations. In order to avoid interference between your cooking hob and a heart pacemaker, or other electrical implants (such as insulin pumps), the pacemaker or implant must be designed and programmed in compliance with the regulations that apply it.
Ask the pacemaker manufacturer or your GP.
This appliance is intended to be used in household and similar applications such as: staff kitchen areas in shops, offices and other working environments; by clients in hotels, motels and other residential type environments; farm-houses; bed and breakfast type environments.
Do not use it for commercial or industrial purposes or for any other purpose than that for which it was designed.
You should never leave cooking unattended.
Warning: Never leave any or products in the cupboard beneath your hob (aerosols or other pressurized cans, papers, recipe books, etc.).
If you have a drawer underneath the hob, we recommend avoiding placing objects in it that are temperature sensitive (plastics, paper, aerosols, etc.).
Disconnect your hob from electrical supplies before carrying out any maintenance operations.
When connecting electrical appliances to a nearby socket, ensure that the power supply cable is not in contact with any hot surface on the appliance.
This appliance should be installed by a qualified technician /installer.
2. INSTALLATION
Unpacking
Remove all the protective packing pieces.
Check and respect the appliance's characteristics that appear on the name plate (sticked on the base of your induction hob).
2.1 Building into a base unit
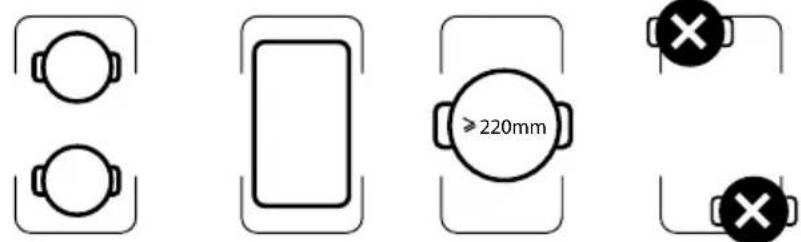
Check that the air intakes and outlets are free of obstruction. Comply with the information concerning the fitting dimensions (in millimeters) of the base unit destined to receive the hob.
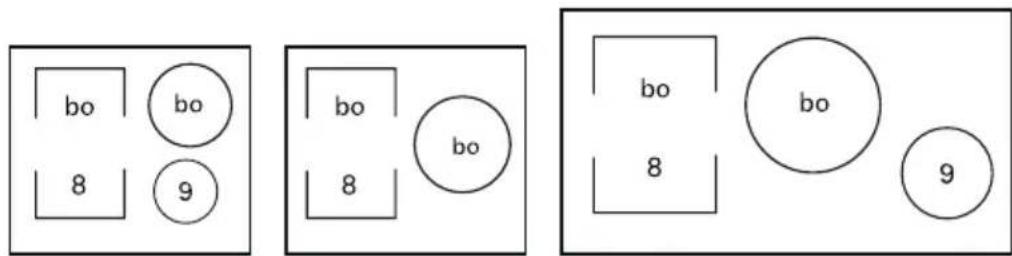
Cut out the work surface according to your model: sizes shown in the drawing (Fig.1/Fig.2).
For the purpose of installation and use, a minimum of 5 cm space shall be preserved around the hole.
Under any circumstances, make sure the induction cooker hob is well ventilated and the air inlet and outlet are not blocked (Fig.3).
If you are installing the hob above a drawer or above a built-in oven, comply with the dimensions provided on the illustrations to ensure a sufficient air outlet at the front.
Note : The hob should not be installed directly above a dishwasher, fridge, freezer, washing machine or clothes dryer, as the humidity may damage the hob electronics.
2.2 Electrical connection
This hob must be connected to the mains via an all-pole cut-off device that complies with current installation regulations. A disconnection device must be incorporated into the fixed wiring.
This hob must be connected to the mains power supply only by a suitably qualified person.
Before connecting the hob to the mains power supply, check that:
- The domestic wiring system is suitable for the power drawn by the hob.
- The data correspond to the value given in the rating plate
- The power supply cable sections can withstand the load specified on the rating plate.
To connect the hob to the mains power supply, do not use adapters, reducers, or branching devices, as they can cause overheating and fire.
The power supply cable must not touch any hot parts and must be positioned so that its temperature will not exceed 75^ C at any point.
If the cable is damaged or to be replaced, the operation must be carried out the by after-sale agent with dedicated tools to avoid any accidents.
- If the appliance is being connected directly to the mains an omni polar circuit-breaker must be installed with a minimum opening of 3mm between contacts.
- The installer must ensure that the electrical connexion has been made and that it is compliant with safety regulations.
Note : When power is first supplied to your hob, or after an extended power outage, an indicator light will appear on the control panel. Wait approximately 30 seconds or press any key on the control panel to make the information disappear and use your hob. This display is normal and is reserved for use by After-Sales Service. In all cases, it should be disregarded.
3. USE
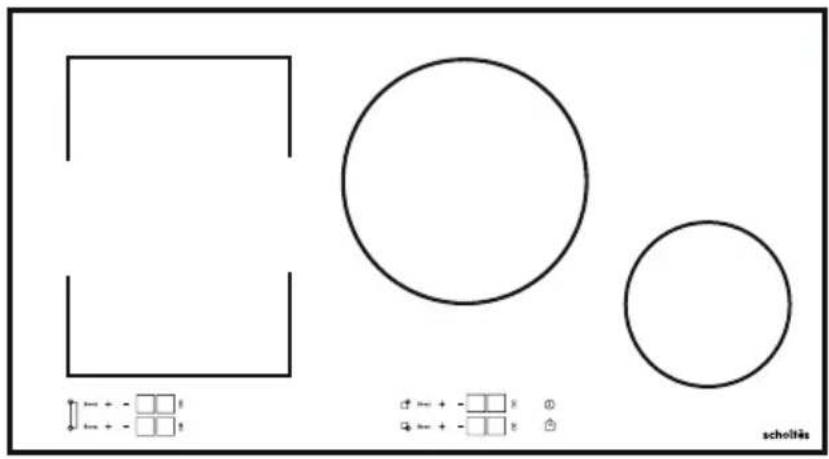
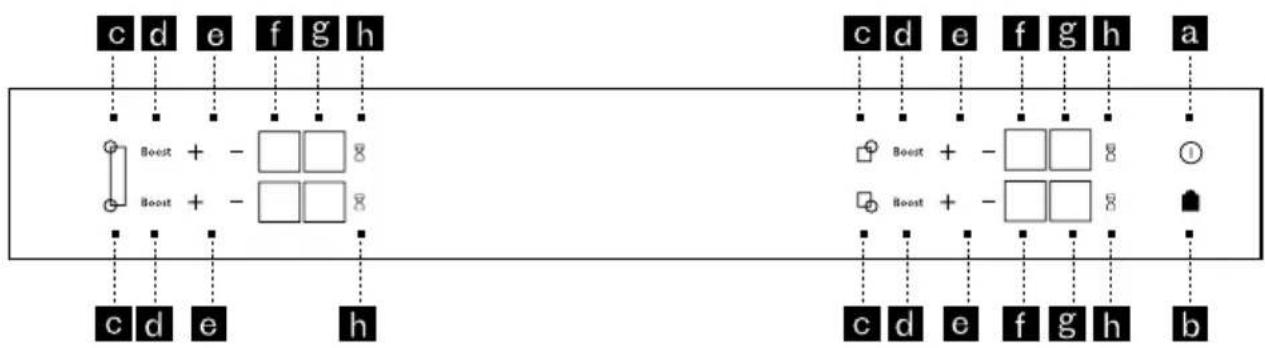
3.1 Control panel
flowchart
graph TD
    subgraph Left_Series
        A1["c d e f g h"] --> B1["Boost + - □□8"]
        A2["Boost + - □□8"] --> B2["Boost + - □□8"]
        C1["c d e h"] --> D1["Boost + - □□8"]
        E1["c d e f g h"] --> F1["Boost + - □□8"]
    end
    subgraph Right_Series
        G1["c d e f g h"] --> H1["Boost + - □□8"]
        I1["Boost + - □□8"] --> J1["Boost + - □□8"]
        K1["c d e f g h"] --> L1["Boost + - □□8"]
        M1["b"] --> N1["Boost + - □□8"]
    end
a. General switch on and off
b. Locking/clean lock
c. Zone switch on and off
d. Boost function
e. Power/timer settings
f. Power display
g. Timer display
h. Timer selection
3.2 Induction theory
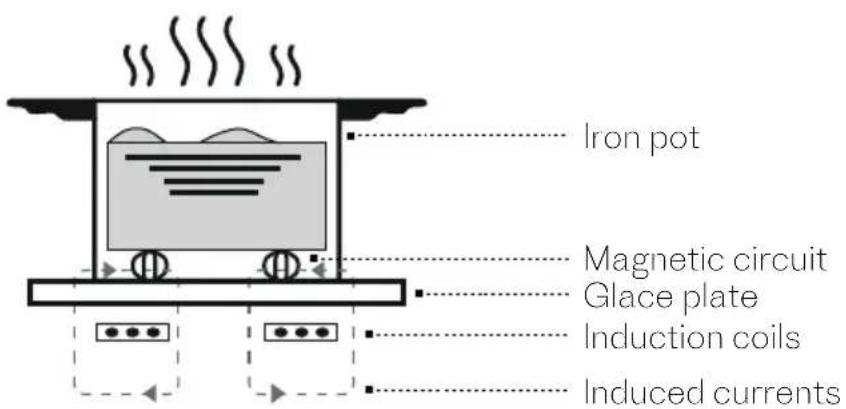
Induction cooking is a safe, advanced, efficient, and economical cooking technology. It works by electromagnetic vibrations generating heat directly in the pan, rather than indirectly through heating the glass surface. The glass becomes hot only because the pan eventually warms it up.
3.3 Choice of cookware
Most cookware is compatible with induction. Only glass, terracotta, aluminium without a special base, copper and some non-magnetic stainless steels do not work with induction cooking.
We suggest that you choose cookware with a thick, flat bottom. The heat will be distributed better, and cooking will be more uniform.
Note : Never leave an empty pan to heat unattended.
Note : Avoid putting cookware on the control panel.
3.4 Pan dimension
There are several cooking zones available. Select one which is suitable, based on the size of the pan. If the base of the cookware is too small, the power indicator will start to flash and the cooking zone will not work, even if the cookware's material is recommended for induction. Refer to here under table.
| Zone diameter(mm) | Minimum pot diameter (mm) | maximum pot diameter (mm) |
| 140 120 160 | ||
| 220 140 240 | ||
| 280 160 300 | ||
| Full flexible zone 220 220x400 | ||
| 1/2 flexible zone 140 240 |
3.5 Switching on/off
For switching on a zone press the general on/off key (a). « 0 » flashes in each zone for 5 secondes. If no pan is detected, select a zone (c). If a pan is detected, the « 0 » will be displayed and the other zones will be switched off. You can then set the power level.
The cooking area heats up automatically.
For switching of a zone: Press and hold the key for zone (c). A long beep sounds and the display goes off or an «H» appears (residual heat indicator). Press the On/Off key (a) to switch off the hob completely.
3.6 Setting the power
Once the cooking zone switched on press the “+” or “-” key (e) to adjust power level from 1 to 15. When switching on, you can go directly to 10 power by pressing the «-» key for the zone. When pressing the Boost touch you will access to boost power.
Note : while Boost function is activated on a zone the other zone has limited power (see here under).
3.7 Using the flexible zone
The flexible zone can be used as 2 separate zones or as a unique zone.
You can select the total flexible zone by pressing at the same time upper and lower keys of left zone selection (c). The lower display will indicate you are using the full flex zone while you will be able to adjust settings by pressing keys on the upper zone.
The power and the timer are adjusted as for a normal cooking zone. To switch the zone off, press and hold the left zone key selection (c). A long bip sounds and the display goes off or the «H» symbol appears.
Note: Pressing the touch key in front of or behind the zone deactivates the function and transfers the settings to the selected zone.
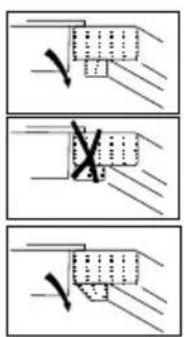
Important: Make sure to place the cookware centered on the single cooking zone. In case of big pot, oval, rectangular and elongated pans make sure to place the pans centered on the cooking zone. Examples of good pot placement and bad pot placement.
3.8 Setting the timer
Each cooking zone has a dedicated timer. It can be used as soon as the cooking zone is turned on. To switch it on or change it, press the timer touch key (h) and then the “+” or “-” key to adjust time setting from 1 to 99 minutes. At the end of cooking, the display indicates 0 and a warning beep sounds. To cancel this information, press any key.
Otherwise, beeps will switch off after a few seconds.
To stop the timer during cooking, press the + and - keys at the same time or return to 0 using the "-" key.
Note: when selecting the timer and pressing "-" touch you can reach directly maximum timer of 99 minutes.
Minute minder function
This function allows you to time an event, without cooking. Press the timer touch key (h) of a cooking zone you are not using, "t." appears in the power display and you can adjust the time by pressing "+" or "-" key.
3.9 Locking function
Your hob has a child safety device which locks the controls when the hob is not in use or during cooking (to maintain the current settings). For safety reasons, only the stop key and the zone selection keys are still active and allow the hob or a cooking zone to be switched off.
Locking : press the cadena key (b) during 3 seconds until bloc appears in the displays and a beep confirms the operation.
Hob locked in operation : The display of cooking zones in operation alternately indicates power and the locking symbol. When you press the power or timer keys for the zones which are on : «bloc» appears for 2 seconds and then switches off.
Unlocking : press the cadena key (b) during 3 seconds until and a double beep confirms the operation and bloc disappears in the displays.
3.10 Safety recommendation
Residual heat
After intensive use, the cooking area you have just used will remain hot for several minutes. An «H» is displayed during this time. So, avoid touching the zones concerned.
Temperature limiter
Each cooking area is fitted with a safety sensor that continuously monitors the temperature of the bottom of the pan. In case that an empty pan is left on a zone that is switched on, the sensor automatically adapts the power delivered by the hob and limits the risk of damaging the cookware or the hob.
Spillage protection
The hob may be switched off in the following three cases:
• A spillage in the touch key area.
- Damp cloth placed over the touch keys.
• A metal object placed on the touch keys
Remove the object or clean and dry the touch keys and then continue cooking. In these cases, the '-' symbol is displayed accompanied by an audible signal.
«Auto-Stop» system
If you forget to switch off a pan, your hotplate has an “Auto-Stop” safety function that automatically switches off the forgotten cooking zone after a preset time. If the safety system is triggered, the cooking zone is shown as cut off with error code (AS) displayed on the control panel and a beep sounds. To stop it, simply press any of the control buttons.
| Power level 1 2 3 4 5 6 7 8 9 | 10 1 | 12 1 | 13 14 | 15 | |||||||||||
| Default working timer (hour) | 8 | 8 | 8 | 4 | 4 | 4 | 2 | 2 | 2 | 2 | 2 | 2 | 2 | 2 | 2 |
4. CLEANING & MAINTENANCE
| What How Important | ||
| Everyday soiling on glass (fingerprints, marks, stains left by food or non-sugary spillovers on the glass) | 1. Switch the power to the cooktop off.2. Apply a cooktop cleaner while the glass is still warm (but not hot!)3. Rinse and wipe dry with a clean cloth or paper towel.4. Switch the power to the cooktop back on. | ·When the power to the cooktop is switched off, there will be no ‘hot surface’ indication but the cooking zone may still be hot!Take extreme care.·Heavy-duty scourers, some nylon scourers and harsh/abrasive cleaning agents may scratch the glass. Always read the label to check if your cleaner or scourer is suitable.·Never leave cleaning residue on the cooktop: the glass may become stained. |
| Boilovers, melts, and hot sugary spills on the glass | Remove these immediately with a fish slice, palette knife or razor blade scraper suitable for Induction glass cooktops, but beware of hot cooking zone surfaces:1. Switch the power to the cooktop off.2. Hold the blade or utensil at a 30° angle and scrape the soiling or spill to a cool area of the cooktop.3. Clean the soiling or spill up with a dish cloth or paper towel.4. Follow steps 2 to 4 for 'Everyday soiling on glass' above. | · Remove stains left by melts and sugary food or spillovers as soon as possible. If left to cool on the glass, they may be difficult to remove or even permanently damage the glass surface.· Cut hazard: when the safety cover is retracted, the blade in a scraper is razor-sharp. Use with extreme care and always store safely and out of reach of children. |
| Spillovers on the touch controls | 1. Switch the power to the cooktop off.2. Soak up the spill3. Wipe the touch control area with a clean damp sponge or cloth.4. Wipe the area completely dry with a paper towel.5. Switch the power to the cooktop back on. | · The cooktop may beep and turn itself off, and the touch controls may not function while there is liquid on them. Make sure you wipe the touch control area dry before turning the cooktop back on. |
| Problem Possible causes What to do | ||
| The induction hob cannot be turned on. | No power. Make sure the | induction hob is connected to the power supply and that it is switched on.Check whether there is a power outage in your home or area.If you've checked everything and the problem persists, call a qualified technician. |
| The touch controls are unresponsive. | The controls are locked. | Unlock the controls. See section ‘Using your induction cooktop’ for instructions. |
| The touch controls are difficult to operate. | There may be a slight film of water over the controls or you may be using the tip of your | Make sure the touch control area is dry and use the ball of your finger when touching the controls. |
| The glass is being scratched. | Rough-edged cookware.Unsuitable, abrasive scourer or cleaning products being used. | Use cookware with flat and smooth bases. See ‘Choosing the right cookware’. |
| Some pans make crackling or clicking noises. | This may be caused by the construction of your cookware (layers of different metals vibrating differently). | This is normal for cookware and does not indicate a fault. |
| The induction hob makes a low humming noise when used on | This is caused by the technology of induction cooking. | This is normal, but the noise should quieten down or disappear completely when you decrease the heat setting. |
| Fan noise coming from the induction hob. | A cooling fan built into your induction hob has come on to prevent the electronics from overheating. It may continue to run even after you’ve turned the induction hob off. | This is normal and needs no action. Do not switch the power to the induction hob off at the wall while the fan is running. |
| Pans do not become hot and appears in the display. | The induction hob cannot detect the pan because it is not suitable for induction cooking.The induction hob cannot detect the pan because it is too small for the cooking zone or not properly centered on it. | Use cookware suitable for induction cooking. See section ‘Choosing the right cookware’. Center the pan and make sure that its base matches the size of the cooking zone. |
| The induction hob or a cooking zone has turned itself off unexpectedly, a tone sounds and an error code is displayed (typically alternating with one or two digits in the cooking timer display). | Technical fault. Please note | to down the error letters and numbers, switch off the power to the induction hob at the wall, and contact a qualified technician. |
| The induction hob or a cooking zone has turned itself off unexpectedly, a tone sounds and an error code is displayed (typically alternating with one or two digits in the cooking timer display). | Technical fault. Please note | to down the error letters and numbers, switch off the power to the induction hob at the wall, and contact a qualified technician. |
5. CARE FOR THE ENVIRONMENT
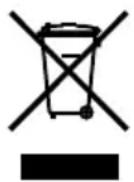
This appliance's packaging can be recycled. Recycle and contribute towards protecting the environment by disposing of packaging in local waste containers designed for this purpose. Your appliance also contains a lot of recyclable material. This logo indicates that used appliances must not be mixed with other waste. Appliance recycling organised by your manufacturer is carried out under optimum conditions, in accordance with European Directive 2002/96/EC on the disposal of waste electrical and electronic equipment. Contact your local authority or retailer fo information on used appliance collection points close to your home. Thank you for helping to protect the environment.
Information on the meaning of the conformity marking CE
The CE marking indicates that the product meets the main requirements of European Directives 2014/35 / CE (Low Voltage), 2014/30 / CE (Electromagnetic Compatibility), 2011/65 / EU (Reduction of the use of certain dangerous substances in EEE).
The warranty does not cover wearing parts of the product, nor problems or damage resulting from:
- Surface deterioration due to normal wear and tear of the product;
- Defects or deterioration due to contact of the product with liquids and due to corrosion caused by rust or the presence of insects;
- Any unauthorized incident, abuse, misuse, modification, disassembly or repair;
- Any improper maintenance operation, use not in accordance with the instructions concerning the product or connection to an incorrect voltage;
- Any use of accessories not supplied or not approved by the manufacturer. The warranty will be void if the product nameplate and / or serial number is removed.
Estimado cliente:
3.8 De timer instellen


- CONTENT
- Important safety instructions read carefully and keep for future use.
- SAFETY INFORMATION
- Children and vulnerable people safety
- General safety
- INSTALLATION
- Unpacking
- Building into a base unit
- Electrical connection
- USE
- Control panel
- Induction theory
- Choice of cookware
- Pan dimension
- Switching on/off
- Setting the power
- Using the flexible zone
- Setting the timer
- Minute minder function
- Locking function
- Safety recommendation
- Residual heat
- Temperature limiter
- Spillage protection
- «Auto-Stop» system
- CLEANING & MAINTENANCE
- CARE FOR THE ENVIRONMENT
- De timer instellen
Brand : SCHOLTES
Model : SOTF1510B
Category : Cooker