
A 210 - Laminating machine OLYMPIA - Free user manual and instructions
Find the device manual for free A 210 OLYMPIA in PDF.
| Product type | Laminating machine |
| Brand | Olympia |
| Model | A 210 |
| Maximum laminating format | DIN A4 (230 mm width) |
| Maximum support thickness to laminate | 0.5 mm |
| Pouch thickness | 80 to 125 microns |
| Warm-up time | 3 to 4 minutes |
| Cooling time | Approximately 15 minutes |
| Laminating speed | 300 mm/min |
| Operating temperature | 105 °C |
| Power supply | 220-240 V, 50 Hz, 0.63 A |
| Power consumption | 145 W |
| Dimensions (L x W x H) | 340 x 110 x 60 mm |
| Weight | 760 g |
| Temperature indicator | Solid red light when ready |
| Special features | Overheat protection, no bubble formation |
| Cleaning | Non-linting damp cloth; for rollers, use a folded sheet of paper |
| Warranty | Return the device in its original packaging with the receipt to the store |
| Box contents | Machine, instruction manual, set of pouches (3 x A4, 4 x A5, 4 x A6, 4 x business card) |
Frequently Asked Questions - A 210 OLYMPIA
User questions about A 210 OLYMPIA
0 question about this device. Answer the ones you know or ask your own.
Ask a new question about this device
Download the instructions for your Laminating machine in PDF format for free! Find your manual A 210 - OLYMPIA and take your electronic device back in hand. On this page are published all the documents necessary for the use of your device. A 210 by OLYMPIA.
USER MANUAL A 210 OLYMPIA
natural_image
White rectangular electronic device with a black line and circular button, no visible text or symbols on the body.OLYMPIA A 210
05.2019
Einleitung 3
1
Eingabeseite
4
Netzstecker
2
natural_image
Diagram showing a white air conditioner unit and a tilted square panel with arrows indicating direction (no text or symbols)Setting Up Safely and Putting Into Operation 20
Laminating 20
If Problems Occur 22
Regular Maintenance and Service 22
Technical Data....24
Declaration of Conformity 25
Information on Disposal 25
Warranty 25
Introduction

We are delighted that you have chosen to purchase the new A 210 laminator - subsequently referred to as: laminator. You have chosen a high-quality laminator. The operating manual is a component part of this laminator. It contains important information concerning safety, use and disposal. Read this manual thoroughly and observe the instructions and safety information in it when operating the laminator. Only use the laminator as described and for the applications specified. Keep the operating manual in a safe place for future reference and hand over all the documents should you pass the laminator on to third parties.
Intended Use
The laminator has been designed to complete lamination using hot lamination pouches (up to a maximum size of A4) with a lamination foil thickness of 80 -125 micron, whereby the maximum thickness of the document to be laminated (photos, pictures, cards, paper etc.) must not exceed 0.5 mm. The laminator is only intended for private use and is not suitable for commercial purposes.
Unintended Use
The laminator must not be used for laminating unsuitable materials or used beyond the permitted ambient conditions described in the Technical Data. Any use other than that defined as intended use is considered unintended use. Unauthorised modifications or alterations are not permitted. Never open the laminator yourself or attempt to perform repairs yourself.
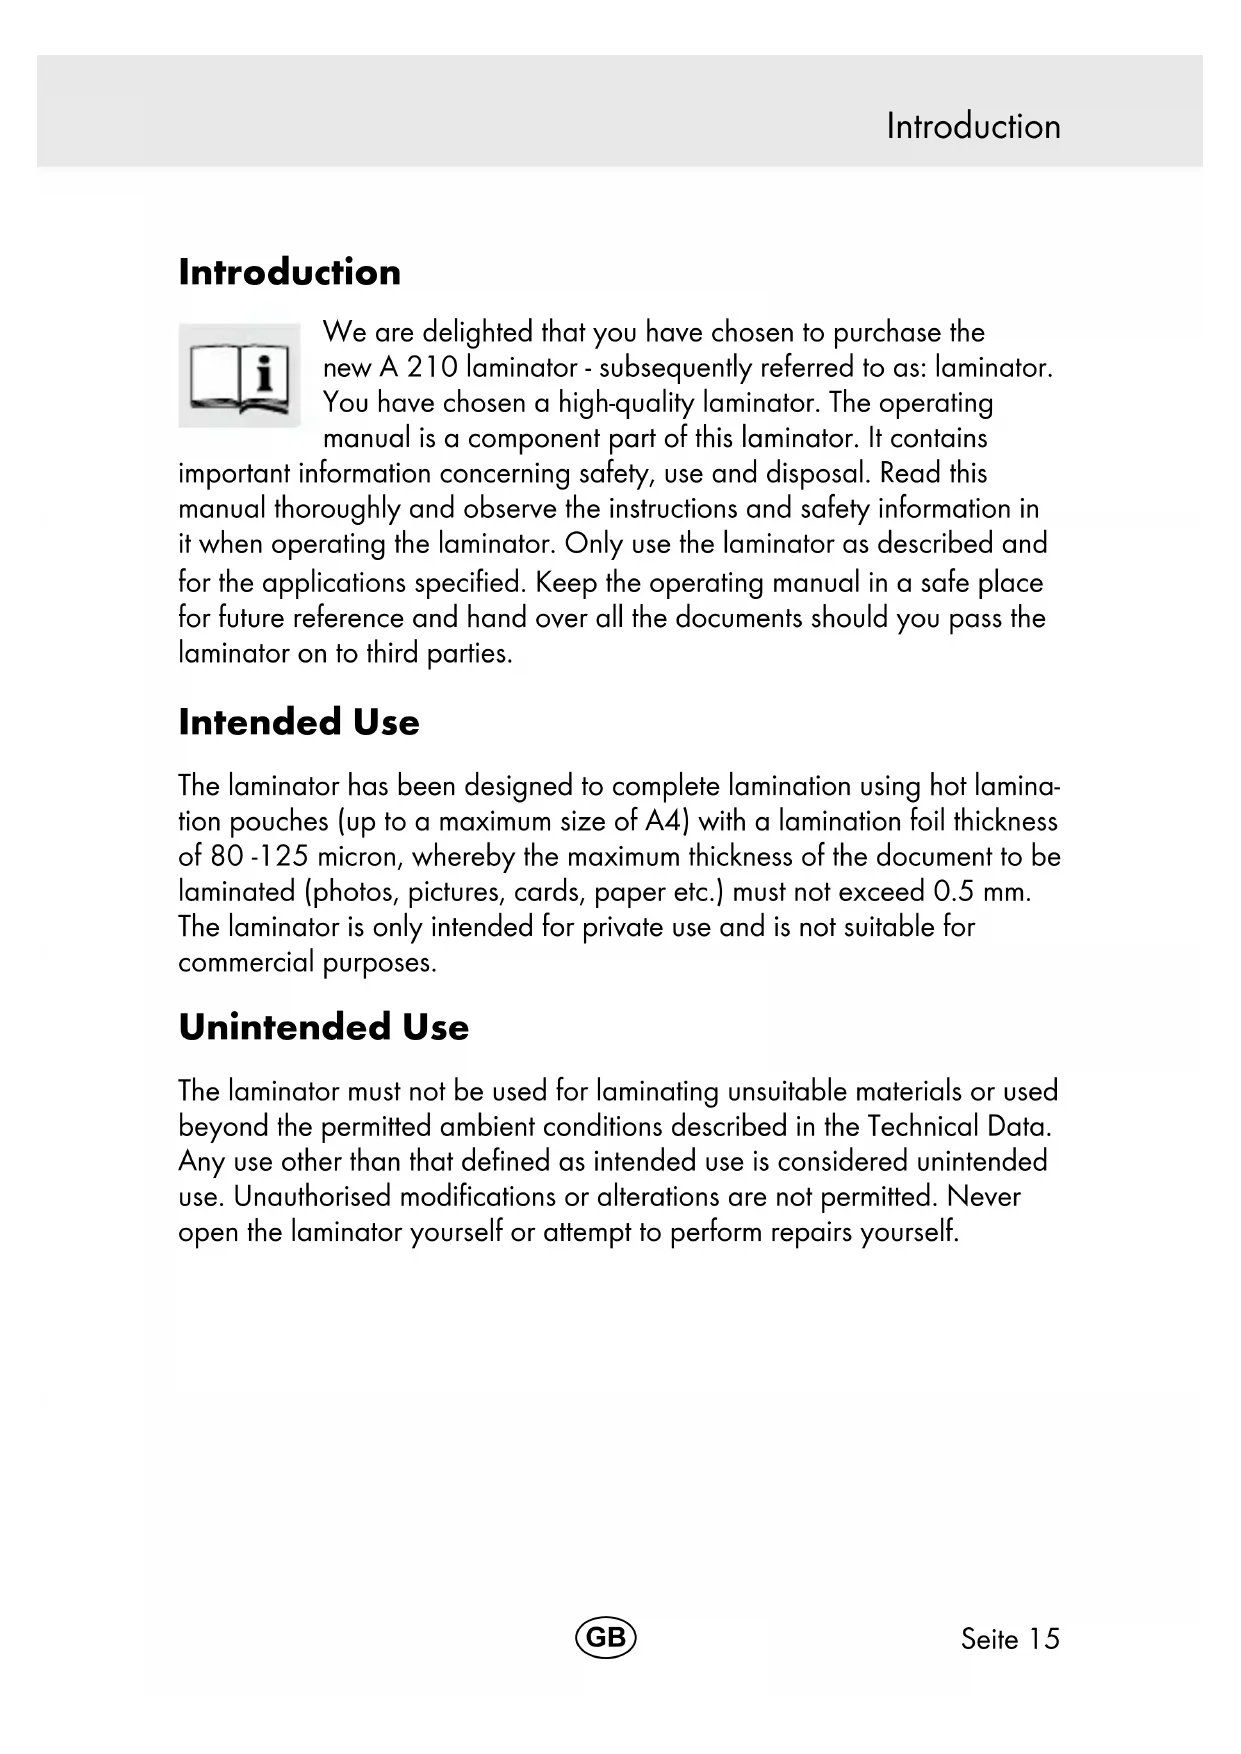
General View
The following illustrations depict the laminator in detail.

1
Infeed
2
Temperature control indicator
3
Output
4
Power plug
5
On/Off switch
Package Contents
Check the package contents of the laminator before putting the laminator into operation. If anything is missing or damaged, do not put the laminator into operation. Contact our Service Department.
■ Laminator A210
■ Operating manual
■ Set of lamination pouches
(consisting of 3 x A4 / 4 x A5 / 4 x A6 / 4 x business card)
Before You Start
Please observe the following information to ensure continued reliable operation of the laminator.
■ Do not laminate metal, wet or uneven materials.
■ Always feed laminating pouches into the laminator infeed ^1 with the closed side first and aligned straight.
■ If necessary, only cut laminating pouches after laminating.
■ Please remember that hot laminated materials are permanently bonded to the laminating pouch and cannot be separated from the foil again without possible damage.
■ Do not pull the laminating pouch out of the output ③ during laminating.
■ Only ever use laminating pouches which are suitable for hot lamination. For an optimum lamination result, we recommend laminating pouches from Olympia which are available from specialist retailers.
For Your Safety
Read and observe all the safety information to protect yourself and the environment from any harm.
WARNING! Risk of injury through electric shock. Improper handling of the laminator can lead to an electric shock.
Unauthorised modifications or alterations to the laminator are not permitted. Repairs may only be carried out by properly trained specialists. Ensure that the laminator is set-up near an easily accessible power socket so that the laminator can be disconnected from the power supply in an emergency. Never take hold of the laminator with wet hands. Avoid any contact with water. The laminator may only be used in dry, indoor areas.
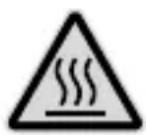
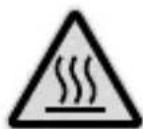
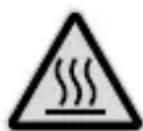
CAUTION! Risk of burns due to hot machine surface! During the laminating process, the machine surface heats up. Do not touch the machine surface during the laminating operation.
Wait a few minutes after laminating until the laminator has cooled down before you touch it.
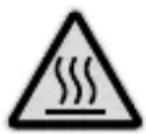
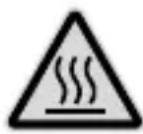
CAUTION! Risk of burns through hot laminating pouch.
When the laminating pouch is ejected after lamination, it is extremely hot. Only remove the ejected lamination pouch holding it at the cooled end.
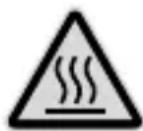
CAUTION! Risk of burns through hot residual laminated
material. When the paper is ejected after the cleaning process, it can contain hot residual material. Only remove the ejected paper holding it at the cooled end.

WARNING! Risk of suffocation through small parts,
packaging materials or protective foils. Children can swallow small parts, packaging materials and protective foils. Keep children away from the laminator and its packaging materials.

WARNING! The laminator can be used by children from the age of eight and by persons with restricted physical, sensory or mental capabilities or a lack of experience and/or knowledge when they are under supervision or have been instructed on the safe use of the laminator and understand the risks involved if it is not used properly. Children must not be allowed to play with the laminator. Children must not be allowed to complete any cleaning or service work on the device without adequate supervision.

WARNING! Risk to health through harmful vapours.
Vapours which are damaging to health can develop during lamination. Always ensure good ventilation during lamination.

WARNING! Risk of injury through the feed mechanism.
Loose items could get caught in the infeed and cause injuries. Keep fingers, hair, scarves, ties, jewellery etc. well away from the infeed.

CAUTION! Risk of tripping through improperly laid cable.
Lay cables in such a way that nobody can trip over them. Make sure the power plug and cable cannot be damaged. Ensure that the laminator is set-up near an easily accessible power socket so that the laminator can be disconnected from the power supply in an emergency.

ATTENTION! Risk of property damage. Avoid exposing the laminator to environmental influences such as smoke, dust, vibration, chemicals, moisture, heat or direct sunlight. Only use the laminator in indoor areas and within the ambient conditions permitted and stipulated in "Technical Data".
Setting Up Safely and Putting Into Operation

IMPORTANT! Prior to starting up, check that the voltage specifications of the laminator correspond to that of your power supply network (220 V - 240 V, 50 Hz).
- Set the laminator down on a level, stable working surface close to an easily accessible power socket.
- Pay attention that the On/Off switch 5 is set to OFF.
- Connect the laminator's power plug 4 to an easily accessible power socket.
Laminating
During hot lamination, the laminating pouch is heated to a temperature of up to 105^ C as it passes through the laminator rollers. This creates a permanent thermal bonding of the laminated material and the laminating pouch. Hot lamination permanently prevents the laminated material from coming into contact with water, oxygen and bacteria.

WARNING! Risk of injury due to the feed mechanism.
Loose items could get caught in the infeed and cause injuries. Keep fingers, hair, scarves, ties, jewellery etc. well away from the feed side.
- Switch the On/Off switch 5 to ON.
- The drive motor for the rollers starts up. The optimum operating temperature is reached after 3 to 4 minutes.
The temperature control indicator ② lights up red continuously.

WARNING! Risk to health through harmful vapours.
Vapours which are damaging to health can develop during lamination. Always ensure good ventilation during lamination.
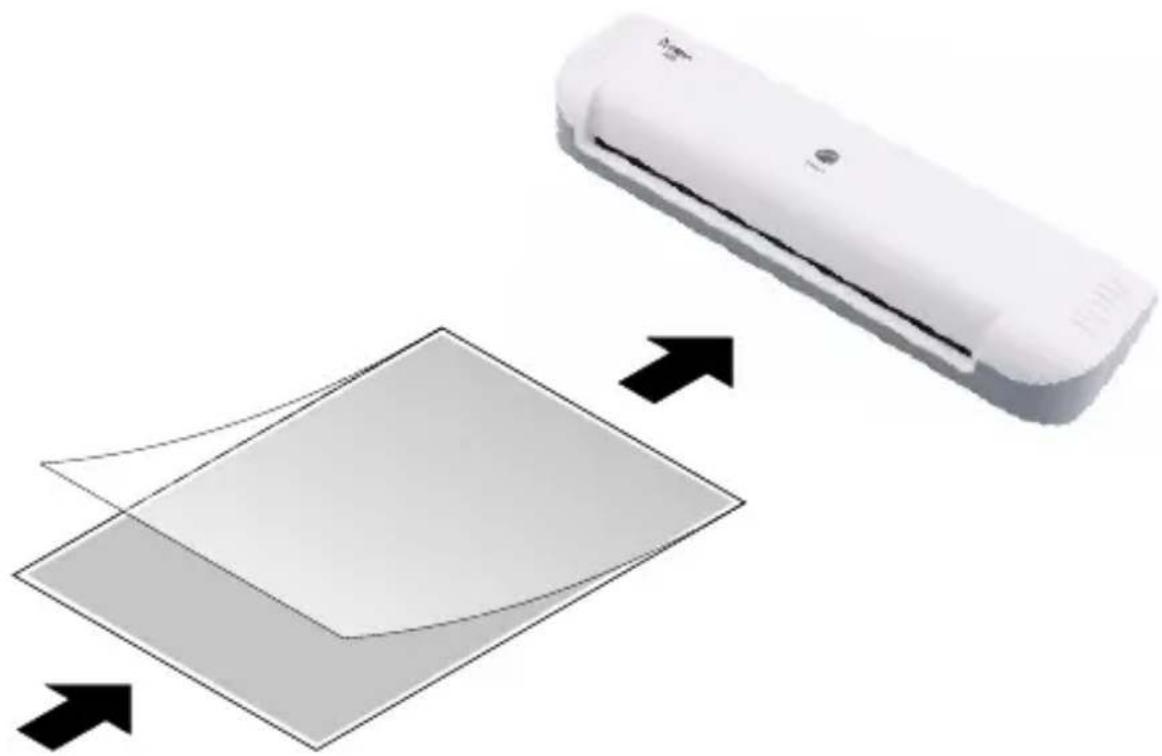
- Place the material to be laminated inside the laminating pouch. For an optimal lamination result, leave an all-round spacing of 3 to 5 ~mm from the edges of the pouch.
- Feed the prepared laminating pouch with the closed side first, keeping it straight, into the infeed 1 of the laminator.
CAUTION! Risk of burns through hot laminating pouch. When the laminating pouch is ejected after lamination, it is extremely hot. Only remove the ejected lamination pouch holding it at the cooled end.
- The laminator automatically draws in the laminating pouch and ejects it at the output ③.
natural_image
Diagram showing a white air conditioner unit and a tilted square with arrows indicating direction (no text or symbols)If Problems Occur
Clearing Pouch Jams
If you inadvertently feed the laminating pouch into the infeed 1 at an angle, or if the rollers are soiled with too much residual adhesive, or if you try to laminate unsuitable materials, laminating pouches can jam inside the laminator.
- Switch the ON/OFF switch 5 to OFF.
- Disconnect the power plug 4 from the power socket.
CAUTION! Risk of burns through hot laminating pouch. When the laminating pouch is ejected after lamination, it is extremely hot. Only remove the ejected lamination pouch holding it at the cooled end.
- Carefully pull the laminating pouch out of the infeed 1 of the laminator.

After a pouch jam, always clean the laminator. Clean the laminator as described in the section Regular Maintenance and Service.
Regular Maintenance and Service
Clean the laminator at regular intervals.
- Before cleaning, disconnect the power plug ④ from the power socket.
- Wait until the laminator has cooled down. Information on cooling down times is provided in Section Technical Data.

Note Risk of damage to the laminator through aggressive cleaning agents. Do not use any solvents or cleaning agents.
- Use a slightly damp, lint-free cloth to clean the surface of the laminator.
Removing Deposits and Residual Adhesive
Adhesive and other residues on the rollers can impair the lamination result. Remove these at regular intervals and whenever the lamination result is not as good as expected.
- Switch the On/Off switch 5 to ON.
CAUTION! Risk of burns due to hot machine surface! During the laminating process, the machine surface heats up. Do not touch the machine surface during the laminating operation. Wait a few minutes after laminating until the laminator has cooled down before you touch it.
- The drive motor for the rollers starts up. The optimum operating temperature is reached after 3 to 4 minutes.
The temperature control indicator ② lights up red continuously.
CAUTION! Risk of burns through hot residual laminated material. When the paper is ejected after the cleaning process, it can contain hot residual material. Only remove the ejected paper holding it at the cooled end.
-
Fold a sheet of paper and feed it into the infeed 1 of the laminator with the folded edge first and keeping it straight. Residual adhesive is removed and taken up by the paper when ejected.
-
Repeat the process with a new sheet of paper until the paper comes out clean.
Technical Data
Subject to change without prior notice.
| Maximum foil thickness 0.5 mm | |
| Maximum laminating width | 230 mm |
| Maximum laminating thickness | 80 -125 micron |
| Warm-up phase 3 - 4 min. | |
| Cool down phase Approx. | 15 min |
| Laminating speed 300 mm/min | |
| Indicator elements Ready to operate: The temperature control indicator lights up red continuously | |
| Special features Overheating protection | |
| No blistering | |
| Power supply 220 - 240 V, 50 Hz, 0.63 A | |
| Power consumption 145 W | |
| Dimensions 340 x 110 x 60 [mm] | |
| Weight 760 g | |
Declaration of Conformity

The CE mark on the laminator confirms conformity. To view the complete Declaration of Conformity, please refer to the free download available on our website:
www.go-europe.com
Information on Disposal
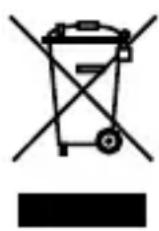
In order to dispose of your laminator, take it to a collection point provided by your local public waste authorities.
According to laws on the disposal of electronic and electrical devices, owners are obliged to dispose of old electronic and electrical devices in a separate waste container. The adjacent symbol indicates that the laminator must not be disposed of in normal domestic waste!

Packaging materials must be disposed of according to local regulations.
Warranty
Dear Customer,
we are pleased that you have chosen this equipment.
In the case of a defect, please return the device together with the receipt and original packing material to the point-of-sale.
Introduction 27
Plastification.... 32

1
2
3
Introducteur
natural_image
Diagram showing a white air conditioner unit and a tilted square with arrows indicating direction (no text or symbols)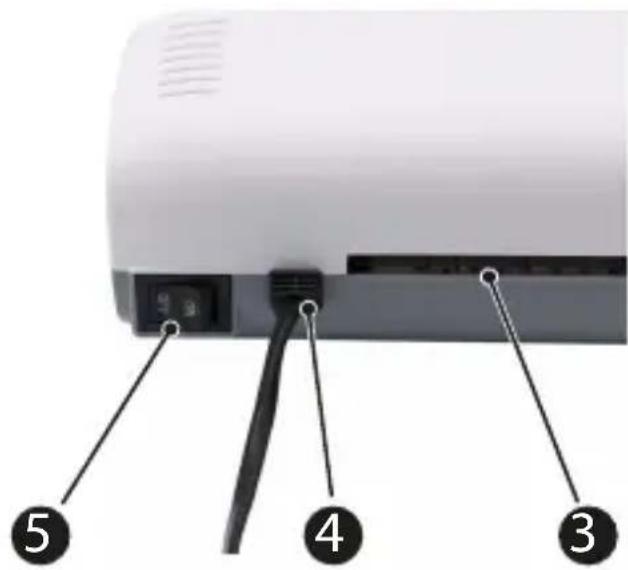
1
Lato di caricamento
2
natural_image
Diagram showing a white air conditioner unit and a tilted square with arrows indicating direction (no text or symbols)Malfunzionamenti
1
Lado de entrada
4
natural_image
Diagram showing a white air conditioner unit and a tilted square with arrows indicating direction (no text or symbols)Si algo no funciona
1
2
3
Invoerzijde
natural_image
Diagram showing a white rectangular device with a curved arrow pointing to a tilted square, with arrows indicating direction (no text or symbols present)1
Πλευρά εισόδου
2
natural_image
Diagram showing a white rectangular device with a curved arrow pointing to a tilted square, with arrows indicating direction (no text or symbols present)
- OLYMPIA A 210
- Introduction
- Intended Use
- Unintended Use
- General View
- Package Contents
- Before You Start
- For Your Safety
- Setting Up Safely and Putting Into Operation
- Laminating
- If Problems Occur
- Clearing Pouch Jams
- Regular Maintenance and Service
- Removing Deposits and Residual Adhesive
- Technical Data
- Declaration of Conformity
- Information on Disposal
- Warranty
- Malfunzionamenti
- Si algo no funciona
Brand : OLYMPIA
Model : A 210
Category : Laminating machine