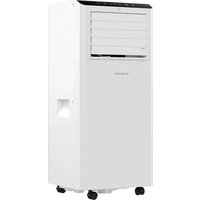
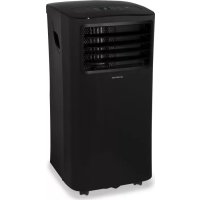
AC127WSET - Air Conditioning INVENTUM - Free user manual and instructions
Find the device manual for free AC127WSET INVENTUM in PDF.
User questions about AC127WSET INVENTUM
0 question about this device. Answer the ones you know or ask your own.
Ask a new question about this device
Download the instructions for your Air Conditioning in PDF format for free! Find your manual AC127WSET - INVENTUM and take your electronic device back in hand. On this page are published all the documents necessary for the use of your device. AC127WSET by INVENTUM.
USER MANUAL AC127WSET INVENTUM
natural_image
White and black electronic device with control panel and ventilation slots (no visible text or symbols)- safety instructions page 17
- product description page 24
- prior to first use page 25
- operating the air conditioner page 26
- draining condensation water page 28
- cleaning and maintenance page 28
- tips for efficient use page 29
- problems and solutions page 29
- technical specifications page 29
general terms and conditions of service and warranty page 58
Deutsch
KOELMIDDEL
natural_image
Three hand-drawn illustrations of a coiled pipe with circular ends, showing different types of flow or deformation (no text or symbols)INSTALLATIE VAN DE RAAMAFDICHTINGSSET
natural_image
Close-up of a hand cleaning a window frame (no text or symbols visible)
natural_image
Black-and-white photo of a hand reaching toward a window, with blurred trees in the background (no text or symbols visible)
natural_image
Close-up of a hand holding a small object near a window frame (no visible text or symbols)
natural_image
Close-up of a hand holding a small white object next to a cylindrical object, likely part of a mechanical or architectural component (no visible text or symbols)
natural_image
Close-up of a window frame with visible edges and a partial view of the window (no text or symbols)
natural_image
Exterior view of a door with a small hole, showing interior lighting and window (no text or symbols visible)
natural_image
Close-up of a hand holding a small object against a plain background (no text or symbols visible)
natural_image
Close-up of a coiled white pipe or duct with ribbed material inside a glass curtain (no text or symbols visible)VERGRENDELINGSKNOP
natural_image
Technical line drawings of industrial equipment components, showing internal structure and movement (no text or symbols)7
1 safety instructions
- First carefully read the instruction manual in full prior to using the appliance and store the manual in a safe place for future reference.
- Do not use agents that accelerate the defrosting process or other cleaning agents than those recommended by the manufacturer.
- Store the appliance in a room without any continuously active ignition sources (e.g. an open flame, switched on gas appliance or switched on electric heating appliance).
- Do not drill through or burn.
- Caution, certain refrigerants do not have an odour.
- Install, use and store the appliance in a room with a floor surface of at least 12m^2 (for 12000Btu/h).
- Only install this appliance when it complies with local/national legislation and standards.

IMPORTANT
- This appliance is intended to be used as an air conditioner in homes and is only suitable for indoor use in living rooms, kitchens and garages on dry locations, under normal household conditions.
- Never use the appliance with a damaged cord or plug. Never clamp the cord and prevent contact with sharp edges.
- The installation should fully correspond with the locally applicable regulations, conditions and standards.
- The appliance is only suitable for use on dry locations, indoors.
- Check the mains voltage.
- This appliance is only suitable for an earthed socket, connection voltage 220-240 Volt/ \~50 Hz.
- The appliance MUST always be connected in an earthed condition. When the power supply is not earthed, it is absolutely not permitted to connect the appliance.
-
The plug must always be easily accessible when the appliance is connected.
-
Always transport the appliance in a straight position and place it on a stable, flat surface during use. If the appliance has been transported in a lying position, leave it to rest in a straight position for 6 hours before inserting the plug in the socket.
- Have the electrical system checked by a recognised expert if you are not certain that everything is in order.
• Install the appliance on a sturdy, flat floor that is strong enough to carry a weight of up to 50 kg. Installation on a weak or uneven floor could result in damage to your properties or personal injury. - Never cover the air inlets and outlets.
- Empty the water reservoir via the water drain point, before moving the appliance.
- Never allow the appliance to come into contact with chemicals.
- Do not insert fingers or objects in the openings of the appliance.
- Never allow the appliance to come into contact with water. Do not spray the appliance with water or submerge it in water, in connection with a short circuit hazard.
- Always first remove the plug from the socket before the appliance or a part thereof must be cleaned or replaced.
- NEVER connect the appliance using an extension cord. If there is no earthed socket available, have one installed by a recognised electrician.
- For reasons of safety, always be careful when there are children near this appliance, same as with any other electrical appliance.
- Do not use the appliance if the plug, cord or appliance are damaged, or if the appliance no longer functions properly or if it is damaged in any other way. If this is the case, consult the retailer or our maintenance service. Never replace the plug or cord yourself.
• Always remove the plug from the socket when the appliance is not being used. -
Only have a damaged electricity cord replaced by the supplier or an authorised person/service point.
-
Keep the appliance out of reach of children. Children do not see the dangers associated with handling electrical appliances. Therefore, never allow children to operate electrical appliances without supervision. Keep the appliance and cord out of reach of children younger than 8 years of age.
- The appliance can be used by children of 8 years and older and by persons with limited physical, sensory or mental capacities or lack of experience or knowledge, provided they use the appliance under supervision or have been instructed about its safe use and understand the hazards it may involve.
• Children must not play with the appliance. - The appliance may not be cleaned or maintained by children, unless this is done under supervision.

CAUTION!
- Never close the room where this appliance is used in such a way that it is fully airtight.
This prevents vacuum from being created in this room. Negative pressure could disrupt the safe operation of geyers, extraction hoods, ovens, etc.
• Non-observance of the instructions could invalidate the warranty on the appliance
• Always lift the appliance with two persons.
• Always make sure the appliance is placed on an sturdy, flat surface.
- Do not leave the appliance unsupervised if the appliance is operational.
- If you want to move the appliance, make sure the appliance is switched off. Use both hands when moving the appliance.
- Never use the appliance with parts that are not recommended or supplied by the manufacturer.
- Do not pull the cord and/or appliance to remove the plug from the wall socket. Never touch the appliance with wet or damp hands.
- If the appliance does not function after it has been switched on, it is possible that the fuse or earth leakage circuit breaker has been activated in the electrical distribution box. The group may be overloaded or an earth leakage current may have occurred.
- In case of a breakdown, never make repairs yourself; a tripped safety device in the appliance could indicate a defect that cannot be remedied by removing or replacing this safety device. Only original parts should be used.
- The printed circuit board (PCB) of the appliance has been provided with a fuse against overvoltage. The specifications of the fuse are stated on the circuit board, such as: T 3.15A/250V, etc.
- Never submerge the appliance, cord or plug in water.
- This appliance is only suitable for household use. If the appliance is not used as intended, no compensation can be claimed in case of defects or accidents and the warranty will be invalidated.
If you decide not to use the appliance any more due to a defect, we recommend cutting off the cord after removing the plug from the socket.
Household appliances do not belong in the dustbin. Take them to the waste processing department concerned of your municipality.
WARNING
Specific information for appliances with R290 refrigerant gas.
• Thoroughly read all warnings.
- When defrosting and cleaning the appliance, only use tools recommended by the manufacturer.
- Place the appliance in a room without any continuously active ignition sources (e.g. an open flame, switched on electric or gas appliance).
- Do not drill through or burn.
• Install, use and store the appliance in a room with a floor surface of at least 12 m ^2 .
- This appliance contains 240 grams of R290 refrigerant gas (see the information plate at the rear of the appliance).
- R290 is a refrigerant gas that is in accordance with the European environmental directives. Never drill through any part of the cooling circuit.
- If the appliance is installed, operated or stored in a room without ventilation, the room should be made in such a way that accumulation of refrigerant as a result of a leak is prevented.
This could lead to a fire or explosion hazard due to the ignition of the refrigerant by an electric heating appliance, stove or other ignition source.
- Store the appliance in such a way that mechanical failures are prevented.
- Persons operating or working at the cooling circuit, must be in the possession of a suitable certificate from an authorised organisation, so that these persons are authorised to handle refrigerants in a safe way in accordance with the specifications that apply within the industry.
- Repairs may only be performed as recommended by the manufacturer of the appliance. Maintenance and repair activities that require assistance from other trained personnel, must be performed under the supervision of a person who know how combustible refrigerants should be used.

REFRIGERANT
(CE) N 842/2006: This air conditioner contains the refrigerant R290.
The quantity of refrigerant is less than 1 kg and is contained in a closed cooling circuit. The refrigerant does not have an ozone depletion potential. It is, however, a greenhouse gas according to the Kyoto protocol and could therefore contribute to global warming when released into the atmosphere. Only trained technicians with a suitable refrigerant certificate are permitted to fill or empty the appliance.
If used correctly and when the refrigerant circuit is undamaged, your air conditioner does not have to be refilled with refrigerant. GWP: R290: 3.
Specific information for appliances with R290/R32 refrigerant gas
- Carefully read all warnings.
- When defrosting and cleaning the appliance, do not use other tools than those recommended by the manufacturer.
- Place the appliance in a room with no ignition sources (you could think of: open fire, gas appliances or electric appliances that could cause sparks).
- Do not drill through and do not burn.
• Refrigerant gases can be odourless. - The appliance must be installed, used and stored in a room that is larger than 12m^2 .
- R290/R32 is a refrigerant gas that complies with the European environmental directives. Never drill through any part of the cooling circuit.
- When installing, using or storing the appliance in an non-ventilated room, the room must be designed in such a way that leaking refrigerant gas cannot accumulate. This can prevent the occurrence of fire or explosions due to the ignition of the refrigerant gas by electric stoves, burners or other ignition sources.
- Store the appliance in such a way that no mechanical defects can occur.
- Persons working at or with the refrigerant circuit should have the correct certification issued by a recognised organisation that guarantees expertise in the handling of refrigerants in accordance with specific certification agreements in the industry.
- In the event of repairs, always observe the recommendations from the manufacturer.
- Maintenance and repair activities that require assistance from other qualified personnel, must be performed under the supervision of a person who is certified in the handling of combustible refrigerants.
- Do not use agents to accelerate the defrosting process or clean than those recommended by the manufacturer.
- The appliance should be stored in a room with no continuously active ignition sources (such as: open fire, an operating gas appliance or an operating electric heater).
- Do not drill through or burn.
• Take into account that refrigerants can be odourless.
• Always observe national laws and legislation. - Do not block the ventilation holes.
- Store the appliance in such a way that no mechanical damages can be caused.
- Apply a warning that the appliance should be stored in a properly ventilated room, the dimensions of which correspond with the space specified for use.
- All persons involved with working at or dismantling a refrigerant circuit, must be in possession of a valid certificate by an evaluating body recognised by the industry, showing their competence in safely handling refrigerants in accordance with recognised certification agreements in the industry.
- Maintenance may only be performed in accordance with the recommendations from the manufacturer of the equipment.
- Maintenance and repair activities that require assistance from other qualified personnel, must be performed under the supervision of a competent person who is certified in the handling of combustible refrigerants.
- The appliance must be installed, used and stored in a room with a floor area of more than 13m^2 .
WARNING: This system contains refrigerant under very high pressure. The system may only be maintained by qualified personnel.
- Transport of equipment containing combustible refrigerants (Appendix CC.1)
Observe the transport instructions.
- Marking equipment with signs (Appendix CC.2)
Observe local regulations.
- Disposal of equipment containing combustible refrigerants (Appendix CC.3)
Observe national regulations.
- Storage of equipment/appliances (Appendix CC.4)
Store equipment in accordance with instructions from the manufacturer.
- Storage of packaged (unsold) equipment (Appendix CC.5)
The storage packaging must have such a sturdy design that no refrigerant can start to leak when the equipment is mechanically damaged in the packaging.
Local regulations determine the maximum number of appliances that can be stored in one room.
6. Information about maintenance (Appendix DD.3)
1) Check the surrounding area
Prior to working at systems containing combustible refrigerants, safety checks are required to make sure that the risk of ignition is limited to a minimum. When repairing cooling systems, take the following precautions before performing work at the system.
2) Working procedure
Perform work in accordance with a regulated procedure to minimize the risk of released combustible gases or vapours during the work.
3) General work area
Inform all maintenance personnel and others working in the vicinity of the nature of the work to be performed. Avoid working in enclosed spaces. Demarcate the area around the workplace. Make sure the work area is safe by checking for the presence of combustible material and ignition sources.
4) Check for the presence of refrigerant
Check the area prior and during the work with a suitable refrigerant detector, which will warn the technician for the presence of possibly combustible ambient air. Only use leak detection equipment that is suitable for use with combustible refrigerants, i.e. free from sparks, adequately guarded or intrinsically safe.
5) Keep a fire extinguisher within reach
If hot work must be performed at cooling equipment or related parts, suitable extinguishing agents should be present within reach. Immediately next to the filling area, mount a powder extinguisher or CO2 extinguisher.
6) Keep ignition sources at a distance
Anyone performing work at a cooling system whereby pipes (once) containing combustible refrigerant are laid bare, may not use ignition sources that could cause a fire or an explosion. Keep all possible ignition sources, including lighted cigarettes, sufficiently far removed from the place of installation, repair or disposal, where combustible refrigerant could be released in the environment. Check prior to performance of the work that there are no combustible materials or ignition sources in the area around the equipment.
Hang warning signs with the text "Smoking prohibited".
7) Provide ventilation
Work in the open air or ensure that the work area is sufficiently ventilated before you open the system or perform hot work.
Continuously ensure sufficient ventilation during the performance of the work. The ventilation should blow away any released refrigerant to a safe place and preferable discharge it to the outdoor air.
8) Check the cooling equipment
Replace electric components only by equivalent parts that meet the correct specifications. Always observe the manufacturer's guidelines for maintenance and repair. In case of doubt, contact the technical support service of the manufacturer for support.
Check installations using combustible refrigerants regarding the following:
- The filling volume should correspond with the dimensions of the room in which the refrigerant containing components are installed;
- The ventilation equipment and exhausts should work properly and may not be blocked.
- If an indirect cooling circuit is being used, the secondary circuit must be checked for the presence of refrigerant;
- All markings on the equipment must be visible and legible. Repair all markings and signs that have become illegible in advance;
- Cooling pipes and components containing refrigerant must be installed in such a way that it is unlikely that they are exposed to substances that could corrode them, to the extent that the components are not made of materials that are inherently resistant to corrosion or are adequately protected against corrosion.
9) Check electrical appliances
In the event of repair and maintenance of electrical components, always first check them for safety and observe the inspection procedures for the components. If there is a failure that could jeopardise safety, no electrical power supply may be connected to the circuit before this failure has been resolved. If the failure cannot immediately be resolved, but the appliance must remain operational, a suitable temporary solution must be achieved. Always report this to the owner of the equipment, so that all involved parties are informed.
Safety checks in advance include:
- Discharging condensers: this should be done in a safe way to prevent the creation of sparks;
- Check that there are no live electrical components and wires lying bare when filling, draining or flushing the system;
- Check that the continuity of the earthed connections is guaranteed.
7. Repairs to guarded components (Appendix DD.4)
1) When performing repairs to guarded components, disconnect all electrical power supplies from the equipment being work on, before removing the cover plates, etc.. If it is absolutely necessary to keep the power supply switched on during maintenance to the equipment, a permanently active leak detector should be installed at the most critical point to warn for the occurrence of possibly hazardous situations.
2) Pay extra attention to the following, to make sure that the housing is not changed in such a way during work at electrical components that the protection level is affected.
You could think of damaged cables, making too many attachments per connection, clamps that do not meet the original specifications, damaged seals, incorrect assembly of gaskets, etc.
Make sure the equipment is firmly attached.
Check that seals and sealing materials are still sufficiently able to prevent penetration of combustible ambient air. Only use replacement parts that meet the manufacturer's specifications.
CAUTION: The use of silicone containing sealing agents could disrupt the operation of some types of leak detection equipment. Intrinsically safe components do not have to be disconnected before working at them.
8. Repairs to intrinsically safe components (Appendix DD.5)
Do not connect permanently inductive or capacitive loads to the circuit without checking whether the allowed voltages and currents for the equipment used are exceeded.
Intrinsically safe components are the only types of component at which you are allowed to work while they are live in the presence of combustible ambient air. Only use test equipment with the correct certifications.
Only replace components by parts that correspond with the manufacturer's specifications. The use of deviating parts could cause fire when refrigerant escapes to the ambient air as a result of a leak.
9. Cables (Appendix DD.6)
Check that the cables are not exposed to wear, corrosion, excessive pressure, vibrations, sharp edges or other negative ambient influences. When checking, also consider the consequences of ageing and constant vibration of compressors or fans.
10. Detection of combustible refrigerants (Appendix DD.7)
Never use potential ignition sources when looking for or tracing refrigerant leaks. Do not use a halogen lam (or any other detector with an open flame).
11. Leak detection methods (Appendix DD.8)
The following leak detection methods may be used for systems containing combustible refrigerants.
Preferably use electronic leak detectors to detect combustible refrigerants. Sometimes the sensitivity of such equipment is not sufficient, or they must be recalibrated. (Always calibrate detection equipment in a room that is free from refrigerant.) Check that the detector is not a potential ignition source and that it is suitable for the refrigerant used. Adjust the leak detection equipment at a percentage of the refrigerant's LFL (lower flammable limit) and calibrate the equipment to the refrigerant used and the correct gas percentage (maximum 25%).
Leak detection liquids are also suitable for use with most refrigerants, but avoid the use of chlorinated substances, as the chlorine could also react with the refrigerant and affect the copper piping.
If a leak is suspected, all open flames must be extinguished or removed.
If a refrigerant leak is found that requires soldering, all refrigerant should first be drained from the system, or the refrigerant should be isolated (by means of valves) in a section of the system away from the leak. Then flush the system with oxygen free nitrogen (OFN), both prior to and during the soldering process.
12. Draining and emptying (Appendix DD.9)
When opening a cooling circuit in order to perform repairs - as well as for all other purposes - the correct regulations and procedures should be observed at all times. In addition, always try to work as safely as possible, due to the flammability of the refrigerants. For that reason, always use the following procedure:
- Remove the refrigerant;
- Flush the circuit with inert gas;
- Empty the system;
- Flush once more with inert gas;
- Open the circuit by sawing or soldering.
Collect the refrigerant in a suitable storage container. Flush the system with OFN (oxygen free nitrogen) to make the system safe. It is possible that you must repeat this process a few times. Never use compressed air or oxygen to flush a system.
Flush the vacuum system by allowing OFN to flow into it and then fill the system with OFN until the operating pressure is achieved. Then allow this to escape to the atmosphere and make the system vacuum again. Repeat this process until there is no more refrigerant in the system. After the last OFN flush, the system must be de-aerated to atmospheric pressure to make the work possible. This is an absolute condition when soldering work has to take place at the piping.
Ensure that the exhaust of the vacuum pump is not in the vicinity of ignition sources and that the surrounding area is sufficiently ventilated.
13. Filling procedures (Appendix DD.10)
In addition to the standard procedures when filling, also observe the following requirements.
- When using the filling equipment, prevent different refrigerants from getting mixed. Hoses and pipes must be as short as possible to minimise the amount of refrigerant that they contain.
- Always place cylinders upright.
- Earth the cooling system before filling the system with refrigerant.
- Mark the system when it is filled (if this has not yet been done).
- Ensure the cooling system is not excessively filled.
Perform a pressure test with OFN (oxygen free nitrogen) before filling the system. Check the system for leaks after filling, but before commissioning. Always perform a final leak test before leaving the location.
14. Decommissioning (Appendix DD.11)
In order to perform this procedure, it is essential that the technician has fully familiarised himself with the equipment and all its parts. It is always recommended to drain and dispose the refrigerants used safely. Prior to the work, always take an oil and refrigerant sample when reuse of the drained refrigerant requires prior analysis. It is essential to check whether there is a power supply present, before starting the work.
a) Familiarize yourself with the equipment and its operation.
b) Disconnect the electrical connection between the system nd the power supply.
c) Prior to starting the work, check that the following items have been met:
- All required mechanical provisions are present, e.g. to handle the refrigerant cylinders;
- All personal protective equipment is present and is used correctly;
- There is always a competent person present who supervises the draining process;
- All draining equipment and storage cylinders comply with the applicable standards.
d) Preferably pump empty the cooling system, if this is possible.
e) If pumping empty is not possible, use a suitable distributor to remove as much refrigerant as possible from the different sections of the system.
f) Place the cylinder on the weighing scale before draining starts.
g) Start the draining system and work in accordance with the manufacturer's instructions.
h) Never fill cylinders by more than is permitted. (Maximum 80% liquid volume).
i) Never exceed the maximum operating pressure of the cylinder, not even briefly.
j) When the cylinders are filled correctly and the process has been completed, immediately remove all cylinders and equipment from the location and close all valves of the equipment.
k) Never fill drained refrigerant in another cooling system, before cleaning and checking it.
15. Marks (Appendix DD.12)
Apply markings on the equipment stating that it has been decommissioned and that the refrigerant has been removed.
Write the date on the marking, as well as your name. Apply markings on the equipment indicating that the equipment contains combustible refrigerant.
16. Draining (Appendix DD.13)
When removing refrigerant from a system, for maintenance or decommissioning, it is recommended to remove all refrigerants to a safe location. When draining refrigerant, only use cylinders that are suitable for storing refrigerant. Ensure there are sufficient cylinders available to store the entire volume of the cooling system. Only use cylinders that are suitable for storing the refrigerant to be drained and apply markings indicating which refrigerant they contain (i.e. use special storage cylinders).
The cylinders must be complete, including properly functioning overpressure valves and valves. Pump empty storage cylinders empty and cool them, if possible, before gas is stored in them.
The draining system must be in a good condition and have a manual describing the equipment used, and must be suitable for collecting combustible refrigerants. In addition, a calibrated weighing scale should be available that is working correctly.
All hoses should be provided with coupling that work correctly and are free from leaks. Prior to using the draining system, check that it is in a good condition, well maintained and that all accompanying electrical components are sufficiently guarded to prevent ignition in the event of a refrigerant leak. In case of doubt, consult the manufacturer.
Hand in the collected refrigerant in the correct storage cylinder at the refrigerant supplier and ask for a receipt for the submitted waste materials. Do not mix refrigerants in the draining system and certainly not in the cylinders.
If compressors or compressor oils must be removed, first empty the appliance to a level at which no combustible refrigerant remains in the lubricant. Emptying should take place before the compressor is sent back to the supplier. The compressor body may only be heated electrically in order to accelerate the process (not with an open flame). When oil must be removed from a system, do this in a safe way.
2
product description
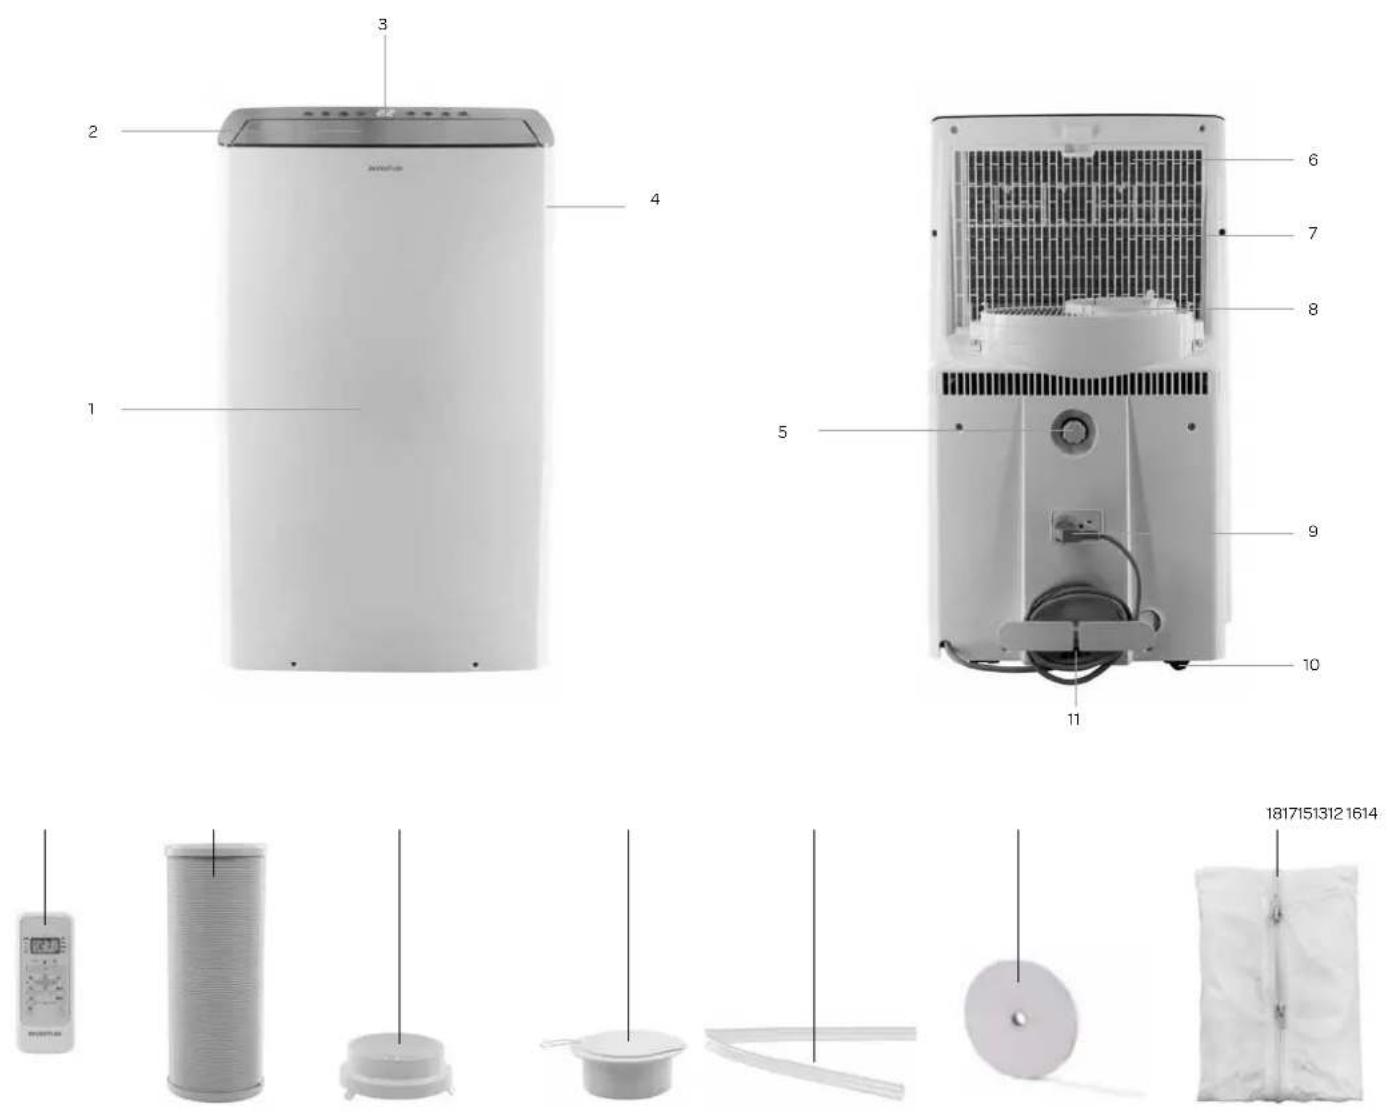
1. Front
2. Air outlet with fins
3. Operating panel
4. Handle
5. Screw cap for water discharge
6. Air filter (behind the grille)
7. Air inlet
8. Connection for discharge hose
9. Connection cord with plug
10. Castors
11. Condensation water drain
12. Remote control with batteries
13. Discharge hose - air
14. Connection piece
15. Wall outlet with valve
16. Discharge hose - water
17. Velcro tape
18. Flexible window seal set
3
prior to first use
Follow these instructions when using the appliance for the first time: Carefully unpack the air conditioner and all accessories and remove all packaging material and any promotional stickers.
Keep the packaging (plastic bags and cardboard) out of reach of children.
After unpacking the appliance, carefully check it for external damage that may have occurred during transport.
Place the appliance on a sturdy, flat surface and make sure there is enough space all around for sufficient ventilation. Check that all mentioned accessories have been supplied.
Clean the air conditioner with a slightly damp cloth.
Prior to connecting the appliance, check that:
- the connection voltage corresponds with what is stated on the information plate;
• the socket and cord are suitable for the appliance;
• the plug of the cord fits in the socket;
• the appliance is placed on a stable and flat surface.
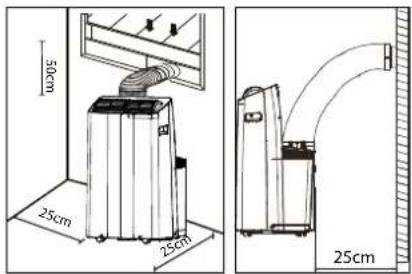
PLACEMENT OF THE AIR CONDITIONER
- The appliance must be placed on a sturdy and flat surface with sufficient room all around.
- Do not block the air outlet and ensure a free space of minimum 25 cm around the appliance.
• After placing the appliance in a straight position allow it to stand for at least 2 hours before inserting the plug in the socket. - For the benefit of easy movement, the appliance has been provided with castors.
Carefully roll the appliance over the floor. Make sure the floor is flant and try not to drive over objects. - REMARK: Optimum operation of the appliance depends on the length of the discharge hose and the number of bends.
Try to limit both. The supplied flexible discharge hose has a maximum length of approx. 150 cm and corresponds with the capacity of the appliance. The use of any other hoses or extensions could cause failures in the appliance. The air should be able to flow without hindrance, or else this could lead to overheating of the appliance or condensation of water in the air discharge hose. Therefore make sure there are no kinks or sharp bends in the discharge hose. For an optimum result, the discharge hose should be kept shorter than 1 metre during use of the appliance.
natural_image
Three hand-drawn illustrations of a coiled pipe with circular ends, showing different types of flow or deformation (no text or symbols)INSTALLATION OF THE WINDOW SEAL SET
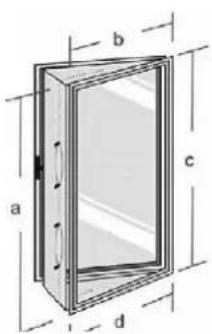
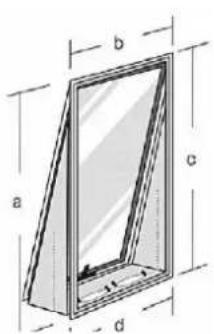
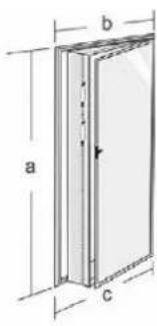
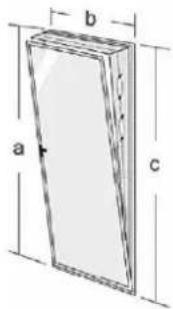
The flexible window seal set is suitable for many windows. Such as: tilt and turn windows, windows turning to the outside and inside. It ensures that you are able to hang the discharge hose to the outside, without hot air flowing into the room again or having problems with insects.
For windows turning to the outside, we recommend taping all four sides (a+b+c+d) around the window and for windows turning to the inside only three sides (a+b+c).
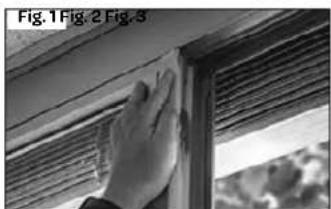
- Attach the supplied double-sided tape on the window frame and the window in accordance with one of the drawings below that is similar to your situation.
- Then attach the cloth to the tape that you attached in the openings.
natural_image
Close-up of a hand cleaning a window frame (no text or symbols visible)
natural_image
Black and white photo of a hand reaching toward a window, with blurred trees in the background (no text or symbols visible)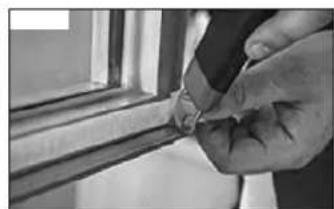
natural_image
Close-up of a hand holding a small object near a window frame (no visible text or symbols)
natural_image
Close-up of a hand holding a small white object next to a cylindrical object, likely part of a mechanical or architectural component (no visible text or symbols)
natural_image
Close-up of a window frame with visible metal framing and glass panels, labeled Fig. 5 (no text or symbols on the main subject)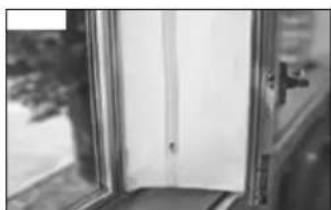
natural_image
Exterior view of a door with a single door and partial window (no visible text or symbols)
natural_image
Close-up of a hand holding a small object against a plain background (no text or symbols visible)
natural_image
Close-up of a coiled white pipe or duct with ribbed texture, partially enclosed by a window frame (no text or symbols visible)- Attach the supplied double-sided tape on the window frame.
- Then attach double-sided tape on the window.
- Cut away excess tape.
- Make sure the tapes on the corners properly overlap to achieve proper sealing.
- Attach the cloth to the tape attached to the window frame and window.
- Make sure the cloth is neatly attached to the tape on both sides.
- Zip open the cloth.
- Insert the discharge hose through the opening and zip the cloth closed to achieve proper sealing.
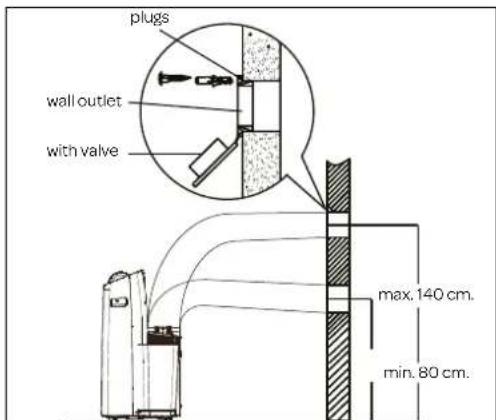
WALL INSTALLATION
- Drill a 125 diameter hole in the wall, for the wall outlet with valve.
- Fasten the wall outlet with the provided screws and plugs.
- Attach the end of the discharge hose with the wall outlet connector to the wall outlet.
- Close the valve of the wall outlet when the appliance is not being used.
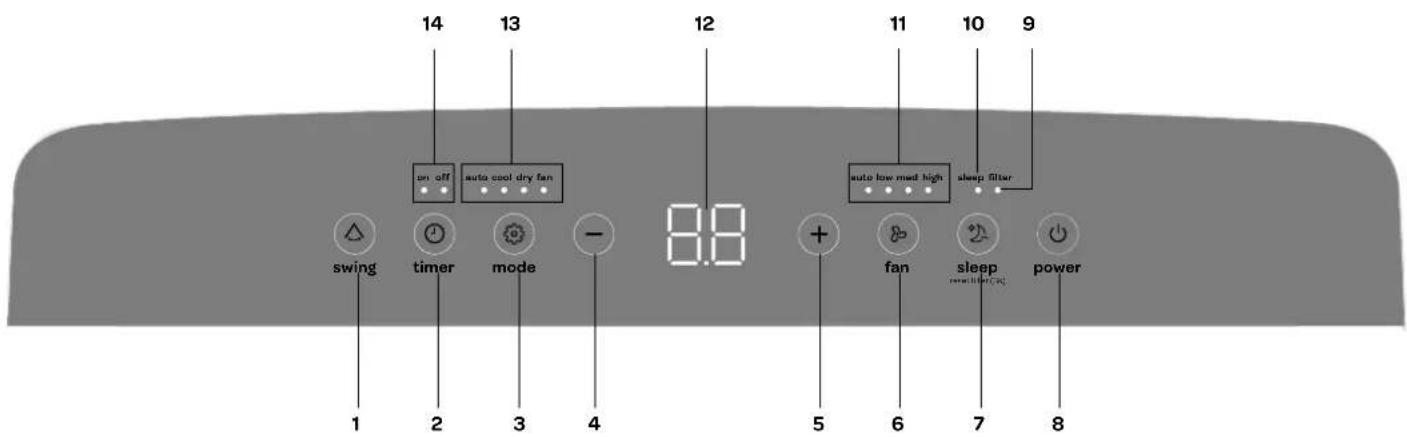
-
Key for oscillation [swing/ △]
-
Timer key [timer/ ⏻]
-
Function key [mode/ ⚙]
-
Down key —
-
Up key
-
Key for wind speed [fan / ]
-
Sleep mode [sleep/
-
on/off key [power]
-
Warning light - clean filter
-
Indicator light - sleep mode
-
Indicator light - ventilation speed: auto / low / medium / high
-
Display
-
Indicator lights - auto / cool / de-humidify / air circulation
-
Indicator lights - timer on / off
In addition to cooling, the air conditioner has two other functions, i.e. air circulation and dehumidification.
The air conditioner can be operated via the control panel on the appliance and with the provided remote control.
- Choose a location near a socket.
• Install the discharge hose in accordance with the figures and make sure the window is closed as much as possible. - Insert the plug in an earthed socket.
- Press the on/off key ⏻ to switch on the air conditioner. The valve of the air outlet opens automatically.
• The temperature range of the air conditioner is: 16 to 30°C. - Check that the discharge hose is mounted correctly.
- Do not share the socket with any other appliances.
COOLING
- Press the mode key [mode / ⚙] until the indicator light - cool - lights up. The set temperature is shown on the display.
- Press the [up + and down -]key to set the required room temperature (between 16°C and 30°C).
- Press the [fan / ] key to set the wind speed. There are four fan positions: automatic, low, medium and high.
The best temperature in the summer will be between 21 and 24°C. The speed of the fan can be sensed better on the air circulation position than on the cooling position.
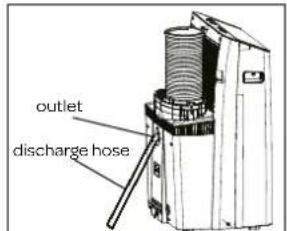
DEHUMIDIFICATION
- Press the mode key [mode/ ⚙] until the indicator light - de-humidify - lights up.
• The wind speed is on automatic and cannot be changed.
- Keep windows and doors closed for the best result. The air discharge hose does not have to discharge to the outside for this mode.
When using this position, a discharge hose (such as a garden hose, not included in the delivery) must be connected in order to discharge the condensation water.
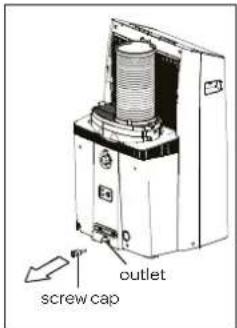
- Unscrew the screw cap on the back of the appliance.
- Mount the end of a garden hose or a similar discharge hose to the drain and place the other end in a receptacle situated lower than the drain of the appliance, so that the condensate water can be discharged properly. Recommendation: hose connection is 5/8" and the hose is 3/4".
Caution:
- Condensation water may run out of the drain when the screw cap is removed and the appliance has been used in cooling mode. Keep a drip tray at hand when removing the screw cap, in order to collect the condensation water.
- Make sure the discharge hose for the condensation water properly descends and is not higher than the drain of the appliance.
- When using the cooling position, it is recommended to not discharge the condensation water continuously, but to close the screw cap again. In this way the appliance is able to provide its best performance.
AIR CIRCULATION
When using this position, the air discharge hose does not have to be connected.
- Press the mode key [mode/ ⚙] until the indicator light - air circulation - lights up.
- Press the [fan/∅] key to set the wind speed - low, medium or high. The accompanying indicator light will light up.
AUTOMATIC POSITION
When using the automatic position [auto], the appliance automatically selects whether it should cool or circulate air. This depends on the set temperature and the room temperature.
- Press the mode key [mode/ ⚙] until the indicator light - auto - lights up.
- Press the [+and -] keys to set the required temperature (between 16°C and 30°C). 23°C for example. When the room temperature is below 23°C, the appliance starts to circulate the air, and above 23°C the appliance starts to cool.
- It is not possible to adjust the wind speed in this mode.
SWING MODE
By means of the swing mode you can determine the up and down movements of the fins and therefore the air flow.
- Switch on the appliance at the required position (cooling, air circulation or dehumidification).
- Press the swing key and the fins stop moving in different positions or the fins move continuously.
- Do not change the positions of the fins manually.
ADJUSTING THE TIMER
The timer function can be used to allow the appliance to switch on automatically (delayed start) or switch off automatically at a set time (automatic deactivation).
Delayed start
- Switch on the appliance and select the position you want to use.
- Switch off the appliance. The appliance remembers the last setting and will switch on at that position/temperature.
- Press the timer key [timer / ⏻] when the appliance is off. The indicator light - timer on - lights up.
- Press the [ + and — ] keys to select the required time for switching on. The required time at which you wish the air conditioner to switch on, will be extended by half an hour each time, up to a total of 10 hours. If you want to delay the activation by more than 10 hours, an hour is added each time until a maximum of 24 hours.
• The set number of hours is shown in the display.
- Then press the timer key again within 5 seconds to confirm the setting.
- When the set number of hours have passed, the appliance switches on automatically.
To cancel the delayed start, hold down the timer key for 3 seconds. Once you switch on the appliance yourself, the timer mode is cancelled.
Automatic deactivation
- Press the timer key [timer / ⭕] when the appliance is on. The indicator light - timer off - lights up.
- Press the keys [ + and — ] to set the required time for switching off. The required time at which you wish the air conditioner to switch off, will be extended by half an hour each time, up to a total of 10 hours. If you want to delay the deactivation by more than 10 hours, an hour is added each time until a maximum of 24 hours.
• The set number of hours is shown in the display. Once the temperature is shown on the display again, the setting has been confirmed.
- When the set number of hours have passed, the appliance switches off automatically.
To cancel automatic deactivation, hold down the timer key for 3 seconds. Once you switch off the appliance yourself, the timer mode is cancelled.
The settings can also be combined.
SLEEP MODE
Use the sleep mode when you want to use the appliance at night.
- Switch on the appliance in the cooling or auto position.
- Press the sleep mode key [sleep / 22]. The indicator light - sleep - lights up.
- If the display light on the appliance bothers you, you can switch it off by pressing the 🔒key on the remote control.
Press the key once more to reactivate the display light.
The sleep mode maintains the optimum temperature in the room, without excessive fluctuations in temperature and air humidity. Room temperature and air humidity vary slightly to make sure the room remains comfortable.
The selected temperature will rise every half hour by 1°C for a period of one hour. This new temperature is maintained for the next 7 hours. Then the appliance switches back to the set temperature and remains on in accordance to its setting.
The sleep mode can be cancelled by pressing the key [sleep / 📋] once more.
When using the air circulation and dehumidification positions, it is not possible to use the sleep mode.
THE REMOTE CONTROL

| + | up key sleep mode | ||
| - | down key lock | ||
| ON/OFF key wind speed key | |||
| mode key timer key on | |||
| swing key timer key off | |||
| m | memory key | display light on/off on air conditioner | |
| i) | i-SENSE key |
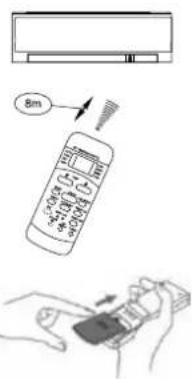
Aim the remote control to the sensor of the appliance. The range of the remote control is approx. 8 metres (without obstacles between the appliance and the remote control).
Caution: if you switched on the air conditioner on the appliance itself, you must first activate the remote control before you can control the appliance with the remote control. Press the on/off key [⏻] on the remote control to activate it.
Insert the two supplied AAA 1.5 Volt batteries in the remote control, as indicated in the drawing. Do take the plus and minus symbols on the inside of the remote control into account.
Note:
- If the remote control is replaced or is no longer used, remove the batteries and dispose them in accordance with applicable legislation, as they are harmful to the environment.
• Do not mix old and new batteries. Do not use a mix of alkaline, standard (carbon-zinc) or chargeable (nickel-cadmium) batteries.
- Batteries could explode or leak when exposed to open fire. Hand in batteries at a waste collection facility or recognised waste collection point.
- Remove the batteries from the remote control when the appliance is not being used for a longer period of time (winter storage) and keep them on a cool, dry place.
Other functions
The remote control can be used for the same functions as described above. You can control extra functions via the remote control, such as the pre-set function and the i-sense function.
MEMORY FUNCTION
By means of the memory key [m] you can set and save your favourite settings such as mode, wind speed and temperature.
- Press the memory key [m] when the remote control is activated. By default, the appliance goes back to the last settings of the cool mode.
- If you want to set different settings or a different mode, you switch on the appliance at the required position (e.g.: air circulation) with the required settings and press the memory key [m] for 2 seconds. If you then set the appliance to a different mode (e.g.: de-aeration) and press the memory key [m], the appliance will return to the current memory setting (according to the example to: air circulation).
i-SENSE FUNCTION
In the remote control you can see a temperature sensor. If you activate the i-SENSE function [i]), the room temperature is measured from the location where the remote control is located and not where the appliance is located. If, for example, you are a little further away from the appliance, it will cool longer in order to achieve the correct temperature on the location where you are, on the condition that you have the remote control with you. The remote control transmits the temperature to the appliance every 3 minutes, until you switch off the i-sense function again.
- In order to switch the i-SENSE function on or off, you hold down the i-SENSE key [i] for 7 seconds while aiming the remote control to the appliance.
- When switching on, the text On appears on the display for 3 seconds to indicate that the function is active.
- When switching off, the text Off appears on the display for 3 seconds to indicate that the function is switched off.
- Switching the appliance on and off, changing the mode or a possible power failure do not affect the function when it is switched on.
- The i-SENSE function does not work for the de-aeration and air circulation modes.
LOCK BUTTON
To prevent the settings of the remote control from being changed, you can lock them with the lock.
- Hold down both keys [m] and [◎ off] at the same time for 5 seconds in order to activate 📄the lock. A lock appears in the display on the remote control 🔒
- It is no longer possible to control the appliance with the remote control.
- Press the lock button once more to deactivate the lock. The lock disappears and the appliance can be controlled again by means of the remote control.
DISPLAY LIGHT
- If the display light on the appliance bothers you, you can switch it off by pressing the [ 🔗] key.
Press the key once more to reactivate the display light.
AUTOMATIC RESTART AFTER POWER INTERRUPTION
After a power interruption, the appliance automatically restarts in accordance with the latest settings, once the power supply has been restored. Dit takes a few minutes.
CHANGING THE TEMPERATURE UNIT CELSIUS/FAHRENHEIT
Simultaneously hold down the + and - keys for 3 seconds to change the display of the temperature unit from Celsius [°C] to Fahrenheit [F].
SAFETY
In order to protect the appliance, it has a safety by means of which it is not possible to switch the appliance on again within 3 minutes after switching it off.
When you have switched off the appliance, you must wait 3 minutes before switching the appliance on again.
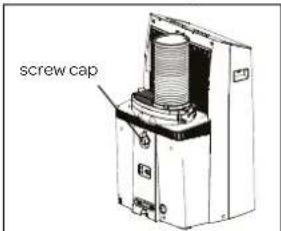
5 draining condensation water
When the air conditioner is not used for a longer period of time, remove the cover cap from the drain opening at the bottom of the appliance and place an empty cup under the outlet.
All the water will flow out of the tank.
The water tank is equipped with an alarm sensor. When the water reaches a certain level in the water tank, the appliance beeps 8 times and P1 appears in the display. The cooling process is switched off automatically. It is possible that the appliance continues with air circulation.
Manual discharge - when using the appliance in a room with high air humidity.
-
Remove the plug from the socket.
-
Place a low receptacle under the lower outlet for condensation water discharge. See the drawing.
-
Remove the screw cap.
-
The water flows out of the drain into the receptacle.
-
Place back the screw cap when no more water is flowing out.
-
Switch the appliance on again.
Continuous discharge - recommended when using the dehumidification position.
For continuous discharge of condensation water we recommend following the method described on page 13 at the section DE-HUMIDIFICATION.
6 cleaning and maintenance
Before cleaning the air conditioner, switch off the appliance by means of the ON/OFF key, wait a few minutes and remove the plug from the socket.
Cleaning the exterior
Clean the exterior of the appliance with a slightly damp cloth and then wipe it with a dry cloth. If necessary, you can clean the exterior of the appliance by means of a mild washing-up liquid.
- Never wash the appliance with water. This can be dangerous.
- Do not use petrol, alcohol or similar solvents to clean the appliance.
- Never spray with insect sprays or similar agents.
- Do not use aggressive or abrasive cleaning agents for cleaning the appliance.
- Never submerge the appliance, cord or plug in water or any other liquid.
The air filter
In order to allow the appliance to function as well as possible, we recommend cleaning the air filter regularly. The air filter could get clogged with dust and dirt.
In order to remind you to clean the air filter, you can activate the warning light for the filter.
- Press the sleep mode key [sleep / 22] for 3 seconds.
- When the appliance has been functioning for 250 hours, the warning light filter lights up to indicate that you should clean the filter. Clean the filter according to the instructions and reset the function by pressing the key [sleep/ ] for 3 seconds again.
Cleaning the air filter
- Switch off the appliance and remove the plug from the socket.
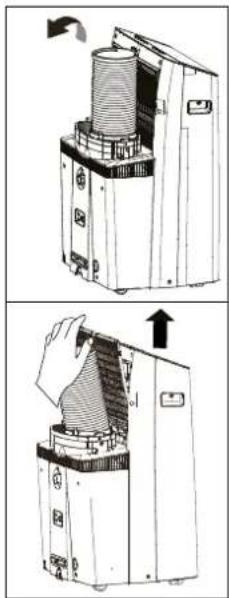
- Remove the air filter as shown in the drawings.
- Use a vacuum cleaner to remove all the dust from the air filter.
If the air filter is very dirty, you can clean it with lukewarm water.
- Submerge the air filter in lukewarm water (max. 40°C) containing a soft cleaning agent. Rinse the air filter a few times and allow it to dry in the air. Do not place the air filter in the sun or on the heating to dry it.
- Place back the air filter. Check that it is fully dry, before using the appliance again.
Cleaning the air inlets
In order to allow the appliance to function as well as possible, you can clean the air inlets by means of a vacuum cleaner with a soft brush nozzle.
Start or end of the season
At the start of the season, check that the cord and plug are undamaged. Observe the installation instructions when placing the appliance.
At the end of the season, make sure there is no condensation water left in the appliance. Drain the water according to the instructions in section
DRAINING CONDENSATION WATER and switch on the appliance for 12 hours in the air circulation mode to make sure that the appliance dries internally and no mould is created.
Ensure the air filter is clean before storing the appliance and remove the batteries from the remote control.
natural_image
Two-panel diagram showing a device with internal components and directional arrows, no text or symbols present.7 tips for efficient use
For a maximum performance of the appliance, observe the following recommendations:
- Close the windows and doors of the rooms to be cooled. If you want to leave the appliance in a room, we recommend leaving the door slightly open (1 cm) so that a good ventilation can be provided.
- Close curtains and/or blinds to keep out the sun, so that the appliance does not have to cool as much and consumes less energy.
• Do not place anything on top of the appliance. - Do not cover the air inlets and outlets. Make sure all grilles are uncovered.
- Ensure there are no heat sources in the room.
- Do not use the appliance in very humid rooms, such as bathrooms and laundry rooms.
• Never use the appliance outdoors.
• Make sure the appliance is placed on a flat, stable surface.
8 problems and solutions
First check the following before submitting the air conditioner for repair.
| Problem | Possible cause | Solution |
| The appliance does not switch on when pressing the on/off key. | The indicator light on the water tank flashes and the water tank is full. | Empty the water tank. |
| The room temperature is lower than the set temperature. | Set the temperature once more. | |
| The appliance does not cool sufficiently. | Not all doors and windows are closed. | Make sure that all doors and windows are closed. |
| There are heat sources that are active in the room. | Remove the heat sources or switch them off if possible. | |
| The temperature is set too high. | Set the temperature once more. | |
| The air inlet is blocked. | Clean the air inlet grille. | |
| The appliance makes a lot of noise. | The surface on which the appliance is placed is not level of flat enough. | Place the appliance on a flat surface, level if possible. |
| The noise is caused by the flowing refrigerant liquid within the air conditioner. | This is normal. | |
| The appliance does not respond to the remote control | The appliance has been switched on via the control panel on the appliance itself.The remote control has not been activated. | Press the on/off button on the remote control to activate it. |
| The appliance does not switch on for a period of 3 minutes after it has been switched on. | The internal safety system of the compressor prevents the appliance from being switched on until 3 minutes have passed since it was switched off. | This delay is normal and the appliance will function normally after the 3 minutes have passed |
| Error code P1 | The water tank is full. | Empty the water tank. |
9 technical specifications
Type number AC127W
Voltage 220-240Volt \~50Hz
Connected load 1600 Watts
Cooling capacity* 12,000 Btu/h (3.5 kW)
EE Class* A
EER* 2.6
Power consumption kW 1.4
Power consumption Standby W 0.5
Current consumption nom. A 5.9
Air displacement max. m³/h 465
Dehumidification max. **L/24h 69.6
Suitable for m^3 105
Refrigerant / GWP type/gr R-290/3/240 g.
thermostat range °C 16 - 30
Fan speeds 3
Max. noise level dB(A) 63 dB
Dimensions (hxwxd) 825 x 496 x 425 mm
Nett weight 36.7 kg
Protection class IPXO
Remote control yes
1
KÄLTEMITTEL
natural_image
Three hand-drawn diagrams showing pipe bend configurations with no text or symbolsnatural_image
Hand cleaning a window frame with visible wood shingles and sheer curtains (no text or symbols)
natural_image
Close-up of a hand opening a window with blurred trees in the background (no text or symbols visible)
natural_image
Close-up of a hand holding a small object near a window frame (no visible text or symbols)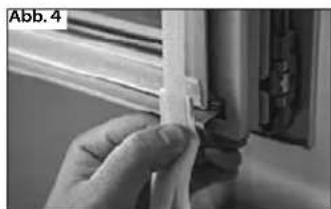
natural_image
Close-up of a hand holding a small rectangular object, possibly a component or tool, with no visible text or symbols.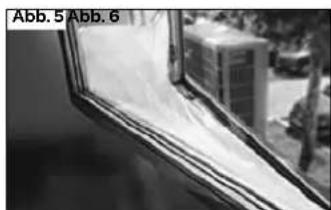
natural_image
Close-up of a window frame with visible door and window, no text or symbols present
natural_image
Black and white photo of a door frame with a window on the left, no visible text or symbols
natural_image
Close-up of a hand holding a small object against a plain background (no text or symbols visible)
natural_image
Close-up of a coiled white hose with striped pattern inside a window (no text or symbols visible)VERRIEGELUNGSKNOPF
natural_image
Technical line drawing of an industrial machine with internal components and directional arrows indicating motion (no text or symbols)FLUIDE RÉFRIGÉRANT
natural_image
Three hand-drawn illustrations of a coiled pipe or tube, showing different shapes and internal patterns (no text or symbols)INSTALLATION DU KIT D'ÉTANCHÉITÉ DE FENÊTRE
natural_image
Close-up of a hand cleaning a window frame (no text or symbols visible)
natural_image
Close-up of a hand opening a window with blurred trees in the background (no text or symbols visible)
natural_image
Close-up of a hand holding a small object near a window frame (no visible text or symbols)
natural_image
Close-up of a hand holding a small white object next to a wall-mounted device (no visible text or symbols)
natural_image
Close-up of a window frame with visible blue and white edges, no text or symbols present
natural_image
Exterior view of a door with a single door and visible window (no text or symbols)
natural_image
Close-up of a hand holding a small object against a plain background (no text or symbols visible)
natural_image
Close-up of a coiled white pipe or duct with horizontal stripes, partially enclosed by a window frame (no text or symbols visible)BOUTON DE VERROUILLAGE
natural_image
Technical line drawings of an industrial machine with internal components and directional arrows indicating motion (no text or symbols)We do not need to remind you of the importance of service. After all, we develop our products to a standard so that you can enjoy them for many years, without any concerns. If, nevertheless, there is a problem, we believe you are entitled to a solution straight away. Hence our products come with an exchange service, on top of the rights and claims you are entitled to by law. By exchanging a product or part, we save you time, effort and costs.
2-year full manufacturer's warranty
-
Customers enjoy a 2-year full manufacturer's warranty on all Inventum products. Within this period, a faulty product or part will always be exchanged for a new model, free of charge. In order to claim under the 2-year full manufacturer's warranty, you can either return the product to the shop you bought it from or contact the Inventum costumer service department via the form at www.inventum.eu/service-aanvraag.
-
The 2-year warranty period starts from the date the product is bought.
-
In order to claim under the warranty, you must produce a copy of the original receipt.
-
The warranty applies only to normal domestic use of Inventum products within the Netherlands.
5-year Inventum warranty
-
Inventum offers a 5-year warranty on most large domestic appliances and a selection of small domestic appliances. This 5-year Inventum warranty consists of a 2-year full manufacturer's warranty, extended by a further 3-year warranty. The only thing you need to do to qualify for the 3-year extended warranty is to register the product within 45 days of purchase. You can read more about registering the product in the following paragraph.
-
In accordance with the 5-year Inventum warranty provisions, a faulty product or part will always be exchanged for a new model during the first 2 years under the warranty. During the 3rd to 5th year under the warranty, you will only pay the costs of exchange. The current costs of exchange are listed at www.inventum.eu/omruilkosten.
-
In order to claim under the 5-year Inventum warranty, you can either return the product to the shop you bought it from or contact the Inventum costumer service department via the form at www.inventum.eu/service-aanvraag.
-
The 5-year warranty period starts from the date the product is bought.
-
In order to claim under the warranty, you must produce a copy of the original receipt.
-
The warranty applies only to normal domestic use of Inventum products within the Netherlands.
Product registration
-
The 3-year extended warranty is easy to obtain, free of charge, by registering the product within 45 days of purchase, via the website www.inventum.eu/garantie-registratie. If you did not register the product within 45 days of purchase, you can still do so up to 2 years after the purchase date. However, there will be a charge. The one-off registration charge is € 89 for each separate product. Registration is possible only for products that are subject to the 5-year Inventum warranty. Whether the product qualifies for the 5-year Inventum warranty is stated in the product user manual and in the product information sheet, on Inventum's website.
-
The warranty period always starts from the date the product is bought. If the product is registered for the extended warranty at a later date, the warranty period still starts from the original date of purchase.
-
The 3-year extended warranty can only be applied for if you are in the possession of a copy of the original receipt and the Inventum 5-year warranty certificate.
Large domestic appliances
-
Breakdowns or faults in large domestic appliances (separate and built-in white goods) can be registered via the form at www.inventum.eu/service-aanvraag, by calling the Inventum costumer service department or in the store where you bought the device. The telephone number of the costumer service department can be found at www.inventum.eu.
-
In the event of breakdowns or faults in large domestic appliances, Inventum will have the option to have a service engineer inspect the faulty device onsite at the customer in the Netherlands and to carry out repairs, there and then. The Inventum customer service department can also decide to have the device exchanged.
-
If you suffer a breakdown or fault in a large domestic appliance during the first 2 years from the date of purchase, Inventum will not charge any costs for the exchange, call-out or for parts and labour.
-
If you registered the product as described before at www.inventum.eu/garantie-registratie and you subsequently report a breakdown of a large domestic appliance in the 3rd to 5th year of the date of purchase, the 5-year Inventum warranty applies and the device will be repaired or exchanged, free of charge. In the event of a repair or exchange of the device, you only pay the costs of exchange. The current costs of exchange are listed at www.inventum.eu/omruilkosten. If you did not register the product, the 3-year extended warranty does not apply.
-
When reporting a breakdown or fault, a service engineer will contact the customer within 1 working day in order to make an appointment. When the report is made in a weekend or during a public holiday, this will be the next working day.
-
If you report a breakdown or fault via the form at www.inventum.eu/service-aanvraag, you will be kept informed of the progress via mobile messages and e-mail.
-
The warranty period starts from the date the product is bought.
-
In order to claim under the warranty, you must produce a copy of the original receipt and the Inventum 5-year warranty certificate.
-
The warranty applies only to normal domestic use of Inventum products within the Netherlands.
Breakdowns or faults outside the warranty period
-
Breakdowns or faults in small or large domestic appliances outside the warranty period, can be reported to the costumer services department via the form at www.inventum.eu/service-aanvraag or by calling the costumer services department.
-
The costumer services department may ask you to send the product for inspection or repair. The costs of dispatch will be at your expense.
-
The inspection to establish whether repair is possible involves a charge. You need to grant your permission for this, in advance.
-
In the event of a large domestic appliance, Inventum, at your request, can send out a service engineer. In that case, you will be charged the call-out costs, as well as parts and labour.
-
In the event of an instruction to repair, the repair costs must be paid in advance. In the event of a repair by a service engineer, the costs of the repair must be settled with the engineer onsite, preferably by means of PIN payment.
Warranty exclusions
- The following is excluded from the aforesaid warranties:
• normal wear and tear;
- improper use or misuse;
• insufficient maintenance;
- failure to comply with the operating and maintenance instructions;
- unprofessional installation or repairs by third parties or the customer himself;
• non-original parts used by the customer;
- use for commercial or business purposes;
- removal of the serial number and/or rating label.
- In addition, the warranty does not apply to normal consumer goods, such as:
- dough hooks, baking tins, (carbon) filters, etc.;
• batteries, bulbs, carbon filters, fat filters etc.;
• external connection cables;
- glass accessories and glass parts such as oven doors;
• and similar items.
-
Transport damage not caused by Inventum is also excluded. Therefore, inspect your new device before starting to use it. If you detect any damage, you must report this to the store where you purchased the product within 5 working days, or to the Inventum customer service department via the form at www.inventum.eu/service-aanvraag. If transport damage is not reported within this period, Inventum does not accept any liability in this respect.
-
The following are excluded from warranty and/or replacement: faults, loss of and damage to the device as a result of an event that is normally insured under the home contents insurance.
Important to know
-
The replacement or repair of a faulty product, or a part thereof, does not lead to an extension of the original warranty period.
-
Parts that have been replaced, packaging material and exchanged devices are taken back by the service engineer and become the property of Inventum.
-
If a complaint is unfounded, all costs arising from it will be at the customer's expense.
-
Following expiry of the warranty period, all costs of repair or replacement, including administration costs, dispatch and call-out charges, will be charged to the customer.
-
Inventum cannot be held liable for damage as a result of devices built in incorrectly.
-
Inventum cannot be held liable for damage caused by external events, unless this liability arises from mandatory statutory provisions.
-
These warranty and service provisions are governed by Dutch law. Disputes will be settled exclusively by the competent Dutch court.
instagram.com/inventum1908
facebook.com/inventum1908
youtube.com/inventum1908