
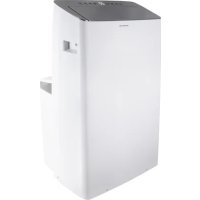
AC907W - Air Conditioning INVENTUM - Free user manual and instructions
Find the device manual for free AC907W INVENTUM in PDF.
| Product type | Monoblock mobile air conditioner |
| Brand | Inventum |
| Model | AC907W |
| Cooling capacity | 9000 Btu/h (2.81 kW) |
| Energy class | A+ (EER 3.1) |
| Connected power | 1100 W |
| Voltage / Frequency | 220-240 V ~50 Hz |
| Standby consumption | 0.5 W |
| Maximum air flow | 350 m³/h |
| Maximum dehumidification | 30 L/24h |
| Refrigerant | R290 (260 g, GWP=3) |
| Temperature range | 18-32 °C |
| Fan speeds | 3 (high, medium, low) + automatic |
| Maximum noise level | 58 dB(A) |
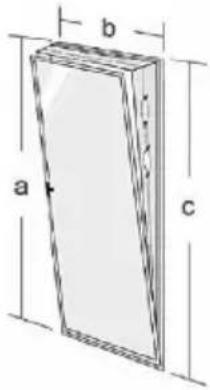
| Dimensions (H x W x D) | 745 x 450 x 396 mm |
| Net weight | 34 kg |
| Protection class | IPX0 |
| Remote control | Yes (AAA batteries included) |
| Minimum room area | 13 m² |
| Exhaust hose length (max.) | 150 cm (recommended < 1 m) |
| Functions | Cooling, dehumidification, air circulation, auto mode, sleep, oscillation, timer 1-24h |
| Air filter maintenance | Weekly cleaning recommended (warm water max 40°C) |
| Warranty | 2 years full, 5 years Inventum (with registration within 45 days) |
Frequently Asked Questions - AC907W INVENTUM
User questions about AC907W INVENTUM
0 question about this device. Answer the ones you know or ask your own.
Ask a new question about this device
Download the instructions for your Air Conditioning in PDF format for free! Find your manual AC907W - INVENTUM and take your electronic device back in hand. On this page are published all the documents necessary for the use of your device. AC907W by INVENTUM.
USER MANUAL AC907W INVENTUM
natural_image
White industrial air purifier device with black wheels and lid (no visible text or symbols)- safety instructions page 26
- product description page 38
- before using for the first time page 39
- operation of the air conditioner page 41
- tips for efficient use page 44
- draining condensation water page 44
- cleaning and maintenance page 45
- problems and solutions page 45
- technical specifications page 46
general service and warranty conditions page 94
Deutsch
KOELMIDDEL
natural_image
Three technical line drawings of mechanical components: a cylindrical pipe fitting, a hollow rectangular housing, and a coiled spring-like structure (no text or symbols)12 1716151413

natural_image
Line drawings of a remote control device, cable cord, and cylindrical device with control panel (no text or symbols)natural_image
Close-up of a hand cleaning a wooden window frame (no text or symbols visible)
natural_image
Close-up of a hand cleaning a window frame with blurred background (no text or symbols visible)
natural_image
Close-up of a hand holding a small object near a window (no visible text or symbols)
natural_image
Close-up of a hand holding a small white object, next to a wall-mounted device (no visible text or symbols)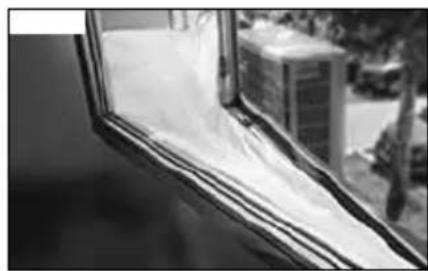
natural_image
Close-up of a window frame with plastic wrap, no visible text or symbols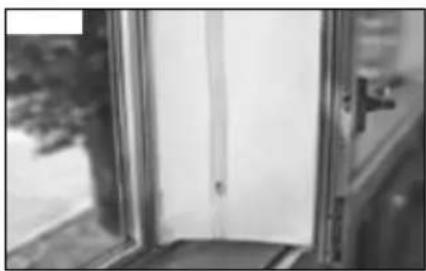
natural_image
Interior view of a door with visible door and window, no text or symbols present
natural_image
Close-up of a hand holding a small object against a plain background (no text or symbols visible)
natural_image
Close-up of a striped fabric hanging from a window frame (no text or symbols visible)natural_image
Two-panel diagram showing a curved line with checkmark and cross symbols, no readable text or labelsLUCHTCIRCULATIE
flowchart
graph LR
    A["Rectangular Frame"] --> B["Square State"]
    B --> C["Downward Arrow to Square"]
    C --> D["Downward Arrow to Square"]
    D --> E["Downward Arrow to Square"]
natural_image
Illustration of a hand holding a smartphone with an arrow indicating the right-hand rule (no text or symbols present)Opmerking:
natural_image
Diagram of an air conditioner unit with cooling fan and heat exchanger (no text or labels)1 safety instructions
- First carefully read the instruction manual in full prior to using the appliance and store the manual in a safe place for future reference.
- Do not use agents that accelerate the defrosting process or other cleaning agents than those recommended by the manufacturer.
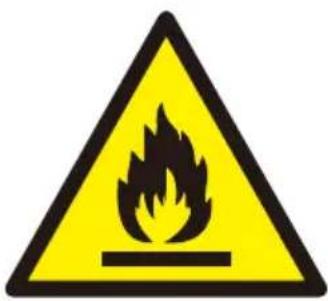
- Store the appliance in a room without any continuously active ignition sources (e.g. an open flame, switched on gas appliance or switched on electric heating appliance).
- Do not drill through or burn.
- Caution, certain refrigerants do not have an odour.
• Install, use and store the appliance in a room with a floor surface of at least 13 m² (for 9000Btu/h). - Only install this appliance when it complies with local/national legislation and standards.

IMPORTANT
This appliance is intended for use as an air conditioner in houses and is only suitable for indoor use in living rooms, kitchens and garages on dry locations, under normal domestic circumstances.
- Never use the appliance with a damaged cord or plug.
Never clamp the cord and avoid contact with sharp edges. - The installation should fully correspond with the locally applicable regulations, conditions and standards.
- The appliance is only suitable for use on dry locations, indoors.
- Check the mains voltage.
- This appliance is only suitable for an earthed socket, connection voltage 220-240 Volt/ \~50 Hz.
- The appliance MUST always be connected in an earthed condition. If the power supply is not earthed, it is absolutely not permitted to connect the appliance.
- The plug must always be easily accessible when the appliance is connected.
• Always transport the appliance in a straight position and place it on a stable, flat surface during use. If the appliance has been transported in a lying position, leave it to rest in a straight position for 6 hours before inserting the plug in the socket.
- Have the electrical system checked by a recognised expert if you are not certain that everything is in order.
• Install the appliance on a sturdy, flat floor that is strong enough to carry a weight of up to 50 kg. Installation on a weak or uneven floor could result in damage to your properties or personal injury.
- Never cover the air inlets and outlets.
- Empty the water reservoir via the water drain point, before moving the appliance.
- Never allow the appliance to come into contact with chemicals.
- Do not insert fingers or objects in the openings of the appliance.
- Never allow the appliance to come into contact with water. Do not spray the appliance with water or submerge it in water to prevent short-circuiting.
• Always first remove the plug from the socket before the appliance or a part thereof must be cleaned or replaced.
- NEVER connect the appliance using an extension cord. If there is no earthed socket available, have one installed by a recognised electrician.
- For reasons of safety, always be careful when there are children near this appliance, same as with any other electrical appliance.
- Do not use the appliance if the plug, cord or appliance are damaged, or if the appliance no longer functions properly or if it is damaged in any other way. If this is the case, consult the retailer or our maintenance service. Never replace the plug or cord yourself.
- Always remove the plug from the socket when the appliance is not being used.
- Only have a damaged electricity cord replaced by the supplier or an authorised person/service point.
- Keep the appliance out of reach of children. Children do not see the dangers associated with handling electrical appliances. Therefore, never allow children to operate electrical appliances without supervision. Keep the appliance and cord out of reach of children younger than 8 years of age.
- The appliance can be used by children of 8 years and older and persons with a limited physical, sensory or mental capacity or lack of experience or knowledge, provided they use the appliance under supervision or have been instructed about its safe use and understand the hazards involved.
• Children must not play with the appliance. - The appliance may not be cleaned or maintained by children, unless this is done under supervision.
CAUTION! • Never cl
- Never close the room where this appliance is used in such a way that it is fully airtight. This prevents vacuum from being created in this room. Negative pressure (=vacuum) could disrupt the safe operation of geysers, extractor hoods, ovens, etc.
- Non-observance of the instructions could invalidate the warranty on the appliance.
• Always lift the appliance with two persons.
• Always make sure the appliance is placed on an sturdy, flat surface.
- Do not leave the appliance unsupervised if the appliance is operational.
- If you want to move the appliance, make sure the appliance is switched off. Use both hands when moving the appliance.
- Never use the appliance with parts that are not recommended or supplied by the manufacturer.
- Do not pull the cord and/or appliance to remove the plug from the wall socket. Never touch the appliance with wet or damp hands.
- If the appliance does not function after it has been switched on, it is possible that the fuse or earth leakage circuit breaker has been activated in the electrical distribution box. The group may be overloaded or an earth leakage current may have occurred.
- In case of a breakdown, never make repairs yourself; a tripped safety device in the appliance could indicate a defect that cannot be remedied by removing or replacing this safety device. Only original parts should be used.
- Never submerge the appliance, cord or plug in water.
- This appliance is only suitable for household use. If the appliance is not used as intended, no compensation can be claimed in case of defects or accidents and the warranty will be invalidated.
- If you decide not to use the appliance any more due to a defect, we recommend cutting off the cord after removing the plug from the socket.
Household appliances do not belong in the dustbin. Take them to the waste processing department concerned of your municipality.
WARNING
Specific information for appliances with R290 refrigerant gas.
• Thoroughly read all warnings.
- When defrosting and cleaning the appliance, only use tools recommended by the manufacturer.
- Place the appliance in a room without any continuously active ignition sources (e.g. an open flame, switched on electric or gas appliance).
- Do not drill through or burn.
- Install, use and store the appliance in a room with a floor surface of at least 13 m ^2 .
- This appliance contains 260 grams of R290 refrigerant gas (see the information plate at the rear of the appliance).
- R290 is a refrigerant gas that is in accordance with the European environmental directives. Never drill through any part of the cooling circuit.
- If the appliance is installed, operated or stored in a room without ventilation, the room should be made in such a way that accumulation of refrigerant as a result of a leak is prevented. This could lead to a fire or explosion hazard due to the ignition of the refrigerant by an electric heating appliance, stove or other ignition source.
- Store the appliance in such a way that mechanical failures are prevented.
- Persons operating or working at the cooling circuit, must be in the possession of a suitable certificate from an authorised organisation, so that these persons are authorised to handle refrigerants in a safe way in accordance with the specifications that apply within the industry.
- Repairs may only be performed as recommended by the manufacturer of the appliance. Maintenance and repairs that require assistance from other trained personnel, must be performed under the supervision of a person who knows how to use combustible refrigerants.
REFRIGERANT
(CE) N 842/2006: This air conditioner contains the refrigerant R290.
The quantity of refrigerant is less than 1 kg and is contained in a closed cooling circuit. The refrigerant does not have an ozone depletion potential. It is, however, a greenhouse gas according to the Kyoto protocol and could therefore contribute to global warming when released into the atmosphere. Only trained technicians with a suitable refrigerant certificate are permitted to fill or empty the appliance. If used correctly and when the refrigerant circuit is undamaged, your air conditioner does not have to be refilled with refrigerant. GWP: R290: 3.
Specific information regarding appliances with R290/R32 refrigerant gas
• Thoroughly read all of the warnings.
- When defrosting and cleaning the appliance, do not use any tools other than those recommended by the manufacturing company.
- The appliance must be placed in an area without any continuous sources of ignition (for example: open flames, gas or electrical appliances in operation).
- Do not puncture and do not burn.
• Refrigerant gases can be odourless.
- The appliance must be installed, used and stored in an area that is greater than 13 ~m^2 .
- R290/R32 is a refrigerant gas that complies with the European directives on the environment. Do not puncture any part of the refrigerant circuit.
- If the appliance is installed, operated or stored in a non-ventilated area, the room must be designed to prevent the accumulation of refrigerant leaks resulting in a risk of fire or explosion due to ignition of the refrigerant caused by electric heaters, stoves, or other sources of ignition.
- The appliance must be stored in such a way as to prevent mechanical failure.
- Individuals who operate or work on the refrigerant circuit must have the appropriate certification issued by an accredited organisation that ensures competence in handling refrigerants according to a specific evaluation recognized by associations in the industry.
- Repairs must be performed based on the recommendations from the manufacturing company.
- Maintenance and repairs that require the assistance of other qualified personnel must be performed under the supervision of an individual specified in the use of flammable refrigerants.
- Do not use means to accelerate the defrosting process or to clean, other than those recommended by the manufacturer.
- The appliance shall be stored in a room without continuously operating ignition sources (for example: open flames, an operating gas appliance or anoperating electric heater).
- Do not pierce or burn.
- Be aware that the refrigerants may not contain an odour.
- Compliance with national gas regulations shall be observed.
- Keep ventilation openings clear of obstruction.
- The appliance shall be stored so as to prevent mechanical damage from occurring.
- A warning that the appliance shall be stored in a well-ventilated area where the room size corresponds to the room area as specified for operation.
- Any person who is involved with working on or breaking into a refrigerant circuit should hold a current valid certificate from an industry-accredited assessment authority, which authorises their competence to handle refrigerants safely in accordance with an industry recognised assessment specification.
- Servicing shall only be performed as recommended by the equipment manufacturer.
- Maintenance and repair requiring the assistance of other skilled personnel shall be carried out under the supervision of the personcompetent in the use of flammable refrigerants.
- Appliance should be installed, operated and stored in a room with a floor area larger than 13m^2 .

WARNING: System contains refrigerant under very high pressure. The system must be serviced by qualified persons only.
- Transport of equipment containing flammable refrigerants (Annex CC.1) Compliance with the transport regulations.
- Marking of equipment using signs (Annex CC.2)
Compliance with local regulations.
- Disposal of equipment using flammable refrigerants (Annex CC.3)
Compliance with national regulations. - Storage of equipment/appliances (Annex CC.4)
The storage of equipment should be in accordance with the manufacturer's instructions.
- Storage of packed (unsold) equipment (Annex CC.5)
Storage package protection should be constructed such that mechanical damage to the equipment inside the package will not cause a leak of the refrigerant charge.
The maximum number of pieces of equipment permitted to be stored together will be determined by local regulations.
- Information on servicing (Annex DD.3)
1) Checks to the area
Prior to beginning work on systems containing flammable refrigerants, safety checks are necessary to ensure that the risk of ignition is minimised. For repair to the refrigerating system, the following precautions shall be complied with prior to conducting work on the system.
2) Work procedure
Work shall be undertaken under a controlled procedure so as to minimise the risk of a flammable gas or vapour being present while the work is being performed.
3) General work area
All maintenance staff and others working in the local area shall be instructed on the nature of work being carried out. Work in confined spaces shall be avoided. The area around the workspace shall be sectioned off. Ensure that the conditions within the area have been made safe by control of flammable material.
4) Checking for presence of refrigerant
The area shall be checked with an appropriate refrigerant detector prior to and during work, to ensure the technician is aware of potentially flammable atmospheres. Ensure that the leak detection equipment being used is suitable for use with flammable refrigerants, i.e. non-sparking, adequately sealed or intrinsically safe.
5) Presence of fire extinguisher
If any hot work is to be conducted on the refrigeration equipment or any associated parts, appropriate fire extinguishing equipment shall be available to hand. Have a dry powder or CO2 fire extinguisher adjacent to the charging area.
6) No ignition sources
No person carrying out work in relation to a refrigeration system which involves exposing any pipe work that contains or has contained flammable refrigerant shall use any sources of ignition in such a manner that it may lead to the risk of fire or explosion. All possible ignition sources, including cigarette smoking, should be kept sufficiently far away from the site of installation, repairing, removing and disposal, during which lammable refrigerant can possibly be released to the surrounding space. Prior to work taking place, the area
around the equipment is to be surveyed to make sure that there are no flammable hazards or ignition risks. "No Smoking" signs shall be displayed.
7) Ventilated area
Ensure that the area is in the open or that it is adequately ventilated before breaking into the system or conducting any hot work. A degree of ventilation shall continue during the period that the work is carried out. The ventilation should safely disperse any released refrigerant and preferably expel it externally into the atmosphere.
8) Checks to the refrigeration equipment
Where electrical components are being changed, they shall be fit for the purpose and to the correct specification. At all times the manufacturer's maintenance and service guidelines shall be followed. If in doubt consult the manufacturer's technical department for assistance.
The following checks shall be applied to installations using flammable refrigerants:
- The charge size is in accordance with the room size within which the refrigerant containing parts are installed;
- The ventilation machinery and outlets are operating adequately and are not obstructed;
- If an indirect refrigerating circuit is being used, the secondary circuit shall be checked for the presence of refrigerant;
- Marking to the equipment continues to be visible and legible. Markings and signs that are illegible shall be corrected;
- Refrigeration pipe or components are installed in a position where they are unlikely to be exposed to any substance which may corrode refrigerant containing components, unless the components are constructed of materials which are inherently resistant to being corroded or are suitably protected against being so corroded.
9) Checks to electrical devices
Repair and maintenance to electrical components shall include initial safety checks and component inspection procedures. If a fault exists that could compromise safety, then no electrical supply shall be connected to the circuit until it is satisfactorily dealt with. If the fault cannot be corrected immediately but it is necessary to continue operation, an adequate temporary solution shall be used. This shall be reported to the owner of the equipment so all parties are advised.
Initial safety checks shall include:
- That capacitors are discharged: this shall be done in a safe manner to avoid possibility of sparking;
- That there no live electrical components and wiring are exposed while charging, recovering or purging the system;
- That there is continuity of earth bonding.
7. Repairs to sealed components (Annex DD.4)
1) During repairs to sealed components, all electrical supplies shall be disconnected from the equipment being worked upon prior to any removal of sealed covers, etc. If it is absolutely necessary to have an electrical supply to equipment during servicing, then a permanently operating form of leak detection shall be located at the most critical point to warn of a potentially hazardous situation.
2) Particular attention shall be paid to the following to ensure that by working on electrical components, the casing is not altered in such a way that the level of protection is affected.
This shall include damage to cables, excessive number of connections, terminals not made to original specification, damage to seals, incorrect fitting of glands, etc. Ensure that apparatus is mounted securely.
Ensure that seals or sealing materials have not degraded such that they no longer serve the purpose of preventing the ingress of flammable atmospheres. Replacement parts shall be in accordance with the manufacturer's specifications.
NOTE: The use of silicon sealant may inhibit the effectiveness of some types of leak detection equipment. Intrinsically safe components do not have to be isolated prior to working on them.
8. Repair to intrinsically safe components (Annex DD.5)
Do not apply any permanent inductive or capacitance loads to the circuit without ensuring that this will not exceed the permissible voltage and current permitted for the equipment in use.
Intrinsically safe components are the only types that can be worked on while live in the presence of a flammable atmosphere. The test apparatus shall be at the correct rating.
Replace components only with parts specified by the manufacturer. Other parts may result in the ignition of refrigerant in the atmosphere from a leak.
9. Cabling (Annex DD.6)
Check that cabling will not be subject to wear, corrosion, excessive pressure, vibration, sharp edges or any other adverse environmental effects. The check shall also take into account the effects of aging or continual vibration from sources such as compressors or fans.
10. Detection of flammable refrigerants (Annex DD.7)
Under no circumstances shall potential sources of ignition be used in the searching for or detection of refrigerant leaks. A halide torch (or any other detector using a naked flame) shall not be used.
11. Leak detection methods (Annex DD.8)
The following leak detection methods are deemed acceptable for systems containing flammable refrigerants.
Electronic leak detectors shall be used to detect flammable refrigerants, but the sensitivity may not be adequate, or may need re-calibration. (Detection equipment shall be calibrated in a refrigerant-free area.) Ensure that the detector is not a potential source of ignition and is suitable for the refrigerant used. Leak detection equipment shall be set at a percentage of the LFL of the refrigerant and shall be calibrated to the refrigerant employed and the appropriate percentage of gas (25 % maximum) is confirmed.
Leak detection fluids are suitable for use with most refrigerants but the use of detergents containing chlorine shall be avoided as the chlorine may react with the refrigerant and corrode the copper pipe-work.
If a leak is suspected, all naked flames shall be removed/ extinguished.
If a leakage of refrigerant is found which requires brazing, all of the refrigerant shall be recovered from the system, or isolated (by means of shut off valves) in a part of the system remote from the leak. Oxygen free nitrogen (OFN) shall then be purged through the system both before and during the brazing process.
12. Removal and evacuation (Annex DD.9)
When breaking into the refrigerant circuit to make repairs – or for any other purpose – conventional procedures shall be used. However, it is important that best practice is followed since flammability is a consideration. The following procedure shall be adhered to:
- Remove refrigerant;
- Purge the circuit with inert gas;
- Evacuate;
- Purge again with inert gas;
- Open the circuit by cutting or brazing.
The refrigerant charge shall be recovered into the correct recovery cylinders. The system shall be “flushed” with OFN to render the unit safe. This process may need to be repeated several times. Compressed air or oxygen shall not be used for this task.
Flushing shall be achieved by breaking the vacuum in the system with OFN and continuing to fill until the working pressure is achieved, then venting to atmosphere, and finally pulling down to a vacuum. This process shall be repeated until no refrigerant is within the system. When the final OFN charge is used, the system shall be vented down to atmospheric pressure to enable work to take place. This operation is absolutely vital if brazing operations on the pipe-work are to take place.
Ensure that the outlet for the vacuum pump is not close to any ignition sources and there is ventilation available.
13. Charging procedures (Annex DD.10)
In addition to conventional charging procedures, the following requirements shall be followed.
- Ensure that contamination of different refrigerants does not occur when using charging equipment. Hoses or lines shall be as short as possible to minimise the amount of refrigerant contained in them.
- Cylinders shall be kept upright.
- Ensure that the refrigeration system is earthed prior to charging the system with refrigerant.
- Label the system when charging is complete (if not already).
- Extreme care shall be taken not to overfill the refrigeration system.
Prior to recharging the system it shall be pressure tested with OFN. The system shall be leak tested on completion of charging but prior to commissioning. A follow up leak test shall be carried out prior to leaving the site.
14. Decommissioning (Annex DD.11)
Before carrying out this procedure, it is essential that the technician is completely familiar with the equipment and all its detail. It is recommended good practice that all refrigerants are recovered safely. Prior to the task being carried out, an oil and refrigerant sample shall be taken in case analysis is required prior to re-use of reclaimed refrigerant. It is essential that electrical power is available before the task is commenced.
a) Become familiar with the equipment and its operation.
b) Isolate system electrically.
c) Before attempting the procedure ensure that:
- Mechanical handling equipment is available, if required, for handling refrigerant cylinders;
- All personal protective equipment is available and being used correctly;
- The recovery process is supervised at all times by a competent person;
- Recovery equipment and cylinders conform to the appropriate standards.
d) Pump down refrigerant system, if possible.
e) If a vacuum is not possible, make a manifold so that refrigerant can be removed from various parts of the system.
f) Make sure that cylinder is situated on the scales before recovery takes place.
g) Start the recovery machine and operate in accordance with manufacturer's instructions.
h) Do not overfill cylinders. (No more than 80 % volume liquid charge).
i) Do not exceed the maximum working pressure of the cylinder, even temporarily.
j) When the cylinders have been filled correctly and the process completed, make sure that the cylinders and the equipment are removed from site promptly and all isolation valves on the equipment are closed off.
k) Recovered refrigerant shall not be charged into another refrigeration system unless it has been cleaned and checked.
15. Labelling (Annex DD.12)
Equipment shall be labelled stating that it has been de-commissioned and emptied of refrigerant. The label shall be dated and signed. Ensure that there are labels on the equipment stating the equipment contains flammable refrigerant.
16. Recovery (Annex DD.13)
When removing refrigerant from a system, either for servicing or decommissioning, it is recommended good practice that all refrigerants are removed safely. When transferring refrigerant into cylinders, ensure that only appropriate refrigerant recovery cylinders are employed. Ensure that the correct number of cylinders for holding the total system charge is available. All cylinders to be used are designated for the recovered refrigerant and labelled for that refrigerant (i.e. special cylinders for the recovery of refrigerant). Cylinders shall be complete with pressure relief valve and associated shut-off valves in good working order. Empty recovery cylinders are evacuated and, if possible, cooled before recovery occurs.
The recovery equipment shall be in good working order with a set of instructions concerning the equipment that is at hand and shall be suitable for the recovery of flammable refrigerants. In addition, a set of calibrated weighing scales shall be available and in good working order. Hoses shall be complete with leak-free disconnect couplings and in good condition. Before using the recovery machine, check that it is in satisfactory working order, has been properly maintained and that any associated electrical components are sealed to prevent ignition in the event of a refrigerant release. Consult manufacturer if in doubt.
The recovered refrigerant shall be returned to the refrigerant supplier in the correct recovery cylinder, and the relevant Waste Transfer Note arranged. Do not mix refrigerants in recovery units and especially not in cylinders.
If compressors or compressor oils are to be removed, ensure that they have been evacuated to an acceptable level to make certain that flammable refrigerant does not remain within the lubricant. The evacuation process shall be carried out prior to returning the compressor to the suppliers. Only electric heating to the compressor body shall be employed to accelerate this process. When oil is drained from a system, it shall be carried out safely.
2 product description
natural_image
Three technical line drawings of mechanical components: a cylindrical pipe fitting, a hollow rectangular housing, and a coiled spring-like structure (no text or symbols)
natural_image
Line drawings of a remote control device, cable cord, and cylindrical device with control panel (no text or symbols)12 1716151413
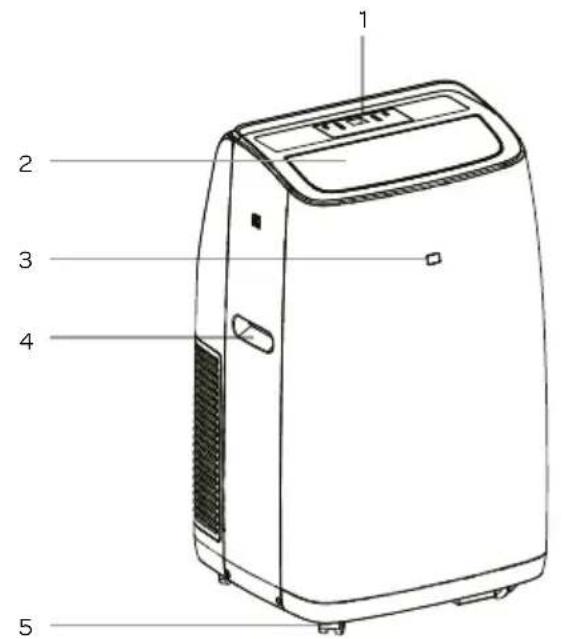
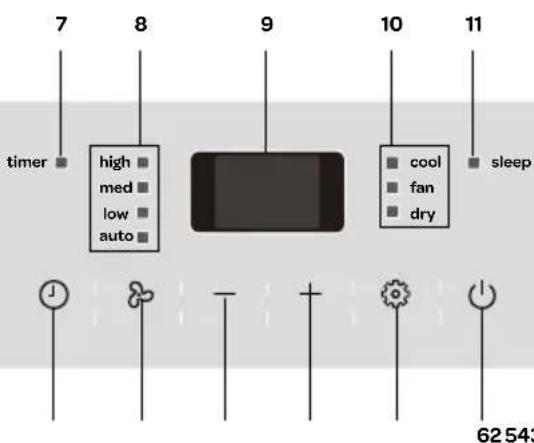
- Operating panel
- Air outlet with fins
- Sensor for remote control
- Handle
- Castors
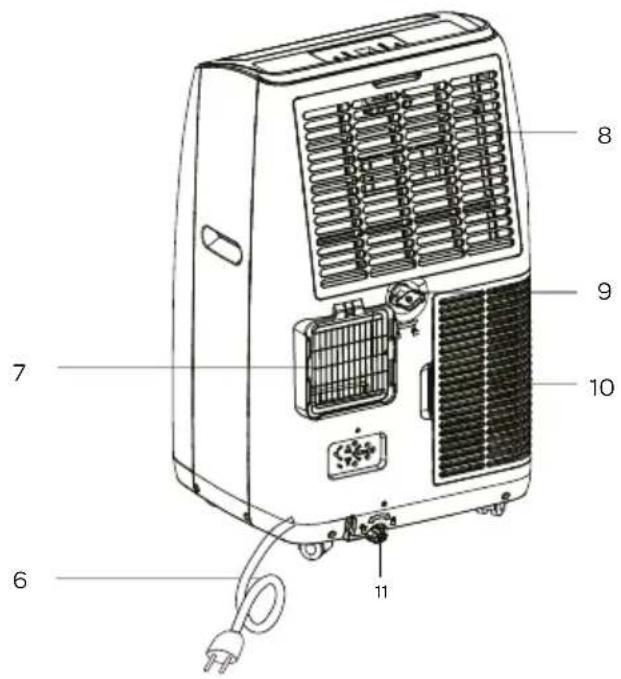
- Connection cord with plug
- Air outlet - warm air
- Air inlet
-
Screw cap for water discharge
-
Air inlet
- Condensation water drain
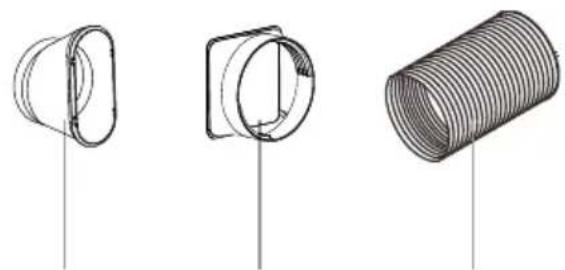
- Connection piece
- Connection piece
- Discharge hose - air
- Discharge hose - water
- Flexible window seal set
- Remote control with batteries
3
before using for the first time
Follow these instructions when using the appliance for the first time: Carefully unpack the air conditioner and all accessories and remove all packaging material and any promotional stickers.
Keep the packaging (plastic bags and cardboard) out of reach of children.
After unpacking the appliance, carefully check it for external damage that may have occurred during transport.
Place the appliance on a sturdy, flat surface and make sure there is enough space all around for sufficient ventilation.
Check that all mentioned accessories have been supplied.
Clean the air conditioner with a slightly damp cloth.
Prior to connecting the appliance, check that:
- the connection voltage corresponds with what is stated on the information plate;
• the socket and cord are suitable for the appliance;
• the plug of the cord fits in the socket;
• the appliance is placed on a stable and flat surface.
PLACEMENT OF THE AIR CONDITIONER
- The appliance should be placed on a sturdy, flat surface with sufficient free space around it.
- Do not block the air outlet and ensure a free space of minimum 45 cm around the appliance.
- After placing the appliance in a straight position, allow it to stand for at least 2 hours before inserting the plug in the socket.
- For the benefit of easy movement, the appliance has been provided with castors. Carefully roll the appliance over the floor. Make sure the floor is flat and try not to drive over anything.
- REMARK: Optimum operation of the appliance depends on the length of the discharge hose and the number of bends. Try to limit both. The supplied flexible discharge hose has a maximum length of approx. 150 cm and corresponds with the capacity of the appliance. The use of any other hoses or extensions could cause failures in the appliance. The air should be able to flow without hindrance, or else this could lead to overheating of the appliance or condensation of water in the air discharge hose. Therefore make sure there are no kinks or sharp bends in the discharge hose. For an optimum result, the discharge hose should be kept shorter than 1 metre during use of the appliance.
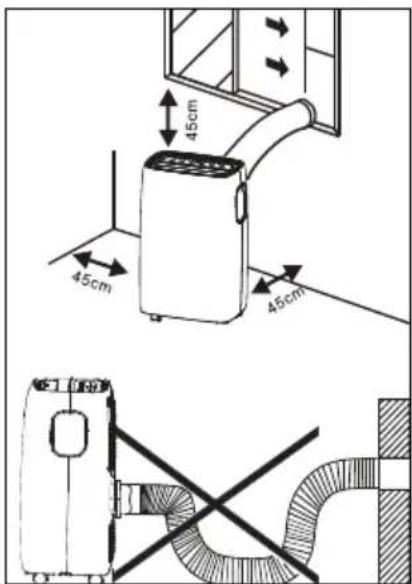
Place the appliance near a window or opening, so that the air can flow to the outside via the discharge hose.
-
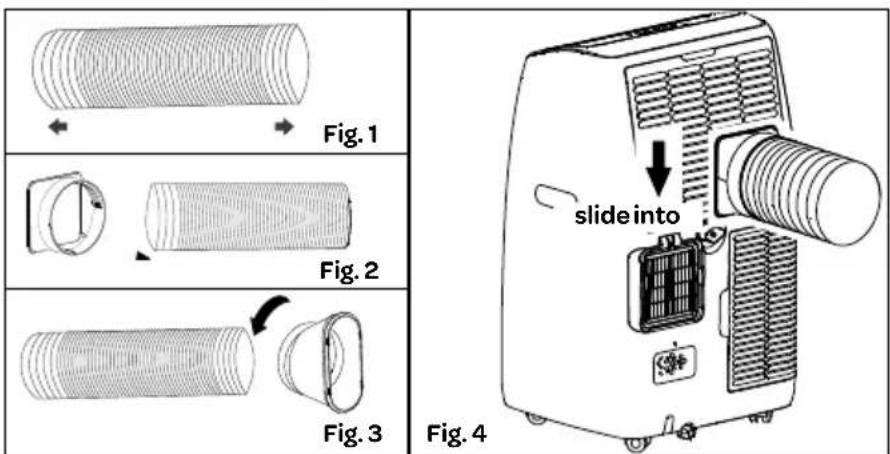
Carefully pull out the discharge hose until the required length is achieved.
-
Screw the connection piece on one end of the discharge hose.
-
Screw the other connection piece on the other end of the discharge hose.
-
Attach the discharge hose to the air outlet on the rear of the appliance.
-
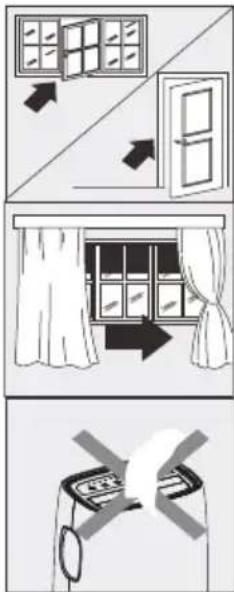
Hang the other end of the discharge hose to the outside. Ensure a free passage of the hose. Close the window or door to the extent possible. If necessary, use the window seal set.
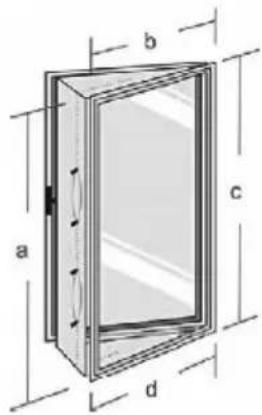
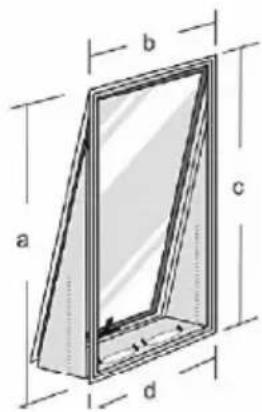
INSTALLATION OF THE WINDOW SEAL SET
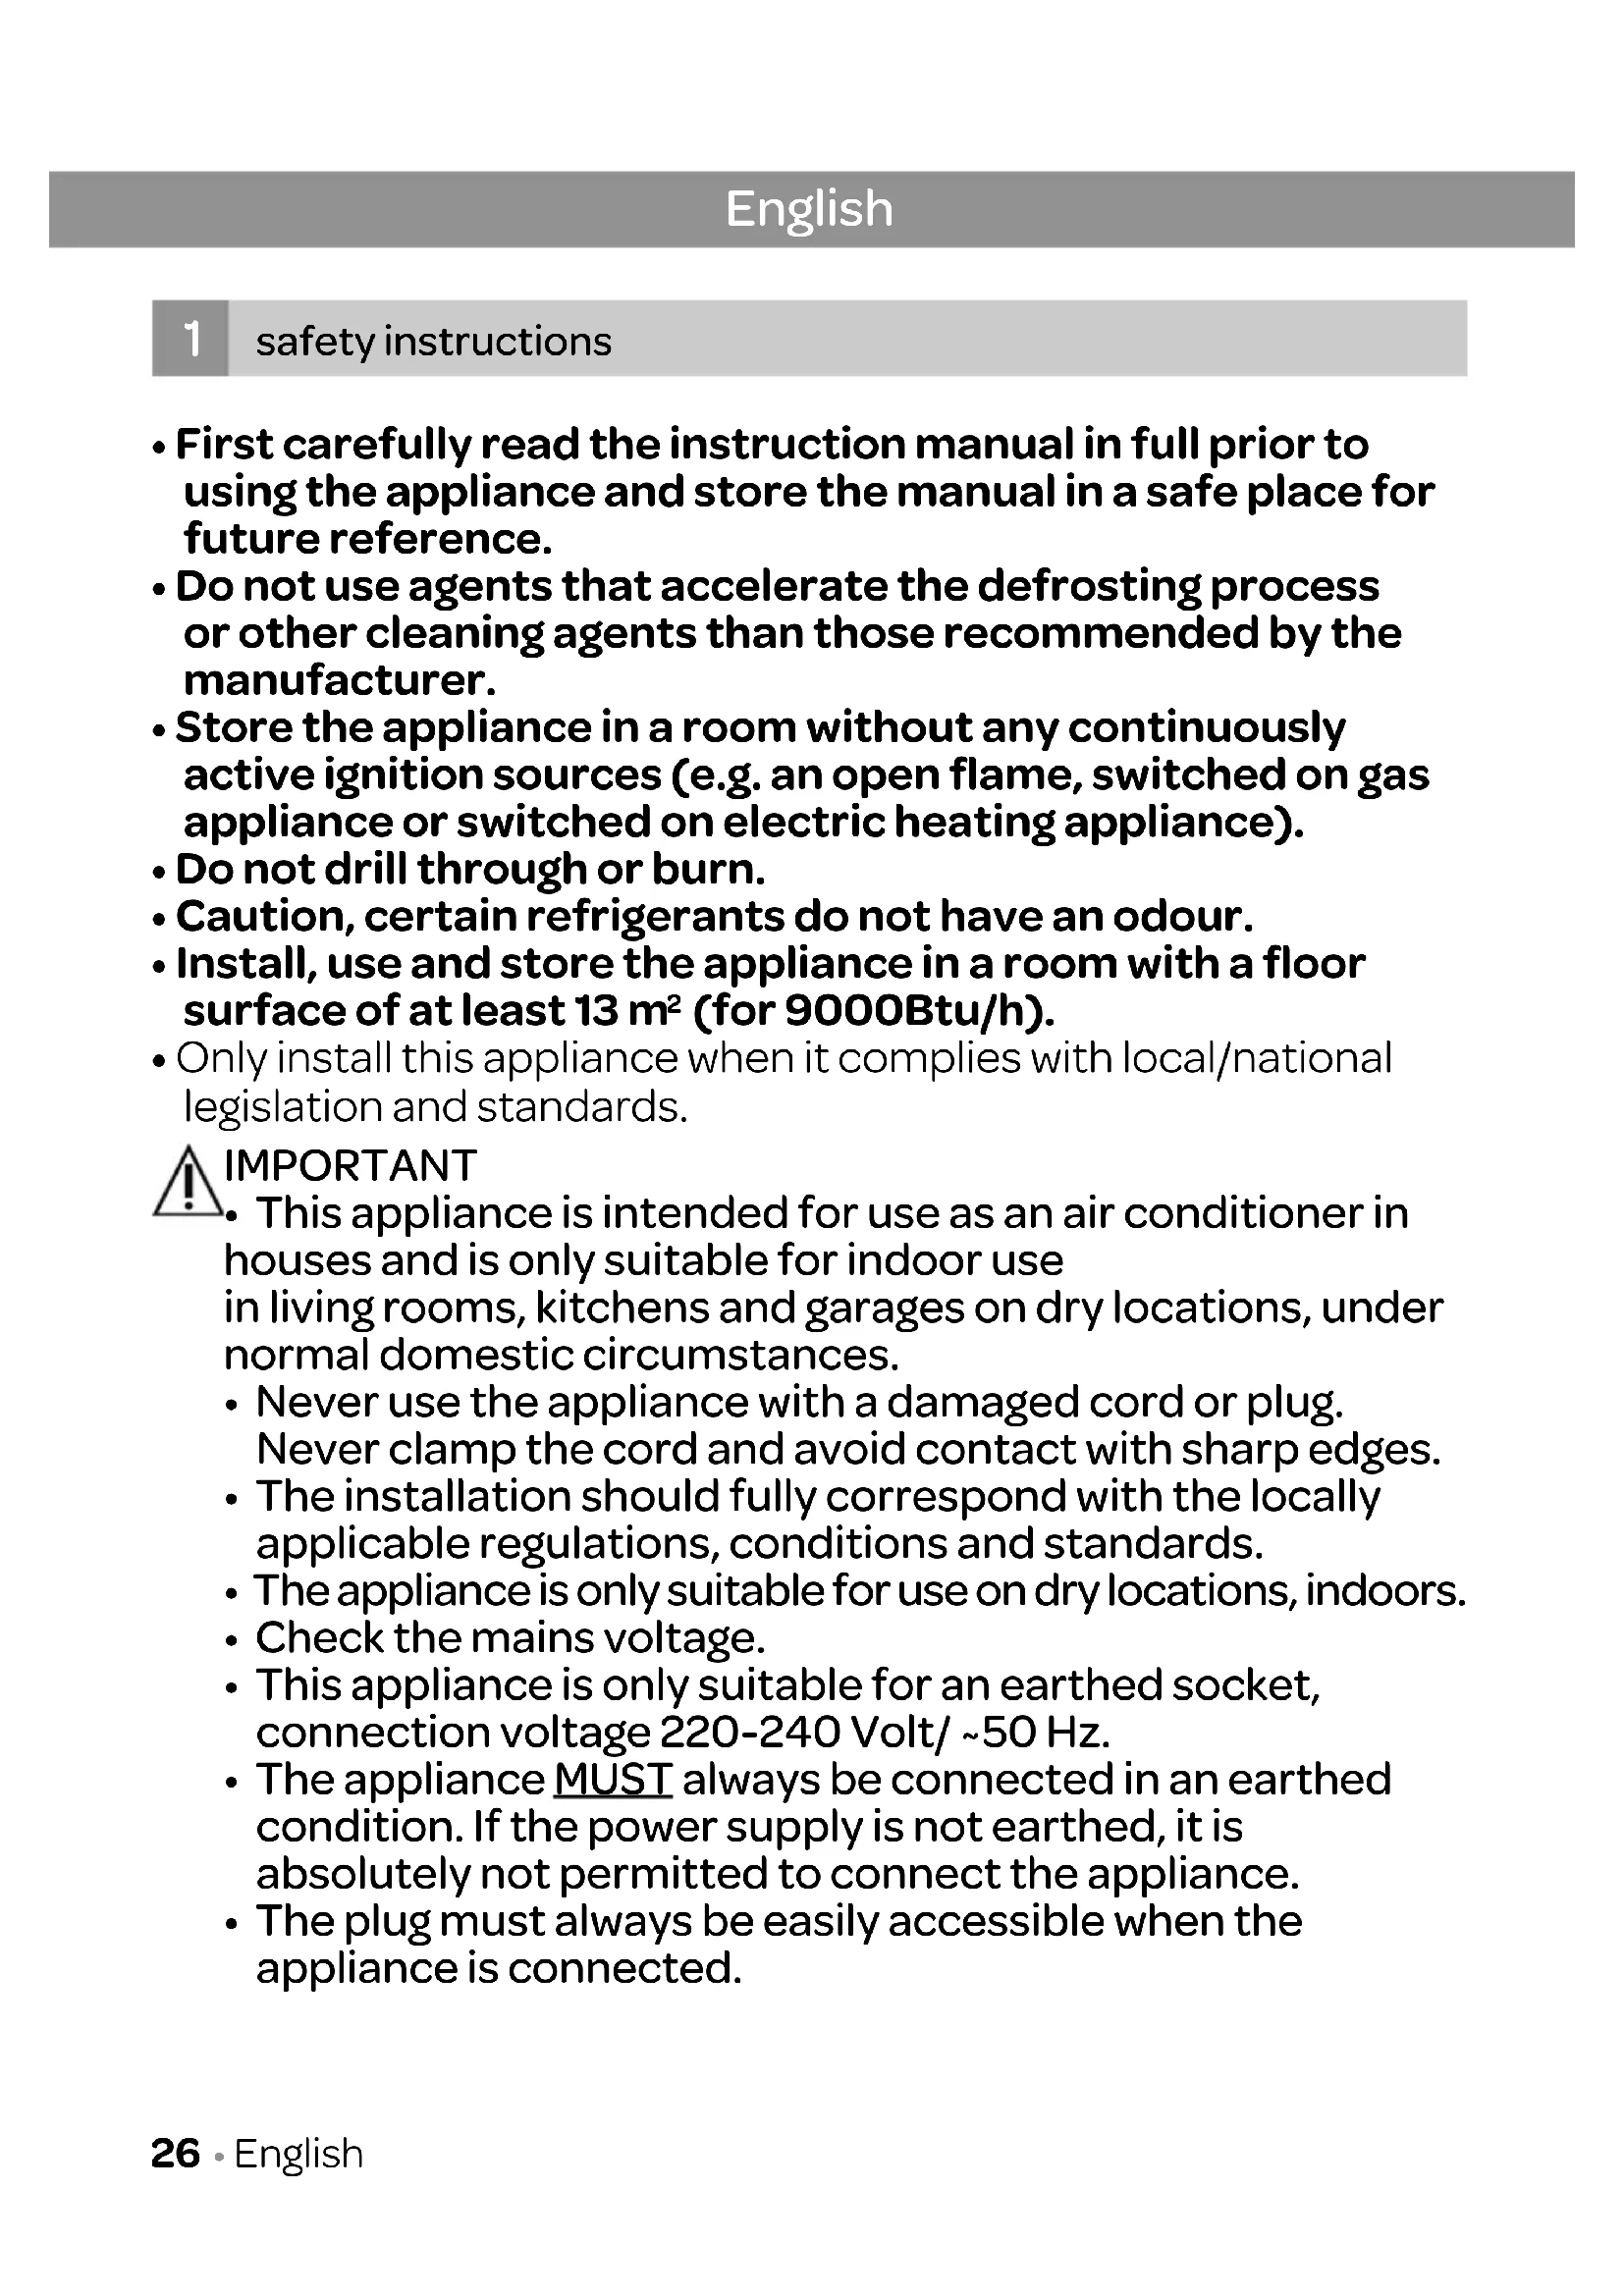
The flexible window seal set is suitable for many windows. Such as: tilt and turn windows, windows turning to the outside and inside. It ensures that you are able to hang the discharge hose to the outside, without hot air flowing indoors again or having problems with insects.
For windows turning to the outside, we recommend taping all four sides (a+b+c+d) around the window and for windows turning to the inside only three sides (a+b+c).
- Attach the supplied double-sided tape on the window frame and the window in accordance with one of the drawings below that is similar to your situation.
- Then attach the cloth to the tape that you attached in the openings.


natural_image
Close-up of a hand cleaning a wooden window frame (no text or symbols visible)
natural_image
Close-up of a hand cleaning a window frame with blurred background (no text or symbols visible)
natural_image
Close-up of a hand holding a small object near a window (no visible text or symbols)
natural_image
Close-up of a hand holding a small white object, next to a wall-mounted device (no visible text or symbols)
natural_image
Close-up of a window frame with plastic wrap, no visible text or symbols
natural_image
Interior view of a door with visible door and window, no text or symbols present
natural_image
Close-up of a hand holding a small object against a plain background (no text or symbols visible)
natural_image
Close-up of a striped fabric hanging from a window frame (no text or symbols visible)- Attach the supplied double-sided tape on the window frame.
- Then attach double-sided tape on the window.
- Cut away excess tape.
- Make sure the tapes on the corners properly overlap to achieve proper sealing.
- Attach the cloth to the tape attached to the window frame and window.
- Make sure the cloth is neatly attached to the tape on both sides.
- Zip open the cloth.
- Insert the discharge hose through the opening and zip the cloth closed to achieve proper sealing.
4 operation of the air conditioner
flowchart
graph TD
    A["7"] --> B["timer"]
    C["8"] --> D["high"]
    C --> E["med"]
    C --> F["low"]
    C --> G["auto"]
    H["9"] --> I["boxed"]
    J["10"] --> K["cool"]
    J --> L["fan"]
    J --> M["dry"]
    N["11"] --> O["sleep"]
    P["62 543"] --> Q["clock with clock icon"]
    R["+"] --> S["+"]
    T["+"] --> U["+"]
    V["+"] --> W["+"]
- Timer key [ ⏻]
- Selection key for wind speed [
- Temperature down
- Temperature up
- Function key [ ]
- ON/OFF key [ ⏻]

- Indicator light - timer
- Indicator light - ventilation speed: high/ medium / low / auto
- Display
- Indicator light - cooling / air circulation / dehumidification
- Indicator light - sleep function
In addition to cooling, the air conditioner has two other functions, i.e. air circulation and dehumidification.
The air conditioner can be operated via the control panel on the appliance and with the provided remote control.
- Choose a location near a socket.
- Insert the plug in an earthed socket.
• The temperature range of the air conditioner is: 18 to 32°C. - Check that the discharge hose is mounted correctly.
- Do not share the socket with any other appliances.
• Install the discharge hose in accordance with the figures and make sure the window is closed as much as possible.
- Press the on/off key ⏻ to switch on the air conditioner. The fins of the air outlet open automatically.
COOLING
- Press the [ ] key until indicator light - cooling - lights up. The set temperature is shown on the display.
- Press the [ + and -] keys to set the required room temperature (between 18°C and 32°C).
- Press the [ ] key to set the wind speed. There are four ventilation positions: high, medium, low and automatic.
The best temperature in the summer will be between 21 and 24^ . The speed of the fan can be sensed better on the air circulation position than on the cooling position.
DEHUMIDIFICATION
- Press the [ 🔍 ] key until the indicator light - dehumidification - lights up. In the display you can seedh
• The wind speed is on automatic and cannot be changed.
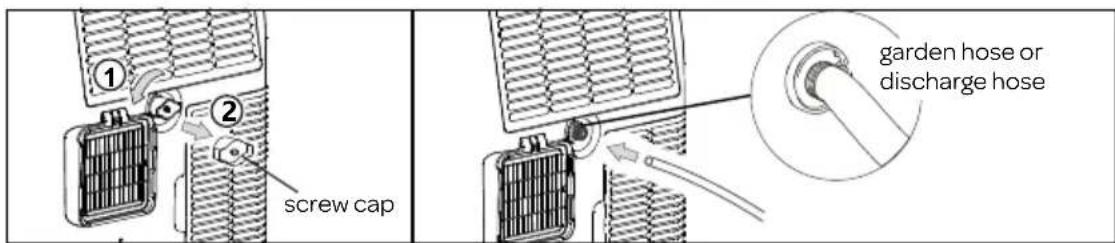
When using this position, a garden hose (not included in the delivery) or something similar must be connected to discharge condensation water.
- Unscrew the screw cap on the back of the appliance.
- Mount the end of a garden hose or a similar discharge hose to the drain and place the other end in a receptacle situated lower than the drain of the appliance, so that the condensate water can be discharged properly.
Caution:
- Condensation water may run out of the drain when the screw cap is removed and the appliance has been used in cooling mode. Keep a drip tray at hand when removing the screw cap, in order to collect the condensation water.
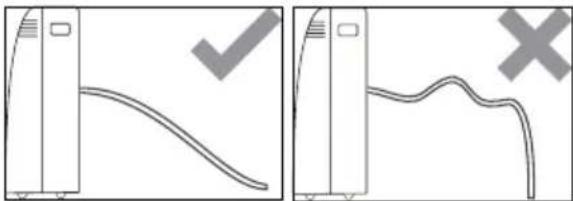
- Make sure the discharge hose for the condensation water properly descends and is not higher than the drain of the appliance.
- When using the cooling position, it is recommended to not discharge the condensation water continuously, but to close the screw cap again. In this way the appliance is able to provide its best performance.
natural_image
Two-panel diagram showing a curved line and a wavy line with checkmark and cross symbols, no readable text or labels.AIR CIRCULATION
When using this position, the air discharge hose does not have to be connected.
- Press the [ ] key until the indicator light - air circulation - lights up.
- Press the [ ] key to set the wind speed to - high, medium or low.
This is indicated on the display as follows: -- high speed, medium speed, low speed.
AUTOMATIC POSITION
When using the automatic position, the appliance automatically selects whether it should cool or circulate air. This depends on the room temperature.
- Press the [mode/ ⚙] key until the indicator light - auto - lights up. The display shows the following:

flowchart
graph LR
    A["3D Grid with directional arrows"] --> B["3D State with directional arrows"]
    B --> C["3D State with directional arrows"]
    C --> D["3D State with directional arrows"]
- It is possible to adjust the wind speed. Press the [speed/80] key to select the required wind speed.
When the room temperature is below 23°C, the appliance starts to circulate the air, and above 23°C the appliance starts to cool.
The timer function can be used to allow the appliance to switch on automatically (delayed start) or switch off automatically at a set time (automatic deactivation).
Delayed start
- Switch on the appliance and select the position you want to use.
- Switch off the appliance. The appliance remembers the last setting and will switch on at that position/temperature.
- Press the timer key ⏻ when the appliance is off and the screen will display 1-24 hours.
- Press the timer key ⏻ several times until the desired time is displayed. Wait 5 seconds until the timer is confirmed. The indicator light of the timer lights up and the timer symbol is shown in the display.
- When the set number of hours have passed, the appliance switches on automatically.
To cancel the delayed start, press the timer key once more or press the ON/OFF key.
Automatic deactivation
- Press the timer key ⏻ when the appliance is on. The display will show hours.
- Press the timer key ⏻ several times until the desired time is displayed. Wait 5 seconds until the timer is confirmed. The indicator light of the timer lights up and the timer symbol is shown in the display.
- When the set number of hours have passed, the appliance switches off automatically.
To cancel the automatic deactivation, press the timer key once more or press the ON/OFF key.
THE REMOTE CONTROL
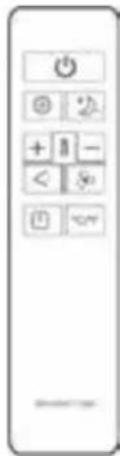
| ON/OFF key wind speed key | |||
| + | up key mode key | ||
| - | down key swing key | ||
| timer key sleep mode | |||
| °C/°F | key for temperature unit |
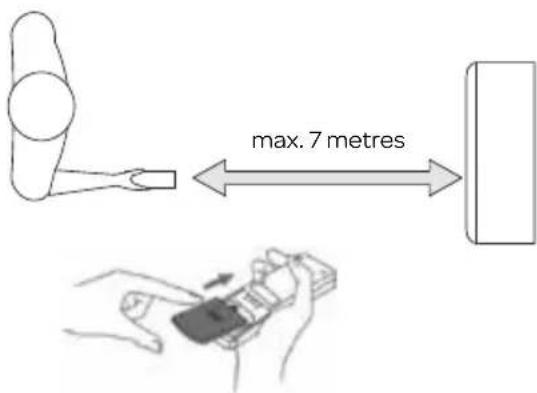
Aim the remote control to the sensor of the appliance. The range of the remote control is approx. 7 metres (without obstacles between the appliance and the remote control).
Insert the two supplied AAA 1.5 Volt batteries in the remote control, as indicated in the drawing. Do take the plus and minus symbols on the inside of the remote control into account.
Remark:
- When the remote control is being replaced or will no longer be used, remove the batteries and dispose them in accordance with applicable legislation, as they are harmful to the environment.
- Do not mix old and new batteries. Do not use a mix of alkaline, standard (carbon-zinc) or chargeable (nickel-cadmium) batteries.
- Batteries could explode or leak when exposed to open fire. Hand in batteries at a waste collection facility or recognised waste collection point.
- Remove the batteries from the remote control when the appliance is not being used for a longer period of time (winter storage) and keep them on a cool, dry place.
Other functions
The remote control can be used for the same functions as described above. Via the remote control you can control two more functions: the swing and sleep mode.
SWING MODE
By means of the swing mode you can determine the up and down movements of the fins and therefore the air flow.
- Switch on the appliance at the required position (cooling, air circulation or dehumidification).
- Press the swing key ( ) and the fins stop moving in different positions or the fins move continuously.
SLEEP MODE
Use the sleep mode when you want to use the appliance at night. Slowly the appliance starts working less and less. The display dims automatically and the wind speed is at the lowest position.
- Switch on the appliance on the - cooling - position.
- Press the sleep key 22. The display dims automatically and the wind speed goes to the lowest position.
The sleep mode maintains the optimum temperature in the room, without excessive fluctuations in temperature and air humidity, while working silently. The wind speed is always low, while room temperature and air humidity vary slightly to make sure the room remains comfortable.
The selected temperature will rise every hour by 1°C for a period of two hours. This new temperature is maintained for the next 6 hours. Then the appliance switches off automatically.
The sleep mode can be cancelled by pressing the sleep ⚡, mode or wind speed key.
When using the air circulation and dehumidification positions, it is not possible to use the sleep mode.
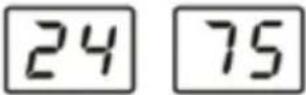
CHANGING THE TEMPERATURE UNIT CELSIUS/FAHRENHEIT
Press the °C/°F key when the appliance is stand-by to change the display of the temperature unit.
Example: if the appliance is on COOLING 24°C, the display shows 24 as indicated to the right.
When you switch on the appliance again after changing the temperature unit, the display shows 75.
5 tips for efficient use
For a maximum performance of the appliance, observe the following recommendations:
- Close the windows and doors of the rooms to be cooled. If you want to leave the appliance in a room, we recommend leaving the door slightly open (1 cm) so that a good ventilation can be provided.
- Close curtains and/or blinds to keep out the sun, so that the appliance does not have to cool as much and consumes less energy.
- Do not place anything on top of the appliance.
- Do not cover the air inlets and outlets. Make sure all grilles are uncovered.
- Ensure there are no heat sources in the room.
- Do not use the appliance in very humid rooms, such as bathrooms and laundry rooms.
- Never use the appliance outdoors.
- Make sure the appliance is placed on a flat, stable surface.
6 draining condensation water
When there is excess condensation water in the appliance, the appliance switches off automatically and F_t is shown in the display to indicate that the internal water reservoir is full. Excess condensation water can be removed as follows:
Manual discharge - when using the appliance in a room with high air humidity.
- Remove the plug from the socket.
- Place a low receptacle under the lower outlet for condensation water discharge. See the drawing.
- Remove the screw cap.
- The water flows out of the drain into the receptacle.
- Place back the screw cap when no more water is flowing out.
- Switch the appliance on again.
Continuous discharge - recommended when using the dehumidification position.
- Remove the plug from the socket.
- Remove the screw cap. Keep a drip tray at hand when removing the screw cap in order to collect the condensation water that may come out of the outlet.
- Connect the discharge hose (1/2" or 12.7 mm). See drawing.
- The water is discharged continuously via the discharge hose.
- Switch the appliance on again.
Condensation water can also be discharged as described on page 41, at section DEHUMIDIFICATION.
7 cleaning and maintenance
Before cleaning the air conditioner, switch off the appliance by means of the ON/OFF key, wait a few minutes and remove the plug from the socket.
Cleaning the exterior
Clean the exterior of the appliance with a slightly damp cloth and then wipe it with a dry cloth. If necessary, you can clean the exterior of the appliance by means of a mild washing-up liquid.
- Never wash the appliance with water. This can be dangerous.
- Do not use petrol, alcohol or similar solvents to clean the appliance.
- Never spray with insect sprays or similar agents.
- Do not use aggressive or abrasive cleaning agents for cleaning the appliance.
- Never submerge the appliance, cord or plug in water or any other liquid.
Cleaning the air filter
In order to allow the appliance to function as well as possible, we recommend cleaning the air filter every week. The air filter could get clogged with dust and dirt. Remove the air filter as shown in the drawing.
Use a vacuum cleaner to remove all the dust from the air filter. If the air filter is very dirty, you can clean it with lukewarm water.
- Submerge the air filter in lukewarm water (max. 40°C) containing a soft cleaning agent. Rinse the air filter a few times and allow it to dry in the air. Do not place the air filter in the sun or on the heating to dry it.
- Place back the air filter. Check that it is fully dry, before using the appliance again.

natural_image
Diagram of an air conditioning unit with cooling fan and heat exchanger (no text or labels)Cleaning the air inlets
In order to allow the appliance to function as well as possible, you can clean the air inlets by means of a vacuum cleaner with a soft brush nozzle.
Start or end of the season
At the start of the season, check that the cord and plug are undamaged. Observe the installation instructions when placing the appliance.
At the end of the season, make sure there is no condensation water left in the appliance. Drain the water in accordance with the instructions in section DRAINING CONDENSATION WATER and make sure the air filter is clean before storing the appliance.
8 problems and solutions
First check the following before submitting the air conditioner for repair.
| Problem Possible cause Solution | ||
| The appliance does not switch on. | ·There is a power interruption·The plug is not in the socket·The safety system is activated | ·Check the power supply·Insert the plug in the socket·Wait 30 minutes before switching the appliance on again. If the problem does not go away, contact customer service. |
| The appliance only works for a short period of time | ·The air discharge hose has a kink·The air outlet / discharge is blocked | ·Place the air discharge hose as prescribed. As short as possible and preferably without bends.·Check that the air is able to flow out freely |
| The appliance does not cool sufficiently. | ·Not all doors and windows are closed. | ·Make sure all doors and windows are closed. |
| ·There are heat sources active in the room. | ·Remove the heat sources or switch them off if possible. | |
| ·The air discharge hose has disconnected from the appliance | ·Connect the air discharge hose to the back of the appliance. | |
| ·The appliance is unsuitable for the room where it is located | ||
| The appliance has an unpleasant smell during use | • The air filter is dirty/blocked • Clean the air filter as prescribed | |
| The appliance does not switch on for a period of 3 minutes after it has been switched on. | • The internal safety system of the compressor prevents the appliance from being switched on until 3 minutes have passed since it was switched off. | |
| Display code | ||
 | • Low temperature - freeze protection • The appliance is provided with a freeze protection to prevent the formation of excess ice. The appliance automatically restarts once the thawing process has been completed. | |
 | • Probe error - sensor defective • If this code is shown on the display, please contact customer service. | |
 | • Full water reservoir • Empty the internal water reservoir. In accordance with instructions in section 6 - discharging condensation water | |
9 technical specifications
Type number AC907W
Voltage 220-240Volt \~50Hz
Connected load 1100 Watt
Cooling capacity* 9000 Btu/h (2.81 kW)
EE Class* A+
EER* 3,1
Power consumption kW 0,9
Power consumption Standby W 0,5
Current consumption nom. A 5,5
Air displacement max. m^3/h 350
Dehumidification max. ** L/24h 30
Suitable for ^3 80
Refrigerant / GWP type/gr R-290/3/260 g.
Thermostat range °C 18 - 32
Fan speeds 3
Max. noise level dB(A) 58 dB
Dimensions (hxwxd) 745 x 450 x 396 mm
Nett weight 34 kg
Protection class IPX0
Remote control ja
KÄLTEMITTEL
natural_image
Three technical line drawings of mechanical components: a cylindrical pipe fitting, a hollow rectangular housing, and a coiled spring-like structure (no text or symbols)12 1716151413

natural_image
Line drawings of a remote control device, cable cord, and cylindrical device with control panel (no text or symbols)natural_image
Close-up of a hand cleaning a wooden window frame (no text or symbols visible)
natural_image
Close-up of a hand cleaning a window frame with blurred background (no text or symbols visible)
natural_image
Close-up of a hand holding a small object near a window frame (no visible text or symbols)
natural_image
Black and white close-up of a window with plastic wrap, no visible text or symbols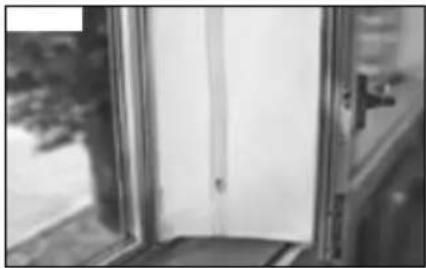
natural_image
Interior view of a vehicle with a door and window, showing no visible text or symbols
natural_image
Close-up of a hand holding a small object, labeled Abb. 7 and Abb. 8 (no other text or symbols visible)
natural_image
Close-up of a striped fabric hanging from a window frame (no text or symbols visible)natural_image
Two diagrams showing a curved line with a checkmark and an X mark, no text or symbols present.LUFTZIRKULATION
flowchart
graph LR
    A["Grid with arrowheads"] --> B["Arrow pointing inward"]
    B --> C["Arrow pointing inward"]
    C --> D["Arrow pointing inward"]
    D --> E["Arrow pointing inward"]
natural_image
Hand holding a small electronic device with a scroll wheel (no text or symbols visible)Sonstige Funktionen
natural_image
Diagram of an air conditioning unit with cooling fan and heat exchanger (no text or labels)FLUIDE RÉFRIGÉRANT
natural_image
Two technical line drawings of a cylindrical mechanical component with flanges and a rectangular housing (no text or symbols)12 1716151413
natural_image
3D illustration of a coiled tube or pipe with a vertical line extending from its tip (no text or symbols)
natural_image
Two line drawings of a rope and a cylindrical object, both without any text or symbols.
natural_image
Close-up of a hand cleaning a wooden window frame (no text or symbols visible)
natural_image
Close-up of a hand cleaning a window frame with blurred background (no text or symbols visible)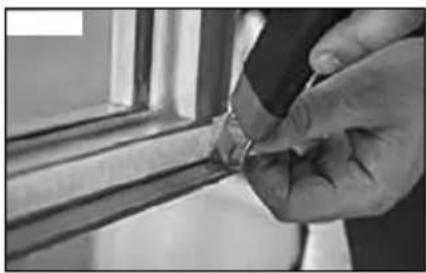
natural_image
Close-up of a hand holding a small object near a window (no visible text or symbols)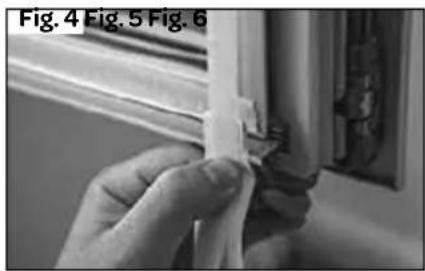
natural_image
Close-up of a hand holding a small white object, next to a wall-mounted device (no visible text or symbols)
natural_image
Close-up of a window frame with plastic wrap, no visible text or symbols
natural_image
Interior view of a door with visible door and window, no text or symbols present
natural_image
Close-up of a hand holding a small object against a plain background (no text or symbols visible)
natural_image
Close-up of a striped fabric or cushion hanging from a window frame (no text or symbols visible)natural_image
Two diagrams showing a curved line and a wavy line with a checkmark and cross symbols, no text or labels present.CIRCULATION D'AIR
natural_image
Diagram of an air conditioning unit with cooling fan and heat exchanger (no text or labels)general terms and conditions of service and warranty
We do not need to remind you of the importance of service. After all, we develop our products to a standard so that you can enjoy them for many years, without any concerns. If, nevertheless, there is a problem, we believe you are entitled to a solution straight away. Hence our products come with an exchange service, on top of the rights and claims you are entitled to by law. By exchanging a product or part, we save you time, effort and costs.
2-year full manufacturer's warranty
- Customers enjoy a 2-year full manufacturer's warranty on all Inventum products. Within this period, a faulty product or part will always be exchanged for a new model, free of charge. In order to claim under the 2-year full manufacturer's warranty, you can either return the product to the shop you bought it from or contact the Inventum costumer service department via the form at www.inventum.eu/service-aanvraag.
- The 2-year warranty period starts from the date the product is bought.
- In order to claim under the warranty, you must produce a copy of the original receipt.
- The warranty applies only to normal domestic use of Inventum products within the Netherlands.
5-year Inventum warranty
- Inventum offers a 5-year warranty on most large domestic appliances and a selection of small domestic appliances. This 5-year Inventum warranty consists of a 2-year full manufacturer's warranty, extended by a further 3-year warranty. The only thing you need to do to qualify for the 3-year extended warranty is to register the product within 45 days of purchase. You can read more about registering the product in the following paragraph.
- In accordance with the 5-year Inventum warranty provisions, a faulty product or part will always be exchanged for a new model during the first 2 years under the warranty. During the 3rd to 5th year under the warranty, you will only pay the costs of exchange. The current costs of exchange are listed at www.inventum.eu/omruilkosten.
- In order to claim under the 5-year Inventum warranty, you can either return the product to the shop you bought it from or contact the Inventum costumer service department via the form at www.inventum.eu/service-aanvraag.
- The 5-year warranty period starts from the date the product is bought.
- In order to claim under the warranty, you must produce a copy of the original receipt.
- The warranty applies only to normal domestic use of Inventum products within the Netherlands.
Product registration
- The 3-year extended warranty is easy to obtain, free of charge, by registering the product within 45 days of purchase, via the website www.inventum.eu/garantie- registratie. If you did not register the product within 45 days of purchase, you can still do so up to 2 years after the purchase date. However, there will be a charge. The one-off registration charge is € 89 for each separate product. Registration is possible only for products that are subject to the 5-year Inventum warranty. Whether the product qualifies for the 5-year Inventum warranty is stated in the product user manual and in the product information sheet, on Inventum's website.
- The warranty period always starts from the date the product is bought. If the product is registered for the extended warranty at a later date, the warranty period still starts from the original date of purchase.
- The 3-year extended warranty can only be applied for if you are in the possession of a copy of the original receipt and the Inventum 5-year warranty certificate.
Large domestic appliances
- Breakdowns or faults in large domestic appliances (separate and built-in white goods) can be registered via the form at www.inventum.eu/service-aanvraag, by calling the Inventum costumer service department or in the store where you bought the device. The telephone number of the costumer service department can be found at www.inventum.eu.
- In the event of breakdowns or faults in large domestic appliances, Inventum will have the option to have a service engineer inspect the faulty device onsite at the customer in the Netherlands and to carry out repairs, there and then. The Inventum customer service department can also decide to have the device exchanged.
- If you suffer a breakdown or fault in a large domestic appliance during the first 2 years from the date of purchase, Inventum will not charge any costs for the exchange, call-out or for parts and labour.
- If you registered the product as described before at www.inventum.eu/garantie-registratie and you subsequently report a breakdown of a large domestic appliance in the 3rd to 5th year of the date of purchase, the 5-year Inventum warranty applies and the device will be repaired or exchanged, free of charge. In the event of a repair or exchange of the device, you only pay the costs of exchange. The current costs of exchange are listed at www.inventum.eu/omruilkosten. If you did not register the product, the 3-year extended warranty does not apply.
- When reporting a breakdown or fault, a service engineer will contact the customer within 1 working day in order to make an appointment. When the report is made in a weekend or during a public holiday, this will be the next working day.
- If you report a breakdown or fault via the form at www.inventum.eu/service-aanvraag, you will be kept informed of the progress via mobile messages and e-mail.
- The warranty period starts from the date the product is bought.
94 • English
- In order to claim under the warranty, you must produce a copy of the original receipt and the Inventum 5-year warranty certificate.
- The warranty applies only to normal domestic use of Inventum products within the Netherlands.
Breakdowns or faults outside the warranty period
- Breakdowns or faults in small or large domestic appliances outside the warranty period, can be reported to the costumer services department via the form at www.inventum.eu/service-aanvraag or by calling the costumer services department.
- The costumer services department may ask you to send the product for inspection or repair. The costs of dispatch will be at your expense.
- The inspection to establish whether repair is possible involves a charge. You need to grant your permission for this, in advance.
- In the event of a large domestic appliance, Inventum, at your request, can send out a service engineer. In that case, you will be charged the call-out costs, as well as parts and labour.
- In the event of an instruction to repair, the repair costs must be paid in advance. In the event of a repair by a service engineer, the costs of the repair must be settled with the engineer onsite, preferably by means of PIN payment.
Warranty exclusions
- The following is excluded from the aforesaid warranties:
• normal wear and tear;
- improper use or misuse;
• insufficient maintenance;
- failure to comply with the operating and maintenance instructions;
- unprofessional installation or repairs by third parties or the customer himself;
• non-original parts used by the customer;
- use for commercial or business purposes;
- removal of the serial number and/or rating label.
-
In addition, the warranty does not apply to normal consumer goods, such as:
-
dough hooks, baking tins, (carbon) filters, etc.;
- batteries, bulbs, carbon filters, fat filters etc.;
• external connection cables; - glass accessories and glass parts such as oven doors;
-
and similar items.
-
Transport damage not caused by Inventum is also excluded. Therefore, inspect your new device before starting to use it. If you detect any damage, you must report this to the store where you purchased the product within 5 working days, or to the Inventum customer service department via the form at www.inventum.eu/service-aanvraag. If transport damage is not reported within this period, Inventum does not accept any liability in this respect.
-
The following are excluded from warranty and/or replacement: faults, loss of and damage to the device as a result of an event that is normally insured under the home contents insurance.
Important to know
- The replacement or repair of a faulty product, or a part thereof, does not lead to an extension of the original warranty period.
- Parts that have been replaced, packaging material and exchanged devices are taken back by the service engineer and become the property of Inventum.
- If a complaint is unfounded, all costs arising from it will be at the customer's expense.
- Following expiry of the warranty period, all costs of repair or replacement, including administration costs, dispatch and call-out charges, will be charged to the customer.
- Inventum cannot be held liable for damage as a result of devices built in incorrectly.
- Inventum cannot be held liable for damage caused by external events, unless this liability arises from mandatory statutory provisions.
- These warranty and service provisions are governed by Dutch law. Disputes will be settled exclusively by the competent Dutch court.
instagram.com/inventum1908

facebook.com/inventum1908

youtube.com/inventum1908
- Deutsch
- KOELMIDDEL
- LUCHTCIRCULATIE
- Opmerking:
- safety instructions
- IMPORTANT
- CAUTION! • Never cl
- WARNING
- Specific information for appliances with R290 refrigerant gas.
- REFRIGERANT
- Specific information regarding appliances with R290/R32 refrigerant gas
- 9) Checks to electrical devices
- Repairs to sealed components (Annex DD.4)
- Repair to intrinsically safe components (Annex DD.5)
- Cabling (Annex DD.6)
- Detection of flammable refrigerants (Annex DD.7)
- Leak detection methods (Annex DD.8)
- Removal and evacuation (Annex DD.9)
- Charging procedures (Annex DD.10)
- Decommissioning (Annex DD.11)
- Labelling (Annex DD.12)
- Recovery (Annex DD.13)
- product description
- 3
- before using for the first time
- PLACEMENT OF THE AIR CONDITIONER
- INSTALLATION OF THE WINDOW SEAL SET
- operation of the air conditioner
- COOLING
- DEHUMIDIFICATION
- Caution:
- AIR CIRCULATION
- AUTOMATIC POSITION
- Delayed start
- Automatic deactivation
- THE REMOTE CONTROL
- Remark:
- Other functions
- SWING MODE
- SLEEP MODE
- CHANGING THE TEMPERATURE UNIT CELSIUS/FAHRENHEIT
- tips for efficient use
- draining condensation water
- cleaning and maintenance
- Cleaning the exterior
- Cleaning the air filter
- Cleaning the air inlets
- Start or end of the season
- problems and solutions
- technical specifications
- KÄLTEMITTEL
- LUFTZIRKULATION
- Sonstige Funktionen
- FLUIDE RÉFRIGÉRANT
- CIRCULATION D'AIR
- general terms and conditions of service and warranty
- 2-year full manufacturer's warranty
- 5-year Inventum warranty
- Product registration
- Large domestic appliances
- • English
- Breakdowns or faults outside the warranty period
- Warranty exclusions
- Important to know
Brand : INVENTUM
Model : AC907W
Category : Air Conditioning