
Accent Module - Keyboard M-AUDIO - Free user manual and instructions
Find the device manual for free Accent Module M-AUDIO in PDF.
| Product Type | Sound Module (Expander) |
| Brand | M-Audio |
| Model | Accent Module |
| Power Supply | 12 V DC, 2 A, center-positive plug |
| USB Port | Type B for MIDI controller and firmware update |
| MIDI Input | 5-pin DIN |
| Main Outputs | 2 x 6.35 mm balanced (line level) |
| Auxiliary Input | 3.5 mm stereo jack |
| Headphone Output | 6.35 mm stereo jack |
| Number of Presets | 32 |
| Operating Modes | Multi (splits and layers) and Piano |
| Instruments | 20 (assignable to keys) |
| Assign Buttons | 8 (B1 to B8) with color LEDs |
| Sliders | 8 (Part 1-3, Reverb, Chorus, Bass, Mid, Treble) + Master |
| Screen | Backlit LCD |
| Button Colors | 13 available (green, blue, red, etc.) |
| MIDI Compatibility | MIDI Input, response to CC, PC, Notes |
| Firmware Update | Via USB flash drive on USB port |
| Maintenance | Clean with a dry, soft cloth |
| Safety | Use only the included adapter; do not expose to moisture |
Frequently Asked Questions - Accent Module M-AUDIO
User questions about Accent Module M-AUDIO
0 question about this device. Answer the ones you know or ask your own.
Ask a new question about this device
Download the instructions for your Keyboard in PDF format for free! Find your manual Accent Module - M-AUDIO and take your electronic device back in hand. On this page are published all the documents necessary for the use of your device. Accent Module by M-AUDIO.
USER MANUAL Accent Module M-AUDIO
User Guide (English)
Introduction
Box Contents
Accent Module
Power Adapter
User Guide
Safety & Warranty Manual
Support
For the latest information about this product (system requirements, compatibility information, etc.) and product registration, visit m-audio.com.
For additional product support, visit m-audio.com/support.
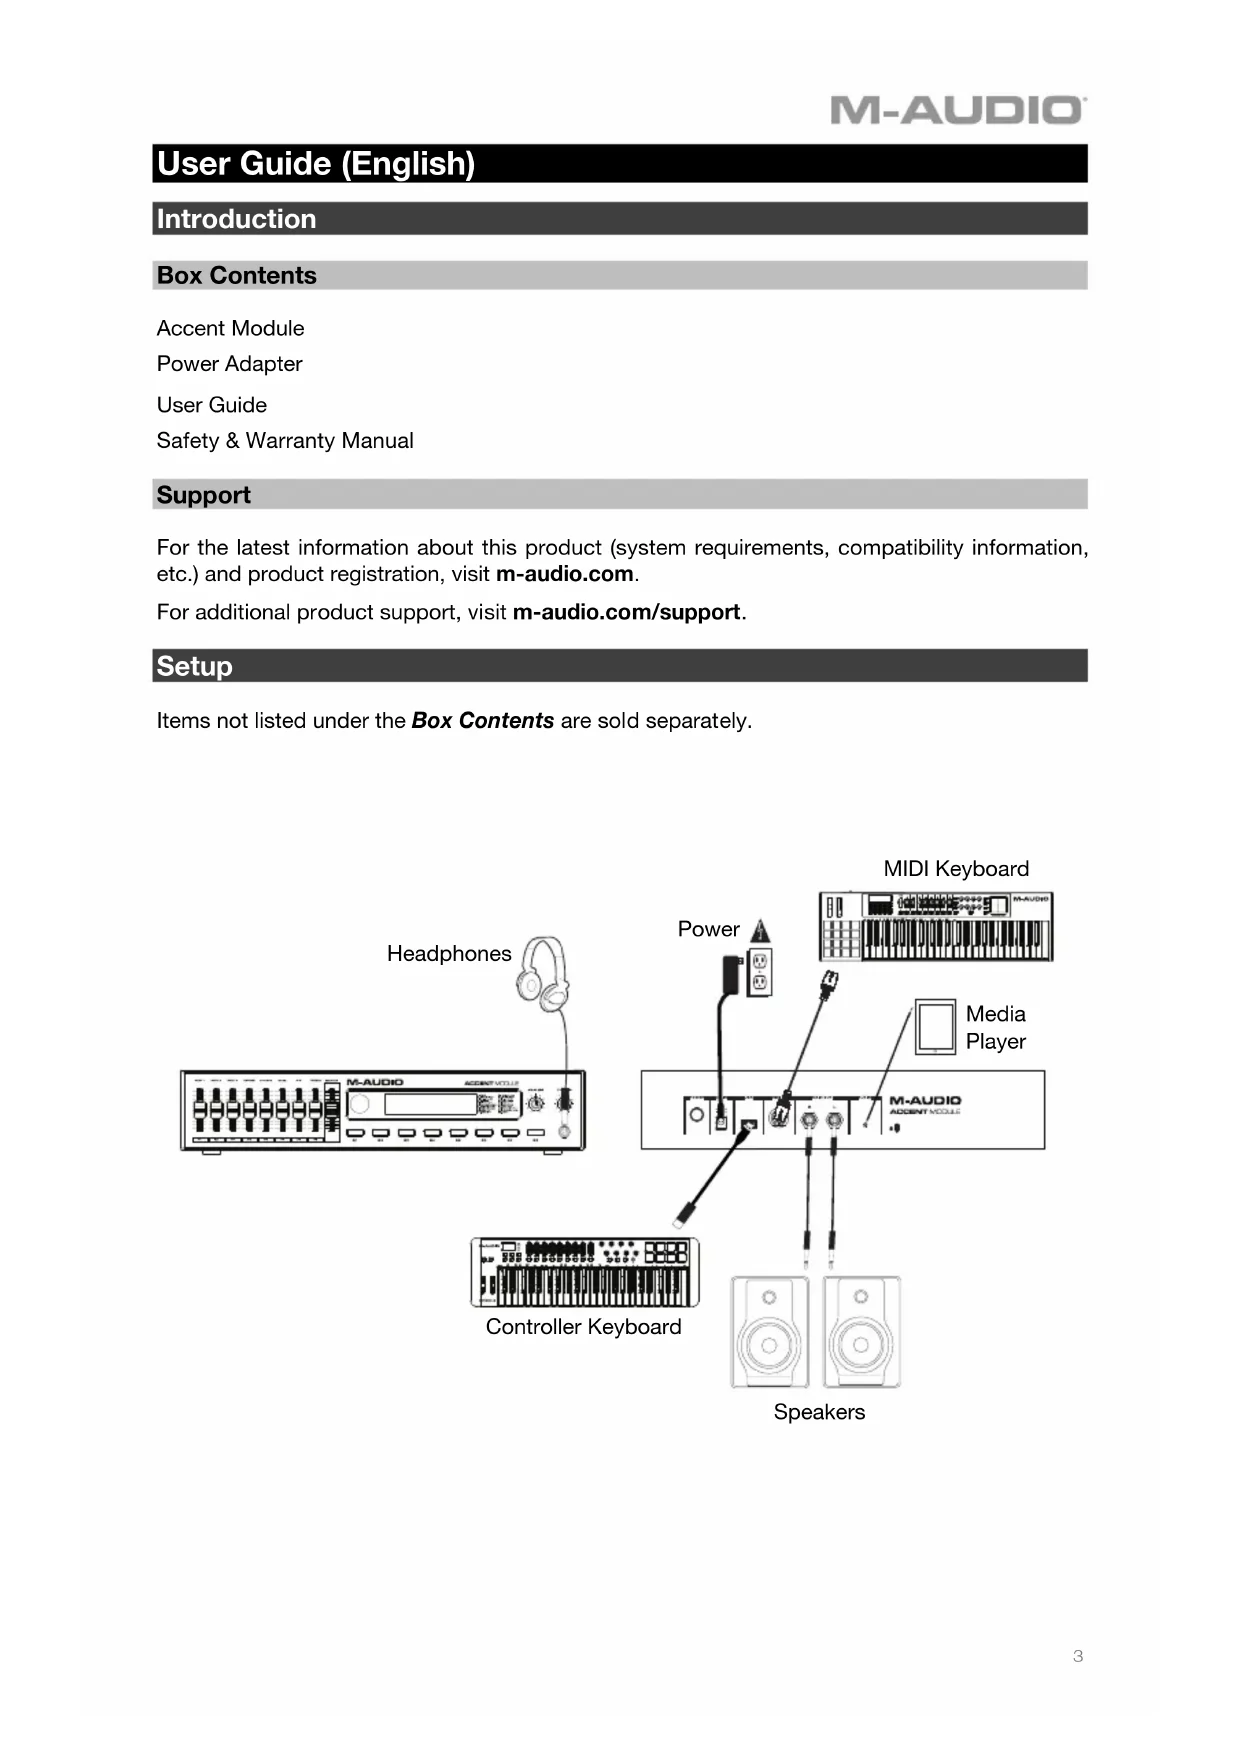
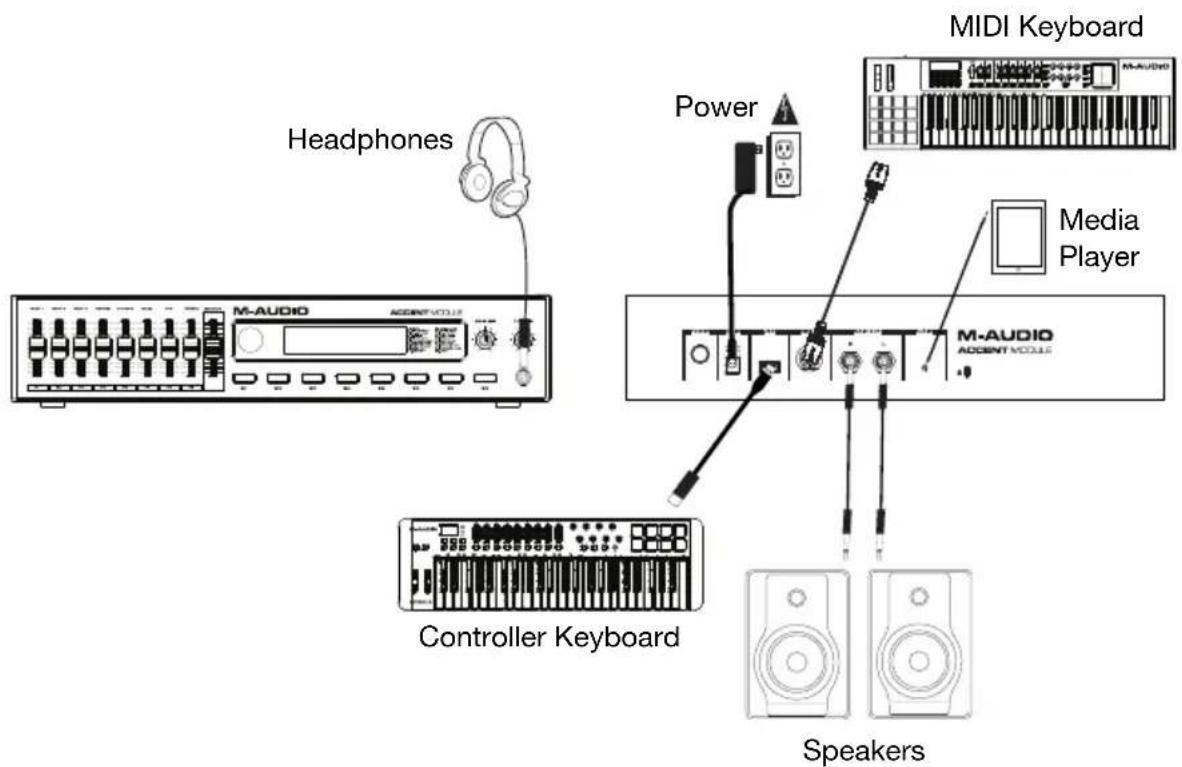
Setup
Items not listed under the Box Contents are sold separately.
Features
Top Panel
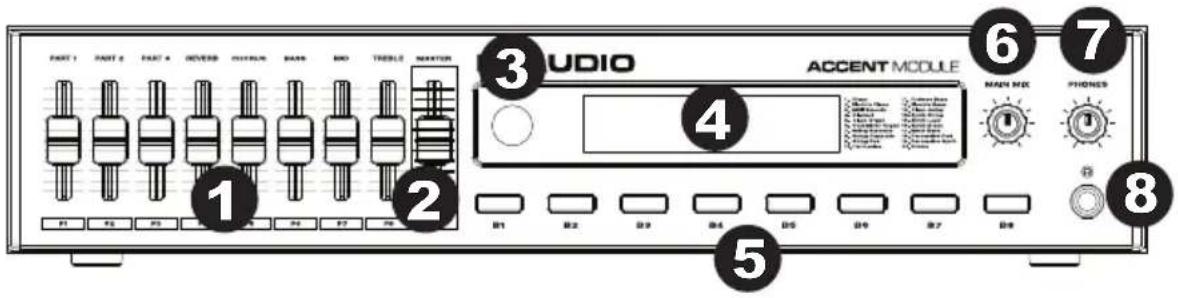
- Sound Engine Controls: Move these faders to control different parameters of the sound module. If there is a change to a parameter from an external MIDI controller and the fader is no longer aligned with the parameter value, this fader will "catch up" when moved to avoid sudden changes. Sound engine Control Change messages can also be sent over MIDI.
The values controlled by the faders are as follows:
Part 1 Volume
Part 2 Volume
Part 3 Volume
Reverb
Chorus
Bass
Mid
Treble
- Master Volume: Move this fader to control the master volume of the sound module. Volume changes can also be sent over MIDI (CC 07). If there is a change to this parameter from an external controller and the fader is no longer aligned with the parameter value, this fader will "catch up" when moved to avoid sudden changes.
- Rotary Knob: Turn this knob to navigate through the menus on the display. Press the knob to go into different menus or confirm changes.
- Display: Shows all the parameters and values related to the currently selected operation and mode of the sound module.
- Part Buttons: Assign one of 20 different instruments to these buttons to quickly access your favorite sounds, activate layers, or splits.
- Main Mix: This knob adjusts the main volume for the sound mix, after you have set the volume for the Parts and the Master Volume control.
- Headphone Volume: This knob adjusts the volume for the headphone output.
- Headphone Output: Connect stereo headphones with a 1/4'' (6.35 mm) stereo phone plug.
Rear Panel
- Power Button: Press and hold this button to turn the Accent Module's power on or off.
- Power Input: Connect the included power adapter (12V DC, 1A, center-positive) here.
- USB Port: Connect to a USB MIDI
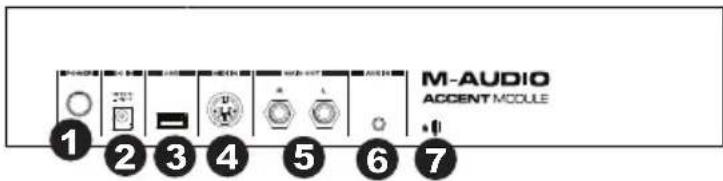
controller keyboard to play the sounds on the Accent Module. Also, connect a USB thumb drive here to update the Accent Module. See m-audio.com to check for updates.
- MIDI In: Connect this to the MIDI output of an external MIDI keyboard using a standard MIDI cable.
- Main Out (Balanced 1/4" / 6.35 mm): These 1/4" (6.35 mm) line-level outputs can be connected to powered speakers or an amplifier system.
- Aux Input: Use a 1/8'' (3.5 mm) stereo cable to connect an external audio source here, such as a drum machine, media player, or CD player.
- Kensington Lock: Use this port to attach a security cable to the Accent Module.
Home Screen
The Home Screen consists of the following:
[Preset]
Preset Parameter: Turn the Rotary knob to scroll through the 32 Presets. Press the Rotary knob to enter that preset and edit its settings. A Preset can have up to a 9-digit alpha/numeric name.
Preset Edit Screen
| ↑ [Home] | [Mode] |
| Edit | Save as... |
Mode Parameter: Mode shows the name of the current mode, Multi or Piano. Multi mode allows you to assign multiple instruments/parts to buttons and faders. In Multi mode you can also set splits (different instruments assigned to different sections of your keyboard's keybed) and layers (assigning multiple instruments/parts to be played by only pressing one key). In Piano mode, you can only edit the MIDI assignments of Reverb, Chorus, Bass, Mid, and Treble to the faders.
When the mode parameter is highlighted (the mode will blink), change the mode by turning the Rotary knob. When your desired mode is displayed, press the Rotary knob to select that mode.
Edit (Multi mode)
| ↑ [Back] | |
| Button | Fader |
Edit (Piano mode)
| ↑ [Back] | Fader[xx] |
| Chn[xx] | More... |
Save As...
| ↑ [Back] | Slot[xx] |
| [Preset Name] | Save |
Clicking Save will save all parameters into a Preset.
Preset Name: Preset Name will display the name of the current Preset. A Preset can have up to a 9-digit alpha/numeric name.
Slot[xx]: Save Slot will display the preset number you are saving to.
Operation
Selecting Presets
- Turn the Rotary knob to scroll through the Presets. The display will show the current Preset name.
- Press the Rotary knob to edit a Preset.
Changing Presets Using MIDI Messages
Presets can be selected using MIDI Program Change messages. Using General MIDI, you can select from the 32 Presets by sending a Program Change message.
For example, to change to Preset Slot 8, select:
- Program Change 8 (Presents are numbered 1-32)
The Accent Module will respond to program changes on all channels and ports.
Program Changes 1-32 = Preset 1-32
Program Changes 33-64 = Preset 1-32
Program Changes 65-96 = Preset 1-32
Program Changes 97-00 = Preset 1-32
Saving Presets
| ↑ [Back] | Slot[xx] |
| [Preset Name] | Save |
Follow these steps to save changes made to a Preset:
- Turn the Rotary knob to scroll to highlight Save As... from the Preset Edit screen, and press the Rotary knob to select it.
- In the Slot[xx] field, press the Rotary knob and turn the Rotary knob to select which one of the 32 locations that the current Preset will be saved over.
- Highlight the Preset Name field. Press the Rotary knob and turn the Rotary knob to select each value/letter by cycling through the alpha/numeric characters.
- Scroll with the Rotary knob to highlight the Save field and press the Rotary knob to save to that Slot location.
Note: This will save all current name, instrument, button, and fader settings. - Select to return to the previous menu.
Editing Buttons
The Button menu will appear as below:
| ↑ [Back] | [B1] |
| [Instrument] | More... |
| ↑ [Back] | Pt[1] |
| [Color] | More... |
| ↑ [Back] | |
| MIDI | Save |
Assigning an Instrument to a Button
- On the Preset Edit screen, scroll with the Rotary knob to highlight Edit and press the Rotary knob to enter the Edit menu.
- On the Edit page, go into the Button menu and select a specific button by scrolling with the Rotary knob to highlight the button value, then press in the Rotary knob and scroll through the button values (B1-B8). Alternatively, press the associated button on the front panel to select the button. Scrolling through the button values will illuminate the corresponding LED on the front panel. For example, if B2 is selected, B2 will be lit solid.
- Once you've selected the button you would like to assign the instrument to, select "Instrument" and scroll through 1 of the 20 instruments. If an instrument is already assigned to another button, an asterisk will appear next to its listing. It is not possible to load the same instrument onto multiple buttons. If "Off" is displayed, this means that no instrument is loaded on that button.
Assigning a Color to a Button
- On the Preset Edit screen, scroll with the Rotary knob to highlight Edit and press the Rotary knob to enter the Edit menu.
- On the Edit page, go into the Button menu and select the active button that you would like the color assigned to by scrolling with the Rotary knob to highlight the button value, then press in the Rotary knob and scroll through the button values (B1-B8). Alternatively, press the associated button on the front panel to select the button. Scrolling through the button values will illuminate the corresponding LED on the front panel. For example, if B2 is selected, B2 will be lit solid.
- Select the More... field.
- Scroll with the Rotary knob to highlight the Color field. Press the Rotary knob and scroll with the Rotary knob to select the color to assign to the button (13 colors are available). If a color is already assigned to another button, an asterisk will appear next to the name. It is possible to load the same color onto multiple buttons.
Colors:
Lt Green
Green
Turquoise
Cyan
Azure
Blue
Purple
Pink
Rose
Red
Orange
Yellow
White
Assigning a Part to a Button
In the Preset Edit menu, Parts can be assigned to buttons, allowing you to press a button on your keyboard controller to activate/deactivate specific Parts. Assigning a Part to a button allows for layering, splits, or quickly changing instruments at the press of a button.
- On the Preset Edit screen, scroll with the Rotary knob to highlight Edit and press the Rotary knob to enter the Edit menu.
- On the Edit page, go into the Button menu and select the active button that you would like. Edit the Part # assignment by scrolling with the Rotary knob to highlight the current button value, then press in the Rotary knob and scroll through the button values (B1-B8). Alternatively, press the associated button on the front panel to select the button. Scrolling through the button values will illuminate the corresponding LED on the front panel. For example, if B2 is selected, B2 will be lit solid.
- Select the More... field.
-
Scroll with the Rotary knob to highlight the Pt field. Press the Rotary knob and select the part to assign to the button. The part options are:
-
Pt1-Pt3: This assigns the Instrument/voice and button to that part. This means that the voice's volume will be controlled by that specific Part #'s Part fader. If another voice is assigned to the same part number, an asterisk will appear next to it. Only one part with the same Part # can be selected and played at a time, so if another button/voice is assigned to the same part, the new part will be selected, and the previous part will be deselected.
- PtAuto: This assigns the Instrument/voice and button to that part. This means that the voice's volume will be controlled by the individual Part fader. However, instead of the button always being locked to a specific Part # (and its associated fader), the button's Part # (and its associated fader) will be assigned automatically, in order of when the part is selected, among the parts that are assigned to Auto. The first part selected will become Part 1, the second, Part 2, and the third, Part 3. It will then cycle back to Part 1.
Note: If PtAuto is deselected and it's assigned to Pt2 or Pt3, then the next PtAuto button that's activated will be assigned to the unactive Pt (2 or 3).
- Select Save with the Rotary knob, then press the Rotary knob to save all the Button menu parameters to the current Preset.
Assigning Buttons to Respond to MIDI CCs
In the MIDI menu, buttons can be assigned to respond to a specific MIDI CC value, allowing you to press a button on your keyboard controller to activate/deactivate specific buttons. This allows you to change instruments, enable/disable splits, and enable/disable layers.
| ↑ [Back] | CC[xxx] |
| Chn[xx] | More... |
| ↑ [Back] | LoNt[xx] |
| HiNt[xx] | Save |
- On the Home Screen, scroll with the Rotary knob to highlight Edit and press the Rotary knob to enter the Edit menu.
- Select the Button field.
- In the Button Edit page, select the active Button that you would like to edit the MIDI assignments of by selecting "Button:B#"
- Select the More... field.
- On the Color/Part # selection page, select More...
- Select the MIDI field.
- Scroll with the Rotary knob to highlight the Chn field and select the MIDI channel that the button will respond to, All (being all MIDI channels 1-16).
- Scroll with the Rotary knob to highlight the CC field and select the CC number that the button will respond to, 0-127* or Learn (LRN).
Note: When Learn is selected, it will blink and display the incoming MIDI signal being received. Once your desired CC number is displayed, press the Rotary knob to confirm the CC number.
- Select the More... field.
- Scroll with the Rotary knob to highlight Save and press in the knob to save all of the parameters on that page to the current Preset.
*CC 01 is unable to be assigned, since it's permanently assigned to the Mod Wheel.
*CC 07 is unable to be assigned, since it's permanently assigned to the Master Fader.
*CC 64 is unable to be assigned, since it's permanently assigned to the Sustain Pedal.
Assigning Splits and Layers
The MIDI menu is used to define the MIDI parameters that a voice will respond to and also set up splits or layers. The menu will be displayed as below:
| ↑ [Back] MIDI | Save |
| ↑ [Back] | CC[xxx] |
| Chn[xx] | More... |
| ↑ [Back] | LoNt[xx] |
| HiNt[xx] | Save |
Splits:
- Using the Edit menu, select the button/voice you would like to assign to a section of the keybed (please see Assigning an Instrument to a Button section).
- Select the More... field.
- On the Color/Part # selection page, select More... and then select MIDI to enter the MIDI menu.
- Scroll with the Rotary knob to highlight the LoNt field and select the lowest note that the part/voice will play, between A0 and C8 (the note and octave). For example, select C3. You can also select Learn (LRN) and select the lowest note that the part/voice will play by pressing a key on your MIDI controller, between A0 and C8 (the note and octave).
Note: When Learn is selected, it will blink and display the Note and Octave that is being received. Once your desired Note and Octave is displayed, press the Rotary knob to confirm the Note and Octave.
Note: This cannot be a higher note than the Hi parameter.
- Scroll with the Rotary knob to highlight the HiNt field and select the highest note that the part/voice will play, between A0 and C8 (the note and octave). For example, select G3. You can also select Learn (LRN) and select the highest note that the part/voice will play by pressing a key on your MIDI controller, between A0 and C8 (the note and octave).
Note: When Learn is selected, it will blink and display the Note and Octave that is being received. Once your desired Note and Octave is displayed, press the Rotary knob to confirm the Note and Octave.
Note: This cannot be a lower note than the Lo parameter.
- Using the Edit menu, select the second button/voice you would like to assign to a section of the keybed (please see Assigning an Instrument to a Button section).
- Select the More... field.
- On the Color/Part # selection page, select More... and then select MIDI to enter the MIDI menu.
- Scroll with the Rotary knob to highlight the LoNt field and select the lowest note that the part/voice will play, between A0 and C8 (the note and octave). For example, select C4. You can also select Learn (LRN) and select the lowest note that the part/voice will play by pressing a key on your MIDI controller, between A0 and C8 (the note and octave).
Note: When Learn is selected, it will blink and display the Note and Octave that is being received. Once your desired Note and Octave is displayed, press the Rotary knob to confirm the Note and Octave.
Note: This cannot be a higher note than the Hi parameter.
- Scroll with the Rotary knob to highlight the HiNt field and select the highest note that the part/voice will play, between A0 and C8 (the note and octave). For example, select G4. You can also select Learn (LRN) and select the highest note that the part/voice will play by pressing a key on your MIDI controller, between A0 and C8 (the note and octave).
Note: When Learn is selected, it will blink and display the Note and Octave that is being received. Once your desired Note and Octave is displayed, press the Rotary knob to confirm the Note and Octave.
Note: This cannot be a lower note than the Lo parameter.
- Scroll with the Rotary knob to highlight Save and press in the Rotary knob to save all of the parameters on that page to the current Preset.
Layers:
- Using the Edit menu, select the button/voice you would like to assign to a section of the keybed (please see Assigning an Instrument to a Button section).
- Select the More... field.
- On the Color/Part # selection page, select More... and then select MIDI to enter the MIDI menu.
- Scroll with the Rotary knob to highlight the LoNt field and select the lowest note that the part/voice will play, between A0 and C8 (the note and octave). For example, select C3. You can also select Learn (LRN) and select the lowest note that the part/voice will play by pressing a key on your MIDI controller, between A0 and C8 (the note and octave).
Note: When Learn is selected, it will blink and display the Note and Octave that is being received. Once your desired Note and Octave is displayed, press the Rotary knob to confirm the Note and Octave.
Note: This cannot be a higher note than the Hi parameter.
- Scroll with the Rotary knob to highlight the HiNt field and select the highest note that the part/voice will play, between A0 and C8 (the note and octave). For example, select G3. You can also select Learn (LRN) and select the highest note that the part/voice will play by pressing a key on your MIDI controller, between A0 and C8 (the note and octave).
Note: When Learn is selected, it will blink and display the Note and Octave that is being received. Once your desired Note and Octave is displayed, press the Rotary knob to confirm the Note and Octave.
Note: This cannot be a lower note than the Lo parameter.
- Using the Edit menu, select the second button/voice you would like to assign to the same section of the keybed (please see Assigning an Instrument to a Button section).
- Select the More... field.
- On the Color/Part # selection page, select More... and then select MIDI to enter the MIDI menu.
- Scroll with the Rotary knob to highlight the LoNt field and select the same note as the lowest note that the part/voice is assigned to in Step 3 (C3).
Note: This cannot be a higher note than the Hi parameter.
- Scroll with the Rotary knob to highlight the HiNt field and select the same note as the highest note that the part/voice is assigned to in Step 4 (G3).
Note: This cannot be a lower note than the Lo parameter.
- Scroll with the Rotary knob to highlight Save and press the Rotary knob to save all of the parameters on that page to the current Preset.
Assigning Faders to Respond to MIDI CCs
Faders can be used to adjust part/voice volumes, Reverb, Chorus, EQ, and Master Volume*. The Fader menu allows you to assign the Accent Module faders to be controlled by the faders on your MIDI controller.
*Master Volume is permanently assigned to MIDI CC 07.
The Fader menus will appear like below:
| ↑ [Back] | Fader[xx] |
| Chr [xx] | More... |
| ↑ [Back] | Hi [xxx] |
| Lo [xx] | More... |
| ↑ [Back] | |
| CC [xxx] | Save |
To assign a CC and its range to a fader, follow the procedure below:
- Using the Edit menu, select the Fader field.
- Scroll with the Rotary knob to highlight the Fader[xx] field and select which fader to edit.
- Scroll with the Rotary knob to highlight the Chn[xx] field to select what MIDI channel the slider will respond to, 1-16 and All.
- Select the More... field.
- Scroll with the Rotary knob to highlight the Hi[xxx] field to select the top range/maximum range of the slider from 0-127. If this number is lower than the 'Lo' setting, the slider will work in reverse.
- Scroll with the Rotary knob to highlight the Lo[xxx] field to select the bottom range/minimum range of the slider from 0-127. If this number is higher than the 'Hi' setting, the slider will work in reverse.
- Select the More... field.
- Scroll with the Rotary knob to highlight the CC[xxx] field to select the current CC number, 0-127* or Learn (LRN), that the fader is assigned to.
Note: When Learn is selected, it will blink and display the incoming MIDI signal being received. Once your desired CC number is displayed, press the Rotary knob to confirm the CC number.
- Scroll with the Rotary knob and highlight the Save field to save all parameters for the selected slider to the current Preset.
*CC 01 is unable to be assigned, since it's permanently assigned to the Mod Wheel.
*CC 07 is unable to be assigned, since it's permanently assigned to the Master Fader.
*CC 64 is unable to be assigned, since it's permanently assigned to the Sustain Pedal.
Permanently Assigned MIDI CC Values
MIDI CC 01 is permanently assigned to the Mod Wheel.
MIDI CC 07 is permanently assigned to the Master Fader.
MIDI CC 64 is permanently assigned to the Sustain Pedal.
Resetting to Default Settings
Press and hold Buttons 7 and 8 while powering on the unit to restore the factory defaults.
Note: This will permanently erase any custom settings that you have made.
Assistance technique
Edit (modality Multi)
| ↑ [Back] (indietro) | |
| Button | Fader |
Program Changes 1-32 = Preset 1-32
Program Changes 33-64 = Preset 1-32
Program Changes 65-96 = Preset 1-32
Program Changes 97-00 = Preset 1-32
These are the 20 built-in sounds in the Accent Module to select from:
- Piano
- E. Piano (Electric Piano)
- MKII Smth (MKII Smooth)
- Clavinet
- CIn Organ (Clean Organ)
- Ovd Organ (Overdriven Organ)
- String St (String Staccato)
- String Pz (String Pizzicato)
- String Pd (String Pad)
- Harmonica
- Fls Bass (Fretless Bass)
- E. Bass (Electric Bass)
- CIn Gtr (Clean Guitar)
- Synth Str (Synth String)
- Synth Ld (Synth Lead)
- Synth Brs (Synth Brass)
- Synth Bs (Synth Bass)
- Perc Pad (Percussive Pad)
- Perc Syn (Percussive Synth)
- Drums
Preset List
These are the 32 factory default presets which are completely editable:
- Piano
- E. Piano (Electric Piano)
- MKII Smth (MKII Smooth)
- Clavinet
- CIn Organ (Clean Organ)
- Ovd Organ (Overdriven Organ)
- String St (String Staccato)
- String Pz (String Pizzicato)
- String Pd (String Pad)
- Harmonica
- Fls Bass (Fretless Bass)
- E. Bass (Electric Bass)
- CIn Gtr (Clean Guitar)
- Synth Str (Synth String)
- Synth Ld (Synth Lead)
- Synth Brs (Synth Brass)
- Synth Bs (Synth Bass)
- Perc Pad (Percussive Pad)
- Perc Syn (Percussive Synth)
- Drums
- 32.
Technical Specifications
| Voices (Sounds) | 20 |
| Preset Locations | 32 |
| Assignable Button Colors | 13 |
| Power | 12V DC, 1A, center-positive |
| Dimensions (width x depth x height) | 14.35” x 5.75” x 3.25” 36.4 cm x 14.6 cm x 8.3 cm |
| Weight | 3.6 lbs. 1.6 kg |
Specifications are subject to change without notice.
Trademarks and Licenses
M-Audio is a trademark of inMusic Brands, Inc., registered in the U.S. and other countries.
All other product or company names are trademarks or registered trademarks of their respective owners.
m-audio.com

- User Guide (English)
- Introduction
- Box Contents
- Support
- Setup
- Features
- Top Panel
- Rear Panel
- Home Screen
- Preset Edit Screen
- Operation
- Selecting Presets
- Changing Presets Using MIDI Messages
- Saving Presets
- Editing Buttons
- Assigning an Instrument to a Button
- Assigning a Color to a Button
- Colors:
- Assigning a Part to a Button
- Assigning Buttons to Respond to MIDI CCs
- Assigning Splits and Layers
- Splits:
- Layers:
- Assigning Faders to Respond to MIDI CCs
- Permanently Assigned MIDI CC Values
- Resetting to Default Settings
- Assistance technique
- Edit (modality Multi)
- Preset List
- Trademarks and Licenses
- m-audio.com
Brand : M-AUDIO
Model : Accent Module
Category : Keyboard