Axiom AIR 49 - MIDI Keyboard M-AUDIO - Free user manual and instructions
Find the device manual for free Axiom AIR 49 M-AUDIO in PDF.
User questions about Axiom AIR 49 M-AUDIO
0 question about this device. Answer the ones you know or ask your own.
Ask a new question about this device
Download the instructions for your MIDI Keyboard in PDF format for free! Find your manual Axiom AIR 49 - M-AUDIO and take your electronic device back in hand. On this page are published all the documents necessary for the use of your device. Axiom AIR 49 by M-AUDIO.
USER MANUAL Axiom AIR 49 M-AUDIO
iLok 2 Safety & Warranty Manual
Support
For complete system requirements, compatibility information, and product registration, visit the support section of the M-Audio website: m-audio.com/support.
Important!
Essential Downloads
Windows users: Visit m-audio.com/axiomair49 to download the additional drivers for your Axiom AIR to enable HyperControl to work properly (see below). These drivers also let you use your Axiom AIR with more than one application simultaneously and/or in conjunction with other class-compliant USB devices with audio capabilities.
Mac users: You do not need to install any Mac-specific drivers.
HyperControl Installations
Rather than assigning parameters one by one, activating Axiom AIR's HyperControl Mode automatically maps its controls to many of the most frequently used digital audio workstation (DAW) features and settings. When used with a supported DAW, you can control the transport, mixing controls (faders and panning) and virtual instrument or signal processing plug-in parameters. You can also switch between HyperControl and custom MIDI operation on the fly to match your particular needs.
To enable HyperControl with your Axiom AIR, you need to install some additional software, including the Hypercontrol "personality" for your specific DAW. Visit m-audio.com/hypercontrol for a current list of DAWs that support HyperControl.
Also, see the HyperControl section of this manual for more information.
Additional Installations
We also highly recommend installing the following software applications:
Pro Tools Express: We've included Pro Tools Express with your Axiom AIR so you can get started making music with a professional DAW right out of the box:
- Insert the DVD into your computer's DVD drive. Double-click the DVD to view its contents. Locate, open, and follow the installation instructions (PDF).
- After activating Pro Tools Express and receiving the license, connect the included iLok 2 to a USB port on your computer and transfer the license to it.
Connect the iLok 2 to your computer whenever you want to use Pro Tools Express. The software will launch once it verifies the license on the iLok 2. (Visit avid.com to check for any available software updates.)
Ignite (airmusicitech.com/download ignite): We recommend downloading Ignite, a music creation tool designed by AIR Music Technology to be easiest way to capture, build, and share musical ideas. Ignite works well on its own or as a writing companion to the production capabilities of your DAW. Axiom AIR's controls are fully integrated with Ignite, providing easy control of common tasks like preset selection, parameter control, and interface navigation. See the Controlling Ignite section of this manual for more information.
Quick Start
- Use the included USB cable to connect your Axiom AIR to an available USB port on your computer. (If you are connecting to a USB hub, ensure that it is a powered hub.) When connected properly, and when your computer is on, power Axiom AIR on using the power switch on its rear panel. Its buttons, fader buttons, knobs, trigger pads, and LCD will illuminate.
Windows users: Visit m-audio.com/axiomair49 and download the Axiom AIR drivers to enable HyperControl to work properly. (Please see the Essential Downloads section above.)
- Open your digital audio workstation (DAW).
- You may need to open your DAW's Preferences and select your Axiom AIR as the control surface or device. See your software's documentation for more information.
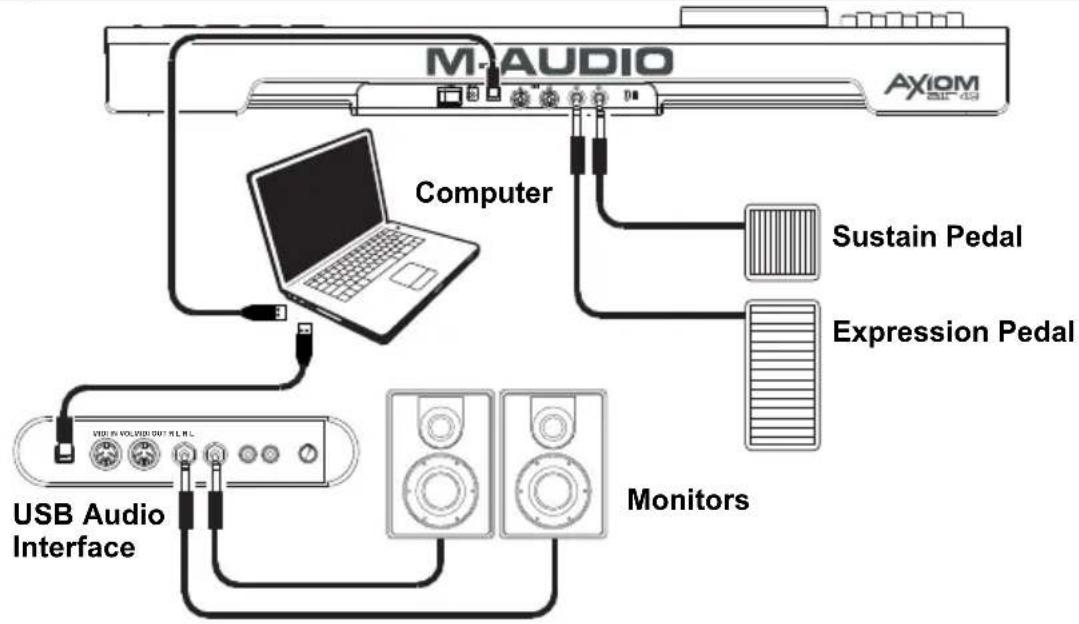
Setup Scenario 1
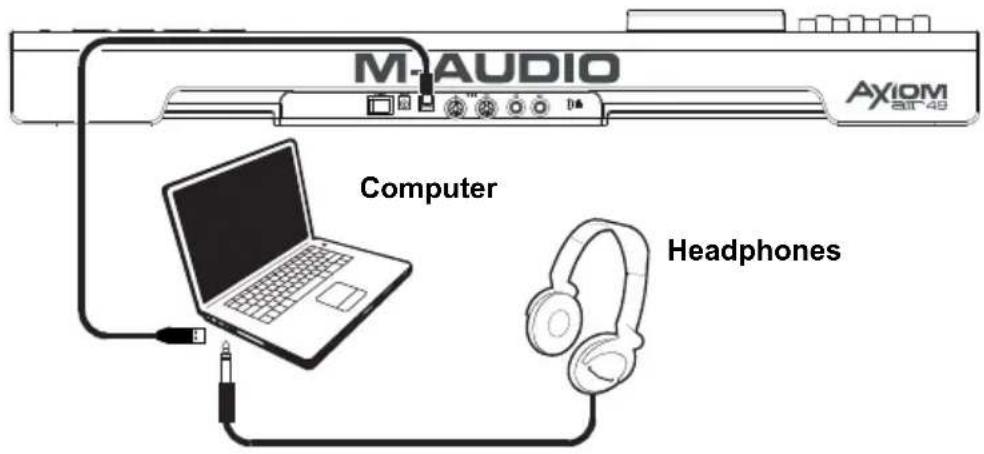
Setup Scenario 2
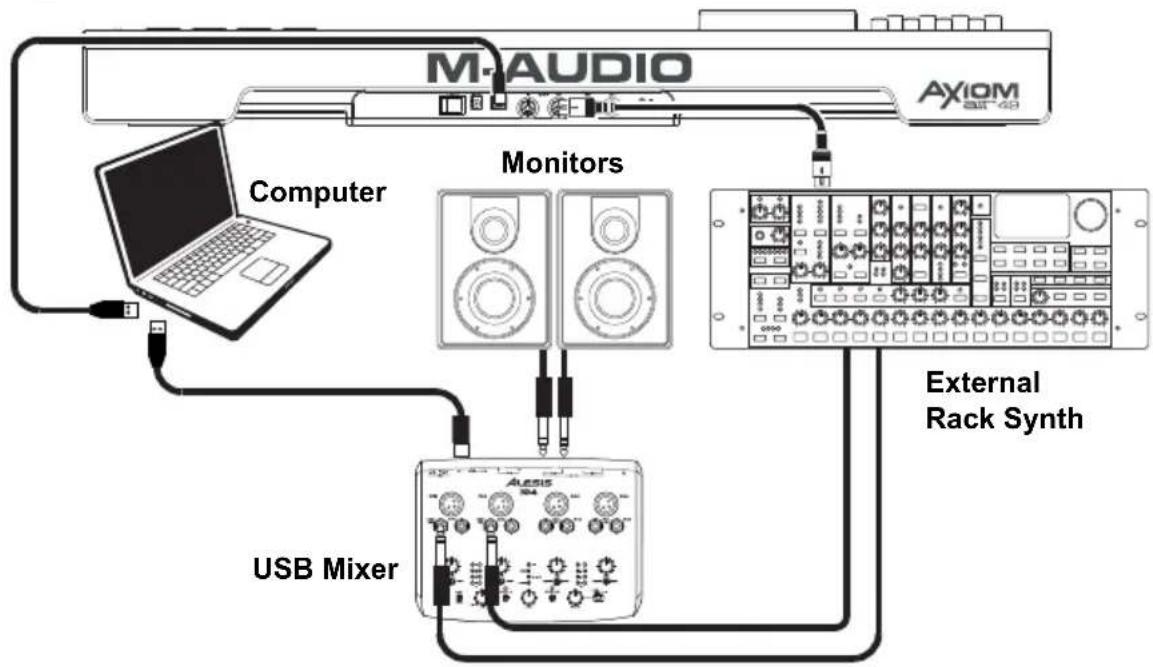
Setup Scenario 3
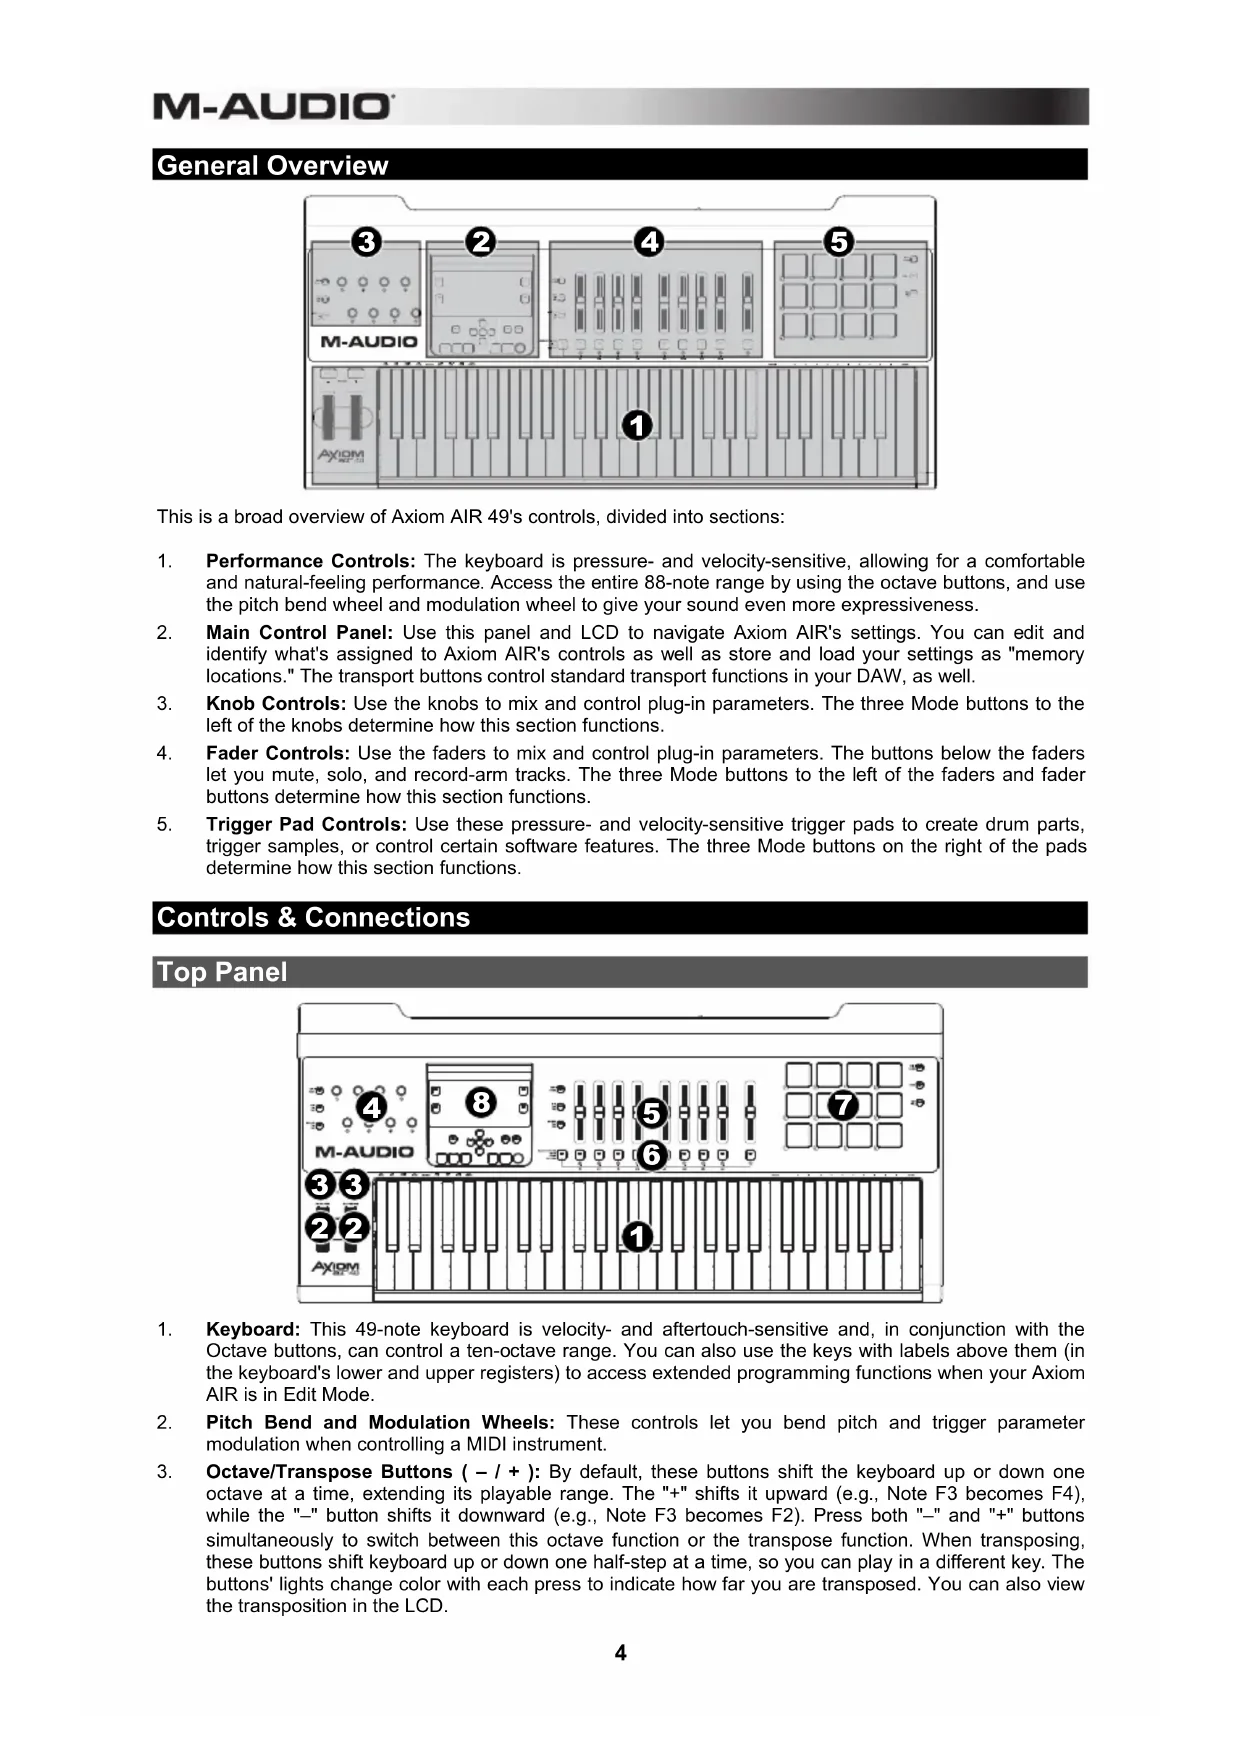
General Overview
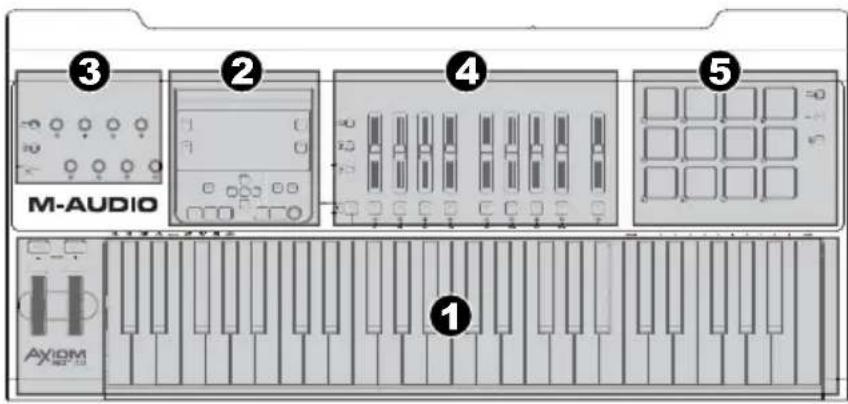
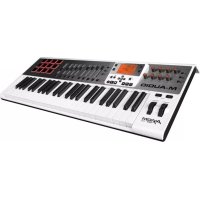
This is a broad overview of Axiom AIR 49's controls, divided into sections:
- Performance Controls: The keyboard is pressure- and velocity-sensitive, allowing for a comfortable and natural-feeling performance. Access the entire 88-note range by using the octave buttons, and use the pitch bend wheel and modulation wheel to give your sound even more expressiveness.
- Main Control Panel: Use this panel and LCD to navigate Axiom AIR's settings. You can edit and identify what's assigned to Axiom AIR's controls as well as store and load your settings as "memory locations." The transport buttons control standard transport functions in your DAW, as well.
- Knob Controls: Use the knobs to mix and control plug-in parameters. The three Mode buttons to the left of the knobs determine how this section functions.
- Fader Controls: Use the faders to mix and control plug-in parameters. The buttons below the faders let you mute, solo, and record-arm tracks. The three Mode buttons to the left of the faders and fader buttons determine how this section functions.
- Trigger Pad Controls: Use these pressure- and velocity-sensitive trigger pads to create drum parts, trigger samples, or control certain software features. The three Mode buttons on the right of the pads determine how this section functions.
Controls & Connections
Top Panel
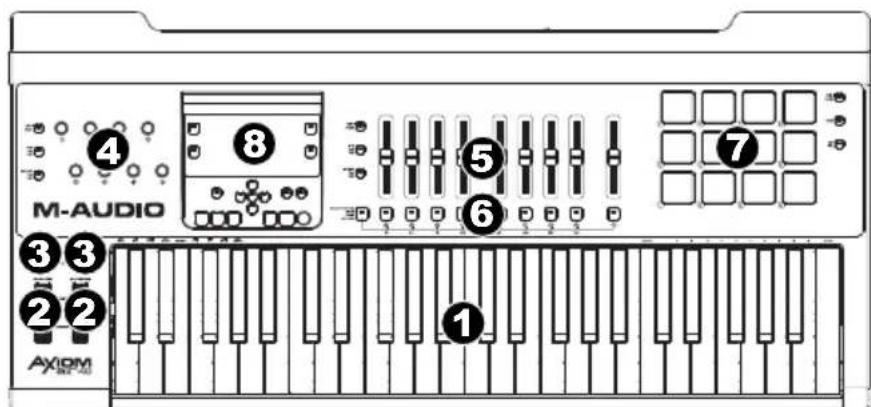
- Keyboard: This 49-note keyboard is velocity- and aftertouch-sensitive and, in conjunction with the Octave buttons, can control a ten-octave range. You can also use the keys with labels above them (in the keyboard's lower and upper registers) to access extended programming functions when your Axiom AIR is in Edit Mode.
- Pitch Bend and Modulation Wheels: These controls let you bend pitch and trigger parameter modulation when controlling a MIDI instrument.
-
Octave/Transpose Buttons (- / + ) : By default, these buttons shift the keyboard up or down one octave at a time, extending its playable range. The "+" shifts it upward (e.g., Note F3 becomes F4), while the "-" button shifts it downward (e.g., Note F3 becomes F2). Press both "-" and "+" buttons simultaneously to switch between this octave function or the transpose function. When transposing, these buttons shift keyboard up or down one half-step at a time, so you can play in a different key. The buttons' lights change color with each press to indicate how far you are transposed. You can also view the transposition in the LCD.
-
Knobs: You can use these eight knobs to send standard MIDI messages or to take control of mixing or plug-in parameters in HyperControl Mode, depending on the setting of the adjacent Mode buttons.
-
MIDI Mode (MIDI Bank button): The knobs will send MIDI messages as assigned or according to the current preset. Press the MIDI Bank button (next to the knobs) repeatedly to switch between three banks of assignments.
- HyperControl Mix Mode (Mix button): The knobs will control common mixing functions.
-
HyperControl Inst/FX Mode (Inst/FX button): The knobs will control useful parameters in the currently selected instrument or effects plug-in.
-
Faders: Axiom AIR has nine faders (eight track faders plus a master fader). Use these controls to send standard MIDI messages or to control mixing or plug-in parameters in HyperControl Mode, depending on the setting of the adjacent Mode buttons.
-
MIDI Mode (MIDI Bank button): The faders will send MIDI messages as assigned or according to the current preset. Press the MIDI Bank button (next to the faders) repeatedly to switch between three banks of assignments.
- HyperControl Mix Mode (Mix button): The faders will control common mixing functions.
-
HyperControl Inst/FX Mode (Inst/FX button): The faders will control useful parameters in the currently selected instrument or effects plug-in.
-
Fader Buttons: Axiom AIR has nine fader buttons (eight track fader buttons plus a master fader button). Use these controls to send standard MIDI messages or to control mixing or plug-in parameters in HyperControl Mode, depending on the setting of the adjacent Mode buttons and Select Track button to the left.
-
MIDI Mode (MIDI Bank button): The fader buttons will send MIDI messages as assigned or according to the current preset. Press the MIDI Bank button (next to the faders) repeatedly to switch between three banks of assignments.
-
HyperControl Mix Mode (Mix button) and HyperControl Inst/FX Mode (Inst/FX button): The fader buttons will have different functions for each track or parameter, depending on your DAW's HyperControl personality and on the setting of the adjacent Select Track button. Press it (multiple times, if necessary) to cycle through the different buttons' different modes.
-
Trigger Pads: These velocity- and aftertouch-sensitive trigger pads are perfect for composing drum parts or triggering samples in a live setting. Use the Pad Bank button to switch between three assignable banks of MIDI notes: the trigger pads will be lit red in Bank 1, green in Bank 2, and amber in Bank 3. The trigger pads also control certain software features in HyperControl Mode.
-
MIDI Mode (MIDI Bank button): The trigger pads will send MIDI note and pressure-based controller data or other more advanced MIDI messages, as assigned or according to the current preset.
- Roll Mode (Roll button): Strike and hold a trigger pad to create a "roll," a rhythmic string of repeated notes. You can control the rhythm and rate of these notes with the Pad Roll parameters. Double-press this button to "latch" Roll Mode, so it stays on. Press it once again to unlatch it.
- HyperControl Mode (按钮): The trigger pads will control various functions, depending on your DAW.
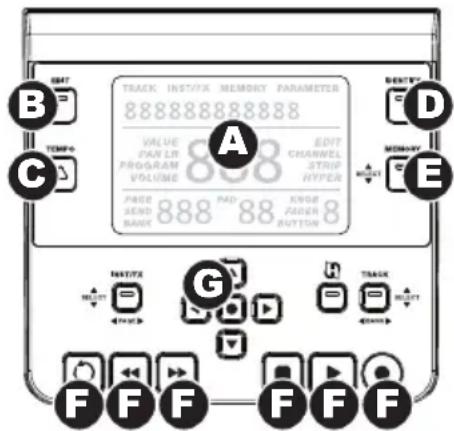
8. Main Control Panel:
A. LCD: This screen displays useful information, such as the current assignment and setting of the most recently moved physical control.
B. Edit Button: This button puts Axiom AIR in Edit Mode, allowing you to use its keyboard's special functions to create or edit MIDl control assignments, global settings, and utility functions.
C. Tempo Button: This button flashes in time with the tempo setting of the trigger pad roll function. Tap this button at 1/4-note intervals to set the tempo. Press and hold this button for over two seconds to set the tempo manually, using Knob 8 or the up and down Directional buttons. Press the center Directional button to save the setting.
Note: When Axiom AIR receives incoming MIDI timecode (MTC) messages, it will automatically synchronize with the external MIDI clock. These messages can be received only over Axiom AIR's USB port.
D. Identify Button: Hold down this button and move a control to identify its assignment, which will appear in the LCD. This lets you identify what is assigned to that control without actually sending out any MIDI data. This is useful for reminding yourself of your assignments without changing your settings, disrupting your live performance, etc. You can double-press this button to "latch" it so it stays on. Press it once again to unlatch it.
E. Memory Button: This button lets you save and access Memory Locations for storing full MIDI configurations. See the Memory Locations section of this manual for more information.
F. Transport Controls: These buttons control standard transport functions in DAW software: loop, rewind, fast-forward, stop, play, and record. When a HyperControl-enabled DAW is running, these buttons automatically map to those functions (or their closest alternatives). You can also map these buttons to a variety of MIDI messages.
G. Directional Buttons: You can use these buttons for various navigational and parameter-setting functions, depending on the setting of the adjacent Mode buttons.
- Inst/FX Mode (INST/FX button): The buttons will select the track and plug-in you want to control with the faders and knobs.
- HyperControl Mode (按钮): The buttons will have alternate, DAW-specific uses.
- Track Select/Bank Mode (Track button): The buttons will select the desired track or bank of tracks to control in HyperControl Mode.
Rear Panel

- Power Switch: Use this switch to power Axiom AIR on or off.
- Power Input: Connect an optional power adapter here (9V DC, 3A, center-pin positive, sold separately). Alternatively, you can power Axiom AIR via the USB port of your connected computer.
- USB Port: When Axiom AIR is connected to a computer via USB, this USB connection powers Axiom AIR and transmits MIDI data to and from the computer.
- MIDI Input: Use a standard 5-pin MIDI cable to connect this input to the MIDI output of an external MIDI device.
- MIDI Output: Use a standard 5-pin MIDI cable to connect this output to the MIDI input of an external MIDI device, allowing you to play the sounds in a MIDI sound module or a rack synth, for example.
- Expression Pedal Input: Connect either a "switch"-type or standard expression pedal (sold separately) to this input to allow for expressive changes while performing. This input is assignable to different functions.
- Sustain Pedal Input: Connect a momentary-contact sustain pedal (sold separately) to this input to allow you to sustain the currently playing notes without having to hold the keys down. This input is assignable to different functions.
Note: When you power on Axiom AIR, verify that your sustain pedal has the right "polarity" – that it sustains notes when pressed down. If your sustain pedal is working "in reverse," remove your foot from it, and power your Axiom AIR off then on again. (When powering on your Axiom AIR, it scans the sustain pedal as being in the raised/off position.)
- Kensington® Security Slot: This connector is compatible with standard laptop-style Kensington security cables for theft protection.
Performance Settings
This section explains settings that change the functions of Axiom AIR's keyboard and trigger pads.
IMPORTANT: When this manual refers to a "key," this means a key on the keyboard with a label printed above it (e.g., "PAD Learn," "PAD Roll," etc.) as opposed to a button elsewhere on the product.
Trigger Pads
Pad Learn
You can easily assign sounds from the keyboard to the trigger pads by using the Pad Learn function. This can be useful if you want to use the trigger pads to send certain MIDI notes to trigger a sound in your virtual instrument.
To assign the MIDI note of a trigger pad:
- Press the Edit button. It will flash red.
- Press the PAD Learn key on the keyboard. Learn:C-2 will appear on the LCD.
- Press a keyboard key to select the desired MIDI note.
- If necessary, press the MIDI Bank button next to the trigger pads to select the pad bank containing the desired pad.
- Press the desired trigger pad to assign the chosen note to the pad. The selected pad number will appear in the LCD. After a moment, Axiom AIR will automatically exit Edit Mode.
Pad Roll
When in Pad Roll Mode, striking and holding a trigger pad creates a "roll," a rhythmic string of repeated notes.
To activate Pad Roll Mode, do any one of the following:
- Press and hold the Roll button. Release the button to deactivate Pad Roll Mode.
- Double-press this button to "latch" Roll Mode, so it stays on. Press it once again to unlatch/deactivate Pad Roll Mode.
- Press the Edit button, and then press the PAD Roll key on the keyboard.
To set the rhythm and duration of the Pad Roll:
- Activate Pad Roll Mode (described above).
- Use the fader buttons to set the rhythmic subdivision (1/4, 1/4T [triplet], etc.).
- If you are not already in Edit Mode (from in Step 1), press the Edit button, and then press the Pad Roll key on the keyboard.
- Use the left and right Directional buttons to decrease or increase (respectively) the "swing" of the roll.
- Use the down and up Directional buttons to decrease or increase (respectively) the length of each note.
Parameter Assign
When you want more control flexibility than HyperControl Mode offers, or if you are using a DAW without an Axiom AIR HyperControl personality, you can set Axiom AIR's knobs, faders, buttons, and trigger pads to output a variety of MIDI messages: continuous controllers (CC), registered parameter numbers (RPNs), non-registered parameter numbers (NRPNs), or system exclusive (SysEx).
As an improvement over previous M-Audio Axiom Pro keyboards, each of the three controller sections (knobs, faders, and trigger pads) can switch independently between HyperControl Mode and MIDI Mode. So, for instance, you can use the faders to mix in HyperControl Mode while simultaneously using the trigger pads to play samples in MIDI Mode.
Assigning MIDI Messages to the Controls
Editing Axiom AIR's MIDI configuration all starts with the Edit button. Press it to enter Edit Mode. It will flash to indicate it is in Edit Mode. To exit Edit Mode, press it a second time.
To assign a specific MIDI message to a physical control:
- Press the Edit button. It will flash red, and all controls will stop sending messages.
- Select the control to assign by moving or pressing it. The selected control's bank and control number will appear in the LCD.
- Enter Parameter Assign Mode by pressing Param Assign key. The MIDI message currently assigned to control will appear in the LCD.
- Select the desired MIDI message for this control by using one of the methods described in the next section, To choose a MIDI message to output.
-
Press the center Directional button to save the new assignment.
-
When selecting Aftertouch in Edit Mode, press a key that does NOT have a secondary Edit Mode function (i.e., the keys without writing above them).
- To exit Edit Mode and discard any new settings, press the Cancel key on the keyboard or the Edit button.
- For a complete list of available MIDI messages and sub-parameters, please see this manual's Appendix.
To choose a MIDI Message to Output:
Directional buttons:
- Select the type of MIDI message you want to output by using Knob 8 or the up and down Directional buttons.
- Use the left and right Directional buttons to access sub-parameters for that MIDI message, if any. The sub-parameter name and its current value will appear in the LCD.
Note: When the LCD displays a "right" arrow () next to the parameter name, it means it has subparameters, which you can also edit. Use the left and right Directional buttons to access these subparameters.
- Increase or decrease the displayed value by using the up and down Directional buttons.
- Press the center Directional button to confirm your choice and return to the sub-parameter list.
Knobs:
- Use Knob 8, the numerical keys on the keyboard, or the up and down Directional buttons to select (1) the type of MIDI message you want to output, (2) the sub-parameter to edit, and (3) that sub-parameter's value.
- Press the center Directional button to confirm your choice and return to the sub-parameter list.
Identifying Control Assignments
It can be helpful to see which hardware control is assigned to which software parameter.
To check the control assignment of a hardware control:
- Press and hold the Identify button, or double-press it to "latch" it on. All control output from Axiom AIR will be temporarily halted, and the button will flash red.
- Manipulate the control you want to identify. The assigned parameter and its current setting will appear on the LCD.
- To go back to normal operation, release the Identify button or, if you latched it, press it once again.
Velocity Curves
The keyboard and trigger pads on Axiom AIR are velocity-sensitive; playing with more force results in a higher volume, while playing with less force results in a lower volume. This dynamic range gives your performance a more natural sound and feel. You can vary this sensitivity by selecting a velocity curve, tailoring the response to your particular playing style.
To select a velocity curve:
- Press the Edit button. It will flash red.
- Press the Vel Curve key on the keyboard. Key Velocity will appear on the LCD.
- To switch between Key Velocity and Pad Velocity, press the Vel Curve key again or use the up and down Directional buttons. Press the center Directional button to edit it.
- Use the numerical keys (0-9) to select the desired velocity curve, and then press the Enter key on the keyboard. Alternatively, you can use the up and down Directional buttons and then press the center Directional button.
IMPORTANT: Exiting Edit Mode or pressing the Cancel key on the keyboard will automatically save your changes.
The velocity curve settings are described in the following chart:
Keyboard Trigger Pads
1 (Low): Low sensitivity
2 (Low Normal): Slightly more sensitive than Low
3 (Normal): Default sensitivity
4 (Normal High): Slightly more sensitive than Normal
5 (High): Highest exponential curve
6 (Linear): True to velocity
7 (Low Range): Velocity limited to lowest third of its range
8 (Mid Range): Velocity limited to middle third of its range
9 (High Range): Velocity limited to highest third of its range
0 (Fixed): Set a fixed velocity value with the illuminated knob
1 (Low): Low sensitivity
2 (Normal): Default sensitivity, linear
3 (High): Highest sensitivity
4 (4 Steps): Velocity limited to four discrete values
5 (3 Steps): Velocity limited to three discrete values
6 (2 Steps): Velocity limited to two discrete values
7 (Low Range): Velocity limited to lowest third of its range
8 (Mid Range): Velocity limited to middle third of its range
9 (High Range): Velocity limited to highest third of its range
0 (Fixed): Set a fixed velocity value with the illuminated knob
Drawbar Mode
This mode reverses the polarity of Axiom AIR's faders: the fader's lowest physical position sends the maximum value, and the fader's highest physical position sends the minimum value. This is useful for organ instrument plug-ins where the various parameters appear as organ drawbars; the farther down you pull a drawbar, the greater its volume.
To activate Fader Drawbar Mode:
- Press the Edit button. It will flash red.
- Press the Drawbar key on the keyboard. The LCD will show whether Fader Drawbar Mode is on or off.
- Press the Drawbar key or use the up and down Directional buttons to activate/deactivate Fader Drawbar Mode.
- Press the Enter key to save the new setting, or press Cancel or Edit to exit Edit Mode and discard any changes.
MIDI Settings
Global MIDI Channel
The "global" MIDI channel is the default MIDI channel over which Axiom AIR sends MIDI messages. Because this is a global setting, it applies across all memory locations, overridden only by custom channel selections for controls in MIDI Mode.
To set the global MIDI Channel:
- Press the Edit button. It will flash red.
- Press the MIDI Chan key on the keyboard. The currently selected channel will appear on the LCD.
- To select the desired channel, use the numerical keys (0-9) to enter it or use Knob 8 or the up and down Directional buttons to select it.
- Press the Enter key on the keyboard or center Directional button to save the new global MIDI channel assignment.
IMPORTANT: Exiting Edit Mode or pressing the Cancel key on the keyboard will automatically save your changes.
Global MIDI Out
This is the default hardware MIDI output port over which Axiom AIR sends MIDI messages. Because this is a global setting, it applies across all memory locations, overridden only by custom channel selections for controls in MIDI Mode.
To set the global MIDI output port:
-
Press the Edit button. It will flash red.
-
Press the MIDI Out key on the keyboard. MIDI Out will appear on the LCD with the current setting:
-
USB: Sends MIDI over the USB port only.
- Ext: Sends MIDI to the MIDI Output jack only.
-
USB+Ext: Sends MIDI to the USB port and MIDI Output jack.
-
Press the 1, 2, or 3 key or use Knob 8 or the up and down Directional buttons to select the desired setting.
-
Press the Enter key on the keyboard or center Directional button to save the new global MIDI channel assignment.
IMPORTANT: Exiting Edit Mode or pressing the Cancel key on the keyboard will automatically save your changes.
MIDI Panic
When you trigger a MIDI Panic message, it sends an "All Notes Off" message on all channels and through all outputs. This is useful when a connected hardware or software synthesizer has a stuck Note On.
To send a MIDI Panic message:
- Press the Edit button.
- Press the MIDI Panic key on the keyboard. Axiom AIR will send an "All Notes Off" MIDI message, and All Notes Off will appear briefly on the display. Your Axiom AIR will automatically exit Edit Mode.
Memory Locations
Once you've made some MIDI control assignments to fit a specific device or task, you may want to save them to one of Axiom AIR's 128 memory locations for later use.
Storing
To store the current set of MIDl assignments to a memory location:
- Press the Edit button. It will flash red.
- Press the Memory button. Memory, and the currently loaded memory location name and number, will appear on the LCD.
- Use the numerical keys (0-9), the up and down Directional buttons, or Knob 8 to enter the desired memory location slot (0-127).
- Enter a name for the memory location. Use the left and right Directional buttons to select a letter to edit, and use Knob 4 to change the currently selected letter.
- Press the Enter key on the keyboard to save the memory location. Saving... will appear on the LCD. When it is finished, Axiom AIR will automatically exit Edit Mode.
To recall a memory location:
- Press the Memory button. It will illuminate green.
- Use the up and down Directional buttons or Knob 8 to select a memory location from the list.
- Press the center Directional button to load the selected memory location. Loading... will appear on the LCD. When it is finished, adjust a control to return the LCD to its normal state.
Backing Up & Loading
You can back up and load individual memory locations or all 128 locations of your Axiom AIR by using MIDI SysEx. Use a SysEx librarian application or simply record it to a MIDI track in your DAW and play it back when needed.
IMPORTANT!: When sending SysEx data, do not set the sending speed any higher than 3.05 KB/sec. Doing so will cause problems with the transfer.
To backup one or all memory locations:
- Ensure that Axiom AIR is connected to the computer, is functioning correctly, and has the desired memory location loaded.
- Ensure that a MIDI track in your DAW is recording (and set to receive MIDI from Axiom AIR), or that your SysEx librarian utility is ready to receive data.
- Press the Edit button. It will flash red.
- Press the up or down Directional buttons or MEM Backup key on the keyboard to switch between Backup? (backup current memory location) and Backup All? (backup all memory locations).
- Press the center Directional button to start the backup. Sending... will appear on the LCD. The LCD will return to the main screen when the process is complete.
To load one or all memory locations from a MIDI backup:
- Ensure that Axiom AIR is connected to the computer and functioning correctly.
-
Ensure that your DAW (with a MIDI track containing backup data) or SysEx librarian utility is set to transmit MIDI to your Axiom AIR (i.e., that your program's MIDI out port is set to the Axiom AIR HyperControl port).*
-
Press Play on your DAW or enable SysEx transmission on your SysEx librarian application. Rec SysEx... will appear on the LCD. The LCD will return to the main screen when the process is complete.
-
Before loading SysEx data from a MIDI track in your DAW, ensure that the transport or playhead is positioned before the desired data in the timeline.
IMPORTANT:
- When loading all memory locations, the memory locations stored in the backup will overwrite the corresponding ones in Axiom AIR. Axiom AIR will retain all other memory locations.
- When loading a single memory location, it will be loaded to the "Edit Mode buffer" only, not to an actual memory location. Store it to a memory location by following the instructions in the Storing section above.
HyperControl
Rather than assigning parameters one by one, activating Axiom AIR's HyperControl Mode automatically maps its controls to many of the most frequently used DAW features. This section is a general outline of HyperControl Mode's features. Keep in mind that features, control behaviors, and workflows differ between DAWs.
Please note that your specific DAW must have an Axiom AIR HyperControl profile to use this feature. To see if HyperControl supports your DAW, and how HyperControl works with it, visit m-audio.com/hypercontrol. There, you can download and refer to the HyperControl user guide for your DAW.
Getting Started
Depending on the brand and version of your software, you may need to install HyperControl support software. Follow the setup instructions in the HyperControl User Guide for your specific DAW, available at m-audio.com/hypercontrol.
After setting up HyperControl, test the transport controls to ensure they are working properly (see next section).
Transport Controls
All transport controls should respond like their counterparts in your DAW software (Play, Record, etc.).
To test the transport controls:
- Connect Axiom AIR to a free USB port on your computer and power it on.
- Launch your DAW and open a project file.
- Press Axiom AIR's Play button, and then press its Stop button. If the DAW transport responds to both commands, HyperControl is working properly.
HyperControl Mix Mode
Using hardware controls for software functions can be very handy when mixing. HyperControl makes this easy. After you install your DAW's HyperControl "personality," you can enter HyperControl Mix Mode, which will automatically map various useful software parameters to Axiom AIR's controls.
Press the HyperControl Mix Mode button (Mix) next to the faders (and fader buttons) or knobs to put that set of controls in HyperControl Mix Mode. Refer to your DAW's HyperControl user guide to see which parameter is assigned to each control.
HyperControl Inst/FX Mode
Plug-In Parameters (Faders, Fader Buttons, and Knobs)
Axiom AIR's faders and knobs can also control parameters within a plug-in instrument or effect.
To select a plug-in instrument or effect, press the HyperControl Inst/FX button (Inst/FX) under the LCD.
To control plug-in parameters with the knobs or faders, press the HyperControl Inst/FX button (Inst/FX) next to the desired bank of controls (faders or knobs). That bank of controls will enter HyperControl Inst/FX Mode. Use the controls to adjust the parameters. Refer to your DAW's HyperControl user guide to see which parameter is assigned to each control.
Other Controls
Directional Buttons
The Directional buttons can be used to control certain supported software features. Press the HyperControl button next to the Directional buttons to enable this function.
Trigger Pads
The trigger pads can be used to trigger drum or instrument sounds mapped by your software, but they have additional functions in HyperControl Mode (depending on your software's specific implementation of HyperControl). Press the HyperControl button next to the trigger pads to enable this function.
Identifying Control Assignments
Whether you're in HyperControl Mode or using your own control assignments, it can be helpful to see which hardware control is assigned to which software parameter.
To check the control assignment of a hardware control:
- Press and hold the Identify button, or double-press it to "latch" it on. All control output from Axiom AIR will be temporarily halted, and the button will flash red.
- Manipulate the control you want to identify. The assigned parameter and its current setting will appear on the LCD.
- To go back to normal operation, release the Identify button or, if you latched it, press it once again.
Controlling Ignite
Ignite, included with your Axiom AIR, is a creative tool designed for rapid and fluid capture, refinement, and sharing of musical ideas. You can use it on its own or as a counterpart to your favorite DAW.
To download Ignite, visit airmusictech.com/download_ignite.
For more in-depth information on Ignite, please see the Ignite documentation.
Axiom AIR keyboards come pre-configured to control Ignite through HyperControl. When you launch Ignite with your Axiom AIR connected to the computer, you can use Axiom AIR's controls in the following ways:
Transport Controls
Press the HyperControl Mix Mode button (h button) on the main control panel, and then use the transport buttons to control those transport functions in Ignite.
Navigation
Use the Directional buttons to navigate through Ignite's tabs and sub-menus, depending on the current control focus.
Instruments
Refer to your Ignite's HyperControl user guide (at m-audio.com/hypercontrol) to see which parameter is assigned to each control.
GUIA DEL USUARIO (ESPANOL)
Paradescending Ignite,visiteairmusictech.com/download ignite.
Installations HyperControl
HyperControl Installation
Keyboard: Trigger-Pads:
MIDI Mode: Messages and Sub-Parameters
Modulation Wheel, Faders, Expression Pedal
Available MIDI Message Types:
| Parameter | MIDI Message | Display |
| MIDI CC 0 - 127 | MIDI CC -> | |
| RPN 128 | RPN Define -> | |
| NRPN 129 | NRPN Define -> | |
| Control Disable * | - | Control |
MIDI CC Sub-Parameters:
| Sub-Parameter | Value Range | Display |
| CC# 0 - 127 | CC#: 0 - 127 | |
| Minimum Value 0 | - 127 Min. Value: | |
| Maximum Value 0 | - 127 Max. Value: | |
| MIDI Channel Global, 1 - 16 | MIDI Channel: | |
| MIDI Output | USB, Ext, USB+Ext, Global | Out: |
RPN and NRPN Sub-Parameters:
| Sub-Parameter | Value Range | Display |
| LSB | 0 - 127 | LSB: |
| MSB | 0 - 127 | MSB: |
| Minimum Value 0 - 127 Min. Value: | ||
| Maximum Value | 0 - 127 | Max. Value: |
| MIDI Channel | Global, 1 - 16 | MIDI Channel: |
| MIDI Output | USB, Ext, USB+Ext, Global | Out: |
| Resolution | Coarse, Fine | Reso: |
- When Control OFF appears on the LCD, you can press the center Directional button to disable MIDI output from the selected control. Press the center Directional button again on another parameter to re-enable it.
Knobs
Available MIDI Message Types:
| Parameter | MIDI Message | Display |
| MIDI CC 0 - 127 | MIDI CC -> | |
| RPN 128 RPN Define -> | ||
| NRPN 129 NRPN Define -> | ||
| Control Disable * | - | Control OFF |
MIDI CC Sub-Parameters:
| Sub-Parameter | Value Range | Display |
| CC# 0 - 127 | CC#: 0 - 127 | |
| Minimum Value | 0 - 127 Min. Value: | |
| Maximum Value | 0 - 127 Max. Value: | |
| MIDI Channel Global, 1 - 16 MIDI Channel: | ||
| MIDI Output | USB, Ext, USB+Ext, Global | Out: |
| Data Format ** | Norm, RBOff, Rel2C, SignB1, SignB2, 1Step | Data: |
RPN and NRPN Sub-Parameters:
| Sub-Parameter | Value Range | Display |
| LSB | 0 - 127 | LSB: |
| MSB | 0 - 127 | MSB: |
| Minimum Value 0 - | 127 Min. Value: | |
| Maximum Value | 0 - 127 Max. Value: | |
| MIDI Channel | Global, 1 - 16 | MIDI Channel: |
| MIDI Output | USB, Ext, USB+Ext, Global | Out: |
| Resolution | Coarse, Fine | Reso: |
- When Control OFF appears on the LCD, you can press the center Directional button to disable MIDI output from the selected control. Press the center Directional button again on another parameter to re-enable it.
** Data Format Settings
Norm: Standard operation
RBOff: Relative (binary offset)
Rel2C: Relative (two's complement)
SignB1: Signed bit 1
SignB2: Signed bit 2
1Step: Single step
Trigger Pads
Available MIDI Message Types:
| Parameter | MIDI Message | Display |
| MIDI Note | Note C-2 to G8 (0 - 127) | MIDI Note -> |
| MIDI CC | 128 - 255 | MIDI CC -> |
| RPN | 256 RPN Define -> | |
| NRPN 257 | NRPN Define -> | |
| Control Disable * | - | Control OFF |
Note C-2 to G8 Sub-Parameters:
| Sub-Parameter | Value Range | Display |
| MIDI Note | Note C-2 to G8 (0 - 127) | Note: C-2 - G8 (0 - 127) |
| Minimum Value | 0 - 127 Min. | Value: |
| Maximum Value 0 - 127 Max. | Value: | |
| MIDI Channel | Global, 1 - 16 | MIDI Channel: |
| MIDI Output | Global, USB, Ext, USB+Ext | Out: |
- When Control OFF appears on the LCD, you can press the center Directional button to disable MIDI output from the selected control. Press the center Directional button again on another parameter to re-enable it.
Sub-parameters for trigger pad MIDI CC, RPN, and NRPN messages are the same as the Modulation Wheel, Faders, Expression Pedal section above.
Fader Buttons, Sustain Pedal
Available MIDI Message Types:
| Parameter | MIDI Message Display | |
| MIDI CC 0 | 127 | MIDI CC -> |
| RPN 128 | RPN Define -> | |
| NRPN 129 | NRPN Define -> | |
| Program Change | 130 | Prg.Charge |
MIDI CC Sub-Parameters:
Program Change Sub-Parameters:
| Sub-Parameter | Value Range | Display |
| LSB | 0 - 127 | LSB: |
| MSB | 0 - 127 | MSB: |
| Program Number | 0 - 127 | Program#: |
| MIDI Channel | Global, 1 - 16 | MIDI Channel: |
| MIDI Output | Global, USB, Ext, USB+Ext | Out: |
| Sub-Parameter | Value Range | Display |
| CC# 0 - 127 | CC#: 0 - 127 | |
| Minimum Value 0 | - 127 Min. Value: | |
| Maximum Value 0 | - 127 Max. Value: | |
| Button Behavior * | Toggle, Momentary | Press: |
| MIDI Channel | Global, 1 - 16 | MIDI Channel: |
| MIDI Output | Global, USB, Ext, USB+Ext | Out: |
RPN and NRPN Sub-Parameters:
| Sub-Parameter | Value Range | Display |
| LSB | 0 - 127 | LSB: |
| MSB | 0 - 127 | MSB: |
| Minimum Value | 0 - 127 Min. Value: | |
| Maximum Value 0 | - 127 Max. Value: | |
| MIDI Channel | Global, 1 - 16 | MIDI Channel: |
| MIDI Output | Global, USB, Ext, USB+Ext | Out: |
| Resolution | Coarse, Fine | Reso: |
| Button Behavior * | Toggle, Momentary | Press: |
-
Button Behavior Settings:
-
Toggle: Alternates between sending 127 and 0 with each press. Releasing the button sends no message.
Moment[ary]: Pressing button sends 127, releasing button sends 0
Transport Controls
Available MIDI Message Types:
| Parameter | MIDI Message | Display |
| MIDI CC 0 - 127 | MIDI CC -> | |
| RPN | 128 | RPN Define -> |
| NRPN | 129 NRPN Define -> | |
| MIDI Machine Control | MMC | MMC -> |
| Control Disable ** | - | Control OFF |
Selecting MMC will assign the standard MMC message to each transport button.
- When Control OFF appears on the LCD, you can press the center Directional button to disable MIDI output from the selected control. Press the center Directional button again on another parameter to re-enable it.
MMC MIDI Message Types:
| Sub-Parameter | MIDI Message | Display |
| MIDI Output | Global, USB, Ext, USB+Ext | Out: |
Sub-parameters for the transport controls' MIDI CC, RPN, and NRPN messages are the same as the Fader Buttons, Sustain Pedal section above.
Specifications
Keys: 49, velocity-sensitive
Octaves: 10 total (3 in either direction)
Drum Trigger Pads: 12, velocity- and pressure-sensitive
Rotary Knob Controls: 8
Velocity Curves: 10 for keyboard, 10 for trigger pads
Transport Control Buttons: Loop, Rewind, Fast Forward, Stop, Play, Record
Memory Locations: 128, user-editable
Connections: USB port, power adapter (optional), MIDI in, MIDI out, expression pedal, sustain pedal
Power: Via USB or optional 9 VDC power adapter
Dimensions (W× D× H) .. 22^ × 15^ × 4^
559 mm x 381 mm x 102 mm
Weight: 10.8 lbs.
4.9 kg