USER MANUAL Uber Mic M-AUDIO
User Guide (English)
Introduction
Features
- Easy, intuitive operation for any application
- Wide-range 30–20,000 Hz frequency response delivers detailed, natural sound
• 3-capsule condenser microphone element, including single-point stereo
• 4 selectable polar patterns to customize your ideal recording
• Polar patterns: cardioid, figure-8, omnidirectional, and stereo
- 1/8" headphone jack and internal headphone amplifier
• USB/direct mixing control with mic volume control enables zero-latency recording and monitoring
- Microphone mute control ensures privacy
• LCD display shows polar pattern and currently selected control level
• Studio-quality recording and playback for accurate reproduction
- Convenient desktop mounting with threaded insert for optional stand-mounting
- Integrated stand fits easily into any setup
Box Contents
Uber Mic Mini-USB Cable
Integrated Microphone Stand User Guide
Microphone Stand Extender Safety & Warranty Manual
Support
Visit m-audio.com to view and download the latest documentation, system requirements, and other information about your product.
For additional product support, visit m-audio.com/support.
- Visit m-audio.com/softwaredownloads to create an account (if you don't already have one) and log in.
- Follow the on-screen instructions to register Uber Mic.
- Download your software.
- Windows users should also download the driver from m-audio.com/drivers.
Setup
Items not listed under Introduction > Box Contents are sold separately.
Connection Diagrams

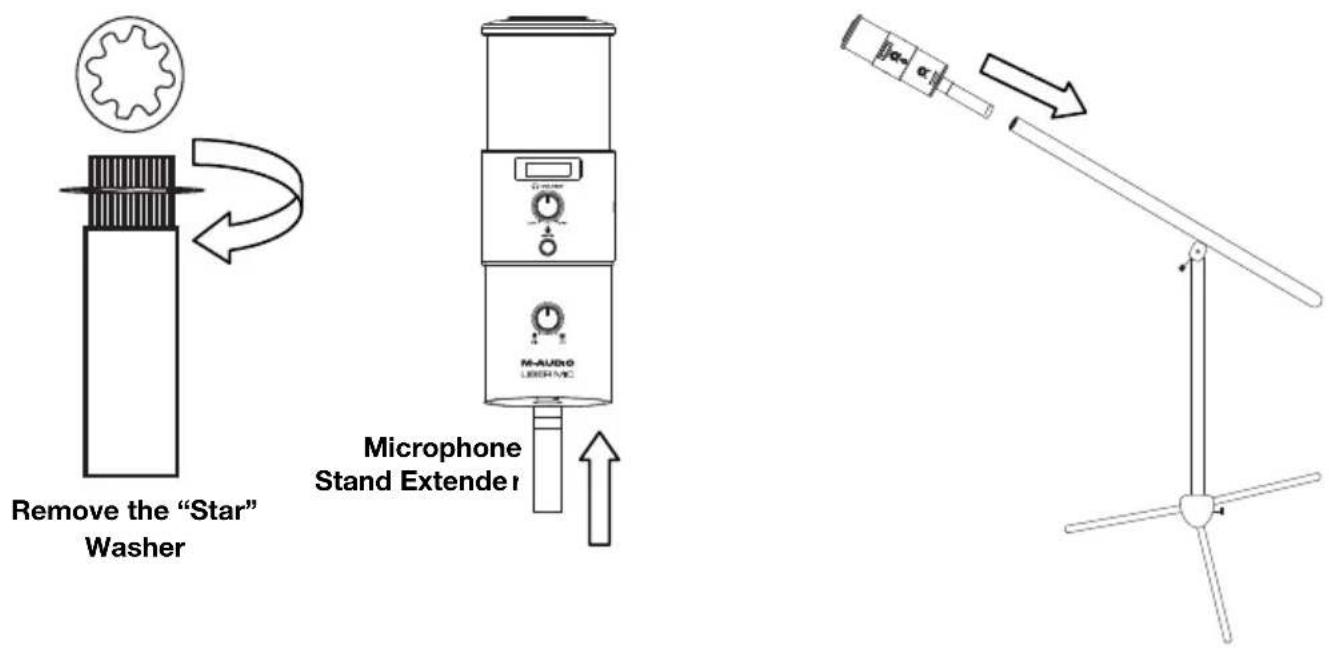
Microphone Stand Extender (optional)
Setup with a boom stand: Connect the included microphone stand extender to Uber Mic's bottom panel threaded mount. Then connect the microphone stand extender to the boom pole mount.
Note: When connecting a boom pole to Uber Mic, the mini-USB port may be blocked from use. Use the included microphone stand extender to have extra room to connect the USB cable and headphone cable to Uber Mic. Remove the "star" washer as this will also block the USB and headphone ports.
Recommended Installation
Software: We've included Pro Tools | First M-Audio Edition with your Uber Mic so you can get started making music with professional software right out of the box. Register your Uber Mic on m-audio.com, and follow the Pro Tools | First M-Audio Edition install instructions in your User Account.
Note for Windows users: To use your Uber Mic with Pro Tools | First M-Audio Edition, download the Uber Mic Windows driver from m-audio.com.
Quickstart
- Connect Uber Mic to a USB port on your computer.
- Set Uber Mic as your default recording and playback device in your computer settings. See the Audio Setup section for more details.
- Adjust the Polar Pattern selector for the source you are recording. See the Operation > Polar Patterns section for more details.
- Set the computer's sound input volume. See the Operation >Adjusting Audio Settings section for more details.
- Set the computer's sound output volume. See the Operation > Adjusting Audio Settings section for more details.
- Open your favorite voice chat, streaming, podcasting, or recording software. To set up Uber Mic with your software, open your software's Preferences, Device Setup, or Options to configure it to send and receive audio with the Uber Mic. Please consult your software manual for more information.
- Speak into the microphone and turn the Mic Gain knob to adjust the level of the signal that the microphone sends to your computer. Set this knob so the gain is at a “healthy” level but not so high that the signal “clips” or peaks, causing distortion in the audio.
- Turn the Headphone Volume knob to adjust the volume level and listen to the audio signal with headphones connected to Uber Mic's headphone output or use speakers connected to your computer's sound card.
- Turn the USB-Mic knob to adjust the blend of the signals sent to the headphone output. Turn it toward Mic to hear more of the microphone signal, or turn it toward USB to hear more of your computer's output signal.
Audio Setup
To set Uber Mic as your default recording and playback device, follow the directions below based on your computer's operating system.
Windows:
- Use the included USB cable to connect the Uber Mic to your computer.
- In the Taskbar, locate the Volume Control "speaker" icon. Right-click it and select Playback Devices.
Alternatively, go to Start Menu > Control Panel (or Settings > Control Panel in Classic View) > Hardware and Sound > Sound.
- In the Windows Sound control panel, select the Playback tab and select M-Audio Uber Mic as the default device.
- Click the Recording tab and select M-Audio Uber Mic as the default device.
- Click Properties in the lower-right corner.
- In the new window, click the Advanced tab and select 2-channel, 16-bit, 48000 Hz (DVD Quality) as the default format.
- Uncheck both boxes under Exclusive Mode.
- Click OK to close the Properties window.
- Click OK to close the Sound control panel.
macOS:
- Use the included USB cable to connect the Uber Mic to your computer.
- Go to Applications > Utilities > Audio MIDI Setup.
- In the Audio Devices window, select M-Audio Uber Mic in the left column.
- Right-click or press Ctrl and click M-Audio Uber Mic, and select Use this device for sound input.
- Right-click or press Ctrl and click M-Audio Uber Mic, and select Use this device for sound output (to monitor the mic/computer signals through Uber Mic's headphone output).
- Quit Audio MIDI Setup.
Setting Up Uber Mic with Your Software
Note for Windows users: To use your Uber Mic with Pro Tools | First M-Audio Edition, download the Uber Mic Windows driver from m-audio.com.
Be sure your audio software program is set up to receive audio from the Uber Mic. This can usually be done in your software's Preferences, Device Setup, or Options. Please consult your software manual for more information.
- Use the included USB cable to connect the Uber Mic to your computer.
- Open Pro Tools | First M-Audio Edition.
- Go to Setup > Playback Engine....
-
Open the Playback Engine dropdown menu and select M-Audio Uber Mic.
Note: You may need to save and restart your project.
-
Select your Sample Rate and then click OK to close the Setup window.
You can now add audio tracks to receive audio from Uber Mic and stream recorded audio back through the Uber Mic Headphone Output.
Features
Front View Rear View Underside
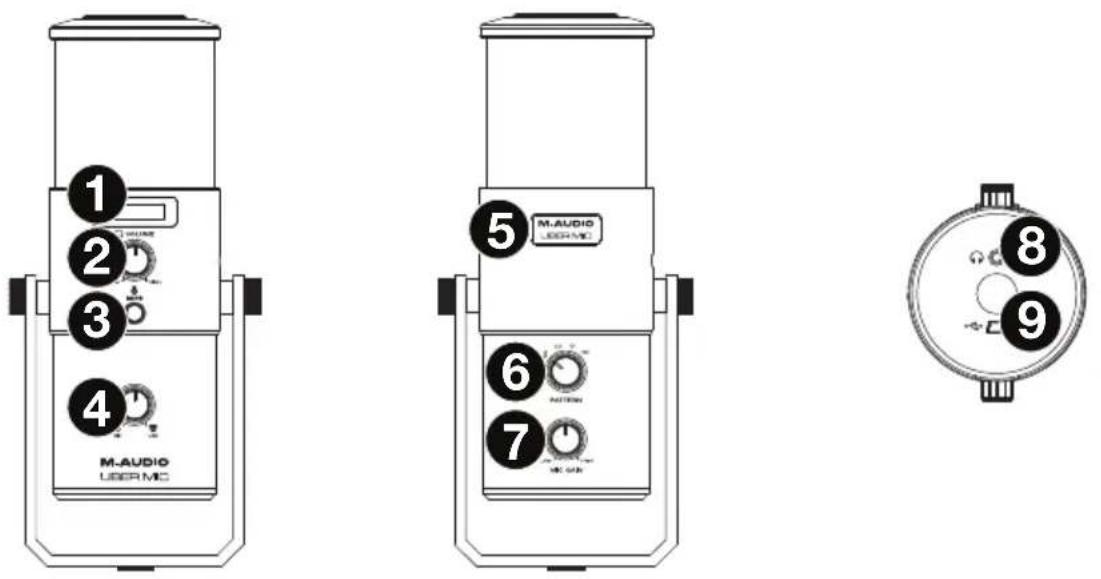
- Display: This display shows the current polar pattern (Pattern) and last setting (Mic Gain or Headphone Volume) that you adjusted on the microphone.
- Headphone Volume: Turn this knob to adjust the volume of the headphone output.
- Mute: Press this button to mute or unmute the microphone signal sent to your computer. This button will flash while muted and be solidly lit while unmuted. (When muted, you will still hear the microphone signal if the Mic-USB knob is turned toward Mic, but be assured that Uber Mic is not sending audio to your computer.)
- Mic-USB: Turn this knob to adjust the blend of the signals sent to the headphone output. Turn it toward Mic to hear more of the microphone signal, or turn it toward USB to hear more of your computer's output signal.
Tip: If you are playing audio on your computer and not using the microphone, we recommend turning this knob fully toward the USB setting.
- Power Light: This name badge will illuminate when Uber Mic is powered on.
- Pattern Selector: Turn this knob to select the microphone's polar pattern, which determines how the microphone picks up sound in its surrounding environment. See the following Operation > Polar Patterns section to learn more about this.
- Mic Gain: Turn this knob to adjust the level of the signal the microphone sends to your computer. Set this knob so the gain is at a "healthy" level but not so high that the signal "clips" or peaks, causing distortion in the audio.
Note: "Clipping" is indicated by your software's volume level meter exceeding 0 dB and usually turning red.
- Headphone Output: Connect 1/8" (3.5 mm) stereo headphones to this output to listen to the audio signal from the microphone and/or your computer. Use the Headphone Volume knob to adjust the volume level. Use the Mic-USB knob to adjust the blend of the two signals.
Note: When using voice chat applications, do not connect the Headphone output to powered speakers. This can result in an acoustic feedback loop or poor conversation quality.
- Mini-USB Port: Use a standard mini-USB cable (included) to connect this port to a USB port on your computer (if you connect it to a USB hub, make sure it is a powered hub). The computer's USB port provides ample power to Uber Mic. Uber Mic is class-compliant, so you do not need to install any additional drivers.
Operation
Polar Patterns
To select the microphone's polar pattern, turn the Pattern Selector knob to the desired setting.
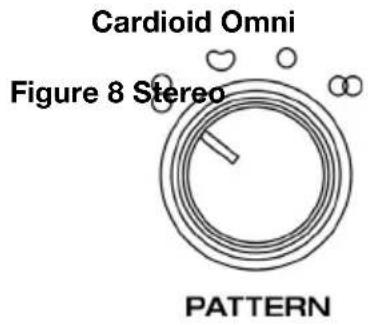
Figure 8 (bidirectional)

radar
| Angle (°) | Value |
| --------- | ----- |
| 0 | 45 |
| 45 | 45 |
| 90 | 45 |
| 135 | 45 |
| 180 | 45 |
| 225 | 45 |
| 270 | 45 |
| 315 | 45 |
Bidirectional means that the microphone picks up sound at the front and rear of the microphone. Sound from the sides of the microphone is not picked up. Use this pattern setting with two or more subjects (one source facing the front of the microphone and the other source facing the back of the microphone) for interviews, instruments, or vocal duets.
Cardioid

radar
| Angle (°) | Value |
| --------- | ----- |
| 0 | 0 |
| 45 | 0 |
| 90 | 0 |
| 135 | 0 |
| 180 | 0 |
| 225 | 0 |
| 270 | 0 |
| 315 | 0 |
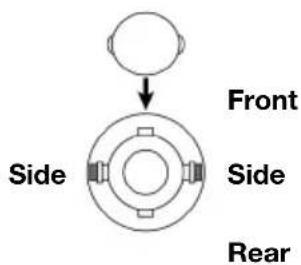
Cardioid means that the microphone picks up sound directly in front of the microphone. Sound from the sides and rear of the microphone is not picked up. This pattern setting is ideal for use with podcasts, voiceovers, vocals, and instruments.
Omni
radar
| Angle (°) | Value |
| --------- | ----- |
| 0 | 0 |
| 45 | 0 |
| 90 | 0 |
| 135 | 0 |
| 180 | 0 |
| 225 | 0 |
| 270 | 0 |
| 315 | 0 |
flowchart
graph TD
    A["Front"] --> B["Center"]
    C["Side"] --> B
    D["Side"] --> B
    E["Rear"] --> B
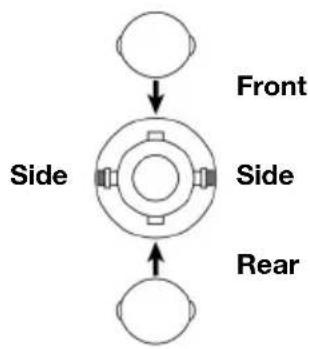
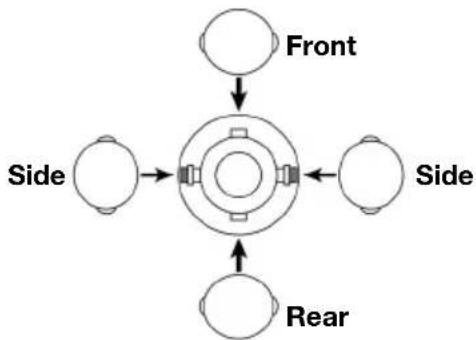
Omni means that the microphone picks up sound equally from all directions. Use this pattern setting in situations where you want to capture the ambience of the room. Start by placing the front of the microphone at the primary sound source. This pattern setting is ideal for conference calls, field recordings, or events/orchestra.
Stereo

radar
| Angle (°) | Value |
| --------- | ----- |
| 0 | 0 |
| 45 | 0 |
| 90 | 0 |
| 135 | 0 |
| 180 | 0 |
| 225 | 0 |
| 270 | 0 |
| 315 | 0 |
flowchart
graph LR
    A["Side"] --> B["Front"]
    B --> C["Rear"]
    C --> D["Side"]
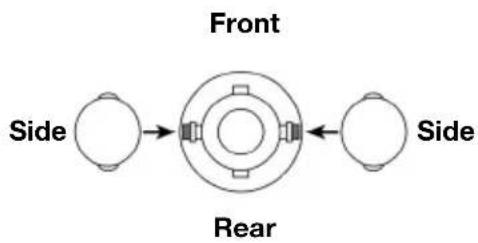
Stereo means that the microphone picks up sound at the left and right sides of the microphone. To start, point the front of the microphone at the sound source, within 2 inches or several feet. Move the sound source to the left or right side of the microphone to get more of the source in either the left or right channel. This pattern setting is ideal for vocals, choir, or instruments. If you are using recording software, set the recording channel as a stereo track (2 channels). This will ensure that your stereo recording is captured properly.
Microphone Placement
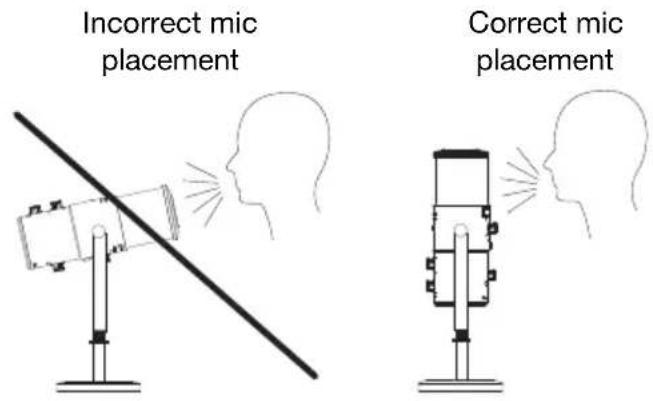
Uber Mic is a side-address microphone, which receives sound from an angle perpendicular to the mic—as opposed to a front-address mic, which accepts sound from the "end" of the microphone. See the diagrams below for proper mic placement.
Adjusting Volume Settings
See the steps below for the best order to adjust volume from the different sources when voice chatting, streaming, podcasting, or recording.
- Turn the Mic Gain knob to adjust the level of the signal that is sent to your computer. Set this knob so the gain is at a “healthy” level but not so high that the signal “clips” or peaks, causing distortion in the audio.
Note: “Clipping” is indicated by your software’s volume level meter exceeding 0 dB and usually turning red.
- Turn the Headphone Volume knob to adjust the volume level and listen to the audio signal with headphones connected to Uber Mic's headphone output or use speakers connected to your computer sound card.
- Turn the USB-Mic knob to adjust the blend of the signals sent to the headphone output. Turn it toward Mic to hear more of the microphone signal, or turn it toward USB to hear more of your computer's output signal.
- Set the computer's sound input volume:
- Windows: In the Taskbar, locate the Volume Control "speaker" icon. Right-click it and select Recording Devices. In the Windows Sound control panel, click the Recording tab and click Properties in the lower-right corner. Click on the Levels tab, and adjust the Microphone volume slider to a "healthy" level without distortion.
Note: “Clipping” is indicated by your software’s volume level meter exceeding 0 dB and usually turning red.
- macOS: From the Apple menu, select System Preferences. Select the Sound icon. Select the Input tab and adjust the input volume to about 80%. Increase or decrease this setting to get the signal to a “healthy” level without distortion.
Note: “Clipping” is indicated by your software’s volume level meter exceeding 0 dB and usually turning red.
-
Set the computer's sound output volume:
-
Windows: In the Taskbar, locate the Volume Control "speaker" icon. Right-click it and select Playback Devices. In the Windows Sound control panel, click the Playback tab and click Properties in the lower-right corner. Click on the Levels tab, and adjust the volume slider to a "healthy" level without distortion.
- macOS: From the Apple menu, select System Preferences. Select the Sound icon. Select the Output tab and adjust the volume to 100%.
natural_image
Diagram of a person using a telescope to observe a human head silhouette (no text or symbols present)
natural_image
Simple line drawing of a microphone emitting sound waves from a human head silhouette (no text or symbols)
Assistance technique
natural_image
Diagram of a person using a megaphone to observe the human head, with no text or symbols present.

natural_image
Simple line drawing of a speaker emitting sound waves from a human head silhouette (no text or symbols)
Réglage du volume
natural_image
Simple line drawing of a megaphone emitting sound waves from a human head silhouette (no text or symbols)
natural_image
Simple line drawing of a microphone emitting sound waves to a human head silhouette (no text or symbols)
natural_image
Diagram of a megaphone emitting sound waves from a human head silhouette (no text or symbols)
natural_image
Simple line drawing of a speaker emitting sound waves into a human head silhouette (no text or symbols)
Technical Specifications
| Microphone |
| Type | 3-capsule condenser USB microphone |
| Capsule Size | 16 mm |
| Polar Patterns | Figure 8, cardioid, omni, and stereo |
| Frequency Response | 30 Hz – 20 kHz |
| Sensitivity | -45 dB (0 dB = 1 V/Pa @ 1 kHz) |
| SNR | 110 dB |
| Maximum SPL | 120 dB (THD ≤1%, 1 kHz) |
| Headphone Output |
| Impedance | 10 Ω |
| Output Power | 30 mW (@ 48 Ω) |
| THD | 0.03% |
| Frequency Response | 20 Hz – 20 kHz |
| SNR | 110 dB |
| General |
| Connectors | (1) 1/8” (3.5 mm) TRS/stereo headphone output(1) mini-USB port(1) 5/8”-27 mounting point |
| Power | via mini-USB |
| Dimensions | 4.5” x 10.8” / 11.4 x 27.4 cm (diameter x height; with integrated stand) |
| Weight | 4.0 lb. / 1.8 kg (microphone & integrated stand)1.5 lb. / 0.7 kg (microphone only)2.1 lb. / 1.0 kg (integrated stand only) |
Specifications are subject to change without notice.
Trademarks & Licenses
M-Audio is a trademark of inMusic Brands, Inc., registered in the U.S. and other countries.
Avid and Pro Tools are registered trademarks of Avid Technology, Inc. in the U.S. and other countries.
Apple and macOS are trademarks of Apple Inc., registered in the U.S. and other countries.
Windows is a registered trademark of Microsoft Corporation in the United States and other countries.
All other product names, company names, trademarks, or trade names are those of their respective owners.
m-audio.com