
AIR 192|4 Vocal Studio Pro - Microphone M-AUDIO - Free user manual and instructions
Find the device manual for free AIR 192|4 Vocal Studio Pro M-AUDIO in PDF.

| Product Type | USB Audio Interface + Condenser Microphone |
| Brand | M-Audio |
| Model | AIR 192|4 Vocal Studio Pro |
| Included Microphone | NOVA Black, cardioid, condenser |
| Microphone Power | +48V via phantom power |
| Interface Power | USB bus (USB-C) |
| Inputs | 1 combo XLR/TRS (mic/line/instrument), 1 TS 6.35 mm instrument input |
| Outputs | 2 main TRS 6.35 mm, 1 headphone TRS 6.35 mm |
| Audio Resolution | Up to 24-bit / 192 kHz |
| Connectivity | USB-C (compatible with USB 2.0 and higher) |
| Controls | Input gain, headphone volume, monitor volume, USB/Direct mix, phantom power |
| LED Indicators | Power, phantom power, clip/signal |
| Dimensions (interface) | Approx. 15 x 10 x 5 cm |
| Weight (interface) | Approx. 0.5 kg |
| Included Software | Pro Tools | First M-Audio Edition, Ableton Live Lite, virtual instruments |
| Compatibility | Windows (ASIO driver), macOS (Core Audio) |
| Security | Switchable phantom power, Kensington lock |
| Microphone Maintenance | Clean with a soft dry cloth, avoid moisture |
| Box Contents | AIR 192|4 interface, NOVA Black microphone, USB-C to USB-C cable, USB-C to USB-A cable, XLR cable, shock mount, pop filter, carrying bag, HDH40 headphones, download cards |
Frequently Asked Questions - AIR 192|4 Vocal Studio Pro M-AUDIO
User questions about AIR 192|4 Vocal Studio Pro M-AUDIO
0 question about this device. Answer the ones you know or ask your own.
Ask a new question about this device
Download the instructions for your Microphone in PDF format for free! Find your manual AIR 192|4 Vocal Studio Pro - M-AUDIO and take your electronic device back in hand. On this page are published all the documents necessary for the use of your device. AIR 192|4 Vocal Studio Pro by M-AUDIO.
USER MANUAL AIR 192|4 Vocal Studio Pro M-AUDIO
User Guide (English)
Introduction
Box Contents
| AIR 192|4 | Microphone Windscreen | USB-C-to-USB-A Cable |
| NOVA Black Microphone | Microphone Pouch | Software Download Cards |
| XLR Microphone Cable | HDH40 Headphones | User Guide |
| Microphone Shock Mount | USB-C-to-USB-C Cable | Safety & Warranty Manual |
Support
Register your product at m-audio.com and log into your account to download the latest software and any necessary drivers for your product.
You can view and download the latest documentation, system requirements, and other information on the website.
For additional product support, visit m-audio.com/support.
Setup
Windows users: Before connecting AIR 192|4 to your computer, install the drivers:
- Go to m-audio.com/drivers and download the latest AIR 192|4 driver for your operating system.
- Open the file you downloaded and double-click the driver installer file.
- Follow the on-screen instructions to install the drivers.
Software: We've included Pro Tools | First M-Audio Edition and Ableton Live Lite with your AIR 192|4 so you can get started making music with professional software right out of the box. Register your AIR 192|4 on m-audio.com, and follow the Pro Tools | First M-Audio Edition install instructions in your User Account. Also, visit ableton.com to check for any available software updates.
Virtual Instruments: Follow the instructions on the software download card for installing the included virtual instrument plugins. After installation, most DAWs will not load virtual instrument plugins automatically. In order to access the virtual instrument plugins with Pro Tools | First M-Audio Edition and Ableton Live Lite, you will need to choose the plugin folder for the software to scan:
Pro Tools | First M-Audio Edition (AAX) plugin folders:
Windows (32-bit): C:\Program Files (x86)\Common Files\Avid\Audio\Plug-Ins
Windows (64-bit): C:\Program Files\Common Files\Avid\Audio\Plug-Ins
macOS: Macintosh HD/Library/Application Support/Avid/Audio/Plug-Ins
Ableton (VST) Plugins:
Windows (32-bit): C:\Program Files (x86)\VSTplugins
Windows (64-bit): C:\Program Files\VSTplugins
macOS: Macintosh HD\Library Audio\Plugins\VST
To set your plugin folder in Ableton Live Lite:
- Go to the Preferences menu.
- Select the File Folder tab. Under Plug-In Sources click Browse and select the appropriate plugin folder.
- After making your selection, the Use VST Custom Plug-In Folder button should be ON. If it is not, click the button to turn it on.
- Exit the Preferences menu.
Connection Diagram
Items not listed under Introduction > Box Contents are sold separately.
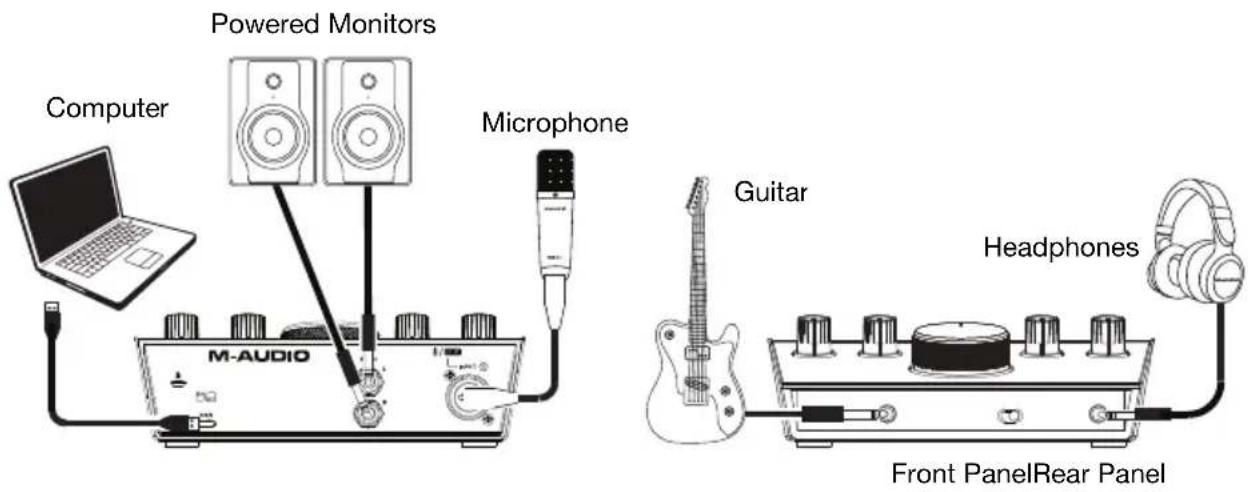
Note:
- Remember to select AIR 192|4 as your interface in the Preferences, Options, Device Setup, etc. in your digital audio workstation (DAW).
- Use the +48V (Phantom Power) Switch only if a microphone requires phantom power. Most dynamic microphones and ribbon microphones do not require phantom power, but most condenser microphones do. Consult your microphone's documentation to find out whether it needs phantom power. When using the included NOVA Black microphone, turn the +48V (Phantom Power) Switch on.
Audio Setup
Windows users: Before connecting AIR 192|4 to your computer, install the driver:
- Go to m-audio.com/drivers and download the latest AIR 192|4 driver for your operating system.
- Open the file you downloaded and double-click the driver installer file.
- Read the End-User License Agreement, then check the box to Agree and click Next to continue.
- Click Install to begin the installation. You may be asked to connect AIR 192|4 to your computer during the installation process. Click Install on any further system messages during the installation.
- Once the installation is complete, click Finish.
To use the Windows driver, open the M-Audio AIR 192|4 Control Panel. Here, you can set your Preferred Buffer Size and Sample Rate.
To set AIR 192|4 as your default playback device, follow the directions below based on your computer's operating system.
Windows users: Before connecting AIR 192|4 to your computer, install the drivers:
- Go to m-audio.com/drivers and download the latest AIR 192|4 driver for your operating system.
- Open the file you downloaded and double-click the driver installer file.
- Follow the on-screen instructions to install the drivers.
Windows:
- Use the included USB cable to connect the AIR 192|4 to your computer.
- In the Taskbar, locate the Volume Control "speaker" icon. Right-click the speaker and select Playback Devices.
Alternatively, go to Start Menu > Control Panel (or Settings > Control Panel in Classic View) > Hardware and Sound > Sound. - In the Windows Sound control panel select the Playback tab and select AIR 192|4 as the default device.
- Click the Recording tab and select AIR 192|4 as the default device.
- Click Properties in the lower right-hand corner.
- In the new window, click the Advanced tab and select 2-channel, 24-bit, 48000 Hz (Studio Quality) as the default format.
- Uncheck both boxes under Exclusive Mode.
- Click OK to close the Properties window.
- Click OK to close the Sound control panel.
macOS:
- Use the included USB cable to connect the AIR 192|4 to your computer.
- Go to Applications > Utilities > Audio MIDI Setup.
- In the Audio Devices window, select AIR 192|4 in the left column.
- Right-click AIR 192|4, and select Use this device for sound input.
- Right-click AIR 192|4, and select Use this device for sound output.
- Quit Audio MIDI Setup.
Setting Up AIR 192|4 with Your Software
Setting Up AIR 192|4 with Pro Tools | First M-Audio Edition
- Use the included USB cable to connect the AIR 192|4 to your computer.
- Open Pro Tools | First M-Audio Edition.
- Go to Setup > Playback Engine....
- Open the Playback Engine dropdown menu and select M-Audio AIR 192|4.
Note: You may need to save and restart your project.
- Select your Sample Rate and then click OK to close the Setup window.
- Go to the Setup > I/O and select M-Audio AIR 192|4 for the Input and Output devices.
You can now add tracks to send and receive audio from sources connected to AIR 192|4 inputs and stream recorded audio back through the AIR 192|4 outputs.
Setting Up AIR 192|4 with Ableton Live Lite
- Use the included USB cable to connect the AIR 192|4 to your computer.
- Open Ableton Live Lite.
- Go to Preferences > Audio tab.
- Click on Driver Type to select CoreAudio (Mac) or ASIO (Windows).
- Select AIR 192|4 in the Input and Output Config section.
- Select your Sample Rate and then close the audio preferences window.
You can now add tracks to send and receive audio from sources connected to AIR 192|4 inputs and stream recorded audio back through the AIR 192|4 outputs.
Features
Top Panel
- Input Gain: Adjusts the input's gain level. Set this knob so the corresponding LED Meter (located below the knob) displays a "healthy" (-3 dB, yellow LED) level during performance—but not so high that the meter "clips" or peaks (Clip, red LED), causing distortion in the audio.
- LED Meters: Indicates the input signal level from the Combo Input or Instrument Input.
- USB / Direct Blend: Adjusts the mix of the audio signal from your inputs (Direct) and the audio output of your computer (USB) that will be sent to the Main Outputs and Headphone Output.
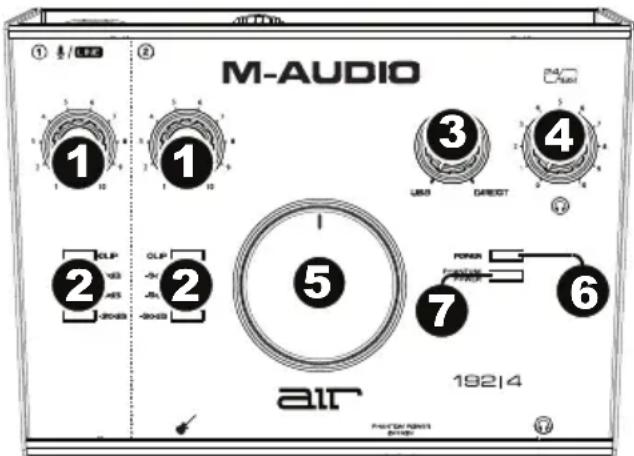
This knob is useful for dealing with “latency” when you are recording in your DAW. Latency is a delay in sound that may occur between the incoming sound (playing your instrument, singing, etc.) and outgoing sound (when you hear it in the DAW).
Latency is often the result of the “buffer size” setting, which is usually located in your DAW’s Preferences, Options, or Device Setup menu. Higher buffer sizes generally result in higher latency. In some cases, lower buffer size settings can consume a lot of your computer’s CPU and cause audio glitches. To prevent these audio glitches, you will need to use a higher buffer setting, and this may result in latency.
If you are experiencing latency when recording, adjust the knob towards the Direct position to increase the blend of unprocessed audio from your inputs directly to your Main Outputs and Headphone Output. This will let you hear the incoming audio from your inputs without latency while still being able to hear the audio from your DAW. When listening to the playback, adjust the knob all the way to the USB position.
If your computer is powerful enough, you may be able to set the buffer size setting in your DAW low enough such that you may never need to listen to the direct audio signal from your inputs. In this case, set the USB / Direct Blend knob all the way to the USB position to monitor only the audio output of your DAW.
- Headphone Level: Adjusts the output volume of the Headphone Output.
- Monitor Level: Adjusts the output volume of Main Outputs, which should be connected to your powered monitors or amplifier system.
- Power LED: Lights up when a valid USB connection has been established between your computer and AIR 192|4. Use this light to verify that AIR 192|4 is receiving power and is ready to use.
- +48V (Phantom Power) LED: Lights up when phantom power is engaged.
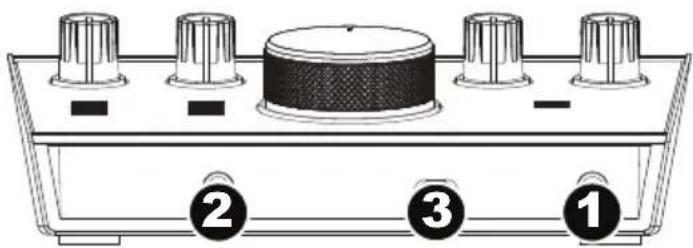
Rear Panel
- USB Port (Type C): This connection will allow you to send audio and MIDI data to and from a computer. Use the included USB-C-to-USB-C or USB-C-to-USB-A cables to connect the AIR 192|4 to a computer. The AIR 192|4 requires a USB 2.0 connection (or higher).

- Combo Input: Connect a microphone, a guitar or bass with an active pickup, or a line-level device to this input. For microphones, use an XLR or 1/4" (6.35 mm) TRS cable. For a guitar or bass with an active pickup, use a standard 1/4" (6.35 mm) TS cable. For line-level signals, use a 1/4" (6.35 mm) TRS cable. View the input signal level with the LED Meters.
- Main Outputs: Use standard 1/4" (6.35 mm) TRS cables to connect these outputs to your powered monitors, amplifier system, etc. The mix you hear from these outputs will be determined by the USB / Direct Blend knob. The level of these outputs is controlled by the Monitor Level knob.
- Kensington Lock Slot: You can use this Kensington lock slot to secure AIR 192|4 to a table or other surface.
Front Panel
- Headphone Output: Connect 1/4" (6.35 mm) TRS headphones to this output. The mix you hear from this output will be determined by the USB / Direct Blend knob. The level of this output is controlled by the Headphone Level knob.
- Instrument Input: Connect a guitar with a passive pickup or other high-impedance signal to this input with a 1/4" (6.35 mm) TS cable. View the input signal level with the LED Meters.
- +48V (Phantom Power) Switch: This switch activates and deactivates phantom power. When activated (lit), phantom power supplies +48 volts to the Combo Input. Please note that most dynamic microphones and ribbon microphones do not require phantom power, while most condenser microphones do. Consult your microphone's documentation to find out whether it needs phantom power. The included NOVA Black microphone requires phantom power.
NOVA Black Microphone Usage
Connections and Phantom Power
The NOVA Black microphone outputs a balanced, low-impedance signal. It is designed to be connected to the mic-level inputs of a mixer channel or a dedicated high-quality preamp.
As with all condenser microphones, your NOVA Black microphone requires power in order to operate. You will need to connect the NOVA Black microphone to the XLR connection of a preamp or mixer channel strip that supplies +48V phantom power (phantom power shares the same XLR cable as the audio from the microphone).
To avoid pops and surges that can damage components like speakers and microphones, always follow these steps when connecting the mic and/or cable:
- Turn the gain of the channel on your preamp/mixer all the way down.
- If your preamp's/mixer's phantom power is activated, deactivate it.
- Use a high-quality XLR cable (included) to connect the NOVA Black microphone to that channel on your preamp/mixer.
- Activate your preamp's/mixer's phantom power.
- Turn up the gain of the channel on your preamp/mixer.
Before disconnecting the mic and/or cable, repeat Steps 1 and 2.
Cardioid Pattern
Cardioid is the most universal microphone polar pattern. This is because the back of the microphone rejects sound, allowing the engineer to isolate the signal source from other performance elements or background noise. The logo side of the microphone is the "live" side.
Care of Your Microphone
- Never subject the NOVA Black microphone to physical shock.
- Always use a mic stand and use the included shock mount when securing it to a stand. Push the metal clips on the sides of the shock mount toward each other to open the center opening and then slide the bottom of the NOVA Black microphone into and through the center of the shock mount. Release the clips so the center of the shock mount holds the NOVA Black microphone in place.
- Always wipe the NOVA Black microphone's exterior with a soft dry cloth and return it to its case after each use to prevent damage caused by dust.
- If your NOVA Black microphone needs more extensive cleaning, lightly dampen a soft cloth with water or mild household soap and clean the metal exterior, wiping it completely dry when finished. Never spray a cleaning agent on the NOVA Black microphone itself, as excessive moisture can damage the unit.
- Avoid subjecting the NOVA Black microphone to any kind of moisture. In vocal applications, use a windscreen to protect the diaphragm from the build-up of breath condensation and saliva.
- Never disassemble the NOVA Black microphone. There are no user-serviceable parts inside.
- Use high-quality cables to avoid short circuits that may damage the microphone's electronics.
- Avoid temperature extremes above 95^ F / 35^ C and below 50^ F / 10^ C. To avoid harmful condensation on the diaphragm when moving between indoor and outdoor environments, allow the NOVA Black microphone to acclimate to room (air) temperature before connection.
macOS: Macintosh HD/Library/Application Support/Avid/Audio/Plug-Ins
Plugins de Ableton (VST):
Windows (32-bit): C:\Program Files (x86)\VSTplugins
Windows (64-bit): C:\Program Files\VSTplugins
macOS: Macintosh HD\Library Audio\Plugins\VST
macOS : Macintosh HD/Bibliothèque/Application Support/Avid/Audio/Plug-ins
Plug-ins Ableton (VST) :
Pro Tools | First M-Audio Edition (AAX) cartelle plugin:
Windows (32-bit): C:\Program Files (x86)\Common Files\Avid\Audio\Plug-Ins
Windows (64-bit): C:\Program Files\Common Files\Avid\Audio\Plug-Ins
macOS: Macintosh HD/Library/Application Support/Avid/Audio/Plug-Ins
Plugin Ableton (VST):
Windows (32-bit): C:\Program Files (x86)\VSTplugins
Windows (64-bit): C:\Program Files\VSTplugins
macOS: Macintosh HD\Library Audio\Plugins\VST
Per configurare la cartella plugin in Ableton Live Lite:
macOS: Macintosh HD/Library/Application Support/Avid/Audio/Plug-Ins
Ableton (VST) Plugins:
Windows (32-bit): C:\Programme (x86)\VSTplugins
Windows (64-bit): C:\Programme\VSTplugins
macOS: Macintosh HD\Library Audio\Plugins\VST
Technical Specifications
AIR 192|4
All specifications are measured at 20 kHz bandwidth. Specifications are subject to change without notice.
| Mic Input 1 (balanced XLR) | |
| Frequency Response | 20 Hz – 20 kHz ( ± 0.1 dB) |
| Dynamic Range | 104 dB (A-weighted) |
| Signal-to-Noise Ratio | 104 dB (+1.0 dBu, A-weighted) |
| THD+N | 0.003% |
| Preamp EIN | -128 dBu (max gain, 150 source, A-weighted) |
| Max Input Level | +1.5 dBu |
| Gain Range | 55 dB |
| Line Input 1 (balanced 1/4" [6.35 mm] TRS) | |
| Frequency Response | 20 Hz – 20 kHz ( ± 0.05 dB) |
| Signal-to-Noise Ratio | 101 dB (1 kHz, +4 dBu, A-weighted) |
| THD+N | 0.003% |
| Max Input Level | 16 dBu |
| Gain Range | 55 dB |
| Inst Input 2 (unbalanced 1/4" [6.35 mm] TS) | |
| Frequency Response | 20 Hz – 20 kHz ( ± 0.05 dB) |
| Dynamic Range | 100 dB (A-weighted) |
| Signal-to-Noise Ratio | 102 dB (+ 4 dBu, A-weighted) |
| THD+N | 0.004% |
| Max Input Level | 6 dBu |
| Input Impedance | 1 M |
| Gain Range | 24 dB |
| Main Outputs, L and R (impedance-balanced 1/4" [6.35 mm] TRS) | |
| Frequency Response | 20 Hz – 20 kHz ( ± 0.06 dB) |
| Dynamic Range / Signal-to-Noise Ratio | 102 dB (A-weighted) |
| THD+N | 0.005% |
| Max Output Level | +7 dBu (1 kHz, -1 dBFS) |
| Headphone Output (1/4” [6.35 mm] TRS) | |
| THD+N | 0.005% |
| Output Impedance | 10 Ω |
General
| Power | USB-bus-powered |
| Dimensions(width x depth x height) | 8.0" x 6.0" x 2.75"204.2 x 152.4 x 70.1 mm |
| Weight | 2.0 lbs.0.9 kg |
NOVA Black Microphone
| Type | Back Electret condenser microphone |
| Element | 18 mm pure aluminum diaphragm capsule |
| Polar Pattern | Cardioid (at 1kHz) (at 1kHz) |
| Frequency Response | 20 Hz – 20 kHz |
| Sensitivity | -38 dB (0 dB = 1 V/Pa @ 1 kHz) |
| Rated Impedance | 200Ω |
| Maximum SPL | 136 dB |
| Phantom Power Required | +48 V |
| S/N Ratio | 77 dB |
| Current Consumption | 3 mA |
HDH40 Headphones
| Acoustic Design | Dynamic, Closed |
| Driver | 40 mm, neodymium |
| Frequency Response | 15 Hz – 22 kHz |
| Sensitivity | 95 dB ±3 dB |
| Rated Impedance | 32Ω |
| Earpad | Leatherette |
| Cable Length | 9.8 ft. / 3 m |
Trademarks and Licenses
M-Audio and AIR Music Tech are trademarks of inMusic Brands, Inc., registered in the U.S. and other countries. Windows is a registered trademark of Microsoft Corporation in the United States and other countries. Macintosh and macOS are trademarks of Apple Inc., registered in the U.S. and other countries. Avid and Pro Tools are registered trademarks of Avid Technology, Inc. in the U.S. and other countries. Ableton is a trademark of Ableton AG. Kensington and the K & Lock logo are registered trademarks of ACCO Brands. All other product or company names are trademarks or registered trademarks of their respective owners.
M-AUDIO.COM

- User Guide (English)
- Introduction
- Support
- Setup
- Connection Diagram
- Note:
- Audio Setup
- Windows:
- macOS:
- Setting Up AIR 192|4 with Your Software
- Setting Up AIR 192|4 with Pro Tools | First M-Audio Edition
- Setting Up AIR 192|4 with Ableton Live Lite
- Features
- Top Panel
- Rear Panel
- Front Panel
- NOVA Black Microphone Usage
- Connections and Phantom Power
- Cardioid Pattern
- Care of Your Microphone
- Technical Specifications
- AIR 192|4
- Trademarks and Licenses
Brand : M-AUDIO
Model : AIR 192|4 Vocal Studio Pro
Category : Microphone