CEMC900IN - Multi-cooker CONTINENTAL EDISON - Free user manual and instructions
Find the device manual for free CEMC900IN CONTINENTAL EDISON in PDF.

| Product type | Multi-cooker (multifunction multicooker) |
| Brand | Continental Edison |
| Model | CEMC900IN |
| Power supply | 220-240 V ~ 50/60 Hz |
| Power | 900 W |
| Bowl capacity | 1.8 L max / 0.6 L min |
| Bowl material | Non-stick |
| Number of preset programs | 20 programs |
| Included programs | Soup, Porridge, Rice, Pilaf, Pasta, Steam, Sauté, Reheat, Cakes, Jelly, Stuffing, Stew, Sauce, Jam, Yogurt, Cottage cheese, Simmer, Brown, Fondue, Multichef |
| Keep warm function | Yes (up to 24 h at 75 °C) |
| Delayed start function | Yes (adjustable from 1 to 24 h depending on program) |
| Control panel type | Digital touch with LED display |
| Included accessories | Graduated bowl, measuring cup, steam basket, 6 yogurt jars with lids, spatula, power cord |
| Temperature adjustment | Yes (Fondue and Multichef programs) |
| Duration adjustment | Yes (most programs) |
| Safety | Lid lock, overheating protection, automatic shut-off, hot surface warning |
| Cleaning | Bowl and accessories hand-washable with dish soap; body cleaned with a soft cloth; never immerse the body |
| Special instructions | Do not use for frying, do not exceed max level, beware of hot steam, do not open during cooking |
| Warranty | 2 years (standard Continental Edison) |
Frequently Asked Questions - CEMC900IN CONTINENTAL EDISON
User questions about CEMC900IN CONTINENTAL EDISON
0 question about this device. Answer the ones you know or ask your own.
Ask a new question about this device
Download the instructions for your Multi-cooker in PDF format for free! Find your manual CEMC900IN - CONTINENTAL EDISON and take your electronic device back in hand. On this page are published all the documents necessary for the use of your device. CEMC900IN by CONTINENTAL EDISON.
USER MANUAL CEMC900IN CONTINENTAL EDISON
- FR (version originale)
- EN (translated from the original)
Please read through this user manual thoroughly, its detailed instructions, warnings and safety precautions to ensure you get the most out of your product.
Keep this manual for future reference.
- READ CAREFULLY THE INSTRUCTIONS BEFORE INSTALLING AND USING THIS APPLIANCE. IN THE CASE YOU RESELL THIS APPLIANCE, PLEASE MAKE SURE TO PROVIDE THIS INSTRUCTION MANUAL TO YOUR BUYER.
-
THIS APPLIANCE IS INTENDED TO BE USED IN HOUSEHOLD AND SIMILAR APPLICATIONS SUCH AS:
-
STAFF KITCHEN AREAS IN SHOPS, OFFICES AND OTHER WORKING ENVIRONMENTS;
- FARM HOUSES;
- BY CLIENTS IN HOTELS, MOTELS AND OTHER RESIDENTIAL TYPE OF ENVIRONMENTS;
-
BED AND BREAKFAST TYPE ENVIRONMENTS.
-
THIS APPLIANCE CAN BE USED BY CHILDREN AGED FROM 8 YEARS AND ABOVE IF THEY HAVE BEEN GIVEN SUPERVISION OR INSTRUCTION CONCERNING USE OF THE APPLIANCE IN A SAFE WAY AND UNDERSTAND THE HAZARDS INVOLVED.
- THIS APPLIANCE CAN BE USED BY CHILDREN AGED FROM 8 YEARS AND ABOVE AND PERSONS WITH REDUCED PHYSICAL, SENSORY OR MENTAL CAPABILITIES OR LACK OF EXPERIENCE AND KNOWLEDGE IF THEY HAVE BEEN GIVEN SUPERVISION OR INSTRUCTION CONCERNING USE OF THE APPLIANCE IN A SAFE WAY AND UNDERSTAND THE HAZARDS INVOLVED. CLEANING AND USER MAINTENANCE SHALL NOT BE MADE BY CHILDREN UNLESS THEY ARE OLDER THAN 8 AND SUPERVISED.
- KEEP THE APPLIANCE AND ITS CORD OUT OF REACH OF CHILDREN LESS THAN 8 YEARS.
- CHILDREN SHALL NOT PLAY WITH THE APPLIANCE.
-
IF THE SUPPLY CORD IS DAMAGED, IT MUST BE REPLACED BY THE MANUFACTURER, ITS SERVICE AGENT OR SIMILARLY QUALIFIED PERSONS IN ORDER TO AVOID A HAZARD.
-
APPLIANCES ARE NOT INTENDED TO BE OPERATED BY MEANS OF AN EXTERNAL TIMER OR SEPARATE REMOTE-CONTROL SYSTEM.
WARNING: POTENTIAL INJURY FROM MISUSE. - WARNING: AVOID SPILLAGE ON THE CONNECTOR.
WARNING: HOT SURFACE!
- THE HEATING ELEMENT SURFACE IS SUBJECT TO RESIDUAL HEAT AFTER USE.
DURING USE, THIS APPLIANCE MAY REACH VERY HIGH TEMPERATURE AND CAUSE BURNS. - CAUTION - SOME PARTS OF THIS PRODUCT CAN BECOME VERY HOT AND CAUSE BURNS. PARTICULAR ATTENTION HAS TO BE GIVEN WHERE CHILDREN AND VULNERABLE PEOPLE ARE PRESENT.
- USE OVEN GLOVES IF YOU NEED TO TOUCH THE APPLIANCE DURING OR AFTER USE.
- THIS APPLIANCE SHALL NOT BE IMMERSED.
- THE COOKING APPLIANCE SHALL BE PLACED ON A STABLE SURFACE WITH ITS HANDLES WELL POSITIONNED TO AVOID ANY HOT LIQUID SPLASHING.
- REGARDING THE INFORMATION FOR INSTALLATION AND OPERATING SETTING, THANKS TO REFER TO THE BELOW PARAGRAPH OF THE MANUAL.
SAFETY INSTRUCTIONS FOR USE
- THIS APPLIANCE MUST BE EARTHED. IF YOU NEED TO USE AN EXTENSION LEAD, IT IS IMPORTANT THAT YOU USE A MODEL FITTED WITH AN EARTH PLUG.
- CHECK THAT YOUR ELECTRICAL INSTALLATION IS SUFFICIENT FOR SUPPLYING THIS APPLIANCE.
DO NOT PUT IT ON TOP OF ANOTHER APPLIANCE. - BE CAREFUL OF HOT STEAM ESCAPING STEAM VENTS DURING COOKING AND OF STEAM ESCAPING FROM MULTICOOKER WHEN YOU OPEN THE COVER. KEEP
YOUR HANDS AND YOUR FACE AWAY FROM THE MULTICOKER TO AVOID CONTACT WITH STEAM.
DURING AND AFTER COOKING, THE BOWL AND THE MULTICOOKER MAY BE HOT AND HEAVY.
- DO NOT LIFT AND MOVE THE MULTICOOKER WHILE IN USE.
- TO AVOID AN OVERFLOW, DO NOT EXCEED THE MAXIMUM WATER LEVEL INDICATED IN THE BOWL.
- DO NOT PLACE UTENSILS INSIDE THE BOWL WHEN COOKING RICE, OR USING KEEP WARM AND REHEATING FUNCTION.
- USE ONLY SUPPLIED KITCHEN UTENSILS. AVOID USING SHARP UTENSILS. COOKING SHELLFISH IS NOT RECOMMENDED TO AVOID SCRATCHES. REMOVE SHELLS BEFORE COOKING.
- DO NOT INSERT A METAL OBJECT OR A FOREIGN BODY THROUGH STEAM VENTS.
- DO NOT PLACE MAGNETIC OBJECT ON THE COVER. DO NOT USE THE MULTICOOKER NEAR A MAGNETIC OBJECT.
- NEVER PLACE THE BOWL DIRECTLY ON A HOTPLATE FOR COOKING RICE. DO NOT USE THE BOWL IF IT IS DEFORMED.
SAFETY INSTRUCTIONS FOR CLEANING AND MAINTENANCE
- ALWAYS UNPLUG THE APPLIANCE AND LET IT COOL DOWN COMPLETELY BEFORE ANY CLEANING OPERATION.
- NEVER IMMERSE IN WATER OR ANY OTHER LIQUID THIS APPLIANCE, ITS ELECTRIC PLUG AND CORD.
- REMOVE THE ACCESSORIES AND CLEAN WITH A SPONGE DAMPED WITH DISHWASHING LIQUID, RINSE THEM AND LET THEM DRY.
- WHEN CLEANING THE OUTER, USE A SOFT CLOTH (OR SPONGE) AND NEUTRAL CLEANER ON THE EXTERIOR
SURFACES OF THE APPLIANCE. DO NOT USE A HARD BRUSH OR ANY OTHERS CLEANERS TO AVOID SCRAatching OR DAMAGING THE SURFACE OF THE APPLIANCE AND ITS ACCESSORIES.
FOR THE DETAILS ON HOW TO CLEAN SURFACES IN CONTACT WITH FOOD, PLEASE SEE SECTION "CLEANING AND MAINTENANCE".
SAFETY CAUTIONS
- ANY COMMERCIAL USE, INAPPROPRIATE USE OR FAILURE TO COMPLY WITH THE INSTRUCTIONS, THE MANUFACTURER ACCEPTS NO RESPONSIBILITY AND THE GUARANTEE WILL NOT APPLY.
- AFTER UNPACKING THE APPLIANCE, MAKE SURE IT IS NOT DAMAGED. IN CASE OF DOUBT, DO NOT USE THE APPLIANCE AND CONTACT YOUR SUPPLIER OR A QUALIFIED TECHNICIAN.
- THE USE OF ACCESSORY AND ATTACHMENTS NOT RECOMMENDED BY THE MANUFACTURER MAY CAUSE INJURIES.
- THE APPLIANCE MUST NOT BE USED IF IT HAS BEEN DROPPED, IF IT HAS ANY VISIBLE DAMAGE, IF IT LEAKS OR IF IT FUNCTIONS ABNORMALLY IN ANY WAY.
- ALWAYS UNPLUG THE APPLIANCE IF NOT USING IT FOR A PERIOD OF TIME.
- REMOVE ALL PACKAGING AND DO NOT LEAVE THE PACKAGING MATERIAL SUCH AS PLASTIC BAGS, POLYSTYRENE AND ELASTIC BANDS IN EASY REACH OF CHILDREN AS THEY MAY CAUSE SERIOUS INJURIES.
- TAKE ALL NECESSARY MEASURE WITH CORDS AND EXTENSIONS TO AVOID ANY INJURIES WHILE IN USE.
- NEVER MOVE THE APPLIANCE WHEN IN USE.
-
THE SUPPLY CORD SHOULD BE REGULARLY EXAMINED FOR SIGNS OF DAMAGE AND THE APPLIANCE IS NOT TO BE USED IF THE CORD IS DAMAGED.
-
NEVER PLUG THE APPLIANCE AND TOUCH THE THERMOSTAT WITH WET HANDS. NEVER USE THE APPLIANCE WITH BARE OR WET FEET.
- NEVER UNPLUG THE APPLIANCE BY PULLING THE POWER CABLE. ALWAYS UNPLUG THE APPLIANCE FROM THE MAIN SOCKET.
- DO NOT STORE ANY FLAMMABLE PRODUCTS CLOSE TO OR UNDER THE UNIT WHERE YOU PLACED THE APPLIANCE. DO NOT PLACE AND USE THE APPLIANCE CLOSE TO ANY FURNITURE WITH FABRICS, CURTAINS OR DRAPES.
- IN THE CASE OF SOME PARTS OF THE APPLIANCE DURING THE USE CATCH FIRE, DO NOT ATTEMPT TO EXTINGUISH IT WITH WATER. USE A DAMP CLOTH OR A BLANKET TO CHOKE THE FLAMES OR USE AN EXTINGUISHER BY SPRAYING THE FOAMS TOWARDS THE APPLIANCE AND ON THE SAME DIRECTION THAN THE WIND.
For installation, handling, cleaning, and disposal of the device, refer to the following chapters of the User's Guide.
Information on the marking of the
CE Center
Conformity Compliance.
The marking indicates that the product meets the main requirements of the European Directives: 2014/35/EU (Low Voltage), 2014/30/EU (Electromagnetic Compatibility), 2011/65 / EU (Restriction of use of certain substances in equipment electronic).
TABLE OF CONTENTS
SAFETYWARNINGS 35
I.DESCRIPTION 42
1.PRODUCT& ACCESSORIESDESCRIPTION 42
2. LED TOUCH CONTROL PANEL 43
II. TECHNICAL INFORMATION 44
III. SET UP AND USE 44
BEFORE FIRST USE 44
- USING YOUR APPLIANCE 46
IV. CLEANING AND MAINTENANCE 60
V.TROUBLESHOOTING 61
VI. ENVIRONMENT: RECYCLING 63
VII. WARRANTY 63
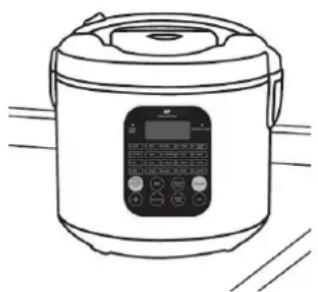
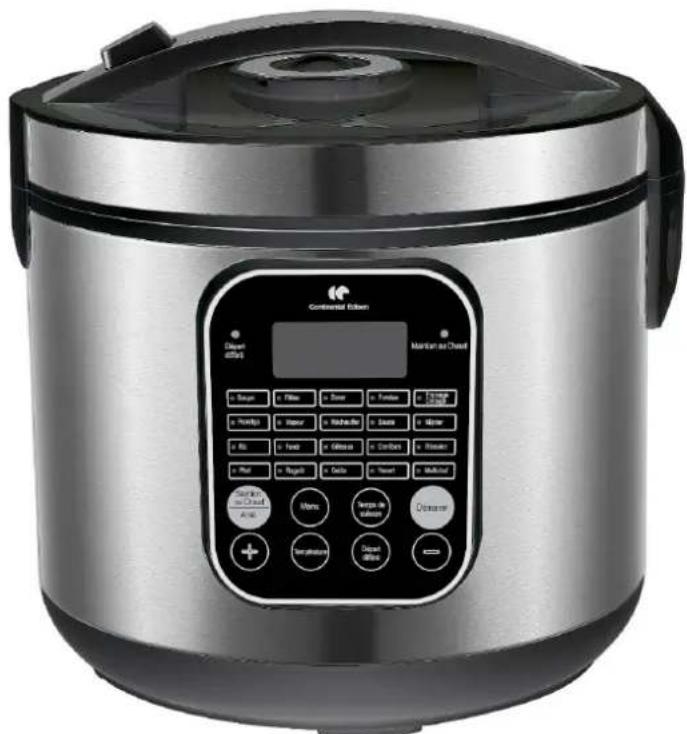
I. DESCRIPTION
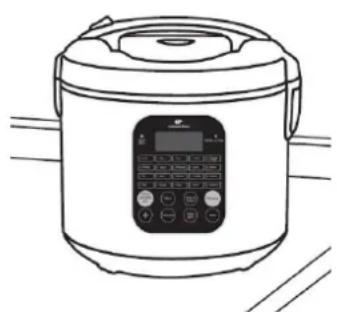
1. Product & accessories description
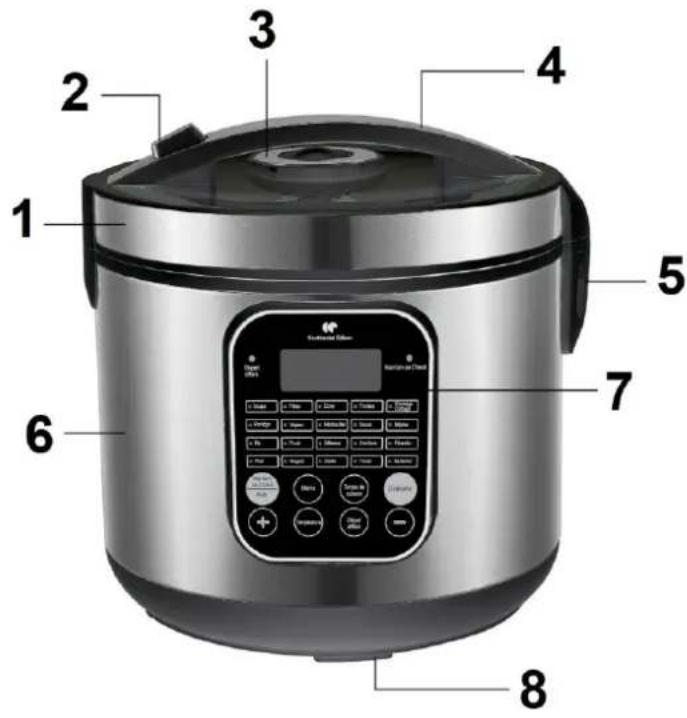
- Cover lid
- Unlock button
- Steam vent and inner valve
- Handle
- Condensation collector
- Main body
-
LED touch control panel
-
Anti-slip base
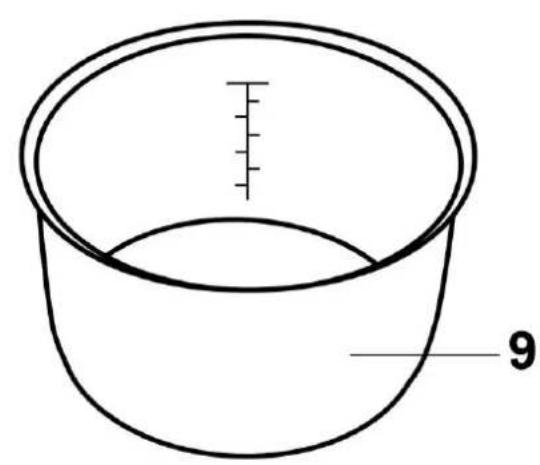
- Bowl
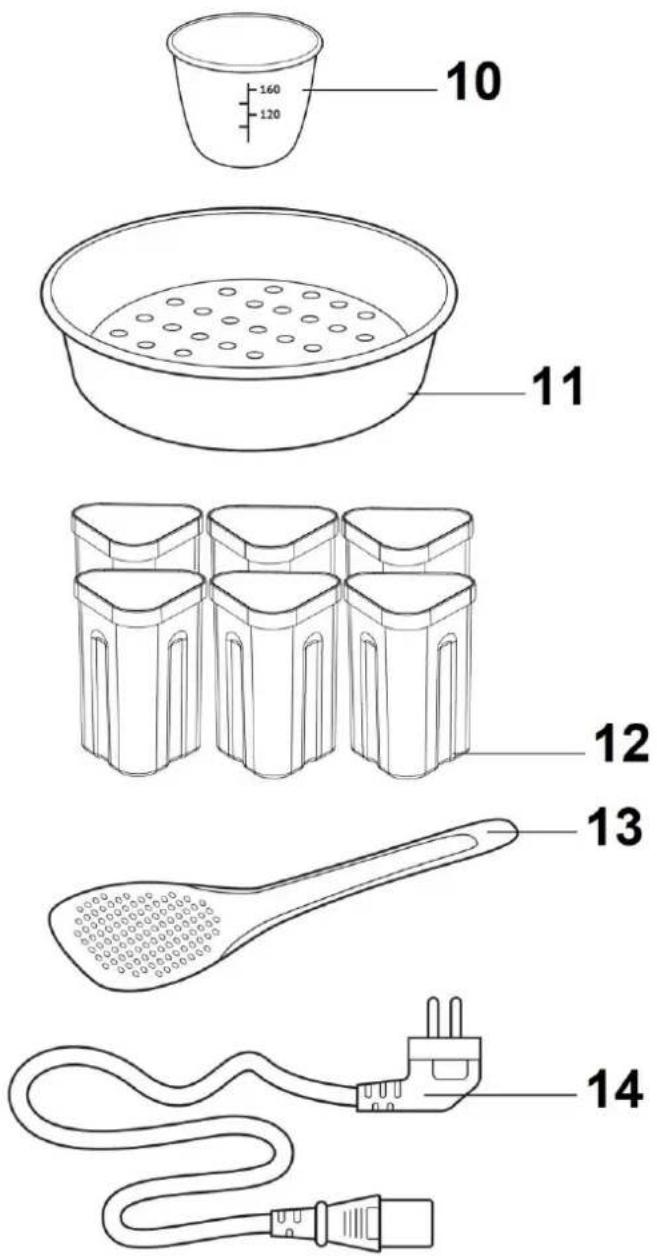
- Measuring cup
- Steam basket
- 6 yogurt pots with lids
- Spatula
- Power cord
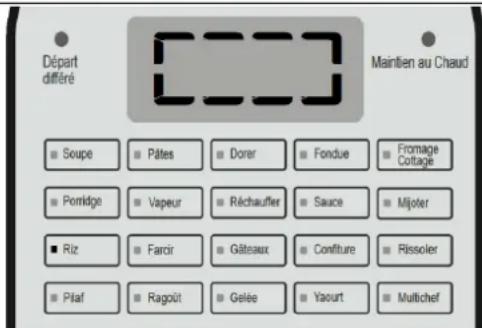
2. LED touch control panel
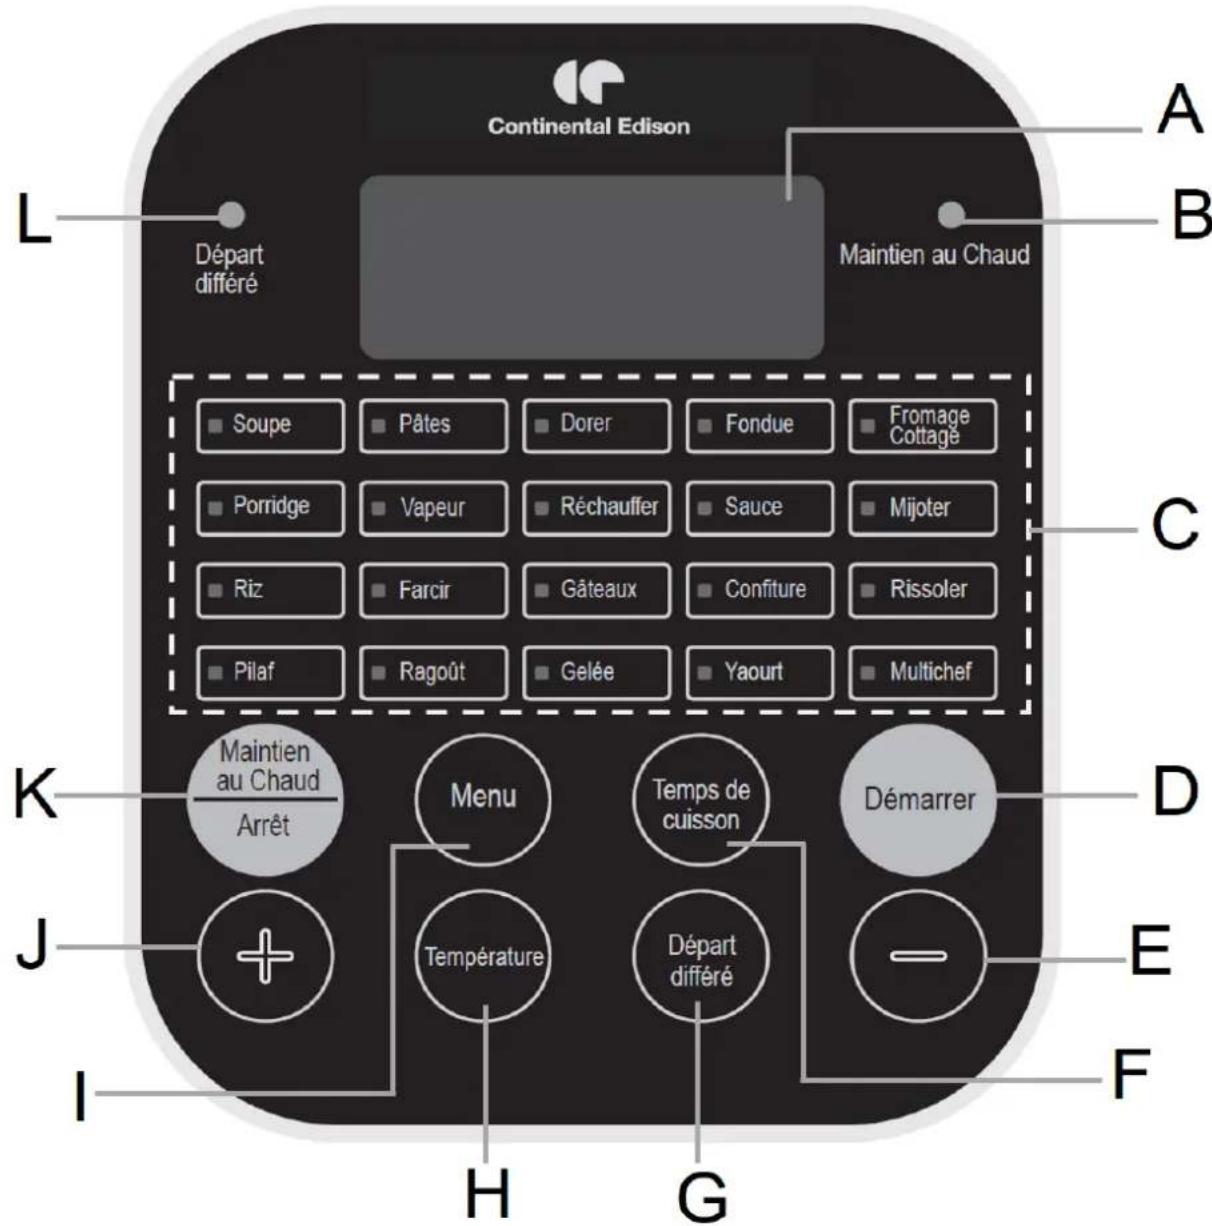
A. LED display: displays the temperature and the duration of the cooking time
B. Indicator light for the Keep warm function
C. Indicators for preset cooking programs
D. « Démarrer »: button to start the selected cooking program
E. « - »: button for selecting the cooking program and setting the cooking time and temperature
F. « Temps de cuisson »: button to set the cooking time
G. « Départ différé »: button to program a later start cooking time
H. « Température »: button to adjust the cooking temperature
I. « Menu »: button to access the preset cooking programs
J. « + »: button for selecting the cooking program and settings for the cooking time and temperature
K. « Maintien au Chaud / Arrêt »: button for the Keep warm function or to switch off the appliance
L. Delayed start function indicator light
II. TECHNICAL INFORMATION
| Reference | CEMC900IN (Modèle MPR50278A) |
| Electrical parameters | 220-240V~50-60Hz |
| Power | 900W |
III. SET UP AND USE
Before first use
Unpacking the appliance and disposing of the packaging elements:

Remove all packing materials that is protecting the appliance and the protective elements inside the appliance compartments.
- The packing box and the papers sheets are recyclable. They must
be thrown in the collection bins provided for this purpose.
- The materials bearing the symbol are recyclable:
PE < = polyethylene; >PS < = polystyrene; >PP < = polypropylene
This means that they can be recycled by depositors in appropriate collection containers.
- The other packaging elements (adhesive, fasteners ...) must be thrown away with household waste.
To know further: www.quefairedemesdechets.fr
- Wash all accessories with a sponge damped with dishwashing liquid. Rinse thoroughly and dry them with a clean cloth.
- Clean the outer body with a dry clean cloth. Do not immerse the appliance into water. Do not put the appliance into a dishwasher.
- Place your appliance on a flat, stable and heat resistant surface.
- Before first use, it is imperative to operate the appliance with the « Vapeur » steam program in order to eliminate the fumes and odors that normally emanate from a new appliance.
- Install your device on a flat, stable and heat-resistant surface.
- Fill the bowl with water up to the 1.0L mark indicated on the inside of the tank and place the bowl inside the appliance. Close the cover of the appliance.
-
Connect the appliance to an earthed socket.
-
The LED display and the indicator lights switch on to indicate that the appliance is on.
- Press the « Menu » key, select the « Vapeur » cooking program using the « - » or « + » selection keys. The selection is confirmed when the steam program indicator light flashes red; press the « Démarrer » button.
- Leave the appliance operating for a complete cooking cycle of the « Vapeur » program.
Air the room during this operation.
NOTE: It is normal that strange odor comes out from the unit for the first use. This will cease after a short while. Do not forget to air the room during this operation.
Attention!
Leave a sufficient space of 20cm around the appliance, and a distance of 30cm above the multicooker. Do not place your appliance and its power cord on or near a heat source and the like such as a hotplate, oven, heater, etc. The appliance must not be placed inside a piece of furniture while it is in use.
Do not exceed the maximum filling level indicated on the internal wall of the tank by the markings «1.8L/10 CUP».
Never operate the appliance without the bowl in place or with an empty bowl. Never put water or ingredients in the appliance without the bowl inside. This can damage and shorten the life of the appliance.
Pour le transport sécurisé de l'appareil, utiliser la poignée de l'appareil.
Risk of burns! Do not place your hand or any part of your body above or near the steam vent. During cooking, a very large amount of steam can accumulate in the appliance. Do not lean over the appliance cover when opening it. The bowl and any accessories used may be hot. Be sure to use an oven mitt when handling the bowl or accessories.
Ne déplacez pas l'appareil lors de son fonctionnement. Do not move the appliance during use.
Never use steel objects, knives or forks on the inner surface of the bowl, as this may scratch and damage the non-stick coating.
Do not use your appliance for deep frying.
Unplug your appliance if you will not use it at the end of cooking.
1. Using your appliance
Cooking programs table
| Function | Cooking Temp (°C) | Cooking time | Delay Start Départ différé | Auto keep warn | Cover lid | ||
| By default | Adjustable | By default | Adjustable | ||||
| Soupe(Soup) | 100-110°C | No | 1h | 1h à 4h5min increment | 24h1h increment | Yes | Closed |
| Porridge | 105-110°C | No | 20min | 20min à 1h105min increment | 24h1h increment | Yes | Closed |
| Riz(Rice) | 105-110°C | No | Auto | No | 24h1h increment | Yes95°C | Closed |
| Pilaf | 110°C | No | 30min | 20min à 2h5min increment | 24h1h increment | Yes | Closed |
| Pâtes(Pasta) | 105-110°C | No | 20min | 15min à 40min5min increment | 24h1h increment | Yes | Closed |
| Vapeur(Steam) | 100-110°C | No | 20min | 10min à 2h5min increment | 24h1h increment | Yes | Closed |
| Dorer(Roast) | 150°C | No | 10min | No | No | No | Closed Open |
| Réchauffer(Reheat) | 120°C | No | 30min | 15min à 1h5min increment | 24h1h increment | No | Closed |
| Gâteaux(Cake) | 130-140°C | No | 45min | 40min à 2h5min increment | No | Yes | Closed |
| Gelée(Jelly) | 100-110°C | No | 4h | 2h à 8h5min increment | No | No | Closed |
| Farcir(Stuff) | 100-110°C | No | 20min | 10min à 2h5min increment | 24h1h increment | Yes | Closed |
| Ragout(Stew) | 100-110°C | No | 40min | 30min à 2h305min increment | 24h1h increment | Yes | Closed |
| Sauce | 118-120°C | No | 5min | 5min à 30min5min increment | No | Yes | Closed |
| Confiture(Jam) | 100°C | No | 30min | 20min à 4h5min increment | No | No | Closed |
| Yaourt(Yogurt) | 39-40°C | No | 8h | 6h à 12h5min increment | No | No | Closed |
| FromageCottage | 65-70°C | No | 1h | 1h à 5h5min increment | No | No | Closed |
| Mijoter(Slow cook) | 95°C | No | 4h | 2h à 12h5min increment | No | Yes | Closed |
| Rissoler | 90°C | No | 50min | 5min à 1h305min increment | No | Yes | Closed |
| Fondue | 100°C | 70°C à 150°C1°C increment | 20min | 5min à 30min5min increment | No | Yes | Open |
| MultiChef | 100°C | 30°C à 160°C1°C increment | 30min | 10min à 6h5min increment | 24h1h increment | Yes | Closed |
| Maintien auChaud(Keepwarm) | 75°C | No | 24h | No | No | - | Closed |
Preparation:
| 1 Install your appliance on a flat, stable and heat-resistant surface. Unwind the power cable completely from its support. Check that there is no liquid or residue on the heating element of the appliance. | 2 Put your preparation in the bowl. Ensure to respect the maximum "1.8L / 10 CUP" and minimum "0.6L" marking of the bowl. Thoroughly wipe the outside of the bowl (especially the underside). Check that there is no liquid or residue under the bowl. |
| 3 Place the bowl inside the multicooker and ensure to position the bowl correctly. | 4 Close the cover lid, ensure it's well locked (an audible click will signal it). |
| 5 Insert the connector into the appliance and then plug the power cable into a main plug. The device beeps with all the light indicators on the control panel lighting up briefly. | 6 The appliance enters standby mode with the screen displaying "8888" and the indicator lights off. Select the pre-set cooking program or personalized by yourself (refer to the Table of cooking programs). |
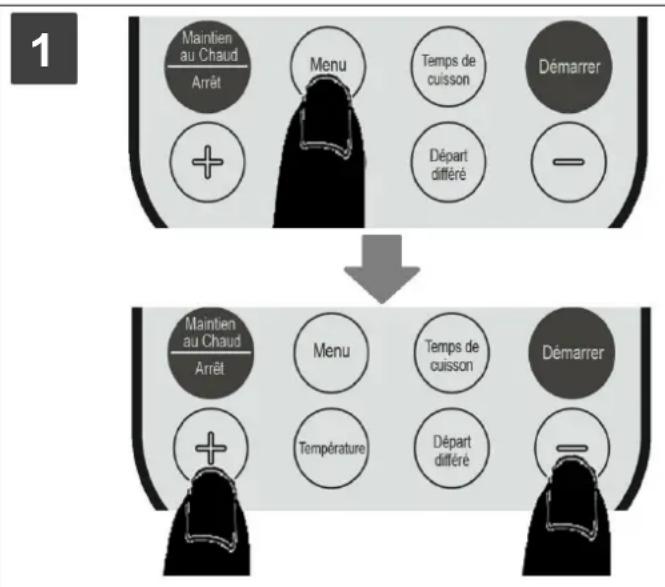
Select the pre-set cooking programs without customize:
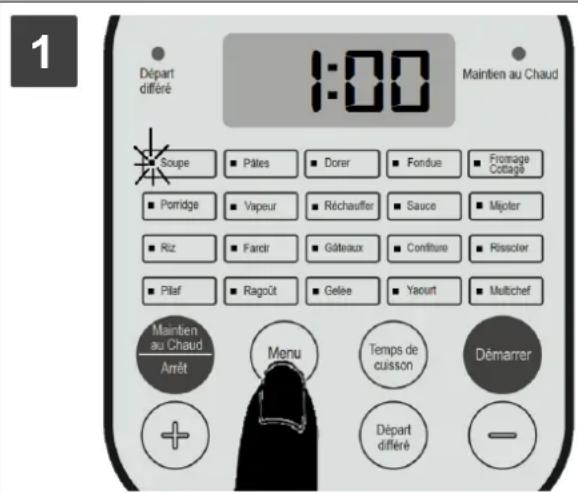
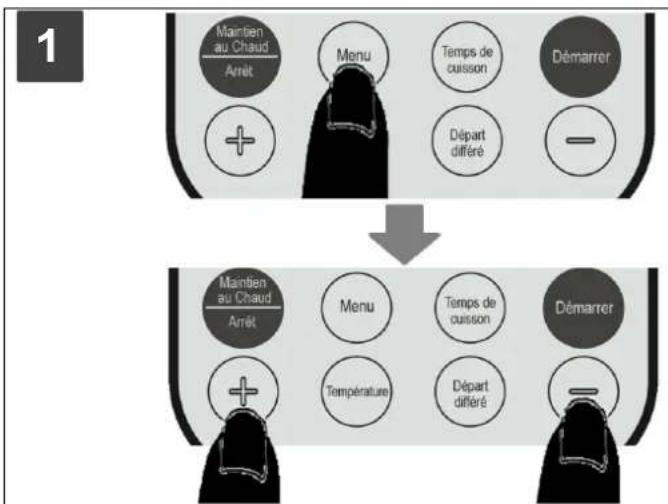
Press on the « Menu » button. The light indicators for the preset cooking programs light up red. By default, the « Soupe » function is selected, its indicator light flashes red.
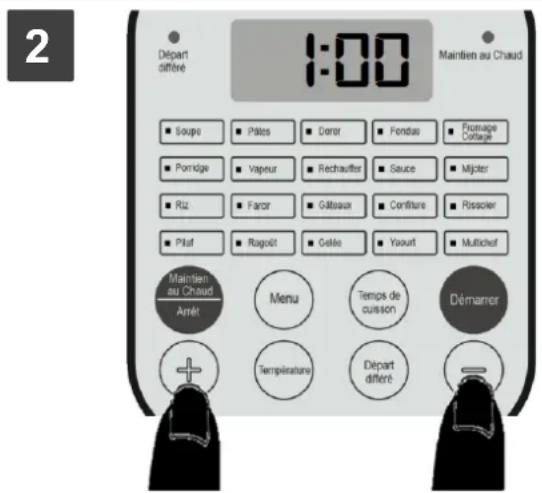
To change the default function, press on the button + or button - to select your desired program.
The button + allows you to successively navigate the following program: Soupe Multichef Yaourt Gelée Ragoût Pilaf Rissoler Confiture Gâteaux Farcir Riz Mijoter Sauce Réchauffer Vapeur Porridge Fromage Cottage Fondue Dorer Pâtes Soupe.
The button « - » allows you to successively navigate the following program: Soupe → Pâtes → Dorer → Fondue → Fromage Cottage → Porridge → Vapeur → Réchauffer → Sauce → Mijoter → Riz → Farcir → Gâteaux → Confiture → Rissoler → Pilaf → Ragout → Gelée → Yaourt → Multichef → Soupe.
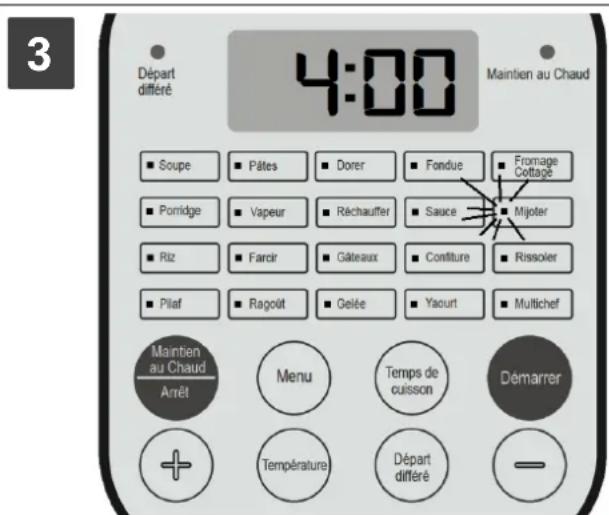
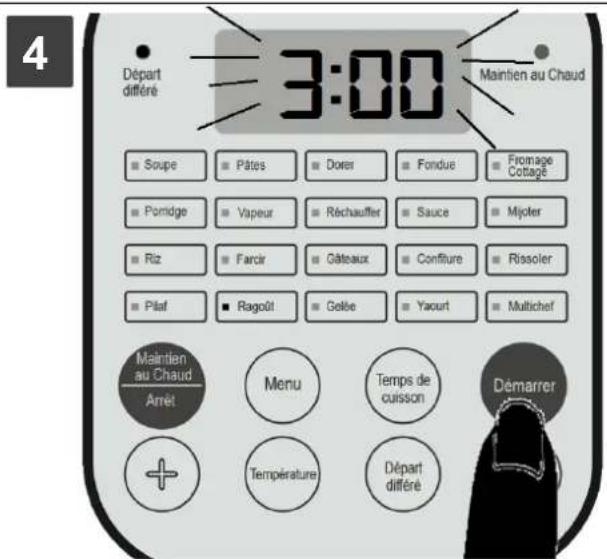
The selected function will have its light indicator flashing.
Only the indicator light for the selected program remains on; and the display shows the cooking time. During cooking, the display shows the remaining cooking time of the cooking program.
At the end of cooking, the appliance emits 5 beeps sounds, the screen displays « 8888 » or « 0:00 ». Depending on the program selected, the appliance automatically switches to "Keep warm" mode or to standby mode.
Unplug the appliance if you are not using it anymore.
Notes:
If no button is pressed after "Menu", the device returns to standby mode after 2 minutes of inactivity.
To cancel any function selection or stop your cooking program, press the Keep warm /Stop button « Maintien au Chaud / Arret ». The appliance automatically enters standby mode, the screen displays « 8888 »
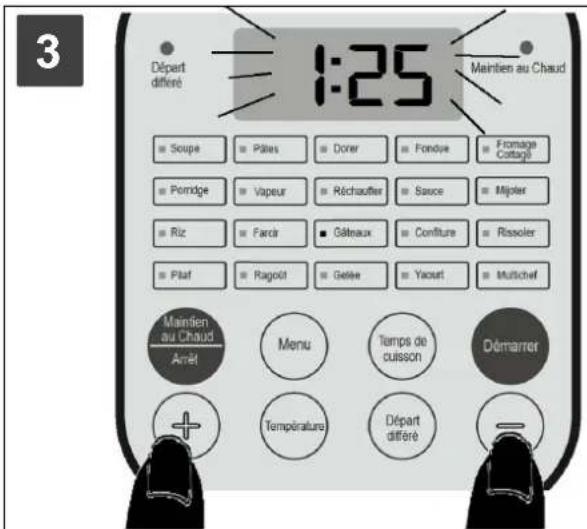
Press and hold the button + or the button - to accelerate the selection of the cooking program or the temperature and duration of the cooking time settings.
In standby mode, if you press the buttons + and - keys simultaneously, the screen displays the temperature inside the appliance.
Never leave the appliance in operation unattended.
Never use the Reheat function « Réchauffer » to defrost food.
Delay start function:
Only applicable for the following functions: Soupe, Porridge, Riz, Pilaf, Pâtes, Vapeur, Réchauffer, Farcir, Ragoût et Multichef.
Press on the button + or - to set the starting time of your cooking program; the display will flash on the selected duration.
Press on the button « Démarrer » to launch the cooking program. The screen will display the countdown time until the start of the cooking program, the delay start light indicator « Départ différé » remains light on.
At the end of the countdown, the delay start « Départ différé » indicator light goes out and the appliance starts the cooking program automatically. The display will then show the remaining cooking time.
At the end of cooking, the appliance emits 5 beeps sounds, the screen displays « 8888 » or « 0:00 ». Depending on the program selected, the appliance automatically switches to "Keep warm" mode or to standby mode.
Unplug the appliance if you are not using it anymore.
Customize the cooking time:
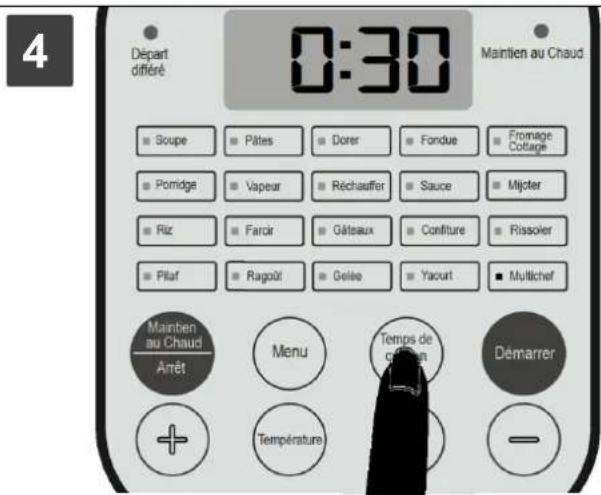
To customize your cooking time, press on the button « Temps de cuisson » after selection your cooking program.
Press on the button + or - to set your desired cooking time, the display will flash on your selected cooking time.
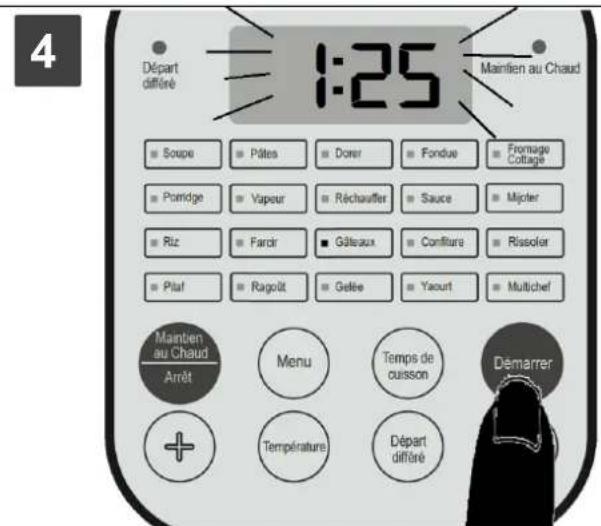
Press on the start button « Demarrer » to launch the customized cooking program, the screen displays the new cooking time.
At the end of cooking, the appliance emits 5 beeps sounds, the screen displays « 8888 » or « 0:00 ». Depending on the program selected, the appliance automatically switches to "Keep warm" mode or to standby mode.
Unplug the appliance if you are not using it anymore.
Notes:
The cooking time is adjustable in 5 minutes increment each time you press on the button « + » or « - »; the minimum and maximum setting ranges depend on the program selected.
For the functions Soupe, Porridge, Pilaf, Pâtes, Vapeur, Réchauffer, Farcir, Ragout et Multichef, you can also activate the delay start function « Départ différé » after setting the new cooking time and before pressing on the start button « Demarrer ».
Customize the cooking temperature:
Press on the button + or - to set your new cooking temperature, the display will flash on your selected cooking temperature.
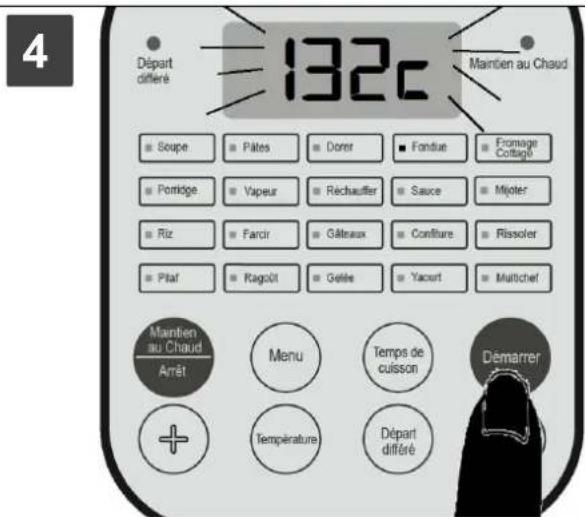
Press on the start button « Démarrer » to launch the customized cooking program. The screen then shows the cooking time.
At the end of cooking, the appliance emits 5 beeps sounds, the screen displays « 8888 » or « 0:00 ». Depending on the program selected, the appliance automatically switches to "Keep warm" mode or to standby mode.
Unplug the appliance if you are not using it anymore.
Notes:
The cooking temperature is adjustable in 1^ increment each time you press on the button + or - ; the minimum and maximum setting ranges depend on the program selected.
For the functions «Fondue », you can also change the cooking time after setting the new cooking temperature and before pressing on the start button « Démarrer ».
Multichef program:
This program allows you to customize the cooking time and temperature according to your recipe; and also activate the delay start function « Départ différé ».
Press on the button + or - to set your new cooking temperature, the screen will flash on the new setting.
Press on the button « Temps de cuisson » to set the new cooking time.
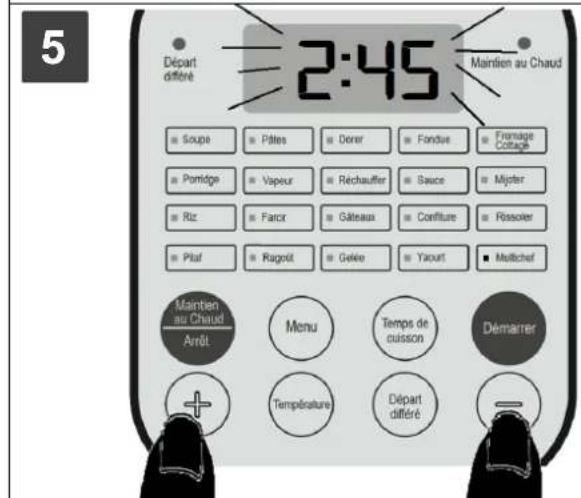
Press on the button + or - to set the new cooking time, the screen will flash on the new setting.
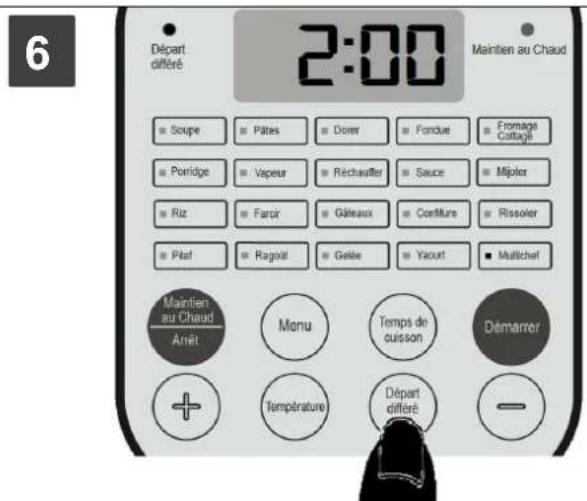
Press on the button + or - to set the starting time of your cooking program; the display will flash on the selected duration.
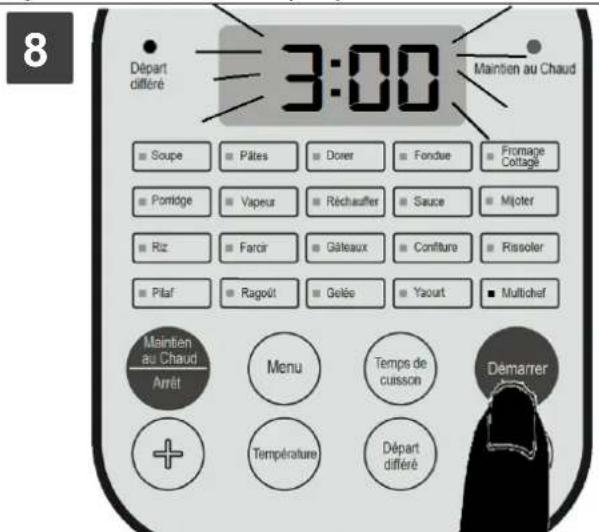
Press on the button « Démarrer » to launch the cooking program. The screen will display the countdown time until the start of the cooking program, the delay start light indicator « Départ différé » remains light on.
At the end of cooking, the appliance emits 5 beeps sounds, the screen displays « 8888 » or « 0:00 ». Depending on the program selected, the appliance automatically switches to "Keep warm" mode or to standby mode.
Unplug the appliance if you are not using it anymore.
Note: if you don't want to activate the delay start function « Départ différé», press on the start button « Demarrer » after setting the new cooking time and temperature.
At the end of cooking, the appliance emits 5 beeps sounds and automatically switch to Keep warm mode « Maintien au Chaud » (only for applicable cooking programs, refer to the cooking table).
The Keep warm light indicator « Maintien au Chaud » lights red, the screen displays « 0:00 » then starts to display the working time of the function.
The appliance keeps the temperature at 75^ for 24h max.
Although the appliance will keep the dish warm for 24 hours, it is not recommended to leave the food in this mode for too long to avoid any risk of the dish deteriorating. When the temperature is below 75^ , the Keep Warm function is not available. When the temperature is above 75^ , the Keep warm function is available.
Rice cooking:

Install your appliance on a flat, stable and heat-resistant surface. Unwind the power cable completely from its support.
Check that there is no liquid or residue on the heating element of the appliance

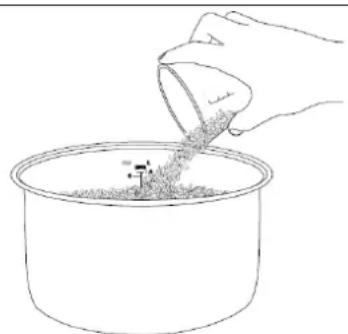
Use the measuring cup to measure the amount of rice to use. Never pour more than 10 cups inside the bowl, because once cooked the rice swells in volume.
For measuring the amount of rice, refer to the dosing guide on page 55.
| 3 Rinse the rice several times with water to wash it of impurities. | 4 Use the measuring cup to measure the amount of water needed to cook the rice. |
| 5 Place the bowl inside the multicooker and ensure to position the bowl correctly. | 6 Close the cover lid, ensure it's well locked (an audible click will signal it). |
| 7 Insert the connector into the appliance and then plug the power cable into a main plug. The device beeps with all the light indicators on the control panel lighting up briefly. | 8 The appliance enters standby mode with the screen displaying "8888" and the indicator lights off. |
| 9 Press on the button « Menu ». Select the rice program « Riz » by using the button « + » or « - ». | 10 The display shows « 8888 », press on the start button « Démarrer » to start the rice cooking program. |
11
During the rice cooking duration, the screen displays a circular rectangle with the « Riz » indicator light on.
12
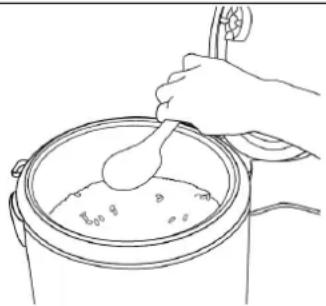
At the end of cooking, the appliance emits 5 beeps sound, and will automatically switch to keep warm mode « Maintien au Chaud ». Open the cover lid and mix the cooked rice, then close the lid again.
Unplug the appliance if you are not using it anymore.
Warning! Risks of burns! Keep away your face and hands away from the cover to prevent scalds from the escaping steam.
Ensure that the quantity of water and rice respect the maximum "1.8L / 10 CUP" marking of the bowl.
Rice dosing guide with measuring cup:
| Type of rice | Measuring cup | Raw rice in g | Amount of water | Servings |
| Short grain white | 2 | 300 g | 450ml | 2 à 4 |
| Medium grain white | 2 | 300 g | 520ml | 2 à 4 |
| Long grain white | 2 | 300 g | 600ml | 2 à 4 |
| Long grain brown | 2 | 300 g | 700ml | 2 à 4 |
| Jasmine rice | 2 | 300 g | 320ml | 2 à 4 |
Note: the dosing guide is only indicative. The amount of water depends on the types of rice, the desired rendering of the cooked rice (crisper or softer). We recommend that you follow the instructions on the rice package.
Steam cooking:
1
Install your appliance on a flat, stable and heat-resistant surface. Unwind the power cable completely from its support. Check that there is no liquid or residue on the heating element of the appliance
2
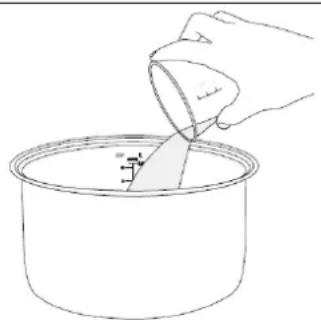
Use the measuring cup to pour water inside the bowl. Ensure to respect the 500ml minimum amount of water.
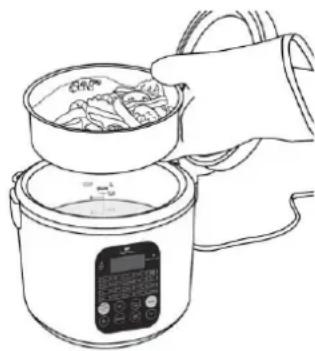
| 3 Place the bowl inside the multicooker and ensure to position the bowl correctly. | 4 Place ingredients inside the steam basket. |
| 5 Place the steam basket inside the bowl. | 6 Close the cover lid, ensure it's well locked (an audible click will signal it). |
| 7 Insert the connector into the appliance and then plug the power cable into a main plug. The device beeps with all the light indicators on the control panel lighting up briefly. | 8 The appliance enters standby mode with the screen displaying "8888" and the indicator lights off. |
| 9 Press on the button « Menu ». Select the steam program « Vapeur » by using the button « + » or « - ». | 10 The display shows « 0:20 », press on the start button « Démarrer » to start the steam cooking program. |
At the end of cooking, the appliance emits 5 beeps sounds, and automatically switches to "Keep warm" mode.
Unplug the appliance if you are not using it anymore.
Warning! Risks of burns! Keep away your face and hands away from the cover to prevent scalds from the escaping steam.
Use a cooking mitt to take out the steam basket.
Notes:
Depending on the used ingredients, you can adjust the cooking time from 10min to 2h.
Do not use the delay start function « Départ différé » with the steam basket.
The steam function « Vapeur » can also be used to boil food, you only need to use the tank and place the ingredients to boil.
Steam cooking time guide:
| Ingredients | Cooking time | Quantity | Amount of required water |
| Fish fillet | 10min | 400 g | 500ml |
| Fresh green beans | 25min | 350 g | 500ml |
| Cut potatoes | 40min | 500 g | 600ml |
| Broccoli | 6min | 400 g | 500ml |
| Chicken breast | 40min | 400 g | 500ml |
Note: the steam cooking time guide is for information only. The cooking times depend on the desired consistency (crisper or softer) and the thickness of the ingredient. For frozen ingredients, it is advisable to add 30% additional cooking time.
Yogurt function:
Important: for a good success of your homemade yoghurt and avoid any risk of compromising their success, be sure to follow the tips below.
- Place your appliance on a flat, even, stable surface. Do not let the appliance rest on a vibrating surface (such as the top of a refrigerator) or exposed to winds.
- Use your appliance in a room at room temperature.
- Leave the appliance still during the fermentation process, do not move it and do not remove the lid and glass jars during the operating cycle.
- Never mix raw fruits with the preparation. The acidity of the fruits prevents the fermentation process.
Tips:
| Milk types | Ferments types |
| * UHT milk with long shelf life, which does not require boiling. * Raw or pasteurized milk should be brought to a boil then cooled and passed to remove the skins. * Whole milk for a creamier and creamy yogurt; count 8h to 10h for fermentation. * Semi-skimmed milk (9h to 11h fermentation) or skim (12h to 14h fermentation) makes a more fragile consistency of yogurt because less protein. * Milk of goat or sheep. * Vegetable milk (soy, almond). Note: For a firmer consistency of yogurt, add 5 tablespoons of whole milk powder. | * A natural yogurt of commerce. * A yogurt from a previous manufacture (for an optimal result reuse within 3 days of the first preparation, do not reuse more than 6 times the same base because the active fermented will decrease). * A freeze-dried dry fermented purchased commercially (follow the instructions on the product packaging). Note: Never boil the active ferments with the milk because the milk dies beyond a temperature of 45°C. |
Recipes for 6 yogurts pots:
| Ingredients | Steps |
| Mixture n° 1:* 1L of whole milk* 110ml of fresh yoghurt | Pour the fresh yogurt into a 2L bowl, whip the yoghurt.Gradually pour the milk into the bowl and mix gently until smooth.Pour the mixture into the glass jars.Note: 8 to 10 hours of fermentation required. |
| Mixture n° 2:* 1L of whole milk* 2gr dry lyophilized ferment | Pour the milk into a 2L bowl.Gradually pour the ferment and mix gently to distribute theferment.Pour the mixture into the glass jars.Note: 8 to 10 hours of fermentation required. |
| Mixture n° 3:* 1L goat's milk* 110ml of fresh yoghurt | Pour the fresh yogurt into a 2L bowl, whip the yoghurt.Gradually pour the milk into the bowl and mix gently until smooth.Pour the mixture into the glass jars.Note: 15h of fermentation required. |
Place your mixture in each pot. Be careful not to pour it to the brim of the pot.
Place the bowl inside the appliance, then place the pots without covers inside the bowl.
Close the cover lid, ensure it's well locked (an audible click will signal it).
Insert the connector into the appliance and then plug the power cable into a main plug. The appliance beeps with all the light indicators on the control panel lighting up briefly.
The appliance enters standby mode with the screen displaying « 8888 » and the indicator lights off.
Press on the « Menu » button. Select the yogurt program « Yaourt » by using the button « + » or « - ». The display shows « 8:00 » (time by default), press on the start button « Démarrer » to launch your yogurt program. If you want to modify the cooking time, press on the button « Temps de cuisson » before pressing on the start button « Démarrer ». Press on the button « + » or « - » to set the new cooking time and press on the start button « Démarrer » to launch the customized Yogurt program.
At the end of cooking, the appliance emits 5 beeps sounds, and automatically switches to standby mode. Unplug the appliance from the power socket.
Open the cover lid. Using a kitchen glove, take out the pots and screw the lids onto the pots. Place the yogurt pots in the refrigerator for at least 3 hours before serving. Yogurt and cottage cheese can be stored in the refrigerator for up to 8 days.
During the tasting, arrange the yoghurt to your liking: plain or by adding for example sugar, jam, honey, cereals, chocolate, fruit in pieces or mixed.
Important: Ensure to sterilize all utensils, jars and glasses before starting your preparation to avoid any bacterial contamination. To sterilise the appliance, it's advised to start a steam cooking program with only water in the bowl.
IV. CLEANING AND MAINTENANCE
- At the end of your use, switch off your appliance by unplugging your appliance from the power socket.
Ensure to always unplug your appliance before any cleaning operation and to always let the appliance fully cool down for at least 1 hour. Never put the appliance into the dishwashing or under the water.
Cleaning the body unit:
Clean the outer surface with a soft cloth (or sponge) on the surfaces of the appliance.
Cleaning the accessories:
Wash the accessories with a sponge and dishwashing liquid and rinse them.
To take out the heavy stains, put all the accessories into hot water with dishwashing liquid and let it rest for 30 min. then use a brush to clean it.
Cleaning the valve
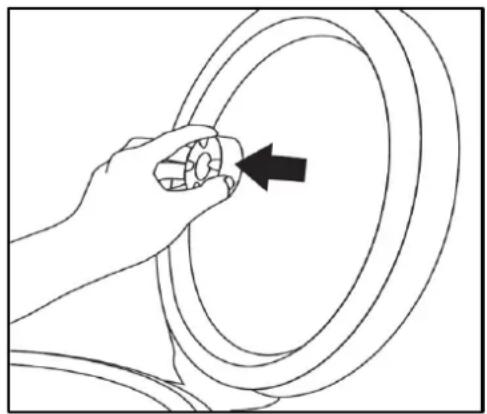
Turn the valve counter clockwise to remove it from the inner wall of the cover.
Wash the valve with a sponge soaked in washing-up liquid, rinse it with hot water and dry it with a soft cloth.
Replace the valve in its location and lock it by turning it clockwise.
Cleaning the condensation collector
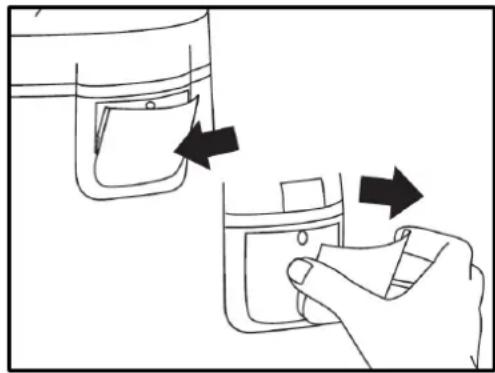
Remove the collector by pulling it towards you, wash it with a sponge soaked in dishwashing liquid, rinse it with hot water then dry it with a soft cloth.
Replace the collector in its location, making sure to lock it securely (an audible click will signal it).
Do not use a hard brush or any others cleaners to avoid scratching or damaging the appliance. Never immerse the appliance. Do not put the bowl inside the dishwasher.
V. TROUBLESHOOTING
| Issues | Causes | Solutions |
| The cover lid does not close. | The locking mechanism is not activated. | Press the cover lid until you hear an audible click. |
| The locking mechanism is broken. | Contact the After-Sales services. | |
| The cover lid does not open. | The unlocking mechanism is broken. | Contact the After-Sales services. |
| Steam leaks. | The maximum filling level has been exceeded. | Remove the ingredients from the pan and make sure they do not exceed the max markings of the bowl. |
| The valve is incorrectly positioned. | Stop cooking, switch off the appliance and wait until it has cooled down. Remove the valve and replace it correctly | |
| The cover gasket is damaged. | Contact the After-Sales services. | |
| Water leaks. | The cover is not closed properly. | Press the cover lid until you hear an audible click. |
| The condensation collector is full. | Remove the collector, empty it and replace it into its location. | |
| Lightings are off and buttons not responding. | The control panel is damaged. | Contact the After-Sales services. |
| The control panel does not light up. | The appliance is unplugged. | Plug in the appliance. |
| The control panel is damaged. | Contact the After-Sales services. | |
| The appliance does not heat up. | The heating element is damaged. | Contact the After-Sales services. |
| Rice not cooked. | Not enough water. | Add water and cook again. |
| Rice overcooked. | Too much water. | Refer to the rice dosing guide. |
| The automatic keep warm is not working. | The appliance is damaged. | Contact the After-Sales services. |
| Display shows E1, E2, E3 or E4. | The sensor is damaged. | Contact the After-Sales services. |
| Yogurts too liquid. | Use of semi-skimmed or skimmed milk without the addition of milk powder. Milk lacks protein and does not allow optimal intake. | Use whole milk for the next batch. Or add the milk powder. |
| The ferment is no longer active. | Use a new pot of yogurt. | |
| The yogurt maker was opened or turned off during the fermentation cycle. | Make sure the yogurt maker is not open or shut off during the cycle; and that it is not subjected to any vibrations and drafts. | |
| Raw fruits added to the preparation. | Never use raw fruits during preparation. Use a compote, jam or fruit puree. | |
| The yoghurt pots were poorly cleaned, rinsed and dried. | Ensure to check there are any forms of liquids or dirt inside the pot. | |
| Yogurts too acid. | The fermentation time was too long. | Reduce the fermentation time for the next batch. |
For any problem occurring on your device: contact the After-Sales Service.
VI. ENVIRONMENT: RECYCLING

The European Directive on Waste Electrical and Electronic Equipment (WEEE) requires that old household electrical appliances must not be disposed of in the normal unsorted municipal waste stream. Old appliances must be collected separately in order to optimize the recovery and recycling of the
materials they contain, and reduce the impact on human health and the environment.
The crossed out "wheeled bin" symbol on the product reminds you of your obligation, that when you dispose of the appliance, it must be separately collected.
Consumers should contact their local authority or retailer for information concerning the correct disposal of their old appliance.
VII. WARRANTY
The warranty does not cover the wear parts of the product, nor the problems or damage resulting from:
- superficial deterioration due to normal wear of the product;
- defects or deterioration caused by the product coming into contact with liquids and corrosion caused by rust;
- any incident, misuse, misuse, alteration, disassembly or unauthorized repair;
- Any unsuitable maintenance, use not in accordance with product instructions or incorrect voltage connection;
- any use of accessories not supplied or not approved by the manufacturer.

The warranty will be void if the rating label and / or serial number of the product is removed.
IC Continental Edison
CEMC900IN
MULTICUISEUR MULTIFONCTION
Guide d'utilisation
MULTIFUNCTION MULTICOOKER
Instruction Booklet