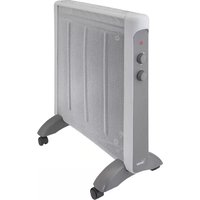
HC510 - Heating Bimar - Free user manual and instructions
Find the device manual for free HC510 Bimar in PDF.
User questions about HC510 Bimar
0 question about this device. Answer the ones you know or ask your own.
Ask a new question about this device
Download the instructions for your Heating in PDF format for free! Find your manual HC510 - Bimar and take your electronic device back in hand. On this page are published all the documents necessary for the use of your device. HC510 by Bimar.
USER MANUAL HC510 Bimar
This symbol indicates that these instructions should be read carefully before using the appliance, and that other users should also be informed of them, if necessary. Store this booklet for future reference and for the entire lifetime of the device. If any parts of these instructions are difficult to understand or when in doubt, contact the manufacturer at the address found on the last page before using the product.
This symbol highlights instructions and precautions for safe use. Warnings and appliance installation, use, cleaning and maintenance procedures may be updated slightly from those described in this manual; for further details, please consult the updated on-line manual at www.bimaritaly.it.
This symbol indicate:
WARNING: in order to avoid
overheating, do not cover the appliance.
- This appliance is designed to heat indoor domestic and similar environments, as specified in these instructions; furthermore it is to be considered an additional heating unit, and should not be considered a source of primary / central heating. Examples of devices for domestic use are those used for typical domestic reasons, in domestic environments and that can be used by non-experts: - in shops, offices and other similar places of work; - in farming businesses or similar businesses;13 - by guests in hotels, motels and other residential type environments; - in bed and breakfast accommodation.
- The device should not be used in dusty areas or in areas with airborne particle/materials (which may block the grids), or in areas with high humidity, or with flammable products, or outdoors. Any other use should be considered inappropriate and dangerous. The manufacturer cannot be held responsible for any damages caused by improper, incorrect or irresponsible use and/or by repairs done by an unqualified person.
- The appliance heats up when it is running. Therefore only touch the buttons on the control panel. Avoid touching the surface since it becomes very hot. The heat supplied by the appliance is variable and can become so hot that it will burn skin that comes into direct contact with it. The use of this appliance is not recommended for people with reduced sensitivity to heat or who are not able to react quickly enough to avoid skin burns.
- The grid and the panel do not provide complete protection to children or to people with reduced physical, sensory or mental capacity.
- Ensure that the convection heater does not come into contact with water or any other liquid. If water or any other liquid comes in contact with the appliance, first turn off the power outlet by switching it off on the electrical panel, and only then remove the plug from the socket. Carefully dry both the plug and the socket before restoring power. Plug into the plug point and then continue using the device. If in doubt consult a qualified professional.14
some parts of this product can become very hot and cause burns. Particular attention has to be given where children and vulnerable people are present.
- when using electrical appliances, always adhere to basic safety precautions to prevent the risk of fire, electric shocks and physical injury. - Do not use in small rooms where there are people who are unable to leave the room unaided, unless they are under constant supervision. - Do not use this appliance in a room with an area of less than 4m².
- This appliance can be used by children aged from 8 years and above and persons with reduced physical, sensory or mental capabilities or lack of experience and knowledge if they have been given supervision or instruction concerning use of the appliance in a safe way and if they understand the hazards involved. Children shall not play with the appliance. Cleaning and user maintenance shall not be made by children without supervision.
- Children younger than 3 years of age must be kept away from the appliance unless they are being constantly supervised. Children between the ages of 3 and 8 years should only turn on / off the unit as long as it has been placed or installed in its normal operating position, and as long as they are supervised or receive instructions concerning the safe use of the appliance and understand the hazards involved. Children between the ages of 3 and 8 years should not plug it in, adjust or clean the appliance or perform user maintenance.15
- The heater must not be located immediately below a socket- outlet. - The plug point must be easily accessible so as to easily remove the plug in case of an emergency. - Do not use this heater with programmers, timers or with any other device that automatically turns on the appliance, as this could pose a fire risk should the device be covered or positioned incorrectly. - If the supply cord is damaged, it must be replaced by the manufacturer, its service agent or similarly qualified in order to avoid a hazard. - Do not use this heater in the immediate surroundings of a bath, a shower or a swimming pool.
- In order to protect yourself from electric shocks, do not immerse the plug, the power cable or the appliance in water or any other liquid.
- If the appliance is not being used, unplug it from the mains.
- Do not touch the appliance with wet hands or feet.
- Do not move the appliance when it is in operation.
- Do not leave the appliance exposed to atmospheric conditions (sun, rain, etc..).
- Should the appliance fall or not work correctly, disconnect the electric cable immediately. Check that it is not damaged, and thereafter turn it back on: if in any doubt, consult a qualified professional.
- Do not pull on the power cable or the appliance itself to unplug the appliance from the mains.16
- Do not pull on the power cable to move the appliance.
- Do no use the appliance if it does not work properly or if it appears damaged; when in doubt, contact a qualified technician.
- Avoid allowing the appliance to overheat; to this end, check that the inlet and outlet are free from obstructions: do not leave anything hanging over or under the unit. Should overheating occur, the in-built safety device will stop the convection heater from running. To restore operation, remove the plug from the mains and wait for it to cool (about 20-30 minutes) and insert the plug into the plug point once again.
- After unpacking, check the integrity of the appliance; if in doubt, do not use it and contact a qualified technician. The packaging materials (plastic bags, polystyrene, metal staples, etc.) must not be left within reach of children, as they constitute possible safety risks and must be disposed of according to applicable regulations.
- Before connecting the heater check that the voltage shown on the specifications plate corresponds to that of the electrical supply, and that the plug is effectively grounded. In the event of incompatibility between the power supply and the plug, have the plug replaced with a suitable model by a qualified professional, who should ensure that the size of the cable is suitable for the power used by the unit. The use of adaptors or extensions is generally not advisable; if it is necessary to use them, they must comply with safety regulations and the total current (amps) must not be rated lower than the maximum current of the the appliance.
- Place the convection heater far from any other source of heat, from flammable material (curtains, tapestries, etc.), from flammable gases or flammable material (spray cans) and from materials that can be deformed by heat. Make sure there is 100cm of free space in front of the heater and 30cm free space on both sides and at the back (at the portable installation).
- The surface must be stable, not sloping (as the unit may fall over), heat resistant.
- Ensure that the power cable is correctly positioned and does not come into contact with hot parts or sharp edges, nor become wound around the appliance itself, is not twisted and does not snag, in order to prevent the appliance from falling. Make sure there's no risk of tripping, to prevent people from accidentally tripping over it or being injured.
- Make sure that the air inlet and outlet are not blocked, to prevent fire hazards or possible overheating; do not cover the device, nor use it for drying laundry.
- If there is a fault or the appliance is not working correctly, switch it off and have it checked by a qualified professional. Repairs done by an unqualified person can be dangerous and cause the guarantee to become void. Portable installation Warning : the appliance must run only if its feet are correctly assembled. To use the machine, equally assemble the two feet supplied as follows (see figure):17 In order to use the appliance the two feet supplied must be fitted to the same by operating as follows: - Always unplug the appliance before you assemble. - Put the appliance down horizontally on a flat, smooth surface. - Position the feet by inserting the hook into the slot on the side and make it run until the lower hooks block
Model HC0001 with hooks. Wall installation
1) Warning: the feet not must be assembled.
2) With wall installation, the wall to which the appliance
is secured must be made of masonry and/or of heat- resistant material (not wood, or synthetic material which can easily overheat); also, follow these indications for the installation:
3) The appliance must be positioned so
that the bottom side is away from the floor at least 400mm.
4) The upper grill is perfectly horizontal (see fig.1), at a
distance of at least - 300 mm from the corners of walls - 600 mm from the corners of walls Fig.1
- 1000 mm from flammable materials (curtains, fabrics, etc.).
5) The appliance not be near socket outlets.
First drill the holes is good to measure the distance of the above holes.
7) Higher part: fix two hooks to the wall at a distance of 510mm apart, make the holes on the
wall, inserting the hooks into the slots provided with screws.
8) Inferior part: fix two hooks on the bottom of the metal body, fig.3 Hang the appliance on
the wall by inserting the hooks into the slots provided in the rear panel. Mark the exact positioning of the holes on the bottom of the metal bracket to the wall at a distance of 660mm apart; remove the appliance, make the holes on the wall, inserting the slots provided. Re-hang the convector heater on the wall and fix the bracket use the screws to secure the appliance to the wall.18
USE Note: before assembling the appliance, ensure that it is not plugged into the mains. First use
Warning:run the appliance for at least a few hours to eliminate the "new smell" and any oil
residue from the manufacturing process.During this operation, ventilate the room well to eliminate the "new smell" that is given off. Model with switches and with room thermostat regulation (type AMA07) The heater is equipped with the following adjustment devices: - Switch (A) to turn on the fan (turbo function), turns on in pos.( ) or turns off in pos.(●). - Switch (B) to adjust the power 750W = heat with low power consumption, turns on in pos. (750) or turns off in pos.(●). - Switch (C) to adjust the power 1250W = heat with low power consumption, turns on in pos.(1250) or turns off in pos.(●). - Switch (B+C) to adjust the power 2000W = immediate heat, turns on in pos.(750+1250/2000W) or turned off in pos.(●). - The thermostat (D) regulates the appliance based on the surrounding ambient temperature: it heats continuously until the set temperature is reached, and then it heats only when the temperature decreases and for the period of time needed to bring it back up to the set temperature.Use the respective knob: if turned fully in an anticlockwise direction, the fan heater stays off (MIN), if fully turned clockwise it is set to the maximum temperature (MAX); the heater runs at intervals when set to the settings in between.19 To operate the heater: check that the thermostat knob is in pos."MIN", insert the plug into the socket and select the desired functions described above. To turn off the appliance, turn the thermostat knob to pos.“MIN” and of the selectors in pos.(●)and remove the plug from the socket. Model with 24h timer, switches and with room thermostat regulation (type AMA04) The heater is equipped with the following adjustment devices: - Switch (A) to turn on the fan (turbo function), turns on in pos.( ) or turns off in pos.(●). - Switch (B) to adjust the power 750W = heat with low power consumption, turns on in pos.(750) or turns off in pos.(●). - Switch (C) to adjust the power 1250W = heat with low power consumption, turns on in pos.(1250) or turns off in pos.(●). - Switch (B+C) to adjust the power 2000W = immediate heat, turns on in pos.(750+1250/2000W) or turned off in pos.(●). - The thermostat (D) regulates the appliance based on the surrounding ambient temperature: it heats continuously until the set temperature is reached, and then it heats only when the temperature decreases and for the period of time needed to bring it back up to the set temperature.Use the respective knob: if turned fully in an anticlockwise direction, the fan heater stays off (MIN), if fully turned clockwise it is set to the maximum temperature (MAX); the heater runs at intervals when set to the settings in between. - Slider switch (F): when the index is in position "I" the appliance works, but the timer is excluded,
in position ” ” the timer is active, in pos.“0” the appliance is off. - 24H timer (E): allows to adjust during the 24 hours, "on" and "off" periods of the fan heater, and to repeat them systematically every day; it is active when the slider switch (F) located below is in correspondence with the symbol” ”.When using the timer, first:
a) Set the correct time: turn the timer disc in the direction of the arrow, matching the correct time to the reference marker. b) The on/off functions are adjustable using the sliders on the disc: when pushed to the centre, the appliance stays off, when pushed towards the outer edge of the disc, it turns on; slide the slider button to position it in either position (1 slider corresponds to 15 minutes).Adjust the position of the sliders for the times of the day when the appliance must be on (slider to the outer edge) or off (slider to the centre): at this stage, the on and off periods can be seen in segments on the disc. The timer will repeat the same functions until the settings are changed or for as long as the button remains in the pos.“ ” and/or plug into the socket. To operate the heater: check that the switch (F) is in pos."0", insert the plug into the socket and select the desired functions described above. Running the appliance without the timer (switch pos.“I”). Running the appliance with the timer (swtich pos. ).20 To turn off the heater, turn the switch to pos.“0”, turn the knob of the thermostat to pos.“MIN” and of the selectors in pos.(●)and remove the plug from the socket.
CLEANING AND MAINTENANCE
before cleaning the appliance, turn it off, unplug the plug from the mains and wait until it cools down.
- Periodically check that the air inlet and outlet are not blocked by lint; to clean use a vacuum cleaner if necessary, taking care not to damage the heating element.
- To clean the main casing using a soft, damp cloth; do not use steel wool or abrasive products.
- If the heater is not used for long period of time, cover it and store it in a dry place; it is advisable to place it in the original packaging to protect it from dust and moisture.
- If you decide to no longer use the appliance, it is recommended that it is made inoperative by cutting the power cable (first ensure that the appliance has been unplugged from the power supply), and ensure that any parts that could represent a risk to playing children are put away. Correctly disposing of the product as per European Directive 2011/65/UE
At the end of its lifespan, the product must not be disposed of as part of ordinary waste. It can be handed in to specific collection points set up by the municipality, or to retailers who provide such a service. Disposing of a household appliance separately avoids possible negative consequences for the environment and human health resulting from inappropriate disposal and allows the recovery of the materials of which it is made in order to obtain significant savings in energy and resources. As a reminder of the obligation to dispose of appliances separately, the product is marked with a wheeled bin symbol. Incorrect disposal of the product by the user will lead to administrative sanctions according to current regulations.21