USER MANUAL AR5M39 ARDES
This appliance may be used by children 8 years of age and older and people with reduced physical, sensory or mental capacities or with a lack of experience and knowledge if they are adequately supervised or have been instructed on the safe use of the appliance and are aware of the related dangers.
Children must not play with the appliance.
Cleaning and maintenance must not be performed by children unless they are under supervision.
Cleaning and maintenance operations must not be performed by children without supervision.
If the power cable gets damaged, it has to be replaced only at a service centre approved by the manufacturer in order to prevent any risks.
Ensure that the fan is switched off from the supply mains before removing the
guard.
Don't connect the appliance to the power supply and don't use it unless it is completely assembled (see mounting instructions).
Be aware that high humidity levels may encourage the growth of biological organisms in the environment.
Do not permit the area around the humidifier to become damp or wet. If dampness occurs, turn the output of the humidifier down. If the humidifier output volume cannot be turned down, use the humidifier intermittently. Do not allow absorbent materials, such as carpeting, curtains, drapes, or tablecloth, to become damp.
Unplug the appliance during filling and cleaning.
Do not leave water in the reservoir when the appliance is not in use.
Empty and clean the humidifier before
storage. Clean the humidifier before next use.
| Clean the water tank every three days. |
WARNING: Micro-organisms that may be present in the water or in the environment where the appliance is used or stored, can grow in the water reservoir and be blown in the air causing very serious health risks when the water is not renewed and the tank is not cleaned properly every 3 days.
ATTENTION : read this booklet carefully it contains important instructions for a safe installation, use and maintenance. Important instructions to be kept for future reference.
It is forbidden for the children to play with the device.
This device must be used only for the purpose it was expressly designed; any use not complying with the instructions contained in the manual is considered inappropriate and dangerous. The manufacturer is not responsible for possible damages caused by the inappropriate and/or unreasonable use.
This device is NOT suitable to use it in an explosive environment (in the presence of flammable substances such as gas, vapor, mist or dust, in
atmospheric conditions when, after ignition, the combustion is spread in the air).
The packing materials (plastic bags, expanded polystyrene, etc.) must be kept out of the reach of children or disabled persons since they represent potential sources of danger.
This device must be used only for the purpose it was expressly designed; any use not complying with the instructions contained in the manual is considered inappropriate and dangerous. The manufacturer is not responsible for possible damages caused by the inappropriate and/or unreasonable use.
This device is NOT suitable to use it in an explosive environment (in the presence of flammable substances such as gas, vapor, mist or dust, in atmospheric conditions when, after ignition, the combustion is spread in the air).
The packing materials (plastic bags, expanded polystyrene, etc.) must be kept out of the reach of children or disabled persons since they represent potential sources of danger.
The installation/assembly of the device will be made/ or according to the indications of the manufacturer. A wrong procedure may cause damages to persons, animals or objects, for which the manufacturer cannot be considered responsible.
Place and use the device on a horizontal and stable surface.
Before use check the integrity of the device and power cable. In case you are not sure contact a qualified person.
Before powering the device make sure the rating (voltage and frequency) corresponds to the grid and the socket is suitable for the plug of the device.
Make sure the power system is equipped with proper protection according to the law in force.
DO NOT power the device using multiple sockets.
If possible, avoid the use of adapters and/or extension cables; if their use is absolutely necessary, use only materials in compliance with the current safety regulations and according to the electrical parameters of the adapters.
The device must not be switched on using external timers and/or other remote control devices which are not specified in this manual.
DO NOT use or store the device near heat sources (heaters, stoves etc.). DO NOT dip the device in water or other liquids; in case the accidental fall in the water DO NOT try to take it out, but first of all unplug immediately the power cable from the socket.
If you use the device for the first time, make sure to remove any label or protective sheet which blocks its proper functioning.
Plug and unplug the power cable with dry hands and hold it firmly.
Before plugging make sure the start button of the device is in the "OFF" position (turned off).
Always unplug the power cable to avoid the overheating and avoid stretching it (do not pull it, tug it or use it to drag the device to which is connected).
Avoid placing the power cable on abrasive or sharp surfaces or in positions where it can be damaged easily.
DO NOT obstruct totally nor partially the air vents or inserts objects inside.
During the functioning do not touch the device with wet body parts, and in any case it is recommended to have between you and the standing surface, an isolating element (for example wearing shoes with rubber soles).
During the use the device must be keep at a safety distance from any object and/or flammable or potentially explosive substance.
In case of malfunction or anomalies during the functioning, switch off the device immediately, turn off the power and check the cause of the anomalies, if possible, with the support of a qualified person. Avoid carrying out operations which are not specified in this manual (such as disassembling and/or altering).
Always remember to unplug the power cable of the device if it is not used for a long period, before storing, cleaning or performing any maintenance operation.
Store and use the device only indoor or in any case protected from weathering such as rain, direct radiation of the sun and dust. The device is not design for the external use or storage.
The cleaning and maintenance of the device MUST NOT be done by children without the supervision of an adult.
Before unplugging the device, switch it off, using the proper command on the control panel.
DO NOT hang the fan on the wall or ceiling unless this type of installation is provided and explained in this manual.
Place the device at a proper distance from the objects or surrounding walls making sure that its functioning will not cause accidental damages.
DO NOT use the device near gas stoves or open flames in general.
DO NOT use the device near curtains or textiles.
DO NOT hang the fan on the wall or ceiling unless this type of installation is provided and explained in this manual.
DO NOT cover the device during functioning.
DO NOT insert objects or body parts inside the protection grille of the fan.
DO NOT leave the device unsupervised for a long period during functioning.
DO NOT expose yourself for a long period to the air flow generated by the device because it can cause damage to the health.
If the fan must be stored for a long period and is not used regularly, place the fan in its original packaging in a dry place. When you use it for the first time after a long period of inactivity, make sure the fan is clean and
the motor blades turn feely (with the device not powered) without any restraint.
WARNING ABOUT BATTERIES
- KEEP BATTERIES OUT OF THE REACH OF CHILDREN. Swallowing can lead to chemical burns, perforation of soft tissue, and death. Severe burns can occur within 2 hours of ingestion. Seek medical attention immediately.
- Do not allow children to replace batteries.
- Always insert batteries correctly with regard to polarity (+ and -) marked on the battery and the equipment.
- Do not short-circuit batteries.
- Do not charge batteries.
- Do not force discharge batteries.
- Do not mix new and used batteries or batteries of different types or brands.
- Exhausted batteries should be immediately removed from equipment and properly disposed of.
- Do not heat batteries
- Do not weld or solder directly to batteries.
- Do not dismantle batteries.
- Do not deform batteries.
- Do not dispose of batteries in fire.
- A lithium battery with a damaged container should not be exposed to water.
- Do not encapsulate and/or modify batteries.
- Store unused batteries in their original packaging away from metal objects. If already unpacked, do not mix or jumble batteries.
- Remove batteries from equipment if it is not to be used for an extended period of time unless it is for emergency purposes.
- Clean the battery contacts and also those of the equipment prior to battery installation.
- In case of leak from batteries, avoid any contact with it; in case of contact, wash the affected part with water and seek medical attention.
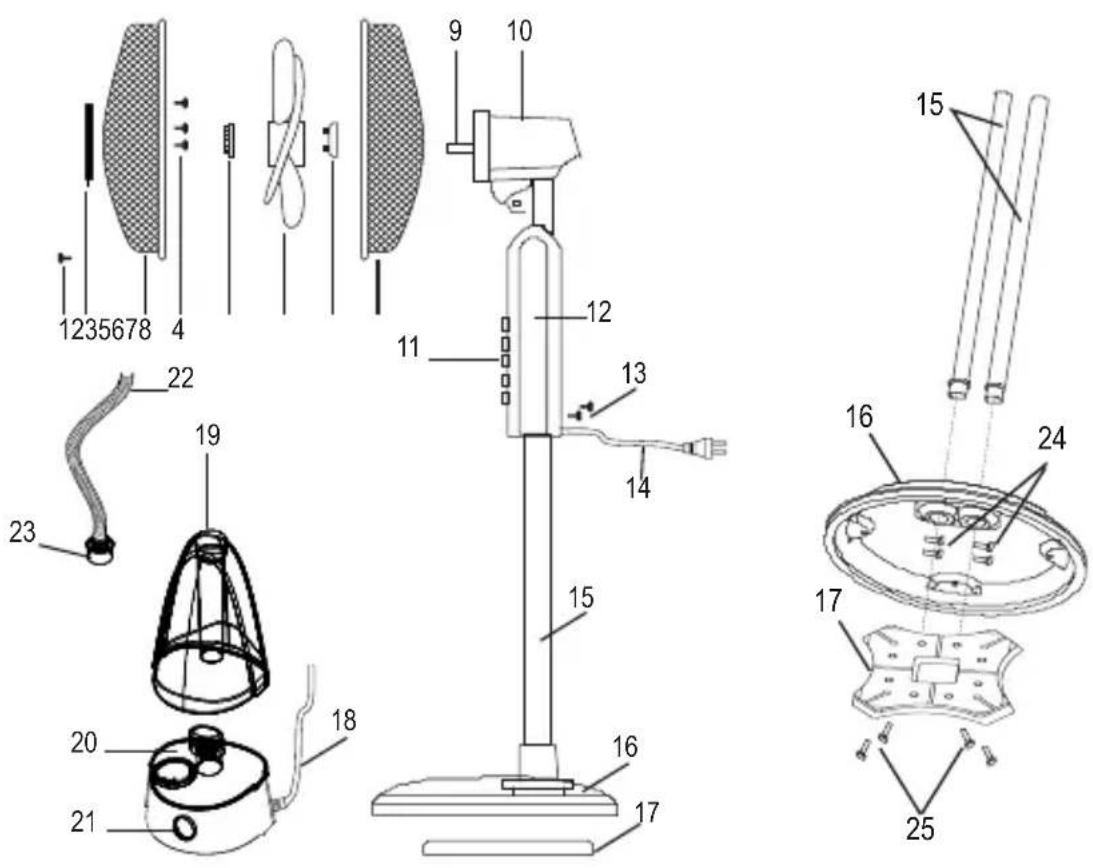
1 - Safety screw
2 - Misting adjustment plate
3 - Front grille
4 - Fixing screw of the misting plate
5 - Fan lock ring
6 - Fan
7 - Back grille lock ring
8-Back grille
9 - Motor shaft
10-Motor
11 - Control panel
12 - Main body
13 - Main body screws
14 - Power cord
15 - Supporting tubes
16 - Base
17 - Base weight
18 - Humidifier power cord
19 - Humidifier tank
20 - Humidifier main body
21 - Humidifier knob
22 - Misting tube
23 - Humidifier cap
24 - Screws of supporting tubes
25 - Screws of weight of the base
Assembling
Unscrew the screws (24) from the supporting tubes (15). Place the supporting tubes (15) into the holes of the base (16) making sure that the holes on the bottom of the support tubes and the holes in the tube housings on the base are coincident. Ensure the supporting tubes (15) on the base (16) by using the 4 screws (24) previously unscrewed.
Place the weight of the base (17) under the base (16). NB: the weight of the base has a flat face and a curved face; the flat side must placed against the base. Fix the weight of the base (17) using the 4 screws supplied (25).
Loosen the screws (13), insert the main body (12) on the support tubes (15) and fix it by tightening the fixing screws (13).
Place the humidifier main body (20) in its housing on the base (16).
Fix the misting plate (2) in the front grid (3) making sure that the logo in the center of the plate is horizontal, parallel to the floor and ensure it by using the screw provided (4).
Unscrew the lock ring of the back grille (7) by rotating it counterclockwise, from the motor shaft (9).
Insert the back grille (8) on the motor shaft (9) so that the grip is pointed upwards and the holes/pins match. Then fix it with the grille lock ring (7) by rotating it clockwise.
Insert the fan (6) on the motor shaft (9) and fix it by rotating the lock ring (5) counterclockwise.
Open the clip of the front grille (3) and place it on the back grille (8) making sure that the logo in the central stud is placed horizontal, parallel to the floor.
Find the proper position to tighten the safety screw (1).
Fill up the tank (19) following the instructions from paragraph "HOW TO FILL UP THE TANK" and place it on the main body of the humidifier (20).
Connect the misting tube (22) to the misting adjustment knob (2) and in the lower part insert the the humidifier cap (23) on the tank (19).
The assembly procedure is complete.
HOW TO FILL THE TANK
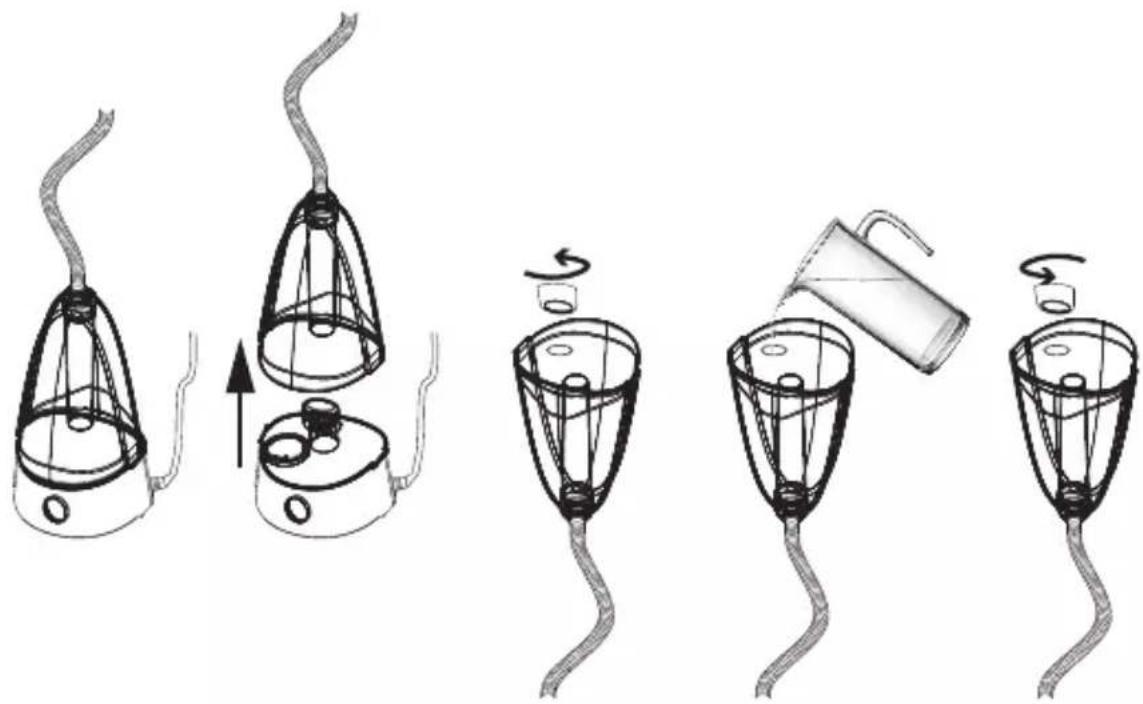
Turn the humidifier off by rotating the humidifier knob counterclockwise and disconnect the power cable from the socket.
Lift the tank of the humidifier and turn it upside down.
Unscrew the cap of the tank by rotating it counterclockwise.
Fill the tank with cold and clean water (previously boiled).
In case of hard water in your area, use cold demineralized water in the water tank (previously boiled) or distilled water.
Close the tank with the cap by rotating it clockwise.
Turn over the tank and place it on the main body of the humidifier.
Instructions for use
Place the fan on a flat, dry and stable surface and plug it to a proper socket; the unit will emit a "BIP" sound and the "POWER" light indicator is on. The misting fan can be controlled both from the control panel (11) and remote control.
Batteries
Remote control is supplied with battery inside (CR2025 type); remove the plastic sheet from the battery cover before use remote control. When the battery is over, it must be replaced with the same type following the drawing on the back of remote control.
CONTROL PANEL AND DISPLAY LIGHTS
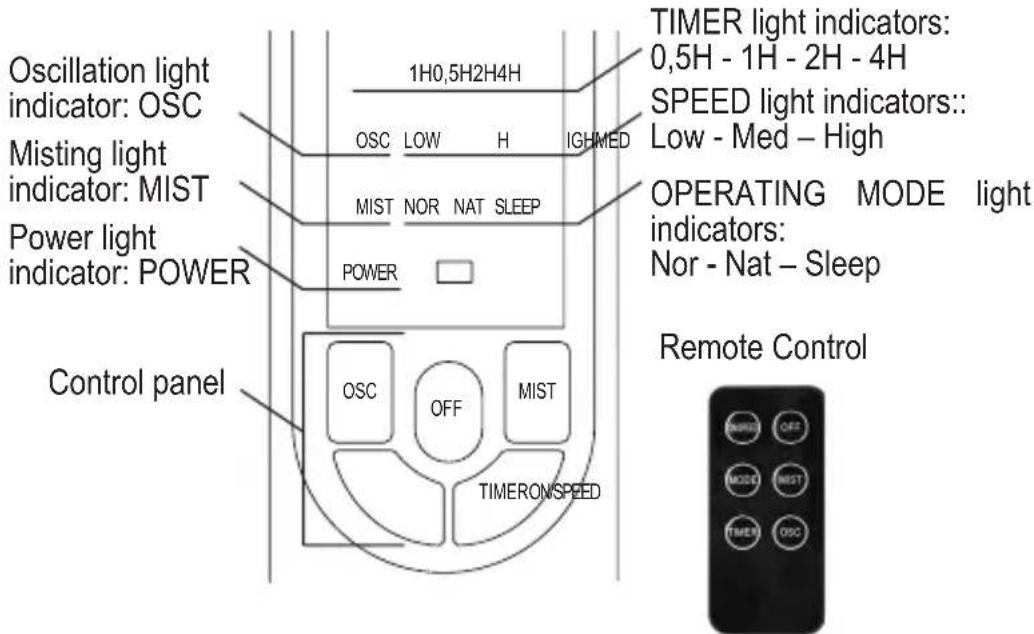
Press the following buttons to select the function you need:
ON/SPEED
(button present both on the control panel and on the remote control): press it to turn on the fan. While the fan is on, press it to select the speed you need and select between Low (low speed), Med (average speed) and High (maximum speed).
Each time you press the button to change the speed the related light indicators will be turned on, on the display.
OFF
(button is present both on the control panel and on the remote control): press it to turn off the fan. All the light indicators are off except for the "Power" light indicator which shows that the fan is connected to the mains supply.
MODE
button present on the remote control): while the fan is on, press it to select the operating mode you need, by selecting between NOR (Normal), NAT (Natural) and SLEEP (Night). NOR (Normal) - the fan operates according to the set speed NAT (Natural) - the fan operates at an irregular speed between the minimum and the maximum set speed, simulating the natural breeze. SLEEP (Night) - the fan operates at an irregular speed as follows:
- If the maximum speed (High) is set: the fan operates at maximum speed on Natural mode for 30 minutes, and then it operates at average speed on Natural mode for another 30 minutes to finally pass to low speed on Natural mode. The speed operating light indicators are turned on/off according to the operating mode.
- If the average speed (Middle) is set: the fan operates at average speed on Natural mode for 30 minutes and then it operates at low speed on Natural mode. The speed operating light indicators are turned on/off according to the operating mode.
- If the low speed (Low) is set: the fan operates at low speed on Natural mode creating a natural breeze.
Each time is pressed, the MODE button changes the operating mode and so the light indicators are turned on, on the display.
TIMER
(button present both on the control panel and on the remote control): while the fan is on, press the button to switch off the fan in a range between 0, 5 and 7, 5 hours from the programming moment.
Each time you press the button, the time increases with 0, 5 hours. The timer light indicators are turned on, on the display (0,5H, 1H, 2H, 4H).
The total operating time set before the automatic switching off is given by the light indicators (for example if all the timer light indicators are on during the operating time set before the automatic switching off, the total operating time is given by:
0,5H (0,5 hours) + 1H (1 hour) + 2H (2 hours) + 4H (4 hours) = 7,5 hours
The timer light indicators are turned off/ on according to the operating time remained.
To disable the timer function press the button until all the operating light indicators are off, or turn off the fan manually by pressing the Off button.
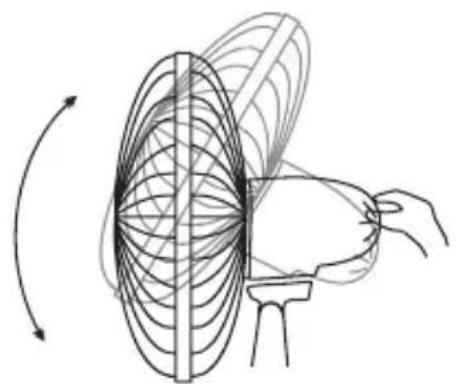
OSC
button present both on the panel and on the remote control): press this button to enable the automatic oscillation from right to left. The relative light indicator is turned on, on the display. To disable the automatic oscillation, press again the button (the related light indicator is turned off on the display).
MIST
(button present both on the panel and on the remote control): press this button to enable the misting. Attention: before enabling this function make sure there is water in the tank; in case you need to add water please see the paragraph "HOW TO FILL UP THE TANK" Once the tank is replaced on the main body of the humidifier, press MIST button to activate the mist function. The indicator light placed on the control panel of the humidifier (21) turns on in green color.
You can adjust the intensity of the misting by rotating the adjustment knob placed on the control panel of the humidifier (21): if you rotate it clockwise the intensity increases; if you rotate it counterclockwise the misting intensity decreases.
The misting comes out of the knob in a few seconds after pressing the button.
When the water is out, the misting function is disabled and the light indicator of the adjustment knob turns red; we recommend you to disable the misting function when the humidifier is off or the tank is empty.
When the function is enabled the related light indicator is turned on, on the display, and when the function is disabled the light indicator is turned off on the display. The misting function can be enabled independently from the ventilation; it is enough to turn off the fan by pressing the Off button and then to press the Mist button.
VERTICAL SLOPE:
You can vertically point the front of the fan choosing the desired angle. It is sufficient to move the front of the fan up or down according to the desired slope.
Maintenance
Before carrying out the regular cleaning operations turn off the fan and unplug it.
Ensure that the fan is switched off from the supply mains before removing the guard.
For external cleaning use a soft and dry cloth.
DO NOT dip the device in water, or splash it with any other liquids.
DO NOT use solvents or any other chemical products for cleaning it.
Reinstall the guard after cleaning and before connecting the plug to he mains.
When you do not use it, after cleaning it, store the fan in a dry place.
HUMIDIFIER
DAILY CLEANING
To reduce bacteria and scale residues, empty the water tank and the water residues in the main body (20); rinse with clean water the tank and the other parts in contact with water and dry them with a soft and clean cloth.
EVERY 3 DAYS
Clean the water tank of the dehumidifier every 3 days with a mild detergent and rinse with clean water by removing all residues.
If the nebulizing plate has mineral water residue use vinegar and wait for 2-5 minutes. Then, rinse the nebulizing plate with clean water. Never use sharp or hard objects to clean the nebulizing plate.
Dry the tank and the other parts in contact with water using a soft and clean cloth.
PACKAGING
In order to respect the environment, packaging material must be disposed of properly in accordance with separate collection.
Check local regulations.
| BATTERIES - Remove the batteries from the appliance before its disposal. Do not dispose the batteries with domestic waste. The batteries must be disposed of in the appropriate containers or in the specific collecting centre. Suitable segregated collection helps prevent damage to the environment and to human health.
To remove batteries, refer to Instructions for use. |
| USER INFORMATION
“Implementation of Directive 2012/19/EU on Waste Electrical and Electronic Equipment (WEEE)”, pertaining to reduced use of hazardous substances in electrical and electronic equipment, as well as to waste disposal.
The symbol of the crossed-out wheelie bin on the equipment or on its packaging indicates that the product must be disposed of separately from other waste at the end of its service life.
The user must therefore take the dismissed equipment to suitable separate collection centres for electrical and electronic waste.
For more details, please contact the appropriate local authority.
Suitable segregated collection of the equipment for subsequent recycling, treatment or environmentally-friendly disposal helps prevent damage to the environment and to human health, and encourages the re-use and/or recycling of the materials that make up the equipment.
Abusive disposal of the product by the user shall result in the application of administrative fines in accordance with the laws in force. |
Terms and Conditions
The guarantee is valid for 24 months.
This guarantee applies only if it has been duly filled in and is submitted with the receipt showing the date of purchase.
The guarantee covers the replacement or repair of parts making up the appliance which were faulty at source due to manufacturing faults.
After the guarantee has expired, the appliance will be repaired against payment.
The manufacturer declines any responsibility for damage to persons, animals or property due to misuse of the appliance and failure to observe the directions contained in the instructions.
Limits
All rights under this guarantee and any responsibility on our part will be avoided if the appliance has been:
The guarantee does not cover damage to the outward appearance or any other that does not prevent regular operation.
If any faults should be found despite the care taken in selecting the materials and in creating the product, or if any information or advice are required, please contact your local dealer.
ARDES, Guzzanti, Scarlett, Luxell, Graef
CERTES spel. s r.o.
Doninska 83
463 34 Hradek nad Nisou
Tel./fax 482771487 - prijem oprav-servis.