
1097911401 - Moisture meter POWERFIX - Free user manual and instructions
Find the device manual for free 1097911401 POWERFIX in PDF.
| Product type | Moisture meter |
| Brand | Powerfix |
| Model | 1097911401 |
| Intended use | Measurement of wood moisture (6-44%) and building materials (0.2-2.0%) |
| Power supply | 4 AAA 1.5V batteries (LR03) |
| Measurement accuracy (wood) | < 30% = ±2%, ≥ 30% = ±4% |
| Measurement accuracy (building) | < 1.4% = ±0.1%, ≥ 1.4% = ±0.2% |
| Operating temperature | 0°C to 40°C |
| Display | Digital display with wood and construction scales |
| Main functions | Moisture measurement, temperature display (°C/°F), LED flashlight, auto-off (30s) |
| Built-in calibration test | Yes, via test points B and T on the protective cap |
| Integrated lighting | LED flashlight (activation via dedicated button) |
| Auto-off | After 30 seconds of inactivity (disabled if light is on) |
| Safety | Sharp pins: protective cap provided; battery precautions |
| Care and cleaning | Slightly damp cloth; clean pins after use |
| Storage | Replace protective cap; remove batteries if unused for long time |
| Package contents | Moisture meter, 4 AAA batteries, instruction manual |
| Certification | TÜV/GS |
| Warranty | 3 years (material and manufacturing defects) |
Frequently Asked Questions - 1097911401 POWERFIX
User questions about 1097911401 POWERFIX
0 question about this device. Answer the ones you know or ask your own.
Ask a new question about this device
Download the instructions for your Moisture meter in PDF format for free! Find your manual 1097911401 - POWERFIX and take your electronic device back in hand. On this page are published all the documents necessary for the use of your device. 1097911401 by POWERFIX.
USER MANUAL 1097911401 POWERFIX
Operation and Safety Notes
FR BE
HuMldIMetre
Intended use.. Page 6
Parts description.. Page 6
Technical Data Page 6
Scope of delivery.. Page 8
General safety instructions...Page 8
Battery safety information.. Page 9
Inserting/replacing batteries
Start-up Page 10
Display... Page 10
Measuring building or wood moisture ....Page 10
Temperature display. Page 11
LED torch.... Page 11
Auto shut-off.... Page 11
Troubleshooting
Cleaning and Care Page 12
Storage
Disposal
Warranty.. Page 13
Introduction
We congratulate you on the purchase of your new device. You have chosen a high quality product. The instructions for use are part of the product. They contain important information concerning safety, use and disposal. Before using the product, please familiarise yourself with all of the safety information and instructions for use. Only use the unit as described and for the specified applications. If you pass the product on to anyone else, please ensure that you also pass on all the documentation with it.
Intended use
This device is suitable for measuring wood and building moisture, for example in firewood, paper, cardboard, mortar, concrete or plaster. The device is only intended for use in private households, and not intended for commercial use.
- Parts description
1 Protective cap/test aid
2 Measuring pins
3 Display
4 ON/SET button (power on/test key)
5 LED button (on/off)
6 LED torch
7 Battery cover
8 Battery compartment
9 Belt Clip
Technical Data
Battery: 4 × 1.5 ~V , AAA, Micro, LRO3
Measuring accuracy:
Wood moisture: < 30% = + / - 2%
Building moisture: < 1.4% = + / - 0.1%
$$ \begin{array}{l} >30\% = + / - 4\% \ > 1.4 \% = + / - 0.2 \% \ \end{array} $$
Operating temperature: 0^ to 40^ TUV/GS tested.
Wood moisture
Guidelines for firewood:
6-15% = excellent fuel value
16-20% = limited suitability for heating
21-44% = not suitable for heating, requires additional drying
Building moisture
Guidelines for concrete / cement floor:
| Meas-urement scale | Con- crete C20/ C25 | Gyp- sum plaster | Cement floor | Gas con-crete |
| 2.0 | XXXX | |||
| 1.8 | XXXX | |||
| 1.6 | O X O O | |||
| 1.4 | O X O O | |||
| 1.2 | O X O O | |||
| 1.0 | O X O O | |||
| 0.8 | O X O O | |||
| 0.6 | O X O O | |||
| 0.4 | O O O O | |||
| 0.2 | O O O O | |||
| \( (X = wet/O = dry) \) | ||||
| Wood moisture approximate value for firewood | |||
| ○ | 6-15 | ideal for heating - high heating value | |
| ○ | 16-20 | restricted heating - low heating value | |
| X | 21-44 | not suitable for heating - further drying necessary | |
| Building moisture for treatment | |||
| Concrete/ cement/screed/gas concrete | ○0,2-1,6 | ideal building moisture for processing | |
| X 1,8-2,0 | too much building mositure - further drying necessary | ||
| Gypsum plaster | ○0,2-0,4 | ideal moisture for processing | |
| X 0,6-2,0 | too much building mositure - further drying necessary | ||
- Scope of delivery
Immediately after unpacking please check the package contents for completeness and if all parts and the product are in good condition.
1 Moisture Meter
4 Batteries, 1.5V AAA, micro, LRO3
1 Instructions for use

General safety instructions
Before using the product, please familiarise yourself with all the operating and safety instructions. Please include all documentation when passing this product on to others.
Check the device for damage before use. If the device is damaged do not use it.
Do not expose the device to moisture. Otherwise the device could be damaged.
This device may be used by children age 8 years and up, as well as by persons with reduced physical, sensory or mental capacities, or lacking experience and / or knowledge, so long as they are supervised or instructed in the safe use of the device and understand the associated risks. Children should not be allowed to play with the device. Cleaning and user maintenance should not be performed by children without supervision.
WARNING! The measuring pins are very sharp. Always be careful when using this device. Always attach the protective cap to the device when not in use. Otherwise there is a risk of injury!
Battery safety information
WARNING! DANGER TO LIFE! Batteries are not intended for children. If accidentally swallowed seek immediate medical attention.

AUTION! EXPLOSION HAZARD!
- Never recharge non-rechargeable batteries and do not short-circuit and / or open any batteries.
Never throw batteries into fire or water.
Do not exert mechanical loads to batteries.
Risk of battery leakage
In the event the batteries leak, remove them from the device immediately to prevent damage.
Do not let the fluid from a leaking battery come into contact with your skin, eyes or mucous membranes. In the event of contact with battery acid, thoroughly flush the affected area with clean water and seek immediate medical attention.
Use only the recommended battery type. Do not use old and new batteries together.
Avoid extreme environmental conditions and temperatures, which could affect batteries, e.g. above radiators / in direct sunlight.
Remove the batteries from the device if they have not been used for a long period.
Risk of property damage
Only use the specified battery type!
When inserting the battery ensure the correct polarity! This is shown in the battery compartment.
If necessary, clean the battery and device contacts before inserting the battery.
Promptly remove used batteries from the product.
- Inserting/replacing batteries
Open the battery compartment at the back of the device by loosening the screw and removing the battery cover.
Insert four new batteries type AAA, 1.5% into the battery compartment. Ensure correct polarity. This is shown in the battery compartment (see Fig. B).
Replace the battery compartment and tighten the screw.
- Start-up
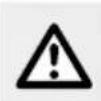
Display
Replace the batteries when this symbol appears.
The scale at the left indicates the wood moisture from 6 - 44% The scale on the right shows the building moisture from 0.2 - 2.0% The temperature is shown on the display in either Celsius (^) or Fahrenheit (^) as required.
The measurement is shown in the middle of the display using gauge marks. On the left scale easy line represents 1% , in the right scale it's 0.05% .
- Measuring building or wood moisture
Before measuring, first remove the protective cap 1.
Push the ON / SET button to switch the device on.
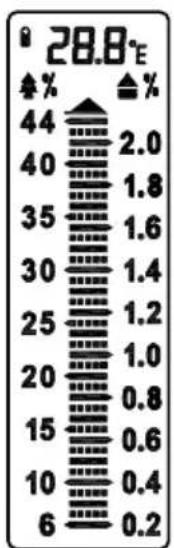
Before making the first measurement, use a test aid to verify the device is working properly. The test aid has four measuring points marked B and T.
Push the measuring pin into measuring point B. All gauge marks in the display 3 will begin to flash.
Now press the measuring pins into measuring points T. The gauge marks in the display should read 19% (+ / - 1%) .
The device is ready for use if both tests return the specified values.
Push the measuring pins into the material you wish to test. The gauge marks in the display will show the moisture content.
- symbol, left: use to read the measurement for firewood, cardboard and construction wood.
- symbol, right: use to read the measurement of mortar, concrete and plaster.
Note: the gauge marks will start flashing if the measurement exceeds the maximum values of 2% resp. 44% .
Note: perform comparison measurements in several different locations to minimize measuring errors.
- Temperature display
Note: the temperature will be displayed in the top section of the display 3.
Hold the ON/SET button for three seconds to switch between Celsius (^) and Fahrenheit (^) .
LED torch
Hold the LED butt for three seconds to switch on the LED torch.
Press the LED button again to switch off the LED torch.
Auto shut-off
The device automatically switches off if no buttons are activated for approx. 30 seconds. The auto shut-off is deactivated so long as the LED torch 6 is on.
Troubleshooting
Electrostatic discharges can lead to malfunctions. In the event of such malfunctions, remove the batteries briefly and reinsert them.
- Cleaning and Care
Do not allow liquids to enter the device. The product may otherwise be damaged.
Only clean the device with a slightly dampened cloth and mild washing-up liquid.
Clean the measuring tips with a slightly dampened cloth and dry it afterwards.
Check the device for visible external damage before every use.
Check the measuring tips for damage before every use.
Storage
Always attach the protective cap to the device when not in use.
Always remove the batteries if the device will not be used for extended periods.
Store the device in a dry location.
Disposal
The packaging is made of environmentally friendly materials, which may be disposed of through your local recycling facilities.
Contact your local refuse disposal authority for more details on how to dispose of your worn-out product.
To help protect the environment, please dispose of the product properly, and not in household waste, when it has reached the end of its useful life. Please contact your local authority for information on collection points and their opening hours.
Faulty or used batteries must be recycled in accordance with Directive 2006 / 66 / EC and its amendments. Please return the batteries and / or the device to the available collection points.
Improper disposal of batteries can harm the environment!
Never dispose of batteries in your household waste. They may contain toxic heavy metals and are subject to hazardous waste regulations. The chemical symbols of the heavy metals are: Cd = cadmium, Hg = mercury, Pb = lead. Therefore dispose of used batteries through your municipal collection site.
Warranty
The device has been manufactured to strict quality guidelines and meticulously examined before delivery. In the event of product defects you have legal rights against the retailer of this product. Your legal rights are not limited in any way by our warranty detailed below.
The warranty for this device is 3 years from the date of purchase. Should this device show any fault in materials or manufacture within 3 years from the date of purchase, we will repair or replace it - at our choice - free of charge to you.
The warranty period begins on the date of purchase. Please keep the original sales receipt in a safe location. This document is required as your proof of purchase. This warranty becomes void if the device has been damaged or improperly used or maintained.
The warranty applies to faults in material or manufacture. This warranty does not cover product parts subject to normal wear, thus possibly considered consumables (e.g. batteries) or for damage to fragile parts, e.g. switches, rechargeable batteries or glass parts.