
Z31280 - Drill POWERFIX - Free user manual and instructions
Find the device manual for free Z31280 POWERFIX in PDF.


| Product Type | Power Drill |
| Brand | Powerfix |
| Model | Z31280 |
| Power Source | Mains (corded), 230 V, 50 Hz |
| Power Consumption | 600 W |
| No-Load Speed | 0 - 2800 rpm, variable |
| Chuck Type | Keyless, 13 mm |
| Drilling Capacity (Steel) | 13 mm |
| Drilling Capacity (Wood) | 25 mm |
| Drilling Capacity (Concrete) | 10 mm |
| Max Torque | 30 Nm |
| Weight | 1.5 kg |
| Cable Length | 2 m |
| Dimensions (L x W x H) | 250 x 200 x 70 mm |
| Features | Variable speed trigger, forward/reverse rotation, lock-on button, auxiliary handle, depth stop |
| Safety | Double insulated, overload protection, safety guard |
| Inclusions | Drill chuck key, side handle, depth stop, carry case |
| Maintenance | Clean with dry cloth; check carbon brushes periodically |
| Spare Parts | Available from Powerfix; replace carbon brushes as needed |
| Disposal | Recycle at appropriate facility; do not dispose with household waste |
Frequently Asked Questions - Z31280 POWERFIX
User questions about Z31280 POWERFIX
0 question about this device. Answer the ones you know or ask your own.
Ask a new question about this device
Download the instructions for your Drill in PDF format for free! Find your manual Z31280 - POWERFIX and take your electronic device back in hand. On this page are published all the documents necessary for the use of your device. Z31280 by POWERFIX.
USER MANUAL Z31280 POWERFIX
Drill stanD
GB CY
Drill stanD
Assembly, operating and safety instructions
HR
POstOJE za bUšiliCU
Upute za montažu, uporabu i sigurnost
RO
sUPOrt PEntrU MaŞinĂ DE GĂUrit
GB/CY Assembly, operating and safety instructions Page 5
HR Upute za montažu, uporabu i sigurnost Stranica 8
natural_image
Close-up of a hand using a drill press to lift a component, with no visible text or symbols

natural_image
Mechanical assembly with metal components and a black cable (no visible text or symbols)DRILL STAND
- Intended use
The product is designed for commercial drills and is suitable for placing exactly defined holes at right-angles into wood, metal and ceramic tiles. It is possible to mount the work-piece securely during drilling. Consult the manufacturer's operating manual before using the drill. The product is not intended for commercial use.
Parts description
Drill stand:
1 Bolt
2 Lever arm
3 Drill holding fixture
4 Guide slot (4 x)
5 Drill hole (4 x)
6 Base plate
7 Pillar
8 Block
9 Slider
10 Locking screw
11 Drill depth gauge with indicator
12 Screw
Vice:
13 Vice
14 Long slot
15 Locking device
16 Quick-release button
17 Clamping jaw
- Contents
1 Drill stand
1 Hexagon key
1 Vice
1 Operating instructions
● Technical data
Drill holding fixture for
clamping collar diameter: 43 mm
Drilling depth: to 60 mm steplessly
adjustable
Dimensions: 155 x 505 x 225 mm
(W x H x D)
Clamping jaw width: 65 mm
Clamp width: 65 mm

Safety advice
YOU SHOULD STORE ALL SAFETY INFORMATION AND INSTRUCTIONS IN A SAFE PLACE IN CASE YOU NEED TO REFER TO THEM AGAIN IN THE FUTURE!
⚠️ CAUTION! RISK OF INJURY! When working with hand-operated electrical tool, slipping or loosening of the mounted work-piece can cause severe injuries. Therefore, never work on a mounted work-piece using a hand-operated electrical tool.
⚠️ CAUTION! RISK OF SHEARING OR CRUSHING INJURY! There is the risk of shearing or crushing injuries while working with the drill stand.
⚠️ CAUTION! RISK OF INJURY! Pay attention to flying chippings and splinters. There is the risk of injury.
- Keep out of the reach of children. Store the product out of the reach of children.
- Check the product for damage before each use. Please do not use this device if you find that it is damaged in any way.
- Check that the screws are tight before each use.
Use the product on a solid, level and intact surface (e.g. a workbench).
■ Always disconnect the drill from the power supply before making adjustments or work breaks.
The drill stand must be mounted on a workbench or a stable, tilt-free table, to ensure a safe work. Use the drill holes 5 in the base plate 6.
Assembly
Note: You need a 5 mm hexagon key (provided), two open-ended spanners (10 mm & 14 mm) and a slot screwdriver (1.2 x 8.0 mm) for assembly and adjustment.
Connect the pill to the base plate 6. Then fix the slider 9 on the pillar (see Fig. A).
Mount the lever amonto the slider (see Fig. B). Tighten the screws and nuts as tight as possible.
Mount the vicle onto the base plate. To do this connect the screws with the guide slots 4 in the base plate through the two long slots 14 (see Fig. C).
Note: The vice can be positioned exactly by moving the guide slots and long slots.
● Mounting the work-piece
- Hold the quick-release buttonpressed and pull the locking device 15 back as far as it goes (see Fig. D).
Place the work-piece into the vice.
Press the quick-release button and push the locking device with the clamping jaw 17 against the work-piece.
■ Fix the work-piece with a right turn (see Fig. E).
● Clamping in and adjusting the drill
Fit the drill with its clamping collar into the drill holding fixture 3 and tighten securely (see Fig. F).
- Insert a suitable drill bit into the chuck.
■ Unscrew b2t(see Fig. G).
■ Move the slider with the clamped in drill on the pillar 7, until the drill nearly touches the work-piece.
■ Retighten screw securely.
● Adjusting the drill depth
■ Loosen the block and slide it up to the slider 9 (see Fig. H).
■ Loosen the locking screw by turning it to the left (see Fig. H).
■ Make sure that the bbl will be released doing this and slides down to the lowest position.
■ Move the lever 2 mdown and read off the desired drill depth on the drill gauge with indicator 11 .
- Fix the locking screw and block 8 with a right turn (see Fig. I).
● Adjusting the work piece
■ Loosen the fixing screws of the vice
- Adjust the vice with the work piece by sliding it into position.
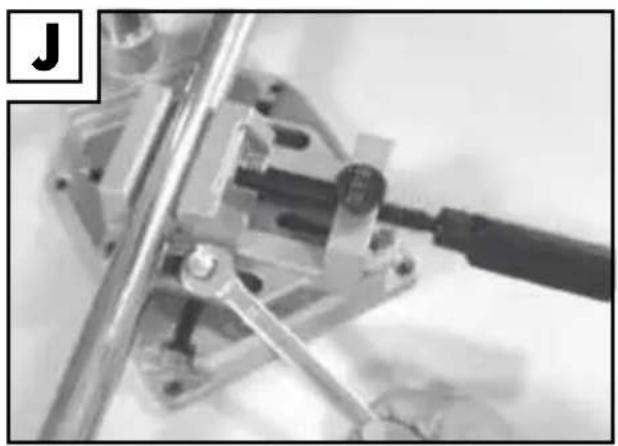
Mark the exact position and punch a drilling point on the work-piece. Retighten the vice (see Fig. J).
● Storage and care
- Store the hexagon key in the fixture on the slider.
■ Store the product in a dry place, out of the reach of children.
■ Clean the product with a damp cloth.
Lightly grease the moving parts, rub the plain metal parts with an oily cloth to protect them from rust.
Disposal

The packaging is made from environmentally friendly materials, which may be disposed through your local recycling facilities.
Contact your local refuse disposal authority for more details of how to dispose of your worn-out product.
Warranty
The device has been manufactured to strict quality guidelines and meticulously examined before delivery. In the event of product defects you have legal rights against the retailer of this product. Your legal rights are not limited in any way by our warranty detailed below.
The warranty for this device is 3 years from the date of purchase. Should this device show any fault in materials or manufacture within 3 years from the date of purchase, we will repair or replace it - at our choice - free of charge to you.
The warranty period begins on the date of purchase. Please keep the original sales receipt in a safe location. This document is required as your proof of purchase. This warranty becomes void if the device has been damaged or improperly used or maintained.
The warranty applies to faults in material or manufacture. This warranty does not cover product parts subject to normal wear, thus possibly considered consumables (e.g. batteries) or for damage to fragile parts, e.g. switches, rechargeable batteries or glass parts.
POSTOLJE ZA BUŠILICU
- Namjena
Proizvod je prikladan za standardne kupovne bušilice za postavljanje točno definiranih rupa pod pravim kutom u drvu, metalu i karamičkim pločicama. Postoji mogućnost za sigurno stezanje radnog komada za vrijeme bušenja. Prije uporabe bušilice, obvezno pročitajte upute za uporabu od proizvođača. Proizvod nije namijenjen profesionalnoj uporabi.
• Opis dijelova
Stalak za bušilicu:
1 Zatik
2 Krak poluge
3 Prihvat bušilice
4 Brazda-vodilica (4 x)
5 Bušotine (4 x)
6 Podložna ploča
7 Stup
8 Glava poluge
9 Zaporni vijak
10 Locking screw
11 Mjera dubine bušenja s prikazom
12 Vijak
Škripac:
13 Škripac
14 Dugačka rupa
15 Učvršćivać
16 Tipka za brzo stezanje
17 Stezne čeljusti
Opseg isporuke
1 stalak za bušilicu
1 šesterobridni usadni ključ
1 škripac
1 upute za korištenje
● Tehnički podaci
Prihvat bušilice


- Drill stanD
- POstOJE za bUšiliCU
- sUPOrt PEntrU MaŞinĂ DE GĂUrit
- - Intended use
- Parts description
- Drill stand:
- Vice:
- - Contents
- ● Technical data
- Safety advice
- Assembly
- ● Mounting the work-piece
- ● Clamping in and adjusting the drill
- ● Adjusting the drill depth
- ● Adjusting the work piece
- ● Storage and care
- Disposal
- Warranty
- POSTOLJE ZA BUŠILICU
- - Namjena
- • Opis dijelova
- Stalak za bušilicu:
- Škripac:
- Opseg isporuke
- ● Tehnički podaci
Brand : POWERFIX
Model : Z31280
Category : Drill