
HG01976 - Drill POWERFIX - Free user manual and instructions
Find the device manual for free HG01976 POWERFIX in PDF.


| Product Type | Multi-function Power Tool |
| Brand | POWERFIX |
| Model | HG01976 |
| Dimensions (L x W x H) | 28 x 20 x 8 cm |
| Weight | 1.2 kg |
| Power Supply | 230 V AC, 50 Hz |
| Power Consumption | 500 W |
| Variable Speed | 5000 - 15000 rpm |
| Main Functions | Sanding, cutting, scraping, polishing |
| Material Compatibility | Wood, metal, plastic, ceramic |
| Accessories Included | Sanding pad, cutting blade, scraping blade |
| Safety Features | Overload protection, double insulation |
| Maintenance | Clean with dry cloth; inspect carbon brushes every 50 hours |
| Spare Parts Available | Carbon brushes, sanding pads, blades |
| Repairability | Modular design; accessible brush compartment |
| General Information | 23-page manual included; multilingual support |
Frequently Asked Questions - HG01976 POWERFIX
User questions about HG01976 POWERFIX
0 question about this device. Answer the ones you know or ask your own.
Ask a new question about this device
Download the instructions for your Drill in PDF format for free! Find your manual HG01976 - POWERFIX and take your electronic device back in hand. On this page are published all the documents necessary for the use of your device. HG01976 by POWERFIX.
USER MANUAL HG01976 POWERFIX
SET DE GUÍA DE BROCA Y TACOS / SET DI CALIBRI PER TASSELLI E PUNTE DA TRAPANO
ES
SET DE GUÍA DE BROCA Y TACOS
Operation and Safety Notes

GB / MT Operation and Safety Notes Page 16
natural_image
Technical line drawing of a mechanical assembly with labeled points H and A (no text or symbols beyond labels)


natural_image
Technical diagram showing mechanical assembly with labeled components (A, B) and a close-up view of a mechanical component (no text or symbols present)

natural_image
Technical line drawing of a mechanical assembly with no visible text or symbols


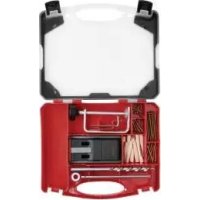
Drill and Plug Jig Kit
- Introduction
We congratulate you on the purchase of your new product. You have chosen a high quality product. Familiarise yourself with the product before using it for the first time. In addition, please carefully refer to the operating instructions and the safety advice below. Only use the product as instructed and only for the indicated field of application. Keep these instructions in a safe place. If you pass the product on to anyone else, please ensure that you also pass on all the documentation with it.
IntendedUse
This product is intended for drilling precisely aligned holes into wooden boards. This product was designed for private use and must not be used for commercial purposes.
Scope of Delivery
1 Drilling jig
3 Wood drills
3 Depth stops
150 Dowels
1 Installation wrench
1 Instructions for use
PartsDescription
1 Wood drill
2 Depth stop
3 Dowel
4 Installation wrench
5 Latch
6 Setting dial
7 Ripfence
8 Side measuring scale
9 Guide
TechnicalData
Maximum bore depth: 6 mm: 25 mm,
∅ 8 mm: 35 mm,
∅ 10 mm: 55 mm

Safety
This section provides important safety notes for using this product. Incorrect use may result in personal injury or property damage. Before using the product, please familiarise yourself with all of the safety instructions and instructions for use! When passing this product on to others, please also include all the documents!
This product may be used by children aged 8 years and up, as well as by persons with physical, sensory or mental impairments, or lacking experience and/or knowledge, so long as they are supervised or instructed in the safe use of the product and understand the associated risks. Do not allow children to play with the product. Never allow children to clean or maintain this product unsupervised.
■ CAUTION! CRUSHING HAZARD! Handling this product poses a crushing hazard.
■ CAUTION! RISK OF INJURY! Pay attention to chippings and splinters flying around. There is a risk of injury.
- Keep out of the reach of children. Store the product out of the reach of children.
- Check the product for damage before every use. Please do not use this product if you detect any damage.
Use the product on a sturdy, level and undamaged surface (e.g. a workbench).
■ Always disconnect the drill from the power supply before making adjustments or taking breaks.
- Adjusting the drill size (see Fig. A)
-
Turn the latch 5 counter-clockwise to unlock.
-
Push and hold the latch 5.
-
Turn the setting dial 6 until the arrow points at the respective drill size.
-
Release and turn the latch 5 clockwise to lock the product again.
- Attaching the depth stop (see Fig. B and C)
☐ Slide the desired depth stop 2 over the respective wood drill 1. Use the installation wrench 4 to tighten the hexagon head screw and secure the depth stop 2 in the desired position.
- Attaching the rip fence to the product (see Fig. D and E)
-
Turn the latch 5 counter-clockwise to unlock the product. Press and hold the latch 5.
-
Insert the rip fence 7 in the product.
-
Release the latch 5.
-
Turn the latch 5 clockwise to lock the rip fence 7.
● Drilling holes (T-joints)
Note: This requires a cordless drill. CAUTION! RISK OF INJURY! Please refer to your cordless drill's instructions for use.
☐ Secure board A to the workbench.
☐ First mark the centre line on board A (see Fig. F), then the location where you wish to drill the hole with an „x“.
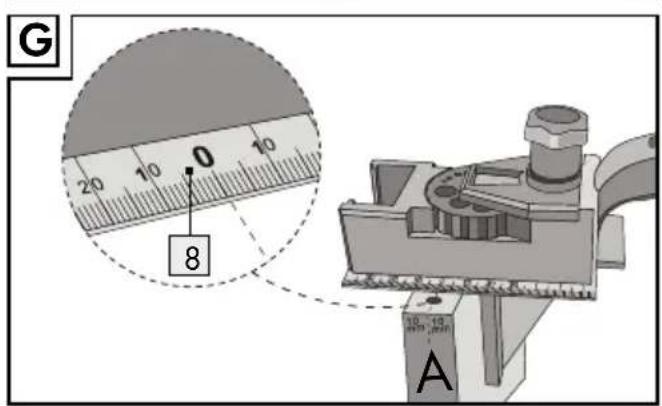
□ Apply the product to the board A and adjust the rip fence 7 so the selected jig is exactly in the location marked „x“. You can check and if necessary correct the positions of the mark
using the measuring scale 8 on both sides of the product (see Fig. G).
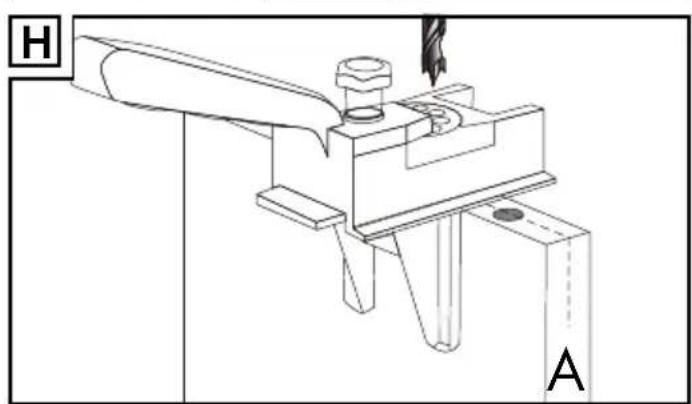
Drill the hole in the marked location (see Fig. H).
☐ Make a line in the location on board B where you wish to later attach board A (see Fig. I).
☐ Remove the rip fence 7 from the product by pressing and holding the latch 5 and pulling the rip fence 7 out toward the back.
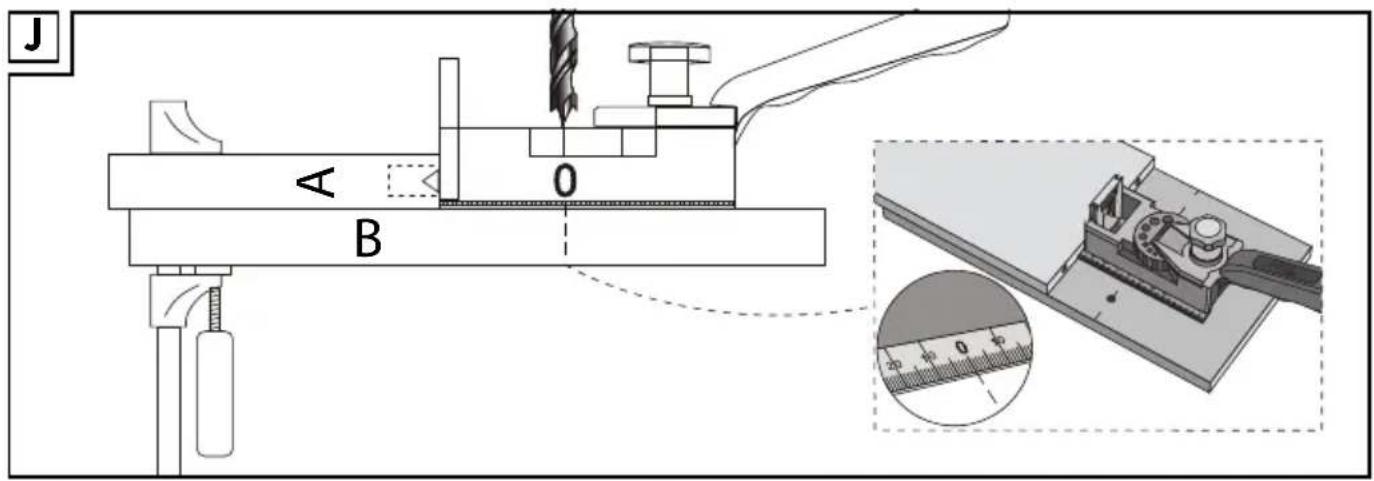
☐ Now clamp board A in the workbench parallel to board B as shown in figure J.
☐ Align the product so the guide 9 is inside the previously drilled hole in board A and the selected jig is exactly over the line on board B (see Fig. J).
Now drill the hole in board B.
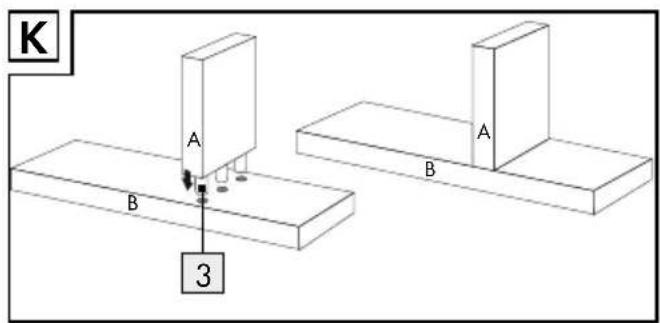
☐ Then insert a dowel 3 coated with wood glue (not included) in the hole (see Fig. K).
☐ Repeat this process as often as necessary.
● Drilling holes (L-joints)
Note: This requires a cordless drill.
CAUTION! RISK OF INJURY! Please refer to your cordless drill's instructions for use.
☐ Secure board A to the workbench.
☐ First mark the centre line on board A (see Fig. F), then the location where you wish to drill the hole with an „x“.
□ Apply the product to the board and adjust the rip fence 7 so the selected jig is exactly in the location marked „x“. You can check and if necessary correct the positions of the mark using the measuring scale 8 on both sides of the product (see Fig. G).
Drill the hole in the marked location (see Fig. H).
☐ Mark the location where you wish to later attach board A with a line (see Fig. L).
☐ Pull the guide 9 out of the product and slide into the rip fence 7 from below (see Fig. M).
☐ Now clamp board A in the workbench parallel to board B as shown in figure M.
☐ Align the product so the guide 9 is inside the previously drilled hole in board A and the selected jig is exactly over the line on board B (see Fig. M).
☐ Now drill the hole in board B.
☐ Then insert a dowel 3 coated with wood glue (not included) in the hole (see Fig. N).
☐ Repeat this process as often as necessary.
● Drilling holes (flat joints)
Note: This requires a cordless drill.
CAUTION! RISK OF INJURY! Please refer to your cordless drill's instructions for use.
☐ Secure boards A and B parallel in the workbench.
☐ First mark the centre line on both boards (see Fig. F) and the location where you wish to drill the hole in board A with an „x“.
□ Apply the product to the board and adjust the rip fence 7 so the selected jig is exactly in the location marked „x“. You can check and if necessary correct the positions of the mark using the measuring scale 8 on both sides of the product (see Fig. G).
Drill the hole in the marked location on board A (see Fig. O).
☐ Remove the guide 9 from the product and install the guide into lower rail so it faces down (see Fig. P).
☐ Align the product so the guide is inside the previously drilled hole in board A and the selected jig is exactly over the line on board B (see Fig. P).
☐ Now drill the hole in board B.
☐ Then insert a dowel 3 coated with wood glue (not included) in the hole (see Fig. Q).
☐ Repeat this process as often as necessary.
●Drillingholes (dowel holes for shelves)
Note: This requires a cordless drill.
CAUTION! RISK OF INJURY! Please refer to your cordless drill's instructions for use.
☐ Make lines in the respective locations on the board you are working on (see Fig. R).
Drill the first hole in the designated location.
☐ Remove the guide 9 from the product and install the guide into lower rail so it faces down (see Fig. S).
☐ Align the product so the guide 9 is inside the previously drilled hole and the selected jig is exactly over the line (see Fig. S).
☐ Now drill the remaining holes.
- Cleaning and Care
☐ Only clean with a dry, lint-free cloth.
●Disposal

The packaging is made entirely of recyclable materials, which you may dispose of at local recycling facilities.
Contact your local refuse disposal authority for more details of how to dispose of your worn-out product.


- SET DE GUÍA DE BROCA Y TACOS / SET DI CALIBRI PER TASSELLI E PUNTE DA TRAPANO
- Drill and Plug Jig Kit
- - Introduction
- IntendedUse
- Scope of Delivery
- PartsDescription
- TechnicalData
- Safety
- - Adjusting the drill size (see Fig. A)
- - Attaching the depth stop (see Fig. B and C)
- - Attaching the rip fence to the product (see Fig. D and E)
- ● Drilling holes (T-joints)
- ● Drilling holes (L-joints)
- ● Drilling holes (flat joints)
- ●Drillingholes (dowel holes for shelves)
- - Cleaning and Care
- ●Disposal
Brand : POWERFIX
Model : HG01976
Category : Drill