
HG04646 - Uncategorized POWERFIX - Free user manual and instructions
Find the device manual for free HG04646 POWERFIX in PDF.


| Product Type | Heavy Duty Ratchet Strap |
| Model Number | HG04646 |
| Length - Fixed End (LGF) | 0.35 m (35 cm) |
| Length - Adjustable End (LGL) | 3.65 m (365 cm) |
| Total Length | Approx. 4.0 m |
| Permissible Load (L_c) | 1600 daN (approx. 1600 kg) |
| Standard Hand Force (S_HF) | 50 daN |
| Material | Polyester (PES) |
| Operating Temperature Range | -40 °C to +80 °C |
| Intended Use | Securing loads on vehicles for private use |
| Lashing Method | Lashing down (tie-down) and diagonal lashing |
| Release Mechanism | Quick release button |
| Cleaning | Lukewarm water and pH-neutral detergent; avoid corrosive agents |
| Storage | Dry, well-ventilated, cool place; avoid chemicals |
| Warranty | 3 years from date of purchase |
| Standards Compliance | prEN 12195-1:1995 (reference) |
Frequently Asked Questions - HG04646 POWERFIX
User questions about HG04646 POWERFIX
0 question about this device. Answer the ones you know or ask your own.
Ask a new question about this device
Download the instructions for your Uncategorized in PDF format for free! Find your manual HG04646 - POWERFIX and take your electronic device back in hand. On this page are published all the documents necessary for the use of your device. HG04646 by POWERFIX.
USER MANUAL HG04646 POWERFIX
HEAVY DUTY RATCHET STRAP WITH HOLDER
GB CY
HEAVY DUTY RATCHET STRAP WITH HOLDER
Operation and safety notes
HR
REMEN S RAČVOM
GB/CY Operation and safety notes Page 5
HG04648

natural_image
Isometric diagram of a rectangular block mounted on a base plate with a diagonal line indicating force or dimension (no text or symbols)
natural_image
Isometric diagram of two rectangular blocks connected by rods, mounted on a base platform (no text or symbols)Introduction Page 6
Intended use.... Page 6
Technical data Page 7
Safety instructions Page 8
Safety instructions for lashing straps....Page 8
Practical use and care information.... Page 10
Use Page 13
Attaching the lashing strap....Page 14
Releasing the lashing strap....Page 15
Cleaning and care.... Page 16
Disposal Page 16
Warranty Page 17
HEAVY DUTY RATCHET STRAP WITH HOLDER
Introduction
We congratulate you on the purchase of your new product. You have chosen a high quality product. Familiarise yourself with the product before using it for the first time. In addition, please carefully refer to the operating instructions and the safety advice below. Only use the product as instructed and only for the indicated field of application. Keep these instructions in a safe place. If you pass the product on to anyone else, please ensure that you also pass on all the documentation with it.
- Intended use
The manufacturer and the dealer of this product are not liable for any damages if the product is not used according to the warnings and instructions of this instruction manual. The product is not intended for commercial use. The product is only suitable for private use, to secure loading on vehicles. Any usage which does not conform with this manual can lead to injuries or damages.
● Technical data
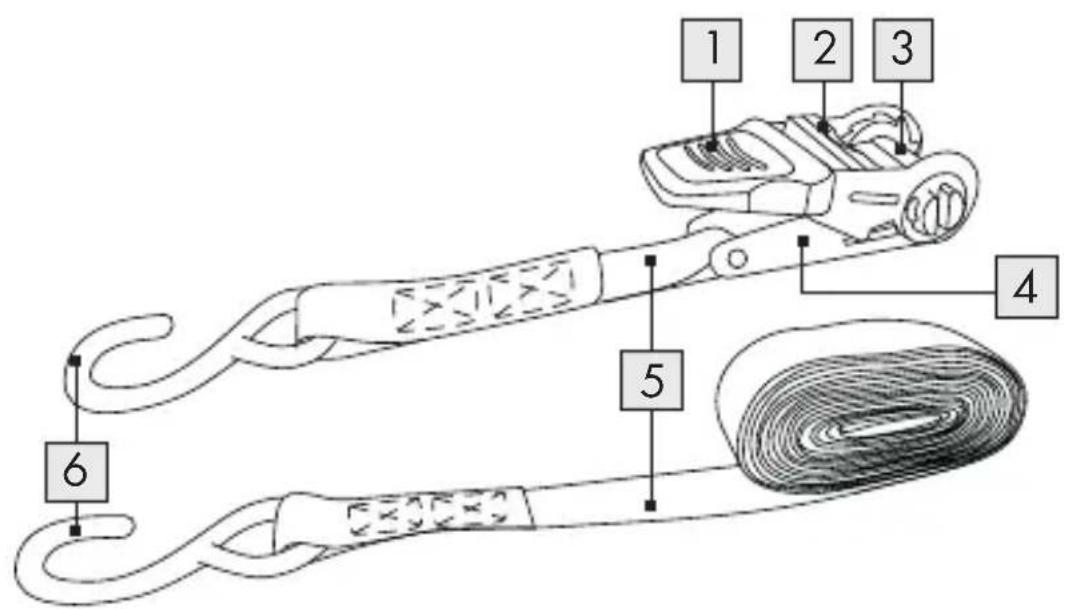
HG04646:
Length: LGF (length - fixed end): 0.35 m
LGL (length - adjustable end): 3.65 m
Permissible load ( L_c ): 1600 daN (16000 N =
Newton / 1600 kg (m / s²) / S _HF 50 daN
Material: Polyester (PES)
HG04647:
Length: LGF (length - fixed end): 0.25 m
LGL (length - adjustable end): 3.75 m
Permissible load ( L_c ): 1000 daN (10000 N =
Newton / 1000 kg (m / s²) / S _HF 50 daN
Material: Polyester (PES)
HG04648:
Length: LGF (length - fixed end): 0.25 m
LGL (length - adjustable end): 3.75 m
Permissible load ( L_c ): 350 daN (3500 N =
Newton / 350 kg (m / s ^2 ) / S _HF 25 daN
Material: Polyester (PES)

Safety instructions
KEEP ALL THE SAFETY ADVICE AND INSTRUCTIONS IN A SAFE PLACE FOR FUTURE REFERENCE!

Safety instructions for lashing straps
- Keep the product away from children.
- Check that all parts have been assembled correctly. Improper assembly may result in injury.
- Check the product for damages prior to each use. Do not use the product anymore if it is damaged.
- Carefully check the product for dirt, contamination, corrosion or other material damages.
- Do not use the product if it is damaged in any way:
- Broken threads or cuts in the thread (especially if the edges have been nicked).
- Missing/irlegible labelling. Only legibly marked and labelled lashing straps may be used.
- Damage to connections. Deformation due to exposure to heat (friction, radiation).
- Material deformations on any component
- Damages due to the effect of corrosive substances.
- After accidental contact with chemical products, the lashing strap must be removed from service and the manufacturer or supplier consulted.
- Never exceed the permissible tensile load of the lashing strap as stated on the label (see also “Technical data”).
- Choose the most suitable lashing strap in accordance with the intended load that needs to be lashed down, the tensile load and loading surface (see label).
- Check that the vehicle parts you wish to strap the load to are sturdy enough.
■ Make sure that the lashing straps are not twisted/knotted and that the load is distributed across their entire width.
- Keep lashing strap away from hot surfaces.
■ Evenly distribute the lashing straps on the load to be secured.
■ Never use the lashing straps to lift loads.
⚠️ CAUTION! DANGER OF ACCIDENT! Always choose suitable lashing straps, lashing points and lashing methods. The size, shape and weight of the cargo as well as the intended mode of use, the transport environment and the type of cargo determine the correct choice.
- Do not exceed the roof load indicated by the vehicle manufacturer.
⚠️ CAUTION! DANGER OF ACCIDENT! When lashing down, pay attention to the required pre-load force. At least 2 lashing straps are required. For reasons of stability, at least 2 lashing straps of the same kind must be used for lashing down and 2 pairs of lashing straps of the same kind used for diagonal lashing.
⚠️ CAUTION! DANGER OF ACCIDENT! During transportation, regularly check that the cargo is correctly lashed and tighten the lashing strap if necessary.
● Practical use and care information
-
In selecting and using lashing equipment, you must consider the required lashing force, the mode of use and the type of cargo to be lashed. The size, shape and weight of the cargo as well as the intended mode of use, the transport environment and the type of cargo determine the correct choice. For stability reasons, at least 2 lashing straps must be used for lashing down and 2 pairs of lashing straps used for diagonal lashing.
-
The selected web lashings shall both be strong enough and of the correct length for the mode of use. Basic lashing rules:
-
Plan the fitting and removal operations of lashing before starting a journey;
- Keep in mind that during journeys parts of the load may have to be unloaded;
- Calculate the number of web lashings according to prEN 12195-1:1995;
- Only those web lashings designed for frictional lashing with STF on the label are to be used for frictional lashing;
-
Check the tension force periodically, especially shortly after starting the journey.
-
Due to different characteristics and because of different changes in length under load, only identical lashing device combinations (e.g. lashing chains and lashing strap made of synthetic fibres) may be used in parallel for lashing the same load.
-
Consideration shall also be given to ancillary fittings (components) and lashing devices in the load restraint assembly are compatible with the web lashing.
-
During use, flat hooks must engage over the entire width of the bearing surface of the hook.
-
Release of the web lashing: Care should be taken to ensure that the stability of the load is independent of the lashing equipment and that the release of the web lashing shall not cause the load to fall off the vehicle, thus endangering the personnel. If necessary attach lifting equipment for further transport to the load before releasing the tensioning device in order to prevent accidental falling and/or tilting of the load. This applies as well when using tensioning devices which allow controlled removal.
- Before starting to unload, you must loosen the lashing until the load is free.
- During loading and unloading attention has to be paid to proximity of any low overhead power lines.
- The materials from which lashing straps are made have selective resistance to chemical attacks. Seek the advice of the manufacturer or supplier if exposure to chemicals is anticipated. It should be noted that the effects of chemicals may increase with rising temperatures. The resistance of man-made fibres to chemicals is summarized below.
- Polyamides are virtually immune to the effects of alkalis. However, they are attacked by mineral acids.
- Polyester is resistant to mineral acids but is attacked by alkalis.
- Polypropylene is little affected by acids and alkalis and is suitable for applications where high resistance to chemicals (other than certain organic solvents) is required.
- Solutions of acids or alkalis which are harmless may become sufficiently concentrated by evaporation to cause damage. Take contaminated webbings out of service at once, thoroughly soak them in cold water, and dry naturally.
-
This product is suitable for use for the following temperature ranges: -40 to +80 °C. This range may vary in a chemical environment. In that case the advice of the manufacturer or supplier shall be sought. Changing the environmental temperature during transport may affect the forces in the lashing. Check the tension force after entering warm areas.
-
Lashing straps shall be rejected or returned to the manufacturer for repair if they show any signs of damage.
The following criteria are considered to be signs of damage:
- Only lashing bearing identification labels shall be repaired;
- If there is any accidental contact with chemical products, lashing straps shall be removed from service and the manufacturer or supplier shall be consulted;
- for lashing straps (to be rejected): tears, cuts, nicks and breaks in load bearing fibres and retaining stitches; deformations resulting from exposure to heat;
-
for end fittings and tensioning devices: deformations, splits, pronounced signs of wear, signs of corrosion.
-
Care should be taken that the lashing is not damaged by sharp edges of the load on which it is used.
A visual inspection before and after each use is recommended. - Only legibly marked and labelled web lashings shall be used.
- Lashing straps must not be overloaded: The maximum hand force 25 daN for model HG04648; 50 daN for model HG04646 and HG04647 (1 daN ≈ 1 kg) may be applied. Mechanical aids such as bars or levers etc. may not be used unless they are part of the tensioning device (HG04646 / HG04647 / HG04648).
- Lashings shall never be used when knotted.
- Damage to labels shall be prevented by keeping them away from sharp edges of the load and, if possible, from the load.
- Webbing must be protected against friction, abrasion and damage from loads with sharp edges by using protective sleeves and / or corner protectors.
Use
Lashing down (HG04646 / HG04647 / HG04648):
With lashing straps stretched over it, the load is pressed down onto the loading area (Fig. 1).
Diagonal lashing (HG04648):
The load is secured by 4 lashing straps and directly connected to the vehicle (Fig. II).
- Attaching the lashing strap
HG04646 / HG04647:

natural_image
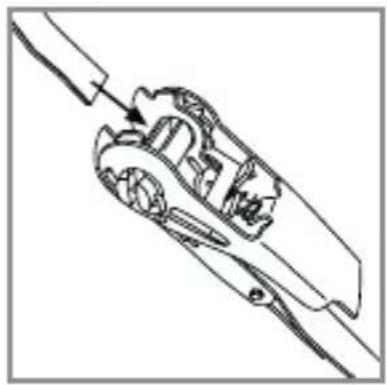
Technical line drawing of a mechanical tool or device with no visible text or symbols■ Fasten the hooks on both sides. Insert the free end of the strap through the slot in the ratchet. Pull through the ratchet until it sits snug around the load.

natural_image
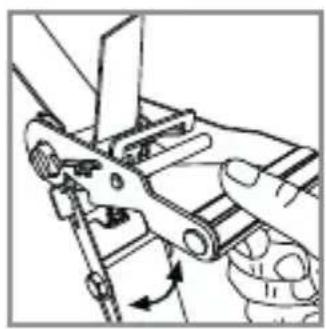
Illustration of a hand using a tool to adjust or install a mechanical component, no text or symbols present■ Tighten the strap by pumping the handle up and down until the strap is tight. Then, fully close the handle.
For HG04646: Before pumping: Pull the quick release button to unlock the handle. After pumping: Lock the handle by pulling the quick release button.
HG04648:
natural_image
Technical line drawing of a mechanical assembly with no visible text or symbols■ Fasten the hooks on both sides. Insert the free end of the strap through the slot in the ratchet. Pull through the ratchet until it sits snug around the load.

natural_image
Illustration of a hand using a tool to adjust or trim a piece of material (no text or symbols present)Tighten the strap by pumping the handle up and down until the strap is tight. Then, fully close the handle.
● Releasing the lashing strap
HG04646 / HG04647:

natural_image
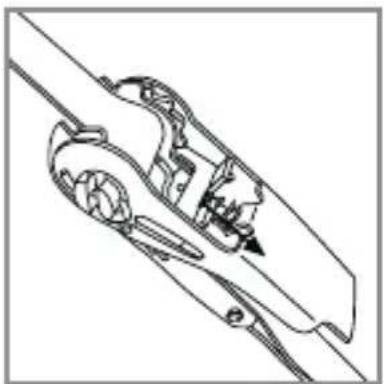
Technical line drawing of a mechanical clamp or bracket assembly (no text or symbols)Pull back the quick release button and hold.

natural_image
Technical line drawing of a mechanical assembly (no text or symbols)Pull the handle up to an open, flat position.
The slot in ratchet will be free to turn. The webbing is released now.
HG04648:
natural_image
Technical line drawing of a mechanical component or tool assembly (no text or symbols)Pull back the quick release button and hold.

natural_image
Technical line drawing of a mechanical assembly with no visible text or symbolsPull the handle up to an open, flat position.
The slot in ratchet will be free to turn. The webbing is released now.
● Cleaning and care
Note: Regular care will maintain the quality and functionality of the lashing strap.
- Clean the lashing strap with lukewarm water and pH-neutral cleaning agents. Avoid corrosive detergents.
The ratchet tensioner should be regularly cleaned and then lightly greased. When greasing it, make sure that parts that come into contact with the webbing are not greased.
■ Store the lashing strap in a dry, well-ventilated cool place.
- Avoid contact with chemicals, acids and alkalis as they may damage the lashing strap.
● Disposal
The packaging is made entirely of recyclable materials, which you may dispose of at local recycling facilities.
Contact your local refuse disposal authority for more details of how to dispose of your worn-out product.
Warranty
The product has been manufactured to strict quality guidelines and meticulously examined before delivery. In the event of product defects you have legal rights against the retailer of this product. Your legal rights are not limited in any way by our warranty detailed below.
The warranty for this product is 3 years from the date of purchase. Should this product show any fault in materials or manufacture within 3 years from the date of purchase, we will repair or replace it – at our choice – free of charge to you.
The warranty period begins on the date of purchase. Please keep the original sales receipt in a safe location. This document is required as your proof of purchase. This warranty becomes void if the product has been damaged, or used or maintained improperly.
The warranty applies to defects in material or manufacture. This warranty does not cover product parts subject to normal wear, thus possibly considered consumables (e.g. batteries) or for damage to fragile parts, e.g. switches, rechargeable batteries or glass parts.
Uvod.... Stranica 19
Uvjeti korištenja .... Stranica 19
natural_image
Technical line drawing of a mechanical tool or device with no visible text or symbolsNa objema stranama učvrstite kuke. Slobodan kraj zateznog pojasa provedite kroz šipku s prorezom u zapornom mehanizmu. Zatezni pojas nastavite zatezati sve dok snažno ne nalegne na teret.

natural_image
Illustration of a hand using a tool to adjust or install a mechanical component (no text or symbols visible)Zatezni pojas zategnite tako da ručicu zapornog mehanizma naizmjenično pomičete prema gore i dolje sve dok pojas čvrsto ne nasjedne. Sada potpuno zatvorite ručicu zapornog mehanizma.
Za HG04646: Prije zatezanja: Povucite brzu deblokadu kako biste deblokirali ručicu. Nakon zatezanja: Ručicu blokirajte povlačenjem brze deblokade.
HG04648:

natural_image
Mechanical assembly diagram showing a gear and shaft assembly (no text or labels)Na objema stranama učvrstite kuke. Slobodan kraj zateznog pojasa provedite kroz šipku s prorezom u zapornom mehanizmu. Zatezni pojas nastavite zatezati sve dok snažno ne nalegne na teret.

natural_image
Illustration of a hand using a tool to cut or adjust a piece of material, showing a curved arrow indicating rotation (no text or symbols present)Zatezni pojas zategnite tako da ručicu zapornog mehanizma naizmjenično pomičete prema gore i dolje sve dok pojas čvrsto ne nasjedne. Sada potpuno zatvorite ručicu zapornog mehanizma.
natural_image
Technical line drawing of a mechanical clamp or connector assembly (no text or symbols)Brzu deblokadu povucite prema natrag pa je držite u tom položaju.

natural_image
Technical line drawing of a mechanical assembly or linkage component (no text or symbols)■ Ručicu zapornog mehanizma preklopite do kraja.
Pritom se bubanj u zapornom mehanizmu može slobodno vrtjeti. Sada se pojas oslobađa.
HG04648:

natural_image
Technical line drawing of a mechanical component or tool assembly (no text or symbols)Brzu deblokadu povucite prema natrag pa je držite u tom položaju.

natural_image
Technical line drawing of a mechanical assembly with directional arrows (no text or symbols)■ Ručicu zapornog mehanizma preklopite do kraja.
Pritom se bubanj u zapornom mehanizmu može slobodno vrtjeti. Sada se pojas oslobađa.
- Čišćenje i njega
Napomena: Redovita njega osigurava kvalitetu i funkcionalnost zateznog pojasa.
natural_image
Technical line drawing of a mechanical tool or device with no visible text or symbolsPričvrstite kuke sa obe strane. Provucite slobodni kraj trake za vezivanje kroz otvor na zapornom mehanizmu. Nastavite da zatežete traku za vezivanje sve dok ne nalegne na teret.
natural_image
Illustration of a hand using a tool to adjust or install a mechanical component (no text or symbols visible)Dobro zategnite traku za vezivanje pomeranjem ručku zapornog mehanizma naizmenično nagore i nadole sve dok traka čvrsto ne nalegne. Potpuno zatvorite ručku zapornog mehanizma.
Za HG04646: Pre zatezanja: Povucite mehanizam za brzo otpuštanje da biste oslobodili ručku. Nakon zatezanja: Zaključajte ručicu povlačenjem ručice za brzo oslobađanje.
HG04648:

natural_image
Mechanical assembly diagram showing a gear and shaft assembly (no text or labels)Pričvrstite kuke sa obe strane. Provucite slobodni kraj trake za vezivanje kroz otvor na zapornom mehanizmu. Nastavite da zatežete traku za vezivanje sve dok ne nalegne na teret.

natural_image
Illustration of a hand using a tool to cut or adjust a piece of material, showing a curved arrow indicating rotation (no text or symbols present)Dobro zategnite traku za vezivanje pomeranjem ručku zapornog mehanizma naizmenično nagore i nadole sve dok traka čvrsto ne nalegne. Potpuno zatvorite ručku zapornog mehanizma.
Skidanje trake za vezivanje
HG04646 / HG04647:

natural_image
Technical line drawing of a mechanical clamp or bracket assembly (no text or symbols)Povucite nazad bravu za brzo otpuštanje i držite je u tom položaju.
natural_image
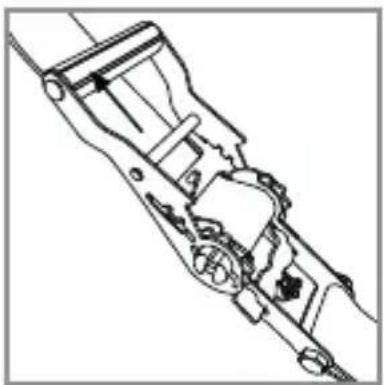
Technical line drawing of a mechanical assembly (no text or symbols)■ Preklopite ručku zapornog mehanizma do graničnika.
Bubanj zapornog mehanizma se slobodno okreće. Traka je sada oslobođena.
HG04648:

natural_image
Technical line drawing of a mechanical component or tool assembly (no text or symbols)Povucite nazad bravu za brzo otpuštanje i držite je u tom položaju.

natural_image
Technical line drawing of a mechanical assembly with no visible text or symbols■ Preklopite ručku zapornog mehanizma do graničnika.
Bubanj zapornog mehanizma se slobodno okreće. Traka je sada oslobođena.
natural_image
Technical line drawing of a mechanical tool or device with no visible text or symbolsnatural_image
Illustration of a hand using a tool to adjust or install a mechanical component (no text or symbols visible)natural_image
Mechanical assembly diagram showing a gear and shaft assembly (no text or labels)natural_image
Illustration of a hand using a tool to cut or adjust a piece of material, with an arrow indicating rotation (no text or symbols present)natural_image
Technical line drawing of a mechanical clamp or connector assembly (no text or symbols)natural_image
Technical line drawing of a mechanical assembly or linkage component (no text or symbols)natural_image
Technical line drawing of a mechanical component or tool assembly (no text or symbols)natural_image
Mechanical assembly diagram showing a lever mechanism with no visible text or symbols


- HEAVY DUTY RATCHET STRAP WITH HOLDER
- REMEN S RAČVOM
- Introduction
- - Intended use
- ● Technical data
- HG04646:
- HG04647:
- HG04648:
- Safety instructions
- Safety instructions for lashing straps
- ● Practical use and care information
- Use
- Lashing down (HG04646 / HG04647 / HG04648):
- Diagonal lashing (HG04648):
- - Attaching the lashing strap
- HG04646 / HG04647:
- ● Releasing the lashing strap
- ● Cleaning and care
- ● Disposal
- Warranty
- - Čišćenje i njega
- Skidanje trake za vezivanje
Brand : POWERFIX
Model : HG04646
Category : Uncategorized