
Z25679A - Uncategorized POWERFIX - Free user manual and instructions
Find the device manual for free Z25679A POWERFIX in PDF.


| Product Type | Door fly screen (Bug Screen for Doors) |
| Brand | Powerfix |
| Model | Z25679A |
| Intended Use | Protection against insects (flies) for indoor use only |
| Maximum Door Width | 100 cm |
| Maximum Door Height | 220 cm |
| Number of Fly Screen Panels Included | 3 |
| Included Components | 1 cover, 1 fixing rail, 3 fly screen panels, 1 hook tape, 1 loop tape, assembly instructions |
| Mounting Type | Permanent (adhesive) or temporary (hook-and-loop) installation |
| Material | Fly screen mesh, plastic cover and rail, adhesive tape |
| Cleaning Instructions | Hand wash fly screen panels with mild detergent; do not machine wash. Wipe cover with damp cloth. |
| Safety Warnings | Risk of suffocation from packaging; keep away from children. Do not climb or hang on product. No open fire near product. |
| Assembly Required | Yes, saw required for cutting rail and cover |
| Package Contents | 1 x cover, 1 x fixing rail, 3 x fly screen panel, 1 x hook tape, 1 x loop tape, assembly instructions |
Frequently Asked Questions - Z25679A POWERFIX
User questions about Z25679A POWERFIX
0 question about this device. Answer the ones you know or ask your own.
Ask a new question about this device
Download the instructions for your Uncategorized in PDF format for free! Find your manual Z25679A - POWERFIX and take your electronic device back in hand. On this page are published all the documents necessary for the use of your device. Z25679A by POWERFIX.
USER MANUAL Z25679A POWERFIX
Assembly and safety advice
PL
GB Assembly and safety advice Page 3
| PL Wskazówki dotyczące montażu oraz bezpieczeństwa Strona 6 | |||
| HU Használati- és biztonsági utasítások Oldal 10 | |||
| SI Navodila za montażo in varnost Stran 13 | |||
| CZ Pokyny k montáži a bezpečnostní pokyny Strana 16 | |||
| SK Pokyny pre montaż a bezpečnosť | Strana | 19 | |
| HR Napomene za montażu i sigurnosne napomene | Stranica | 23 | |
| DE/AT/CH Montage- und Sicherheitshinweise | Seite | 26 | |
Bug Screen for Doors
IMPORTANT, RETAIN FOR FUTURE REFERENCE! READ CAREFULLY!
- Introduction
Before using the product for the first time, take time to familiarise yourself with the product first. Read the following assembly instructions and safety instructions carefully. Only use the product as described and for the designated areas of application. Please keep these instructions in a safe place. If you hand this product on to a third party, you must also pass on all documents relating to the product.
- Intended Use
This article is designed to provide protection against insects such as flies and is intended for indoor use only. Any use other than previously mentioned or any product modification is prohibited and can lead to injuries and / or product damage. The manufacturer is not liable for any damages caused by any use other than for the intended purpose. The product is not intended for commercial use.
• Description of Parts
1 Cover
2 Fixing rail
3 Fly screen panel
4 Hook tape (hook and loop fastener)
5 Loop tape (hook and loop fastener)
- Included in delivery
Note: When opening the packaging, please make sure not to accidentally throw away assembly materials.
Please check immediately on unpacking that the delivery is complete and that the product and all parts are in perfect condition. Do not under any circumstances assemble the product if the delivery is incomplete.
1 x cover
1 x fixing rail
3 x fly screen panel
1 x hook tape (hook and loop fastener)
1 x loop tape (hook and loop fastener)
1 x assembly instructions
Dimensions
KEEP ALL THE SAFETY ADVICE AND INSTRUCTIONS IN A SAFE PLACE FOR FUTURE REFERENCE!
WARNING! RISK OF FATAL INJURY AND RISK OF ACCIDENTS FOR INFANTS AND
CHILDREN! Never leave children unattended with the packaging material or the product. There is a risk of suffocation from the packaging materials and a risk of fatal injury by strangulation. Children often underestimate dangers. Always keep children away from the product. The product is not a toy.
CAUTION! RISK OF INJURY! Ensure that all parts are undamaged and have been assembled appropriately. Risk of injury exists if assembled incorrectly. Damaged parts can effect safety and function.
■ Make sure that the product is only assembled by competent persons.
CAUTION! Do not leave children unsupervised. The product is not a climbing frame or toy. Make sure that nobody climbs on or hangs onto the product; this applies particularly to children.
Safety advice / Prior to assembly / Assembly
The fly screen panels 3 may tear off. This can result in injury and / or damage.
CAUTION! FIRE HAZARD! Do not light an open fire anywhere near the product.
■ Donothanganythingontheproduct.
First make sure that the material of your door is suitable for installation of self-adhesive materials.
Take care that you do not get caught on the fly screen panels 3 when you pass through, since they may otherwise tear off.
- Prior to assembly
□ Keep the loop tape 5 and fixing rail 2 out of direct sunlight prior to assembly. Excessive heat can diminish the strength of the adhesive strips.
□ Clean the door frame thoroughly before installing the product. The door frame must be clean, free from grease and dry before you install the fixing rail 2 or the loop tape 5 on it. If this is not the case, the strength of the adhesive strips may be reduced.
- Assembly
●Permanentinstallation of the door fly screen
⚠️ CAUTION! RISK OF INJURY! You will need a saw for this part of assembly. Please make sure that you consult the operating instructions for your saw and use protective gloves.
☐ First measure the width of your door using a tape measure (see Fig. A).
Note: The product is suitable for doors with a maximum width of 100 cm.
☐ Shorten the fixing rail 2 and cover 1 to the required width using a saw (see Fig. B).
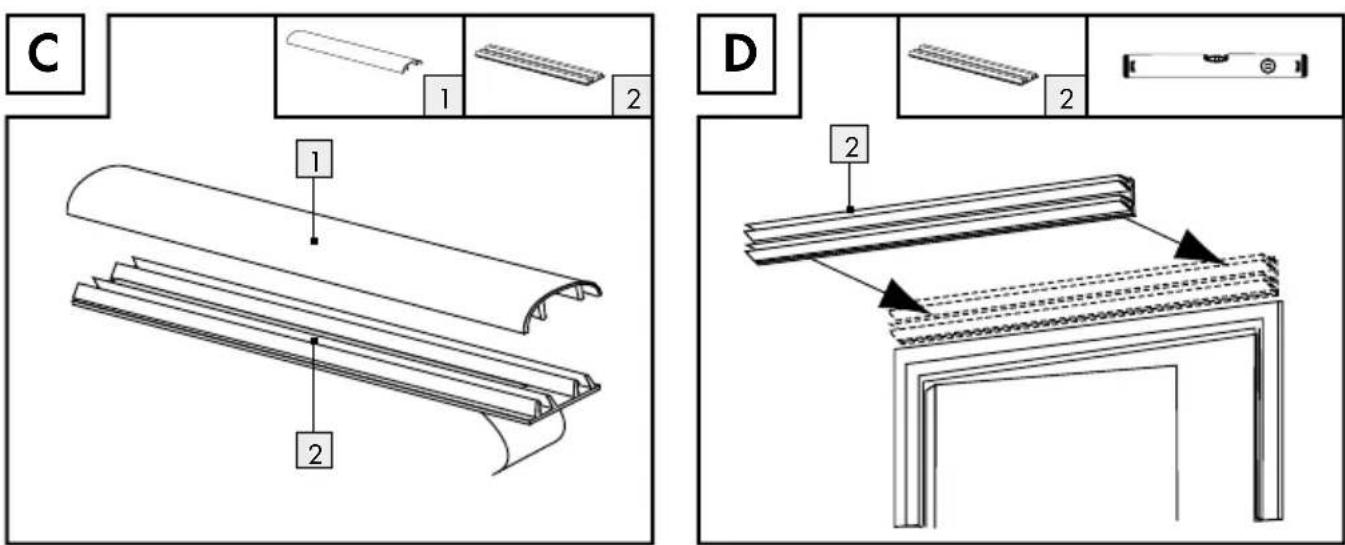
□Removethecover 1 from the fixing rail 2 (see Fig. C)
☐ Remove the protective film from the adhesive strip on the back of the fixing rail 2 and stick the fixing rail 2 directly onto the door frame (see Fig. C - E). Use a spirit level if necessary.
□ Wait 2 hours before continuing with assembly.
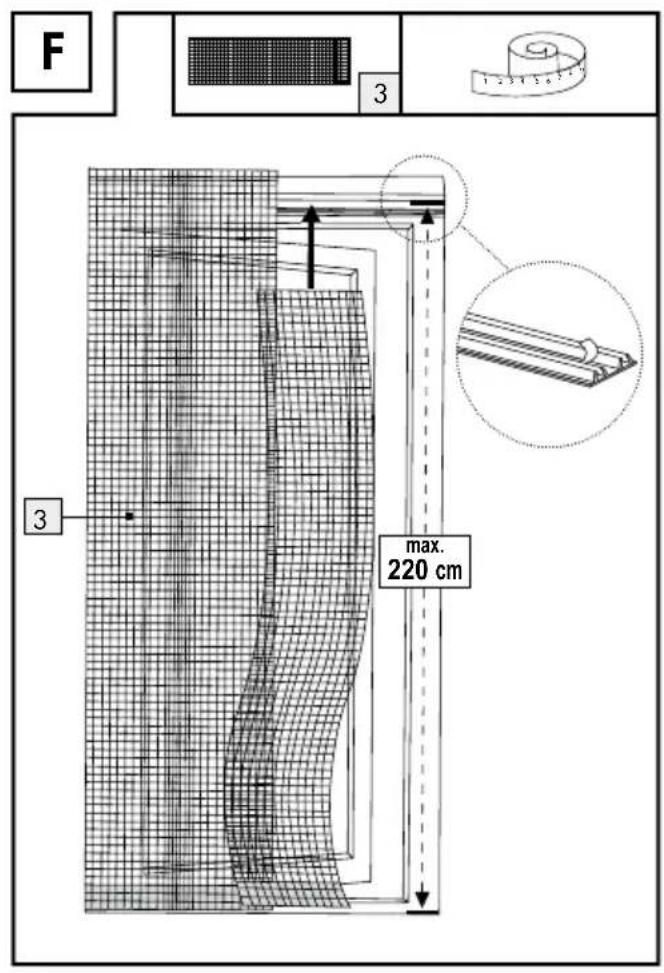
☐ Measure the height of your door using a tape measure (see Fig. F).
Note: The product is suitable for doors with a maximum height of 220 cm.
☐ Remove the protective film from the adhesive strip on the front of the fixing rail 2.
☐ Stick the fly screen panels 3 onto the adhesive strip on the fixing rail 2 (see Fig. F).
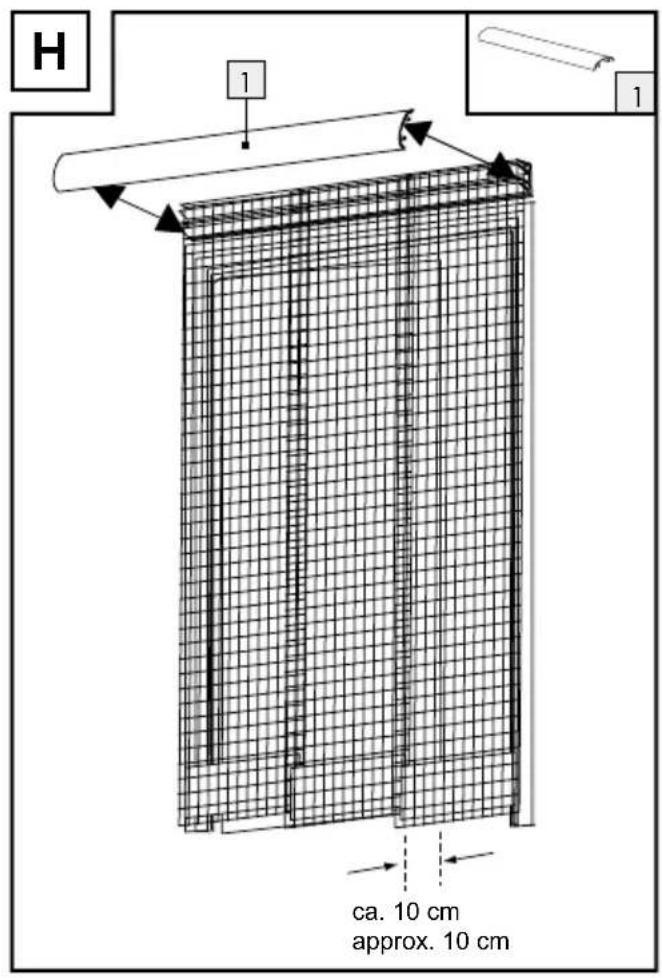
Note: Take care that the fly screen panels overlap by at least 10 cm.
Note: Take care that the fly screen panels end at floor level. Any excess fly screen should protrude at the top.
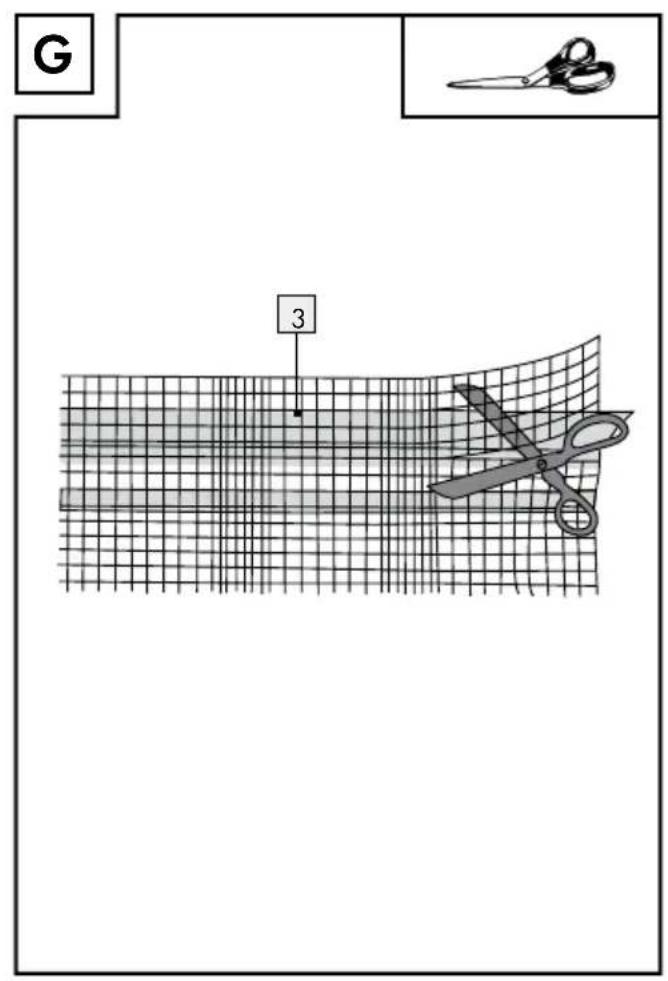
□ Cut off any excess fly screen (see Fig. G).
Note: Always cut off excess fly screen at the top - never at the bottom. The fly screen panels may otherwise fray.
□Placethecover 1 on the fixing rail 2 (see Fig. H).
- Temporary installation of the door fly screen
⚠️ CAUTION! RISK OF INJURY! You will need a saw for this part of assembly. Please make sure that you consult the operating instructions for your saw and use protective gloves.
☐ First measure the width of your door using a tape measure (see Fig. A).
Note: The product is suitable for doors with a maximum width of 100 cm.
Shorten the fixing rail 2 and cover 1 to the required width using a saw (see Fig. B).
☐ Shorten the loop tape 5 and hook tape 4 to the required width with a pair of scissors.
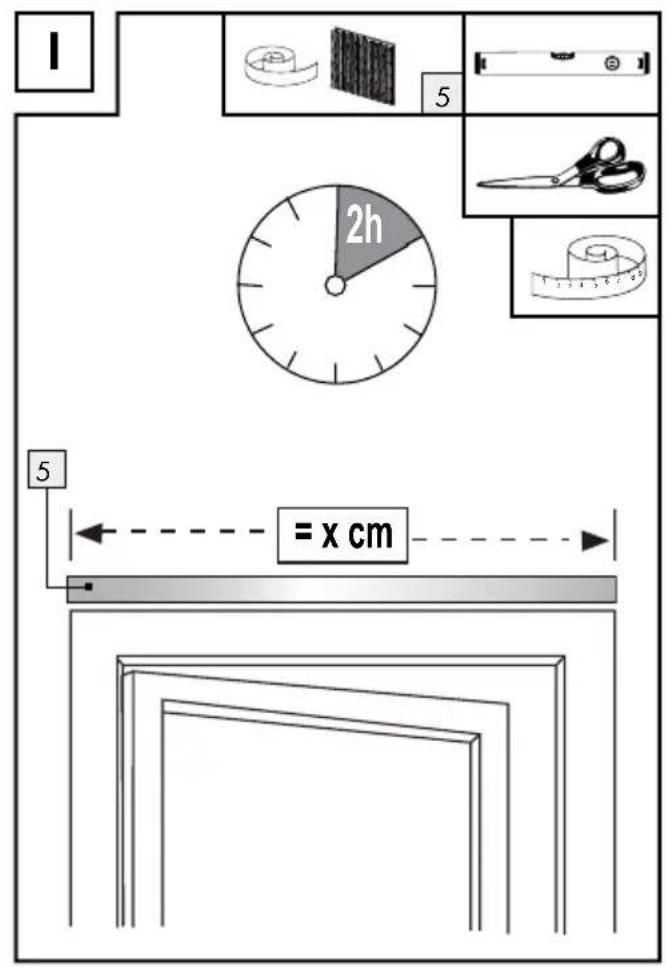
☐ Remove the protective film from the adhesive strip on the loop tape 5 and stick the tape onto the door frame (see Fig. I). Use a spirit level if necessary.
□ Wait 2 hours before continuing with assembly.
□Removethecover 1 from the fixing rail 2 (see Fig. C).
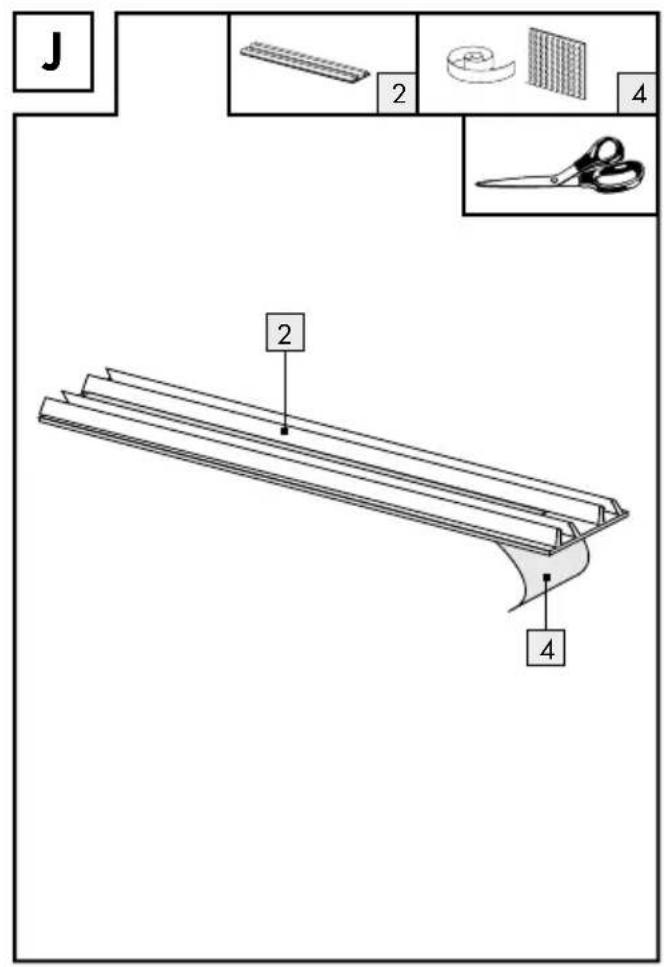
☐ Remove the protective film from the adhesive strip on the back of the fixing rail 2 and stick the hook tape 4 onto the back of the fixing rail 2 (see Fig. J).
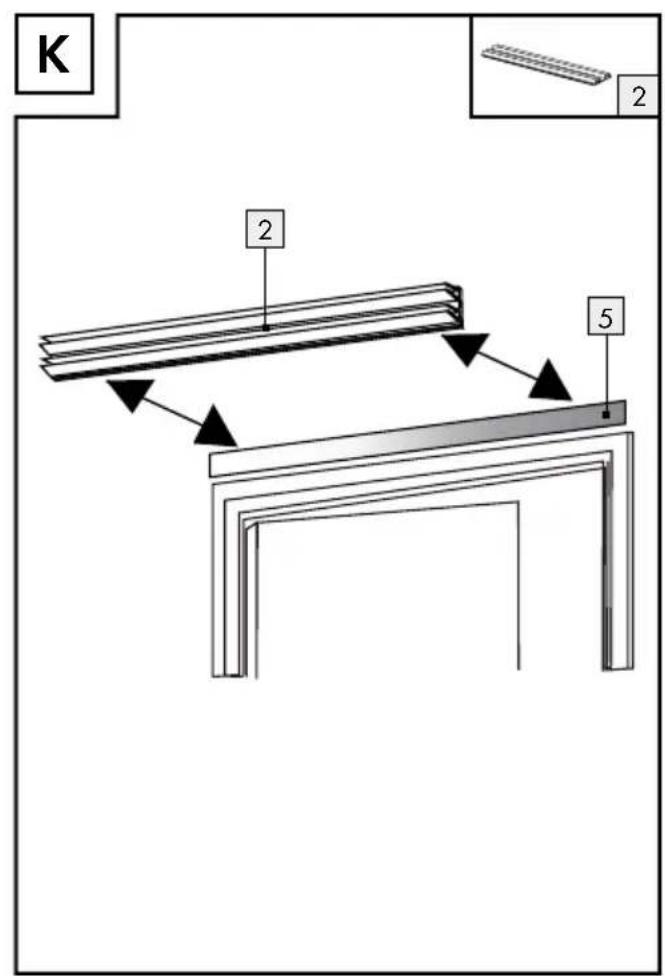
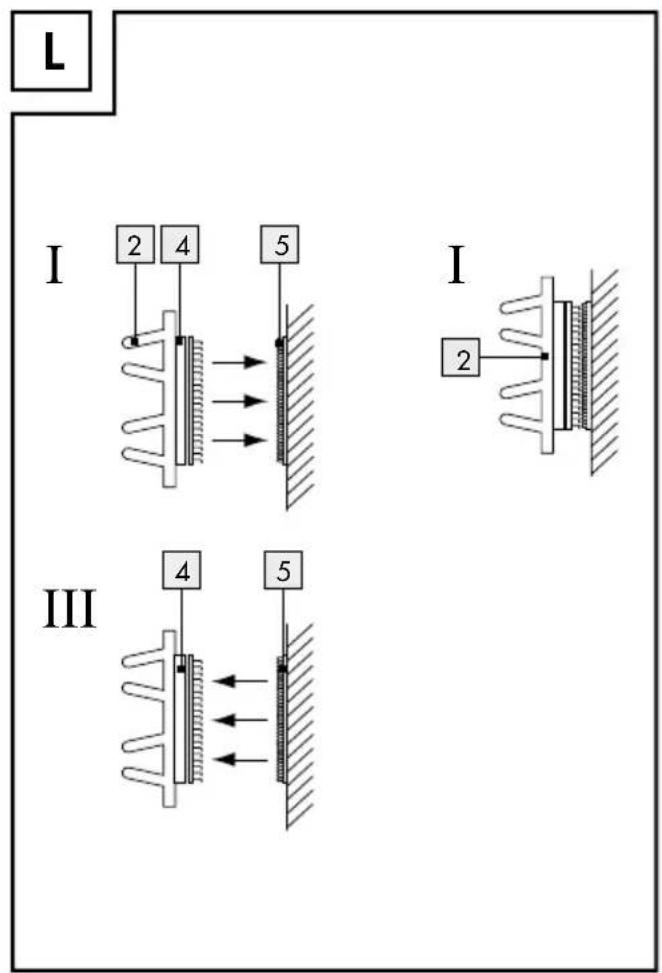
□ Mount the fixing rail 2 using the hook and loop fastening system (see Fig. K and L).
☐ Measure the height of your door using a tape measure (see Fig. F).
Note: The product is suitable for doors with a maximum height of 220 cm.
☐ Remove the protective film from the adhesive strip on the front of the fixing rail 2.
☐ Stick the fly screen panels 3 onto the adhesive strip on the fixing rail 2 (see Fig. F).
Note: Take care that the fly screen panels overlap by at least 10 cm.
Note: Take care that the fly screen panels end at floor level. Any excess fly screen should protrude at the top.
☐ Cut off any excess fly screen (see Fig. G).
Note: Always cut off excess fly screen at the top - never at the bottom. The fly screen panels may otherwise fray.
□Placethecover 1 on the fixing rail 2 (see Fig. H).
☐ Remove and/or attach the product as shown in Figures K and L as required.
● Cleaning and Care
□Cleanthecover 1 with a non-fluffing, dampened cloth.
☐ Use a mild cleaning agent where necessary.
☐ Do not under any circumstances use corrosive or abrasive cleaning agents.
- Cleaning the fly screen panels
We recommend that you clean the fly screen panels 3 regularly.
Proceed as follows:
□Removethecover 1 from the fixing rail 2 (see Fig. H).
☐ Then carefully detach the fly screen panels 3 from the adhesive strip on the fixing rail 2.
□ Wash the fly screen panels 3 by hand. If necessary use a mild detergent.
CAUTION! The fly screen panels are not suitable for machine washing.
Note: Allow the fly screen panel to dry out thoroughly before reinstalling them.
Attach the fly screen panels 3 to the adhesive strip on the fixing rail 2 (see Fig. F).
Note: Take care that the fly screen panels overlap by at least 10 cm.
□Placethecover 1 on the fixing rail 2 (see Fig. H).
- Disposal

The packaging is made entirely of recyclable materials, which you may dispose of at local recycling facilities.
Contact your local refuse disposal authority for more details of how to dispose of your worn-out product.
Product description:
Bug Screen for Doors
Model No.: Z25679A/Z25679B
Version: 01/2010

IAN 45827
Milomex Ltd.
c/o Milomex Services
Hilltop Cottage
Barton Road
Pulloxhill
Bedfordshire
MK45 5HP
UK
© by ORFGEN Marketing


- Bug Screen for Doors
- - Introduction
- - Intended Use
- • Description of Parts
- - Included in delivery
- Dimensions
- WARNING! RISK OF FATAL INJURY AND RISK OF ACCIDENTS FOR INFANTS AND
- Safety advice / Prior to assembly / Assembly
- - Prior to assembly
- - Assembly
- ●Permanentinstallation of the door fly screen
- - Temporary installation of the door fly screen
- ● Cleaning and Care
- - Cleaning the fly screen panels
- Proceed as follows:
- - Disposal
- Product description:
Brand : POWERFIX
Model : Z25679A
Category : Uncategorized