
CEFR25IND - Deep fryer CONTINENTAL EDISON - Free user manual and instructions
Find the device manual for free CEFR25IND CONTINENTAL EDISON in PDF.
| Product Type | Electric Deep Fryer |
| Brand | Continental Edison |
| Model | CEFR25IND |
| Power Supply | 220-240 V ~, 50/60 Hz, 2000 W |
| Oil Capacity | Approximately 1.1 L of oil or 0.7 kg of solid fat |
| Cooking Modes | Continuous mode (190 °C), automatic mode (12 preset programmes), programmable mode (duration 0-99 min, temperature 100-190 °C) |
| Display | Digital screen with temperature and time |
| Indicator Lights | ON, HEATING, PROG, MANUAL |
| Material | Metal tank, metal basket, lid with aluminum filter |
| Cleaning | Basket washable with soapy water; tank wiped with paper towel and damp cloth; aluminum filter removable for cleaning |
| Safety | Automatic shut-off at end of cooking, audible beep; do not immerse; hot surface; use on dedicated circuit |
| Dimensions (approx.) | Approximately 35 x 35 x 30 cm |
| Weight (approx.) | Approximately 3 kg |
| Country of Import | Imported by A.M.C., France |
| After-Sales Service | Contact Continental Edison or authorized dealer |
| Repairability | Repair by specialist; replaceable aluminum filter |
Frequently Asked Questions - CEFR25IND CONTINENTAL EDISON
User questions about CEFR25IND CONTINENTAL EDISON
0 question about this device. Answer the ones you know or ask your own.
Ask a new question about this device
Download the instructions for your Deep fryer in PDF format for free! Find your manual CEFR25IND - CONTINENTAL EDISON and take your electronic device back in hand. On this page are published all the documents necessary for the use of your device. CEFR25IND by CONTINENTAL EDISON.
USER MANUAL CEFR25IND CONTINENTAL EDISON
natural_image
Abstract geometric shapes resembling partial crescent and angular segments (no text or symbols)Continental Edison
natural_image
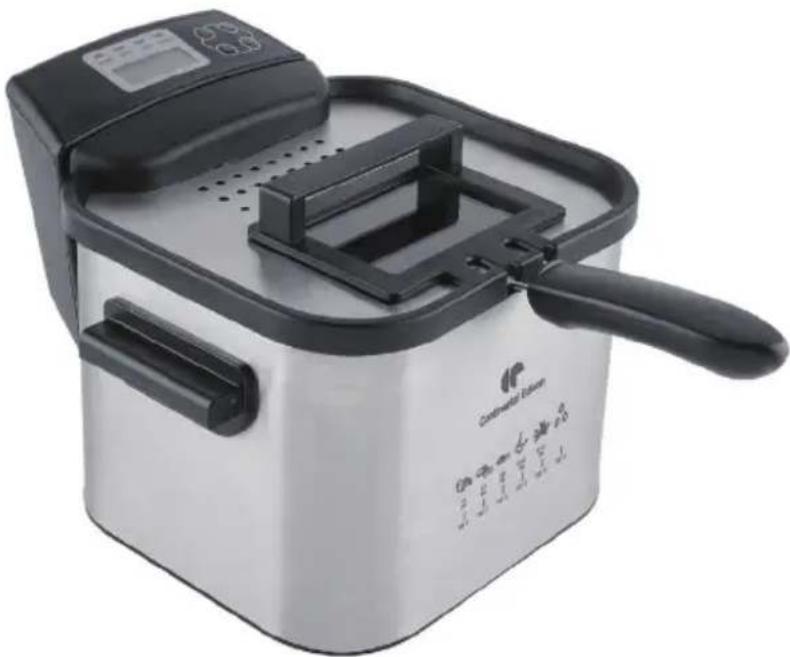
Exterior view of a modern single-fryer cooking pan with digital display and black handle (no text or symbols visible)CEFR25IND
FRITEUSE ---- DEEP FRYER
natural_image
Close-up of a mechanical device with a screwdriver inserted into a square component (no visible text or symbols)2. Réparation
MISE AU REBUT CORRECTE
DE CE PRODUIT
This product is only for household use.
WARNING: A risk of fire and electrical shock exists in all electrical appliances and may cause personal injury or death. Please follow all safety instructions.
- READ ALL INSTRUCTIONS BEFORE USING APPLIANCE.
- Please locate the appliance accessible to the power socket.
Warning: This appliance must be earthed.
- Hot oil can cause very serious burns. The appliance is hot during operation and retains heat for some time after being switched off. Do not touch hot surface such as oil tank and metal surface. Never move the appliance during use.
- Do not operate this appliance if it has a damaged cord or plug, is not working properly, has been dropped, damaged, or is dropped into water. Return the appliance to our service center or an electrician for proper repair.
- This appliance shall not be used by children from 0 year to 8 years. This appliance can be used by children aged from 8 years and above if they are continuously supervised. This appliance can be used by people with reduced physical, sensory or mental capabilities or lack of experience and knowledge if they have been given supervision or instruction concerning use of the appliance in a safe way and understand the hazards involved. Keep the appliance and its cord out of reach of children aged less than 8 years. Cleaning and user maintenance shall not be made by children.
- This appliance is not intended for use by persons (including children) with reduced physical, sensory or mental capabilities, or lack of experience and knowledge, unless they have been given supervision or instruction concerning use of the appliance by a person responsible for their safety.
-
The appliance should be positioned in a stable situation with the handles positioned to avoid spillage of the hot liquids.
• The appliance must not be immersed. -
The appliance is not intended to be operated by means of an external timer or a separate remote-control system.
- This appliance is intended to be used in household and similar applications such as:
– staff kitchen areas in shops, offices and other working environments;
– farm houses;
– by clients in hotels, motels and other residential type environments;
– bed and breakfast type environments.
Caution, hot surface. The metal enclosure will get hot during use.
- Close supervision is necessary when the appliance is used by or near children and disabled persons.
- Do not operate unattended, and never leave the appliance unattended when connected to power outlet.
- Unplug the appliance from power outlet after use, before filling and emptying oil, and before cleaning.
- If the power cord of this appliance is damaged, it must only be replaced by an authorized service center.
- The use of accessory attachments is not recommended by the manufacturer may cause injuries and may damage the appliance.
- Do not use outdoors.
- Do not let the cord hang over edge of table or touch hot surfaces.
- Do not place on or near a hot gas or electric burner, or in a heated oven.
- Place the appliance on a flat surface that is resistant to heat.
- Always attach plug to the appliance first, then plug cord into the wall outlet. To disconnect, switch OFF, then remove plug from power outlet.
- Do not use the appliance for other than intended use.
- Be sure handle is properly assembled to basket and locked in place.
- To protect against electric shock, do not immerse the oil tank, the cord or the plug into water or other liquid.
-
Damp food should be dried first. Remove any loose ice from frozen food. Lower the basket with food gently into the oil. Cover with lid during cooking of the food. Beware of oil spattering when food is put into the oil.
-
Never obstruct the air outlet vent on top of the lid with any objects. Beware of hot steam escaping from the air outlet vent.
- The oil in the oil tank must always be above the minimum oil level. Never operate the appliance without oil or with insufficient oil in the oil tank.
- Ensure that there are no inflammable objects put over or close to the appliance. If the oil catches fire, unplugs the appliance and cover with the lid. Never use water to extinguish the fire.
- Do not operate this appliance if the lid and the oil tank are not free from water completely.
Caution: The temperature of the accessible surface may be high when the appliance is operating.
- Short Cord Instructions
CAUTION: A short power cord is provided to reduce the risk of personal injury from entanglement in or tripping over a longer cord.
- Extension Cord Use
An extension cord or longer detachable cord is not recommended for use with deep-fat fryers and cooker/fryers.
Electric Power
If the electric circuit is overloaded with other appliances, your appliance may not operate. It should be operated on a separate electrical circuit from other appliances. If you are not sure the reason of overloading or cannot find a separate circuit, contact a qualified electrician.
SAVE THESE INSTRUCTIONS
FOR FUTURE REFERENCE
FEATURE
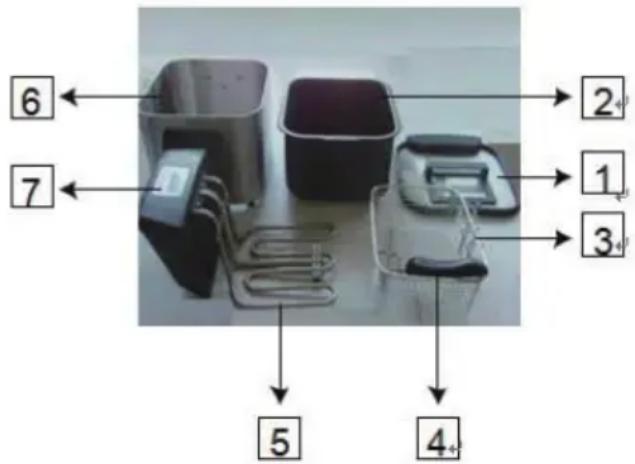
Parts of Appliance
- Cover
- Pot
- Basket
- Handle of basket
- Heating element
- Pot support
- Control panel
HOW TO USE
Warning: This appliance must be earthed.
- Keep the appliance away from children.
● The socket used should be in accordance with the plug of the appliance. - Do not heat without food inside. Do not open the lid when frying.
- The surface is hot when frying. Never touch the fryer before it's cooled to avoid scald.
- Before first use, please check carefully if all the parts of the appliance are in good condition. If not, please contact the supplier or manufacturer. Never use this appliance if it is not in good condition.
- If the cable is damaged, it should be replaced by a qualified repairman in order to avoid any hazard.
- Waste electrical products should not be disposed of with household waste. Please recycle where facilities exist.
- Check with your local authority or retailer for recycling advice.
Using your fryer
Introducing the oil or fat
- Open the top lid.
- Lift the basket using the handle.
- Place approximately 1.1 liters of oil or 0.7kg of hard fat into the fryer body (the level must always be between the two marks on the oil container wall).
- If you use blocks of fat, cut them into pieces before placing them in the body.
- Set switch of the temperature controller to 140 °F (the red indicator light comes on). To melt the fat needs roughly 8 minutes. Never attempt to melt fat in the basket.
Cooking
Plug in the fryer; the yellowindicator "POWER" comes on, and the LCD display turn blue but no display on the screen. The press "ON/OFF" to start control panel and
LCD shows enters standby state.
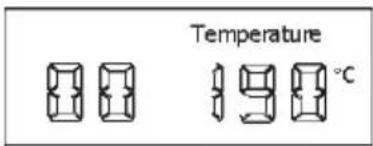
Function 1. Continual Work Mode
A. Press "ON/OFF" in the standby state, fryer enters continual work mode maintaining 190-Celsius degree.
B. With the continual work mode, the bluelight is on. Press “+”, “-” to switch the temperature display between “C” and “F”.
Press "ON/OFF" to shut off control panel. Function 2.
Fixed Program Work Mode
A. In the standby state, press “+” or “-” with the serial figure (1-12) to select 12 fixed programs. After selecting needed program, then press “ON/OFF” and enter the selected work mode. When the fryer reaches the fixed temperature, there will be a beep to remind you putting food in the deep fryer (beep 1 time/second and last 30 seconds). 30 seconds later, it will count down with the selected program.
B. Under the fixed program work mode, during the heating, press "+", "-" can switch the temperature display between "C" and "F" system.
When reaches the set time of the fixed program work mode, the buzzer beeps for 20 seconds at the first time, and then beeps for another 20 seconds after 10 seconds' stop. Meantime, indicators (PROG/MANUAL) flash quickly (2 times/second) to inform you the program is finished. After 3 cycles of alternative beep, the power of fryer will automatically shut-off.
12 fixed programs, temperature setting and the corresponding LCD display charts are as follows.
| Serial No. | Program | Work Time | Temp. |
| 01 | PROG1 9 M | N. 190Celsius | |
| 02 | PROG2 | 7 MIN. 190Celsius | |
| 03 | PROG3 | 10 MIN. | 180Celsius |
| 04 | PROG4 8 M | N. 180Celsius | |
| 05 | PROG5 8 M | N. 170Celsius | |
| 06 | PROG6 6 M | N. | 170Celsius |
| 07 | PROG7 6 M | N. 160Celsius | |
| 08 | PROG8 4 M | N. 160Celsius | |
| 09 | PROG9 | 7 MIN.30 S | 150Celsius |
| 10 | PROG10 | 5 MIN.30 S | 150Celsius |
| 11 | PROG11 | 7MIN.30 S | 140Celsius |
| 12 | PROG12 | 5 MIN. 140Celsius |
| Temperature | ||
| 01 | 190°C | |
| 02 | 190°C | |
| 03 | 180°C | |
| 04 | 180°C | |
| 05 | 170°C | |
| 05 | 170°C |
| 07 | 160°C |
| 08 | 160°C |
| 09 | 150°C |
| 10 | 150°C |
| 11 | 140°C |
| 12 | 140°C |
Function 3: Auto-set work model
A. When under standby situation, Press "SET" and the fryer goes to auto-set situation, at this moment, 5 figures show on the LCD, the first two figures from the left for time setting, the last three figures from the right for temperature setting. Press "+" and "-" to set the first figures, then press
"SET" to set the second one. (Timing from 0 to 99 minutes.
The LCD shows minute if the countdown over one minute, while shows second if below one minute.)
B. After setting time, press "SET" to set the third figure for temperature. The third figure is the highest temperature setting.
(NOTE: due to the lowest temperature of the chip being just 100°C, the third number shows "1" in °C display, while in F display it only can be chosen from 2 and 3.); Then press "SET" Againto set the forth figure for temperature by pressing "+" or "-" . Then press "SET" to set the lastfigure for temperature. Then press
"SET" for switching C_or_F by pressing "+" or "−". Continue pressing "SET" to be back to the first figure setting of LCD. (temperature setting from 100°C to 190°C)
C. When underworking situation, press “+” or “−” to switch “C” or “F”. After finishing the time and temperature setting, press “ON/OFF”, and the fryer starts to work as per the settings. When it reaches the setting time, the buzzer will beep for 20 seconds, and then pause for 10 seconds, then again beep for 20 seconds. The fryer will automatically shut off after three beeping times.
Meanwhile, the indicators (PROG/MANUAL) will quickly flicker twice in one second which means finishing working.
Meaning of the indicators:
MARCHE LIGHT: Lights up when the device is plugged in. It turns off when the device is disconnected.
CHAUFFE LIGHT: Lights up when the device works and turns off when it no longer works.
PROG LIGHT: Lights up in automatic or continuous cooking mode. It lights up when the appliance is plugged in and is turned off in programmable cooking mode.
MANUEL LIGHT: Lights up in programmable cooking mode.
Cleaning
- Unplug the appliance when cleaning.
- Clean the outside of the fryer and the lid with a damp cloth.
- Never use abrasive pads or alcohol.
- Detach the handle from the basket.
- Wash the basket with hot water or washing-up liquid. Rinse and dry carefully.
- The instructions for appliances normally cleaned after use, and not intended to be immersed in water for cleaning. Shall state that the appliance must not be immersed.
Practical advice
1. Oils and fats
● Always use oil and fats which can withstand high temperature.
- Do not mix different types of oil or fat.
- Change the oil or fat when it becomes brown after cooking.
2. Preparing the food
- Whatever the recipe used, the food must be perfectly dry: this will avoid overflowing and make the oil or fat last longer.
- When preparing potato-based food (chips, crisps, etc.), cut them up and then wash them in cold water to remove the starch. Dry them carefully. This will stop them sticking together.
3. Cooking
- Do not overfill the basket. This will cause the oil temperature to drop and make the food greasy.
- Do not keep the oil at high temperature for long periods. This will make it lose its properties.
- Set the temperature controller to the lowest temperature while waiting between two batches.
- Do not leave the cooked food in the basket in the draining position too long. The vapors could cause the food to lose its crispness and go soft.
- Frozenfood can be cooked in the basket without being defrosted.
4. After cooking
- Oil or fat can be left in the fryewith its basket and lid on. It will not lose its properties.
- Change the fat or oil regularly, after approximately 20 batches.
SPECIFICATION
Item reference: CEFR25IND
Model: XJ-6K118C0
Voltage: 220-240V\~, 50/60Hz
Wattage: 2000W
Care and maintenance
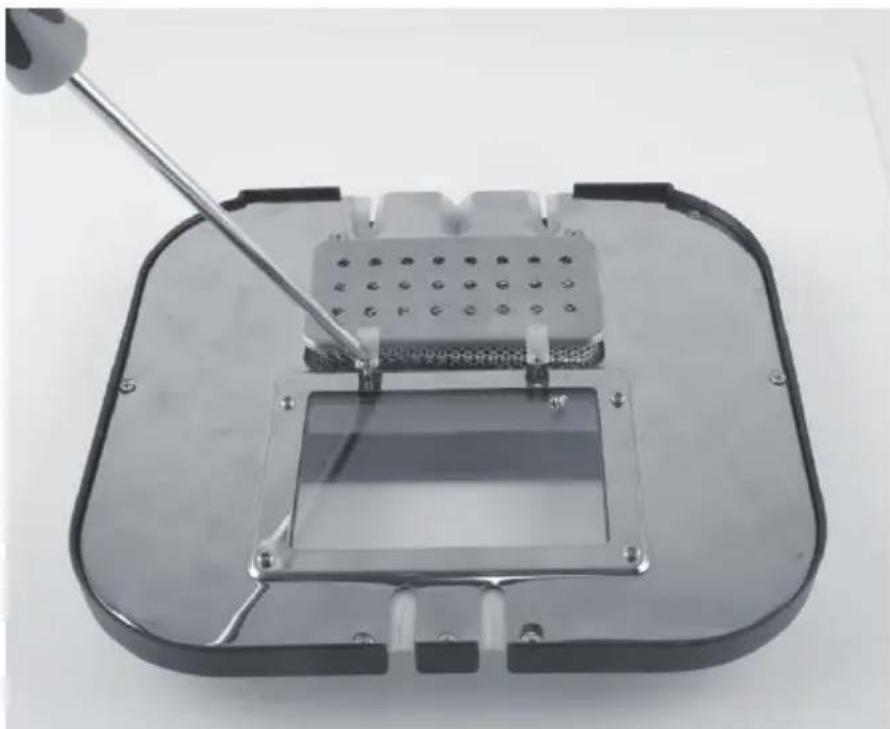
1. Replacing the filter
There is an Aluminum filter inside the lid, if you want to remove it from the lid for cleaning, you can screw 4 screws out and take away the stainless filter cover, then remove the filter. After cleaning the filter, you can put back the filter and the cover, then screw 4 screws in
natural_image
Close-up of a mechanical device with a tool inserted into a housing, showing internal components and mounting holes (no text or symbols visible)2. Repairing
If there is any breakdown or damage; the appliance must be repaired by specialized people. Non-specialized people are not permitted to dismantle or repair the appliance.
CORRECT DISPOSAL OF THIS PRODUCT
This marking indicates that this product should not be disposed with other household wastes throughout the EU. To prevent possible harm to the environment or human health from uncontrolled waste disposal, recycle it responsibly to promote the sustainable reuse of material resources. To return your used device, please use the return and collection systems or contact the retailer where the product was purchased. They can take this product for environmental safe recycling.
Continental Edison
120-126 Quai de Bacalan
CS 11584
33000 Bordeaux
IMPORT BY:
A.M.C.
123, QUAI JULES GUESDE
94400 VITRY SUR SEINE
France

natural_image
Abstract geometric shapes with overlapping semicircles and a right-angle cut (no text or symbols)Continental Edison


- Continental Edison
- Réparation
- MISE AU REBUT CORRECTE
- DE CE PRODUIT
- This product is only for household use.
- Warning: This appliance must be earthed.
- - Short Cord Instructions
- - Extension Cord Use
- Electric Power
- SAVE THESE INSTRUCTIONS
- FOR FUTURE REFERENCE
- FEATURE
- Parts of Appliance
- HOW TO USE
- Using your fryer
- Cooking
- Function 3: Auto-set work model
- Meaning of the indicators:
- Cleaning
- Practical advice
- Oils and fats
- Preparing the food
- Cooking
- After cooking
- SPECIFICATION
- Care and maintenance
- Replacing the filter
- Repairing
- CORRECT DISPOSAL OF THIS PRODUCT
Brand : CONTINENTAL EDISON
Model : CEFR25IND
Category : Deep fryer