Max Power RLM36X46S5 - Electric mower RYOBI - Free user manual and instructions
Find the device manual for free Max Power RLM36X46S5 RYOBI in PDF.

| Product type | Cordless lawn mower |
| Brand | RYOBI |
| Model | Max Power RLM36X46S5 |
| Power source | Lithium-ion battery (battery pack) |
| Cutting height | Adjustable (adjustment lever) |
| Maximum mowing area | Up to 620 m² (fine, dry grass) |
| Guaranteed sound power level | 92 dB(A) |
| Grass collection box capacity | Not specified |
| Weight | Not specified |
| Main functions | Collection, mulching, rear discharge |
| Safety | Isolation key, blade stop, overload and overheat protection |
| Maintenance and cleaning | Clean after each use, check blade, grass collection box |
| Warranty | 24 months (extendable via online registration) |
| Intended use | Homeowners, outdoor lawn mowing |
| Maximum slope | 15° (mow across slope) |
Frequently Asked Questions - Max Power RLM36X46S5 RYOBI
User questions about Max Power RLM36X46S5 RYOBI
0 question about this device. Answer the ones you know or ask your own.
Ask a new question about this device
Download the instructions for your Electric mower in PDF format for free! Find your manual Max Power RLM36X46S5 - RYOBI and take your electronic device back in hand. On this page are published all the documents necessary for the use of your device. Max Power RLM36X46S5 by RYOBI.
USER MANUAL Max Power RLM36X46S5 RYOBI
RLM36X46S240 RLM36X46S5 RLM36B46S
ORIGINAL INSTRUCTIONS
TRADUCTION DE LA NOTICE ORIGINALE
natural_image
Black-and-white photo of a Ryobi lawn mower with visible wheels and branding (no text or symbols on the device itself)
| Important! | It is essential that you read the instructions in this manual before assembling, maintaining and operating the product. |
| Attention! | Il est essentiel que vous lisiez les instructions contenues dans ce manuel avant d'assembler, d'entretenir et d'utiliser le produit. |
| Achtung! | Es ist wichtig, dass Sie vor Zusammenbau, Wartung und Benutzung des Produktes die Anweisungen in dieser Anleitung lesen. |
| ¡Atención! | Resulta fundamental que lea este manual de instrucciones antes de realizar el montaje, el mantenimiento y de utilizar este producto |
| Attenzione! | E' importante leggere le istruzioni contenute nel presente manuale prima di montare il prodotto, svolgere le operazioni di manutenzione sullo stesso e metterlo in funzione. |
| Let op! | Het is van essentieel belang dat u de instructies in deze gebruiksaanwijzing leest voor u het product monteert, onderhoudt en gebruikt. |
| Atenção! | É fundamental que leia as instruções deste manual antes da montagem, manutenção e operação do aparelho. |
| OBS! | Det er vigtigt, at man læser instrukserne i denne brugsanvisning, inden man samler, vedligeholder og betjener produktet. |
| Observera! | Det är viktigt att du läser instruktionerna i manualen före montering, användning och underhåll av produkten. |
| Huomio! | On tärkeää, että luet tämän käsikirjan ohjeet ennen tuotteen kokoamista, huoltoa ja käyttöä. |
| Advarsel! | Det er viktig at du leser instruksjonene i denne manualen før sammensetning, vedlikehold og bruk av produktet |
| Внимание! | Необходимо прочитать инструкции в данном руководстве перед сборкой, обслуживанием и эксплуатацией этого изделия. |
| Uwaga! | Koniecznie należy przeczytać instrukcje zawarte w tym podręczniku przed montażem, obsługą oraz konserwacją produktu. |
| Dûležité upozornění! | Neinstalujte, neprovádějte údržbu ani nepoužívejte tento výrobek dříve, než si přečtete pokyny uvedené v tomto návodu. |
| Figyelem! | Fontos, hogy a termék összeszerelése, karbantartása és használata előtt elolvassa a kézikönyvben található utasításokat. |
| Atenție! | Este esențial să citiți instrucțiunile din acest manual înainte de asamblare, efectuarea întreținerii și operarea produsului. |
| Uzmanību! | Ir svarīgi izlasīt šīs rokasgrāmatas instrukcijas pirms uzstādīšanas, apkopes un preces darbināšanas. |
| Dèmesio! | Prieš surenkant, prižiūrint ir naudojant gaminį, būtina perskaityti šiame vadove pateiktus nurodymus. |
| Tähtis! | Enne masina kokkupanekut, hooldamist ja kasutama hakkamist tuleb käesolevas juhendis esitatud juhised kindlasti läbi lugeda. |
| Upozorenje! | Vrlo je važno da ste prije sklapanja, održavanja i rada s ovim proizvodom pročitali upute u ovom priručniku. |
| Pomembno! | Pomembno je da pred montažo vzdrževanjem in uporabo tega izdelka preberete navodila v tem priročniku. |
| Upzornenie! | Je dôležité, aby ste si pred montážou, údržbou a obsluhou produktu prečitali pokyny v tomto návode. |
| Важно! | Изключително важно е да прочетете инструкциите в настоящото ръководство, преди да преминете към сглобяване, поддръжка или работа с продукта. |
| Важливо! | Дуже важливо, щоб ви прочитали інструкції в цьому керівництві перед складанням, обслуговуванням та експлуатацією цієї машини. |
| Önemli! | Ürünü monte etmeden, kullanmadan ve bakımını yapmadan önce bu kılavuzdaki talimatları okumanız önemlidir. |
Subject to technical modification | Sous réserve de modifications techniques | Technische Änderungen vorbehalten | Bajo reserva de modificaciones técnicas | Con riserva di eventuali modifiche tecniche | Technische wijzigingen voorbehouden | Com reserva de modificações técnicas | Med forbehold for tekniske ændringer | Med förbehåll för tekniska ändringar | Tekniset muutokset varataan | Med forbehold om tekniske endringer | могут быть внесены технические изменения | Z zastrzeženiem modyfikacji technicznych | Změny technických údajů vyhrazeny | A můszaki módosítás jogát fenntartjuk | Sub rezerva modificațiilor tehnice | Paturam tiesības mainīt tehniskos raksturlielumus | Pasiliekant teisę daryti techninius pakeitimus | Tehnilised muudatused võimalikud | Podloæno tehniëkim promjenama | Tehnične spremembe dopuščene | Právo na technické zmeny je vyhradenė | Подлежи на технически модификации | Є ob'єктом для технічних змін | Teknik değişikliğe tabidir.
Safety, performance, and dependability have been given top priority in the design of your cordless lawn mower.
INTENDED USE
The cordless lawn mower is intended for outdoor use only.
The product is designed for domestic lawn mowing. The cutting blade should rotate approximately parallel to the ground over which it is being wheeled. All four wheels should touch the ground while mowing. It is a pedestrian-controlled, walk-behind mower designed to be pushed by hand.
The product should never be operated with the wheels off the ground. It should not be pulled or ridden on. It should not be used to cut anything other than domestic grass lawns. Do not use the product for any other purpose.
GENERAL SAFETY WARNINGS
WARNING
When using the product, the safety rules must be followed. For your own safety and that of bystanders, please read these instructions before operating the product. Please keep the instructions safe for later use.
WARNING
The product should be operated only with the battery packs specified in this manual. When using a battery-operated product, basic safety precautions should always be followed to reduce the risk of fire, leaking batteries, and personal injury.
PERSONAL SAFETY
■ The product is capable of amputating hands and feet, and of throwing objects. Failure to observe all safety instructions could result in serious injury or death.
■ Be familiar with the controls and the correct use of the product.
■ Never allow children or people with reduced physical, sensory or mental capabilities, or persons who are not familiar with these instructions to operate, clean, or maintain the product. Local regulations may restrict
the age of the operator. Children should be adequately supervised to ensure they do not play with the product.
■ Stay alert, watch what you are doing, and use common sense when operating the product. Do not operate the product while tired, ill, or under the influence of drugs, alcohol, or medication. A lapse in concentration while operating the product may result in serious personal injury.
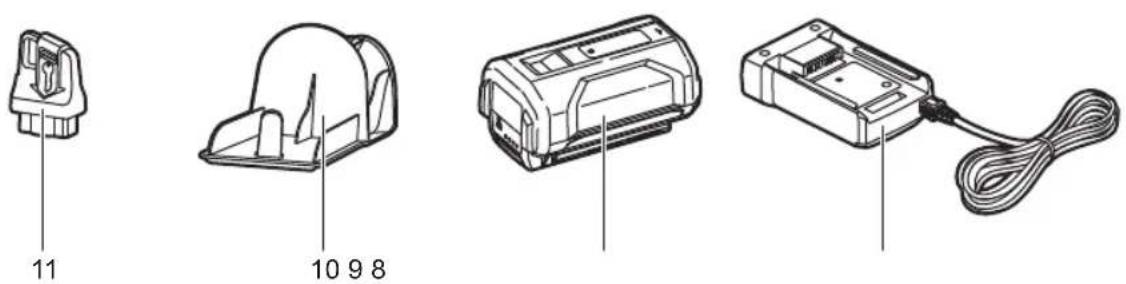
■ Wear heavy, long trousers, long sleeves, and sturdy anti-slip footwear. Do not wear short trousers, sandals, or go barefoot. Avoid wearing clothing that is loose-fitting or that has hanging cords or ties.
■ Always wear safety glasses with side shields.
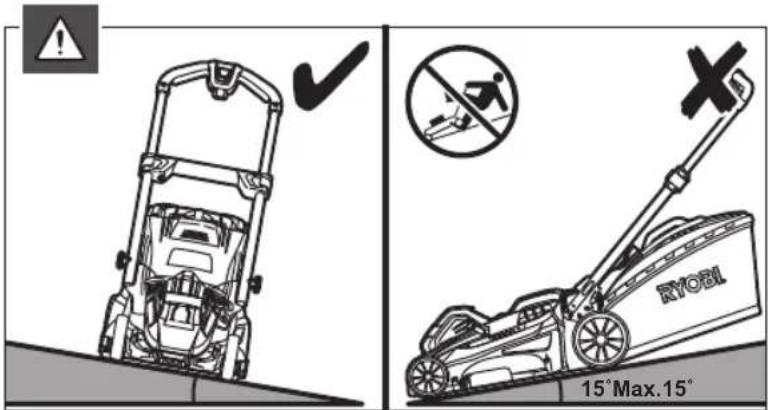
■ Always be sure of your footing especially on slopes. Keep firm footing and balance. Walk, never run.
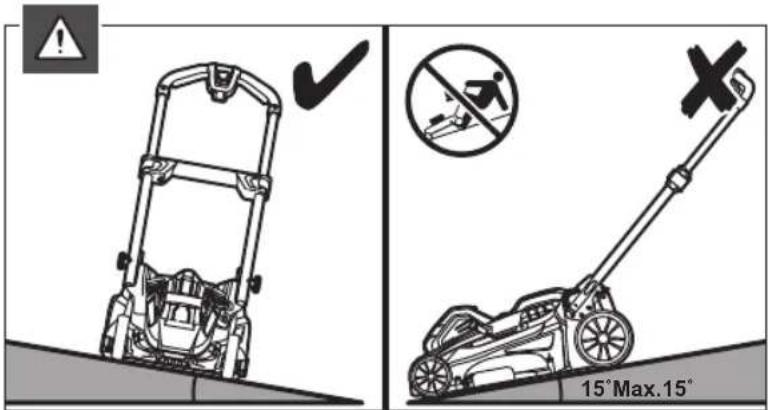
■ Use the product across the face of slopes; never up and down. Exercise extreme caution when changing direction on slopes.
- Do not use the product near drop-offs, ditches, excessively steep slopes, or embankments. Poor footing could cause a slip and fall accident.
WORK AREA SAFETY
■ Never use product while people, especially children, or pets are within 15 m because of the danger of objects being thrown by contact with the blade.
■ Objects struck by the lawn mower blade can cause severe injuries to persons. Thoroughly inspect the area where the product is to be used and remove all rocks, sticks, metal, wire, bones, toys, or other foreign objects. Remember, string or wire may entangle with the cutting means.
■ Always use the product in the daylight or with good artificial light.
- Do not operate the product in explosive atmospheres, such as in the presence of flammable liquids, gases, or dust. The product creates sparks which may ignite the dust or fumes.
■ Do not operate the product on wet grass or in the rain.
■ Do not use the product when there is a risk of lightning.
- Keep in mind that the operator or user is responsible for accidents or hazards occurring to other people or their property.
■ Tragic accidents can occur if the operator is not alert to the presence of children. Children are often attracted to the product and the mowing activity. Never assume that children will remain where you last saw them.
- Keep children out of the mowing area and under the watchful care of a responsible adult other than the operator. Be alert, and turn off the product if a child enters the area.
■ Use extra care when approaching blind corners, shrubs, trees, or other objects including overhanging shrubs, which may block your view.
BATTERY TOOLS USE AND CARE
- Read, understand, and always follow the safety instructions that came with your battery and charger. Failure to do so may result in electric shock, fire or other hazardous situations. Keep all the instructions together in a safe place for future reference.
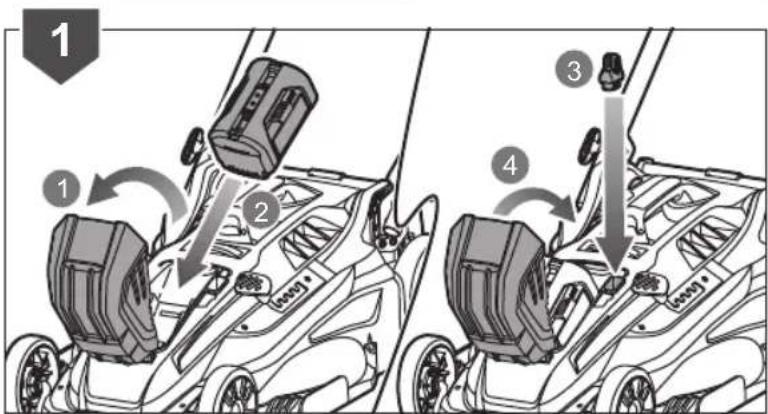
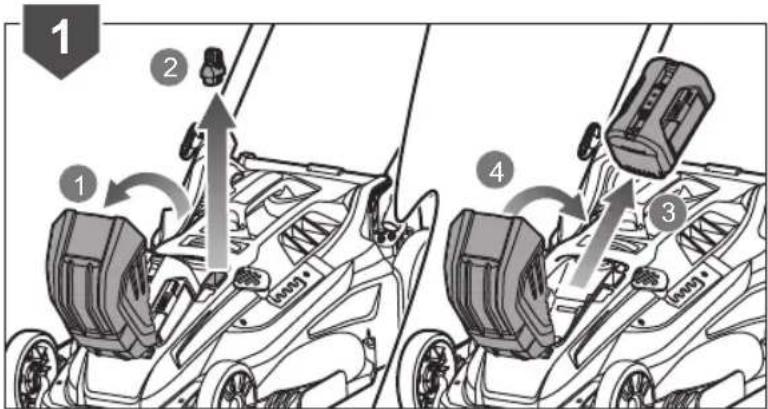
■ Battery-operated products do not have to be plugged into an electrical outlet; therefore, they are always in operating condition. Remove the isolator key whenever you are not operating the product.
■ Remove the battery pack before making any adjustments, cleaning, or removing material from the product.
■ Ensure that the isolator key is removed before inserting battery pack.
■ A battery pack must be recharged only with the charger specified by the manufacturer. Using a charger with an incompatible battery pack may create a risk of fire. Use battery pack only with charger listed.
■ Use only battery pack intended specifically for the product. Use of any other battery packs may result in a risk of fire, electric shock, or injury to persons.
- When battery pack is not in use, keep it away from other metal objects like, paper clips, coins, keys, nails, screws, or other small metal objects, that can make a connection from one terminal to another. Shorting the battery pack terminals together may cause sparks, burns, fire or explosion.
■ Do not place battery products or their batteries near fire or heat. This increases the risk of explosion and possibly injury.
■ Do not open or mutilate the battery pack. Released electrolyte is corrosive and may cause damage to the eyes or skin. It may be toxic if swallowed.
■ Protect the battery pack against moisture and water. Do not charge the product in a damp or wet location. Following this rule will reduce the risk of electric shock.
In case of damage and improper use of the battery, vapour may be emitted. Provide for fresh air, and seek medical help in case of complaints. The vapour can irritate the respiratory system.
■ Do not leave the battery pack inside a vehicle in hot or cold conditions.
■ Do not incinerate the battery.
■ Under abusive conditions, liquid may be ejected from the battery; avoid contact. If contact accidentally occurs, flush with water. If liquid contacts eyes, seek medical help. Liquid ejected from the battery may cause irritation or burns.
LAWN MOWER SAFETY WARNINGS
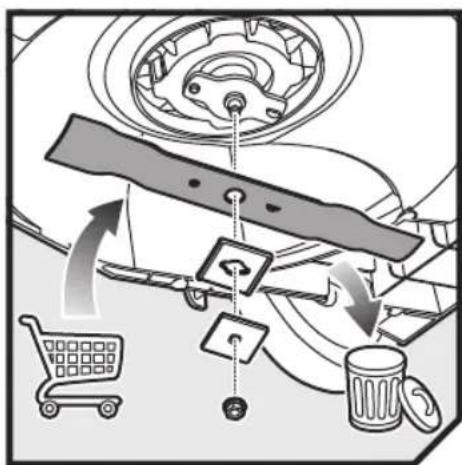
■Before use, always visually inspect to ensure that blades, blade bolts, and cutter assembly are not worn or damaged.
■ Replace worn or damaged blades and bolts in sets to preserve balance.
■ The blade on the product is sharp. Use extreme caution and wear heavy-duty gloves when fitting, replacing, cleaning or checking bolt security.
■ Bring the product to an authorised service centre to replace damaged or unreadable labels.
- Check all nuts, bolts, and screws at frequent intervals for proper tightness to be sure that the product is in safe working condition.
■ Frequently check the grass catcher for wear, holes, or deterioration.
■ Replace worn or damaged parts before operating the product.
■ The product must be started with the user behind the handlebars in the operator safety zone. Never start the product if:
- Not all four wheels are on the ground.
- The grass discharge chute is exposed and is not protected by the grass catcher and grass discharge chute cover.
- Hands and feet of all persons are not clear of the cutting enclosure.
■ Never operate the product if the on/off switch on the handlebar does not properly start and stop the product.
■ Never attempt to lock the on/off switches in the on position; this is extremely dangerous.
- Do not force the product. It will do the job better and safer at the speed for which it was designed.
■ Stop the blade when crossing gravel surfaces.
■ Do not pull the product backwards unless absolutely necessary. If you must back the product away from a wall or obstruction, first look down and behind to avoid tripping or pulling the product over your feet.
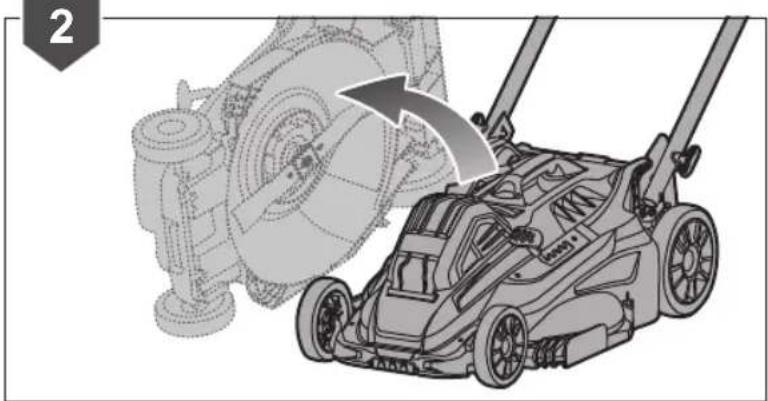
■ Turn off the motor, and allow the blade to stop if the product has to be tilted for transportation, when crossing surfaces other than grass, and when transporting the product to and from the work area.
■ Never use the product with defective guards or shields, or without safety devices, such as, deflectors and grass collectors, in place.
- Do not tilt the product when turning on the motor or while the motor is running. If absolutely necessary, you may raise the front of the lawn mower by no more than 5 cm to enable easier starting. Press down on the handlebar to achieve this. Always return the mower to its normal position with all wheels on the ground before cutting. Tilting the mower exposes the blade and increases the probability of objects being thrown and accidental contact with the blade.
■ Turn on the motor carefully according to instructions and keep hands and feet away from blades. Do not put hands or feet near or under rotating parts.
■ Never pick up or carry the product while it is running.
■ Turn off the product, and remove the isolator key and battery pack. Make sure that all moving parts have come to a complete stop:
- whenever leaving the product unattended (including disposal of grass clippings)
- before clearing blockages or unclogging the discharge chute
- before checking, cleaning, or working on the product
- before removing the grass catcher or opening the grass discharge chute cover
- after striking a foreign object (inspect the product for damage and make repairs as necessary before restarting and operating the product)
- If the product starts to vibrate abnormally (check immediately)
– inspect for damage, particularly the blades
– replace or repair any damaged parts
– check for and tighten any loose parts
- Avoid holes, ruts, bumps, rocks, property stakes, or other hidden objects. Uneven terrain could cause a slip-and-fall accident.
■ Always ensure the motor control cable is never trapped, pinched or otherwise damaged during assembly or when folding the handle.
ADDITIONAL BATTERY SAFETY WARNINGS
WARNING
To reduce the risk of fire, personal injury, and product damage due to short circuit, never immerse your tool, battery pack, or charger in fluid or allow fluid to flow inside them. Corrosive or conductive fluids, such as seawater, certain industrial chemicals, and bleach or bleach-containing products, etc., can cause a short circuit.
PRODUCT FEATURES
OVERLOAD ANDOVERHEATPROTECTION
The product has an overload protection device. When overloading is detected, the product automatically limits the current rise and slow down the cutting speed until the product stops. If the overload protector is actuated, the on-off button must be released. Press the on-off button to restart the product.
The battery pack has overheat protection. Excessive temperatures causes the battery to stop powering the product. If the battery pack is too warm, allow it to cool down before resuming operation. If the product still does not work, recharge the battery.
NOTE: The battery pack LED indicator does not work if the battery protection feature has caused the battery pack to stop powering the product. Release the on-off button or remove the battery pack from the product and the battery pack LED indicator will resume normal function.
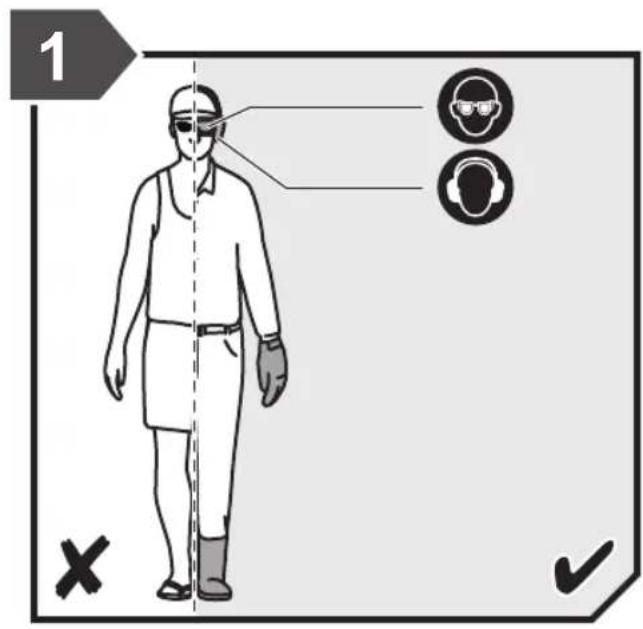
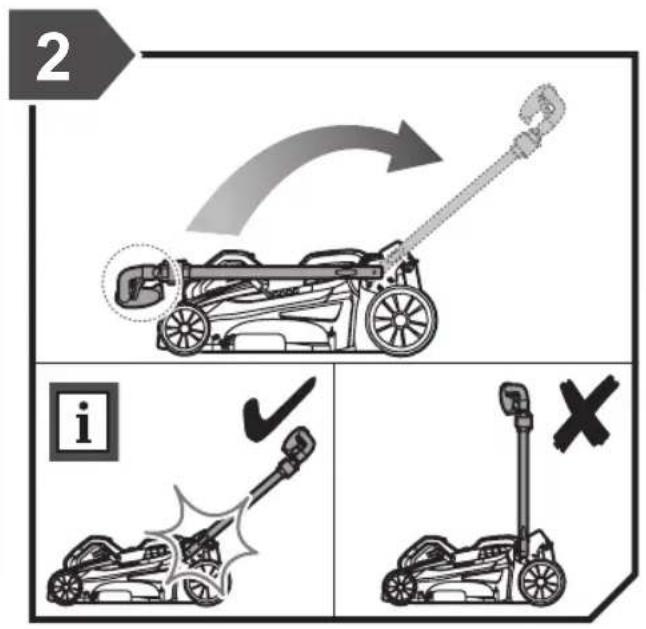
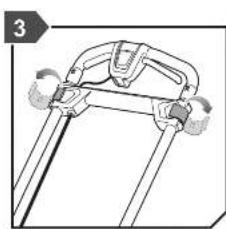
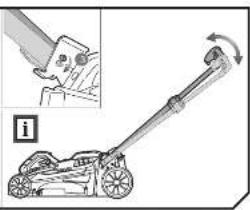
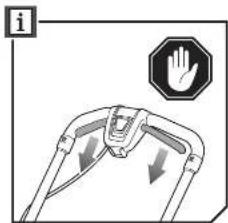
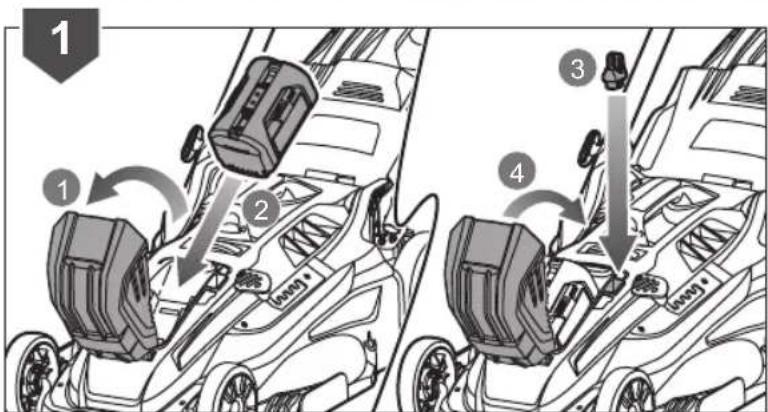
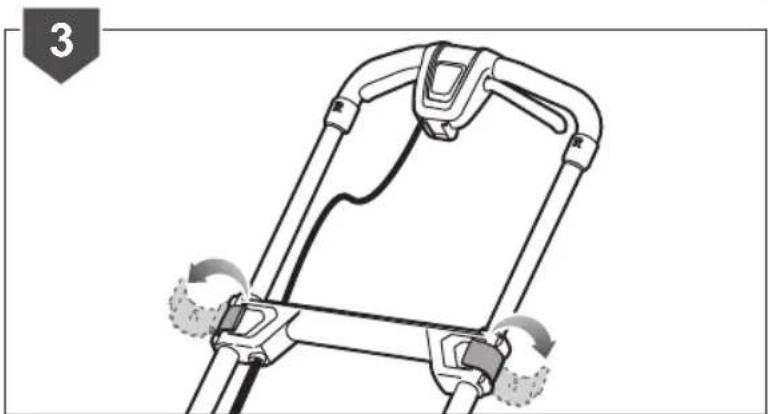
TELESCOPIC HANDLE
The product is equipped with a telescopic handle that can be adjusted for storage and operation. The telescopic handle must be fully extended when setting up the product for use.
NOTE: The product will not function if the telescopic handle is not fully extended and the two latches are not in the correct position.
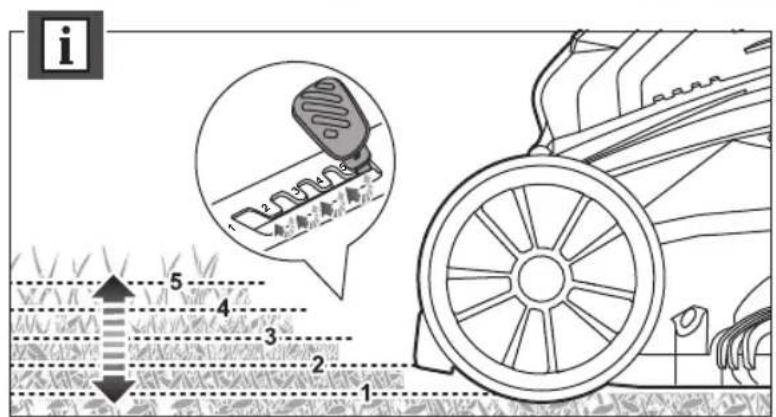
GENERAL MOWING TIPS
The run time of the battery depends on the condition, length, and density of the grass.
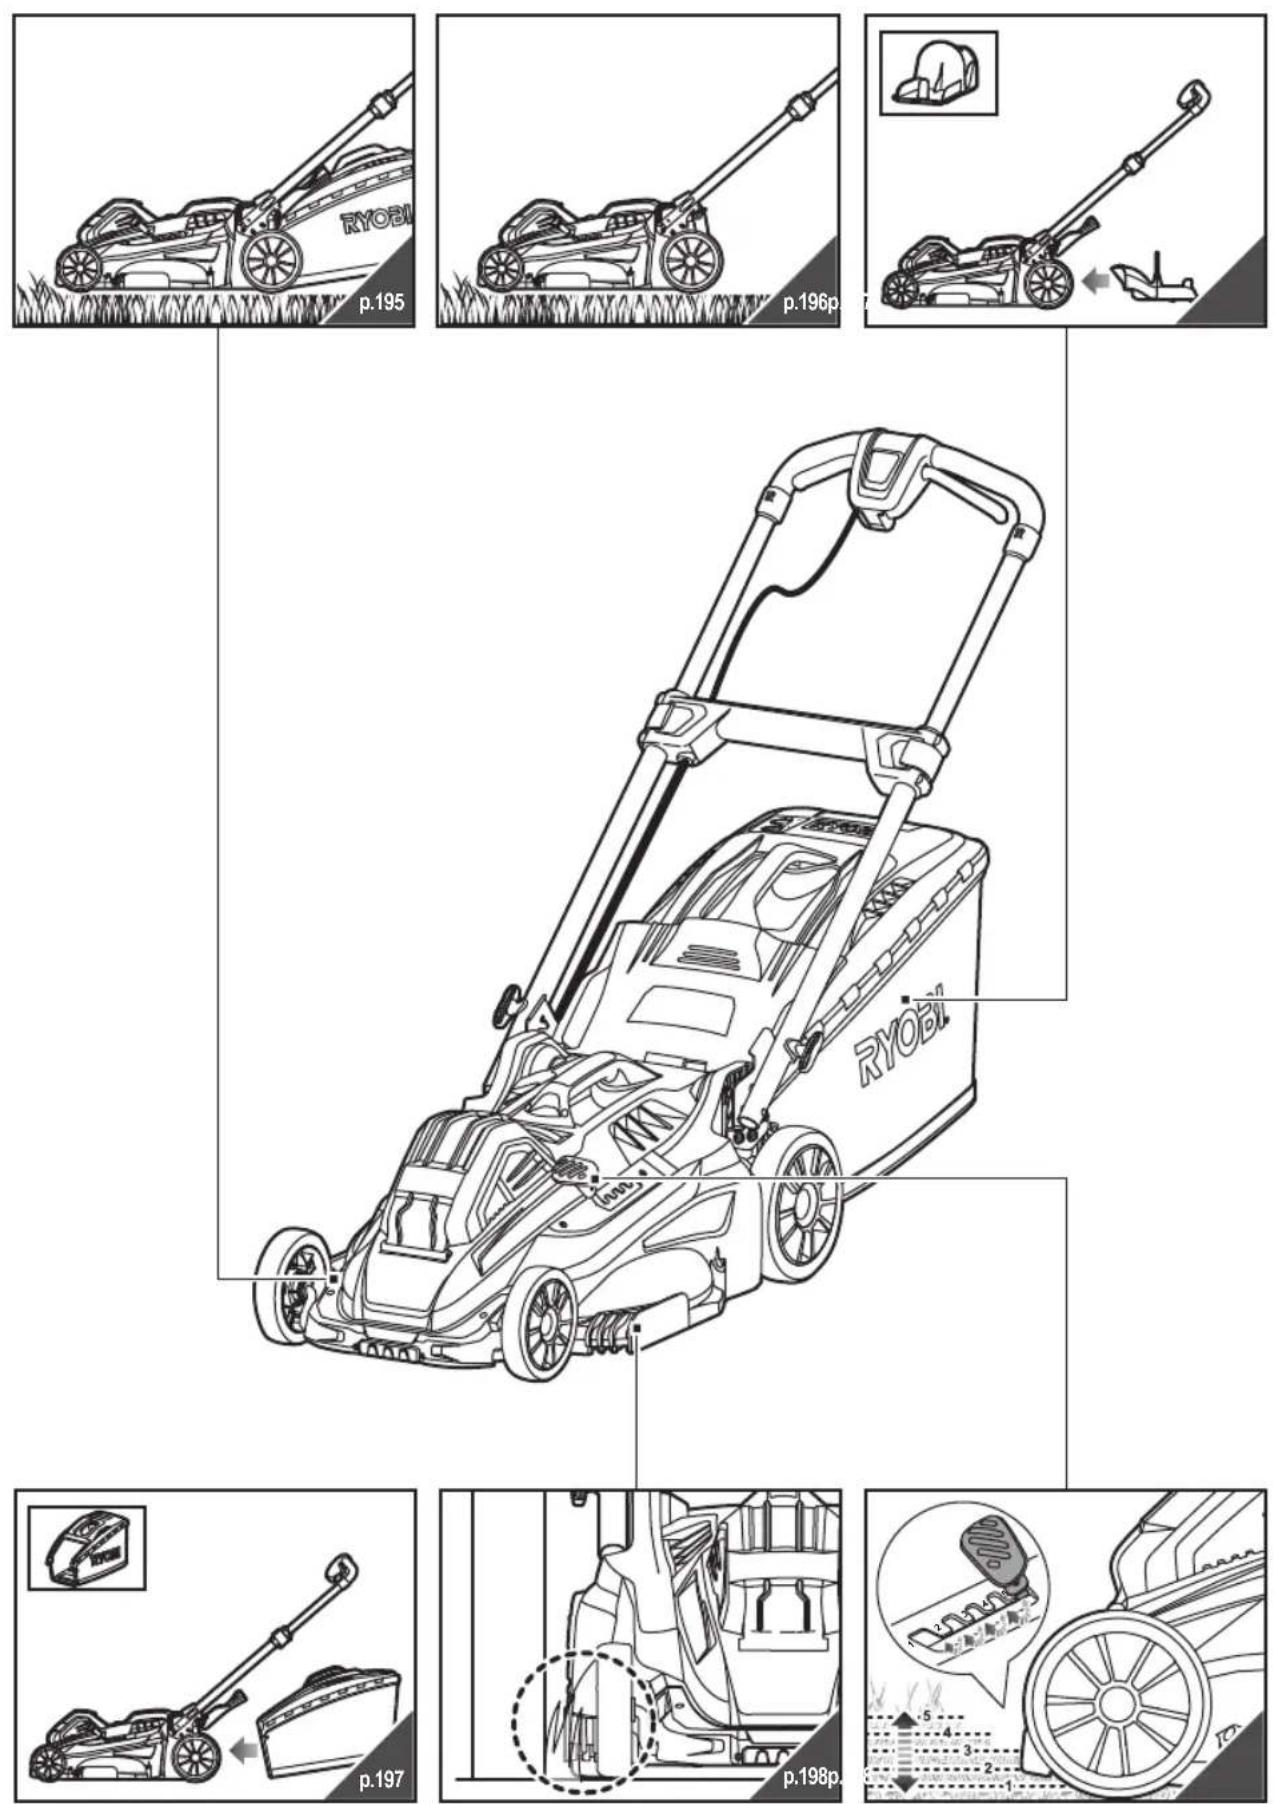
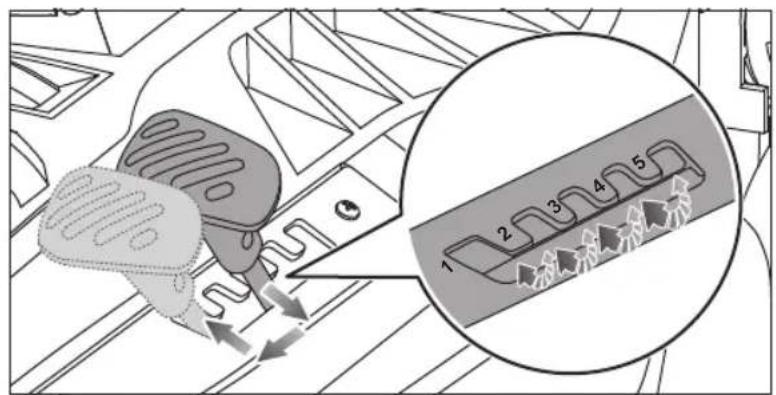
Adjust the cutting height of the lawn mower to suit the current condition of the lawn.
| Grass conditions | Suggested height adjustment | Coverage (maximum) | |
| First pass | Succeeding passes | ||
| Thin / Dry 4 | 3 → 2 | 620 m | ^2 * |
| Medium / Dense | 5 | 4 | → 3 ^2 400 m |
* battery: BPL3650D
■ For best performance, always cut off one-third or less of the total height of the grass.
■ When cutting long grass, reduce walking speed to allow for more effective cutting and a proper discharge of the clippings.
■ Do not cut wet grass; it will stick to the underside of the deck and prevent proper collection or discharge of grass clippings.
■ New or thick grass may require a higher cutting height.
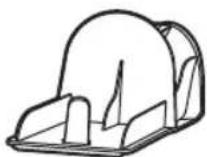
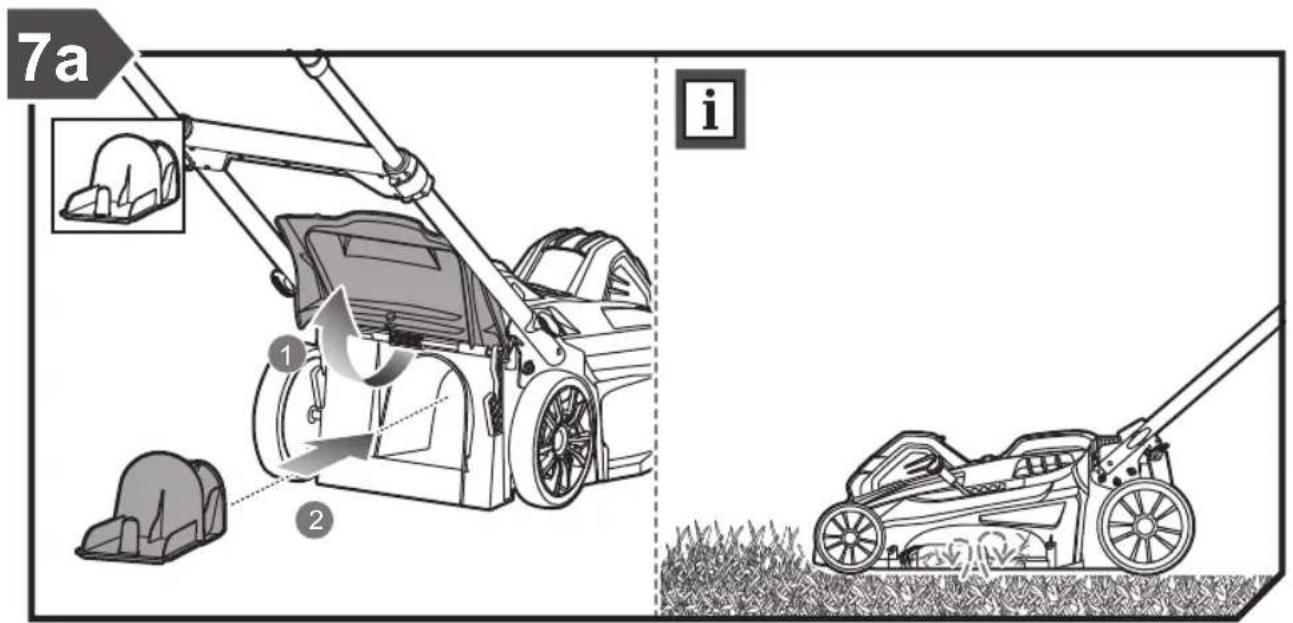
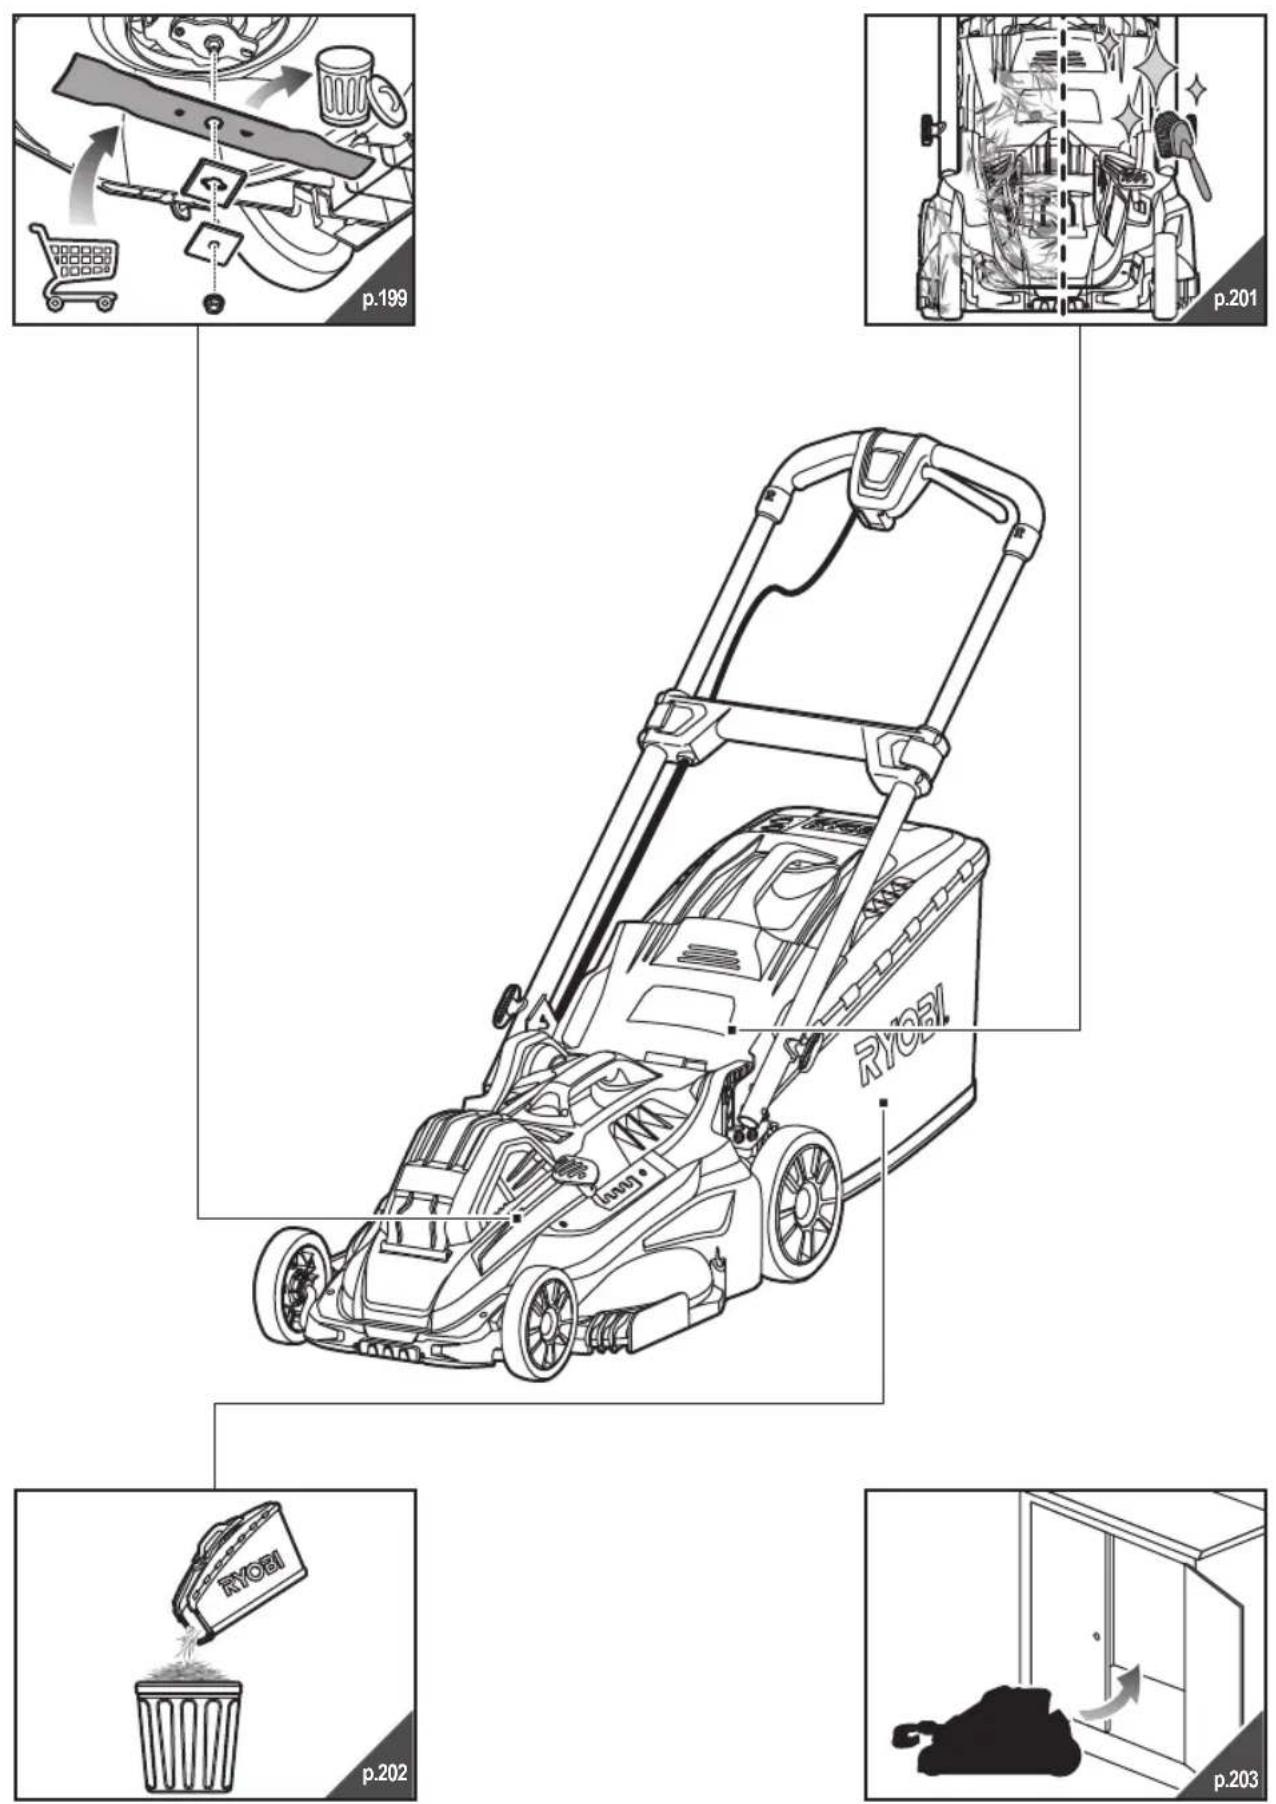
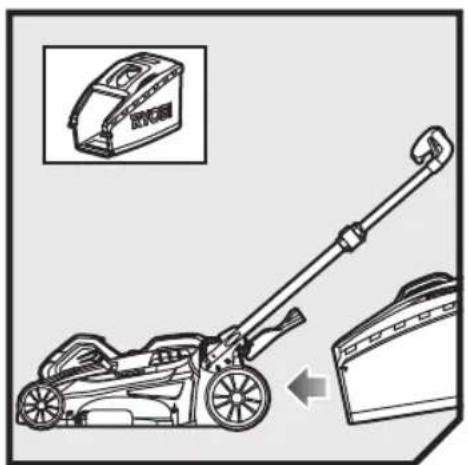
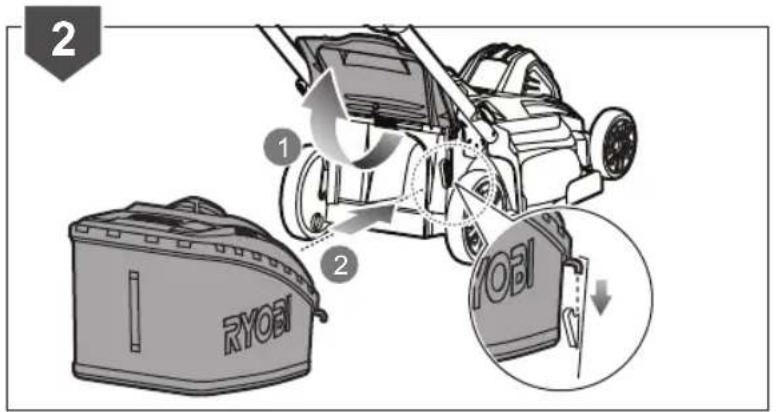
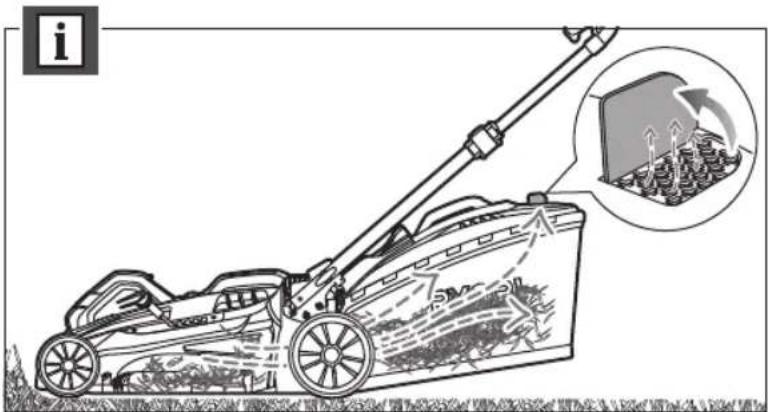
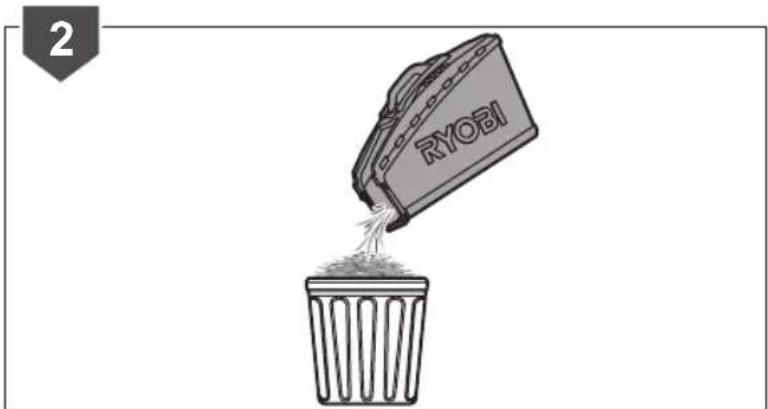
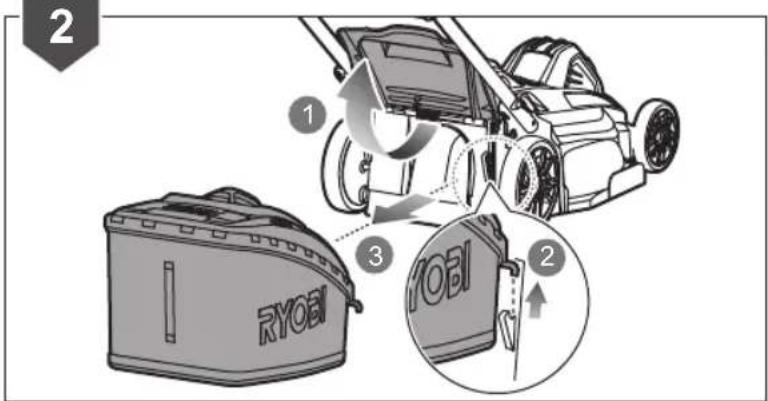
■ To collect the grass cuttings for disposal, remove the mulching plug and install the grass catcher, making sure that the top flap is properly closed. Empty the grass catcher
regularly; otherwise, the discharge chute will become blocked with grass cuttings.
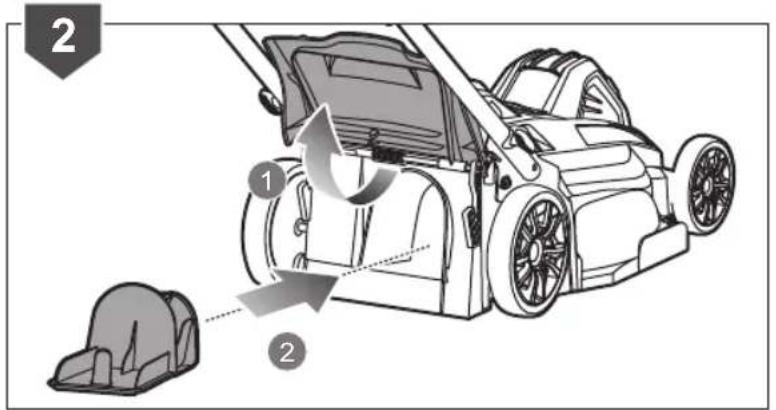
If you are making a light cut and wish for the grass cuttings to remain on the lawn, install the mulching plug and close the top flap to cover the discharge opening. It is not necessary to install the grass catcher in this case.
■ The product is designed to operate and cut most effectively when moving forwards.
■ A higher cutting height extends the run time of the battery.
TRANSPORTATION AND STORAGE
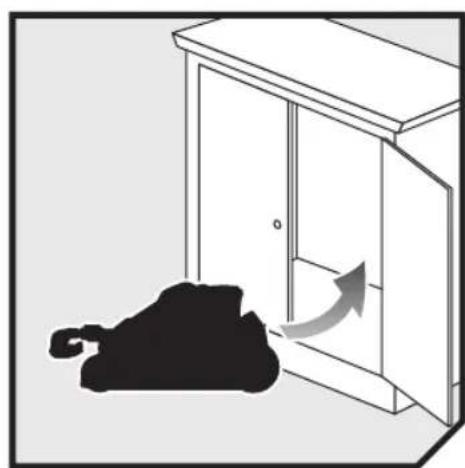
■Turn off the product, and remove the isolator key and the battery. Make sure that all moving parts have come to a complete stop. Allow the product to cool down before storing or transporting.
■ Clean all foreign materials from the product. Store the product in a cool, dry, and well-ventilated place that is inaccessible to children. Keep the product away from corrosive agents, such as garden chemicals and de-icing salts. Do not store the product outdoors.
■ For transportation in vehicles, remove the isolator key and secure the product against movement or falling to prevent injury to persons or damage to the product.
WARNING
Use extreme caution when lifting or tilting the product for maintenance, cleaning, storage, or transportation. The blade is sharp, keep all body parts away from the blade while it is exposed.
TRANSPORTING LITHIUM BATTERIES
Transport the battery in accordance with local and national provisions and regulations.
Follow all special requirements on packaging and labelling when transporting batteries by a third party. Ensure that no batteries can come in contact with other batteries or conductive materials while in transport by protecting exposed connectors with insulating, non-conductive caps or tape. Do not transport batteries that are cracked or leaking. Check with the forwarding company for further advice.
MAINTENANCE
WARNING
Use only original manufacturer's replacement parts, accessories and attachments. Failure to do so can cause possible injury, can contribute to poor performance, and may void your warranty.
WARNING
Servicing requires extreme care and knowledge and should be performed only by a qualified service technician. Have the product serviced by an authorised service centre only. When servicing, use only original replacement parts.
■ Turn off the product, and remove the isolator key and the battery. Make sure that all moving parts have come to a complete stop before any cleaning or maintenance task.
■ You may make adjustments and repairs described in this manual. For other repairs, contact an authorised service centre.
■ Replace worn or damaged part for safety.
■ Check the grass catcher frequently for wear or deterioration.
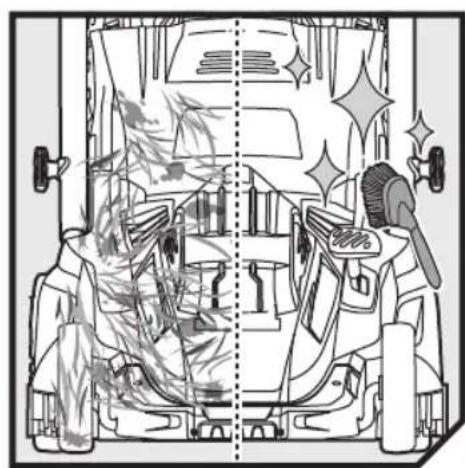
■ After each use, clean the product with a soft dry, cloth. Any part that is damaged should be properly repaired or replaced by an authorised service centre.
- Check all nuts, bolts, and screws at frequent intervals for proper tightness to ensure the product is in safe working condition.
■ Be careful during adjustment of the product to prevent entrapment of the fingers between moving blades and fixed parts of the product.
■ When servicing the blades, be aware that even though the power source is turned off, the blades can still be moved.
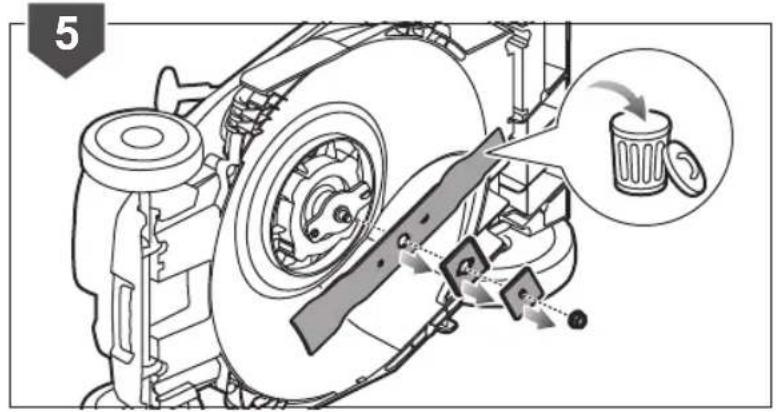
■ The blade on the product is sharp. Use extreme caution, and wear heavy-duty gloves when fitting, replacing, cleaning or checking bolt security.
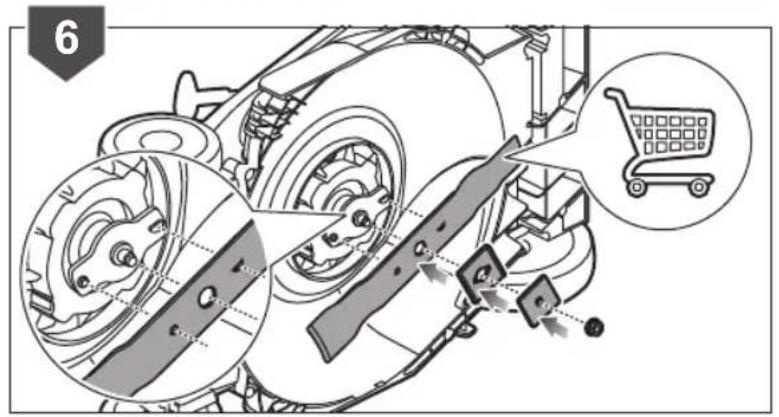
■ Replace damaged blades and bolts in sets to preserve balance.
■ The blade bolts must be adequately tightened. See the manufacturer's
recommendations for blade bolt torque which can be found in the product specification table in this manual.
CLEARING BLOCKAGES
■ Turn off the product, and remove the isolator key and the battery. Make sure that all moving parts have come to a complete stop.
■ Always wear heavy-duty gloves when checking or clearing a blockage.
■ The blades are sharp and the blockage itself could be a sharp object.
■ Remove the grass catcher, check for and carefully clear obstructions.
■ Check the grass discharge chute, and carefully clear for blockages.
■ Turn the product on its side. Check its underside, and the area around the blade. If any blockages are found, remove carefully. Remember, the blade may move during cleaning.
RESIDUAL RISKS
Even when the product is used as prescribed, it is still impossible to completely eliminate certain residual risk factors. The following hazards may arise during use and the operator should pay special attention to avoid the following:
■ injury caused by vibration
- Always use the right tool for the job. Use designated handles and restrict working time and exposure.
■ injury caused by noise
- Exposure to noise can cause hearing injury. Wear ear protection and limit exposure.
■ injury from contact with the blades
■ injury caused by thrown objects
RISK REDUCTION
It has been reported that vibrations from handheld tools may contribute to a condition called Raynaud's Syndrome. Symptoms may include tingling, numbness and blanching of the fingers, usually apparent upon exposure to cold. Hereditary factors, exposure to cold and dampness, diet, smoking and work practices are all thought to contribute to the development of these symptoms. There are measures that can be taken by the operator to possibly reduce the effects of vibration:
- Keep your body warm in cold weather. When operating the product, wear gloves to keep the hands and wrists warm. It is reported that cold weather is a major factor contributing to Raynaud's Syndrome.
■ After each period of operation, exercise to increase blood circulation.
■ Take frequent work breaks. Limit the amount of exposure per day.
If you experience any of the symptoms of this condition, immediately discontinue use and see your physician.
WARNING
Injuries may be caused, or aggravated, by prolonged use of a tool. When using any tool for prolonged periods, ensure that you take regular breaks.
KNOW YOUR PRODUCT
See page 189.
Parts
- Start button
- Motor control cable
- Handle lock
- Grass catcher
- Quick release fastener
- Rear wheel
- Front wheel
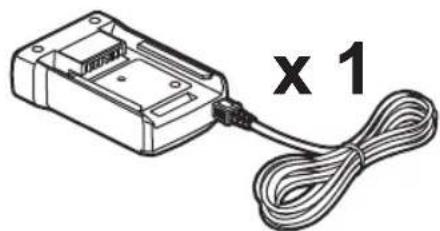
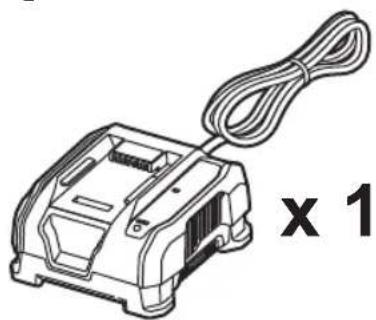
- Charger
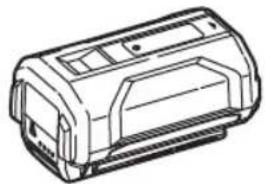
- Battery
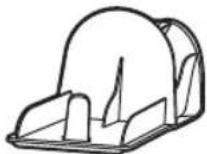
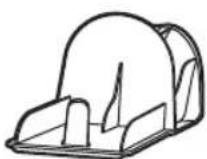
- Mulching plug
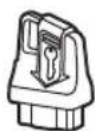
- Isolator key
- Battery door
- Height adjustment lever
- Grass catcher full indicator
- Telescopic handle
- On-off button
SYMBOLS ON THE PRODUCT
Read and understand all instructions before operating the product. Follow all warnings and safety instructions.

Wear ear protection.

Wear eye protection.

Do not operate the product on inclines greater than 15^ . Mow across the face of slopes, never up and down.

Do not expose the product to rain or damp condition.
Beware of sharp blades. Blades continue to rotate after the motor is switched off – Remove isolator key before maintenance
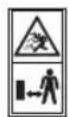
Beware of thrown or flying objects. Keep all bystanders, especially children and pets, at least 15 m away from the operating area.
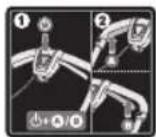
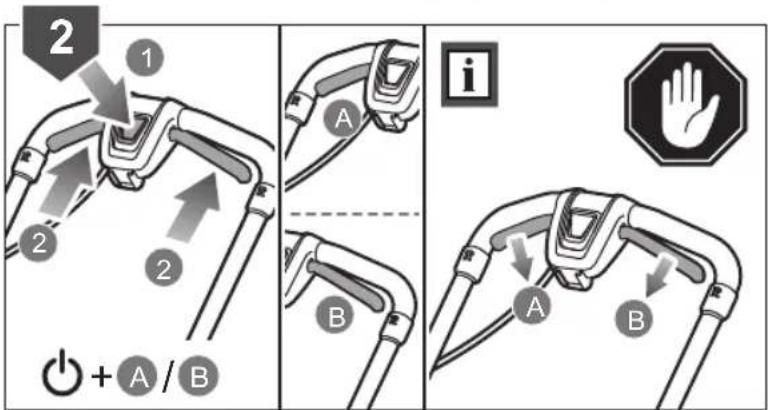
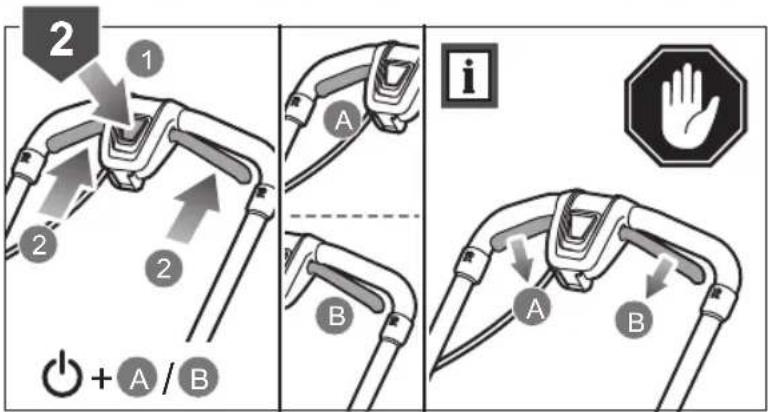
Press the start button and then the on-off button (A or B) to start the product. Release the start button and keep pressing the on-off button to run the product. Release the on-off button to stop the product.
Go
Stop

Please read the instructions carefully before using the product.
Waste electrical products should not be disposed of with household waste. Please recycle where facilities exist. Check with your local authority or retailer for recycling advice.

Conforms to all regulatory standards in the country in the EU where the product is purchased

EurAsian Conformity Mark

Ukrainian mark of conformity
001
Guaranteed sound power level
SYMBOLS IN THIS MANUAL

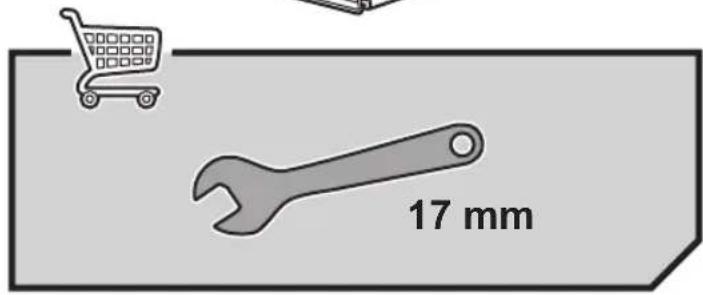
Parts or accessories sold separately

Note

Warning
The following signal words and meanings are intended to explain the levels of risk associated with this product:
DANGER
Indicates an imminently hazardous situation, which, if not avoided, will result in death or serious injury.
WARNING
Indicates a potentially hazardous situation, which, if not avoided, could result in death or serious injury.
CAUTION
Indicates a potentially hazardous situation, which, if not avoided, may result in minor or moderate injury.
CAUTION
(Without safety alert symbol) Indicates a situation that may result in property damage.
CARACTÉRISTIQUES DU PRODUIT
SYMBOLES APPLIQUÉS SUR LE PRODUIT

MACHEN SIE SICH MIT IHREM PRODUKT VERTRAUT
Siehe Seite 189.
Teile
SYMBOLE AUF DEM PRODUKT

VEILIGHEIDSWAARSCHUWINGEN
WAARSCHUWING
VEILIGHEIDSWAARSCHUWINGEN GRASMAAIMACHINE
SYMBOLER PÅ PRODUKTET

TRANSPORT OCH FÖRVARING
SYMBOLER PÅ PRODUKTEN

SYMBOLER I MANUALLEN

KJENN PRODUKTET DITT
Se side 189.
Deler
SYMBOLER PÅ PRODUKTET

SYMBOLER I DENNE MANUALLEN

* Akumulator: BPL3650D
* Acumulator: BPL3650D
ELIBERAREA UNUI BLOCAJ
* Akumulators: BPL3650D
NOSPROSTOJUMA NOVĚRŠANA
* Akumulator: BPL3650D
OBOZNÁMTE SA S VAŠÍM PRODUKTOM
Pozrite stranu 189.
Diely
natural_image
Line drawing of a lawn mower with visible blades and handle (no text or symbols)
x 1
natural_image
Illustration of a small electronic device connected to a coiled cable, labeled 'x 1' (no text or symbols on the device itself)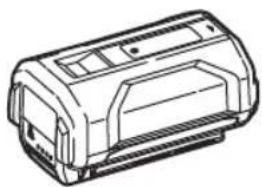
natural_image
Line drawing of a cylindrical electronic device with mounting holes and internal structure (no text or symbols)x 2

natural_image
Line drawing of a YOBI branded container (no text or symbols on the device itself)x 1x 1x
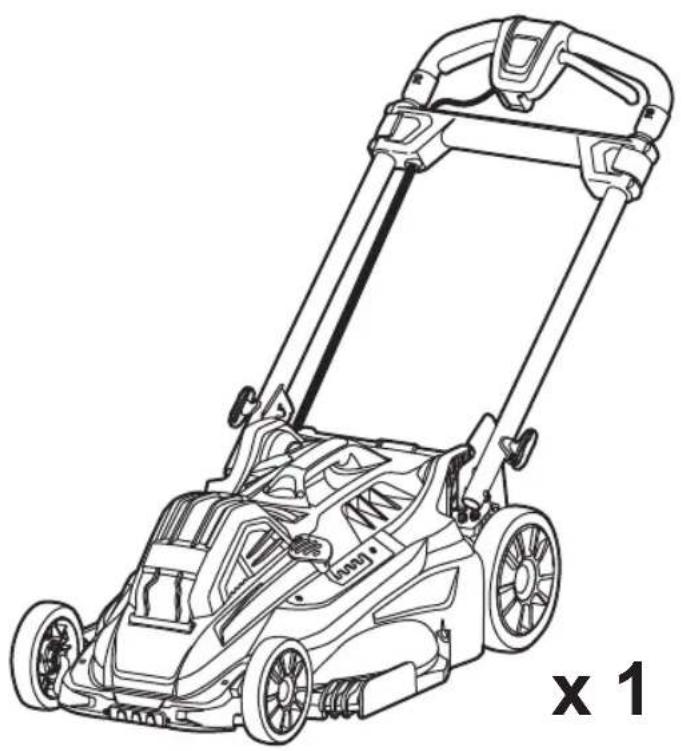
RLM36X46S5
natural_image
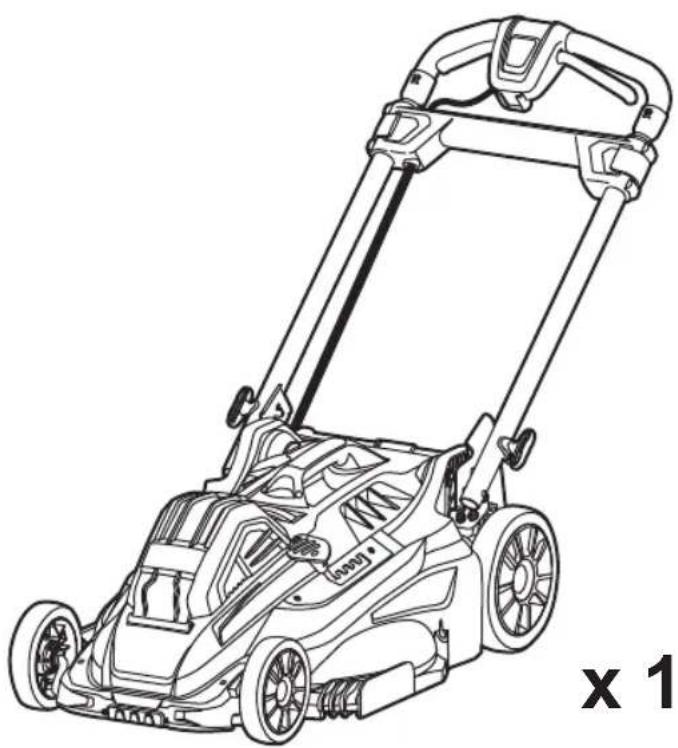
Line drawing of a lawn mower with visible frame and wheels (no text or symbols)
x 1
natural_image
Line drawing of a cylindrical electronic device with mounting holes (no text or symbols)x 1
natural_image
Line drawing of a mechanical device with a coiled cable and 'x 1' label (no text or symbols on the device itself)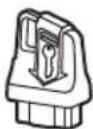
natural_image
Line drawing of a YOBI plastic container with no text or symbols on the bodyx 1x 1x

RLM36B46S
natural_image
Line drawing of a lawn mower with visible blades and handle (no text or symbols)x 1 x 1


natural_image
Line drawing of a YOBI branded container (no text or symbols on the device itself)x 1x 1x
natural_image
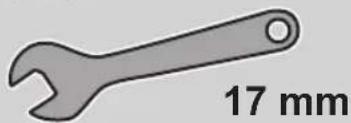
Illustration of a wrench with a 17 mm measurement label (no other text or symbols)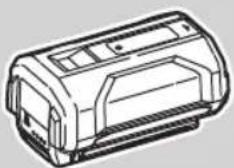
natural_image
Line drawing of a cylindrical electronic device with mounting brackets (no text or symbols)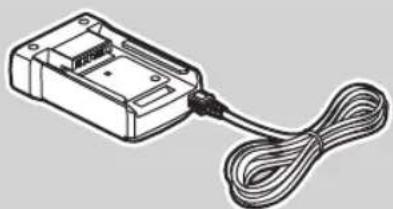
natural_image
Illustration of a small electronic device with a coiled cable (no text or symbols)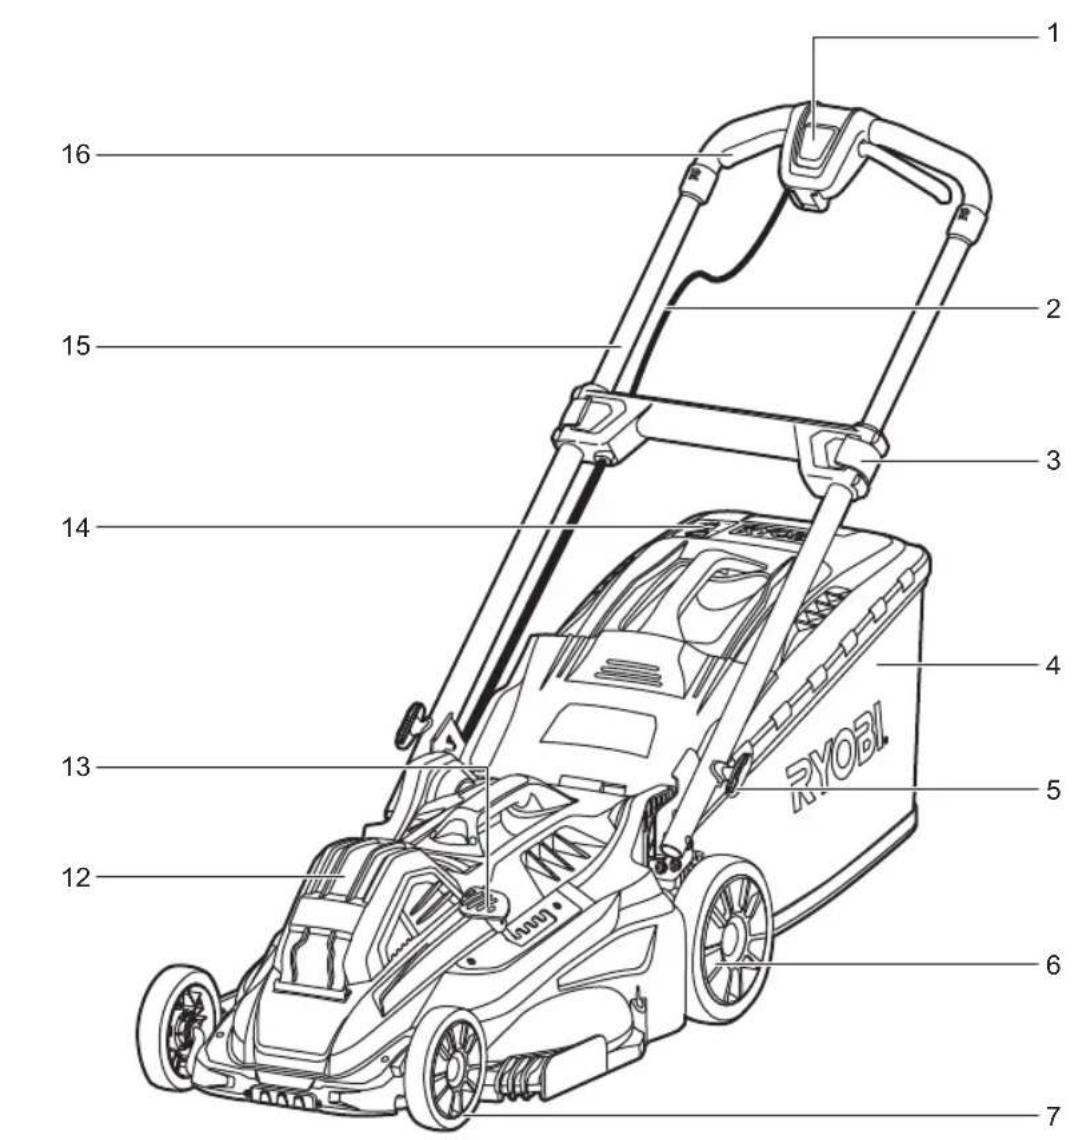
natural_image
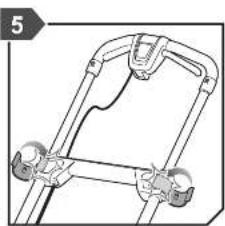
Mechanical clamp assembly diagram showing a bracket and lever mechanism (no text or labels)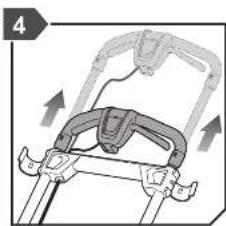
natural_image
Mechanical component diagram showing a bracket with arrows indicating motion direction (no text or symbols)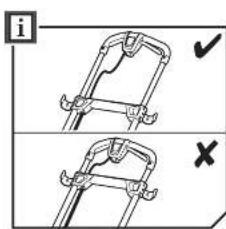
natural_image
Mechanical component diagram showing a bracket with two wheels and a handle (no text or symbols)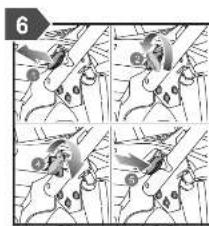
natural_image
Diagram of a manual lawn mower with a hand tool inserted, showing motion direction (no text or symbols)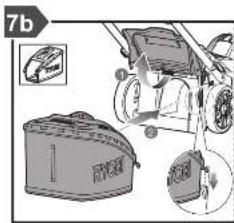
natural_image
Line drawing of a lawn mower with a grassy slope and a tool, no text or symbols present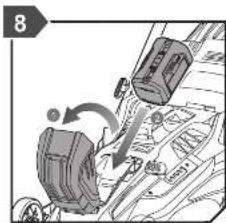


natural_image
Line drawing of a lawn mower with grass and a tractor, no text or symbols present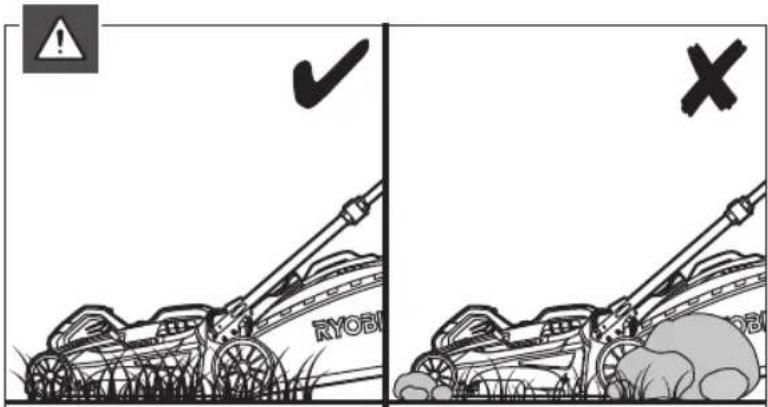
natural_image
Line drawing of a lawn mower on grass, no text or symbols present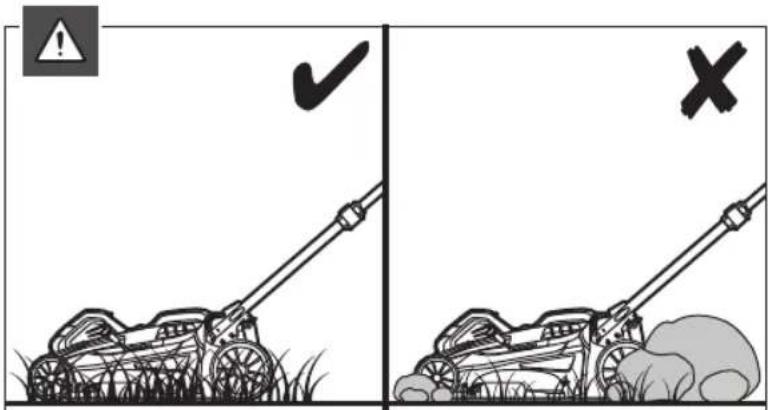
natural_image
Line drawing of a lawn mower with a side-mounted tool and a close-up inset showing the blade (no text or symbols)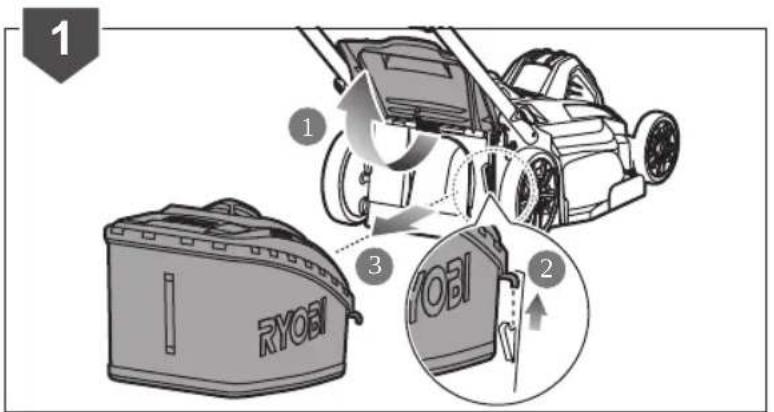
natural_image
Line drawing of a lawn mower with a device attached, showing mechanical components and a magnified inset (no text or symbols)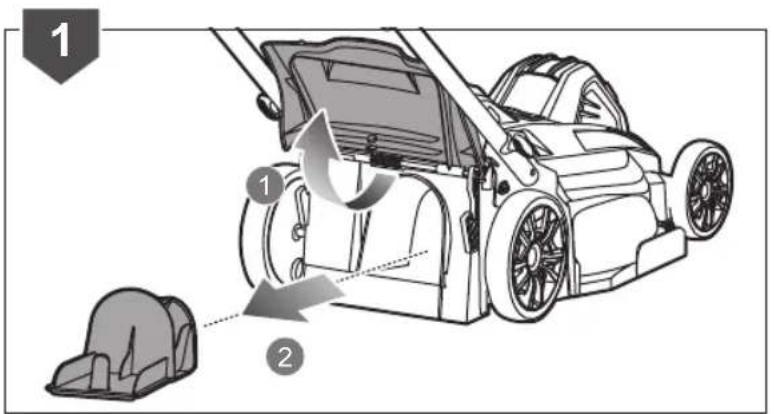
natural_image
Technical line drawing of a mechanical assembly with a highlighted circular detail (no text or symbols)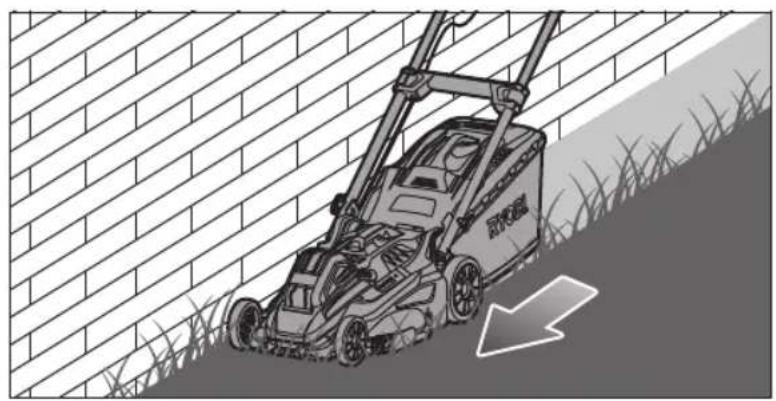
natural_image
Illustration of a lawn mower on a brick wall, with grass at the base and a downward arrow indicating direction (no text or symbols)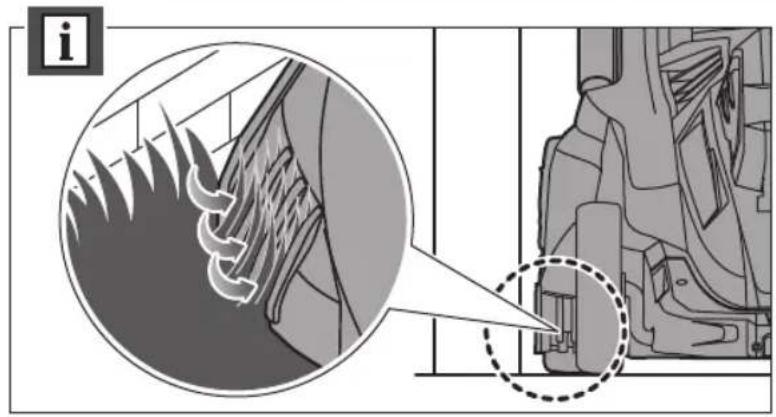
natural_image
Technical diagram showing a mechanical component with a magnified inset highlighting a specific section (no text or symbols present)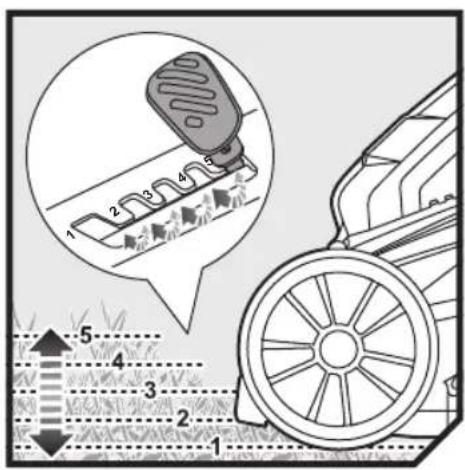
natural_image
Diagram of a lawn mower system with a motor and fan assembly (no text or labels)
natural_image
Technical illustration of a mechanical assembly with a brush and fan blade (no text or symbols)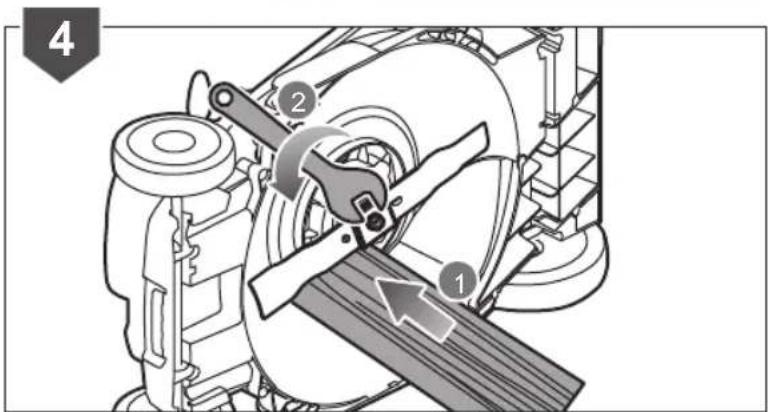

natural_image
Interior view of a car with dashboard and brush, showing cleaning patterns (no text or symbols)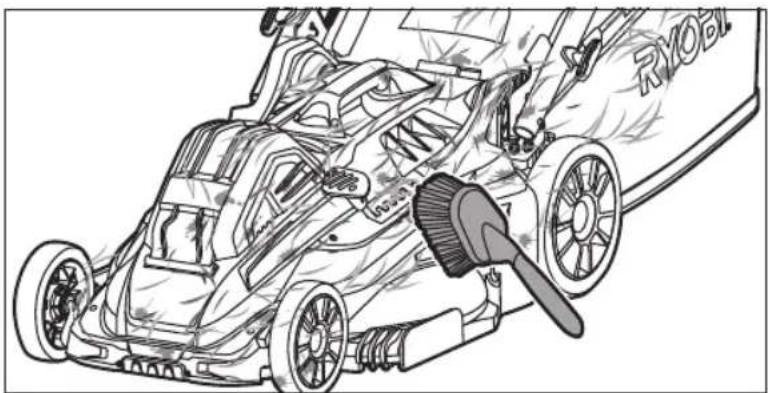
natural_image
Line drawing of a car's front view showing engine, wheels, and exhaust pipe (no text or symbols)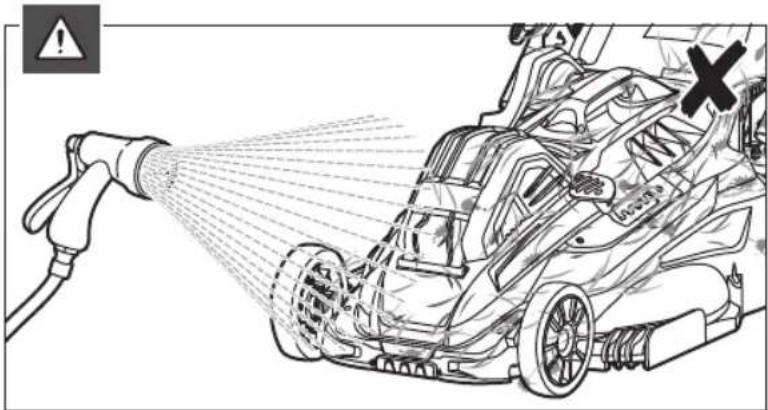
natural_image
Illustration of a car being sprayed with a hose, showing spray and exhaust components (no text or symbols)
natural_image
Illustration of a lawn mower with a magnified inset showing mechanical components (no text or symbols)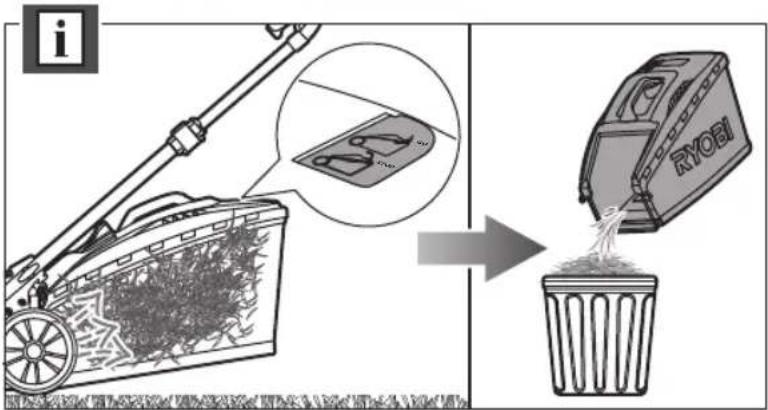

natural_image
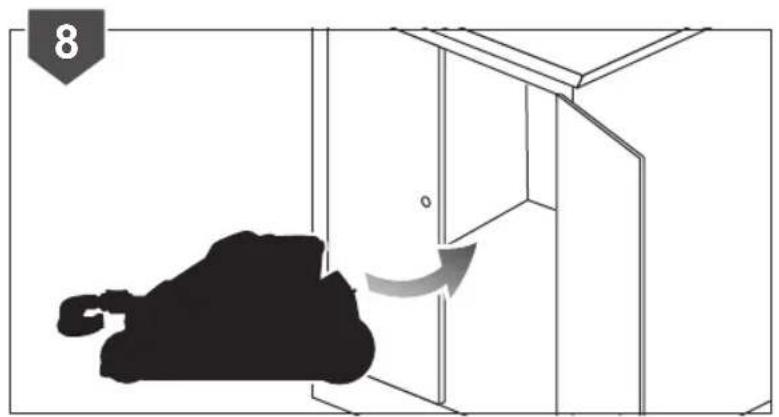
Simple line drawing of a cabinet with an open door and a black silhouette, showing a curved arrow indicating rotation (no text or symbols)
natural_image
Diagram of a mechanical device with rotating arms and adjustment arrows (no text or symbols)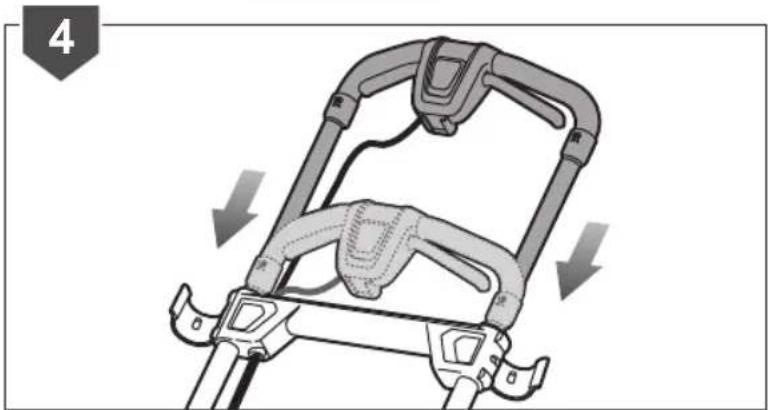
natural_image
Mechanical assembly diagram showing a clamp or bracket with directional arrows indicating motion (no text or symbols)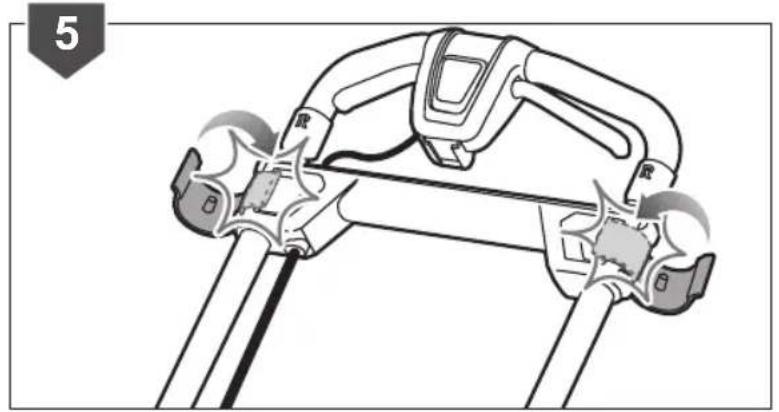
natural_image
Diagram of a mechanical device with labeled parts (R, B) and no readable text or symbols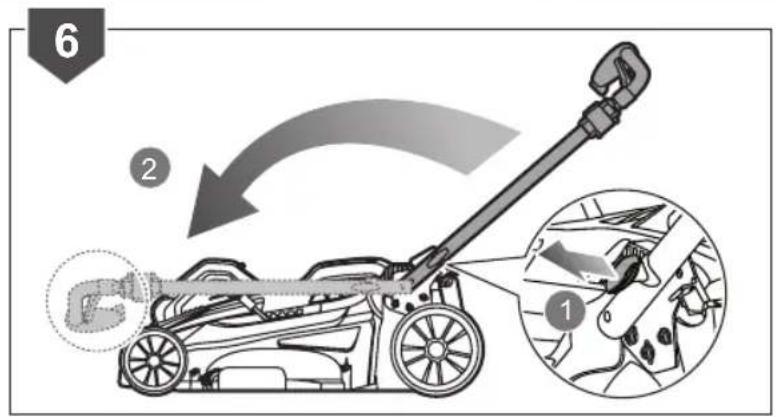

natural_image
Diagram showing a black silhouette of a person lying down inside a doorway with an arrow indicating motion (no text or symbols)


English Français Deutsch Español Italiano
| Product specifications | Caractéristiques produit Produkt-Spezifikationen Características del producto Caratteristiche del prodotto | |||
| Cordless lawn mower | Tondeuse à gazon sans fil Akku-Rasenmäher Cortacésped inalámbrico Tosaerba senza cavo | |||
| Model | Modèle | Modell | Modelo | Modello |
| Rated voltage | Tension nominale | Nennspannung | Tensión nominal | Voltaggio nominale |
| Ingress protection | Indice de protection IP | Eindringungsschutz | Protección de ingreso | Protezione ingresso |
| Width of cut | Largeur de coupe | Schnittbreite | Anchura de fresado | Larghezza di fresatura |
| Height of cut | Hauteur de coupe | Schnitthöhe | Altura del corte | Altezza del taglio |
| No-load speed | Vitesse de rotation à vide | Leerlaufgeschwindigkeit | Velocidad sin carga | Velocità senza carico |
| Weight (without battery) | Poids (sans batterie) | Gewicht (ohne Akku) | Peso (sin la batería) | Peso (senza batterie) |
| Grass catcher capacity | Capacité du bac de ramassage | Fassungsvermögen des Grasauffangbehälters | Capacidad colectora de césped | Capacità del contenitore di raccolta |
| Blade bolt tightening torque | Couple du boulon de serrage de lame | Drehmoment der Messerschraube | Par de torsión de los pernos de la cuchilla | Coppia di serraggio del bullone della lama |
| Vibration level (in accordance with Annex FF of EN 60335-2-77) | Niveau de vibration (selon l'Annexe FF de la norme EN 60335-2-77) | Vibrationsgrad (gemäß Anhang FF von EN 60335-2-77) | Nivel de vibración (de acuerdo con el Anexo FF de EN 60335-2-77) | Livello vibrazioni (secondo quanto disposto dall'Allegato FF della Direttiva EN 60335-2-77) |
| Right handle | Poignée droite | Rechter Haltegriff | Empuñadura derecha | Impugnatura destra |
| Left handle | Poignée gauche | Linker Haltegriff | Empuñadura izquierda | Manico sinistro |
| Uncertainty of measurement | Incertitude de la mesure | Unsicherheit der Messung | Incertidumbre de medición | Incertezza delle misurazioni |
| Declared vibration value | Valeur déclarée des vibrations | Angegebener Vibrationswert | Valor de vibración declarado | Valore dichiarato vibrazioni |
| Noise emission level (in accordance with Annex GG of EN 60335-2-77) | Niveau d'émission sonore (selon l'Annexe GG de la norme EN 60335-2-77) | Geräuschemission (gemäß Anhang GG von EN 60335-2-77) | Nivel de emisión de ruido (de acuerdo con el Anexo GG de EN 60335-2-77) | Livello di emissione rumore (secondo quanto disposto dall'Allegato GG della Direttiva EN 60335-2-77) |
| A-Weighted sound pressure level at operator's position | Niveau de pression sonore pondéré-A au niveau de l'opérateur | A-bewerteter Schalldruckpegel an der Position des Anwenders | Nivel de presión sonora ponderado A en la posición del operario | Livello di pressione sonora ponderata A alla posizione dell'operatore |
| Uncertainty of measurement | Incertitude de la mesure | Unsicherheit der Messung | Incertidumbre de medición | Incertezza delle misurazioni |
| A-Weighted sound power level | Niveau de puissance sonore pondéré-A | A-bewerteter Schallleistungspegel | Nivel de potencia acústica ponderada en A | Livello di potenza sonora pesato A |
| Uncertainty of measurement | Incertitude de la mesure | Unsicherheit der Messung | Incertidumbre de medición | Incertezza delle misurazioni |
| Noise emission level (in accordance with ISO 4871) | Niveau d'émission sonore (selon ISO 4871) | Schallenergiepegel (gemäß ISO 4871) | Nivel de emisión de ruido (de acuerdo con ISO 4871) | Livello di emissione rumore (in accordo con la direttiva ISO 4871) |
| Declared A-Weighted sound pressure level at operator's position | Niveau déclaré de pression sonore pondéré A au niveau de l'opérateur | Angegebener A-bewerteter Schalldruckpegel an der Position des Anwenders | Nivel declarado de presión sonora ponderado A en la posición del operario | Livello di pressione sonora pesato A dichiarato alla posizione dell'operatore |
| Declared A-Weighted sound power level | Niveau déclaré de puissance sonore pondéré-A | A-bewerteter Schallleistungspegel | Nivel declarado de potencia sonora ponderado A | Livello di pressione sonora pesato A dichiarato |
| Battery and charger | Batterie et chargeur | Akku und Ladegerät | Bateria y cargador | Batteria e caricatore |
| Model | Modèle | Modell | Modelo | Modello |
| Battery pack | Batterie | Akku | Bateria | Batteria |
| Weight | Poids | Gewicht | Peso | Peso |
| Charger | Chargeur | Ladegerät | Cargador | Caricatore |
| Compatible battery packs | Blocs de batteries compatibles | Kompatible Akkus | Paquetes de batería compatibles | Gruppo batterie compatibili |
| Compatible chargers | Chargeurs compatibles | Kompatibles Ladegerät | Cargador compatible | Caricatore compatibile |
| Replacement Part | Pièces de rechange | Ersatzteile | Piezas de repuesto | Parti di ricambio |
| Blade | Lame | Messer | Hoja | Lama |

| Nederlands Português Dansk Svenska | ||||
| Productgegevens Características | cas do aparelho Produktspecifikationer | fikationer Produktspecifikationer | ||
| Snoerloze grasmaaier | Corta-relva sem fios | Ledningsfri plæneklipper | Sladdlös gräsklippare | |
| Model | Modelo | Model | Modell | RLM36X46S5 / RLM36B46S / RLM36X46S240 |
| Toegekende spanning | Tensão nominal | Mærkespænding | Spänning | DC 36V |
| IP-beschermingsgraad | Protecção contra entrada | Indtrængningsbeskyttelse | Inträngningsskydd | IPX1 |
| Freesbreedte | Largura de fresagem | Fræsebredde | Fråsbredd | 46 cm |
| Hoogte van de snede | Altura de corte | Klippehøjde | Klipphöjd | 20-70 mm |
| Snelheid zonder lading | Velocidade sem carga | Tomgangshastighed | Hastighet utan belastning | 3000/min ^1 |
| Gewicht (zonder batterij) | Peso (sem a bateria) | Vægt (uden batteri) | Vikt (utan batteri) | 17,8 kg |
| Capaciteit grasvanger | Capacidade do saco de aparas | Græssamlerens kapacitet | Gråsuppsamlarens kapacitet | 55 L |
| Koppel voor mesbout | Binário de aperto do parafuso da lâmina | Moment for klingebolt | Åtdragningsmoment bladskruv | 35~40 Nm |
| Trillingsniveau (in overeenstemming met bijlage FF van EN 60335-2-77) | Nível de vibração (em conformidade com o Anexo FF de EN 60335-2-77) | Vibrationsniveau (iht. bilag FF til EN 60335-2-77) | Vibrationsnivå (enligt Annex FF i EN 60335-2-77) | |
| Rechter handvat | Pega direita | Højre håndtag | Höger handtag | 0,9 m/s ^2 |
| Linkerhandvat | Pega esquerda | Venstre håndtag | Vänster handtag | 1,0 m/s ^2 |
| Onzekerheid bij meting | Incerteza de medições | Målingsusikkerhed | Osäkerhet för mått | 1,5 m/s ^2 |
| Aangegeven trillingswaarde | Valor de vibração declarado | Deklareret vibrationsværdi | Deklarerat vibrationsvärde | 2,5 m/s ^2 |
| Geluidsemissieniveau (in overeenstemming met bijlage GG van EN 60335-2-77) | Nível de emissão de ruído (em conformidade com o Anexo GG de EN 60335-2-77) | Støjemissionsniveau (iht. bilag GG til EN 60335-2-77) | Bullerutsläppsnivå (enligt Annex GG i EN 60335-2-77) | |
| A-gewogen geluidsdrukniveau bij positie van gebruiker | Nível de pressão sonora ponderada A na posição do operador | A-vægtet lydtryksniveau ved operatørens position | A-viktad ljudtrycksnivå vid operatörsplats | 76,2 dB(A) |
| Onzekerheid bij meting | Incerteza de medições | Målingsusikkerhed | Osäkerhet för mått | 1,5 dB |
| A-gewogen geluidsniveau | Nível de potência sonora ponderada A | A-vægtet lydeffektniveau | A-vägd ljudeffektsnivå | 90,8 dB(A) |
| Onzekerheid bij meting | Incerteza de medições | Målingsusikkerhed | Osäkerhet för mått | 1,5 dB |
| Geluidsemissieniveau (in overeenstemming met ISO 4871) | Nível de emissão de ruído (em conformidade com ISO 4871) | Støjemissionsniveau (iht. ISO 4871) | Bullerutsläppsnivå (enligt ISO 4871) | |
| Aangegeven A-gewogen geluidsdrukniveau op de plaats van de bediener | Nível de pressão sonora ponderado A na posição do operador declarado | Deklareret A-vægtet lydtryksniveau ved operatørens position | Deklarerad A-viktad ljudtrycksnivå vid operatörsplats | 78 dB(A) |
| Aangegeven A-gewogen geluidsniveau | Nível de potência sonora ponderado A declarado | Deklareret A-vægtet lydeffektniveau | Deklarerad A-viktad ljudeffektsnivå | 92 dB(A) |
| Accu en oplader | Bateria e carregador | Batteri og oplader | Batteri och batteriladdare | |||
| Model | Modelo | Model | Modell | RLM36X46S5 | RLM36B46S | RLM36X46S240 |
| Accu | Bateria Batteri | Batteri | BPL3650D2 | - | BPL3640D2 x 2 | |
| Peso | Gewicht Vikt | Vægt | 1,4 kg | - 1,4 kg | ||
| Lader | Carregador | Oplader | Batteriladdare | RY36C60A | - | RY36C17A |
| Compatibele accupacks | Baterias compatíveis | Kompatible batterier | Kompatibla batteripaket | BPL3626 / BPL3626D / BPL3626D2/ BPL3640 / BPL3640D / BPL3650D / BPL3650D2 / BPL3640D2 | ||
| Compatibele oplader | Carregador compativel | Kompatibel oplader | Kompatibel laddare | BCL3620 / BCL3620S / BCL3650F / RY36C17A / RY36C60A | ||
The declared vibration value has been measured with a standard test method and may be used to compare one tool with another.
The declared vibration value may be used in a preliminary assessment of exposure.
The vibration emission during actual use of power tool can differ from the declared total value depending on the ways in which the tool is used.
Identify safety measures to protect yourself based on an estimation of exposure in the actual conditions of use, taking account of all parts of the operating cycle such as the times when the tool is switched off and when it is running idle in addition to the trigger time.
In addition to any statutory rights resulting from the purchase, this product is covered by a warranty as stated below.
-
The warranty period is 24 months for consumers and commences on the date the product was purchased. This date has to be documented by an invoice or other proof of purchase. The product is designed and dedicated to consumer and private use only. So there is no warranty provided in case of professional or commercial use. This warranty applies only on new products.
-
There is a possibility to extend for a part of the range of power tools (AC/DC) the warranty period over the period described above using the registration on the www.ryobitools.eu website. The eligibility of products for extended warranty is clearly displayed in stores and / or on packaging and is contained within the product documentation. The end user is required to register his/her newly-acquired products online within 30 days from the date of purchase. The end user may register for the extended warranty in his/her country of residence if listed on the online registration form where this option is valid. Furthermore, end users must give their consent to the storage of their personal data that is required to be entered online. They must also accept the terms and conditions. The registration confirmation receipt, which is sent out by e-mail, and the original invoice showing the date of purchase will serve as proof of the extended warranty.
-
The warranty covers all defects of the product during the warranty period due to faults in workmanship or material at the purchase date. The warranty is limited to repair and/or replacement and does not include any other obligations including but not limited to incidental or consequential damages. The warranty is not valid if the product has been misused, used contrary to the instruction manual, or has been incorrectly connected to a power supply. This warranty does not apply to: - any damage to the product that is the result of improper or lack of maintenance -any product that has been altered or modified
- any product where original identification (trade mark, serial number) markings have been defaced, altered or removed
-any damage caused by non-observance of the instruction manual
-any product not displaying the CE approval mark on the rating plate
- any product that has been attempted to be repaired by a non-authorised warranty service centre or without prior authorisation by Techtronic Industries
– any product connected to improper power supply (amps, voltage, frequency)
- any damage caused by external influences (water, chemical, physical, shocks) or foreign substances
-normal wear and tear spare parts
-inappropriate use, overloading of the tool -use of non-approved accessories or parts
- Power tool accessories provided with the tool or purchased separately, including but not limited to screw driver bits, drill bits, abrasive discs, sand paper and blades, lateral guide, etc.
- Components (parts and accessories) subject to natural wear and tear, including but not limited to service & maintenance kits, carbon brushes, bearings, chuck, SDS drill bit attachment or reception, power cord, auxiliary handle, transport carry case, sanding plate, dust bag, dust exhaust tube, felt washers, impact wrench pins & springs, etc.
-
For servicing, the product must be sent or presented to a RYOBI authorised service station listed for each country in the following list of service station addresses. In some countries your local RYOBI dealer undertakes to send the product to the RYOBI service organisation. When sending a product to a RYOBI service station, the product should be safely packed without any dangerous contents such as petrol, marked with sender's address and accompanied by a short description of the fault.
-
A repair / replacement under this warranty is free of charge. It does not constitute an extension or a new start of the warranty period. Exchanged parts or products become our property. In some countries delivery charges or postage will have to be paid by the sender. Your statutory rights arising from the purchase of the product remain unaffected
-
This warranty is valid in the European Community, Switzerland, Iceland, Norway, Liechtenstein, Turkey and Russia. Outside these areas, please contact your authorised RYOBI dealer to determine if another warranty applies.
AUTHORISED SERVICE CENTRE
Any request or issue with the product can be addressed to your local authorised service centres (visit www.ryobitools.eu) or directly to: Techtronic Industries GmbH, Max Eyth Straße 10, 71364 Winnenden, Germany. Please state the serial number and product type printed on the label.
FR RYOBI® CONDITIONS D'APPLICATION DE LA GARANTIE
DECLARATION OF CONFORMITY
Techtronic Industries GmbH
Max-Eyth-Straße 10, 71364 Winnenden, Germany
Herewith we declare that the product
Cordless Lawn Mower
Brand: RYOBI
Model number: RLM36B46S
Serial number range: 47552201000001 - 47552201999999
is in conformity with the following European Directives and harmonised standards
2006/42/EC, 2014/30/EU, 2000/14/EC, 2005/88/EC, 2011/65/EU,
EN 60335-1:2012+A11:2014+A13:2017, EN 60335-2-77:2010,
EN 55014-1:2017, EN 55014-2:2015, EN IEC 63000:2008
Measured sound power level: 90.8 dB(A)
Guaranteed sound power level: 92 dB(A)
Conformity assessment method to Annex VI Directive 2000/14/EC amended by 2005/88/EC.
The notified body involved:
Sr. Director, CPT Quality and Asia Regulatory & Safety
Authorised to compile the technical file:
Alexander Krug, Managing Director
Techtronic Industries GmbH
Max-Eyth-Straße 10, 71364 Winnenden, Germany

Max-Eyth-Straße 10, 71364 Winnenden, Germany
Max-Eyth-Straße 10, 71364 Winnenden, Germany

DÉCLARATION DE CONFORMITÉ
Techtronic Industries GmbH
Max-Eyth-Straße 10, 71364 Winnenden, Germany
Max-Eyth-Straße 10, 71364 Winnenden, Germany

Max-Eyth-Straße 10, 71364 Winnenden, Germany
Max-Eyth-Straße 10, 71364 Winnenden, Germany

Max-Eyth-Straße 10, 71364 Winnenden, Germany
Max-Eyth-Straße 10, 71364 Winnenden, Germany
Max-Eyth-Straße 10, 71364 Winnenden, Germany
Max-Eyth-Straße 10, 71364 Winnenden, Germany
NL CONFORMITEITSVERKLARING
Techtronic Industries GmbH
Max-Eyth-Straße 10, 71364 Winnenden, Germany
Max-Eyth-Straße 10, 71364 Winnenden, Germany
DA OVERENSSTEMMELSESERKLÆRING
Techtronic Industries GmbH
Max-Eyth-Straße 10, 71364 Winnenden, Germany
Vi erklærer hermed, at produktet
Akku-plæneklipper
Brand: RYOBI
Modelnummer: RLM36B46S
Serienummerområde: 47552201000001 - 47552201999999
Max-Eyth-Straße 10, 71364 Winnenden, Germany


KONFORMITETSDEKLARATION
Techtronic Industries GmbH
Max-Eyth-Straße 10, 71364 Winnenden, Germany
Max-Eyth-Straße 10, 71364 Winnenden, Germany

SAMSVARSERKLÆRING
Techtronic Industries GmbH
Max-Eyth-Straße 10, 71364 Winnenden, Germany
Max-Eyth-Straße 10, 71364 Winnenden, Germany

SÄÄNNÖSTEN NOUDATTAMINEN
Techtronic Industries GmbH
Max-Eyth-Straße 10, 71364 Winnenden, Germany
Max-Eyth-Straße 10, 71364 Winnenden, Germany

Max-Eyth-Straße 10, 71364 Winnenden, Germany
Max-Eyth-Straße 10, 71364 Winnenden, Germany

PL DEKLARACJA ZGODNOŚCI
Techtronic Industries GmbH
Max-Eyth-Straße 10, 71364 Winnenden, Germany
Max-Eyth-Straße 10, 71364 Winnenden, Germany
CS PROHLÁŠENÍ O SHODĚ
Techtronic Industries GmbH
Max-Eyth-Straße 10, 71364 Winnenden, Germany
Max-Eyth-Straße 10, 71364 Winnenden, Germany
HU MEGFELELŐSÉGI NYILATKOZAT
Techtronic Industries GmbH
Max-Eyth-Straße 10, 71364 Winnenden, Germany
Max-Eyth-Straße 10, 71364 Winnenden, Germany
RO DECLARATIE DE CONFORMITATE
Techtronic Industries GmbH
Max-Eyth-Straße 10, 71364 Winnenden, Germany
Alexander Krug, Director General
Techtronic Industries GmbH
Max-Eyth-Straße 10, 71364 Winnenden, Germany


ATBILSTĪBAS DEKLARĀCIJA
Techtronic Industries GmbH
Max-Eyth-Straße 10, 71364 Winnenden, Germany
Modela numurs: RLM36B46S
Max-Eyth-Straße 10, 71364 Winnenden, Germany

VASTAVUSDEKLARATSIOON
Techtronic Industries GmbH
Max-Eyth-Straße 10, 71364 Winnenden, Germany
Kinnitame, et see toode
Juhtmeta Muruniiduk
Mark: RYOBI
Mudeli number: RLM36B46S
Seerianumbri vahemik: 47552201000001 - 47552201999999
Max-Eyth-Straße 10, 71364 Winnenden, Germany

ATITIKTIES DEKLARACIJA
Techtronic Industries GmbH
Max-Eyth-Straße 10, 71364 Winnenden, Germany
Max-Eyth-Straße 10, 71364 Winnenden, Germany

IZJAVA O USKLAĐENOSTI
Techtronic Industries GmbH
Max-Eyth-Straße 10, 71364 Winnenden, Germany
Max-Eyth-Straße 10, 71364 Winnenden, Germany


IZJAVA O SKLADNOSTI
Techtronic Industries GmbH
Max-Eyth-Straße 10, 71364 Winnenden, Germany
Max-Eyth-Straße 10, 71364 Winnenden, Germany

PREHLÁSENIE O ZHODE
Techtronic Industries GmbH
Max-Eyth-Straße 10, 71364 Winnenden, Germany
Max-Eyth-Straße 10, 71364 Winnenden, Germany

Max-Eyth-Straße 10, 71364 Winnenden, Germany
Max-Eyth-Straße 10, 71364 Winnenden, Germany

Max-Eyth-Straße 10, 71364 Winnenden, Germany
Alexander Krug, Managing Director
Techtronic Industries GmbH
Max-Eyth-Straße 10, 71364 Winnenden, Germany


UYGUNLUK BEYANI
Techtronic Industries GmbH
Max-Eyth-Straße 10, 71364 Winnenden, Germany
Max-Eyth-Straße 10, 71364 Winnenden, Germany


EN RYOBI is a trade mark of Ryobi Limited, and is used under license.
71364 Winnenden, Germany