USER MANUAL WIFIWP10GY NEDIS
Wi-Fi Smart Irrigation Pump
automatically water up to 10 plants
WIFIWP10GY
A
B
C
![graph TD A["App 2"] --> B["A14 IN OUT"] B --> C["A15"] C --> D["A16"] D --> E["A10"] E --> F["A9"] F --> G["A11"] G --> H["Pot 8"] G --> I["Pot 9"] G --> J["Pot 11"] C --> K["A12 A13"] K --> L["A12"] L --> M["A13"] M --> N["A12"] N --> O["A13"] O --> P["A11"]](/content/2026/03/541227/images/0407ec05fb4c9e661c39bc0fb62a2702f9aa8056c292c3a756b9ca97f13151b2.jpg)

Quick start guide
WIFIWP10GY
Wi-Fi Smart Irrigation Pump

For more information see the extended manual online: ned.is/wifiwp10gy
Intended use
The Nedis WIFIWP10GY is a water control system that allows you to wirelessly schedule automatic irrigation via Wi-Fi connection.
The product can be controlled with the Nedis SmartLife app.
This product is intended for indoor and outdoor use. The product is not intended for professional use.
This product can be used by children aged from 8 years and above and persons with reduced physical, sensory or mental capabilities or lack of experience and knowledge if they have been given supervision or instruction concerning use of the product in a safe way and understand the hazards involved. Children shall not play with the product. Cleaning and user maintenance shall not be done by children without supervision.
Any modification of the product may have consequences for safety, warranty and proper functioning.
Specifications
| Product Wi-Fi Smart Irrigation Pump |
| Article number WIFIWP10GY |
| Dimensions (I x w x h) 81.5 x 87.5 x 77.5 mm |
| Weight 300g | |
| Input voltage 5.0 VDC; 1.0 A |
| Required power 5 W | |
| Battery type | 4 x 1.5 V AA (not included) |
| Max. radio transmit power | 17 dBm |
| Antenna gain 2.5 dBi | |
| Frequency range | 2.412 - 2.484 GHz |
| Operating temperature | 3 °C - 50 °C |
| Operating humidity 0 % – 90 % (RH) |
| Working water flow 23 L/hr |
| Working water pressure | 0.3 bar |
| Max. water pressure ≥ 200 kPa |
| Max. pumping height 3 m |
| Irrigation tube size 1/4" | |
| Irrigation frequency 1 hour - 7 days |
| Irrigation duration 6 seconds - 30 minutes |
| Irrigation amount Manual irrigation: open at any timeAutomatic irritation: accurate water output |
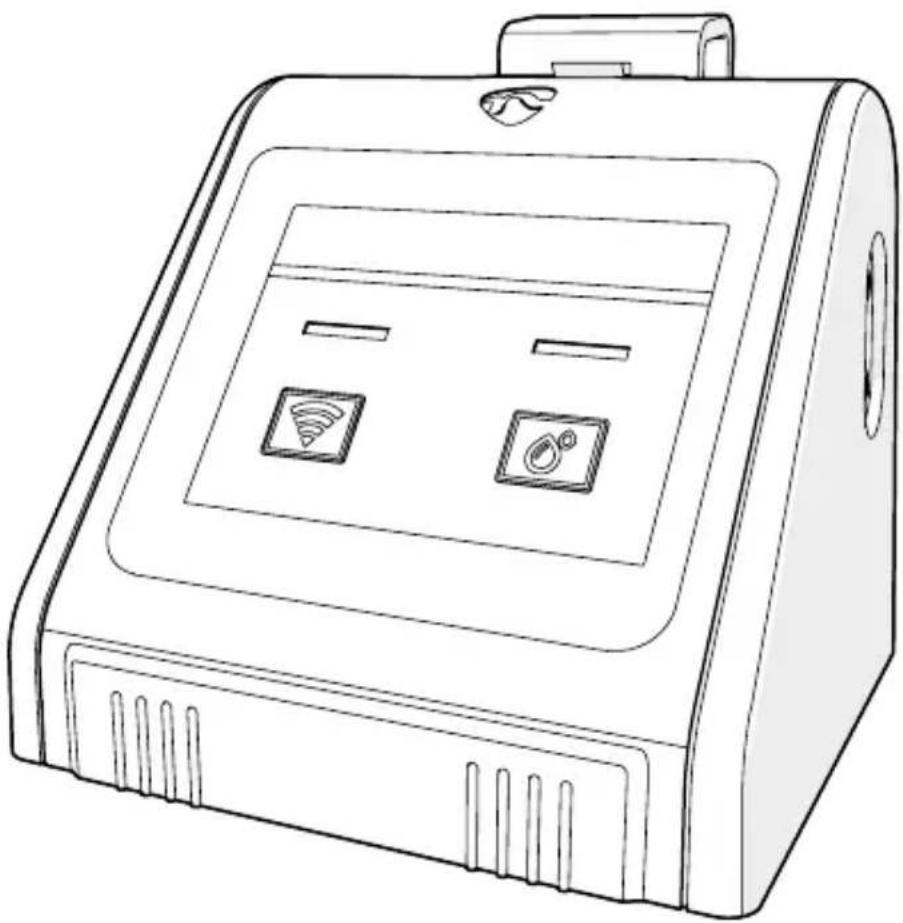
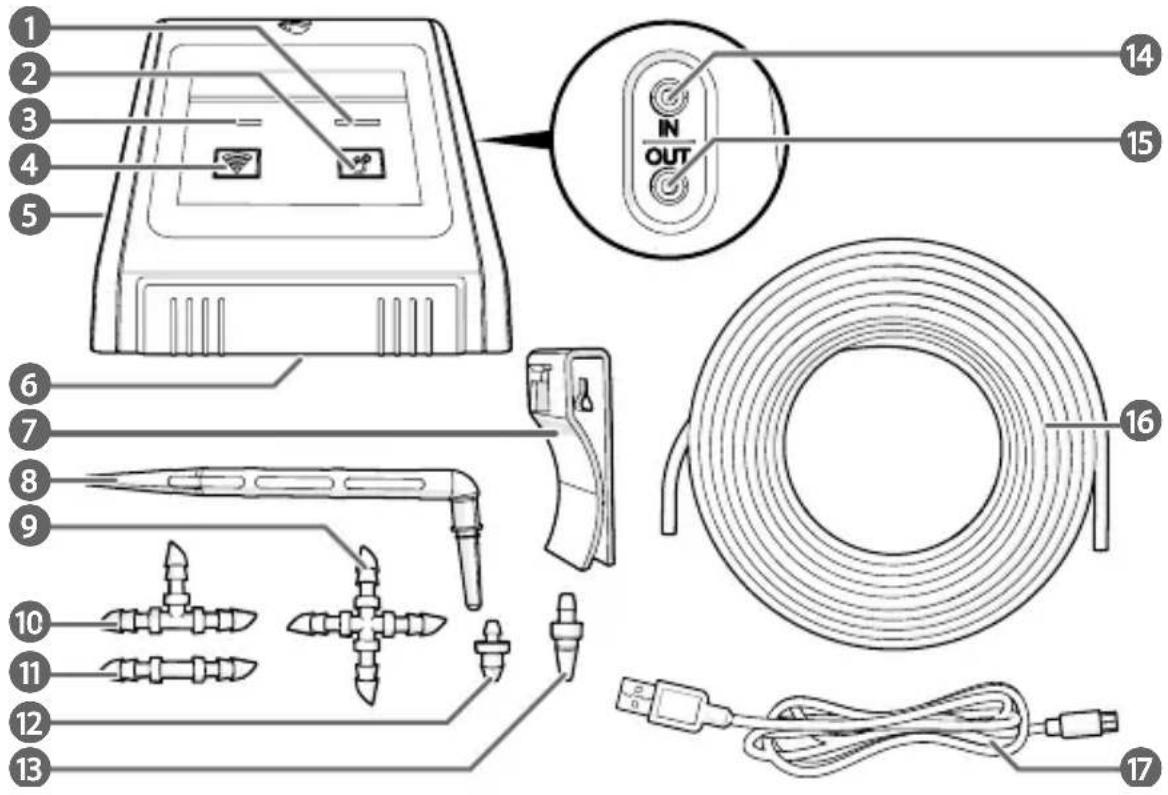
Main parts (image A)
1 Irrigation indicator LED
2 Manual irrigation button
3 Wi-Fi indicator LED
4 Wi-Fi button
5 Micro USB charging port
6 Battery compartment
7 Mounting clip
8 Arrow drippers (10x)
9 Cross connector (3x)
10 Tee connector (10x)
11 Straight connector (3x)
12 End plug (3x)
13 Water filter
14 Water inlet
15 Water outlet
16 Irrigation tube (10 m)
17 Micro USB cable
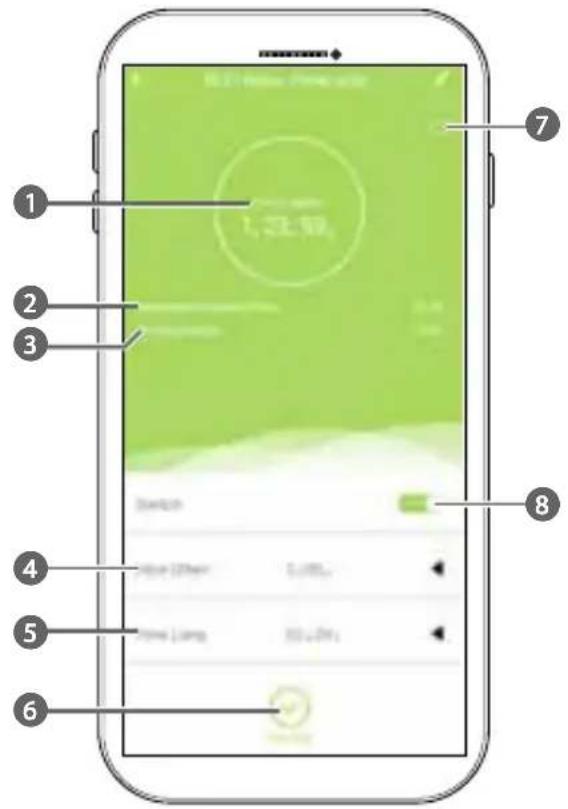
App overview (image B)
1 Remaining time until next irrigation
2 Remaining time until current irrigation ends
3 Working status
4 Irrigation frequency
5 Irrigation duration
6 Enable or disable automatic irrigation
7 Battery status
8 Switch to activate or deactivate manual irrigation
Safety instructions
WARNING
- Ensure you have fully read and understood the instructions in this document before you install or use the product. Keep the packaging and this document for future reference.
- Only use the product as described in this document.
- Do not use the product if a part is damaged or defective. Replace a damaged or defective product immediately.
- Close supervision is necessary when the product is used by or near children, animals or infirm persons. Do not allow children to play with it or touch it.
- Keep the product out of reach from children.
- Battery usage by children should be supervised.
- Only use batteries that correspond with the specifications.
- Do not use any cell or battery that is not designed for use with the product.
- Remove the battery before the product is scrapped.
- This product may only be serviced by a qualified technician for maintenance to reduce the risk of electric shock.
Installing the Nedis SmartLife app
- Download the Nedis Smartlife app for Android or iOS on your phone via Google Play or the Apple App Store.
- Open the Nedis Smartlife app on your phone.
- Create an account with your e-mail address and tap Continue.
You will receive a verification code on your e-mail address.
- Enter the received verification code.
- Create a password and tap Done.
- Tap Add Home to create a SmartLife Home.
- Set your location, choose the rooms you want to connect with and tap Done.
Adding the product to the Nedis SmartLife app
Plugging the micro USB cable A 17 is required to connect the product to a Wi-Fi network.
- Plug A17 into the micro USB charging port A5.
- Plug the other end of A 17 into a suitable 5.0 VDC ; 1.0 A USB power supply.
☐ not use a USB power supply with a higher voltage.
The Wi-Fi indicator LED A 3 blinks every 0.5 second to indicate the product is ready for pairing.
- Press and hold the Wi-Fi button A4 to activate the Wi-Fi pairing.
A 3 blinks every 1.5 seconds to indicate the product is searching for a Wi-Fi network.
- Tap + in the Nedis SmartLife app.
- Select the device type you want to add from the list.
- Follow the instructions in the Nedis SmartLife app.
Make sure you connect the product to a 2.4 GHz Wi-Fi network.
- Rename the product after it has been found and added.
- After confirming you can control the product with your smartphone.
To connect your SmartLife account to Amazon Alexa and/or Google Home, set it up using the "Smart Life" action or skill. For more details check the instruction on either Amazon or Google.
Placing the batteries (optional)
The product works either on batteries or with a micro USB cable and power adapter.
Connect the product from the power source before placing or removing batteries.
only size AA batteries (not included) for this product.
-
Open the battery compartment A6.
-
Place 4 batteries into A6.
Make sure to match the (+) and (-) polarity markings.
- Close A6.
Make sure A 6 is completely closed to ensure no water can run into A 6.
A 3 blinks 0.5 second on and 3 seconds off to indicate the batteries are connected.
Installing the product (image C)
- Position the product and a water reservoir. Choose between:
Option A:
Place the product on a flat, stable surface.
Place a water reservoir close to the product.
Option B:
Click the mounting clip A7 on the back of the product.
Use A 7 to mount the product to or near a water reservoir.
- Fill the water reservoir with water.
- Press the irrigation tube A16 into the water inlet A14.
- Cut a piece off A 16. Make sure A 16 reaches the bottom of the water reservoir.
- Connect A16 to the water filter A13.
- Place A16 in the water reservoir.
- Create an irrigation network using A 16 and the provided connectors A 9 10 11. See an installation example in image C.
- Insert the arrow drippers A 8 into the ends of A 16 for every irrigation point.
- off any remaining tube ends of A 16 with end plugs A 12 .
- Connect the irrigation network to the water outlet A 15.
Using the product
Connect the product when freezing temperatures are expected, to avoid potential freeze damage.
Use the app to set and operate the product.
For more information about the working and possibilities of the app, consult the extended manual online.
Manual irrigation
- Press the manual irrigation button A2 to irrigate the time set in the app.
The irrigation indicator LED A 1 lights up to indicate the product is irrigating.
- Press A2 to manually stop the cycle.
Automatic irrigation
Automatic irrigation is only available in the app.
Plugging A 17 is required to set or change the automatic irrigation settings.
-
Plug A17 into A5.
-
Plug the other end of A 17 into a suitable 5.0 VDC ; 1.0 A USB power supply.
☐ not use a USB power supply with a higher voltage.
- Set the desired irrigation frequency at How often B 4.
Select a delay between 1 hour and 7 days.
- Set the desired irrigation duration at B5.
Select a duration between 6 seconds and 30 minutes.
- Tap Auto Run E6 to start the automatic irrigation schedule.
After confirming the automatic irrigation settings, the Working Status B3 changes to Auto.
The product starts the countdown to the first irrigation at Next Irrigation B 1 .
The product starts irrigating for the selected duration. The Remaining Watering Time B 2
shows a countdown until the current irrigation ends.
When the first irrigation has finished, the product will irrigate again after the selected delay.
Status indicator LED
| Irrigation indicator LED A1 | Blinks every 0.5 second. | Lack of water. |
| Lights up. Irrigating. |
| Wi-Fi indicator LED A3 | Blinks every 0.5 second. | Ready for pairing. |
| Blinks every 1.5 seconds. | Searching for a Wi-Fi network. |
| Blinks every 3 seconds. | Batteries almost empty. |
| Blinks 0.5 second on and 3 seconds off. | Batteries connected. |
| Lights up. Paired | with a smartphone. |
We, Nedis B.V. declare as manufacturer that the product WIFIWP10GY from our brand Nedis ® , produced in China, has been tested according to all relevant CE standards and regulations and that all tests have been passed successfully. This includes, but is not limited to the RED 2014/53/EU regulation.
The complete Declaration of Conformity (and the safety datasheet if applicable) can be found and downloaded via:
nedis.com/wifiwp10gy#support
For additional information regarding the compliance, contact the customer service: Web: www.nedis.com
E-mail: service@nedis.com
Nedis B.V., de Tweeling 28
5215 MC 's-Hertogenbosch, the Netherlands

Kurzanleitung
Colocar as pilhas (opcional)
WiFi Smart- vandingspumpe

5215 MC 's-Hertogenbosch, the Netherlands