FHA 1100 B2 - Water pump FLORABEST - Free user manual and instructions
Find the device manual for free FHA 1100 B2 FLORABEST in PDF.

User questions about FHA 1100 B2 FLORABEST
0 question about this device. Answer the ones you know or ask your own.
Ask a new question about this device
Download the instructions for your Water pump in PDF format for free! Find your manual FHA 1100 B2 - FLORABEST and take your electronic device back in hand. On this page are published all the documents necessary for the use of your device. FHA 1100 B2 by FLORABEST.
USER MANUAL FHA 1100 B2 FLORABEST
natural_image
Exterior view of a modern electric motor (no signage or text visible on the device body)
HAUSWASSERAUTOMAT FHA 1100 B2
DE AT CH
HAUSWASSERAUTOMAT
Translation of original operation manual
IAN 85992
CH
DE AT CH
Before reading, unfold the page containing the illustrations and familiarise yourself with all functions of the device.
GB Translation of original operation manual Page34
Inhalt
Einleitung ....4
Bestimmungsgemäße
Verwendung ....4
Service Réparations ......23
Service-Center 23
Homepage:http://multiservices-
moulinoisplus.fr/

ASA Marina AG
Postfach 04
6949 Comano
IT CH
Contenuto
Intended purpose ....34
General description ......35
Scope of delivery 35
Overview 35
Functional description ......35
Technical data ......35
Notes on Safety ......36
Symbols in the manual 36
Symbols on the equipment .....36
General notes on safety 36
Initial Operation ....38
Assembly 38
Mains Connection ....38
Setting up 38
Connecting the hoses ....38
Filling the pump 38
Operational start-up 39
Starting the unit 39
Restarting the appliance....39
Maintenance Instructions ......39
General cleaning instructions .....39
Storage....40
Waste Disposal and Environmental
Protection ....40
Spare Parts Order ....40
Guarantee 40
Repair Service ....41
Service-Center ....41
Service Branch ....41
Translation of the original
EC declaration of conformity .....44
Exploded Drawing ......45
Introduction

Congratulations on the purchase of your new device. With it, you have chosen a high quality product.
The operating instructions constitute part of this product. They contain important information on safety, use and disposal.
Before using the product, familiarise yourself with all of the operating and safety instructions. Use the product only as described and for the applications specified.
Keep this manual safely and in the event that the product is passed on, hand over all documents to the third party.
Intended purpose
The home water dispenser is intended for use in private homes and gardens. The unit is suitable for service water supply and the irrigation of gardens. It is solely intended for pumping clear and rain water up to temperatures of no more than 35^ C.
Any other use, not expressly authorised in these instructions (e.g. for transporting foodstuffs, salt water, motor fuels, chemical products or water with abrasive materials), may cause damage to the equipment and represent a serious risk for the user.
The home water dispenser is not suitable for continuous duty. Continuous operation reduces the durability and shortens the guarantee period. This equipment is not suitable for commercial use.
Commercial use will invalidate the guarantee.
The operator or user is responsible for accidents or damage to other people or their property.
The manufacturer shall not be liable for damages caused by use other than for which the equipment is intended or by incorrect operation.
General Description
Scope of Delivery
- Home water dispenser
- Automatic switch
- Connecting piece
- Carrying handle
- Srews
- Instruction Manual
The diagram of the most important functional elements can be found on the foldout side.
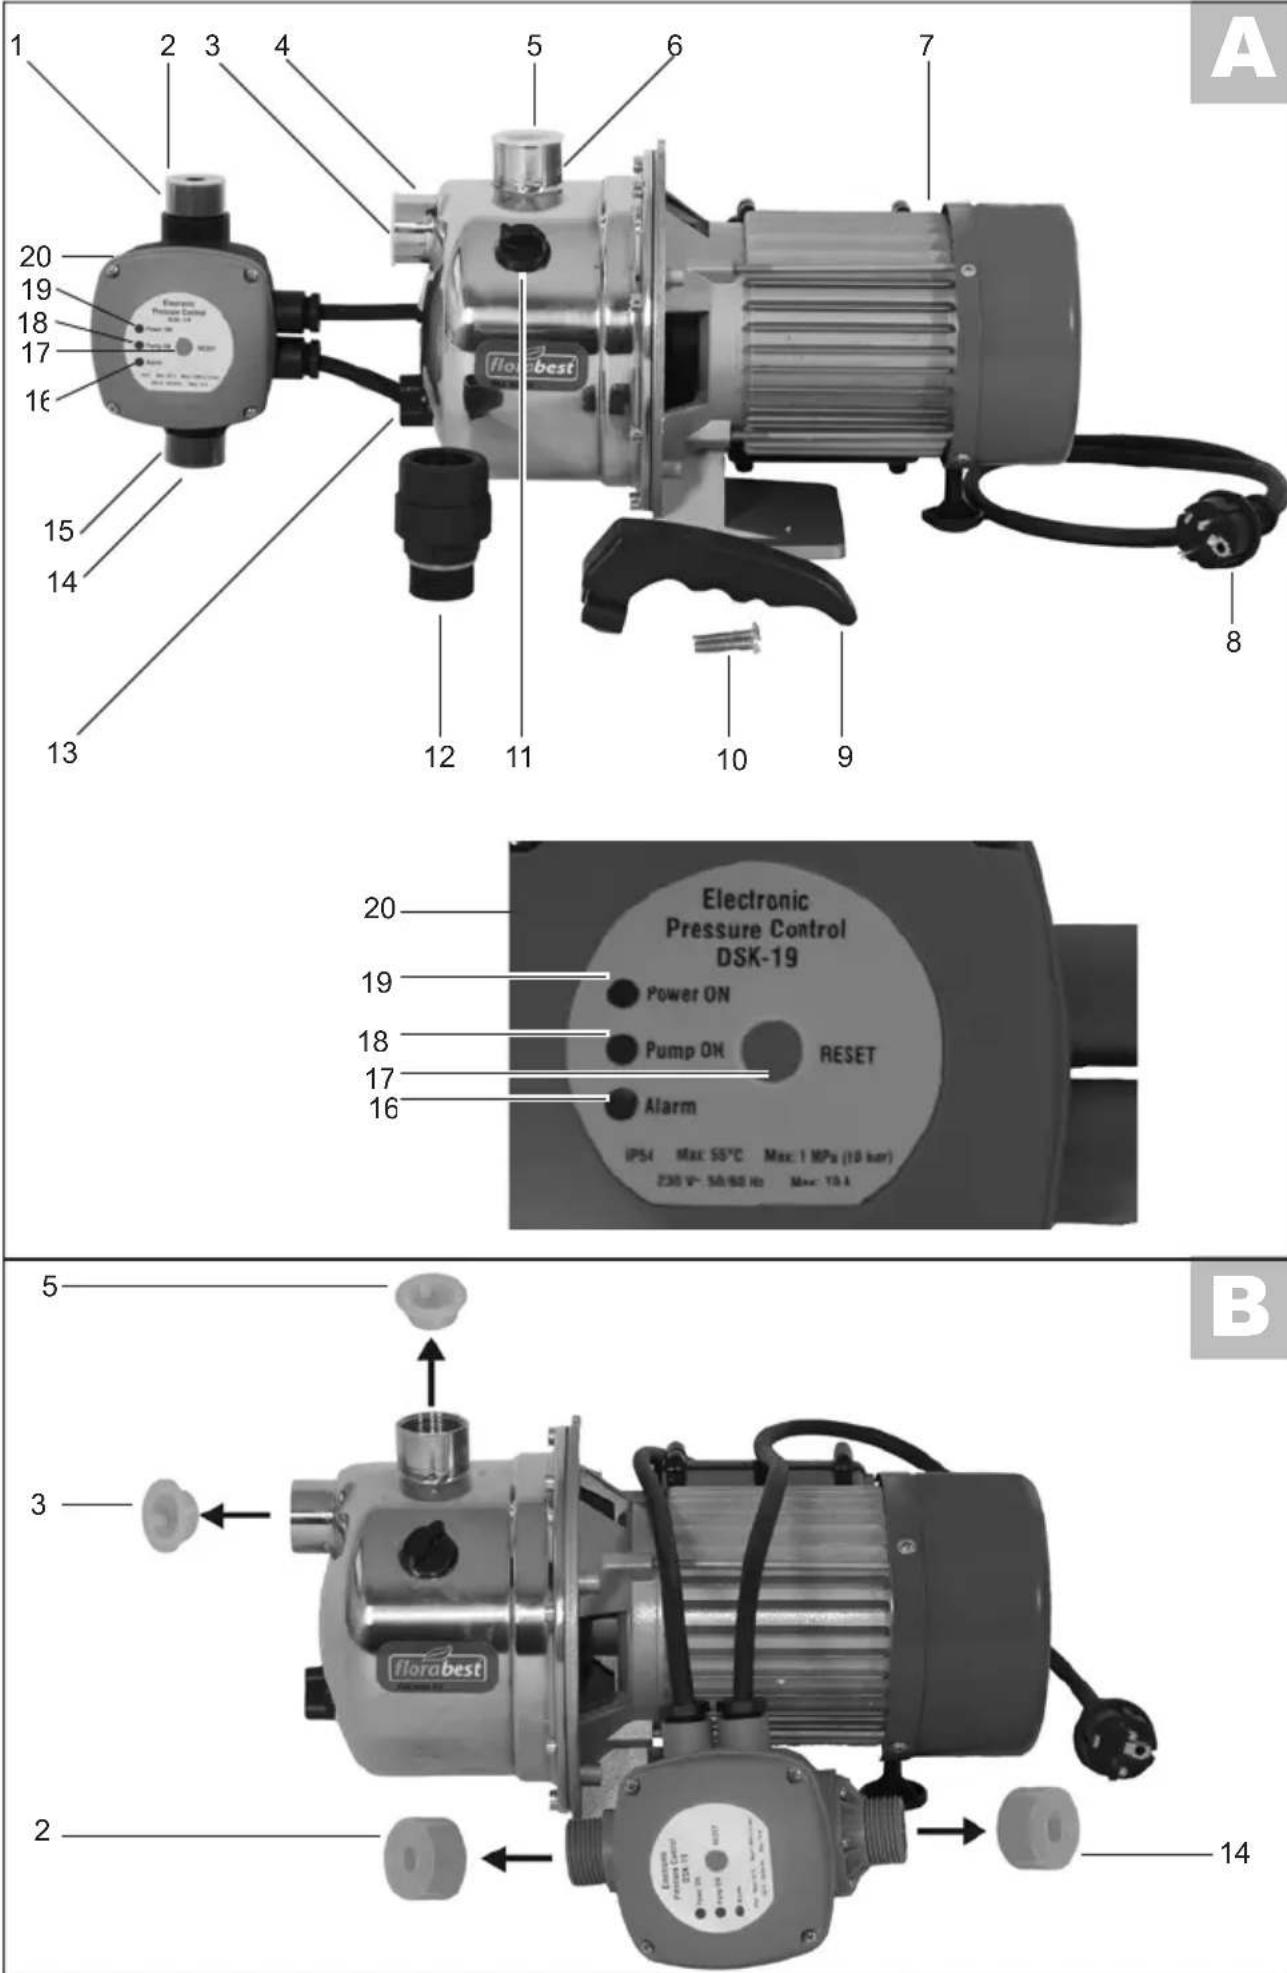
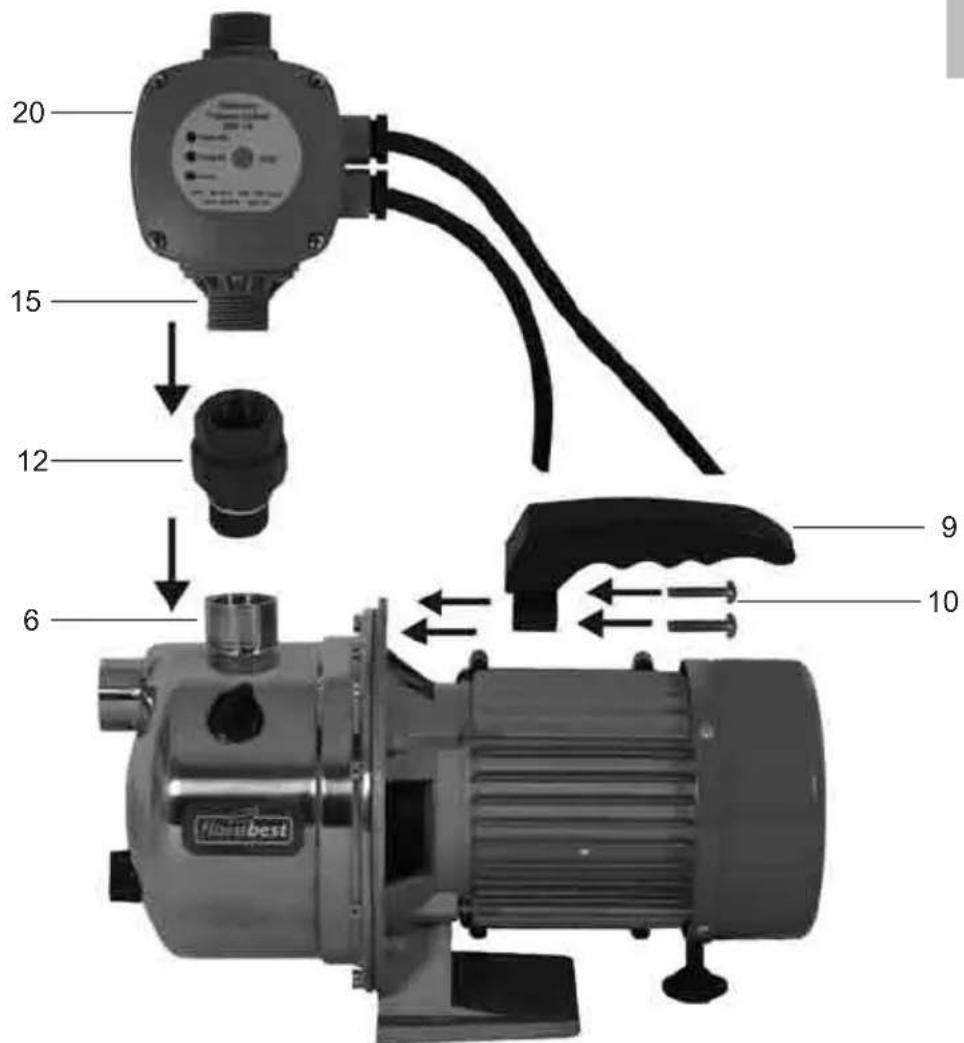
Overview
1 Water outlet, automatic switch 2 Protective cap for male thread
3 Protective cap for female thread
4 Water inlet, home water dispenser
5 Protective cap for female thread
6 Water outlet, home water dispenser
7 On/Off switch
8 Power cable
9 Carrying handle
10 Srews
11 Filler screw
12 Connecting piece
13 Draining screw
14 Protective cap for male thread
15 Water inlet, automatic switch
16 "Alarm" indicator
17 Restart switch
18 "Pump On" indicator
19 "Power On" indicator
20 Automatic switch
Functional description
The home water dispenser pumps water automatically. The pump will turn on and convey water at turn-on pressure. The turn-on point is set in the factory and cannot be adjusted by the user.
Read the sections below to learn more about each operating element's function.
Technical Data
Home water dispenser FHA 1100 B2
Mains connection .....230 V\~, 50 Hz
Power consumption ....1100 Watt
Suction lift 7 m
Max. discharge rate ....4.600 l/h
Max. discharge head 45 m
Max. water temperature 35 °C
Hose connection 1"
Turn-on pressure .....0,2 MPa (2,0 bar)
Turn-off pressure .....0,45 MPa (4,5 bar)
Maximum pressure .....1 MPa (10 bar)
Safety class ....
Degree of protection .....IPX4
Noise pressure
level (LpA) .....74 dB(A); KpA = 3,0 dB(A)
Noise performance level
(measured) / (LWA)
......88,2 dB(A); KWA = 2,89 dB(A)
Noise performance level
(guaranteed) 91 dB(A)
line
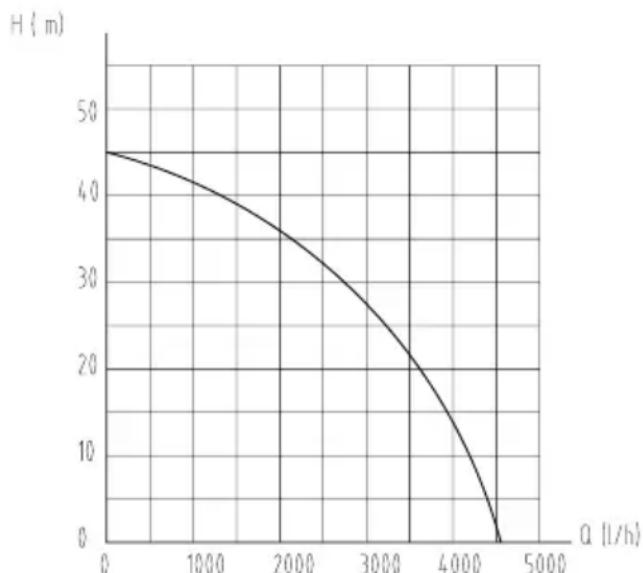
| α (l/h) | H (m) | | ------- | ----- | | 0 | 45 | | 1000 | 40 | | 2000 | 35 | | 3000 | 25 | | 4000 | 10 | | 4500 | 0 | | 5000 | 0 |The stated values relate to the use of the automatic domestic water pump without automatic switch DSK-19. The values may differ slightly as a result of use with the automatic switch.
Automatic switch ...... DSK-19
Degree of protection ..... IP54 Max. ambient temperature..... 55 °C Maximum pressure .....1 MPa (10 bar) Maximum current draw .....10 A Mains connection .....230V\~, 50/60 Hz
Technical and optical changes can be carried out in the course of further development without notice. All dimensions, references and information of this instruction manual are without guarantee. Legal claims, which are made on the basis of the instruction manual, cannot thus be considered as valid.
Notes on Safety
This section deals with the general safety regulations for working with the equipment.
Symbols in the manual

Warning symbols with information on damage and injury prevention.

Instruction symbols (the instruction is explained at the place of the exclamation mark) with information on preventing damage.

Help symbols with information on improving tool handling.
Symbols on the equipment

Do not use for water with a high sand content!

Read and follow the operating instructions provided for the device!

Attention: Remove the plug from the socket as soon as the power lead is damaged or cut.

Information of the acoustic power level LWA in dB
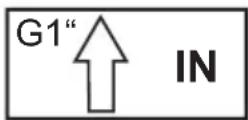
Water inlet
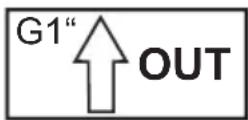
Water outlet
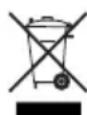
Electric appliances should not be disposed of in the domestic garbage.
General notes on safety
Working with the equipment:

Caution: to avoid accidents and injuries:
- This appliance is not intended for operation by persons (including children) with reduced physical, sensory or mental capabilities, or lacking experience and/or knowledge, unless they are under the supervision of or have been instructed on how to use the appliance by a person responsible for their safety.
- Keep the equipment away from children and pets. Children should be supervised in order to ensure that they do not play with the equipment.
- People who are unfamiliar with the operating instructions are not permitted to use the equipment. The operation of the equipment is not authorised for people under the age of 16.
- Should there be people in the water, do not operate the equipment.
- Take appropriate measures to keep children away from the equipment whilst it is running.
-
Dispose of the packaging material correctly.
-
Do not use the equipment in the vicinity of flammable liquids or gases. Non-observance will result in a risk of fire or explosion.
- Do not use for water containing abrasive particles such as sand. The dispensing of aggressive, abrasive (grinding effect), corrosive, combustible (e.g. motor fuels) or explosive liquids, salt water, cleaning agents and foodstuffs is not permitted. Liquid temperature not to exceed 35°C.
- Store the equipment in a dry place and out of reach of children.

Caution! To avoid damage to the equipment and any possible person injury resulting from this:
- Do not work with damaged or incomplete equipment, or with equipment that has been converted without the approval of the manufacturer. Before initial operation, have a specialist check that the required electrical protection measures are in place.
- Do not carry or fix the equipment by the cable or pressure line.
- Protect the equipment from frost and from running dry.
- Use only original accessories and do not carry out conversion work on the equipment.
- Please read the notes in the operating instructions on the topic of "maintenance and cleaning". Any measures above and beyond these, particularly opening the equipment, are to be carried out by an electrician. In the case of repairs, always contact our service centre.
Electrical safety:

Caution: to avoid accidents and injuries from electric shocks:
- After erection, the mains plug must be freely accessible when the equipment is in operation.
- Before operating your new pump, have a specialist check:
- The earthing, the protective multiple earthing; the residual current circuit breaking must be compliant with the safety regulations of the energy supply company and function without fault,
- The protection of the electrical plug connections from the wet.
- If there is a risk of flooding, fix the plug connections in an area that is safe from flooding.
- Ensure that the mains voltage matches the specifications on the rating plate.
- The electrical installation shall be according to national wiring rules.
- Connect the equipment only to a socket with a residual current protection device (residual current circuit breaker) with a rated current of not more than 30 mA; minimum fuse 10 amperes.
- Before each use, check the equipment, cable and plug for damage. Defective cables are not to be repaired, but rather replaced by new ones. Have any damage to your equipment repaired by a specialist.
- If the power cable for this equipment is damaged, it must be replaced by the manufacturer, a customer service agent of the same or a similarly qualified person in order to prevent hazards.
- Do not pull the plug from the socket by the cable. Protect the cable from heat, oil and sharp edges.
- Do not carry or fix the equipment by the cable.
-
Use only extension cables that are protected from spray water and designed for outdoor use. Always fully unroll a cable drum before use. Check the cable for damage.
-
Before any work on the equipment, during work breaks and in the case of non-use, remove the plug from the socket.
- The cross-section of mains connection lines must be no smaller than rubber hose lines with the designation H07RN-F. The line must be 10 m long.
Initial Operation
Assembly

- Fix the carrying handle (9) to the domestic water pump using the fixing screws (10).
- To permanently install the home water dispenser, screw it to the ground. Screwing it to a fixing panel will prevent the appliance from moving.
Mind not to obstruct the access to the draining screw (13).
Mains Connection
The pump you have purchases is already fitted with an earthed plug. The pump is intended for connection to an earthed socket at 230 V \~ 50Hz.
Setting up
- Place the unit on a firm, horizontal, non-flooding surface.
- Always put up the home water dispenser at a point higher than the water surface you wish to pump water from.
Where this is impossible, install a low pressure-resistant shut-off implement between the appliance and the suction hose (Available from specialist retailers). - Remove the protective cap (5) from the domestic water pump water outlet (6). Fit the connecting piece (12) to the domestic water pump water outlet (6).
- Remove the protective cap (14) from the automatic switch water inlet (15). Fit the automatic switch (20) to the connecting piece 12).
Connecting the hoses
On the suction side, attach a hose with reflow stopper and install a prefilter (Available from specialist retailers). On the suction side, do not use any quick-action connection systems.
All screw connections must be fitted with a sealing strip if the domestic water pump is used inside the house.
- Remove the protective cap (3) from the domestic water pump water inlet (4). Fill the suction line with water (please continue to fill the suction line with water until all of the air has escaped). Fit the suction line to the domestic water pump water inlet (4).
- Remove the protective cap (2) from the automatic switch water outlet (1).
Attach a pressure hose to the automatic switch's water outlet fitting (A 1).
Air in the suction hose will stop the house water dispenser from working properly. Observe the directions in the chapter "Filling the Pump".
Filling the pump
Fill up the house water dispenser every time before you start using it. This will ensure an immediate start. Running dry will destroy the pump.
- Open the filling screw (11) on the domestic water pump.
- Fill with water to the fill point such that water starts to run out of the filling screw (11) hole.
• Retighten the filling screw (11).
Operational start-up

- Check that the electrical connection is 230V \~50Hz
- Check the proper status of the electrical plug socket and make sure that the plug socket is sufficiently fused (at least 10 A). Insert the pump plug into the plug socket and the pump is ready for operation.
- Make sure that moisture or water never come in contact with the mains connection.
There is a risk of electrocution.
Starting the unit
- Connect the power cable of the automatic switch (A8) to the power supply.

When you connect the appliance to the mains, all lamps will first of all light up.
- Set the On/Off switch ( A 7) to turn on the unit.
- The "Power On" indicator (A 19) will light up to indicate that the unit is ready to operate.
- The "Pump On" indicator ( A 18) tells you that the pump is working.
- In the case of water withdrawal, the automatic switch is activated automatically and switches on the pump in the event of a pressure drop in the line. If the water withdrawal is stopped then the line pressure increases and the automatic switch automatically switches off the pump.
- The "Alarm" indicator (A 16) lights up when the appliance turns itself off automatically.
Restarting the appliance
- After the equipment is switched off automatically and the "Alarm" display (16) illuminated, press the restart switch (17).
- If restarting the appliance fails several times, fill up the pump with new water.
Maintenance Instructions
Clean and maintain your equipment regularly. This will guarantee its performance and long durability.

Ask our service centre to carry out any work that is not described in these instructions. Use only original parts.

Pull out the power plug before every maintenance operation. There is a risk of electrocution or of injury from moving parts.
General cleaning instructions
A reduction in pump feed output may be indicative of a blockage. In case the unit clogs up, remove the suction and pressure hoses. Dismantle the automatic switch (20) and flush water through the threaded hole on the pump in order to remove the foreign body.
Any measures above and beyond these, particularly opening the equipment, are to be carried out by an electrician. In the case of repairs, always contact our service centre.
Storage
- Keep the equipment clean, dry and out of the reach of children.
- To keep the pump when not in use, open the draining screw (13) and carefully drain the pump.
Waste Disposal and Environmental Protection
Be environmentally friendly. Return the tool, accessories and packaging to a recycling centre when you have finished with them. Hand the tool in at a recycling centre. The plastics and metal parts can be separated and recycled. Ask your Service Center about this.
Do not dispose of electrical appliances as unsorted municipal waste, use separate collection facilities. Contact you local government for information regarding the collection systems available. If electrical appliances are disposed of in landfills or dumps, hazardous substances can leak into the groundwater and get into the food chain, damaging your health and well-being. When replacing old appliances with new ones, the retailer is legally obligated to take back your old appliance for disposals at least free of charge.
Spare Parts Order
Use the service address or fax number supplied to order replacement parts.
Guarantee
Dear Customer, This equipment is provided with a 3-year guarantee from the date of purchase. In case of defects, you have statutory rights against the seller of the product. These statutory rights are not restricted by our guarantee presented below.
Terms of Guarantee
The term of the guarantee begins on the date of purchase. Please retain the original receipt. This document is required as proof of purchase.
If a material or manufacturing defect occurs within three years of the date of purchase of this product, we will repair or replace – at our choice – the product for you free of charge. This guarantee requires the defective equipment and proof of purchase to be presented within the three-year period with a brief written description of what constitutes the defect and when it occurred.
If the defect is covered by our guarantee, you will receive either the repaired product or a new product. No new guarantee period begins on repair or replacement of the product.
Guarantee Period and Statutory Claims for Defects
The guarantee period is not extended by the guarantee service. This also applies for replaced or repaired parts. Any damages and defects already present at the time of purchase must be reported immediately after unpacking. Repairs arising after expiry of the guarantee period are chargeable.
Guarantee Cover
The equipment has been carefully produced in accordance with strict quality guidelines and conscientiously checked prior to delivery.
The guarantee applies for all material and manufacturing defects. This guarantee does not extend to cover product parts that are subject to normal wear and may therefore be considered as wearing parts (e.g. filters or attachments) or to cover damage to breakable parts (e.g. switches, batteries, or parts made of glass).
This guarantee shall be invalid if the product has been damaged, used incorrectly or not maintained. Precise adherence to all of the instructions specified in the operating manual is required for proper use of the product. Intended uses and actions against which the operating manual advises or warns must be categorically avoided.
The product is designed only for private and not commercial use. The guarantee will be invalidated in case of misuse or improper handling, use of force, or interventions not undertaken by our authorised service branch.
Processing in Case of Guarantee
To ensure quick handling of you issue, please follow the following directions:
- Please have the receipt and item number (e.g. IAN 12345) ready as proof of purchase for all enquiries.
- Please find the item number on the rating plate, an engraved plate on the front page of your manual (bottom left) or as a sticker on the back or bottom.
- Should functional errors or other defects occur, please initially contact the service department specified below by telephone or by e-mail. You will then receive further information on the processing of your complaint.
- After consultation with our customer service, a product recorded as defective can be sent postage paid to the service address communicated to you, with the proof of purchase (receipt) and specification of what constitutes the defect and when it occurred. In order to avoid acceptance problems and
additional costs, please be sure to use only the address communicated to you. Ensure that the consignment is not sent carriage forward or by bulky goods, express or other special freight. Please send the equipment inc. all accessories supplied at the time of purchase and ensure adequate, safe transport packaging.
Repair Service
For a charge, repairs not covered by the guarantee can be carried out by our service branch, which will be happy to issue a cost estimate for you.
We can handle only equipment that has been sent with adequate packaging and postage.
Attention: Please send your equipment to our service branch in clean condition and with an indication of the defect.
Equipment sent carriage forward or by bulky goods, express or other special freight will not be accepted.
We will dispose of your defective devices free of charge when you send them to us.

Service-Center
Service Great Britain
Tel.: 0871 5000 720
(£ 0.10/Min.)
E-Mail: grizzly@lidl.co.uk
IAN 85992

Service Branch
Please note that the following address is not a service address. Please initially contact the service centre specified above.
DES UK Ltd.
Unit B7
Oxford Street Industrial Park
Vulcan Road
Bilston, West Midlands WV14 7LF
| DEATCH | Original CE Konformitätserklärung |
| Hiermit bestätigen wir,dass derHauswasserautomatBaureihe FHA 1100 B2Seriennummern 201301000001-201301026000ab Baujahr 2013 folgenden einschlägigen EU-Richtlinien in ihrer jeweils gültigen Fassung entspricht: | |
| 2006/95/EC • 2004/108/EC • 2000/14/EC • 2011/65/EU | |
| Um die Übereinstimmung zu gewährleisten, wurden folgende harmonisierte Normen sowie nationale Normen und Bestimmungen angewendet: | |
| EN 60335-1/A15 • EN 60335-2- 41:2003+A2EN 55014-1:2006/A2:2011 • EN 55014-2/A2:2008 • EN 61000-3-2:2006/A2:2009EN 61000-3-3:2008 • EN 62233:2008EN 60730-1:2000+A1+A16 • EN 60730-2-6:2008 | |
| Zusätzlich wird entsprechend der Geräusch-emissionsrichtlinie 2000/14/EC bestätigt:Schallleistungspegel:Garantiert: 91 dB(A);Gemessen: 88,2 dB(A)Angewendetes Konformitätsbewertungsverfahren entsprechendAnh. V / 2000/14/EC | |
 | Grizzly Gartengeräte GmbH & Co. KGAm Gewerbepark 2D-64823 Groß-Umstadt / 07.02.2013  Oliver ChristDokumentationsbevollmächtigter Oliver ChristDokumentationsbevollmächtigter |
| FRCH Traduction de la déclaration de conformité CE originale | ITCH Traduzione della dichiarazione di conformità CE originale |
| Nous certifions par la présente que le modèleAutomate d’eau domestiquesérie FHA 1100 B2Numéro de série 201301000001-201301026000est conforme depuis l’année de construction 2013 aux directives UE actuellement en vigueur : | Con la presente dichiariamo che Sistema automatico per aqua domestica serie di costruzione FHA 1100 B2Numero di serie 201301000001-201301026000a partire dall’anno di costruzione 2013 corrisponde alle seguenti direttive UE in materia nella rispettiva versione valida: |
| 2006/95/EC • 2004/108/EC • 2000/14/EC • 2011/65/EU | |
| En vue de garantir la conformité les normes harmonisées ainsi que les normes et décisions nationales suivantes ont été appliquées : | Per garantire la conformità sono state applicate le seguenti norme armonizzate e anche le norme e disposizioni nazionali che seguono: |
| EN 60335-1/A15 • EN 60335-2- 41:2003+A2EN 55014-1:2006/A2:2011 • EN 55014-2/A2:2008 • EN 61000-3-2:2006/A2:2009EN 61000-3-3:2008 • EN 62233:2008EN 60730-1:2000+A1+A16 • EN 60730-2-6:2008 | |
| De plus, conformément à la directive sur les émissions de bruit 2000/14/EC, nous confirmons :Niveau de puissance sonore garanti: 91 dB(A)mesuré: 88,2 dB(A)Procédé utilisé pour l’évaluation de la conformité en fonction de l’annexe V / 2000/14/EC | Si dichiara inoltre in conformità alla direttiva 2000/14/EC sull’émissione acustica ambientale:Livello di potenza sonoragarantita: 91 dB(A)misurata: 88,2 dB(A)Procedura della valutazione della conformità applicata come da allegato V / 2000/14/EC |
 Grizzly Gartengeräte GmbH & Co. KG Am Gewerbepark 2 D-64823 Groß-Umstadt / 07.02.2013 Grizzly Gartengeräte GmbH & Co. KG Am Gewerbepark 2 D-64823 Groß-Umstadt / 07.02.2013  Oliver Christ Chargé de documentation Responsabile documentazione tecnica Oliver Christ Chargé de documentation Responsabile documentazione tecnica | |
| GB Translation of the original EC declaration of conformity | |
| We hereby confirm that theHome water dispenserDesign Series FHA 1100 B2Serial number 201301000001-201301026000conforms with the following applicable relevant version of the EU guidelines as of model year 2013 : | |
| 2006/95/EC • 2004/108/EC • 2000/14/EC • 2011/65/EU | |
| In order to guarantee consistency, the following harmonised standards as well as national standards and stipulations have been applied: | |
| EN 60335-1/A15 • EN 60335-2- 41:2003+A2EN 55014-1:2006/A2:2011 • EN 55014-2/A2:2008 • EN 61000-3-2:2006/A2:2009EN 61000-3-3:2008 • EN 62233:2008EN 60730-1:2000+A1+A16 • EN 60730-2-6:2008 | |
| We additionally confirm the following in accordance with the 2000/14/EC emissions guideline:Guaranteed sound power level: 91dB(A)Measured sound power level: 88,2 dB(A)Compliance evaluation process carried out in accordance with Appendix V, 2000/14/EC | |
 Grizzly Gartengeräte GmbH & Co. KGAm Gewerbepark 2D-64823 Groß-Umstadt / 07.02.2013 Grizzly Gartengeräte GmbH & Co. KGAm Gewerbepark 2D-64823 Groß-Umstadt / 07.02.2013  Oliver ChristDocumentation Representative Oliver ChristDocumentation Representative | |
text_image
Exploded view diagram of a mechanical assembly with numbered parts for identificationinformativ, informatif, informativo, informative
2013-01-11-rev02-op
C
text_image
20 15 12 6 9 10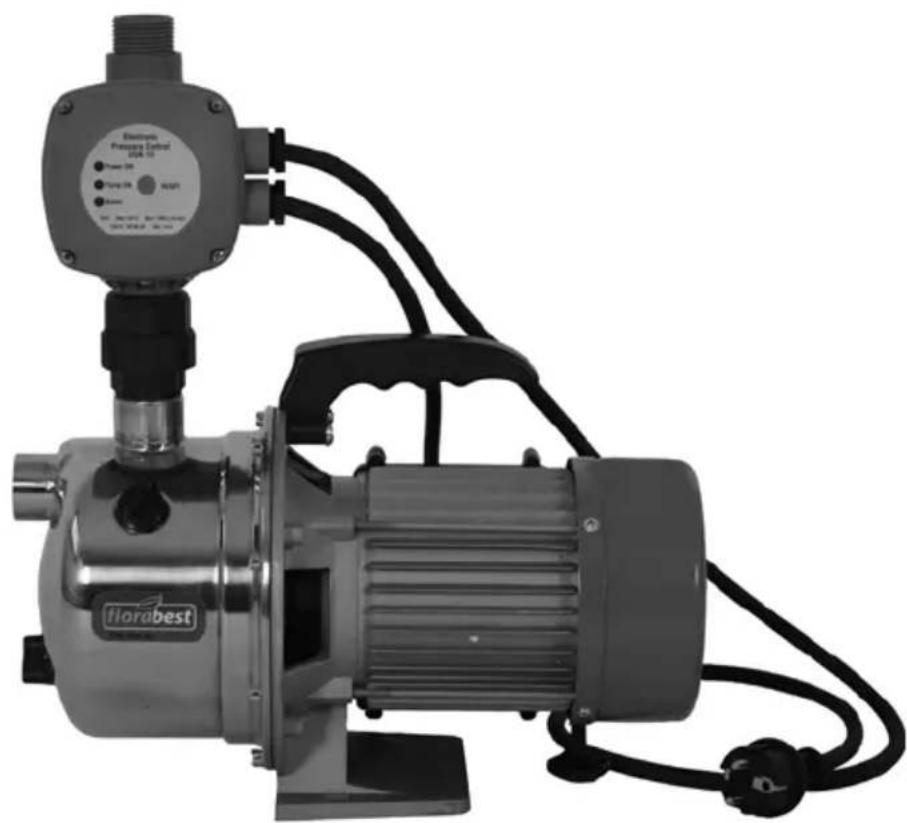
natural_image
Exterior view of a Florabest industrial pump with digital display and wiring (no readable text or symbols beyond branding)


GRIZZLY GARTENGERÄTE GMBH & CO. KG
Am Gewerbepark 2