KB 52 - Oven STEBA - Free user manual and instructions
Find the device manual for free KB 52 STEBA in PDF.
| Brand | Steba |
| Model | KB 52 |
| Product type | Combination microwave oven with hotplates |
| Weight | 22 kg |
| Power supply | 240 V ~ 50 Hz |
| Microwave power | 900 W |
| Grill power | 1200 W |
| Convection power | 1350 W |
| Main functions | Microwave, Grill, Convection, Combi modes, Defrost, Auto menu, Hotplates (large and small), Timer, Clock |
| Included accessories | Glass turntable, Metal rack, Turntable support, Rotating base |
| Child safety | Key combination lock |
| Care and cleaning | Clean interior with a damp cloth; turntable, roller ring, and base washable with soapy water; do not use abrasive products |
| Safety | Mandatory grounding, 10 A fuse, automatic shutdown in case of overheating, microwave protection |
| Spare parts and repairability | Turntable, rack, support, rotating base available; repairs by qualified personnel only |
| General information | Private use only, do not built-in, safety distances: 15 cm above, 10 cm behind, 5 cm sides |
Frequently Asked Questions - KB 52 STEBA
User questions about KB 52 STEBA
0 question about this device. Answer the ones you know or ask your own.
Ask a new question about this device
Download the instructions for your Oven in PDF format for free! Find your manual KB 52 - STEBA and take your electronic device back in hand. On this page are published all the documents necessary for the use of your device. KB 52 by STEBA.
USER MANUAL KB 52 STEBA
natural_image
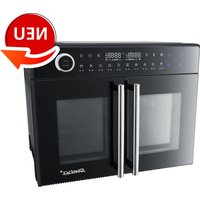
Modern microwave oven with two top ovens and a digital display (no visible text or symbols)Instructions for use 32
Mode d'emploi 52
1 Päckchen Pudding pulver
Vanillegeschmack
2 Becher saure Sahne
4 Eigelb
150 g Zucker
Vanillezucker
Zitronenschale
150 ml Speiseöl
150 ml Milch
4 Eiweiß
text_image
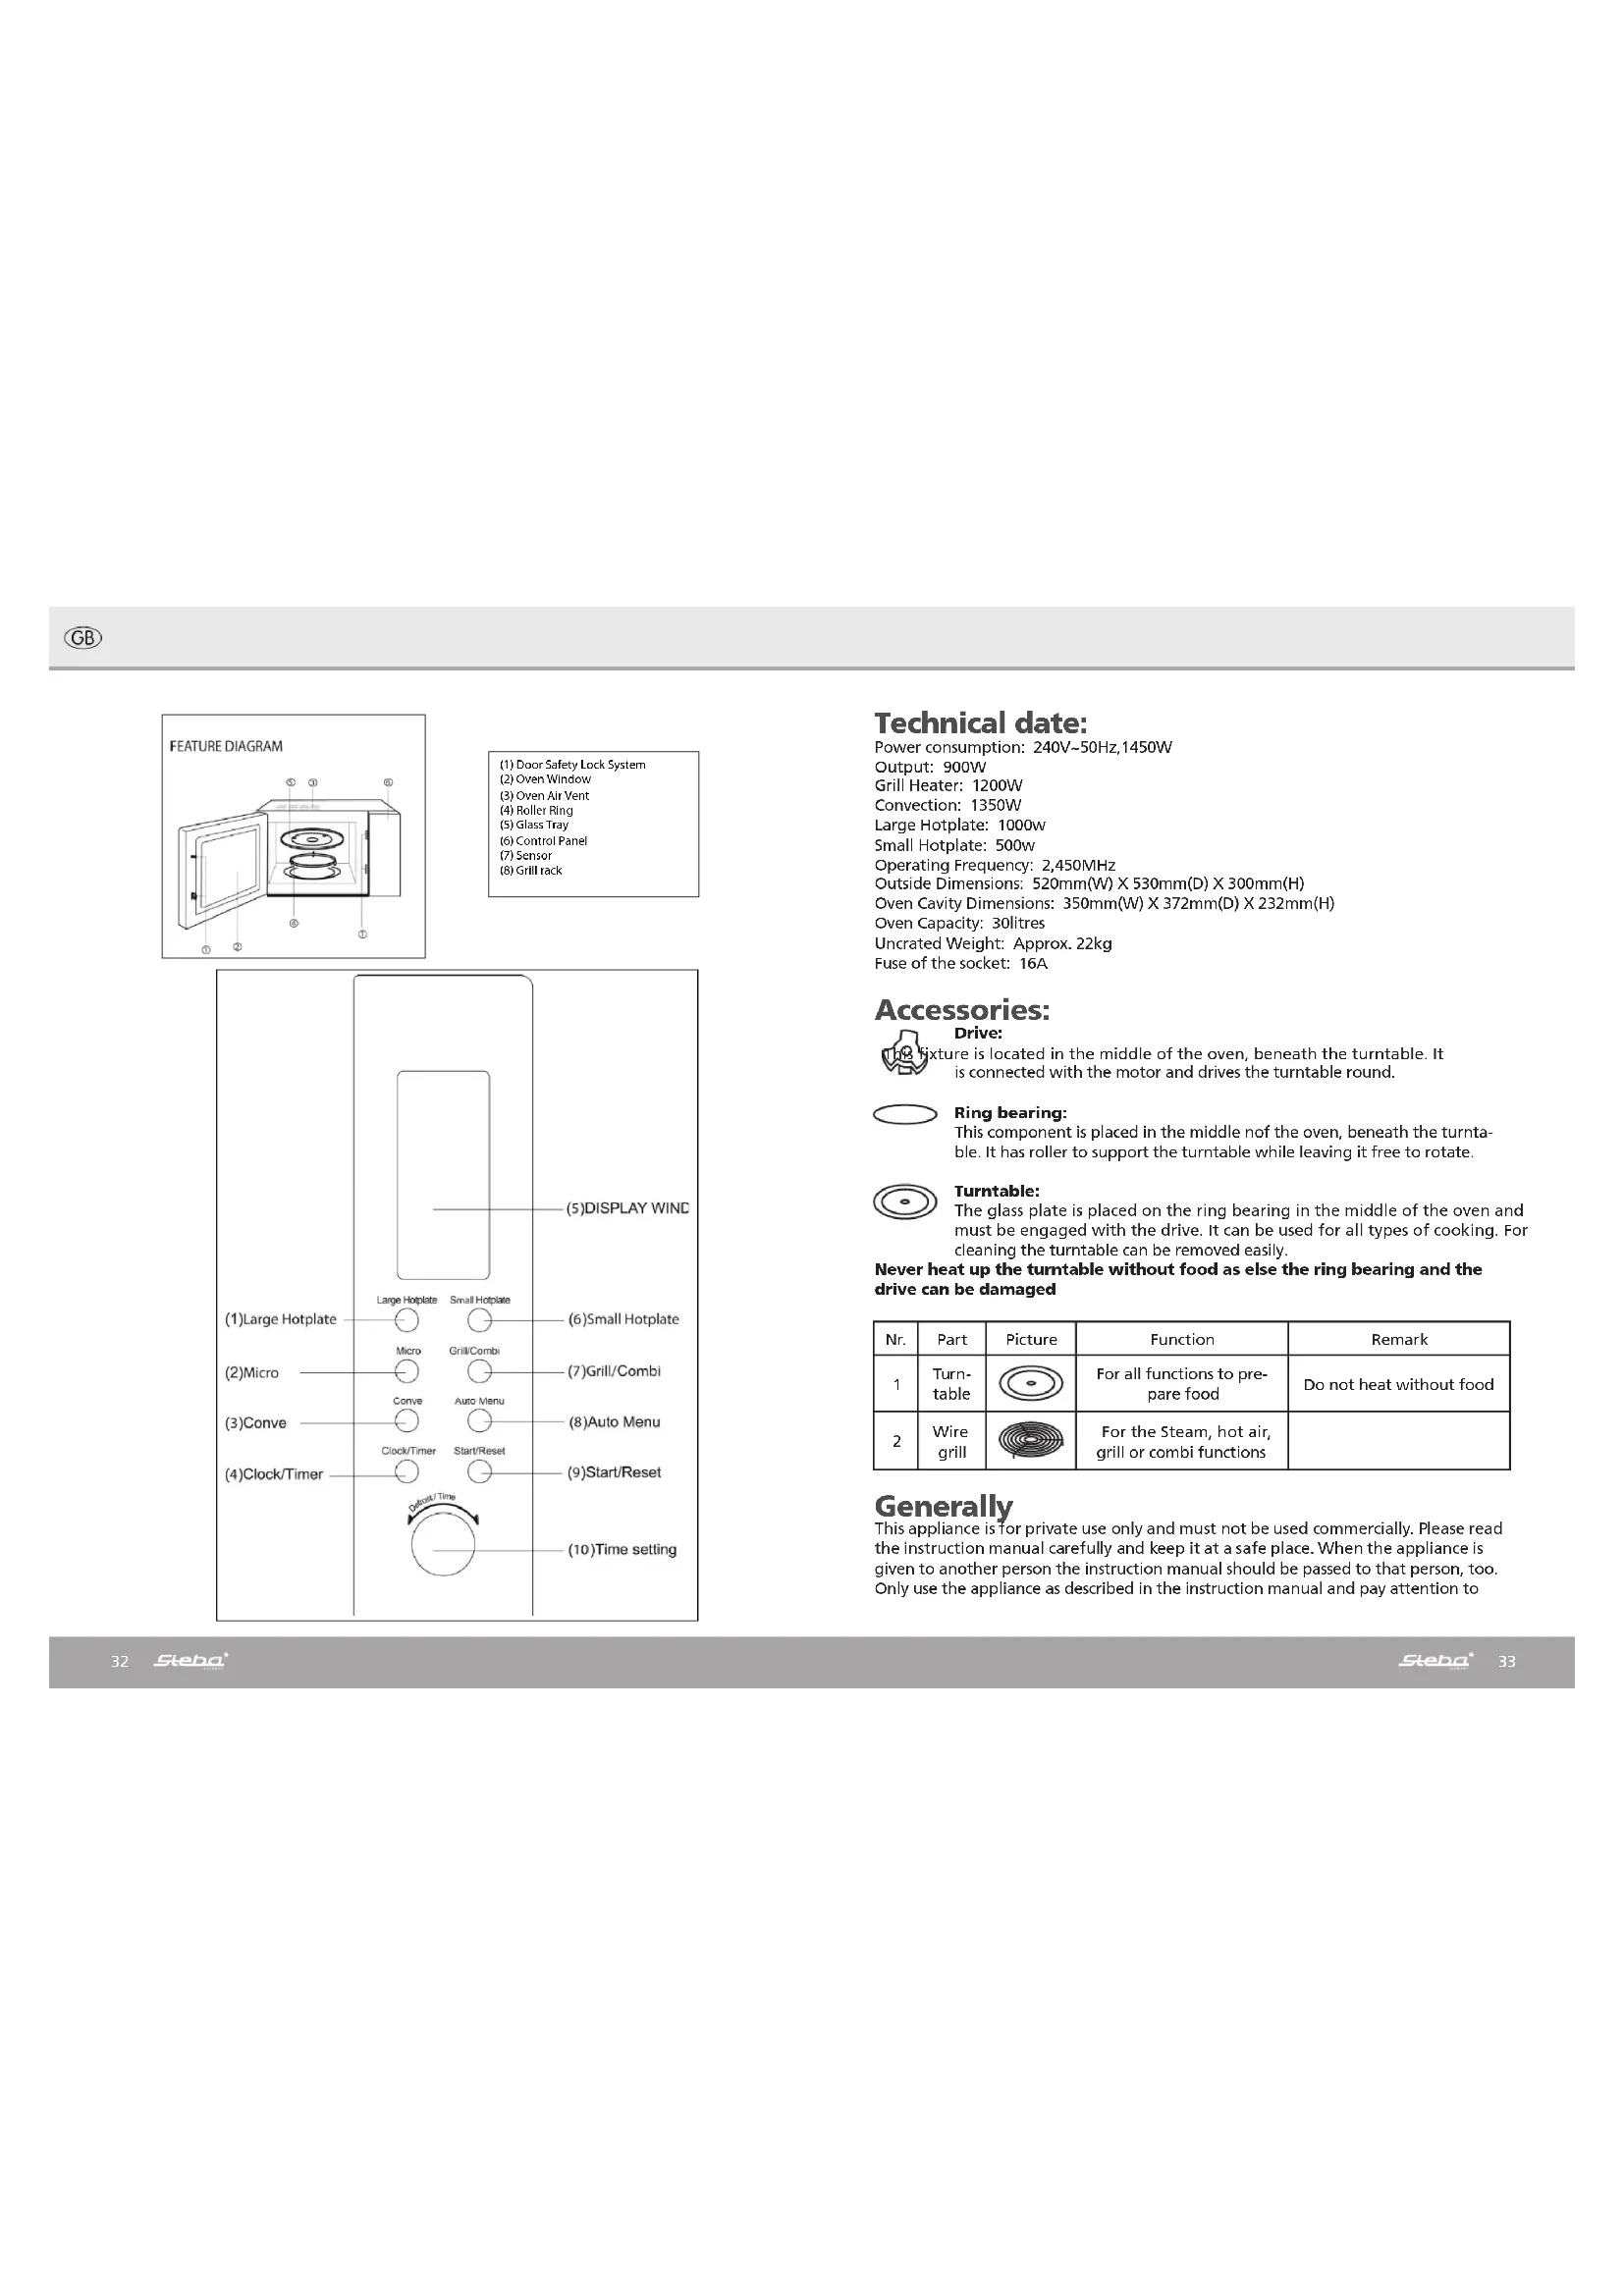
FEATURE DIAGRAM(1) Door Safety Lock System
(2) Oven Window
(3) Oven Air Vent
(4) Roller Ring
(4) Holcl Hing (5) Glass Tray
(5) Glass Tray
(6) Control Panel
(b) Control Panel
(7) Sensor
(8) Grill rack
text_image
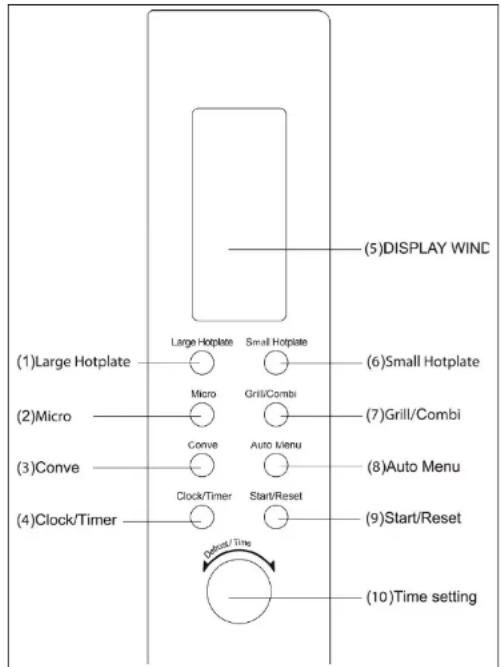
(1)Large Hotplate (2)Micro (3)Conve (4)Clock/Timer Large Hotplate Micro Conve Clock/Timer Small Hotplate Grill/Combi Auto Menu Start/Reset Display/Time (5)DISPLAY WIND (6)Small Hotplate (7)Grill/Combi (8)Auto Menu (9)Start/Reset (10)Time settingTechnical date:
Power consumption: 240V\~50Hz,1450W
Output: 900W
Grill Heater: 1200W
Convection: 1350W
Large Hotplate: 1000w
Small Hotplate: 500w
Operating Frequency: 2,450MHz
Outside Dimensions: 520mm(W) X 530mm(D) X 300mm(H)
Oven Cavity Dimensions: 350mm(W) X 372mm(D) X 232mm(H)
Oven Capacity: 30litres
Uncrated Weight: Approx. 22kg
Fuse of the socket: 16A
Accessories:
Drive:
are is located in the middle of the oven, beneath the turntable. It
is connected with the motor and drives the turntable round.

Ring bearing:
This component is placed in the middle of the oven, beneath the turnta-
ble. It has roller to support the turntable while leaving it free to rotate.

Turntable:
The glass plate is placed on the ring bearing in the middle of the oven and
must be engaged with the drive. It can be used for all types of cooking. For
cleaning the turntable can be removed easily.
Never heat up the turntable without food as else the ring bearing and the drive can be damaged
| Nr. | Part | Picture | Function | Remark |
| 1 | Turn-table | For all functions to prepare food | Do not heat without food | |
| 2 | Wire grill | For the Steam, hot air, grill or combi functions |
Generally
This appliance is for private use only and must not be used commercially. Please read the instruction manual carefully and keep it at a safe place. When the appliance is given to another person the instruction manual should be passed to that person, too.
Only use the appliance as described in the instruction manual and pay attention to
the safety information. No liability for damages or accidents will be accepted, which are caused by not paying attention to the instruction manual.
Check your microwave: The appliance should be taken out of the packaging. Remove all packaging material and check the appliance if there is any damage like broken door handles or cracks at the door. If there are any damages contact your trader. Never use the appliance when it is damaged!
Attention! Do not remove the cover made from isolation material at the right side of the inner cavity! Clean the cover only with maximum care.
Earthing of the appliance:
Important: The appliance must be earthed correctly to ensure the personal safety. When your AC socket is not earthed, then it is the personal responsibility to exchange it to a correct earthed socket.
Power supply:
Only connect the appliance to the power supply according to the data shown on the rating label. If a higher Voltage is used then shown on the rating label fire or other damages can occur.
Position of the appliance:
- Place the appliance on a stable non-sensitive surface.
- Position the appliance in such way that the supply socket or the socket switch is readily accessible so it can be easily disconnected.
- For correct working it is important that enough space is around the appliance. There should be a gap of at least 15cm above the steam microwave, 10 cm behind and 5cm at each side.
- To disconnect the appliance from the power supply the plug of the power cord must be easy to access.
Installation:
- This microwave must only be used on a table or on a working plate. It is not suitable for build in use, like a cupboard.
Do not place the appliance near an electrical or gas stove. Do not remove the feet.
- The appliance must only be used inside. Do not use it outside, e.g. garden.
The appliance should not be used in a damp area. The power cord should not touch the outside housing. Keep the power cord away from hot surfaces. Never pull the power cord over edges of tables or working places. Do not immerse the cable or the plug in water.
The cooling opening at the sides and the back of the housing must not be blocked. When they are blocked during usage the appliance can be overheated. Do not pull at the power cord or pinch it.
Security Information
The built-in safety switches prevent the microwave oven from operating when the door is open. Do not tamper with them, or attempt to operate the oven with the door open as open door operation can result in exposure to microwave energy. It is particularly important that the oven door closes properly and that there is no damage to the: (1) door, (2) hinges and latches, or (3) door seals and sealing surface.
- Do not remove the outer case, door or control panel at any time. Doing so may cause exposure to extremely high voltage.
- Install or locate this microwave oven only in accordance with the installation instructions found in the 'Installation' section.
- Do not store the microwave oven outdoors.
- Accessible surfaces of the microwave oven may get HOT while it is operating.
- Do not allow food spills or cleaner residue to accumulation door sealing surfaces.
- Failure to maintain the microwave oven in a clean condition could lead to deterioration of the surface adversely affecting the life of the appliance and possibly result in a hazardous situation.
- This microwave oven is specifically designed for domestic heating, cooking and defrosting food only must be used as described in this manual. It is not designed for industrial or non domestic use
- Do not use corrosive chemicals in this microwave oven.
- Do not operate the microwave oven empty. If food or water is not present to absorb the microwave energy, the microwave can be damaged.
- DO NOT use this microwave oven near water, a swimming pool or other wet environment.
Do not attempt to dry clothing or newspapers in the microwave oven. These items can ignite. - Do not use the microwave oven cavity for storage purposes. Do not leave paper products, cooking utensils, or food
- in the cavity when not in use
- Keep the power cord away from hot surfaces and DO NOT let the power cord hang over the edge of tables or
- counters.
- If the power cord is damaged, it must be replaced by the manufacturer, its service agent or similarly qualified
- persons.
- Do not force the turntable to rotate by hand. This may cause damage to the unit.
- DO NOT use metal utensils during microwave operation as this will cause arcing. Continuous arcing will damage the
- unit. Should arcing occur, stop the program and remove the utensil.
- Only use utensils that are suitable for use in the microwave.
- Care should be taken not to obstruct any air vents located on the top, rear, side and bottom of the oven.
- During use the appliance becomes hot. Care should be taken to avoid touching heating elements inside the unit.
This appliance is not intended for use by persons (including children) with reduced physical or sensory capabilities, or lack of experience and knowledge, unless they have been given supervision or instruction concerning use of the appliance by a person responsible for their safety.
Children should be supervised to ensure that they don't play with the appliance
- If the door, hinges/latches or door seals are damaged, the microwave oven must not be operated until it has been repaired by an authorised service person.
- It is hazardous for anyone except authorised service personnel to carry out any service or repair to this combination microwave oven, especially if it involves the removal of a cover which gives protection against exposure to microwave energy.
- Liquids and foods must not be heated in sealed containers since they are liable to explode.
- Accessible parts may become hot during use. To avoid burns young children should be kept away.
- When heating food in plastic or paper containers, keep an eye on the oven due to the possibility of ignition.
- DO NOT disassemble this appliance, as touching some of the internal components can cause serious personal injury.
Power cord and plug
This microwave oven must be earthed. In the event of an electrical short circuit, earthing reduces the risk of
electric shock by providing an escape wire for the electric current. This oven is equipped with a power cord having an
earthing wire with an earthing plug. The plug must be plugged into an outlet that is properly installed and earthed.
Consult a qualified electrician or serviceman if the earthing instructions are not completely understood or if doubt
exists as to whether the oven is properly earthed.

Warning:
Liquids and food must not be heated in dosed containers, as they can explode.
Usage:
- Use the appliance to no other purpose than to heat up food. Never heat up chemicals or other products, which is no food.
- Always ensure that the used accessories are suitable to be used in a microwave.
- Never put any inflammable things into the appliance.
- Never store any objects inside the appliance when it is not used, except the delivered accessories, to avoid any danger when the appliance is turned on by accident.
-
The appliance must not be used as a microwave or a microwave combination function when there is no food inside the appliance. If the appliance is used in that way it can cause damage to the appliance. To test the microwave program please put a glass of water inside to absorb the microwave radiation. An exemption is the up-heating with hot air function with bake pan or a wire grill.
-
If any flame occur inside the appliance then press the "Stop Cancel" button and leave the door closed to extinguish any flames. Pull the plug.
- Never place the face to near to the appliance during or after the cooking when opening the door. Take care when opening he door. During opening the door some vapour can escape. Danger of burns! Always use special oven gloves.
Warning:
The door must be closed correctly at all programs, as else the safety mechanism won't switch on the appliance.
- If some fat splashes touch the heating element during the grill program it can happen sometimes that small flames occur, which are extinguished by their own and have no harming effects on the appliance. Always keep a minimum distance of 2cm between the food and the heating element.
Attention: Never try to use the appliance with an open door, to bypass the safety mechanism or put anything into the safety mechanism.
• Take care that nothing is blocking the door when opening or closing the door.
- Never allow food or cleaning products residues to accumulate on the door seals. Always clean the appliance after use. If the door or the door seals are damaged, the oven must not be operated anymore.
The appliance must not be operated with a external Timer or any other remote system.
Using of the appliance:
Before using the Hot Air, Combination or grill function for the first time, remove excessive process oil from the inside of the appliance. Use the appliance without glass turntable, ring bearing, drive o accessories, like wire grill or pan, for ca 10 min. With this process oil is removed. Some smoke or smell can occur during the first time of use. This is normal and disappear after short time.

Warning:
Danger of burns!
Please always keep in mind that after cooking all accessories of the appliance can be very hot. To avoid any burns always use oven gloves when removing e.g. pots, table ware, bake pans etc, from the appliance and carrying it.
Cooling system:
When the microwave is used the cooling system is working permanent to cool all electrical components. After the appliance has stopped, the cooling system could still work for some time. That is normal and food can still be removed from the appliance.
Illumination of the appliance:
If the illumination is not working any more, please contact us directly.
Accessories:
The microwave is equipped with accessories. Always obey the instructions, which are for using the accessories.
Wire grill:
- The wire grill can be used for grilling food. It also can be used for Hot Air or Combination Cooking.
- When using the microwave function the wire grill can be used alone, when it is centred in the middle of the glass turntable.
Cooking Times:
The cooking times shown in the instruction manual are average values. The cooking time is depending from the kind, temperature and quantity of the food and from the kind of the cooking accessories used.
Always start with the minimum cooking time to avoid a too long cooking time. When the food is not cooked long enough then make the cooking time longer.
Notice: When the recommended cooking time is exceeded then the food can go bad and in extreme cases can catch fire and damage the interior of the appliance.
Temperature of food:
The Microwave heats up food. The container can be cold, but the food can be hot. Before the food is served stir the food and check carefully the temperature before the food is served to children.
Small quantities of food:
Small quantities of food or food which contains only small quantity of water can burn, dry out or catch fire, when they are cooked to long. If any food catches fire inside the appliance, keep the door closed, switch off the appliance and pull the plug out of the socket.
Eggs:
Never cook eggs inside the microwave when they are still in the shell or are already hard boiled. Pressure can be build up, which can make the eggs explode, even after the cooking process is finished.
Punctuation of skins:
Food with a non porous skin, like potatoes, yellow of a egg and sausages must be punctuated before cooking with a microwave to avoid a burst of the food.
Meat thermometer:
Only us a meat thermometer to check the temperature inside of meat or poultry, when the food is put out of the appliance. Never use a standard Meat thermometer when using the microwave or a Combination function, as sparks can occur.
Liquids:
When liquids like soups, sauces or beverages are heated up in the appliance then a overheating of the liquids over the boiling point can occur, without any sign of bubble formation. This can cause a delayed eruptive boiling or a splattering of hot liquids. a) Never overheat any liquids b) Stir the liquid carefully
Paper/Plastic:
When heating up food inside a paper or plastic container then the appliance must be check more often as these containers can catch fire when they are overheated. Never use recycled paper products, only when it is written on them that they are microwave safe they can be used. Recycled paper products can contain impurities which can cause sparks and/or fire. Always remove metal parts like cramps from cooking containers before insert them into the microwave.
Utensils/Foils:
Never heat up close cans or bottles, as they may explode. Metal containers and bowls with metal decoration must be not used when cooking with microwave. Sparks can occur. When aluminium foil, meat skewer or metal cook ware is used, the minimum distance between them and the interior walls is 2cm to avoid any sparks.
Baby bottles/Glasses with baby food
Upper parts or the teat/comforter or covers of baby feeding bottles or glasses with baby food must be removed before they are put into the microwave. Before the food/bottles is give to babies the temperature of the liquid or the food must be carefully checked to avoid any danger of burns.
Never use the appliance as a deep fryer as the oil or fat can overheat and catch fire!
Overview, which materials are suitable for microwaves and for high temperatures
| Material Microwave suitable Remark | ||
| Aluminium Foil In certain cases Can be used | in small quantities to avoid overcooking. Risk to have an electrical arc when the foil is to near to the side walls or to much is used. | |
| Metal pots with high edge | No Danger of electrical arcing and fire | |
| Metal pots not higher than 3-4cm | Yes Place in the middle of the turntable, min 2cm distance to the walls | |
| Glass Yes | ||
| Glass with metal decorative elements | No Danger of electrical arcing | |
| Thin glass No Can crack because of high temperatures. | ||
| Plastic Yes If the plastic is temperature resisting Some containers can deform and change the colout. Never seal the container | ||
| Porcelain Yes | ||
| Porcelain with metal decorative elements | No Danger of electrical arcing | |
| Paper/Foils Yes Short time use inside Microwave, but not at the grill or hot Air Function | ||
Never use hermetic closed containers, cans baby bottles, plastic containers etc as this can cause danger of explosion. Always remove the lid or put holes in it.
To test if a container is microwave safe put a cup of water inside the container and place it in the middle of the glass turntable.
Start the microwave for ca 1min on max power. Is the container cold and the water hot then it can be used. Is the container warm or hot, then it is not suitable.
If any sparks occur, then switch off the microwave instantly. The appliance must be supervised permanently.
What is microwave?
Electrical energy is transformed inside a magnetron into microwaves.
The microwaves makes water molecules, which are in food, start to oscillate. The friction between the molecules heats up the food. The microwaves are reflected from the interior walls of the oven on the food.
The cold microwaves are absorbed from the water molecules or the fat of the food.
Microwaves enter into the food ca 4cm and cooking the food from the outside to the inside. Therefore some time after switching off the appliance is recommended, as the food is still cooking to the inside.
The cooking utensils are getting hot up by the food. Therefore always use cooking gloves to remove them.
Cooking utensils made from metal cannot be passed from the microwaves and must therefore normally not be used.
Grill ∪
At the upper side of the appliance there is a 1200W heating element for grilling or au four of food.
Always take care to have enough distance between the food and the heating element, to avoid any ignition of splattering oil. To reduce the grilling time- when the food is slightly brown- the microwave can be added. Always take care, that only one wire grill is used when using the microwave function.
Hot Air
In the inside of the back plate of the oven there is a adjustable (100-220°C) heating element combined with a convection unit. By the circulating hot air it is possible to cook food on different levels. By the circulation the food preparation is more energy efficient.
When using hot air and microwave at the same time it is important to use only one wire grill on the glass turntable. Always place the wire grill in the middle of the glass turntable.
RADIO INTERFERENCE
This microwave oven may cause interference to your radio, TV, or similar equipment. When interference occurs,
it may be eliminated or reduced by the following procedures.
a. Clean the door and sealing surface of the oven.
b. Place the radio, TV, etc. as far away from your microwave oven as possible.
c. Use a properly installed antenna for your radio, TV, etc. to get stronger signal reception.
Installation
- Make sure all the packing materials are removed from the inside of the microwave door.
- Inspect the oven after unpacking for any visual damage such as: Misaligned Door, Damaged Door, Dents or Holes in Door Window and Screen, Dents in Cavity If any of the above are visible, DO NOT use the oven.
- This Microwave Oven weighs 22 kg and must be placed on a horizontal surface strong enough to support this weight
WARNING-THIS APPLIANCE MUST BE EARTHED.
- Ensure the plug socket is within easy reach for the power cord. DO NOT force the cord over a significant distance or stretch the cord excessively
- This oven requires 1.5 KVA for its input. Please consult an authorised service agent for any installation requirements
- The oven must be placed away from high temperature areas and steam.
- DO NOT place anything on top of the oven.
- DO NOT remove the turn -table drive shaft.
CAUTION: This oven is protected internally by ac 250V,10 Amp Fuse.
Important
The wires in this mains lead are coloured in accordance with the following code:
Green and Yellow: Earth
Blue: Neutral
Brown: Live
As the colours of the wires in the mains leads of the appliance may not correspond with the coloured markings identifying the terminals in your plug, proceed as follows:
The wire which is coloured green-and-yellow must be connected to the terminal in the plug which is marked with the letter E or by the earth symbol coloured green of green-and-yellow.
The wire which is coloured blue must be connected to the terminal which is marked with the letter N or coloured black. The wire which is coloured brown must be connected to the terminal which is marked with the letter L or coloured red.
1. Single Button Heating
With the press of a button you can heat everyday items quickly and conveniently Place desired item on turntable.
- Press the "Start/Reset" button, the microwave will heat at 100% for 1 minute
- You will hear 5 beeps at the end of the cooking cycle
Standard Operation
There are two methods of heating using this microwave. Automatic and Manual
2. Automatic Heating
Automatic heating will run the microwave at 100% power for a time specified by you.
- Set the timer to your desired length using the "Defrost/Timer". Turn to the right for heating
- Press the "Start/Reset" button. The microwave will run at 100% power for the time length selected
3. Manual Heating
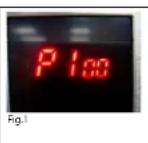
With Manual operation you can select both the power at which the microwave will run and the time.
Press the "Micro" button until the display reads the desired power setting
The power settings read as follows on the microwave display.
P100 - 100% power (see fig.1)
P70 - 70% power
P50 – 50% power
P30 – 30% power
P10 - 10% power
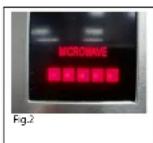
The red bar at the base of the
microwave display screen (see fig. 2)
also shows the corresponding power level.
- Use the control dial called "Defrost/Timer" to select the desired time length for heating (00.10 - 60.00 minutes)
- Press the "Start/Reset" button to begin.
- The microwave will now cook at the selected power level and time length.
4. Auto Weight Defrost
Your microwave can also be used to defrost based on the weight of the desired item E.g. 0.5 kg of meat:
1. Rotate the "Defrost/Timer" control dial to the left until the display read 0.5
2. Press "Start/Reset" The microwave will now begin to defrost at a set time
length and power setting
5. Auto Menu
There are a number of auto menu options available with this microwave. These menus are useful for cooking predetermined items based on their food type and weight.
There are six settings and a number of different weight settings for each. Follow the below grid to guide you to the most appropriate setting for you
Selecting an auto menu option is simple. Follow these steps:
- Review the table below. Establish which auto option best suits your desired meal
- Press the "Auto Menu" button. The display will now read A-, select the desired meal type by continuing to press the "Auto/Menu" button until you have selected the correct option Rotate the "Defrost/Timer" dial to select the weight of your meal. Again, use the below chart to make the appropriate choice. Press the "Start/Reset" button to commence.
| Touching Times\Weight Menu(g) | Reheat | Potato | Pizza | Meat | Fish | Chicken |
| 1 | 100 | 200 | 100 | 100 | 100 | 200 |
| 2 | 200 | 300 | 200 | 200 | 200 | 400 |
| 3 | 300 | 400 | 300 | 300 | 300 | 600 |
| 4 | 400 | 500 | 400 | 400 | 400 | 800 |
| 5 | 500 | 600 | 500 | 500 | 500 | 1000 |
| 6 | 600 | 700 | 600 | 600 | 600 | 1200 |
| 7 | 900 | 800 | 700 | 1400 | ||
| 8 | 1100 | 1000 | 800 | 1600 | ||
| 9 | 1300 | 1300 | 900 | 1800 | ||
| 10 | 1500 | 1500 | 1000 | 2000 |
6. Using The Grill
Using the grill function is as easy as using the microwave options. Follow these steps to grill your food to perfection
- Press the "Grill" button. G-1 will be displayed, this indicates the grill has been selected
- Use the "Defrost/Timer" dial to select the length of time you wish to grill for Press the "Start /Reset" Button, the grill will begin to heat.
The heating element located on the top of the microwave cavity will begin to heat.
The grill will run in two stage, after the first stage of grilling is complete it will beep twice, indicating that your food is ready to be turned. Should you wish for it to continue, simply leave the microwave as is. After 1 minute of inactivity it will automatically recommence its grilling cycle
7. Using Combination Mode
Combination mode is where you use more than one method of cooking at one time to heat your food. This model has 3 different combination options
Option 1. Convection + Microwave Cooking (230°C Convection + 50% Microwave) (Displayed as C-1) This option is ideal for roasting or baking
Option 2. Grill + Convection (50% Grill + 230°C Convection) (Displayed as C-2) Ideal for fast crisping etc.
Option 3. Grill + Microwave (45% Grill + 55% Microwave) (Displayed as C-3) For fast grilling
Using this mode is easy. Follow these steps:
- Press the "Grill/Combi" button until desired option is displayed (C-1, C-2, C-3)
- Use the "Defrost/Timer" control to set the desired cooing length
- Press the "Start/Reset" button to begin cooking
8. Using Convection Mode
This microwave can be used as a convection oven. It can be preheated for traditional cooking. The default
temperature for preheating is 230°C, but by repeatedly pressing the "Conve" button you can alter it's preheating
default to the desired temperature
Once the appliance has reached the set preheating temperature it will beep twice letting you know you can now place food into the oven.
To set the cooking time see as followos:
Press the "Conve" button to select convection cooking
Use the "Defrost/Timer" dial to select the desired cooking length.
Press the "Start/Reset button to begin cooking"
9. Setting the Clock
This microwave runs on a 24-hour clock. To set this please follow these steps:
Press the "Clock/Timer" button. The hour display will flash, indicating the clock is - waiting to be set.
- Use the Defrost/Timer dial to select the desired hour time
- Press the Clock/Timer again, the minutes display will now be flashing
- Use the Defrost/Timer dial to select the desired minutes time
- Press the Clock/Timer button again. The time is now set
10. Setting The Timer
This function allows you to set a predetermined start cooking time, the power at which you want to cook and the time length you wish to cook for
To set this, follow these steps:
Press the "Clock/Timer" button (just like setting the clock) Using the "Setting the Clock" steps above as a guide, set the desired time you wish for the microwave to turn on and begin cooking (Don't worry this will not alter your clocks default time!) Immediately after setting the desired turn on time, press the "Micro" button and select the desired power level at which you wish to cook.
After this use the "Defrost/Timer" dial to select the length of time you wish to cook for
Now press the "Start/Reset" button.
You will hear two beeps indicating the timer has been set. You will also notice a small red clock symbol appears above the default time. This is a reminder that a switch on timer has been inputted.
At the selected turn on time the microwave will beep 2 times and then begin cooking based on the inputted time length. It will beep 5 times at the conclusion of its cooking cycle.

11. Using the Hotplates
To use the either of the hotplates please see as follows:
Press "Large hotplate or Small Hotplate" button, it will show "H1, H2, H3, H4, H5" in
the display and the hotplate function icon will ash.
(H1 = 100%, H2 = 80%, H3 = 60%, H4 = 40%, H5 = 20%)
Choose the power level by repeatedly pressing the "Large Hotplate or Small Hot-plate" button
Input the cooking time with "Defrost/Timer" dial
Press the "Start/Reset" button to begin operation
To cease operation, press the "Start/Reset" or hold the power key of the large hot-plate for 2 seconds, it will stop
running and return to standby.
Example: to heat food on 80% power for 50 minutes
a) Press "Large hotplate" button, select "H2" power;
b) Rotate the "Defrost/Time Setting" to set the time 50 minutes;
c) Press "Start/Reset"
*Please note the maximum cooking time on the hotplate is 90 minutes
| Pressing times of the hotplates power key | 1 | 2 | 3 | 4 | 5 |
| Display | H1 | H2 | H3 | H4 | H5 |
| Cycle ratio(S) | 30/30 | 24/30 | 18/30 | 12/30 | 6/30 |
| Power | 100% | 80% | 60% | 40% | 20% |
Large/Small Hotplates Combination:
Running the hotplates in combination with each other is no problem. To run both hotplates at once simply press the either the "Large Hotplate" or "Small Hotplate" buttons at any time to set to desired levels and time lengths. Use the instructions in the previous heading to set to desired settings (11. Using the Hotplates)
To cease the operation of a particular hotplate while leaving the other running, press and hold the corresponding hotplate button for two seconds. This will return it to standby mode. Alternatively to shut both o press the "Start/Reset" button.
Notes:
When the hot plates are in operation the turntable and microwave light will not operate due the power draw running the hotplates. The power light will also not be displayed
To check the power levels on the hotplate, press the corresponding hotplate key, it will display to power level it is operating at for 3 seconds.
- The timer for each hotplate is displayed in the top left (large hotplate – in large font) and top right (small hotplate in small font) of the digital display.
- If you wish to change the power level of a hotplate after you have begun cooking, simply press the power button for the hotplate you wish to alter until you have the desired power setting. You may also alter the timer setting at this point if desired by using the "Defrost/Timer" dial. PLEASE NOTE: In order to change the timer during operation you must select the power setting prior to altering the timer. Doing this will ensure the correct element is selected
- The maximum cooking time available is 90 minutes
- When the hotplates have been operating for longer than 10 minutes, at the conclusion of operation, the cooling fan will come on and run for the nal minute of the timed settings.
12. Child Safety Lock
To lock the microwave and prevent use press the "Auto menu" & "Clock/Timer" buttons down at the same time for 2 seconds This will lock the microwave.
To unlock repeat the above, this will unlock the machine ready for use.
To stop the microwave at any time in it's operation press the "Start/Reset" button. This will cancel all operation
LOOKING AFTER YOUR MICOWAVE
- Turn the oven off and remove the power plug from the wall before cleaning.
- Keep the inside of the oven clean. When food splatters or spilled liquids adhere to oven walls, wipe with a damp cloth. DO NOT use any harsh clean detergents or abrasives
- The outside oven surface should be cleaned with a damp cloth. To prevent damage to operating parts inside the oven, water should not be allowed to seep into the ventilation openings.
- Do not allow the control panel to become wet. Clean with a soft, damp cloth, Do not use detergents, abrasives or spray-on cleaners on this
- If steam accumulates inside or around the outside of the oven door, wipe with a soft cloth. This may occur when the microwave oven is operated under high humidity conditions. This is part of normal operation and is not a fault or problem
- It is occasionally necessary to remove the glass tray for cleaning. Wash the tray in warm soapy water.
- The roller ring and oven cavity floor should be cleaned regularly to avoid the build up of grit. Simply wipe the bottom surface of the oven with mild detergent, water or window cleaner and dry. The roller ring may be washed in mild sudsy water or a dishwasher provided a low caustic level detergent is used. When removing the roller ring from cavity floor for cleaning, be sure to replace it in the proper position.
- Remove odours from your oven by combining a cup of water with the juice and skin of one lemon in a deep microwaveable bowl. Microwave for 5 minutes, wipe thoroughly and dry with a soft cloth.
- When it becomes necessary to replace the oven light, please consult any authorised service agent.
Cleaning:
Pull the plug out of the socket
- Never immerse the appliance, the power cord or the steam generator into water.
- The heating element inside and the walls inside the chamber can be very hot.
- Clean the door sealing, the stainless steel inner walls and the door with a mild detergent. Do not use any aggressive or abherasive cleaners. The back plate inside the oven is coated with a selfcleaning coating.
- The outer surfaces and the control panel should be cleaned with a damp cloth. Due to the steam concentration some water can collect in front of the appliance. Wipe it away with a cloth. This is not a malfunction of the appliance.
When the appliance is not cleaned correctly it can happen that splatters of fat can cause smoke and therefore reduce the lifetime and the usage of the appliance. Check if the ventilation outlets are jammed with dust or similar substances. This can cause an overheating of the appliance.
- To reduce cooking odeurs from the appliance place a cup of vinegar on the turntable. Switch on the appliance on with microwave function (800Watts) for 3minutes. After that wipe the inner chamber walls with a damp cloth.
Disposal:
Packaging disposal:
Do not throw away the package materials. Please put it in the recycling bin.

PS

PP

PE
Gift box: Paper, should be put to the old paper collection point. Plastic packaging material and foils should be collected in the special collection containers.
Correct Disposal of this product

This marking indicates that this product should not be disposed with otherehold wastes throughout the EU. To prevent possible harm to the
onment or human health from uncontrolled waste disposal, recycle it
onsibly to promote the sustainable reuse of material resources. To return
your used device, please use the return and collection systems or contact the retailer where the product was purchased. They can take this product for environmental safe recycling.
Service and Repair:
If the appliance must be repaired, plaese get in touch with your trader or with the manufacturer:
Large Hotplate: 1000w
Small Hotplate: 500w
Operating Frequency: 2,450MHz
Outside Dimensions: 520mm(W) X 530mm(D) X 300mm(H)
Oven Cavity Dimensions: 350mm(W) X 372mm(D) X 232mm(H)
Oven Capacity: 30litres
Uncrated Weight: Approx. 22kg
Fuse of the socket: 16A
Accessoires

Précautions: Surfaces chaudes!
8. Le mode convection
(H1 = 100%, H2 = 80%, H3 = 60%, H4 = 40%, H5 = 20%)
Large Hotplate: 1000w
Small Hotplate: 500w
Operating Frequency: 2,450MHz
Outside Dimensions: 520mm(W) X 530mm(D) X 300mm(H)
Oven Cavity Dimensions: 350mm(W) X 372mm(D) X 232mm(H)
Oven Capacity: 30litres
Uncrated Weight: Approx. 22kg
Fuse of the socket: 16A
Toebehoren