
PUV 2000 B1 - Thermal weed remover PARKSIDE - Free user manual and instructions
Find the device manual for free PUV 2000 B1 PARKSIDE in PDF.

| Product type | Thermal weed killer |
| Brand | Parkside |
| Model | PUV 2000 B1 |
| Power supply | 230 V ~, 50 Hz, 2000 W |
| Maximum temperature (at nozzle outlet) | Approx. 650 °C |
| Protection class | II (double insulation) |
| Main functions | Thermal weeding, paint and varnish stripping, defrosting water pipes, lighting barbecue, welding plastics, deforming plastics, loosening screw connections |
| Included accessories | 5 nozzles (conical, flat, surface, reduction, barbecue) + support bracket + mounting screw + instruction manual |
| Maintenance and cleaning | Clean the housing with a cloth or brush; do not use gasoline, solvent or aggressive cleaning agent; keep air vents and blow tube clean |
| Safety | Do not direct the hot air jet at people or animals; wear protective gloves and safety goggles; do not touch hot nozzle; always place the device on the support bracket; unplug before changing nozzle or cleaning |
| Spare parts and repairability | Switch and replacement nozzles available through after-sales service; power cord replaceable only by the manufacturer or a qualified professional |
| Warranty | 3 years (detailed conditions in the instruction manual) |
| General information | For private household use only; use as intended; do not use as a hair dryer |
Frequently Asked Questions - PUV 2000 B1 PARKSIDE
User questions about PUV 2000 B1 PARKSIDE
0 question about this device. Answer the ones you know or ask your own.
Ask a new question about this device
Download the instructions for your Thermal weed remover in PDF format for free! Find your manual PUV 2000 B1 - PARKSIDE and take your electronic device back in hand. On this page are published all the documents necessary for the use of your device. PUV 2000 B1 by PARKSIDE.
USER MANUAL PUV 2000 B1 PARKSIDE
natural_image
Industrial soldering iron with a handle and metal body (no visible text or symbols)
ELECTRIC WEED BURNER / HEISSLUFT-UNKRAUTVER-NICHTER / DÉSHERBEUR THERMIQUE PUV 2000 B1
GB
ELECTRIC WEED BURNER
Translation of the original instructions
FR
DÉSHERBEUR THERMIQUE
Before reading, unfold the page containing the illustrations and familiarise yourself with all functions of the device.
DE
GB Translation of the original instructions Page 1
| DE | Originalbetriebsanleitung | Seite | 11 |
| FR | Traduction des instructions d'origine Page 21 | ||
| NL | Vertaling van de originele gebruiksaanwijzing Pagina 33 | ||
| CZ | Překlad originálního provozního návodu Strana 43 | ||
| PL | Tłumaczenie oryginalnej instrukcji obstugi | Strona 53 | |
| SK | Preklad originálneho návodu na obsluhu | Strana 63 | |
| ES | Traducción del manual de instrucciones original | Página 73 | |
| DK | Oversættelse af den originale driftsvejledning | Side | 83 |
Contents
Introduction 2
Intended use 2
Features 2
Package contents 2
Technical data 2
General Power Tool Safety Warnings 3
General instructions for hot air blower....3
Safety instructions for the hot air blower 4
Safety information for solid fuel lighters....4
Additional safety instructions 4
Operation 5
Before Operation 5
Operation 5
Shutting down....6
Using nozzles 6
Additional usage examples for house, car and garden....6
Cleaning....7
Disposal....7
Disposal of the appliance....7
Kompernass Handels GmbH warranty 7
Service 8
Importer 8
Translation of the original Conformity Declaration 9
ELECTRIC WEED BURNER PUV 2000 B1
Introduction
Congratulations on the purchase of your new appliance. You have selected a high-quality product. The operating instructions are part of this product. They contain important information about safety, usage and disposal. Before using the product, please familiarise yourself with all operating and safety instructions. Use the product only as described and for the specified areas of application. Please also pass on these operating instructions to any future owner.
Intended use
The appliance is suitable for the removal of wild growth between paving slabs, on brick-paved areas, on walling, in flowerbeds and in lawns during the growth periods, for the removal of paint-work, for heating (e.g. of heat-shrinkable tubing) and for the deformation and welding of plastics. It can also be used for separating glued joints, thawing frozen pipes and lighting barbecues. Any other usage of or modification to the appliance is deemed to be improper and carries a significant risk of accidents. The manufacturer accepts no responsibility for damage(s) attributable to misuse. The appliance is not intended for commercial use.
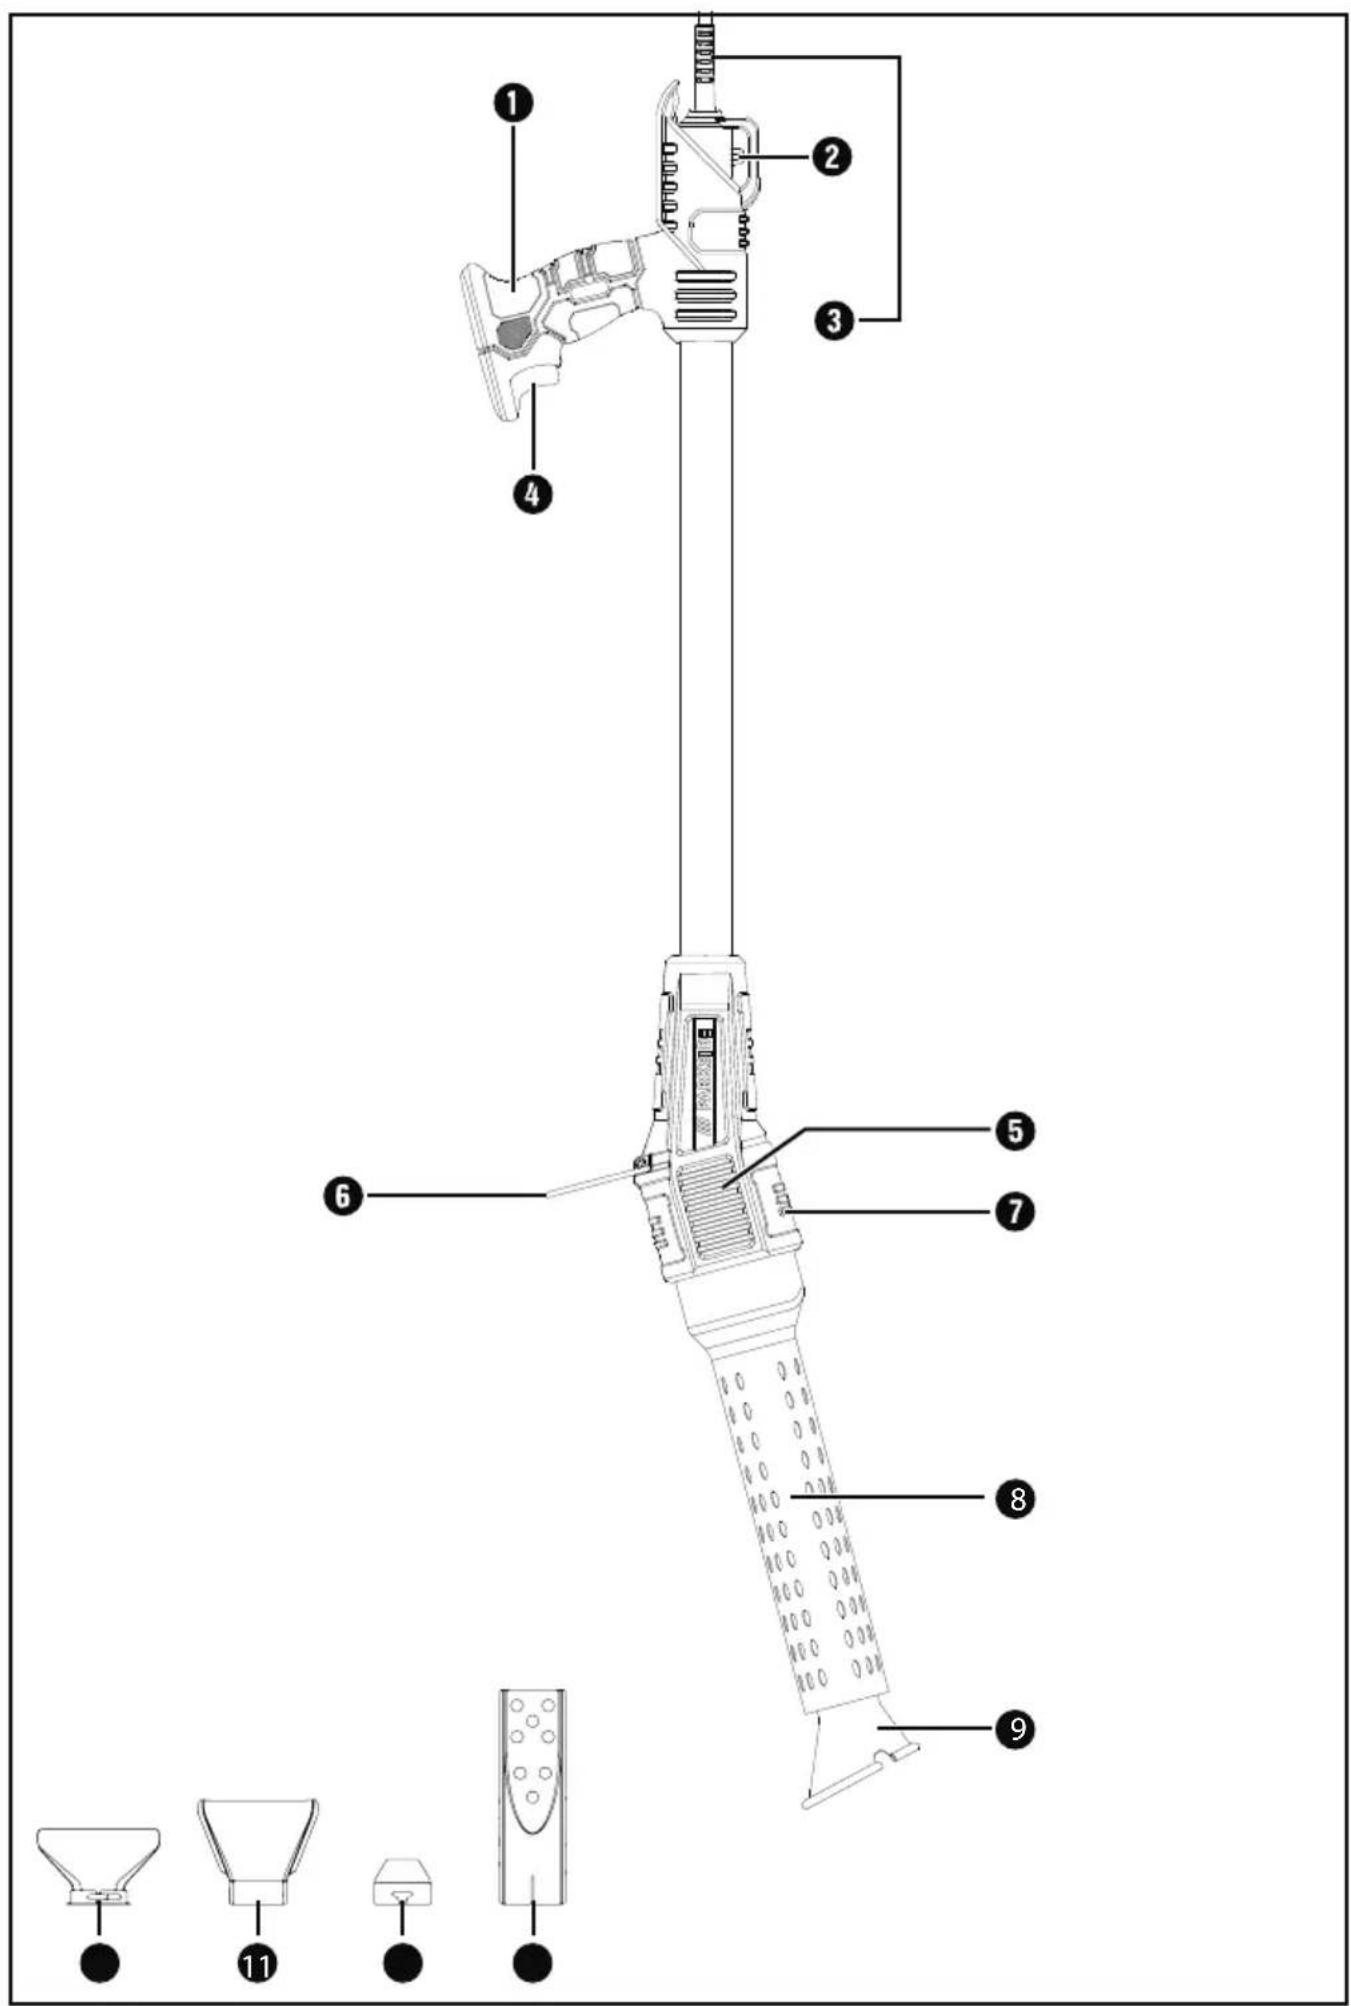
Features
① Ergonomic handle
② Strain relief
③ Power cable
④ ON/OFF switch
⑤ Air intake opening
6 Stand
⑦ Housing with heating element and ventilator
8 Heat shield
9 Cone nozzle
⑩ Spatula nozzle
11 Flat nozzle
⑫ Reducer nozzle
⑬ Barbecue nozzle
Package contents
1 electric weed burner PUV 2000 B1
1 cone nozzle (pre-fitted)
1 spatula nozzle
1 flat nozzle
1 reducer nozzle
1 barbecue nozzle
1 stand
Mounting screws
1 set of operating instructions
Technical data
Rated voltage 230 V \~, 50 Hz (alternating current)
Rated input power 2000 W
Temperature
(nozzle outlet) max. 650 °C
Protection class II / □ (double insulation)


General Power Tool Safety Warnings

WARNING!
▶ Read all safety warnings and all instructions. Failure to follow the warnings and instructions may result in electric shock, fire and/or serious injury.
Save all warnings and instructions for future reference.
The term "power tool" in the warnings refers to your mains-operated (corded) power tool or battery-operated (cordless) power tool.
■ Do not expose power tools to rain or wet conditions. Water entering a power tool will increase the risk of electric shock.
- Do not abuse the cord. Never use the cord for carrying, pulling or unplugging the power tool. Keep cord away from heat, oil, sharp edges or moving parts. Damaged or entangled cords increase the risk of electric shock.
If operating a power tool in a damp location is unavoidable, use a residual current device (RCD) protected supply. Use of an RCD reduces the risk of electric shock.
- Do not use the power tool if the switch does not turn it on and off. Any power tool that cannot be controlled with the switch is dangerous and must be repaired.
Risk of burns caused by hot surfaces! Do not touch!
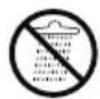
Protect from rain and moisture!

Outlet temperature at the nozzle max. 650 °C!
Unplug the appliance immediately if the cable is damaged or has been cut.
General instructions for hot air blower
■ This appliance may be used by children aged 8 years and above and by persons with limited physical, sensory or mental capabilities or lack of experience and knowledge, provided that they are under supervision or have been told how to use the appliance safely and are aware of the potential risks. Children may not play with the appliance. Cleaning and user maintenance tasks may not be carried out by children unless they are supervised.
■ To avoid potential risks, damaged mains cables should be replaced by the manufacturer or the manufacturer's customer service department or a similarly qualified person.
NOTE
▶ Spare parts not listed (such as switches and replacement nozzles) can be ordered via our call centre.
Safety instructions for the hot air blower

NOTICE!
This tool must be placed on its stand when not in use.
■ Careless use of the appliance can cause a fire.
■ Take care when using the appliance in the vicinity of inflammable materials.
■ Do not aim at the same place for a prolonged period of time.
■ Do not use in the presence of an explosive atmosphere.
■ Heat can be transferred to combustible materials which are hidden from view.
■ Replace on stand after use and allow to cool before putting it away.
- Do not leave the appliance unattended while it is in operation.
Safety information for solid fuel lighters
- Check that the solid fuel lighter is in the correct position.
■ Disconnect from mains before removing from fire.
- Allow solid fuel lighter to cool down before packing away.
■ The power cable or other flammable materials may not come into contact with hot components of the solid fuel lighter.
Additional safety instructions
CAUTION! Avoid the risk of injury or fire as well as health risks:
In case of danger, remove the plug from the socket immediately.

CAUTION! RISK OF INJURY!
▶ Never use the appliance as a hair dryer.
■ Never aim the hot air stream at people or animals.
■ Never look directly into the nozzle opening at the outlet.

CAUTION! RISK OF BURNS!
▶ Do not touch the hot nozzle.
■ Wear protective gloves.
■ Wear safety goggles.
■ Always remove the plug from the power socket during work breaks, when adjusting the appliance (e.g. changing nozzles) and when it is no longer in use.
- Keep the nozzle at a distance from the workpiece or the area being processed. A build-up of hot air can result in damage to the appliance.
■ The appliance must always be kept clean, dry and free from oil or grease.
■ Never use the appliance for purposes other than the ones for which it was designed.
Operation
Before Operation
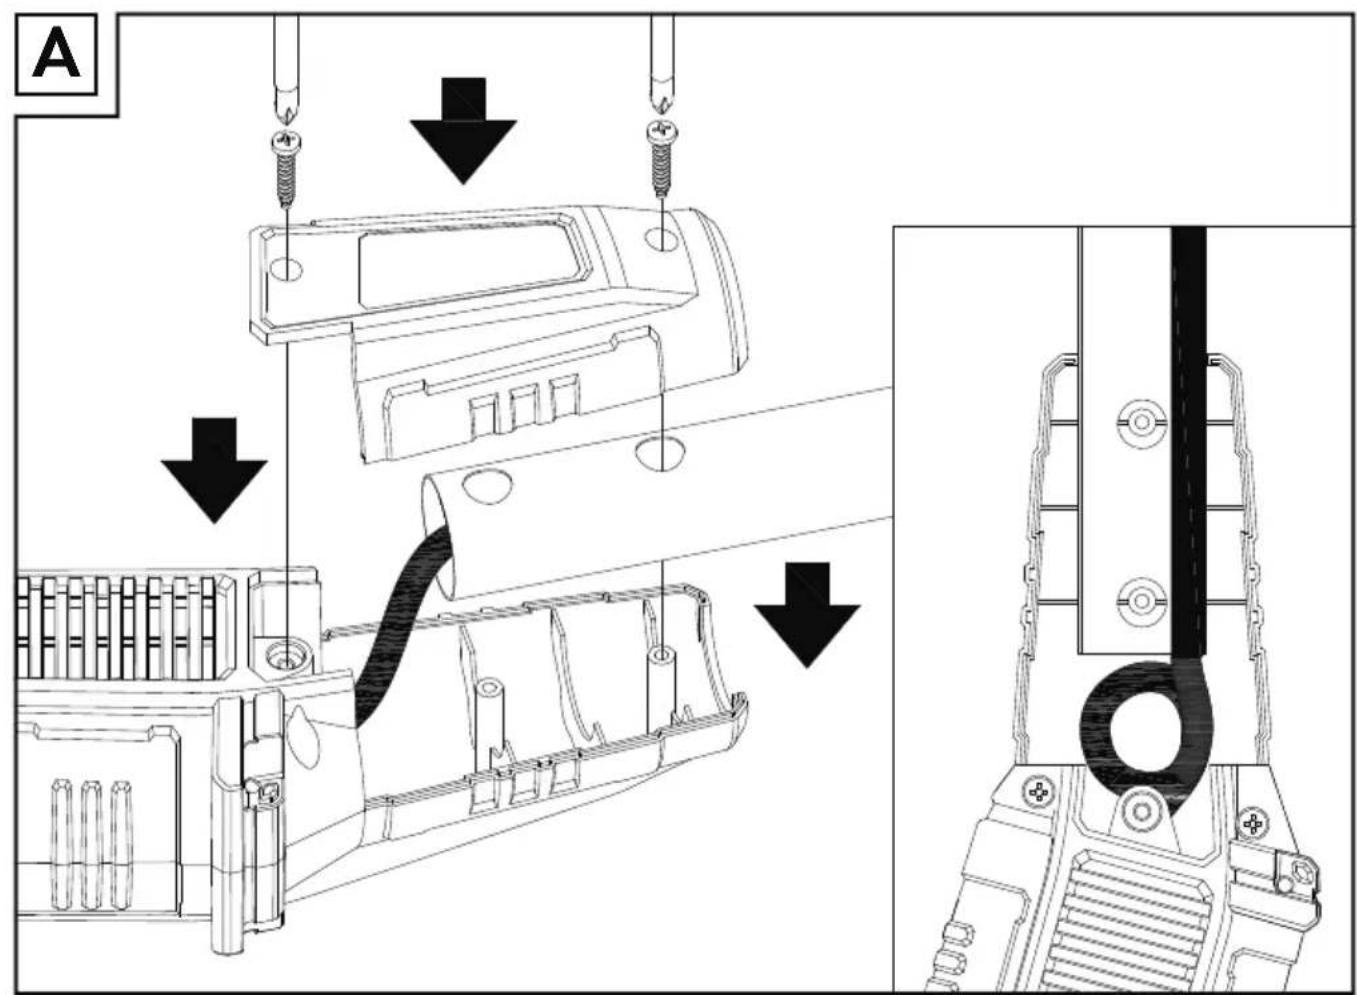
Mount the device
NOTE
▶ Place the unit on a flat surface. The cable must be routed in the device as shown in figure A (detailed view). Insert the cable with a loop into the unit. It must not exceed the housing of the appliance. The cover of the housing must be easy to install. Make sure that the cable is not pinched.
Place the cover on the device and screw it with the supplied mounting screws (see Fig. A).
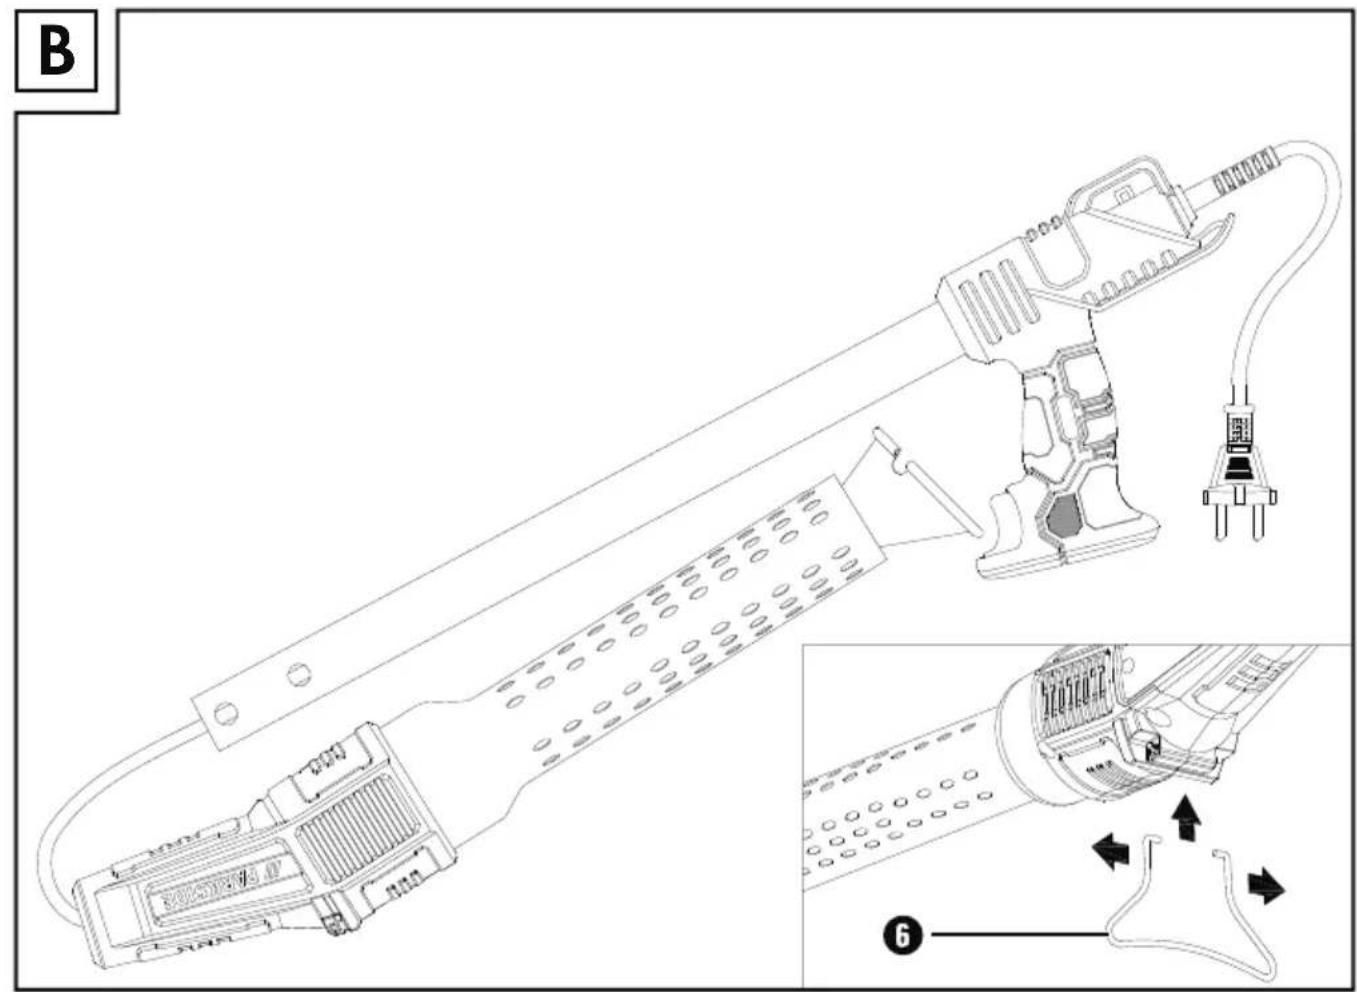
Mount the stand 6
◆ Attach the stand ⑥ to the unit (see Fig. B).
Operation
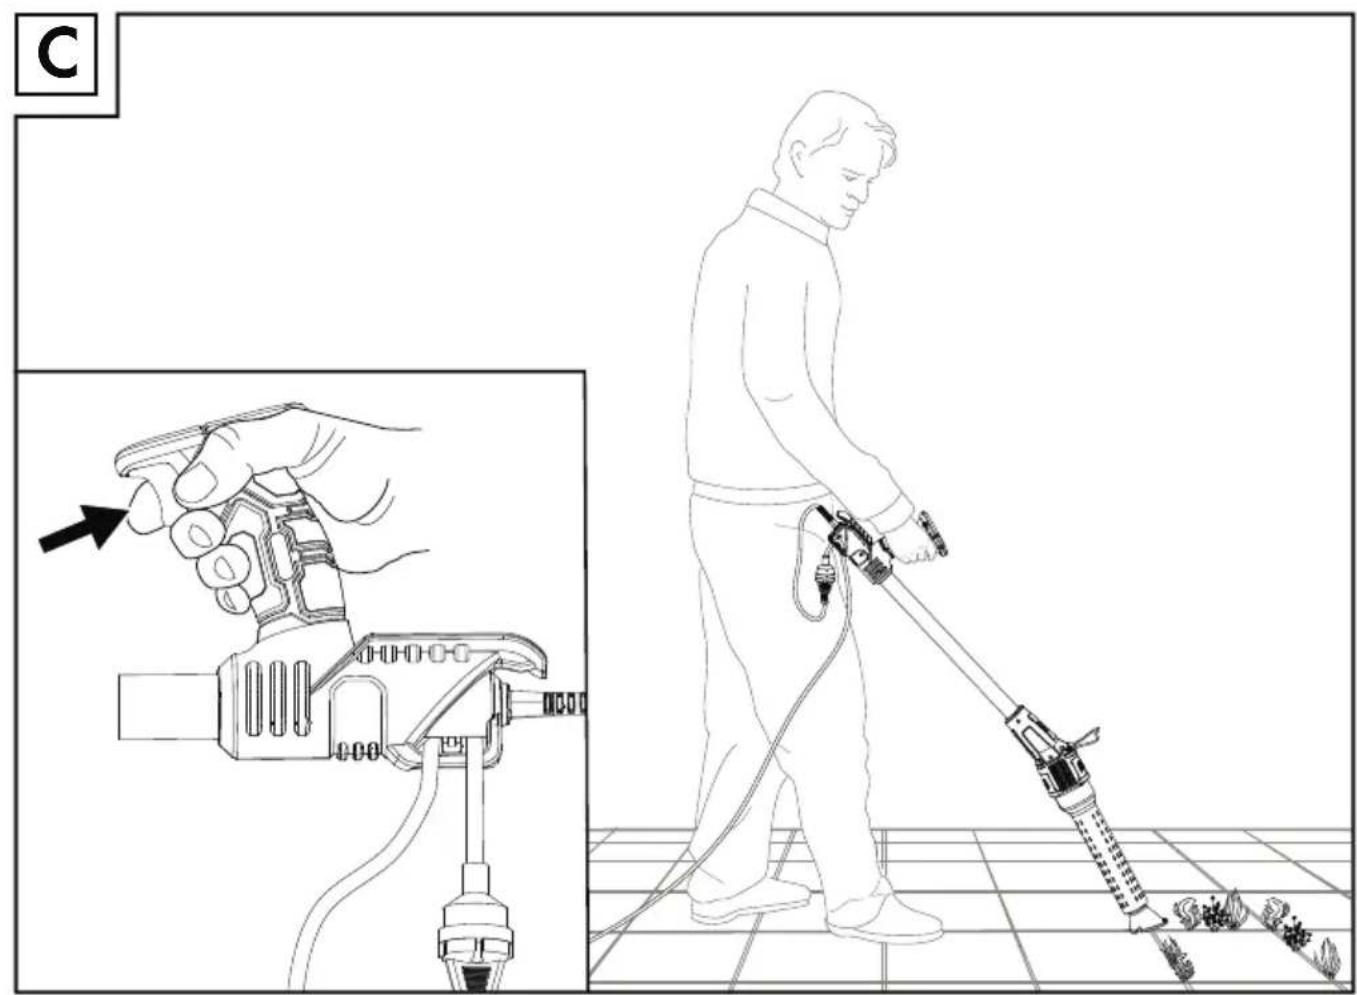
◆ Push the loop of the extension cable into the provided strain relief ② in the handle ① and fix it to the bar provided.
Connect the appliance to a power socket (230 V alternating current) using an extension cable.
Switch the appliance on by pressing the ON/OFF switch 4. The full operating temperature is reached after approx. 1 minute (see Fig. C).
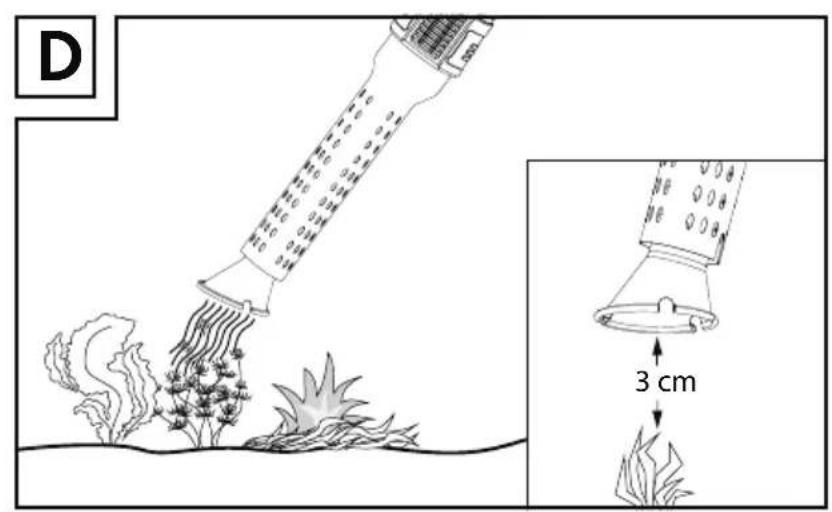
To kill weeds, now place the cone nozzle onto the plant to be treated for around 5–10 seconds depending on the type of plant. Keep at a distance of approximately 3 cm. Guide the opening of the cone nozzle slowly and parallel to the ground (see Fig. D, detailed view).
For taller plants, first only heat the upper section of the plant briefly and then place the cone nozzle ⑨ against the shrunken plant for approx. 5–10 seconds (see Fig. D).
NOTE
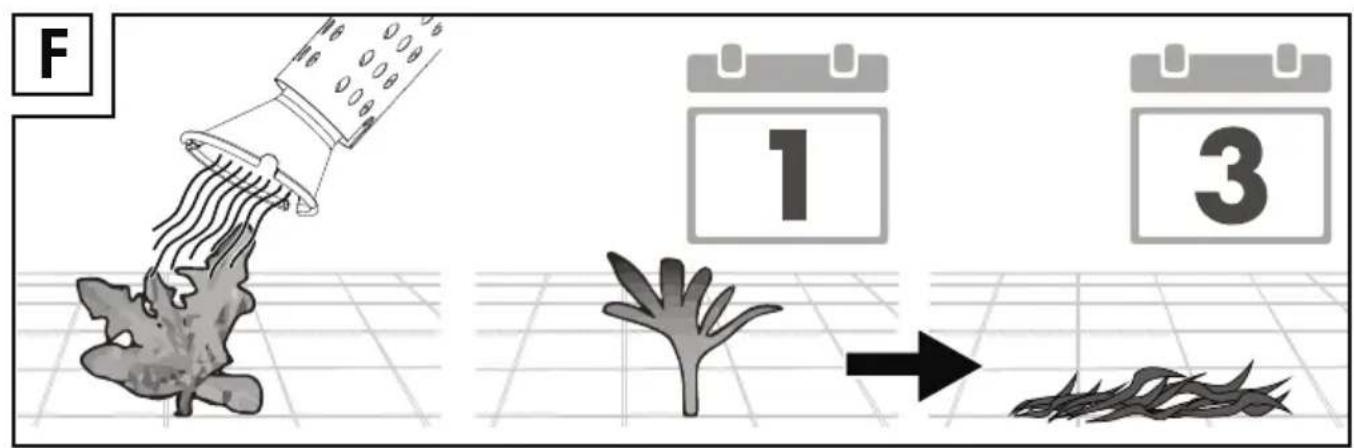
▶ Burning the plants off completely is not essential. During heating, the leaf cells dry out and the weed will die (see Fig. F).
▶ To begin with, overgrown areas must be treated several times at short intervals in order to produce long-term success. After this, treatment at longer intervals is sufficient. The heat flowing out of the nozzle penetrates far into the root system and causes the cell fluid of the plant cells to coagulate. This expansion causes the cell walls to burst.
This appliance is particularly suitable for removing weeds.
▶ Weedkilling is most effective at an early stage of vegetation growth.
▶ The most suitable time is during spring.
The treatment is at its most intensive the younger the plant is. However, the success of the measure is not immediately visible. The visible section of the plant can also be burnt off with a longer exposure time/treatment.
▶ Plants do not react immediately to the heat radiation with the recommended treatment time.
The following applies as a basic principle: young, soft-leaved plants react most sensitively to treatment. They are subsequently no longer capable of survival.
▶ Older plants with hard leaves such as thistles must be treated more frequently at an interval of between 1 and 2 weeks in order to make them dry out.
Winter-green grasses are extremely robust and require longer treatment.
▶ Repeated treatment of certain types of weed may be necessary.
Shutting down
◆ Release the ON/OFF switch ④.
◆ Always replace the appliance on the stand 6 after use on a level, fireproof underlay until the hot components have cooled down.
Using nozzles
WARNING!
▶ Before changing the nozzle, you must ensure that the nozzle has cooled down to avoid burns.
Remove the cone nozzle ⑨
◆ Remove the cone nozzle ⑨ from the outlet.
Spatula nozzle ⑩ – removing paints or varnish
♦ Push the spatula nozzle ⑩ onto the outlet.
The spatula shape of the nozzle is designed for targeted hot air delivery. Use it together with a separate spatula to remove paint and coatings.
Flat nozzle ⑪ - separating glued joints, softening paints
♦ Push the flat nozzle ⑪ onto the outlet.
- Avoid prolonged exposure to heat, since burned paint can be very difficult to remove. Many adhesives can be softened with heat. The glued joints can be separated and excess glue removed.
Reducer nozzle ⑫ - welding plastics
♦ Push the reducer nozzle 12 onto the outlet.
Use the reducer nozzle 12 with heat-shrinkable tubing and films.
Additional usage examples for house, car and garden
Defrosting water pipes
NOTE
▶ PVC piping must not be thawed out.
▶ Water and gas pipes are often indistinguishable from the outside. If in doubt, always ask a professional.
▶ Copper pipes are soldered and may not be heated to above 200^ C.
Slackening screwed joints
- Heat screwed joints carefully with hot air and the screws can then usually be removed easily.
Lighting charcoal
WARNING!
▶ Do not use any lighter fluid.
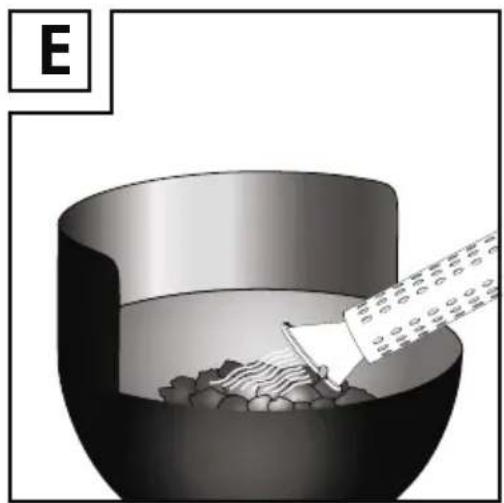
♦ Push the barbecue nozzle 13 onto the outlet.
♦ Push the barbecue nozzle ⑬ into the charcoal. When doing so, ensure that the last three barbecue nozzle holes remain free (see Fig. E).
As soon as the charcoal has started to glow, remove the appliance from the charcoal.
De-waxing
Use the product with suitable caution to remove residual wax from skis/snowboards or candle holders.
Cleaning

WARNING! RISK OF INJURY! Always pull the plug out of the socket and let the appliance cool down before you carry out any work on the appliance.
- Keep the air inlet and the outlet clean.
■ Use a cloth or a brush to clean the housing ⑦.
■ Never use petrol, solvents or cleaning agents that can damage plastic.
Disposal
Disposal of the appliance
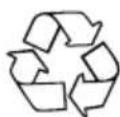
The packaging is made from environmentally friendly material and can be disposed of at your local recycling plant.
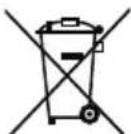
Do not dispose of power tools in the normal domestic waste!
European Directive 2012/19/EU requires that worn-out power tools be collected separately and recycled in an environmentally compatible manner.
Your local community or municipal authorities can provide information on how to dispose of the worn-out appliance.
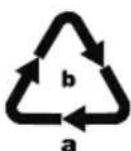
Dispose of the packaging in an environmentally friendly manner. Note the labelling on the packaging and separate the packaging material components for disposal if necessary. The packaging material is labelled with abbreviations (a) and numbers (b) with the following meanings: 1-7: plastics, 20-22: paper and cardboard, 80-98: composites.

Your local community or municipal authorities can provide information on how to dispose of the worn-out product.

The product is recyclable, subject to extended producer responsibility and is collected separately.
This appliance has a 3-year warranty valid from the date of purchase. If this product has any faults, you, the buyer, have certain statutory rights. Your statutory rights are not restricted in any way by the warranty described below.
Warranty conditions
The warranty period starts on the date of purchase. Please keep your receipt in a safe place. This will be required as proof of purchase.
If any material or manufacturing fault occurs within three years of the date of purchase of the product, we will either repair or replace the product for you or refund the purchase price (at our discretion).
This warranty service requires that you present the defective appliance and the proof of purchase (receipt) within the three-year warranty period, along with a brief written description of the fault and of when it occurred.
If the defect is covered by the warranty, your product will either be repaired or replaced by us. The repair or replacement of a product does not signify the beginning of a new warranty period.
Warranty period and statutory claims for defects
The warranty period is not prolonged by repairs effected under the warranty. This also applies to replaced and repaired components. Any damage and defects present at the time of purchase must be reported immediately after unpacking. Repairs carried out after expiry of the warranty period shall be subject to a fee.
Scope of the warranty
This appliance has been manufactured in accordance with strict quality guidelines and inspected meticulously prior to delivery.
The warranty covers material faults or production faults. The warranty does not extend to product parts subject to normal wear and tear or to fragile parts which could be considered as consumable parts such as switches or parts made of glass.
The warranty does not apply if the product has been damaged, improperly used or improperly maintained. The directions in the operating instructions for the product regarding proper use of the product are to be strictly followed. Uses and actions that are discouraged in the operating instructions or which are warned against must be avoided.
This product is intended solely for private use and not for commercial purposes. The warranty shall be deemed void in cases of misuse or improper handling, use of force and modifications / repairs which have not been carried out by one of our authorised Service centres.
The warranty period does not apply to
■ Normal reduction of the battery capacity over time
■ Commercial use of the product
■ Damage to or alteration of the product by the customer
■ Non-compliance with safety and maintenance instructions, operating errors
■ Damage caused by natural hazards
Warranty claim procedure
To ensure quick processing of your case, please observe the following instructions:
■ Please have the till receipt and the item number (e.g. IAN 12345) available as proof of purchase.
■ You will find the item number on the type plate on the product, an engraving on the product, on the front page of the operating instructions (below left) or on the sticker on the rear or bottom of the product.
If functional or other defects occur, please contact the service department listed either by telephone or by e-mail.
■ You can return a defective product to us free of charge to the service address that will be provided to you. Ensure that you enclose the proof of purchase (till receipt) and information about what the defect is and when it occurred.

You can download these instructions along with many other manuals, product videos and installation software at www.lidl-service.com.
This QR code will take you directly to the Lidl service page (www.lidl-service.com) where you can open your operating instructions by entering the item number (IAN) 354722_2010.
Service
GB Service Great Britain
Tel.: 0800 404 7657
E-Mail: kompernass@lidl.co.uk
IE Service Ireland
Tel.: 1890 930 034
(0,08 EUR/Min., (peak))
(0,06 EUR/Min., (off peak))
E-Mail: kompernass@lidl.ie
IAN 354722_2010
Importer
Please note that the following address is not the service address. Please use the service address provided in the operating instructions.
KOMPERNASS HANDELS GMBH
BURGSTRASSE 21
44867 BOCHUM
GERMANY
www.kompernass.com
Translation of the original Conformity Declaration
We, KOMPERNASS HANDELS GMBH, documents officer: Mr. Semi Uguzlu, BURGSTR. 21, 44867 BOCHUM, GERMANY, hereby declare that this product complies with the following standards, normative documents and EC directives:
EC Low Voltage Directive
(2014/35/EU)
EMC (Electromagnetic Compatibility)
(2014/30/EU)
RoHS Directive
(2011/65/EU)*
* The manufacturer bears the full responsibility for compliance with this conformity declaration. The object of the declaration described above complies with the requirements of the Directive 2011/65/EU of the European Parliament and Council of 8 June 2011 on the limitations of use of certain dangerous substances in electrical and electronic appliances.
Applied harmonised standards
EN 60335-1:2012/A2:2019
EN 60335-2-45:2002/A2:2012
EN 62233:2008
EN 55014-1:2017
EN 55014-2:2015
EN 61000-3-2:2014
EN 61000-3-3:2013
EN IEC 63000:2018
Type/appliance designation: Electric weed burner PUV 2000 B1
Year of manufacture: 01-2021
Serial number: IAN 354722_2010
Bochum, 22/01/2021

Semi Uguzlu
- Quality Manager -
The right to effect technical changes in the context of further development is reserved.
Inhaltsverzeichnis
Einleitung 12
KOMPERNASS HANDELS GMBH
BURGSTRASSE 21
44867 BOCHUM
DEUTSCHLAND
www.kompernass.com
KOMPERNASS HANDELS GMBH
BURGSTRASSE 21
44867 BOCHUM
ALLEMAGNE
www.kompernass.com
Semi Uguzlu
KOMPERNASS HANDELS GMBH
BURGSTRASSE 21
44867 BOCHUM
DUITSLAND
www.kompernass.com
Semi Uguzlu
KOMPERNASS HANDELS GMBH
BURGSTRASSE 21
44867 BOCHUM
NĚMECKO
www.kompernass.com
Semi Uguzlu
- manažer kvality -
KOMPERNASS HANDELS GMBH
BURGSTRASSE 21
44867 BOCHUM
NIEMCY
www.kompernass.com
KOMPERNASS HANDELS GMBH
BURGSTRASSE 21
44867 BOCHUM
NEMECKO
www.kompernass.com
Semi Uguzlu
- Manažér kvality -
KOMPERNASS HANDELS GMBH
BURGSTRASSE 21
44867 BOCHUM
ALEMANIA
www.kompernass.com
KOMPERNASS HANDELS GMBH
BURGSTRASSE 21
44867 BOCHUM
TYSKLAND
www.kompernass.com
Semi Uguzlu
- Kvalitetschef -
KOMPERNASS HANDELS GMBH
BURGSTRASSE 21
44867 BOCHUM
GERMANY
www.kompernass.com
Last Information Update · Stand der Informationen · Version des informations · Stand van de informatie
Stav informaci · Stan informacji · Stav informacií · Estado de las informaciones · Tilstand af information:
02 / 2021 · Ident.-No.: PUV2000B1-012021-1
- ELECTRIC WEED BURNER / HEISSLUFT-UNKRAUTVER-NICHTER / DÉSHERBEUR THERMIQUE PUV 2000 B1
- ELECTRIC WEED BURNER
- DÉSHERBEUR THERMIQUE
- DE
- Contents
- Introduction 2
- General Power Tool Safety Warnings 3
- Operation 5
- Cleaning....7
- Kompernass Handels GmbH warranty 7
- Importer 8
- Translation of the original Conformity Declaration 9
- ELECTRIC WEED BURNER PUV 2000 B1
- Introduction
- Intended use
- Features
- Package contents
- Technical data
- General Power Tool Safety Warnings
- WARNING!
- Save all warnings and instructions for future reference.
- General instructions for hot air blower
- NOTE
- Safety instructions for the hot air blower
- NOTICE!
- Safety information for solid fuel lighters
- Additional safety instructions
- CAUTION! RISK OF INJURY!
- CAUTION! RISK OF BURNS!
- Operation
- Before Operation
- Mount the device
- Mount the stand 6
- Shutting down
- Using nozzles
- Remove the cone nozzle ⑨
- Spatula nozzle ⑩ – removing paints or varnish
- Flat nozzle ⑪ - separating glued joints, softening paints
- Reducer nozzle ⑫ - welding plastics
- Additional usage examples for house, car and garden
- Defrosting water pipes
- Slackening screwed joints
- Lighting charcoal
- De-waxing
- Cleaning
- Disposal
- Disposal of the appliance
- Do not dispose of power tools in the normal domestic waste!
- Warranty conditions
- Warranty period and statutory claims for defects
- Scope of the warranty
- The warranty period does not apply to
- Warranty claim procedure
- Service
- GB Service Great Britain
- IE Service Ireland
- Importer
- Translation of the original Conformity Declaration
- Inhaltsverzeichnis
- Einleitung 12
- KOMPERNASS HANDELS GMBH
Brand : PARKSIDE
Model : PUV 2000 B1
Category : Thermal weed remover