
Agras T10 - Drone DJI - Free user manual and instructions
Find the device manual for free Agras T10 DJI in PDF.
| Product Type | Agricultural Spraying Drone |
| Brand | DJI |
| Model | Agras T10 (3WWDZ-10A) |
| Dimensions (arms and propellers unfolded) | 1958 × 1833 × 553 mm |
| Dimensions (arms and propellers folded) | 600 × 665 × 580 mm |
| Maximum Takeoff Weight | 24.8 kg (at sea level) |
| Spray Tank Capacity | 8 L (payload 8 kg) |
| Recommended Battery | T10 Intelligent Flight Battery BAX501-9500-51.8 (9500 mAh, 51.8 V) |
| Hovering Flight Time | 19 min (at 16.8 kg takeoff weight) / 9 min (at 24.8 kg) |
| Maximum Flight Speed | 10 m/s (with strong GNSS signal) |
| Maximum Operating Speed | 7 m/s |
| Maximum Wind Resistance | 8 m/s |
| Maximum Service Ceiling | 4,500 m above sea level |
| Remote Controller Transmission Range | Up to 7 km (FCC) in open area |
| Positioning System | GNSS (GPS+GLONASS+BeiDou+Galileo) + D-RTK (centimeter-level) |
| Obstacle Detection Sensors | Omnidirectional digital radar (360°) + upward-facing radar |
| FPV Cameras | Front and rear, resolution 1280×720, 15-30 fps |
| Protection Rating | IP67 (aircraft and main components) |
| Maintenance and Cleaning | Rinse with water after each day of use; disassemble and soak nozzles and filters |
| Recommended Operating Temperature | 0 to 45 °C |
| Recommended Operating Humidity | < 93 % |
Frequently Asked Questions - Agras T10 DJI
User questions about Agras T10 DJI
0 question about this device. Answer the ones you know or ask your own.
Ask a new question about this device
Download the instructions for your Drone in PDF format for free! Find your manual Agras T10 - DJI and take your electronic device back in hand. On this page are published all the documents necessary for the use of your device. Agras T10 by DJI.
USER MANUAL Agras T10 DJI
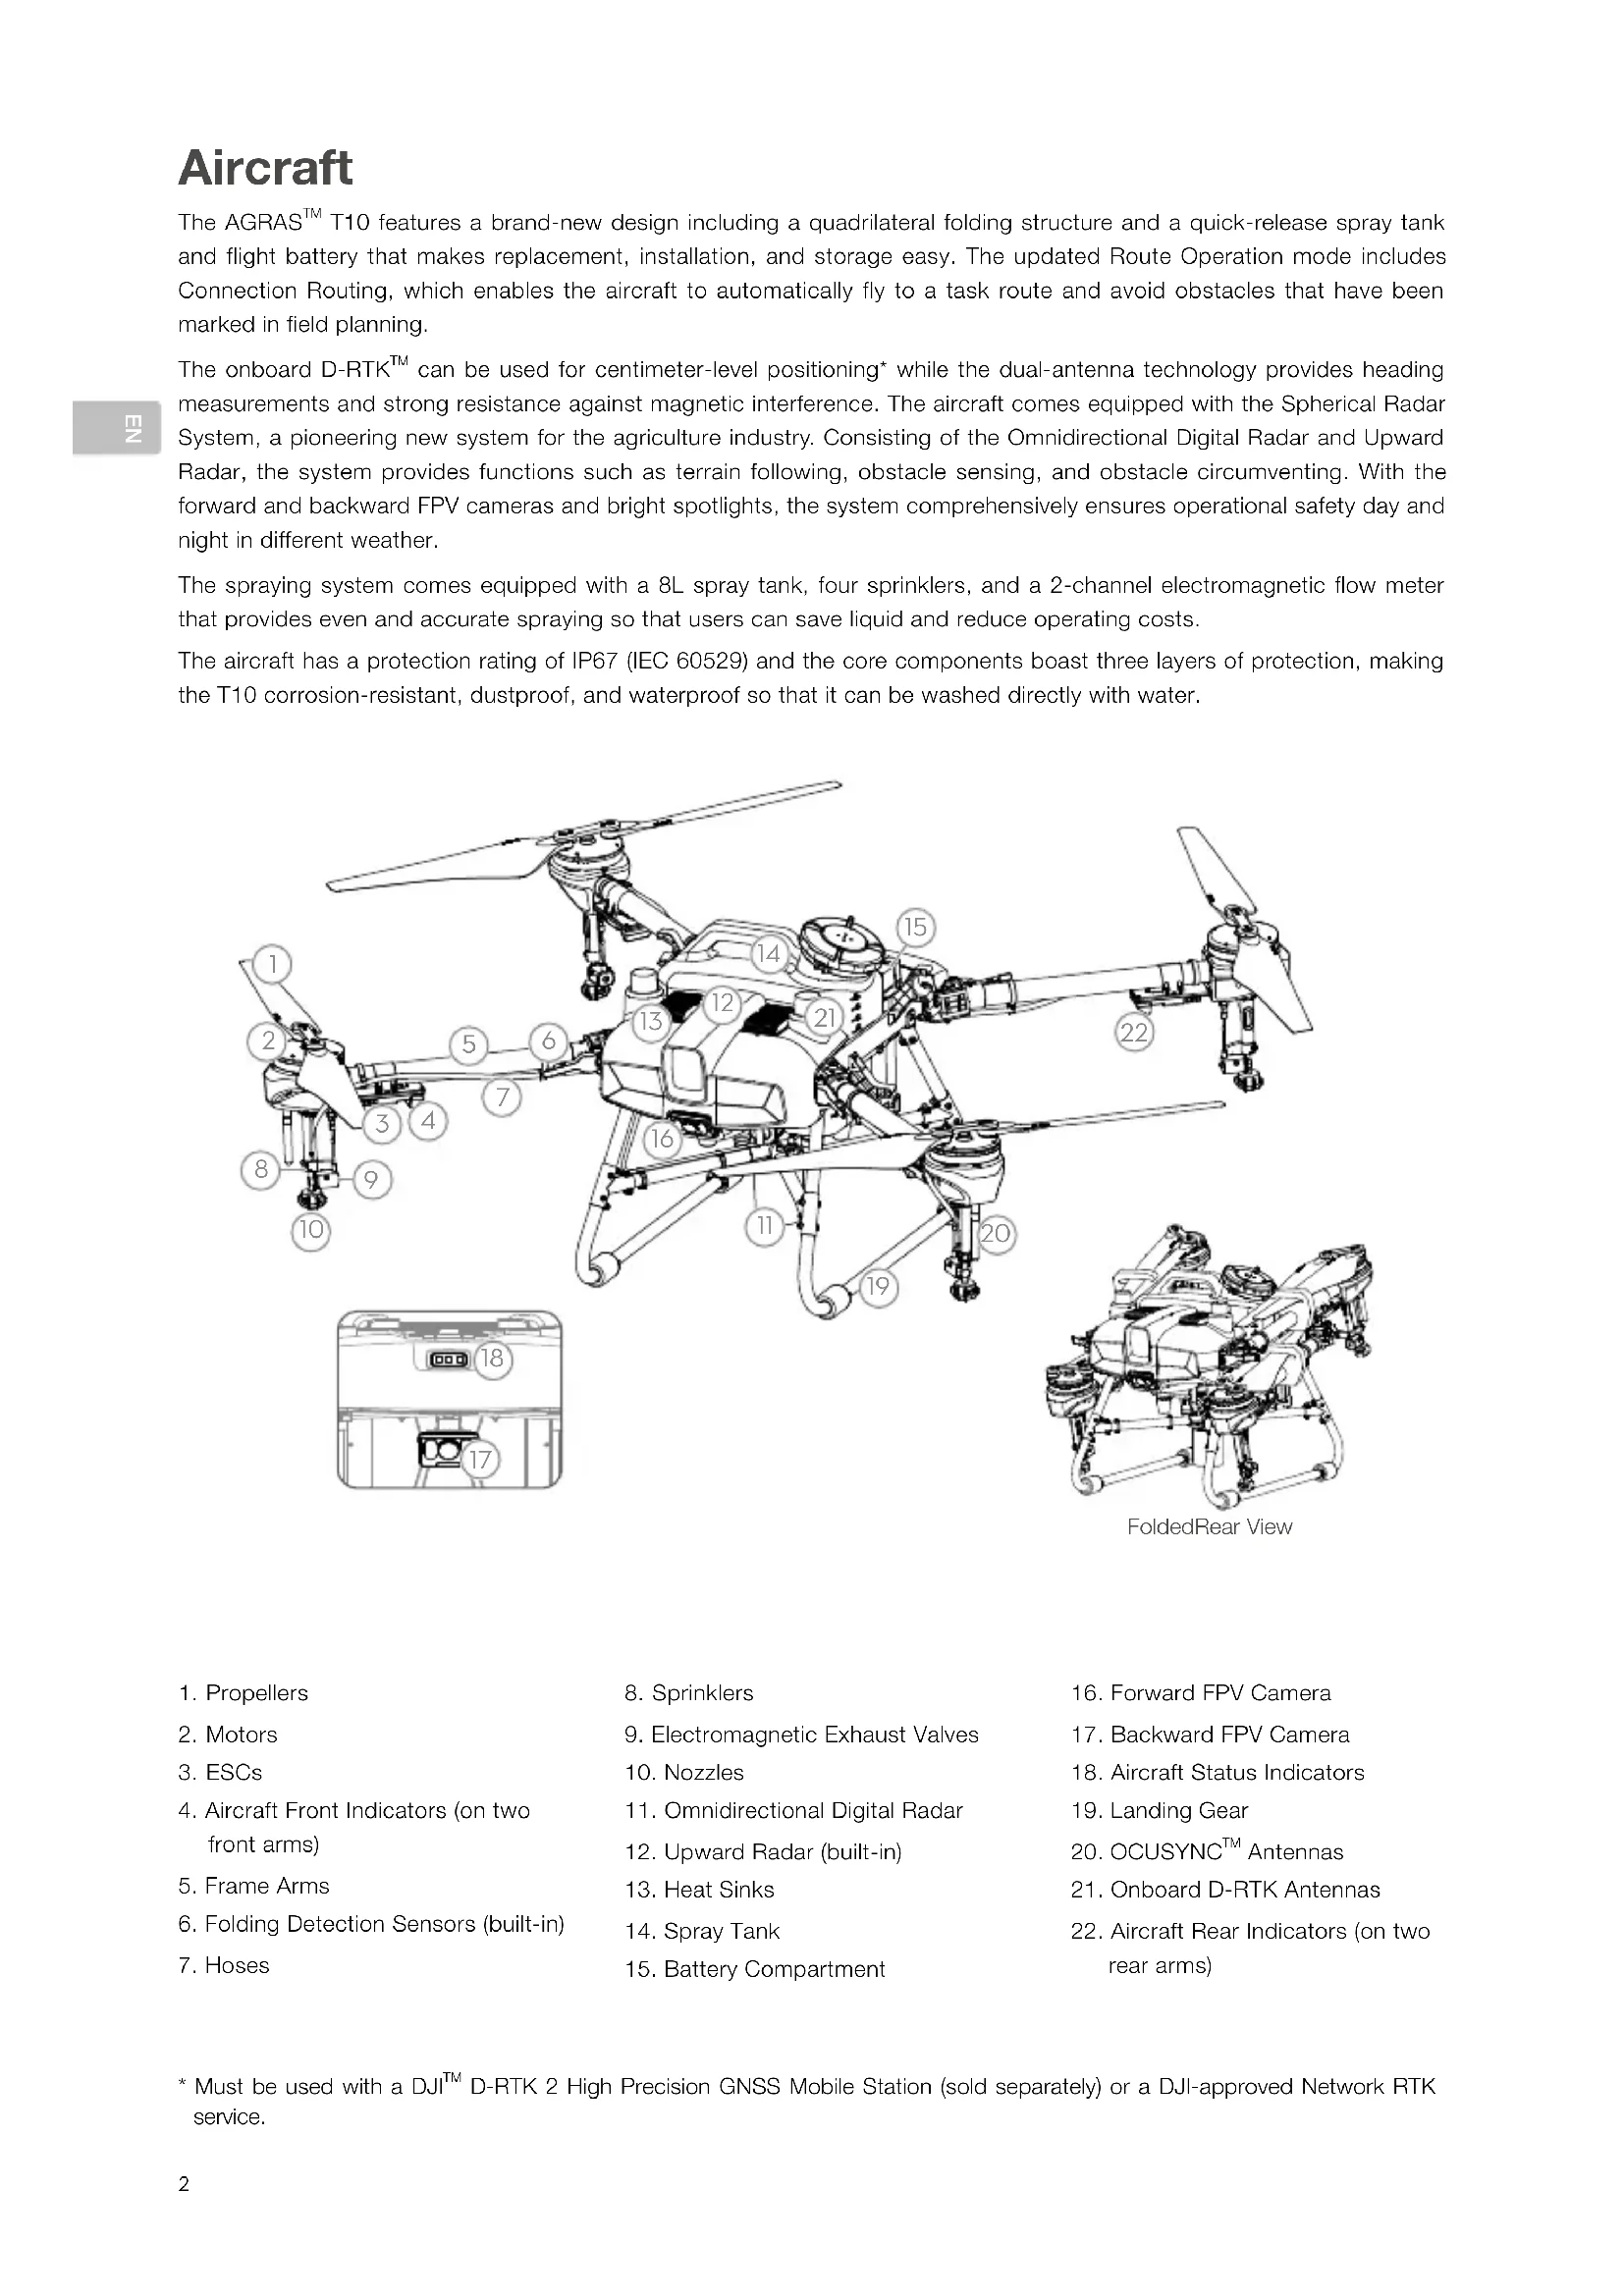
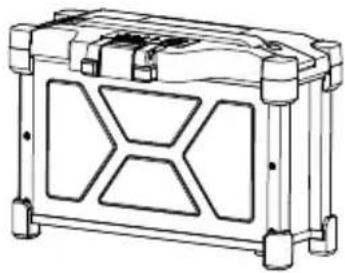
The AGRAS™ T10 features a brand-new design including a quadrilateral folding structure and a quick-release spray tank and flight battery that makes replacement, installation, and storage easy. The updated Route Operation mode includes Connection Routing, which enables the aircraft to automatically fly to a task route and avoid obstacles that have been marked in field planning.
The onboard D-RTK™ can be used for centimeter-level positioning* while the dual-antenna technology provides heading measurements and strong resistance against magnetic interference. The aircraft comes equipped with the Spherical Radar System, a pioneering new system for the agriculture industry. Consisting of the Omnidirectional Digital Radar and Upward Radar, the system provides functions such as terrain following, obstacle sensing, and obstacle circumventing. With the forward and backward FPV cameras and bright spotlights, the system comprehensively ensures operational safety day and night in different weather.
The spraying system comes equipped with a 8L spray tank, four sprinklers, and a 2-channel electromagnetic flow meter that provides even and accurate spraying so that users can save liquid and reduce operating costs.
The aircraft has a protection rating of IP67 (IEC 60529) and the core components boast three layers of protection, making the T10 corrosion-resistant, dustproof, and waterproof so that it can be washed directly with water.
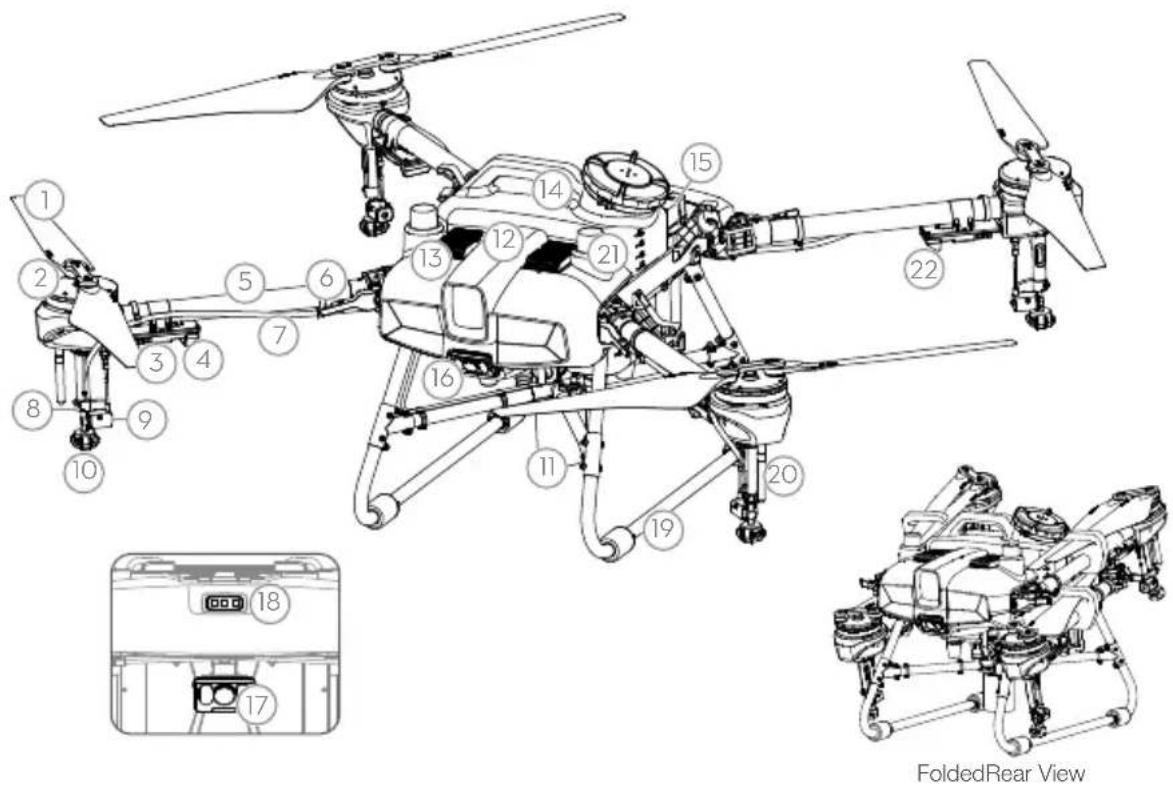
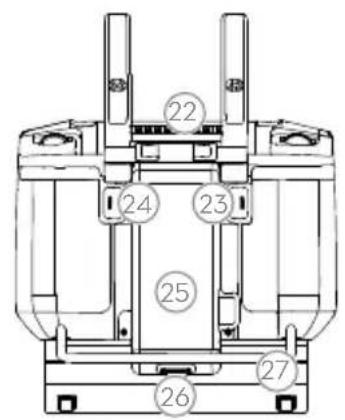
- Propellers
- Motors
- ESCs
- Aircraft Front Indicators (on two front arms)
- Frame Arms
- Folding Detection Sensors (built-in)
-
Hoses
-
Sprinklers
- Electromagnetic Exhaust Valves
- Nozzles
- Omnidirectional Digital Radar
12.Upward Radar (built-in) - Heat Sinks
- Spray Tank
-
Battery Compartment
-
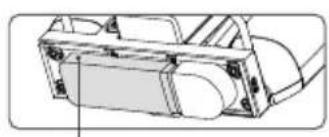
Forward FPV Camera
- Backward FPV Camera
- Aircraft Status Indicators
- Landing Gear
20.OCUSYNC Antennas - Onboard D-RTK Antennas
- Aircraft Rear Indicators (on two rear arms)
Remote Controller
The Smart Controller Enterprise uses DJI OcuSync Enterprise transmission technology, has a max transmission distance of up to 7 km, and supports Wi-Fi and Bluetooth. The remote controller has a 5.5-inch bright, dedicated screen and comes with the updated DJI Agras app built-in, delivering a smooth and easy-to-use experience. Operations can be planned to centimeter-level precision when the RTK dongle (sold separately) is connected to the remote controller. The Multi-Aircraft Control mode of the remote controller can be used to coordinate the operation of multiple aircraft at the same time, enabling pilots to work efficiently. Both the built-in battery and external battery can be used to supply power to the remote controller. The remote controller has a working time of up to 4 hours, making it ideal for long and high-intensity operations.
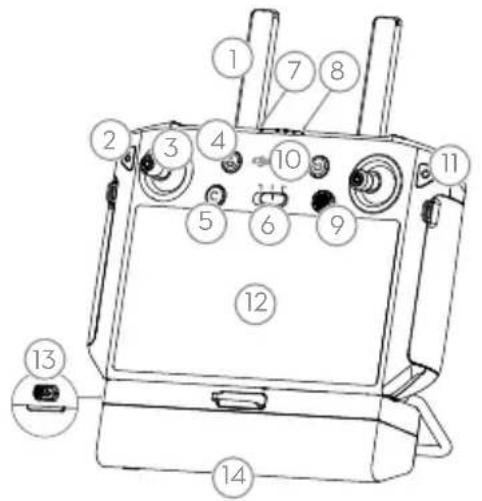
- Antennas
- Back/Function Button
- Control Sticks
- RTH Button
- Button C3 (customizable)
- Flight Mode Switch
7.StatusLED -
Battery Level LEDs
9.5D Button (customizable) -
Power Button
- Confirm Button
- Touch Screen
- USB-C Charging Port
- Dongle Compartment Cover
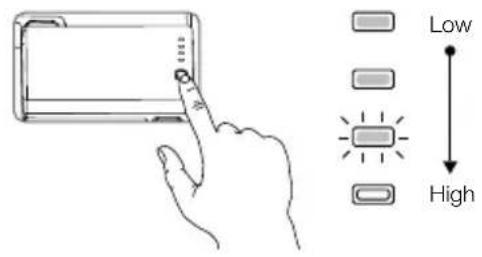
- Spray Rate Dial
- Spray Button
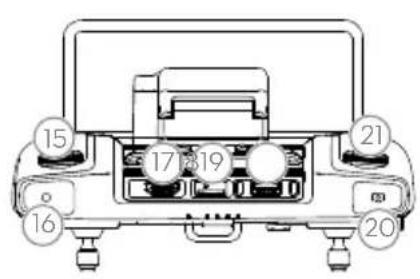
17.HDMI Port -
microSD Card Slot
-
USB-A Port
- FPV/Map Switch Button
- Reserved Dial
- Air Outlet
- Button C1 (customizable)
- Button C2 (customizable)
- Battery Cover
- Battery Cover Release Button
- Handle
The figure below shows the function that each control stick movement performs and uses Mode 2 as an example. In Mode 2, the left stick is used to control the altitude and heading of the aircraft while the right stick is used to control the forward, backward, left, and right movements.
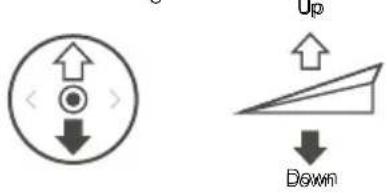
Left Stickk Rghtt Sbiok
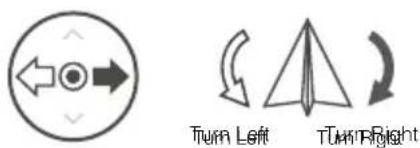

Forward
Backward

- The remote controller is able to reach its maximum transmission distance (FCC/NCC: 7 km (4.35 mi); SRRC: 5 km (3.11 mi); CE/KCC/MIC: 4 km (2.49 mi)) in an open area with no electromagnetic interference, and at an altitude of approximately 2.5 m (8.2 ft). Make sure to comply with local laws and regulations when using Multi-Aircraft Control mode.
Fly Safe
It is important to understand some basic flight guidelines, both for your protection and for the safety of those around you.
- Flying in Open Areas: pay attention to utility poles, power lines, and other obstacles. DO NOT fly near or above water, people, or animals.
- Maintain Control at All Times: keep your hands on the remote controller and maintain control of the aircraft when it is in flight, even when using intelligent functions such as the Route and A-B Route operation modes and Smart Return to Home.
- Maintain Line of Sight: maintain visual line of sight (VLOS) with your aircraft at all times and avoid flying behind buildings or other obstacles that may block your view.
- Monitor Your Altitude: for the safety of manned aircraft and other air traffic, fly at altitudes lower than 100m (328 ft) and in accordance with all local laws and regulations.

Visit https://www.dji.com/flysafe for more information on critical safety features such as GEO zones.

Flight Environment Requirements
- DO NOT use the aircraft to spray in winds exceeding 18 kph (11 mph).
- DO NOT use the aircraft in adverse weather conditions such as winds exceeding 28 kph (17 mph), heavy rain exceeding 25 mm (0.98 in) in 12 hours, snow, or fog.
- DO NOT fly more than 4.5km (14,763 ft) above sea level.
- The DJ Agras app will intelligently recommend the payload weight limit for the tank according to the current status and surroundings of the aircraft. Do not exceed the recommended payload weight limit when adding material to the tank. Otherwise, the flight safety may be affected.
- Make sure that there is a strong GNSS signal and the D-RTK antennas are unobstructed during operation.
Return to Home (RTH)
The aircraft will automatically return to the Home Point in the following situations:
Smart RTH: user presses and holds the RTH button.
Failsafe RTH: the remote controller signal is lost.*
If there is an obstacle within 20m of the aircraft, the aircraft decelerates and brakes and hovers. The aircraft will exit RTH and wait for further commands.
If RTH is triggered during Route operations, the aircraft can plan a flight path for RTH to circumvent the obstacles added when planning a field.
- The aircraft will RTH or hover if the remote controller signal is lost. The action can be set in the app. Failsafe RTH will only be available if RTH is set.

- Obstacle avoidance is disabled when the aircraft is in Attitude mode, which it enters in situations such as when the GNSS signal is weak. Note that obstacle avoidance is unreliable when using the aircraft in environments where the radar module cannot operate normally. Extra caution is required in such situations.
Pesticide Usage
- Avoid the use of powder pesticides as much as possible as they may reduce the service life of the spraying system.
- Pesticides are poisonous and pose serious risks to safety. Only use them in strict accordance with their specifications.
- Use clean water to mix the pesticide and filter the mixed liquid before pouring into the spray tank to avoid blocking the strainer.
- Effective use of pesticides depends on pesticide density, spray rate, spray distance, aircraft speed, wind speed, wind direction, temperature, and humidity. Consider all factors when using pesticides.
- DO NOT compromise the safety of people, animals, or the environment during operation.

It is important to understand the basic flight guidelines, both for your protection and for the safety of those around you. Make sure to read the disclaimer and safety guidelines.
Using the T10
1. Preparing the Intelligent Flight Battery
Only use the official DJI flight batteries listed below. Check the battery level before flying and charge it according to the instructions in the corresponding manual documents.
T10 Intelligent Flight Battery BAX501-9500-51.8 (recommended)
T20 Intelligent Flight Battery AB3-18000mAh-51.8V
T16 Intelligent Flight Battery AB2-17500mAh-51.8V

芸
2. Preparing the Aircraft

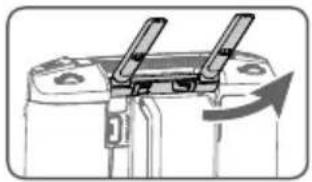
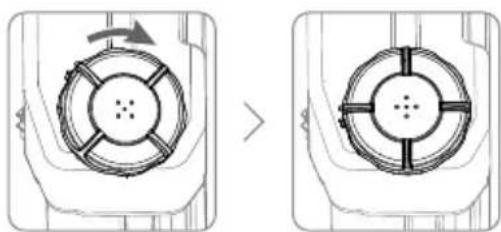
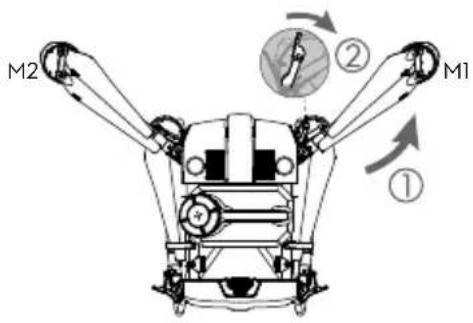
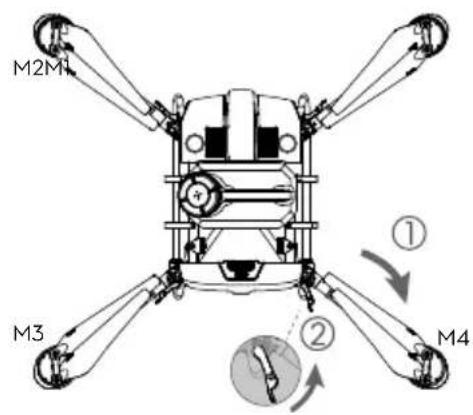
Unfold the M1 and M2 arms, and fasten the two arm locks. Avoid pinching fingers.
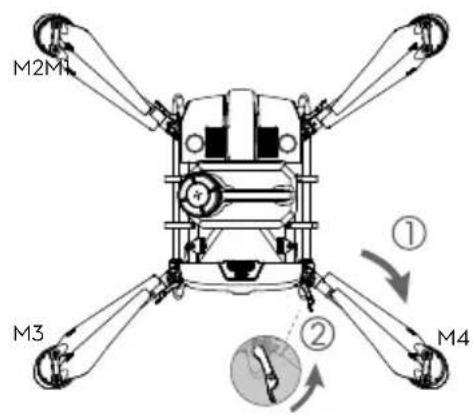
Unfold the M3 and M4 arms, and fasten the two arm locks. Avoid pinching fingers.
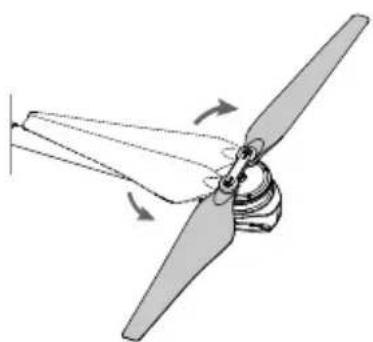
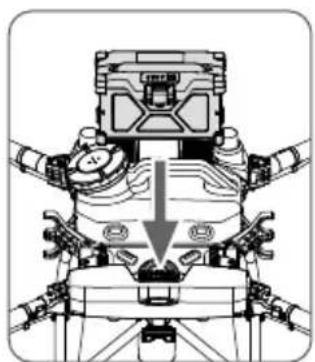
Unfold the propeller blades. Insert the Intelligent Flight Battery into the aircraft until you hear a click.

- Make sure that the battery is firmly inserted into the aircraft. Only insert or remove the battery when the aircraft is powered off.
- To remove the battery, press and hold the clamp and lift the battery up.
- Fold the M3 and M4 arms followed by the M1 and M2 arms and make sure that the arms are inserted into the storage clamps on both sides of the aircraft. Otherwise, the arms may be damaged.
3. Preparing the Remote Controller
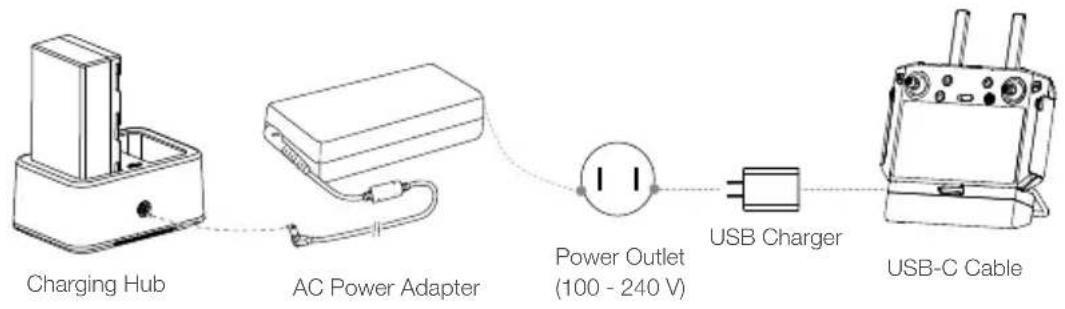
Charging the Batteries
Charge the external Intelligent Battery using the charging hub and AC power adapter. Charge the internal battery of the remote controller using the USB charger and USB-C cable. Fully charge the batteries before using for the first time.
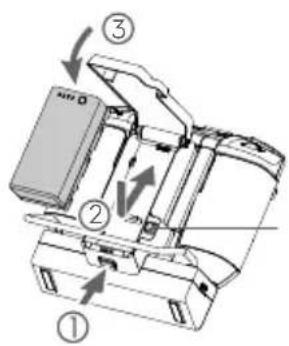
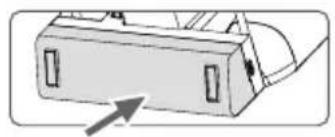
Mounting the External Battery
① Press the battery cover release button on the back of the remote controller down to open the cover.
② Insert the Intelligent Battery into the compartment and push it to the top.
3 Close the cover.

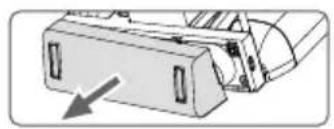
- To remove the Intelligent Battery, press and hold the battery release button and push the battery downward.
Battery Release Button
Mounting the 4G Dongle and SIM Card

- Only use a DJI-approved dongle. The dongle supports various network standards. Use a SIM card that is compatible with the chosen mobile network provider and select a mobile data plan according to the planned level of usage.
- The dongle and SIM card enable the remote controller to access specific networks and platforms such as the DJI Agras Management Platform. Make sure to insert them correctly. Otherwise, network access will not be available.
Remove the dongle compartment cover.
Make sure the SIM card is inserted into the dongle. Insert the dongle into the USB port and test the dongle.*
Dongle
Reattach the cover firmly.
- Test procedure: press the remote controller power button and press again and hold to power on the remote controller. In DJ Agras, tap and select Network Diagnostics. The dongle and SIM card are functioning properly if the status of all the devices in the network chain are shown in green.
Checking the Battery Levels
Press the power button on the remote controller once to check the internal battery level. Press once and press again and hold for two seconds to power on or off.
Press the battery level button on the external Intelligent Battery once to check the battery level.

- When using an external Intelligent Battery, it is still necessary to make sure that the internal battery has some power. Otherwise, the remote controller cannot be powered on.
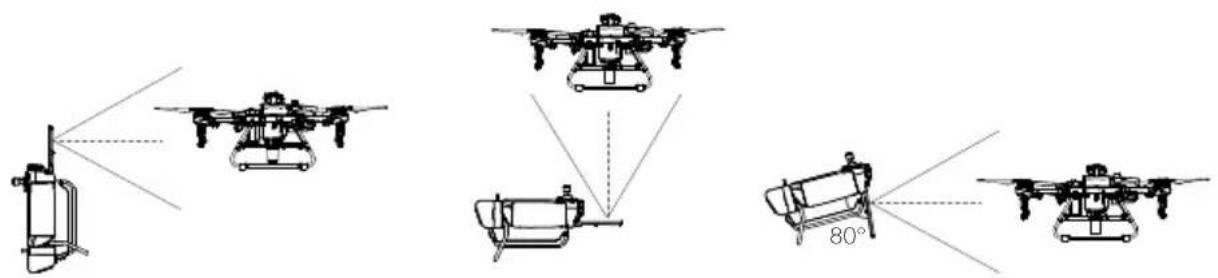
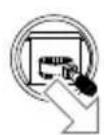
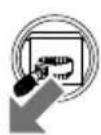
Adjusting the Antennas
Lift and adjust the antennas. The strength of the remote controller signal is affected by the position of the antennas. For an optimal connection between the remote controller and aircraft, make sure the angle between the antennas and the back of the remote controller is 80^ or 180^ .
Try to keep the aircraft inside the optimal transmission zone. If the signal is weak, adjust the antennas or fly the aircraft closer.
Optimal Transmission Zone

- Avoid using wireless devices that use the same frequency bands as the remote controller.
- If the RTK dongle is used for RTK planning, the module should be disconnected from the remote controller after planning is completed. Otherwise, it will affect the communication performance of the remote controller.
4. Getting Ready for Takeoff
A. Place the aircraft on open, flat ground with the rear of the aircraft facing toward you.
B. Make sure that the propellers are securely mounted, there are no foreign objects in or on the motors and propellers, the propeller blades and arms are unfolded, and the arm locks are firmly fastened.
C. Make sure that the spray tank and flight battery are firmly in place.
D. Pour liquid into the spray tank and tighten the cover. Make sure that the four lines on the cover are aligned to the horizontal or vertical direction.
E. Power on the remote controller, make sure that the DJI Agras app is open, and power on the aircraft.


- When using for the first time, activate the aircraft using the DJI Agras app. A DJI account and internet connection are required.
Calibrating the Compass
When the app prompts that compass calibration is required, tap then and swipe to the bottom. Select Advanced Settings, then IMU, and Compass Calibration. Tap Calibration in Compass Calibration and follow the on-screen instructions.
Discharging Trapped Air in the Hoses
The T10 features an automatic trapped air discharge function. When it is necessary to discharge trapped air, press and hold the spray button for two seconds. The aircraft will discharge automatically until the trapped air is fully discharged.
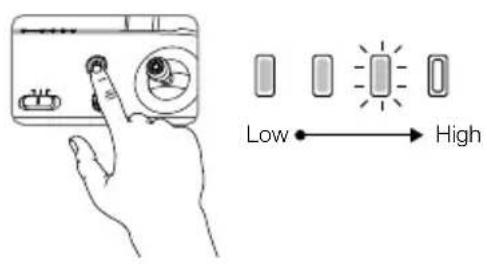
Calibrating the Flow Meter
Make sure to calibrate the flow meter before using for the first time. Otherwise, the spraying performance may be adversely affected.
A. Preparation
① Fill the spray tank with approximately 2 L of water.
② Use the automatic trapped air discharge function to discharge the trapped air. Users can also manually discharge the trapped air. Press the spray button to spray the trapped air and press the button again once all trapped air is discharged.
B. Calibration
① In the app, tap Execute Task to enter Operation View. Tap then swipe up, and tap Calibration on the right of the flow meter calibration section.
② Tap Start Calibration to begin. Calibration will be complete after 25 seconds and the results are displayed in the app.
- Users can proceed once calibration is completed successfully.
- If calibration fails, tap "?" to view and resolve the problem. Recalibrate once the problem is resolved.
5. Flight
In the app, go to Operation View. Make sure that there is a strong GNSS signal and the system status bar indicates Manual Route (GNSS) or Manual Route (RTK).* Otherwise, the aircraft cannot take off.
In order for the aircraft to automatically take off and perform an operation, it is recommended to create a plan for a field and select an operation before takeoff. Refer to the Starting Operations section for more information. For other scenarios, take off and land manually.
Takeoff
Perform a Combination Stick Command (CSC) and push the throttle stick up to take off.
OR


Throttle Stick
(left stick in Mode 2)
Landing
To land, pull down on the throttle stick to descend until the aircraft touches the ground. There are two methods to stop the motors.
Method 1: when the aircraft has landed, push and hold the throttle stick down. The motors will stop after three seconds.
Method 2: when the aircraft has landed, push the throttle stick down, and perform the same CSC that was used to start the motors. Release both sticks once the motors have stopped.
RTK positioning is recommended. In the app, go to Operation View, tap , then RTK to enable Aircraft RTK Positioning, and select a method for receiving RTK signals.


OR

Method 1 Method 2

- Spinning propellers can be dangerous. Stay away from spinning propellers and motors. DO NOT start the motors in confined spaces or where there are people nearby.
- Maintain control of the remote controller as long as the motors are running.
DO NOT stop the motors mid-flight unless in an emergency situation where doing so will reduce the risk of damage or injury. - It is recommended to use Method 1 to stop the motors. When using Method 2 to stop the motors, the aircraft may roll over if it is not completely grounded. Use Method 2 with caution.
After landing, power off the aircraft before turning off the remote controller.
Starting Operations
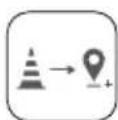
After the operation area and obstacles have been measured and settings have been configured, the DJI Agras app uses a built-in intelligent operation planning system to produce a flight route based on the user's input. Users can invoke an operation after planning a field. The aircraft will begin the operation automatically and follow the planned flight route.
In scenarios with complicated terrain, Phantom 4 RTK and DJI TERRA™ can be used to plan flight routes and import routes to the DJI Agras app for operation. Refer to the Agras T10 User Manual for more information.
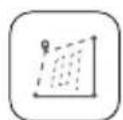
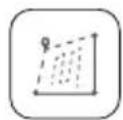
Field Planning
The DJA app supports flight route planning by flying the aircraft to waypoints, obstacles, and calibration points or by walking to these points carrying a remote controller, a remote controller with an RTK dongle, or an RTK device. The following route has been planned by walking to the points with a remote controller.
When the RTK dongle (sold separately) is connected to the USB-A port on the remote controller, "Walk with RTK" can be selected during field planning to plan operations to centimeter-level precision. The remaining steps are the same as the instructions for walking with a remote controller.
Power on the remote controller. Launch DJI Agras.

Tap Plan Field, select Walk with RC.

Wait until the GNSS signal is strong. Positioning accuracy may vary by + / - 2 meters.

Walk with the remote controller alongside the boundary of the operation area and tap Add Waypoint C2 at turning points.
Walk to each obstacle in turn and tap Obstacle Mode C1.*

Walk around the obstacle and tap Add Obstacle C2 at several points around the obstacle.
Tap Waypoint C1 to return to add edge points to the operation area.
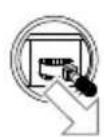
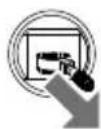
Tap Field Editing to use the crosshair to add points, configure distance and route spacing, and adjust the route direction by tapping or dragging the icon

Save the field plan.
* Any obstacles in or out of the operation area can be marked.
Once you have finished planning, press the back button on the remote controller to return to the home screen.

Performing an Operation
Power on the remote controller and aircraft.

Tap Execute Task in the home screen of the app.

Tap and select the field from the field list.
Tap Edit to edit the waypoints and flight route again.
parameters, and confirm.

Tap Start.Tap Use, set operatorSet the auto-takeoff height by setting the Connection Routing Altitude in the app and move the slider to take off. The aircraft will perform the operation automatically.

- Only take off in open areas and set an appropriate auto-takeoff height according to the operating environment.
- An operation can be paused by moving the control stick slightly. The aircraft will hover and record the breakpoint. After which, the aircraft can be controlled manually. To continue the operation, select it again from the Executing tag in list. The aircraft will return to the breakpoint automatically and resume the operation. Pay attention to aircraft safety when returning to a breakpoint.
- In Route Operation mode, the aircraft is able to circumvent obstacles, which is disabled by default and can be enabled in the app. If the function is enabled and the aircraft detects obstacles, the aircraft will slow down and circumvent the obstacles and return to the original flight path.
- Users can set the action the aircraft will perform after the operation is completed in the app.
More Operation Modes and Functions
Refer to the Agras T10 User Manual for more information about the A-B Route, Manual, and Manual Plus Operation modes and on how to use functions such as Connection Routing, Operation Resumption, System Data Protection, and Empty Tank.
6. Maintenance
Clean all parts of the aircraft and remote controller at the end of each day of spraying after the aircraft returns to a normal temperature. DO NOT clean the aircraft immediately after operations are completed.
A. Fill the spray tank with clean water or soapy water and spray the water through the nozzles until the tank is empty. Repeat the step twice more.
B. Detach the spray tank and spray tank connector to clean them. Remove the spray tank strainer, nozzle strainers, and nozzles to clean them and clear any blockage. Afterwards, immerse them in clean water for 12 hours.
C. Make sure that the aircraft structure is completely connected so that it can be washed directly with water. It is recommended to use a spray washer filled with water to clean the aircraft body and wipe with a soft brush or wet cloth before removing water residue with a dry cloth.
D. If there is dust or pesticide liquid on the motors, propellers, or heat sinks, wipe them with a wet cloth before cleaning the remaining water residue with a dry cloth.
E. Wipe the surface and screen of the remote controller with a clean wet cloth that has been wrung out with water.
Refer to the disclaimer and safety guidelines for more information on product maintenance.

Download the Agras T10 User Manual for more information: https://www.dji.com/t10/downloads
Specifications
Product Model 3WWDZ-10A
Airframe
Max Diagonal Wheelbase 1480 mm
Dimensions 1958× 1833× 553mm arms and propellers unfolded
1232 × 1112 × 553 ~mm (arms unfolded and propellers folded)
600× 665× 580mm arms and propellers folded
- Propulsion System
Motors
Max Power 2500 W/rotor
ESCs
Max Working Current 32 A
(Continuous)
Foldable Propellers (R3390)
Diameter × Pitch 33× 90 in
Spraying System
Spray Tank
Volume Fully loaded: 8 L
Operating Payload Fully loaded: 8 kg
Nozzles
Model XR11001VS (standard), XR110015VS, XR11002VS (optional, purchase separately)
Quantity 4
Max Spray Rate XR11001VS: 1.8 L/min, XR110015VS: 2.4 L/min, XR11002VS: 3 L/min
Spray Width 3-5.5 m (4 nozzles, at a height of 1.5-3 m above crops)
Droplet Size XR11001VS: 130-250 m, XR110015VS: 170-265 m, XR11002VS: 190
300~ m (subject to operating environment and spray rate)
Flow Meter
Measurement Range 0.25-20 L/min
Error < ± 2%
Measurable Liquid Conductivity >50~ S / cm (liquids such as tap water or pesticides that contain water)
- Omnidirectional Digital Radar
Model RD2424R
Operating Frequency SRRC/NCC/FCC/MIC/KCC/CE: 24.05-24.25 GHz
Power Consumption 12 W
Transmission Power (EIRP) SRRC: ≤ 13 dBm, NCC/MIC/KCC/CE/FCC: ≤ 20 dBm
Altitude Detection & Terrain Altitude detection range: 1-30 m
Follow[1] Stabilization working range: 1.5-15 m
Max slope in Mountain mode: 35^
Obstacle Avoidance[1] Obstacle sensing range: 1.5-30 m
FOV: Horizontal: 360^ , Vertical: ± 15^
Working conditions: flying higher than 1.5m over the obstacle at a speed lower
than 7m / s
Safety limit distance: 2.5m (distance between the front of propellers and the
obstacle after braking)
Obstacle avoidance direction: omnidirectional obstacle avoidance in the
horizontal direction
IP Rating IP67
- Upward Radar
Model RD2414U
Operating Frequency SRRC/NCC/FCC/MIC/KCC/CE: 24.05-24.25 GHz
Power Consumption 4 W
Transmission Power (EIRP) SRRC: ≤13 dBm, NCC/MIC/KCC/CE/FCC: ≤20 dBm
Obstacle Avoidance1) Obstacle sensing range: 1.5-15 m
FOV: 80^
Working conditions: available during takeoff, landing, and ascending when an
obstacle is more than 1.5m above the aircraft.
Safety limit distance: 2m (distance between the highest point of the aircraft and the
lowest point of the obstacle after braking)
Obstacle avoidance direction: upward
IP Rating IP67
FPV Cameras
FOV Horizontal: 129^ , Vertical: 82^
Resolution 1280x720 15-30fps
FPV Spotlights FOV: 120^ , Max brightness: 13.2 lux at 5 m of direct light
- Flight Parameters
Operating Frequency SRRC/NCC/FCC/CE/MIC/KCC: 2.4000-2.4835 GHz
SRRC/NCC/FCC/CE: 5.725-5.850 GHz[2]
Transmission Power (EIRP) 2.4 GHz
SRRC/CE/MIC/KCC: ≤20 dBm, FCC/NCC: ≤31.5 dBm
5.8 GHz
FCC/SRRC/NCC: ≤ 29.5 dBm, CE: ≤ 14 dBm
Total Weight (exc. battery) 13kg
Max Takeoff Weight 24.8 kg (at sea level)
Hovering Accuracy Range D-RTK enabled: Horizontal: ± 10 cm, Vertical: ± 10 cm
(with strong GNSS signal) D-RTK disabled:
Horizontal: ± 0.6m Vertical: ± 0.3m (Radar module enabled: ± 0.1m )
RTK/GNSS Operating RTK: GPS L1/L2, GLONASS F1/F2, BeiDou B1/B2, Galileo E1/E5
Frequency GNSS: GPS L1, GLONASS F1, Galileo E1
Battery DJI-approved flight battery (BAX501-9500-51.8, AB3-18000mAh-51.8V, or AB2-
17500mAh-51.8V)
Max Power Consumption 3700 W
19 min (takeoff weight of 16.8 kg with an 9500 mAh battery)
9 min (takeoff weight of 24.8kg with an 9500 mAh battery)
Max Tilt Angle 15^
Max Operating Speed 7 m/s
Max Flying Speed 10 m/s (with strong GNSS signal)
Max Wind Resistance 8 m/s
Max Service Ceiling Above 4500 m
Sea Level
Recommended Operating <93%
Humidity
Recommended Operating 0^ to 45^ (32^ to 113^)
Temperature
Remote Controller
Model RM500-ENT
Screen 5.5-in screen, 1920× 1080 1000 cd/m 2Android system
RAM 4GB
Built-in Battery 18650 Li-ion (5000 mAh @ 7.2 V)
GNSS GPS+GLONASS
Power Consumption 18 W
Operating Temperature 0^ to 45^ (32° to 113° F)
Charging Environment 5^ to 40^ (41^ to 104^)
Temperature
Storage Temperature -30^ to 60^ C (-22° to 140° F) (stored for no more than one month with a built-in battery power of 40% to 60%)
OcuSync Enterprise
Operating Frequency SRRC/NCC/FCC/CE/MIC/KCC: 2.4000-2.4835 GHz SRRC/NCC/FCC/CE: 5.725-5.850 GHz[2]
Max Transmission Distance FCC/NCC: 7 km, SRRC: 5 km, MIC/KCC/CE: 4 km (Unobstructed, free of interference)
Transmission Power (EIRP) 2.4 GHz SRRC/CE/MIC/KCC: ≤ 20 dBm, FCC/NCC: ≤ 30.5 dBm 5.8 GHz SRRC: ≤ 21.5 dBm, FCC/NCC: ≤ 29.5 dBm, CE: ≤ 1.4
Wi-Fi
Protocol Wi-Fi Direct, Wi-Fi Display, 802.11a/g/n/ac Wi-Fi with 2× 2 MIMO
Operating Frequency 2.4000-2.4835 GHz 5.150-5.250 GHz[2] 5.725-5.850 GHz[2]
Transmission Power (EIRP) 2.4 GHz SRRC/CE:18.5 dBm, NCC/FCC/MIC/KCC:20.5 dBm 5.2 GHz SRRC/NCC/FCC/CE/MIC:14 dBm, KCC:10 dBm 5.8 GHz SRRC/NCC/FCC:18 dBm, CE/KCC:12 dBm
Bluetooth
Protocol Bluetooth 4.2
Operating Frequency 2.4000-2.4835 GHz
Transmission Power (EIRP) SRRC/NCC/FCC/CE/MIC/KCC: 6.5 dBm
Remote Controller Intelligent Battery
Model WB37-4920mAh-7.6V Battery Type 2S LiPo Capacity 4920 mAh Voltage 7.6 V Energy 37.39 Wh Charging Environment 5^ to 40^ (41° to 104° F) Temperature
- Intelligent Battery Charging Hub
Model WCH2
Input Voltage 17.3-26.2 V
Output Voltage and Current 8.7 V, 6 A
Operating Temperature 5^ to 40^ C (41^ to 104^ F)
- AC Power Adapter
Model A14-057N1A
Input Voltage 100-240 V, 50/60 Hz
Output Voltage 17.4 V
Rated Power 57 W
[1] The effective radar range varies depending on the material, position, shape, and other properties of the obstacle.
[2] Local regulations in some countries prohibit the use of the 5.8 and 5.2 GHz frequencies. In some countries, the 5.2 GHz frequency band is only allowed for indoor use.
[3] Hovering time acquired at sea level with wind speed lower than 3m / s and a temperature of 25^ (77^) . For reference only. The data may vary depending on the environment. Actual results shall be as tested.
機体
SRRC/NCC/FCC/CE:5.725\~5.850GHz[2]
伝送電力 (EIRP) 2.4 GHz
2.4 GHz
https://www.dji.com/flysafe

i
- mllllouioe oaiiuuueuaaunue 18 malusoe (11 laieo
- nuluuluaumwmaia 28 nu./Buu.(17 laioa) uannn (nu 25 u.(0.98 t)lu 12
- muaugmnaaunnnaa 4.5 na.(14,763 n)
- uDJI Agras aennnnnne nnnnnnnnnnnnnnnnnnnnnnnnnnnnnnnnnnnnnnnnnnnnnnnnnnnnnnnnnnnnnnnnnnnnnnnnnnnnnnnnnnnnnnnnnnnnnnnnnnnnnnnnnnnnnnnnnnnnnnnnnnnnn
- 5
Return to Home (RTH)
Home Point Iuaaunauuua
Smart RTH: 1970-1980 RTH 1970
Failsafe RTH (RTH wuuuuaaannnnae)
wnnnaanrnnnne 20 nnnnnnne nnne ane aannnne annnne ane ane ane ane ane ane ane ane ane ane ane ane ane ane ane ane ane ane ane ane ane ane ane
RTH RTH RTH
n. 103uW u7uLd lo9vTuNtuTuTuTuTuTuTuTu
v. 03a0u1u1u7a0d1u7u007u1u7u7u7u7u7u7u7u7u7u7u7u7u7u7u7u7u7u7u7u7u7u7u7u7u7u7u7u7u7u7u7u7u7u7u7u7u7u7u7u7u7u7u7u7u7u7u7u7u7u7u
n. 032001uuiuuiuuiuuiuuiuuiuuiuuiuuiuuiuuiuui
3. 110000000000000000000000000000000000000000000000000000
a. 1nnnnaa nnaa aannnnnna DJI Agras iao

1
JU 1
maaan
uCalibration u Compass Calibration u
Jiaoyanmianyuan yu
T10 1
m
aannnnnnaanennnnnne aannnnnne nnnnnnne ane annnnnnnnnnnnnnnnnnnn
n. n
1yauuunue 2 aunnuia aunnuu
2
1.0737
1 1uouuuuue Execute Task wotng Operation View uae annu uauauuue Calibration mnnnuuua
2 Start Calibration 25
Operation View GNSS (GNSS)
Lumuuluuluuuuluuuuluuuunnnn uuuuunnnnnnnnnnnnnnnnnnnnnnnnnnnnnnnnnnnnnnnnnnnnnnnnnnnnnnnnnnnnnnnnnnnnnnnnnnnnnnnnnnnnnnnnnnnnnnnnnnnnnnnnnnnnnnnnnnnnnnnnnnnnnnn
mua
Combination Stick Command (CSC) u'thruuThrottle

1

luuunmuaaunauauauauauauauauauauauauauauauauauauauauauauauauauauauauauauauauuuuuuuuuuuuuuuuuuuuuuuuuuuuuuuuuuuuuuuuuuuuuuuuuuuuuuuuuuuuuuuuuuuuuuuuuuuuuuuuuuuuuuuuuuuuuuuuuuuuuuuuuuuuuuuuuuuuuuuuuuuuuuuuuuuuuuuuuuuuuuuuuuuuuuuuuuuuuuuuuuuuuuuuuuuuuuuuuuuuuuuuuuuuuuuuuuuuuuuuuUU
mnnnnaaannnnnnae
aui DJI Agras aannnnnnaanennnnnnnnnnnnnnnnnnnnnnnnnnnnnnnnnnnnnnnnnnnnnnnnnnnnnnnnnnnnnnnnnnnnnnnnnnnnnnnnnnnnnnnnnnnnnnnnnnnnnnnnnnnnnnnnnnnnnn
Agras T10 Agra A-B Route, Manual uz Manual Plus Operation uz Empty Tank
6. mss
m
n. 1
u. 0000000000000000000000000000000000000000000000000000000000000
a. 000000000000000000000000000000000000000000000000000000000
n 1
1.
y

Agras T10
https://www.dji.com/t10/downloads
yaaan7nW7%
Juaa
3WWDZ-10A
Airframe
1111111111111111111
1480
1958x1833x553 (nnnnaaWooan)
1232x1112x553 (nnnnnaaWooan)
600x665x580 (
10
2500W/15600 ESCs 32A luwul (R3390)
#
1330 8n7n:8n7n
m
X 4
mssmaaefyueu SRRC: ≤ 13 dBm, NCC/MIC/KCC/CE/FCC: ≤ 20 dBm
mnnnnaaennnnnnaeannnnn nnnnnnnnnnnnnnnnnnnnnnnnnnnnnnnnnnnnnnnnnnnnnnnnnnnnnnnnnnnnnnnnnnnnnnnnnnnnnnnnnnnnnnnnnnnnnnnnnnnnnnnnnnnnnnnnnnnnnnn
yannnnnna 1.5-15u
35
yannan 15-30
FOV: 360°
ammmnnn: 1.5 mssssssssssssssssssssssssssssssssssssssssssssssssssssssss
Jnssssssssssssssssssssssssssssssssssssssssssssssssssssssssssssssssssssssssssssssssssssss
yannnnnnaaannnnaeennn: nannnnnnaanrnnnneennnnnnnnnnnnnnnn
anomummuuauuIP IP67
6307959370177646
mnnnnnne
mshw
mamnnaeeyne
1
RD2414U
SRRC/NCC/FCC/MIC/KCC/CE:24.05-24.25 GHz
4W
SRRC: ≤13 dBm, NCC/MIC/KCC/CE/FCC: ≤20 dBm
1.5-15
FOV: 80^
amnnnnaa: waaanrnuu u aauo aauanrnnn rannnnn n 1.5
Jnnae 2 1
H
anumunuauipIP IP67
nFV
FOV
129 82°
7
1280×720 15-30fps
Jouanol FPV
FOV: 120° nanowarnggog: 13.2 anwovnuee 5 a.
Wnnae
mnnnnnne
SRRC/NCC/FCC/CE/MIC/KCC:2.4000-2.4835 GHz
SRRC/NCC/FCC/CE:5.725-5.850GHz
mssnnnnae
2.4 GHz
SRRC/CE/MIC/KCC: ≤20 dBm, FCC/NCC: ≤31.5 dBm
5.8 GHz
ywnnnn (naaannnnnnnnnnnnnnnnnnnnnnnnnnnnnnnnnnnnnnnnnnnnnnnnnnnnnnnnnnnnnnnnnnnnnnnnnnnnnnnnnnnnnnnnnnnnnnnnnnnnnnnnnnnnnnnnnnnnnnnnnnnn
y
FCC/SRRC/NCC:≤29.5dBm,CE:≤14dBm
DJI (BAX501-9500-51.8, AB3-18000mAh-51.8V wAAB2
T
17500mAh-51.8V)
3700W
19 m(wnnne 16.8nn. Wwunwaae39500 mAh)
3
9 w (wnnnnne 24.8 m. wesuunwne 9500 mAh)
mnnnne nnnnnnne
15^
5.5 1920x1080,1000 cd/m,Android
RAM 4GB
a.1000018650(5000mAh@7.2V)
1
18W
GNSS GPS + GLONASS
0^ - 45^ waiwa(32°-113°wuiu
m 1
5°-40°waiu(41°-104°whuiu)
gnnnnnne
-30° 60° C (-22° 140° F) (wnwauuueaewaae 40% 60% agnulus
y
aennnnnne
OcuSync Enterprise
y
SRRC/NCC/FCC/CE/MIC/KCC:2.4000-2.4835 GHz
SRRC/NCC/FCC/CE:5.725-5.850GHz
zuznnnnaaennnnnnae (
FCC/NCC: 7 km, SRRC: 5 km, MIC/KCC/CE: 4 km
SRRC/CE/MIC/KCC: ≤ 20 dBm, FCC/NCC: ≤ 30.5 dBm
5.8 GHz
Wi-Fi
SRRC: ≤21.5 dBm, FCC/NCC: ≤29.5 dBm, CE: ≤14 dBm
wW
Wi-Fi Direct, Wi-Fi Display, 802.11a/g/n/ac
1
Wi-Fi 2x2 MIMO
2.4000-2.4835 GHz
5.150-5.250 GHz
5.725-5.850GHz
mnnnnae 2.4GHz
SRRC/CE:18.5 dBm, NCC/FCC/MIC/KCC:20.5 dBm
5.2 GHz
SRRC/NCC/FCC/CE/MIC:14dBm,KCC:10dBm
5.8 GHz
SRRC/NCC/FCC:18 dBm,CE/KCC:12 dBm
Iwlnnaa
Bluetooth 4.2
aannnnnna
2.4000-2.4835 GHz
mss
SRRC/NCC/FCC/CE/MIC/KCC:6.5dBm
y
12
WB37-4920mAh-7.6V
1
2S LiPo
(
4920 mAh
u30016w
7.6V
WAN
37.39 Wh
086n 177w620603u77
5^ - 40^ 周期为(41°-104°周
-
3
WCH2
wouwuwu wuyu
17.3-26.2V
wunoonuaaualw
8.7V,6A
eannnnnne
Tur bay védiem cat canh (Return to Home, RTH)
May bay se turo dong bay ve diem cat canh (Home Point) trong cac tinh hong sau:
RTH thong minh: ngroi dung nhan va giu nut RTH.
RTH tur an toan: Mattin hieu tur bo dieu khien tur xa.*
Néu co vát can trong pham vi cach may bay 20m, may bay sé giàm tóc, phanh va bay treo. May bay thoát khoi quy trinh RTH va doi lenh dieu khién tiep theo.
Neu kich hoat tinh nang RTH khi van hanh o ché do Tuyen (Route), may bay co the lap ke hoach duong bay cho RTH de vuot qua cac chirong ngai vát bo sung khi lap ke hoach ruong phun.
- May bay se tur bay ve diem cat canh RTH hoac bay treo neu mat tin hi eu dieu khien tur xa. Co the thiet lap hanh dong trong ung dung. Ch do RTH tur an toan se chi khadung neu RTH ducc thiet lap.

Tinh nang tranh vat can bi tai khi may bay o ché do Do cao, che do nay se duoc sur dung trong cac tin huong nhur khi tin hiue GNSS yeu. Luru ry rang tin nang tranh vat can khong dang tin cay khi sur dung may bay tong moi truong ma mo-dun ra-da khong the hoat dong binh thuong. Can rat than tong trong cac tinh huong do.
Srdung Thuoc trsau
- Han ché tói da viéc su dung tuoc tru sau dung bot, vi thuc dung bot co the lam giam tuoi tho cua he thong phun.
- Thuoc tru sa co doc tinh va gay ra cac rui ro nghiem tro ng v an toan. Tuan thu chat che hong dan ky thuat khi su dung thuoc.
- Sur dung nuroc sach de pha thuoc tru sau va loc hon hop thuoc da pha truroc khi do vao sinh thuoc phun de tranh lam tac nghen bo loc.
- Hieu qua cua viec sur dung thuoc tru sau phu thuoc vao nong do thuoc tru sau, toc do phun, khoang cach phun, toc do may bay, toc do gio, huong gio, nhiet do, va do am. Hay xem xet tat ca cac yeu to khi sur dung thuoc tru sau.
- KHONG lam anh hong den su an toan cua nguoi, dong vat, hoac cua moi truong tong khi vanh hanth thiet bi.

Bieu quan trong la can hiéu ro cac huóng dān bay co bān de bao vé chinh ban va bao dam an toan cho nhūng nguòxung quanh. Hay nhó doc tuyén bó miěn tru trach nhiēm va cac huóng dān an toàn.
Srdung T10
1. Chuan bi Pin Bay Thong minh
Chi su dung pin may bay chinh häng DJI nhu duroi day. Kiem tra muc pin truoc khi bay, va sac pin theo hrong dan trong tai lieuu hrong dan tuong ung.
Pin may bay thong minh T10 BAX501-9500-51.8 (duoc khuyen nghi)
Pin may bay thong minh T20 AB3-18000mAh-51.8V
Pin may bay thong minh T16 AB2-17500mAh-51.8V

2. Chuàn bj Máy bay
Mo canh tay M1 va M2, dong thoi chot hai khoa canh tay. Tranh de bi kep ngon tay.
Mo cac canh quat. Lap Pin May bay Thong minh vao may bay cho den khi
ban nghe duoc tieng "cach".

- Bām bāo rāng pin duoc láp chac chan vào may bay. Chi láp hǎc thao pin khi may bay dā duoc tát nguàn.
- De thao pin, an va giur kep, sau do nhac pin ra.
Gap cac canh tay M3 va M4, sao do la cac canh tay M1 va M2 va dam bao rang cac canh tay nay duoc lap vao cac kep giur ca hai ben cua may bay. Neu khong, cac tay co the bi hur hai.
Nhap vao Plan Field (Lap ké hoach ruong phun), chon Walk with RC (Di voi RC).


Di bo cung bo dieu khien tu xa doc theo duong bian cua khu vuc hoat dong va bam Add Waypoint C2 (Them Diem moc C2) 6 cac vi tri chuyen huong.

Lan luot di den cac vat can vanhap Obstacle Mode C1 (Vat can Ché do C1).


Nhap vao Waypoint C1 (Ché dô Diém moc C1) de quay tro lái de them cac diém canh vao khu vuc hoat dong.

Nhan vao muc Field Editing (Chinh sura Truong) de su dung hinh chu thap de them diem, dinh cau hinh quang duong va khoang cach tuyen duong, dong thai dieu chinh huong tuyen duong bang cach nhanh hoac keo biieu troong

Luru ke hoach ruong phun.
Tán sǒ hoà dòng SRRC/NCC/FCC/MIC/KCC/CE: 24,05 - 24,25GHz
Cóng suátromium (EIRP) SRRC: ≤ 13dBm, NCC/MIC/KCC/CE/FCC: ≤ 20dBm
Phat hien Do cao & Bay bam Pham vi phat hien do cao: 1 - 30m
Dja hinh[1] Pham vi on dinh: 1,5 - 15m
Dó doc tói da o' ché d'o Mountain (Vung nui): 35^
Tranh vát can[1]
Pham viphat hiencvatc:1,5-30m
Truong Quan sát (FOV): Ngang: 360^ , Doc: ± 15^
Dieu kien lam viec: bay cao hon 1,5m qua vat can voi toc do thai hon 7m/giay
Khoang cach giói hàn an toán: 2,5m (Khoang cach giūa mǎt trucc canh quat vāvat can sau khi giam tóc)
Huóng tranh vát can: Tranh vát can da huóng theo phuong ngang
Cap IP
IP67
Ra-da hróng len
Model RD2414U
Tán sǒ hoà dòng SRRC/NCC/FCC/MIC/KCC/CE: 24,05 - 24,25GHz
Cóng suát Trayén phát (EIRP) SRRC: ≤ 13dBm, NCC/MIC/KCC/CE/FCC: ≤ 20dBm
Tranh vát can! Pham vi phat hiên vát can: 1,5 - 15m
Truong Quan sát (FOV): 80^
Dieu kien lam viec: san sang trong qua trinh cat canh, ha canh va bay len khi co vát can cao hon 1,5m so voi may bay.
Khoang cach gioi han an toan: 2m (khoang cach giua diem cao nhat cua may bay va diem thap nhat cua vat can sau khi giam toc)
Huóng tranh vát can: di lén tren
Cap IP IP67
- Camera FPV
Truong Quan sát (FOV) Ngang: 129^ , Doc: 82^
Tán sǒ hoànt dòng SRRC/NCC/FCC/CE/MIC/KCC: 2,4000 - 2,4835GHz
SRRC/NCC/FCC/CE: 5,725-5,850GHz[2]
Cóng suátrialuyénphát(EIRP)2,4GHz
SRRC/CE/MIC/KCC: ≤ 20dBm, FCC/NCC: ≤ 31,5dBm
5,8GHz
FCC/SRRC/NCC: ≤ 29,5dBm, CE: ≤ 14dBm
Tóng trong luong (khóng ké pin) 13kg
Khoi luong Cát canh Tói da 24,8kg (O'muc nuoc bién)
Pham vi treo chinh xac (voi tin Co bhat D-RTK: Ngang: ± 10cm Doc: ± 10cm
hiéu GNSS manh) KhongbatD-RTK:
Ngang: ±0,6m, Doc: ±0,3m (Có dung mô-dun ra dα: ±0,1m)
Tán sǒ lām viéc cúa RTK/GNSS RTK: GPS L1/L2, GLONASS F1/F2, BeiDou B1/B2, Galileo E1/E5
GNSS: GPS L1, GLONASS F1, Galileo E1
Pin Pin may bay duoc DJI pheduyet (BAX501-9500-51.8, AB3-18000mAh-51.8V,
hoac AB2-17500mAh-51.8V)
Tieu thu Dien nang Toi da 3700W
Thoi gian Bay treo[3] 19 phut (Trong luong cat canh 16,8kg voi môt pin 9500mAh)
9 phut (Trong luong cat canh 24,8kg voi môt pin 9500mAh)
Goc Nghieng Toci da 15^
Pin lap trong 18650 Li-ion (5000mAh @ 7,2V)
GNSS GPS+GLONASS
Muc tieu thu dien nang 18W
Nhiét do hoat dong 0^ den 45°C (32° den 113°F)
Nhiét do mi truong sac 5° den 40°C (41° den 104°F)
Nhiêt dô bǎo quán -30° dén 60°C (-22° dén 140°F) (bǎo quán khòng qua môt tháng vói ngún pin tich hop tu 40% dén 60%)
OcuSync Enterprise
Tán sǒ hoà dòng SRRC/NCC/FCC/CE/MIC/KCC: 2,4000 - 2,4835GHz
SRRC/NCC/FCC/CE: 5,725-5,850GHz[2]
Cyr ly truyen phat toci da (khong FCC/NCC: 7km, SRRC: 5km, MIC/KCC/CE: 4km
vát can, khong nhieu)
Cóng suátrialuyénphát(EIRP)2,4GHz
SRRC/CE/MIC/KCC: ≤ 20dBm, FCC/NCC: ≤ 30,5dBm
5,8GHz
SRRC: ≤ 21,5dBm, FCC/NCC: ≤ 29,5dBm, CE: ≤ 14dBm
Wi-Fi
Giao thuc Wi-Fi Direct, Wi-Fi Display, 802.11a/g/n/ac
Wi-Fi vói 2×2 MIMO
Tán sǒ hoàt dòng 2,4000 - 2,4835GHz
5,150-5,250GHz[2]
5,725-5,850GHz[2]
Cóng suátrialuyénphát(EIRP)2,4GHz
SRRC/CE: 18,5dBm, NCC/FCC /MIC/KCC: 20,5dBm
5,2GHz
SRRC/NCC/FCC/CE/MIC: 14dBm, KCC: 10dBm
5,8GHz
SRRC/NCC/FCC: 18dBm, CE/KCC: 12dBm
Bluetooth
Giao thuc Bluetooth 4.2
Tán sǒ hoàt dòng 2,4000 - 2,4835GHz
Cong suat truyen phat (EIRP) SRRC/NCC/FCC/CE/MIC/KCC: 6,5dBm
T10 Intelligent Flight Battery BAX501-9500-51.8 (empfohlen)
T20 Intelligent Flight Battery AB3-18000mAh-51.8V
T16 Intelligent Flight Battery AB2-17500mAh-51.8V
Betriebsfrequenz SRRC/NCC/FCC/CE/MIC/KCC: 2,4000-2,4835 GHz
SRRC/NCC/FCC/CE:5,725-5,850 GHz[2]
SRRC/CE/MIC/KCC: ≤20 dBm, FCC/NCC: ≤31,5 dBm
5,8 GHz
FCC/SRRC/NCC: ≤29,5 dBm, CE: ≤14 dBm
Betriebsfrequenz SRRC/NCC/FCC/CE/MIC/KCC:2,4000-2,4835 GHz
SRRC/NCC/FCC/CE: 5,725-5,850 GHz[2]
Max.
NCC/FCC: 7 km; SRRC: 5 km, MIC/KCC/CE: 4 km
SRRC/CE/MIC/KCC: ≤20 dBm, FCC/NCC: ≤30,5 dBm
5,8 GHz
SRRC: ≤21,5 dBm, FCC/NCC: ≤29,5 dBm, CE: ≤14 dBm
Wi-Fi
Protokoll Wi-Fi Direct, Wi-Fi-Anzeige, 802.11a/g/n/ac
WLANmit 2× 2 MIMO
SRRC/NCC/FCC/CE/MIC: 14 dBm, KCC: 10 dBm
5,8 GHz
SRRC/NCC/FCC: 18 dBm, CE/KCC: 12 dBm
Bluetooth
Protokoll Bluetooth 4.2
SRRC/NCC/FCC/MIC/KCC/CE:24.05-24.25 GHz
funcionamento
Consumo electrico 12 W
SRRC: ≤13 dBm; NCC/MIC/KCC/CE/FCC: ≤20 dBm
Detectione alttud y Altura constante[1]
SRRC/NCC/FCC/MIC/KCC/CE:24.05-24.25 GHz
funcionamento
SRRC: ≤13 dBm; NCC/MIC/KCC/CE/FCC: ≤20 dBm
SRRC/NCC/FCC/CE/MIC/KCC:2.4000-2.4835 GHz
funcionamento
SRRC/NCC/FCC/CE: 5.725-5.850 GHz[2]
SRRC/CE/MIC/KCC: ≤20 dBm; FCC/NCC: ≤31.5 dBm
5.8 GHz
FCC/SRRC/NCC: ≤29.5 dBm; CE: ≤14 dBm
Peso total (excludla la bateria) 13 kg
Hélices repliables (R3390)
SRRC/NCC/FCC/CE:5,725-5,850GHz[2]
FCC/SRRC/NCC:≤29,5dBm;CE:≤14dBm
Poids total (sans batterie) 13kg
Consommation electrode 18 W
SRRC/NCC/FCC/CE:5,725-5,850GHz[2]
Distance de transmission max.
FCC/NCC:7km;SRRC:5km,MIC/KCC/CE:4km
(sans obstacle ni interfeence)
SRRC/CE:18,5dBm,NCC/FCC/MIC/KCC:20,5dBm
5,2 GHz
SRRC/NCC/FCC/CE/MIC:14dBm,KCC:10dBm
5,8 GHz
SRRC/NCC/FCC:18dBm,CE/KCC:12dBm
Bluetooth
Protocole Bluetooth 4.2
Como carregar as baterias
Retire a tampa do compartmento do dongle.
- Radar digital omnidirectional
Modelo RD2424R
Campo de visão Horizontal: 129^ , Vertical: 82^
Resoluçao 1.280 x 720 15 a 30 qps
SRRC/NCC/FCC/CE: 5,725 a 5,850 GHz[2]
SRRC/CE/MIC/KCC: ≤ 20 dBm, FCC/NCC: ≤ 31,5 dBm
5,8 GHz
FCC/SRRC/NCC: ≤ 29,5 dBm, CE: ≤ 14 dBm
Peso total (exc. bateria) 13kg
SRRC/NCC/FCC/CE:5,725 a 5,850 GHz[2]
Distancia max. de transmissao FCC/NCC: 7 km, SRRC: 5 km, MIC/KCC/CE: 4 km
SRRC/CE/MIC/KCC: ≤ 20 dBm, FCC/NCC: ≤ 30,5 dBm
5,8 GHz
SRRC: ≤ 21,5 dBm FCC/NCC: ≤ 29,5 dBm, CE: ≤ 14 dBm
Wi-Fi
Protocolo Wi-Fi Direct, Wi-Fi Display, 802.11a/g/n/ac
Wi-Fi com MIMO 2×2
Frequencies de funciona 2,4000 a 2,4835 GHz
5,150 a 5,250 GHz[2]
5,725 a 5,850 GHz[2]
SRRC/CE: 18,5 dBm, NCC/FCC/MIC/KCC: 20,5 dBm
5,2 GHz
SRRC/NCC/FCC/CE/MIC: 14 dBm, KCC: 10 dBm
5,8 GHz
SRRC/NCC/FCC: 18 dBm, CE/KCC: 12 dBm
Bluetooth
Protocolo Bluetooth 4.2
Frequencies de funciona 2,4000 a 2,4835 GHz
https://www.dji.com/support

FacebookYouTube

For the latest information on Agras products, scan the Facebook or YouTube QR code.
- Remote Controller
- Fly Safe
- Flight Environment Requirements
- Return to Home (RTH)
- Pesticide Usage
- Using the T10
- Preparing the Intelligent Flight Battery
- Preparing the Aircraft
- Preparing the Remote Controller
- Charging the Batteries
- Mounting the External Battery
- Mounting the 4G Dongle and SIM Card
- Checking the Battery Levels
- Adjusting the Antennas
- Getting Ready for Takeoff
- Calibrating the Compass
- Discharging Trapped Air in the Hoses
- Calibrating the Flow Meter
- Flight
- Takeoff
- Landing
- Starting Operations
- Field Planning
- Performing an Operation
- More Operation Modes and Functions
- Maintenance
- Specifications
- FPV Cameras
- - Flight Parameters
- OcuSync Enterprise
- Wi-Fi
- Bluetooth
- Remote Controller Intelligent Battery
- - Intelligent Battery Charging Hub
- - AC Power Adapter
- 機体
- i
- maaan
- Jiaoyanmianyuan yu
- m
- mua
- mnnnnaaannnnnnae
- mss
- yaaan7nW7%
- Juaa
- Airframe
- 10
- #
- 6307959370177646
- Tur bay védiem cat canh (Return to Home, RTH)
- Srdung Thuoc trsau
- Srdung T10
- Chuan bi Pin Bay Thong minh
- Chuàn bj Máy bay
- Ra-da hróng len
- - Camera FPV
- Como carregar as baterias
- - Radar digital omnidirectional
Brand : DJI
Model : Agras T10
Category : Drone