5B60M8690 - Oven BLAUPUNKT - Free user manual and instructions
Find the device manual for free 5B60M8690 BLAUPUNKT in PDF.
User questions about 5B60M8690 BLAUPUNKT
0 question about this device. Answer the ones you know or ask your own.
Ask a new question about this device
Download the instructions for your Oven in PDF format for free! Find your manual 5B60M8690 - BLAUPUNKT and take your electronic device back in hand. On this page are published all the documents necessary for the use of your device. 5B60M8690 by BLAUPUNKT.
USER MANUAL 5B60M8690 BLAUPUNKT
text_image
Technical diagram of an oven with labeled parts and a magnified inset showing a close-up of the component.natural_image
Line drawing of a rectangular tray with horizontal slats and side handles (no text or symbols)natural_image
Simple line drawing of a rectangular tray with side handles and a flat center (no text or symbols)natural_image
Line drawing of an oven with a rack and ventilation system inside (no text or symbols)
text_image
2 5 4 3 2 1
natural_image
Illustration of a ceiling-mounted heating element with a flag and mesh grid (no text or symbols)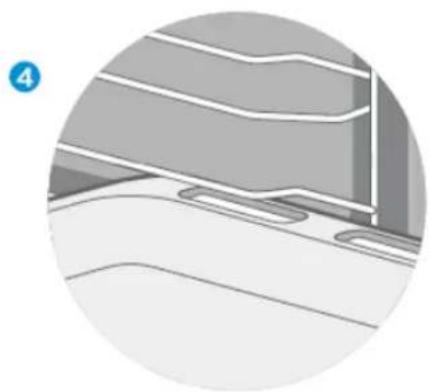
natural_image
Close-up of a mechanical component with layered surfaces and mounting holes (no visible text or symbols)text_image
Diagram showing a heating unit with labeled components and airflow direction, alongside a rack-mounted cooling system.FEHLERBEHEBUNG
2 SAFETY INSTRUCTIONS
2 Intended purpose
2 Warning
5 Causes of damage
6 INSTALLATION
8 OPERATING THE APPLIANCE
8 Operating elements
9 Before using the appliance
10 Operating modes
11 Using your appliance
14 AUTOMATIC PROGRAMMES
15 ACCESSORIES
18 ENERGY-EFFICIENT USE
18 ENVIRONMENT
19 HEALTH
19 MAINTENANCE OF YOUR APPLIANCE
22 APPLIANCE DOOR
23 TROUBLESHOOTING
25 CUSTOMER SERVICE
26 TIPS AND TRICKS
28 TEST FOOD ACCORDING TO EN 60350-1
28 DATA SHEET (EU 65/2014 & EU 66/2014)
SAFETY INSTRUCTIONS
Intended purpose
Thank you for choosing a microwave/oven combination unit from Blaupunkt. Please read this manual thoroughly before unpacking your new appliance. Only then will you be able to operate your appliance safely and correctly. We strongly recommend that you keep the manual and installation instructions for future use or for future owners.
The appliance is only intended for installation in a kitchen. Please observe the installation instructions.
After unpacking the appliance, check it for possible damage. Do not connect the appliance if it is damaged. Only an authorised technician may connect appliances without a plug. Damage caused by incorrect connection is not covered by the warranty. Use this appliance indoors only. The appliance may only be used to prepare food and beverages. The appliance must be monitored during operation.
This appliance may be used by children over 8 years of age and by persons with reduced physical, sensory or mental abilities or lack of experience and knowledge provided that they have been instructed in the use of the appliance by a person responsible for them and that they understand and appreciate the risks and dangers involved.
The appliance is not a toy. The appliance may only be cleaned and maintained by children over 8 years of age under the supervision of a responsible adult.
Ensure that the appliance and its power cable are out of reach of children under 8 years of age. Please always push any accessories into the oven the right way round.
Precautions to avoid exposure to excessive microwave radiation energy
(a) Never use this appliance with the door open, as you will be exposed to harmful microwave radiation. The safety interlock must not be tampered with or rendered inoperative.
(b) Do not place any objects between the front of the appliance and the door and make sure that there is no dirt or cleaning residue on the sealing surfaces.
(c) WARNING: If the door seals or the door are damaged, the appliance may not be used again until it has been repaired by a qualified person.
WARNING
Danger of electric shock!
-
Incorrectly performed repairs are hazardous. Repairs and the replacement of damaged power cables may only be carried out by one of our trained service technicians. If the appliance is defective, disconnect it from the mains or switch off the circuit breaker in the fuse box. Contact customer service.
-
The cable insulation of electrical appliances can melt if they come into contact with hot appliance parts. Never allow the cables of electrical appliances to come into contact with hot appliance parts.
- Do not use high-pressure cleaners or steam cleaners, as this can cause an electric shock.
- A defective appliance can cause an electric shock. Never switch on a defective appliance. If the appliance is defective, disconnect it from the mains or switch off the circuit breaker in the fuse box. Contact customer service.
Risk of burns!
- The appliance becomes very hot. Never touch the inner surfaces of the appliance or the heating elements.
- Always let the appliance cool down.
- Always keep children at a safe distance.
- Accessories and ovenware become very hot. Always use oven gloves to remove accessories or ovenware from the cooking chamber.
- Alcoholic vapours can ignite in the hot cooking chamber. Never prepare food that contains large quantities of liquids with a high alcohol content. Only use small amounts of liquids with a high alcohol content. Always open the appliance door carefully.
- Do not leave the appliance unattended when heating food in plastic or cardboard containers, as there is a risk of fire.
- If you are warming up baby bottles or baby jars, stir or shake them after heating and check the temperature to avoid burning your baby.
Risk of scalding!
- Accessible parts become hot during operation. Never touch the hot parts. Always keep children at a safe distance.
- Hot steam may escape when the appliance door is opened. Depending on the temperature, the steam may not be visible. Do not stand too close to the appliance when opening it. Always open the appliance door carefully. Keep your children away from the hob.
- Water in the hot cooking chamber can produce hot steam. Never pour water into the hot cooking chamber.
Risk of injury!
- Scratched glass in the appliance door can cause cracks. Do not use glass scrapers, strong or abrasive cleaning agents.
- The hinges of the appliance door move when the door is opened and closed. In the process, you could trap your fingers or other parts of your body. Keep your hands away from the hinges.
Risk of fire!
- Flammable objects stored in the cooking chamber may ignite. Do not store flammable objects in the cooking chamber. Never open the appliance door if there is smoke inside. If this happens, switch off the appliance and unplug the power plug from the power outlet or turn off the circuit breaker in the fuse box.
- Opening the appliance door creates a draught. This can cause the oven paper to come into contact with the heating element and catch fire. Do not place any oven paper loosely over the accessories while preheating. Always weigh down the oven paper with a tray or baking tray. Only cover the required area with oven paper. The oven paper must not project over the accessories.
Danger from magnetism!
Permanent magnets are used in the control panel or control elements. They can interfere with electronic implants such as pacemakers or insulin pumps. Carriers of electronic implants must maintain a distance of at least 10 cm from the control panel.
Careful when handling the microwave/oven combination unit
- Read and follow these instructions: "PRECAUTIONS TO AVOID EXPOSURE TO EXCESSIVE MICROWAVE RADIATION ENERGY."
- WARNING: Maintenance or repair work, for which the cover for protection against microwave energy must be removed, may only be carried out by qualified persons.
- Only use accessories suitable for microwave ovens.
- Heating drinks in the microwave/oven combination unit can cause delayed boiling. Be careful when removing the container.
- Hard-boiled eggs and eggs in shells should never be heated in the appliance, as they may explode even after they have been heated in the appliance.
- This microwave/oven combination unit is designed to heat food and beverages. Drying food or clothing and heating heat pads, slippers, sponges, damp cloths or similar items can cause injury and fire.
- Metal containers for food and beverages must not be heated in the appliance.
- WARNING: When the combination mode is used, children should only use the appliance under the supervision of an adult due to the high temperatures involved.
Causes of damage
- Accessories, foil, oven paper or ovenware on the cooking chamber floor: Do not place any accessories on the cooking chamber floor. Do not cover the cooking chamber floor with any kind of foil or oven paper. Do not place any ovenware on the cooking chamber floor if the temperature is set above 50 °C. This will result in heat accumulation. This will damage the enamel.
- Aluminium foil: Aluminium foil in the cooking chamber must not come into contact with the door glass. This could lead to a permanent discolouration of the door glass.
- Silicone pans: Do not use pans, mats, covers or accessories containing silicone. This could damage the oven sensor.
- Water in the hot cooking chamber: Do not pour water into the cooking chamber when it is hot. This will produce steam. The change in temperature may damage the enamel.
- Moisture in the cooking chamber: Over a long period of time, moisture in the cooking chamber can lead to corrosion. Allow the appliance to dry after use. Do not keep moist foods in the closed cooking chamber for long periods of time. Do not store food in the cooking chamber.
- Cooling with the appliance door open: After using the appliance at high temperatures, only allow it to cool down with the door closed. Do not allow anything to become jammed in the appliance door. Even if the door is left open only a crack, the fronts of adjacent appliances may be damaged over time. Only allow the appliance to dry with the door open if a lot of moisture has been produced while operating the oven.
- Fruit juice: When baking particularly juicy fruit cakes, do not cover the baking tray too generously. Fruit juice dripping from the baking tray leaves stains that cannot be removed. If possible, use a deep universal baking tray.
- Heavily soiled seal: If the seal is heavily soiled, the appliance door will not close properly. This could damage the fronts of adjacent appliances. Always keep the seal clean.
- Using the appliance door as a seat, shelf or worktop: Do not sit on the appliance door, do not place anything on it, and do not hang anything from it. Do not place cookware or accessories on the appliance door.
- Inserting accessories: Depending on the appliance model, accessories may scratch the door panel when the appliance door is closed. Always insert the accessory into the cooking chamber as far as it will go.
- Carrying the appliance: Do not carry or hold the appliance by the door handle. The door handle cannot support the weight of the appliance and may break off.
- If you use the residual heat of the switched-off oven to keep food warm, a great deal of moisture can build up in the cooking chamber. This can lead to the formation of condensation water and cause corrosion damage to your appliance as well as damaging your kitchen. Avoid the formation of condensation water by opening the door or using “Defrost” mode.
- Operation of the microwave/oven combination unit without food: Operating the appliance without food in the cooking chamber can cause an overvoltage. Never switch on the appliance when there is no food in the cooking chamber.
INSTALLATION
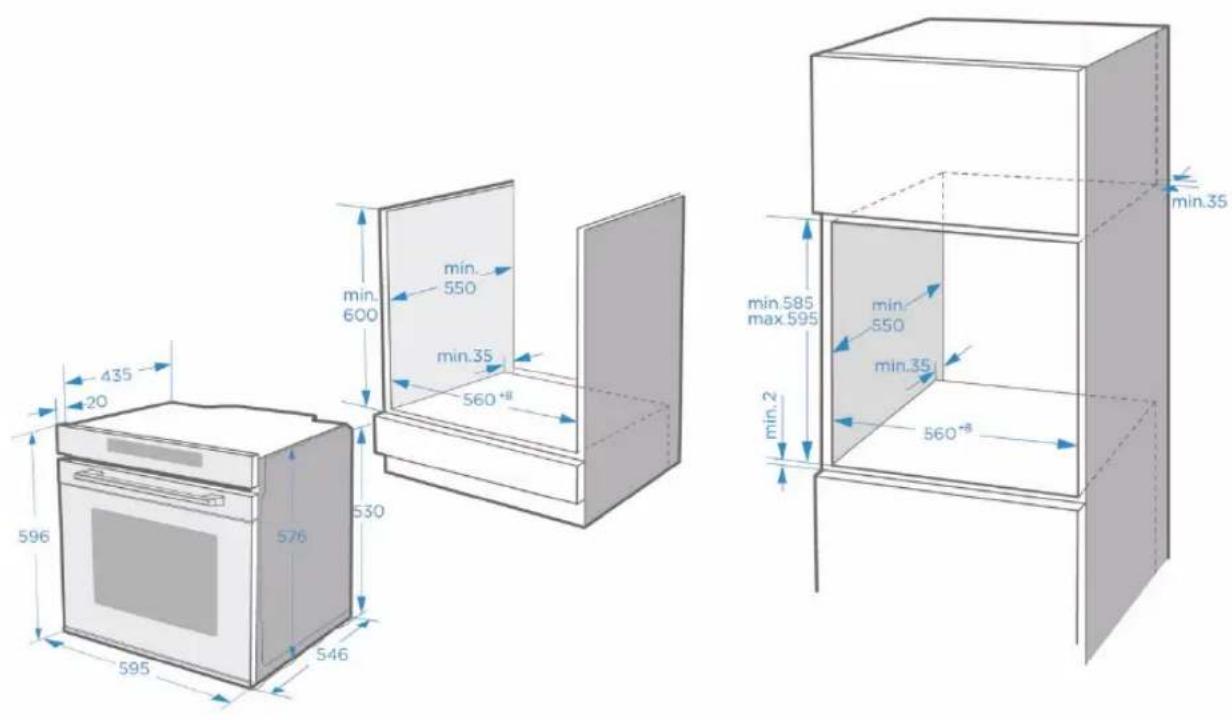
text_image
min.35 600 min.585 max.595 min.2 550 min.35 560° min.35 min.550 min.580 max.590 min.435 435 20 596 576 530 546 595To ensure the safe operation of this appliance, it must be properly installed in accordance with the installation instructions. Damage caused by incorrect installation is not covered by the warranty.
Wear protective gloves during installation to prevent cuts from sharp edges.
Check the appliance for damage before installation. Do not connect it if it is damaged.
Remove all packing material and adhesive foil before turning on the appliance.
The above dimensions are given in mm.
To disconnect the appliance from the power supply if necessary after installation, the plug must be accessible or a switch must be integrated into the fixed wiring.
Warning: To prevent overheating, the appliance must not be installed behind a decorative door.
INSTALLATION
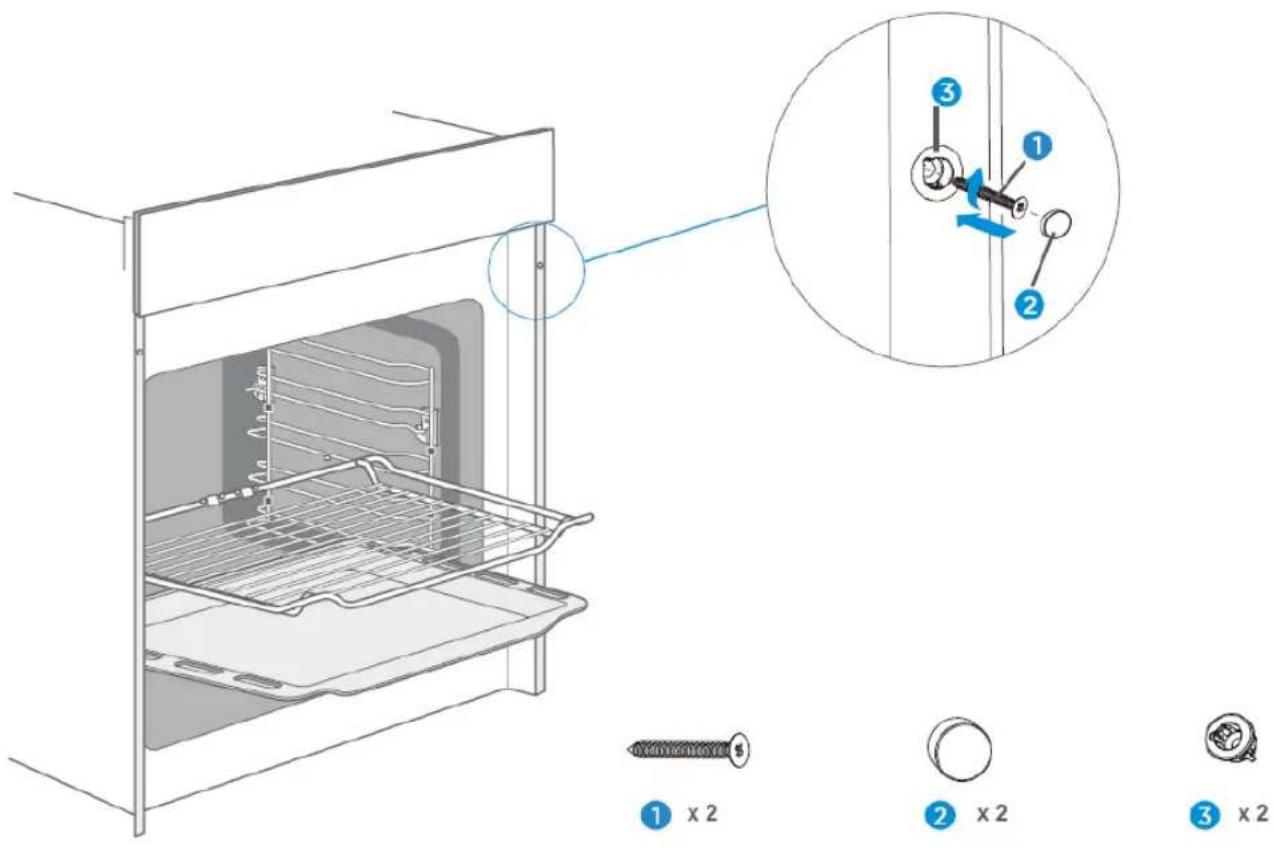
text_image
Technical diagram of an oven with labeled parts and a magnified inset showing a close-up of the component.Slide the microwave/oven combination unit into the opening provided. Fasten it with the screws 1, 2 and 3
Caution
To avoid damage to the appliance or the appliance housing, do not over-tighten the screws 1. Use a screwdriver only!
OPERATING THE APPLIANCE
OPERATING ELEMENTS
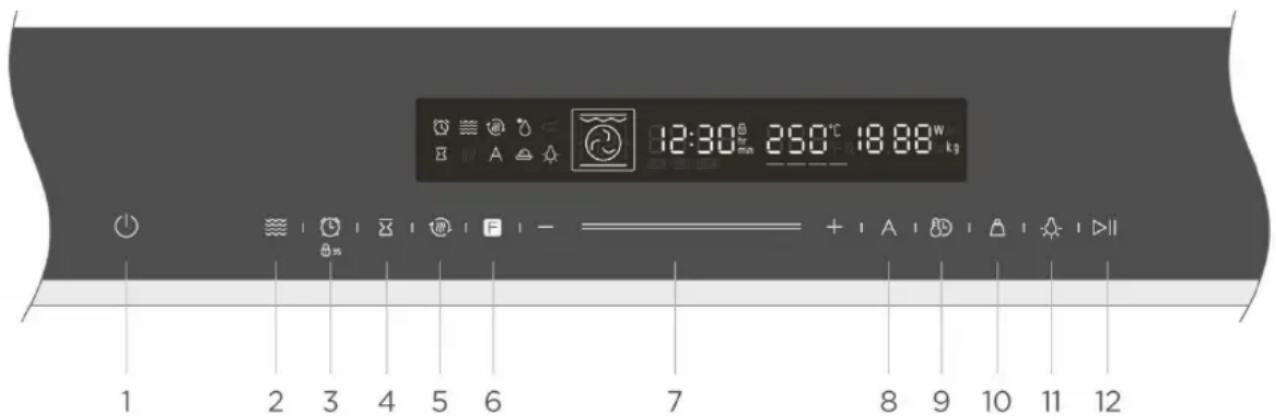
text_image
12:30 250°C 18.88W kg 1 2 3 4 5 6 7 8 9 10 11 12 | 1. ON/OFF | Switches the oven on/off. |
 | 2. Microwave symbol | Use the microwave and microwave/oven combination function. |
 | 3. Timer / child lock | Use timer/press button for 3 seconds to turn on child lock. |
 | 4. End time | Set an end time for the cooking process. |
 | 5. Fast Preheat | For fast preheating. |
 | 6. Oven function | Press this symbol to change the operating mode. Press and hold for 5 seconds to change it quickly. |
 | 7. Smart Slider | You can use the Smart Slider or the “+/-” buttons to change the values shown on the display. |
 | 8. Automatic programmes | Use automatic programmes. |
 | 9. Time/temperature | Set the clock time in standby mode/Switch between time setting and temperature. |
 | 10. Weight | Tap this symbol to set the weight for the automatic programmes. |
 | 11. Lamp ON/OFF | Switches the lamp on/off. |
 | 12. Start/pause | Starts and interrupts the cooking process. |
First-time use
Before you use the appliance for the first time to prepare food, you must clean the cooking chamber and accessories.
- Remove all stickers, surface protection films and transport protection parts.
- Remove all accessories and the slide-in strips from the cooking chamber.
- Thoroughly clean the accessories and the guide rails with soapy water and a cloth or soft brush.
- Make sure that the cooking chamber does not contain any packaging residue such as polystyrene balls or pieces of wood, as these can pose a fire hazard.
- Wipe the smooth surfaces in the cooking chamber and on the door with a soft, damp cloth.
- To remove the new odour from the appliance, heat the appliance while it is empty and with the oven door closed.
- Thoroughly ventilate the kitchen when heating the appliance for the first time. Keep children and pets away from the kitchen during this time. Close the door to adjacent rooms.
- Adjust the displayed settings. Please see the next section on how to set the operating mode and temperature.
"Using your appliance" on Page 11
| Settings | |
| Operating mode | |
| Temperature | 250 °C |
| Time | 1h |
After the appliance has cooled down:
- Clean the smooth surfaces and the door with soapy water and a cloth.
- Dry all surfaces.
- Put the guide rails back in place.
Setting the clock time
Before the oven can be used, the clock time should be set.
- After the oven is plugged in, tap the clock symbol to select the time in hours. Use the Smart Slider or the +/- buttons to select the time.
- Tap the clock symbol again. Now use the Smart Slider or the +/- buttons to set the time in minutes.
- Tap the clock symbol again to end the setting process.
NOTE: The clock has a 24-hour display.
Your appliance has various operating modes. To help you choose the right type of heating for your dish, we will now explain the differences and areas of application.
| Operating modes | Temperature | Use | |
 | Top/bottom heat | 30~250 °C | For traditional baking and roasting at one level. Especially suitable for cakes with a moist topping. |
 | Hot air | 50~250 °C | For baking and roasting on one or more levels. The heat comes from the ring heater, which evenly surrounds the fan. |
 | Top/bottom heat + circulation | 50~250 °C | For baking and roasting on one or more levels. The heat from the heating elements in the cooking chamber is evenly distributed by a fan. |
 | Radiant heat | 150~250 °C | For grilling small quantities of food and for browning. Please place the food to be grilled in the middle section under the grill heating element. |
 | Dual grill + circulation | 50~250 °C | For grilling flat food and browning. The fan distributes the heat evenly in the cooking chamber. |
 | Dual grill | 150~250 °C | For grilling flat food and browning. |
 | Pizza mode | 50~250 °C | For pizza and dishes that require a lot of heat from below. The bottom heat and the ring heater are switched on. |
 | Bottom heat | 30~220 °C | For the additional browning of the bases of pizzas, cakes and pastries. The heat comes from the bottom heat. |
 | Defrosting | - | For the gentle defrosting of frozen food. |
 | Dough process | 30~45 °C | For the preparation of yeast and sourdough and for the cultivation of yoghurt. |
Caution!
If you open the appliance door while a process is running, the process will be stopped. In this case there is a risk of burns!
Notes
- To defrost large portions of food, you can remove the guide rails and place the container on the cooking chamber floor.
- To preheat dishes, remove the guide rails and select the "Hot air grill" and "Circulation" modes with a temperature of 50 °C. "Hot air grill" mode should be used if more than half of the cooking chamber floor is covered with the dishes.
- In "Circulation" mode, the fan switches on at certain times during the heating process to ensure optimum heat distribution in the cooking chamber.
Fan
The fan switches on and off as required. Hot air escapes above the door.
Caution!
Do not cover the ventilation slots. This may cause the unit to overheat. To make the unit cool down faster, the fan may continue to run for a while.
USING YOUR APPLIANCE
Cooking with the oven
- After the oven is plugged in electrically, tap the "Oven function" symbol to select functions and use the Smart Slider or the "+/-" keys to set the cooking temperature.
- Tap the ON/OFF symbol. The oven will start working. If you do not tap the ON/OFF symbol, the oven will display the time again after 5 minutes.
- If you tap ⏻ during the cooking process, the process will be cancelled.
NOTE: After setting the temperature, tap the clock symbol 📋 to set the cooking time.
Fast Preheat
You can shorten the preheating time by using the Fast Preheat function. Select a function, and tap the symbol for Fast Preheat 📂 the symbol for Fast Preheat will light up on the display. If Fast Preheat is not available for the selected function, a beep will be heard. Fast Preheat is not available with the “Automatic programmes”, “Defrost” and “Dough process” functions.
Set end time
You can set the time at which the cooking process is to be ended here.
- Tap ☒. Use the Smart Slider or tap the “+/-” symbol to set the end time in hours. Tap ☒ again to set the end time in minutes. When you have finished setting, tap ☒ to save the setting.
- If you set the end time, you must also set the cooking time. For information on how to set the cooking time, refer to the section "Cooking with the oven".
- For example, if you set the end time to 10 o'clock and the cooking time to 1 hour, the oven will heat up at 9 o'clock and be ready at 10 o'clock.
Changes while cooking
When the appliance is switched on, you can change the operating mode and temperature using the oven function control or the Smart Slider. If no further action is taken after the change for 6 seconds, the oven will accept the change.
If you want to change the cooking time while cooking, tap on 📞 and change it using the Smart Slider or the “+/-” symbol. If no further action is taken after the change for 6 seconds, the oven will accept the change. You cannot make any changes during a cooking process with a specified end time and during automatic programmes.
If you want to cancel the cooking process, tap ⏻
Notes
Changing the operating modes/temperature/remaining cooking time can have a number of negative effects on the cooking result. We recommend that you avoid doing this – unless you are an experienced cook.
Caution!
After switching on the appliance, it will become very hot, especially inside. Never touch the inner surfaces of the appliance or the heating elements. Use oven gloves to remove accessories or ovenware from the cooking chamber and let the appliance cool down. Keep children at a safe distance to avoid burns.
Timer
Tap ☐ to use the timer function. When the set time is up, the oven will signal this with a beep. The first time you tap the ☐ symbol, the hours are set. Then tap the ☐ symbol again to set the minutes. Tap the ☐ symbol once more to end the setting process. You can set the timer before and during cooking, but if you select the function and temperature, the timer will not be available.
Microwave and microwave/oven combination function
- Your appliance has 4 microwave functions, including a single microwave and a microwave/oven combination function.
| Operating modes | Default power | Default temperature | Temperature range | Time | ||
 | Microwave | 800 W | / | / | 00:01–30:00 min | |
 | Microwave + hot air | 320 W | 160 °C | 50~250 °C | 00:01–01:30 h | |
| [BTX8] | Microwave+ dual grill + circulation | 320 W | 180 °C | 50~250 °C | 00:01–01:30 h | |
 | Microwave + pizza mode | 320 W | 180 °C | 50~250 °C | 00:01–01:30 h | |
- When your oven is in standby, press 📋 to use the microwave function. The 📋 symbol will now appear in the status bar. The default time is 1 minute and the default power is 800 W. Tap 📋 and set the microwave power with the Smart Slider or the "+/-" symbol. Tap 📋 and set the duration with the Smart Slider or the "+/-" symbol.
- When your oven is in standby, press 📋 to use the microwave function. Press the Function button 🔒 to use the microwave/oven combination function. There are 3 combination functions. Use the Smart Slider or the “+/-” symbol to set the temperature. Tap 🔒 to set the time. Tap 🔒 to set the microwave power.
- You can select the hot air, dual grill and pizza mode first and then tap 📁 to use the combination function. If you select another function and then tap 📁, a beep will sound to alert you to an error.
- If you have selected the combination function by mistake, press and hold the button for 3 seconds to clear the selection.
Note
The baking rack can be used not only for grilling, but also for cooking in the microwave. The baking tray cannot be used with the microwave function.
When using the microwave function, the second guide rail of the appliance is recommended.
Never use the microwave function if there is no food in the cooking chamber.
Child lock
Your appliance has a child lock so that children cannot accidentally turn it on or change settings. You can activate and deactivate the child lock at any time, regardless of whether the oven is switched on or not. Press and hold the button for 3 seconds to turn the child lock on and off. When the child lock is on, the symbol is shown in the display.
AUTOMATIC PROGRAMMES
Your oven has a wide range of automatic programmes that allow you to obtain excellent results with ease. Simply select the appropriate programme for the type of food you are cooking and follow the instructions on the display.
| Programme | Recipes | Microwave | Preheat time (min) | Weight |
| d01 | Defrost (meat) | YES | NO | 0.2 kg |
| d02 | Defrost (poultry) | YES | NO | 0.2 kg |
| d03 | Defrost (fish) | YES | NO | 0.2 kg |
| A01 | Popcorn | YES | NO | 0.1 kg |
| A02 | Potato gratin | YES | NO | 0.5 kg |
| A03 | Cheesecake | NO | NO | / |
| A04 | Quiche | NO | 10 | / |
| A05 | Meat loaf | NO | NO | 0.5 kg ~ 1 kg |
| A06 | Marble cake | NO | NO | / |
| A07 | Pita bread | NO | 8 | / |
| A08 | Apple tart | NO | 7 | / |
| A09 | Fresh pizza on a baking tray | NO | 8 | / |
| A10 | Apple tart with crumbles | NO | NO | / |
Note
The baking tray cannot be used for recipes d01, d02, d03, A01 and A02.
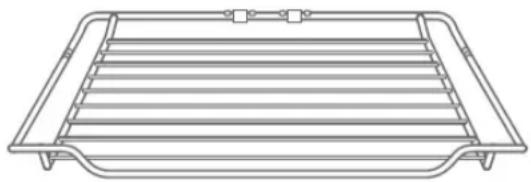
ACCESSORIES
Your appliance is supplied with several accessories. Here you will find an overview of the accessories supplied and information on their correct use.
Accessories included
Your appliance is equipped with the following accessories:
natural_image
Line drawing of a rectangular tray with horizontal slats and side handles (no text or symbols)Baking rack
For ovenware, cake tins and ovenproof plates. For roasts and grilled dishes.
natural_image
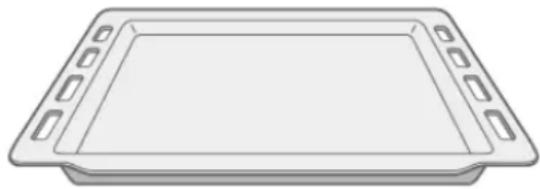
Simple line drawing of a rectangular tray with side handles and a flat center (no text or symbols)Baking tray
For sheet cakes and small baked goods.
Use only original accessories. It is specially designed for your appliance.
You can find the right accessories in our online shop at www.blaupunkt-einbaugeraete.com or from your specialist dealer.
Note
- The accessories can become deformed when hot. This does not affect their function. Once they have cooled down, they will return to their original shape.
- The baking rack can be used not only for grilling, but also for cooking in the microwave. The baking tray cannot be used with the microwave function.
- When using the microwave function, the second guide rail of the appliance is recommended.
- Never use the microwave function if there is no food in the cooking chamber.
Inserting accessories
The cooking chamber has five guide rails. The guide rails are counted from bottom to top. The accessories can be pulled out about halfway without tilting.
Notes
- Make sure that you always insert the accessories the right way round in the cooking chamber.
- Always push the accessories completely into the cooking chamber so that they do not touch the appliance door.

natural_image
Line drawing of an oven with a rack and ventilation system (no text or symbols)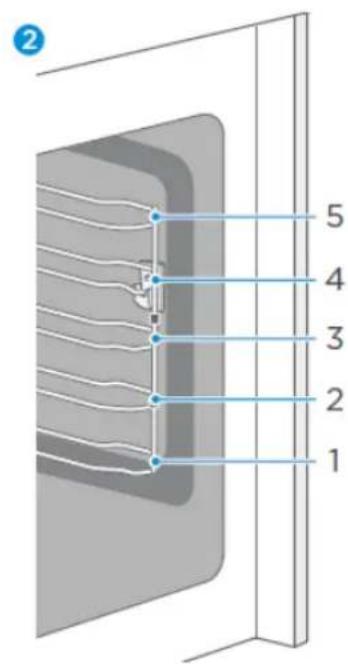
text_image
2 5 4 3 2 1
natural_image
Circular diagram showing a ladder with a flag above it, no text or symbols present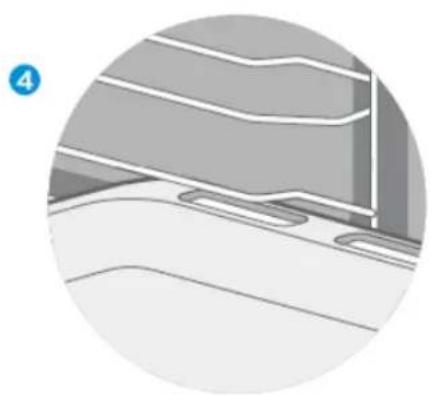
natural_image
Close-up of a mechanical component with layered surfaces and mounting brackets (no visible text or symbols)Locking function
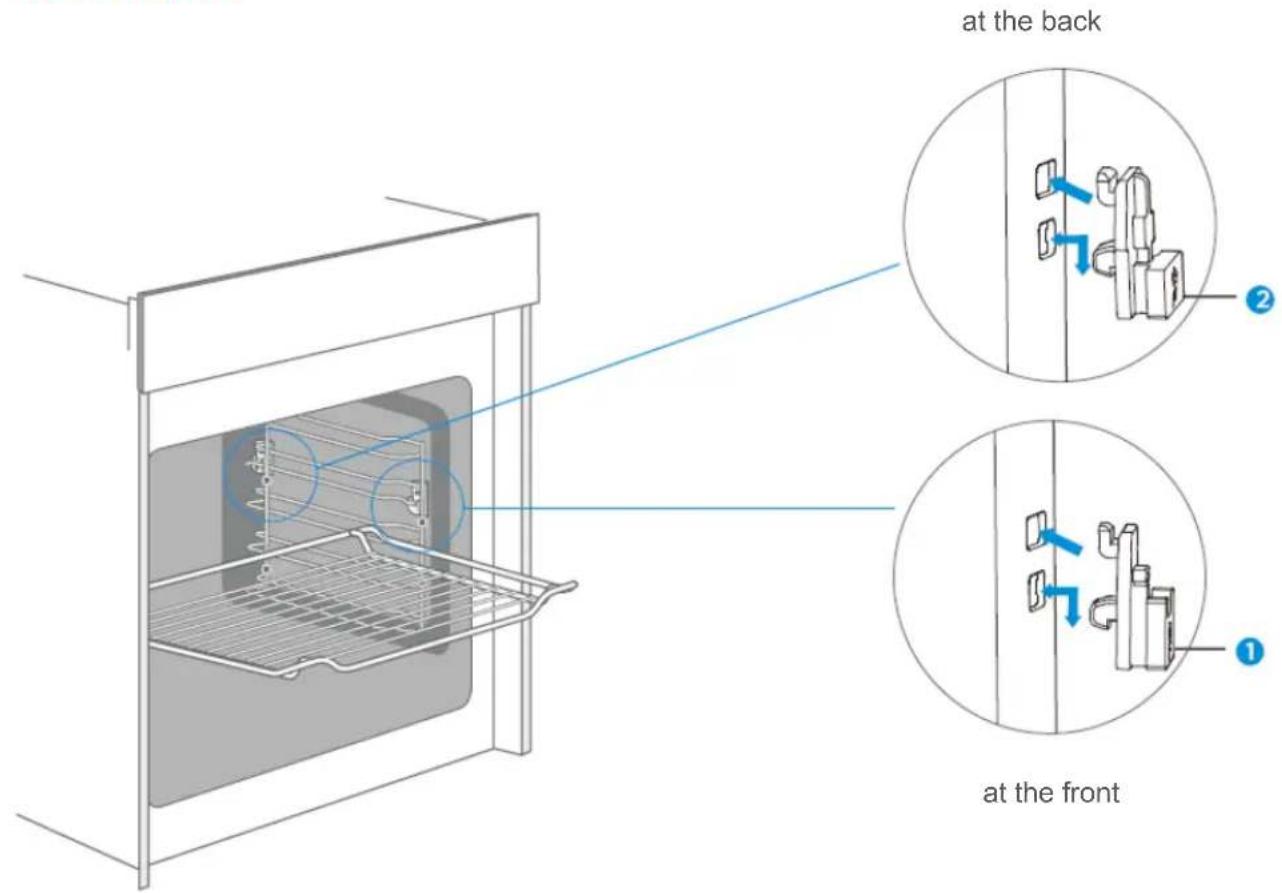
The accessory can be pulled out about halfway until it locks into place. The locking function prevents the accessories from tilting when they are pulled out. The accessories should be correctly inserted into the cooking chamber to ensure proper tilt protection. When inserting the baking rack, make sure that it points in the right direction, as shown in the illustrations ① ③.
When inserting the baking tray, make sure that it points in the right direction, as shown in the illustrations 1 4
Inserting accessories
Ceramic clips
text_image
at the back ② ① at the front
1 x 2
2 × 2
ENERGY-EFFICIENT USE
- Remove all accessories that are not necessary during the cooking process.
- Do not open the door while cooking is in progress.
- If you open the door while cooking, switch the operating mode to "light" (without changing the temperature setting).
- In the case of operating modes with no fan, reduce the temperature setting to 50 °C 5 min to 10 min before the end of the cooking process. This will allow you to use the heat of the cooking chamber to complete the cooking process.
- If possible, use the circulation function. This will allow you to reduce the temperature by 20 °C to 30 °C .
- With the hot air function, you can cook and bake on several levels at the same time.
- If it is not possible to cook and bake different dishes at the same time, you can cook them one after the other to make use of the preheated oven.
- Do not preheat the empty oven if it is not needed.
Place the food in the oven immediately after it has reached the desired temperature. The control light will switch off once the desired temperature is reached. - Do not use reflective foil such as aluminium foil to cover the bottom of the cooking chamber.
- Use the timer if possible.
- Use dark, matt and light baking tins and containers. Do not use heavy accessories with shiny surfaces, such as stainless steel or aluminium.
- Never use the microwave function if there is no food in the cooking chamber.
ENVIRONMENT
The packaging is intended to protect your new appliance from damage in transit. The materials used have been carefully selected and should be recycled. Recycling reduces the use of raw materials and waste. Electrical and electronic devices often contain valuable materials. Please do not dispose of them with your household waste.
HEALTH
Acrylamide is formed especially when starchy foods (e.g. potatoes, chips, bread) are heated to very high temperatures for a long time.
Tips
- Select short cooking times.
- Cook the food until it has a golden yellow surface colour. Do not let food burn until it has a dark brown colour.
- Larger portions have less acrylamide.
- Use the hot air function if possible.
- Chips: Do not cook more than 450 g per tray. Distribute them on the tray evenly and turn them from time to time. Read the product information if necessary to achieve the best cooking result.
MAINTENANCE OF YOUR APPLIANCE
Cleaning agent
With good care and cleaning, your appliance will retain its appearance and remain fully functional for a long time. We will now explain to you how to properly care for and clean your appliance.
Please follow the instructions in the table so that the different surfaces are not damaged by using the wrong cleaning agents. Depending on your appliance model, not all of the areas listed may be on/in your appliance.
Caution!
Risk of surface damage
Do not use:
- Sharp or abrasive cleaning agents.
- Detergents with high alcohol content.
- Hard scouring or cleaning sponges.
- High-pressure or steam cleaners.
- Special cleaners for cleaning hot equipment.
Wash new sponges and cloths thoroughly before use.
| Oven area | Cleaning |
| Stainless steel front | Warm soapy water:Clean with a tea towel and then dry off with a soft cloth.Remove lime spots, grease, starch and albumin (e.g. protein)immediately.Rust can form under such spots.Special stainless steel cleaning agents for cleaning hot surfaces areavailable from specialist dealers. Apply a very thin layer of the cleaniragent with a soft cloth. |
| Plastic | Warm soapy water:Clean with a tea towel and then dry off with a soft cloth. Do not use glasscleaner or a glass scraper. |
| Painted surfaces | Warm soapy water:Clean with a tea towel and then dry off with a soft cloth. |
| Operating panel | Warm soapy water:Clean with a tea towel and then dry off with a soft cloth. Do not use glasscleaner or a glass scraper. |
| Door panel | Warm soapy water:Clean with a tea towel and then dry off with a soft cloth.Do not use a glass scraper or stainless steel scouring pad. |
| Door handle | Warm soapy water:Clean with a tea towel and then dry off with a soft cloth.If the door handle comes into contact with descaling agent, wipe it offimmediately. Otherwise, any stains cannot be removed. |
| Enamel surfaces andself-cleaning surfaces | Follow the instructions for the surfaces of the cooking chamber in thetable. |
| Glass cover for theinterior lighting | Warm soapy water:Clean with a tea towel and then dry off with a soft cloth.If the cooking chamber is very dirty, use oven cleaner. |
| Door sealShould never beremoved | Warm soapy water:Clean with a tea towel. Do not scrub. |
| Stainless steel doorcover | Stainless steel cleaner:Please observe the respective manufacturer's instructions.Do not use stainless steel care products.Remove the door cover for cleaning. |
| Accessories | Warm soapy water:Soak and clean with a tea towel or brush.In case of heavy dirt deposits, a stainless steel scouring pad can be used. |
| Guide rails | Warm soapy water:Soak and clean with a tea towel or brush. |
Notes
- Slight differences in colour on the front of the appliance are due to the use of different materials such as glass, plastic and metal.
- Shadows on the door panels that look like stripes are caused by reflections of the interior lighting.
- The enamel is applied at very high temperatures. This can lead to slight colour variations. This is normal and does not affect performance. The edges of thin sheets cannot be completely enamelled. As a result, these edges can be rough. The corrosion protection is not impaired by this.
- Always keep the appliance clean and remove dirt immediately to prevent the formation of stubborn dirt deposits.
Tips
- Clean the cooking chamber after each use. This prevents dirt from caking on.
- Always remove any lime deposits, grease, starch and albumin (e.g. protein) immediately.
- Remove spots from sugary foods as soon as possible while the spot is still warm.
- For roasting, use suitable oven utensils, e.g. a roaster.
APPLIANCE DOOR
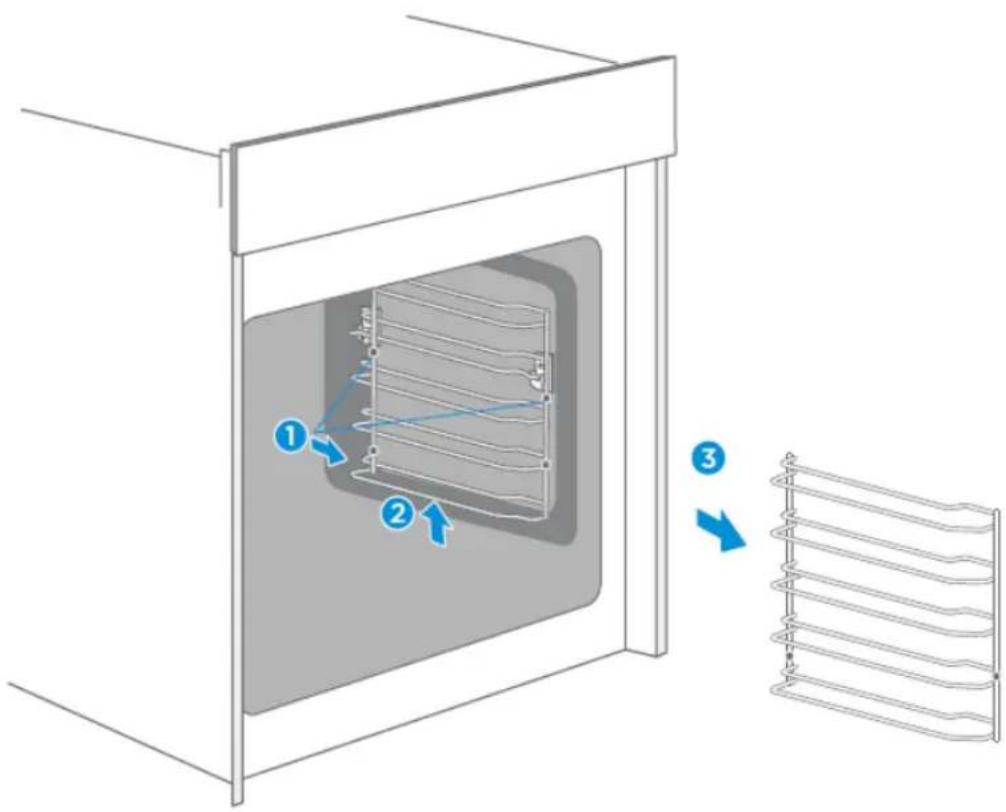
Guide rails
If you want to clean the guide rails and cooking chamber thoroughly, you can remove the guide rails and clean it. With good care and cleaning, your appliance will retain its appearance and remain fully functional for a long time.
- Remove white Teflon accessories.
- Lift up the guide rails.
- Pull out the guide rails.
text_image
Diagram showing a heating unit with labeled components and a rack-mounted rack, illustrating heat transfer or cooling process.TROUBLESHOOTING
If a fault occurs, be sure that it is not due to incorrect operation before calling customer service. First, try to correct the fault yourself using the following overview. You can often easily correct technical problems with the appliance yourself.
If a dish does not turn out exactly as you would like it to, you will find many cooking tips and instructions at the end of the operating manual.
| Fault | Possible cause | Comments/remedy |
| The appliance does not work. | Defective fuse. | Check the circuit breaker in the fuse box. |
| Power failure | Check that the kitchen lamp or other kitchen appliances are working. | |
| The fan is not always switched on in circulation mode. | This is a normal process, ensuring the best possible distribution of heat and the best possible performance of the oven. | |
| After a cooking process, you can hear a noise and observe a flow of air near the control panel. | The fan is still running to prevent high levels of humidity in the cooking chamber and to cool the oven down. The fan will switch off automatically. | |
| Food is not sufficiently cooked in the time specified in the recipe. | A temperature other than that specified in the recipe has been used. Check the temperature setting. The ingredient quantities differ from the recipe. Check the recipe. | |
| Uneven browning | The temperature setting is too high or the dish has not been placed on the correct guide rail. Check the recipe and the settings. The surface finish and/or colour and/or material of the ovenware was not the best choice for the selected oven function. If you use radiant heat, such as in the “Top and bottom heat” mode, you should use matt, dark-coloured, light ovenware. | |
| The lamp does not switch on | The lamp must be replaced. | |
Warning – Danger of electric shock!
Incorrectly performed repairs are hazardous. Repairs and the replacement of damaged power cables may only be carried out by one of our trained service technicians. If the appliance is defective, disconnect it from the mains or switch off the circuit breaker in the fuse box. Contact customer service.
Maximum operating time
The maximum operating time of this appliance is 9 hours, in case you forget to switch it off.
Replacing the lamp in the cooking chamber
If the lamp has stopped working, please contact customer service.
CUSTOMER SERVICE
If your appliance needs to be repaired, our customer service is there for you. We always find the right solution. Please contact the dealer from whom you purchased this device or the Blaupunkt customer service directly. You can find the contact information on the back of this manual.
When you call, please include the model number and serial number so that we can advise you correctly. You will find the type plate with these numbers if you open the appliance door.
Rated voltage: 230 V
Rated output: 1600 W (microwave), 2880 W (grill)
Rated frequency: 50 Hz
Microwave power: 800 W; 2450 MHz

To save time in case of an emergency, you can note the model of your appliance and the telephone number of customer service in the following field.
MAINTENANCE CARD
| Model number | Date of purchase |
| Serial number | Dealer business |
Warning
This appliance must be installed in accordance with current regulations and used only in a well-ventilated room. Please read this manual carefully before installing or using this appliance.
TIPS AND TRICKS
| You want to prepare your own recipe | First try to use settings of similar recipes and optimise the cooking process based on the result. |
| Is the cake ready-baked? | Insert a wooden stick into the cake about 10 minutes before the specified baking time. If there is no more raw dough on the stick after pulling it out, the cake is ready. |
| The cake loses a considerable amount of volume when it cools down after baking. | Lower the temperature setting to 10 °C and check the recipe concerning the mechanical handling of the dough. |
| The cake is much higher in the middle than on the outer edge. | Do not grease the outer ring of the springform pan. |
| The cake is too brown on top. | Use a lower guide rail and/or a lower temperature (this may result in a longer cooking time). |
| The cake is too dry. | Increase the temperature by 10°C (this may result in a shorter cooking time). |
| The food looks good, but it is too moist inside. | Reduce the temperature by 10°C (this may result in a longer cooking time) and check the recipe. |
| The browning is uneven. | Reduce the temperature by 10 °C (this may result in a longer cooking time). Use the top and bottom heat. |
| The bottom of the cake is not browned enough. | Position it one level lower. |
| Baking on several levels simultaneously: The browning result varies on the different levels. | To bake on more than one level, use an operating mode with fan and remove the trays one by one when they are ready. It is not necessary for all trays to be finished at the same time. |
| Condensation while baking | Steam is part of the cooking process and normally travels out of the oven together with the cooling air flow. This steam can condense on various surfaces on or near the oven and form water droplets. This is a physical process and cannot be completely avoided. |
| What type of ovenware can be used? | Any heat-resistant ovenware can be used. Aluminium should not come into direct contact with food, especially if the food is acidic. Please ensure that the container and lid close well. |
| How is the grill function used? | Preheat the oven for 5 minutes and place the food in the level indicated in this manual.Close the oven door. Do not use the oven when the door is open except to place/remove/check the food. |
| How do I keep the oven clean while grilling? | Slide a tray filled with 2 litres of water onto level 1. Almost all liquids dripping from the food standing on the grille will be collected by the tray. |
| The heating element switches on and off in all operating modes with grill. | This is a normal process and depends on the temperature setting. |
| How do you calculate the oven settings if the weight of a roast is not specified by a recipe? | Select the settings next to the roast weight and change the time slightly.If possible, use a temperature sensor to determine the temperature in the meat.Carefully place the tip of the temperature sensor into the meat according to the manufacturer's instructions.Make sure that the tip of the temperature sensor is in the middle of the bulk of the meat, but not near a bone or cavity. |
| What happens if a liquid is poured onto a food in the oven during the cooking process? | The liquid will boil, producing steam as a normal physical process.Please be careful, as the steam is hot. See also “Condensation while baking” for more information. If the liquid contains alcohol, the cooking process will be faster and flames may appear in the cooking chamber. Make sure that the oven door is closed during such processes. Please monitor the cooking process carefully.Only open the door when necessary and with great care. |
TEST FOOD ACCORDING TO EN 60350-1
| RECIPES | Accessories | F | °C | Level | Time (min) | Preheating |
| Sponge cake | Springform pan Φ 26cm |  | 170 | 1 | 30–35 | YES |
| Small cake | 1 baking tray |  | 150 | 2 | 30–40 | YES |
| Apple tart | Springform pan Φ 20cm |  | 160 | 1 | 70–80 | NO |
| Bread | 1 baking tray |  | 210 | 2 | 30–35 | YES |
| Toast | Baking rack |  | Max. | 5 | 6–8 | YES, 5 min |
| Chicken | Baking rack & baking tray |  | 180 | Backing rack: Level 2 Baking tray: Level 1 | 75–80 | YES |
DATA SHEET (EU 65/2014 & EU 66/2014)
| Built-In Oven with Microwave5B60M8690 | |
| Mass of the oven | 45kg |
| Number of cooking chambers | 1 |
| Heat source | Electrical |
| Useful volume | 71L |
Note
All the operating modes described on page 9 are main functions of the oven.
TABLE DES MATIÈRES
2 CONSIGNES DE SÉCURITÉ
2 Usage prévu
2 Avertissement
text_image
Technical diagram of an oven with labeled parts and a magnified inset showing a close-up of the component.natural_image
Line drawing of a rectangular tray with horizontal slats and side handles (no text or symbols)Grille de cuisson
natural_image
Simple line drawing of a rectangular tray with side handles and a flat center (no text or symbols)Lèchefrite
natural_image
Line drawing of an oven with internal rack and ventilation system (no text or symbols)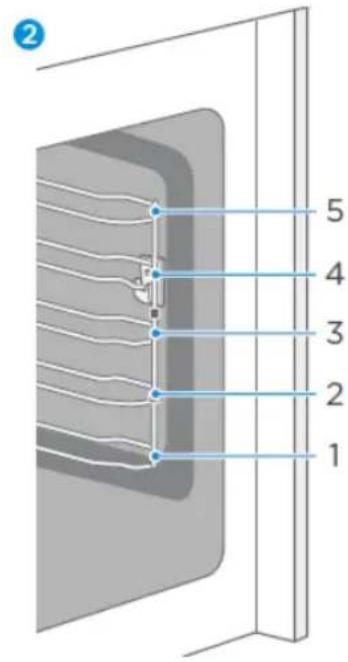
text_image
2 5 4 3 2 1
natural_image
Illustration of a window with horizontal stripes and a vertical pole, no text or symbols present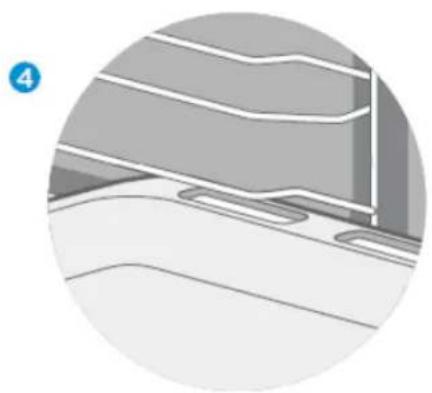
natural_image
Close-up of a mechanical component with layered surfaces and mounting brackets (no visible text or symbols)Fonction d'arrêt
text_image
Diagram illustrating a cooling system with labeled components and airflow direction, showing a chamber with internal cooling ducts and a rack-mounted unit.DÉPANNAGE
23 PROBLEEMOPLOSSING
25 KLANTENSERVICE
26 TIPS EN TRUCS
28 TESTVOEDSEL CONFORM EN 60350-1
28 GEGEVENSBLAD (EU 65/2014 & EU 66/2014)
text_image
Technical diagram of an oven with labeled parts and a magnified inset showing a screw and two screws.natural_image
Line drawing of a rectangular tray with horizontal slats and side supports (no text or symbols)Bakrooster
natural_image
Simple line drawing of a rectangular tray with side grout (no text or symbols)Bakplaat
natural_image
Line drawing of an oven with a rack and ventilation system (no text or symbols)
text_image
2 5 4 3 2 1
natural_image
Illustration of a window with horizontal stripes and a vertical pole, no text or symbols present
natural_image
Close-up of a mechanical component with layered surfaces and mounting holes (no visible text or symbols)text_image
Diagram showing a heating unit with labeled components and airflow direction, alongside a rack-mounted rack system.PROBLEEMOPLOSSING
text_image
Technical diagram of an oven with labeled parts and a magnified inset showing a screw and two screws.natural_image
Line drawing of a rectangular tray with horizontal slats and side supports (no text or symbols)natural_image
Simple line drawing of a rectangular tray with side handles and a flat center (no text or symbols)natural_image
Line drawing of an oven with internal rack and ventilation system (no text or symbols)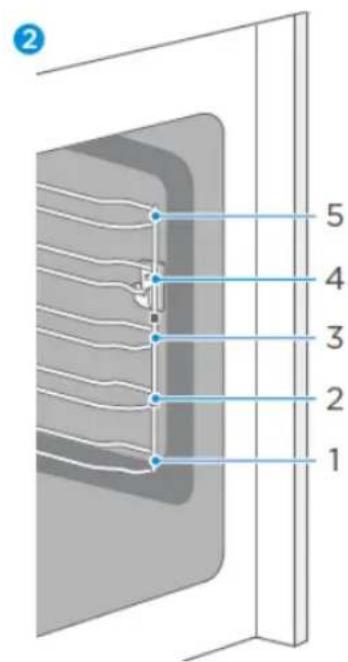
text_image
2 5 4 3 2 1
natural_image
Illustration of a window with a flag and metal grid pattern, no text or symbols present
natural_image
Close-up of a mechanical component with layered structure (no visible text or symbols)Funzione Blocco
text_image
Diagram showing a heating unit with labeled components and airflow direction, alongside a rack-mounted rack system.INNEHÅLLSFÖRTECKNING
2 SÄKERHETSANVISNINGAR
2 Användningsområde
2 Varning
5 Skadeorsaker
6 MONTERING
8 ANVÄNDA PRODUKTEN
8 Manöverelement
text_image
Technical diagram of an oven with labeled parts and a magnified inset showing a screw and two screws.natural_image
Line drawing of a rectangular tray with horizontal slats and side supports (no text or symbols)Bakgaller
natural_image
Simple line drawing of a rectangular tray with side grout (no text or symbols)Bakplåt
natural_image
Line drawing of an oven with internal rack and ventilation system (no text or symbols)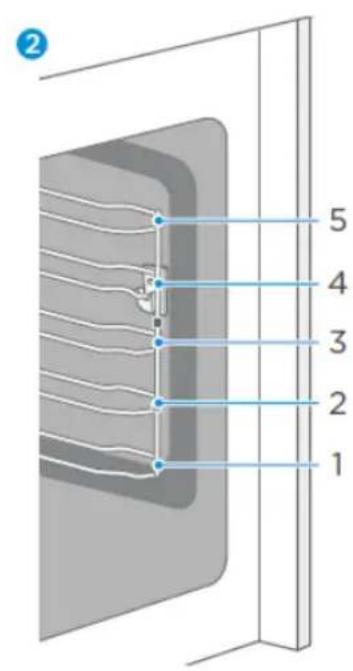
text_image
2 5 4 3 2 1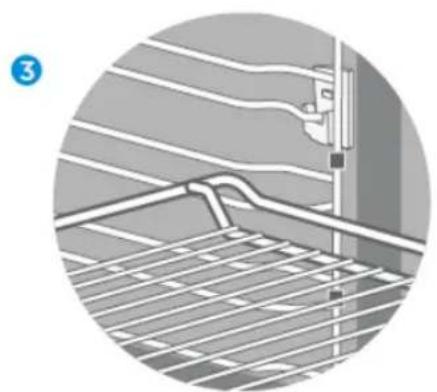
natural_image
Illustration of a window with a mounted device and grid pattern, no text or symbols present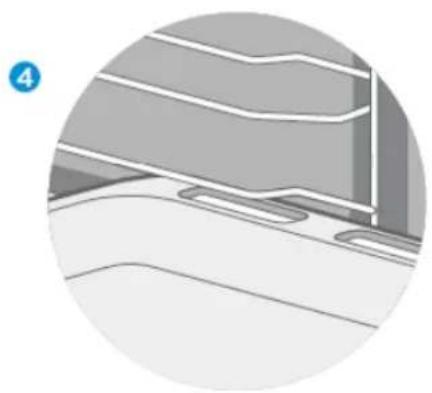
natural_image
Close-up of a mechanical component with layered structure (no visible text or symbols)Låsfunktion
text_image
Diagram illustrating a cooling system with labeled components and directional arrows, showing a furnace interior and rack structure.ÅTGÄRDANDE AV FEL
text_image
Technical diagram of an oven with labeled parts and a magnified inset showing screw, washer, and dial assembly.natural_image
Line drawing of a rectangular tray with horizontal slats and side supports (no text or symbols)Parrilla
natural_image
Simple line drawing of a rectangular tray with side handles and a flat center (no text or symbols)Bandeja de horno
natural_image
Line drawing of an oven with a rack and ventilation system (no text or symbols)
text_image
2 5 4 3 2 1
natural_image
Illustration of a window with horizontal stripes and a vertical pole, no text or symbols present
natural_image
Close-up of a mechanical component with layered structure (no visible text or symbols)Función de bloqueo
text_image
Diagram illustrating a cooling system with labeled components and airflow direction, showing a chamber with internal heat flow and a rack-mounted unit.text_image
BLAUPUNKT