
KDX176 - Car stereo JVC - Free user manual and instructions
Find the device manual for free KDX176 JVC in PDF.
| Product Type | Digital car radio |
| Brand | JVC |
| Model | KDX176 |
| Dimensions (W x H x D) | 178 mm x 50 mm x 160 mm (1 DIN standard) |
| Weight | Approx. 0.5 kg |
| Power supply | 12 V DC, negative ground |
| Speaker impedance | 4 Ω - 8 Ω |
| Recommended max speaker power | ≥ 50 W (AMP GAIN adjustment available) |
| Audio sources | FM/AM radio, USB, AUX (via front input) |
| FM radio | RDS, 18 presets |
| AM radio | 6 presets |
| USB playback | MP3/WMA files, folder search, random and repeat |
| Equalizer | EQ presets and manual adjustments |
| Subwoofer | Adjustable level, SUBWOOFER output |
| Display | Monochrome screen, customizable illumination color (49 colors + flow) |
| Clock | 12/24 h display, adjustable, integrated date |
| Menu languages | English, French, Spanish, Russian |
| Detachable faceplate | Yes, detachable for security |
| Installation | Recessed mounting (with or without sleeve), max angle 30° |
| Standby power | Clock display even when off (adjustable) |
| Fuse | Replacement with fuse of same rating |
| Operating temperature | 0°C to +40°C (estimate) |
| Box contents | Faceplate, trim plate, mounting sleeve, wiring harness, extraction keys (×2) |
Frequently Asked Questions - KDX176 JVC
User questions about KDX176 JVC
0 question about this device. Answer the ones you know or ask your own.
Ask a new question about this device
Download the instructions for your Car stereo in PDF format for free! Find your manual KDX176 - JVC and take your electronic device back in hand. On this page are published all the documents necessary for the use of your device. KDX176 by JVC.
USER MANUAL KDX176 JVC
RECEPTOR MÉDIA DIGITAL
KpaTkoe pyKOBoCTBO no Haay pa60TbI
JVCKENWOOD Corporation
For detailed operations and information, refer to the INSTRUCTION MANUAL on the following website:

B5K-0662-10 [E]


Information on Disposal of Old Electrical and Electronic Equipment and Batteries (applicable for countries that have adopted separate waste collection systems)
Products and batteries with the symbol (crossed-out wheeled bin) cannot be disposed as household waste. Old electrical and electronic equipment and batteries should be recycled at a facility capable of handling these items and their waste byproducts.
Contact your local authority for details in locating a recycle facility nearest to you. Proper recycling and waste disposal will help conserve resources whilst preventing detrimental effects on our health and the environment.
Notice: The sign "Pb" below the symbol for batteries indicates that this battery contains lead.
Data n3roTOBHeHHaMea/ToHaxoHTcHa 3HTKeTKe yCTPOIcTBa.
B co0tBeTCTbHnC3aKoHOM PocchckKoΦeepaunuO 3aunTe npab notpebntenepcoknykb (roHIOCTH DAHORO TOBAPA NO HTEUHN KOTOPOR OH MOKET pndctabNtbo anchoCTb DAAK3HH, 3dopOBBA nTOpeBNTA, pnuHHTb BpE erO HmUyecTB BY NIN Okpykaoue CpeDe COCTABNtET cEmb (7) net Co dHn pno3BDCTBA.
IIOIOHNITENbHBe KOCMETHueCHeN MaTePnAbIb K DAHOMy ToBApY, NOCTaJIaEMbIe BMeCTe C HIM,MOrYT XpaHtBCBa T TeueHene DByx (2)NET CO dHa er OPOH3BODcTBa.
Cpok cnjkbbl (rohdctn), Kpome cpoka xpaHHeMa dnononHHeTbehX KOcMeTnecknx MaTePhaNoB, yOnmAHytbx B ppebdyuux DByx nyHKtax, He 3aTpparnaeBt HNkAaKxDpyrX npab Notpe6ntera, B qactHOCTn, rapaHTMHoro o6cbNyKbaHMa JVC, KOtOpoe OH MOKet NOyUHb COoTBETCTBM C3aKOH O npabax Notpe6ntela HIN dpYHX 3aKOHb, CB3aHHbx CHM.
YcnoBuaXpaHeHnA:
Temnepatypa:ot-30°Cdo+85°C
BnaxHoCTb:0T0%do90%
For Israel
nennnnne nnnnnae) nnoe pe neonne nnne nee
n nnnn nnne (nXn nn) nnnn nn nnnn nn nnnn nn
nnnnnnnnnnnnnnnnnnnnnnnnnnnnnnnnnnnnnnnnnnnnnnnnnnnnnnnnnnnnnnnnnnnnnnnnnnnnnnnnn
nne nnnnne nee nee nee nee nee nee nee nee nee nee nee nee nee nee nee nee nee nee nee nee nee nee nee nee nee nee nee nee nee nee nee nee nee nee nee nee nee nee nee nee nee nee nee nee nee nee nee nee nee nee nea

Declaration of Conformity with regard to the RE Directive 2014/53/EU Declaration of Conformity with regard to the RoHS Directive 2011/65/
Manufacturer:
JVCKENWOOD Corporation
3-12, Moriya-cho, Kanagawa-ku, Yokohama-shi, Kanagawa, 221-0022, JAPAN
EU Representative:
JVCKENWOOD Europe B.V.
Amsterdamseweg 37,1422 AC UITHOORN, THE NETHERLANDS
IpeCTaBtTeJbCTBO BEC:
JVCKENWOOD Europe B.V.
Amsterdamseweg 37,1422 AC UITHOORN, THE NETHERLANDS
English
Hereby, JVckenwo0D declares that the radio equipment "KD-X176" is in compliance with Directive 2014/53/EU.
The full text of the EU declaration of conformity is available at the following internet address: http://www.jvc.net/cs/car/eudoc/
Français
The software embedded in the Product (hereinafter the "Licensed Software") provided by Licensee is copyrighted to or licensable by the Licensee, and this Agreement provides for the terms and conditions which Users shall follow in order to use the Licensed Software.
The User shall use the Licensed Software by agreeing with the terms of this Software License Agreement. This Agreement shall be deemed completed at the time the User (hereinafter the "User") initially used the Product in which the "Licensed Software" is embedded.
The Licensed Software may include the software which has been licensed to the Licensor directly or indirectly from any third party. In such case, some third parties require the Users to follow their conditions for use separately from this Software License Agreement. Such software shall not be subject to this Agreement, and the Users are urged to read the "Important Notice concerning the Software" to be provided separately below.
Article 1 General Provision
The Licensee shall grant to the User a non-exclusive and non-transferable (other than the exceptional case referred to in Article 3, Paragraph 1) licensed to use the Licensed Software within the country of the User. (the country where the User bought the Product (hereinafter the "Country")
Article 2 License
- The license granted under this Agreement shall be the right to use the Licensed Software in the Product.
- The User shall not duplicate, copy, modify, add, translate or otherwise alter, or lease the Licensed Software and any related documents, whether in whole or in part.
- The use of the Licensed Software shall be limited to personal purpose, and the Licensed Software shall not be distributed, licensed or sub-licensed whether it is for commercial purpose or not.
- The User shall use the Licensed Software according to the directions described in the operation manual or help file, and is prohibited to use or duplicate any data in a manner violating the Copyright Law or any other laws and regulations by applying whole or a part of the Licensed Software.
Article 3 Conditions for Grant of License
- When the User transfers the Product, it may also transfer the license to use the Licensed Software embedded in the Product (including any related materials, updates and upgrades) on condition that no original, copies or related materials continue in the possession of the User, and that the User shall cause the transferee to comply with this Software License Agreement.
- The User shall not carry out reverse engineering, disassembling, decompiling or any other code analysis works in connection with the Licensed Software.
Article 4 Right pertaining to the Licensed Software
Any and all copyrights and other rights pertaining to the Licensed Software and related documents shall belong to the Licensee or the original holder of the right who granted to the Licensee the license or sublicense for the Licensed Software (hereinafter the "Original Rightholder"), and the User shall not be entitled to any right other than the license granted hereunder, in respect of the Licensed Software and any related documents.
Article 5 Indemnification of Licensee
- Neither the License nor the Original Rightholder shall be liable for any damage incurred by the User or any third party due to the exercise of the license granted to the User under this Agreement, unless otherwise restricted by law.
- The Licensee will offer no guarantee for the merchantability, convertibility and consistency with certain objective of the Licensed Software.
Article 6 Liability to Third Party
If any dispute has arisen with any third party due to an infringement upon a copyright, patent or any other intellectual property right that was caused by the User's use of the Licensed Software, the User shall settle such dispute at its own cost and hold the Licensee and the Original Rightholder harmless from any inconvenience it may cause.
Article 7 Confidentiality
The User shall keep the confidentiality of such portion of the Licensed Software, related documents thereof or any other information to be granted under this Agreement, as well as the conditions of this Agreement as has not yet entered the public domain, and shall not disclose or divulge the same to any third party without approval of the Licensor.
Article 8 Termination
In case the User falls under any of the events described in the following items, the Licensor may immediately terminate this Agreement or claim that the User compensates for the damage incurred by the Licensor due to such event:
(1) when the User violated any provision of this Agreement; or
(2) when a petition has been filed against the User for an attachment, provisional attachment, provisional disposition or any other compulsory execution.
Article 9 Destruction of the Licensed Software
If this Agreement is terminated pursuant to the provision of Article 8, the User shall destroy the Licensed Software, any related documents and copies thereof within two (2) weeks from such date of termination.
Article 10 Protection of Copyright
- The copyright and all the other intellectual property rights relating to the Licensed Software shall belong to the Licensor and the Original Rightholder, and in no event shall they be under the ownership of the User.
- The User shall, whenever it uses the Licensed Software, comply with any laws relating to the copyright and other intellectual property rights.
Article 11 Export Restriction
- It is prohibited to export the Licensed Software and any related documents outside the country of the User (including transmission thereof outside the country of the User via Internet of other communication tools).
- The User shall understand that the Licensed Software shall be subject to the export restrictions adopted by the country of User and any other countries.
- The User shall agree that the software will be subject to any and all applicable international and domestic laws (including the export control regulation of the country of User and any other countries, and any restrictions concerning the end-users, the use by end-users and importing countries to be provided by the country of User and any other countries, and any other governmental authorities).
Article 12 Miscellaneous
- In the event any part of this Agreement is invalidated by operation of law, the residual provisions shall continue in force.
- Matters not stipulated in this Agreement or any ambiguity or question raised in the construction of this Agreement shall be provided or settled upon good-faith consultation between the Licensor and the User.
- The Licensor and the User hereby agree that this Agreement is governed by the laws of Japan, and any dispute arising from, and relating to the rights and obligations under, this Agreement shall be submitted to the exclusive jurisdiction of the Tokyo District Court for its first instance.
Important Notice concerning the Software
libFLAC
Copyright (C) 2000-2009 Josh Coalson
Copyright (C) 2011-2013 Xiph.Org Foundation
Redistribution and use in source and binary forms, with or without modification, are permitted provided that the following conditions are met:
- Redistributions of source code must retain the above copyright notice, this list of conditions and the following disclaimer.
- Redistributions in binary form must reproduce the above copyright notice, this list of conditions and the following disclaimer in the documentation and/or other materials provided with the distribution.
- Neither the name of the Xiph.org Foundation nor the names of its contributors may be used to endorse or promote products derived from this software without specific prior written permission.
THIS SOFTWARE IS PROVIDED BY THE COPYRIGHT HOLDERS AND COLNTRIBUTORS "AS IS" AND ANY EXPRESS OR IMPLIED WARRANTY, INCLUDING, BUT NOT LIMITED TO, THE IMPLIED WARRANTYES OF MERCHANTABILITY AND FITNESS FOR A PARTICULAR PURPOSE ARE DISCLAIMED. IN NO EVENT SHALL THE FOUNDATION OR COLNTRIBUTORS BE LIABLE FOR ANY DIRECT, INDIRECT, SPECIAL, EXEMPLARY, OR CONSEQUENTIAL DAMAGES (INCLUDING, BUT NOT LIMITED TO, PROCEDURE OF SUBSTITUTE GOODS OR SERVICES; LOSS OF USE, DATA, OR PROFITS; OR BUSINESS INTERRUsION) HOWEVER CAUSED AND ON ANY THEORY OF LIABILITY, WHETHER IN CONTRACT, STRICT LIABILITY, OR TORT (INCLUDING NEGLIGENCE OR OTHERWISE) ARISING IN ANY WAY OUT OF THE USE OF THIS SOFTWARE, EVEN IF ADVISED OF THE POSSIBILITY OF SUCH DAMAGE.
-JSON
Copyright (c) 2009 Dave Gamble
Permission is hereby granted, free of charge, to any person obtaining a copy of this software and associated documentation files (the "Software"), to deal in the Software without restriction, including without limitation the rights to use, copy, modify, merge, publish, distribute, sublicense, and/or sell copies of the Software, and to permit persons to whom the Software is furnished to do so, subject to the following conditions:
The above copyright notice and this permission notice shall be included in all copies or substantial portions of the Software.
THE SOFTWARE IS PROVIDED "AS IS", WITHOUT WARRANTY OF ANY KIND, EXPRESS OR IMPLIED, INCLUDING BUT NOT LIMITED TO THE WARRANTY OF MERCHANTABILITY, FITNESS FOR A PARTICULAR PURPOSE AND NONINFRINGEMENT. IN NO EVENT SHALL THE AUTHORS OR COPYRIGHT HOLDERS BE LIABLE FOR ANY CLAIM, DAMAGES OR OTHER LIABILITY, WHETHER IN AN ACTION OF CONTRACT, TORT OR OTHERWISE, ARISING FROM, OUT OF OR IN CONNECTION WITH THE SOFTWARE OR THE USE OR OTHER DEALINGS IN THE SOFTWARE.
Microsoft and Windows Media are either registered trademarks or trademarks of Microsoft Corporation in the United States and/or other countries.
Installation/Connection
This section is for the professional installer.
For safety's sake, leave wiring and mounting to professionals. Consult the car audio dealer.
WARNING
The unit can only be used with a 12VDC power supply, negative ground.
- Disconnect the battery's negative terminal before wiring and mounting.
- Do not connect Battery wire (yellow) and Ignition wire (red) to the car chassis or Ground wire (black) to prevent a short circuit.
- To prevent short circuit:
Insulate unconnected wires with vinyl tape.
- Be sure to ground this unit to the car's chassis again after installation.
- Secure the wires with cable clamps and wrap vinyl tape around the wires that comes into contact with metal parts to protect the wires.
CAUTION
- Install this unit in the console of your vehicle. Do not touch the metal parts of this unit during and shortly after use of the unit. Metal parts such as the heat sink and enclosure become hot.
- Do not connect the wires of speakers to the car chassis or Ground wire (black), or connect them in parallel.
- Connect speakers with a maximum power of more than 50 W. If the maximum power of the speakers is lower than 50 W, change the [AMP GAIN] setting to avoid damaging the speakers.
- Mount the unit at an angle of less than 30^ .
- If your vehicle wiring harness does not have the ignition terminal, connect Ignition wire (red) to the terminal on the vehicle's fuse box which provides 12 V DC power supply and is turned on and off by the ignition key.
- Keep all cables away from heat dissipate metal parts.
- After the unit is installed, check whether the brake lamps, blinkers, wipers, etc. on the car are working properly.
- If the fuse blows, first make sure the wires are not touching car's chassis, then replace the old fuse with one that has the same rating.
Basic procedure
1 Remove the key from the ignition switch, then disconnect the terminal of the car battery.
2 Connect the wires properly. See "Wiring connection" on page 3.
3 Install the unit to your car. See the following "Installing the unit (in-dash mounting)".
4 Connect the terminal of the car battery.
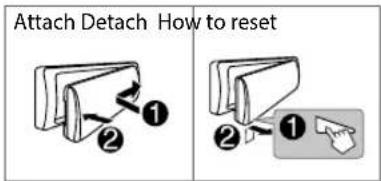
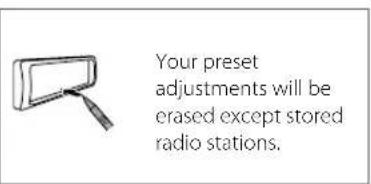
5 Detach the faceplate and reset the unit. See "How to reset" on page 4.
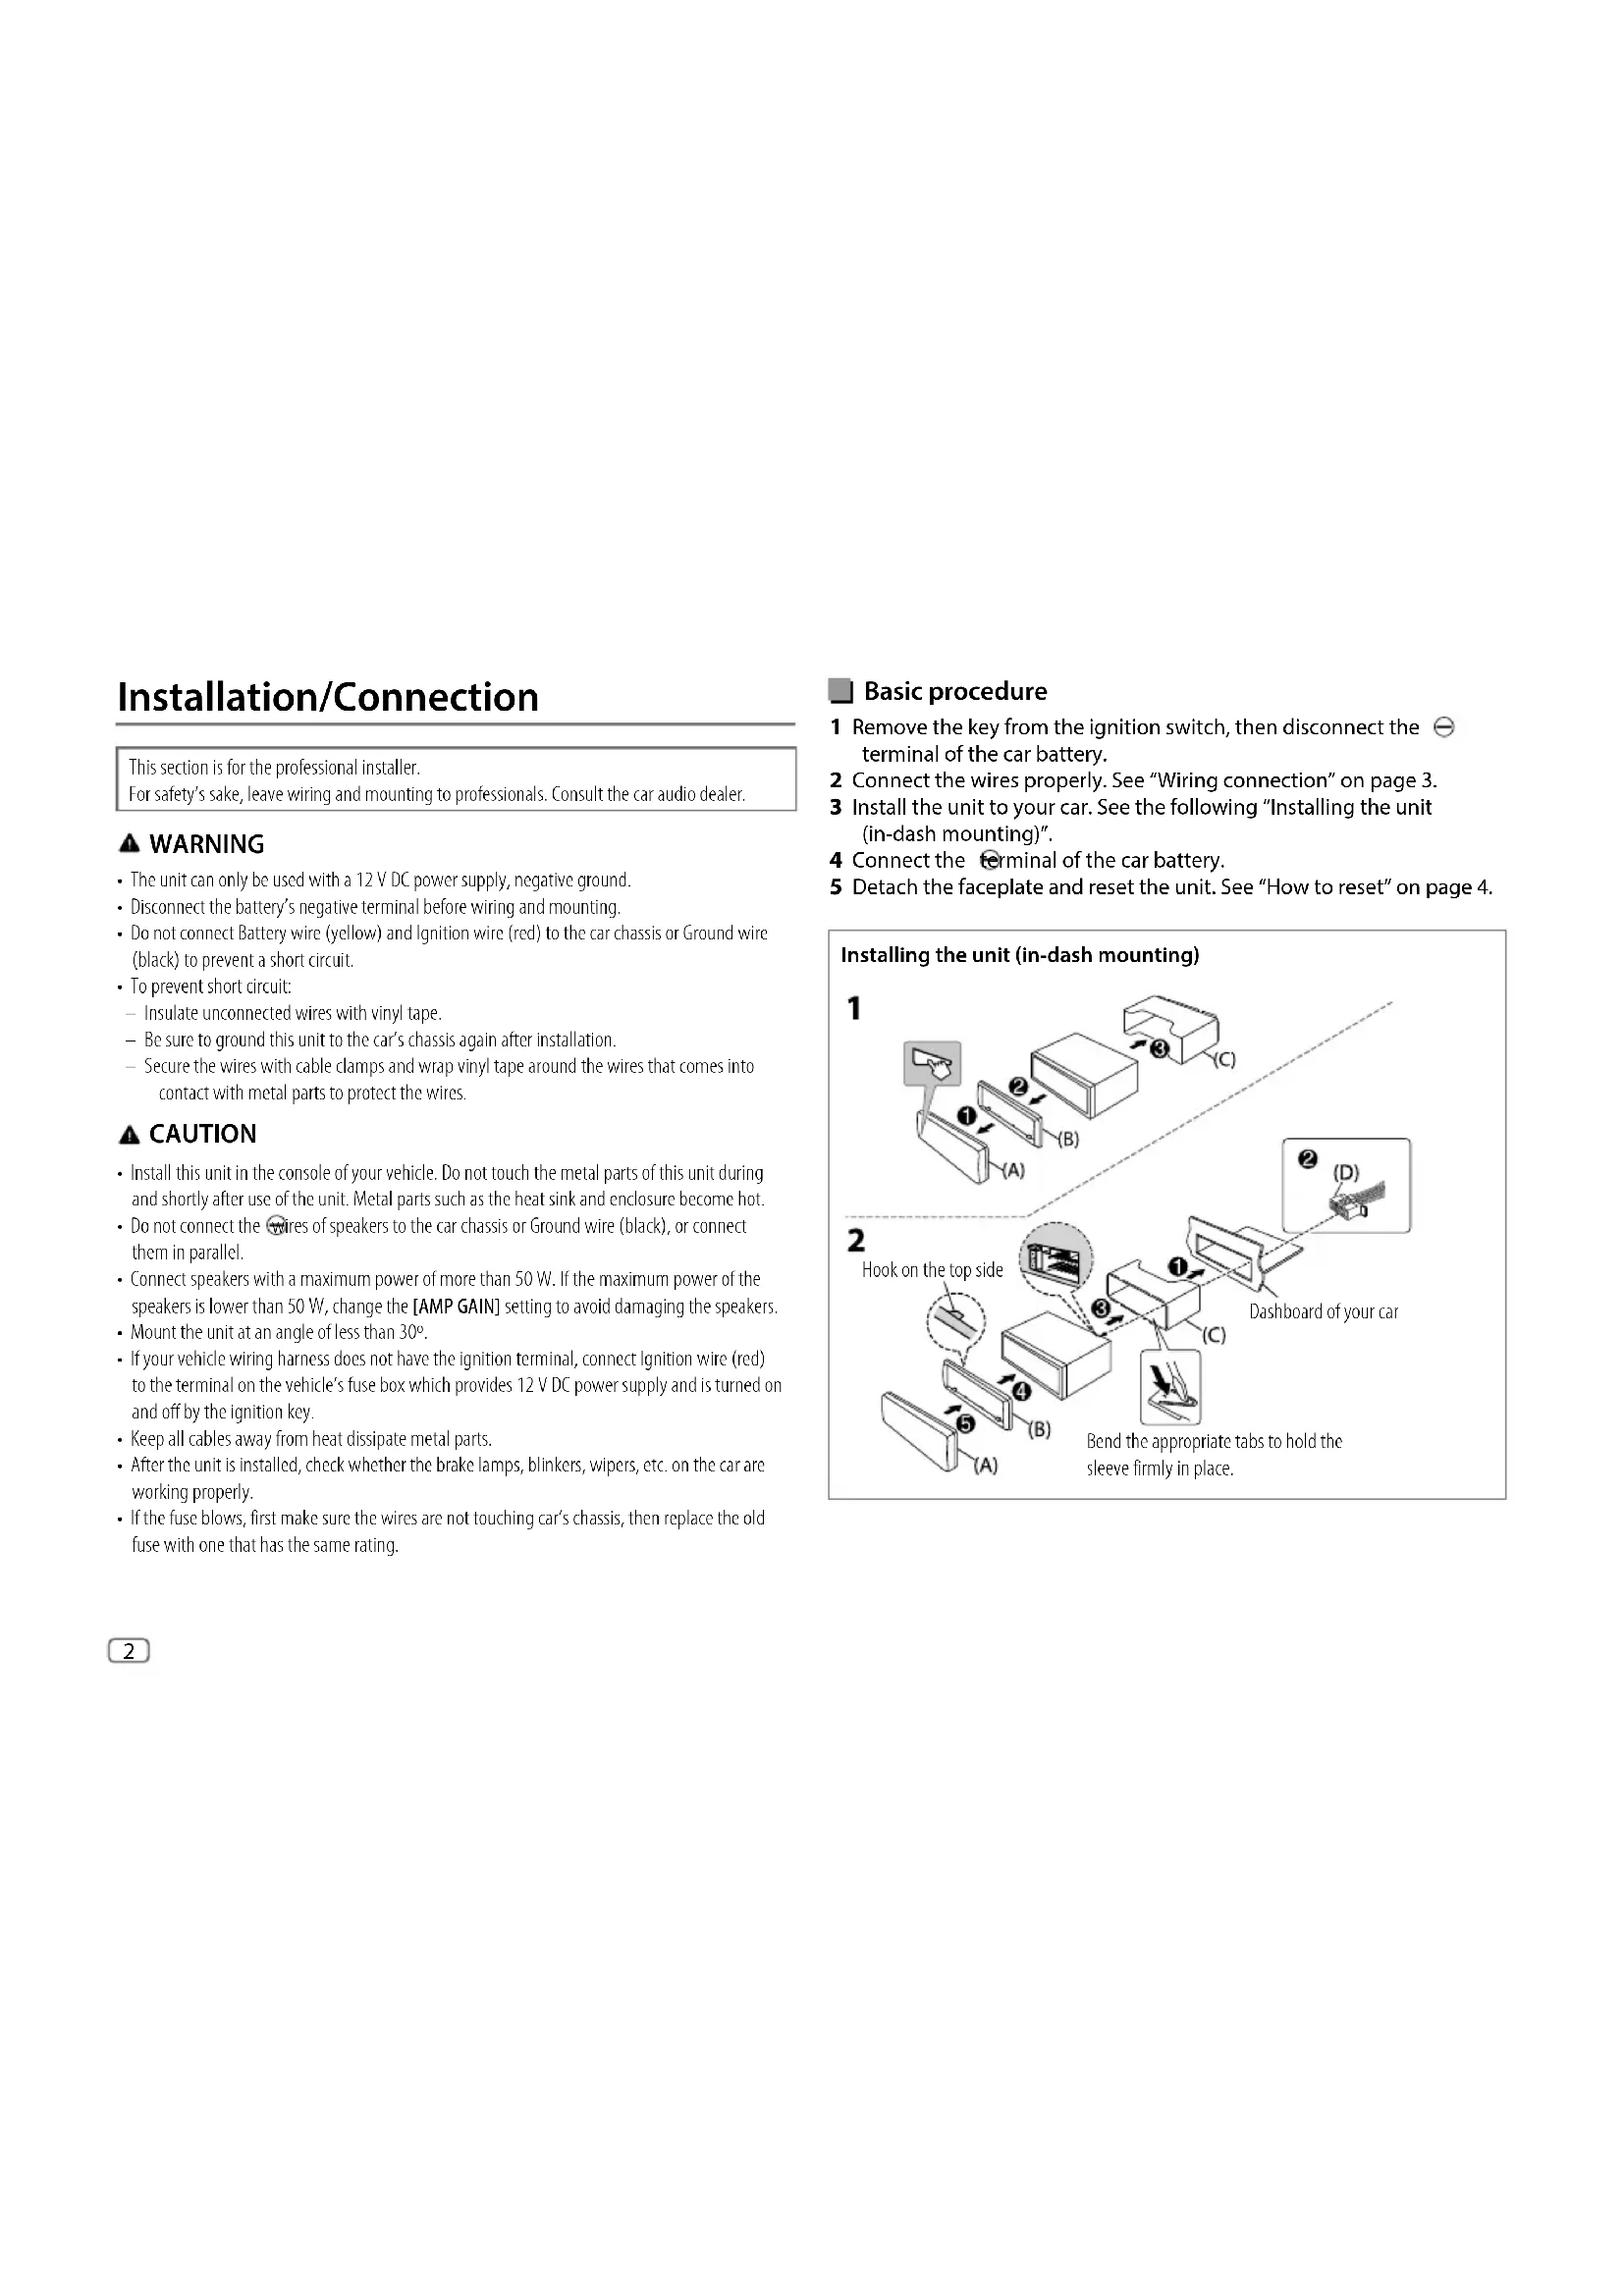
Installing the unit (in-dash mounting)
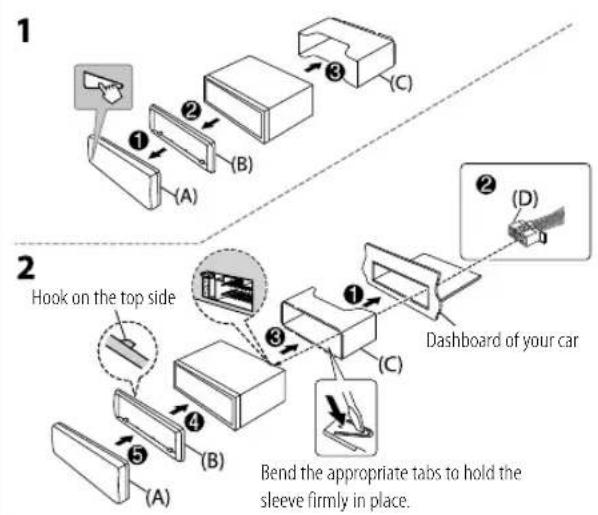
Installing the unit (without mounting sleeve)
1 Remove the mounting sleeve and trim plate from the unit.
2 Align the holes in the unit (on both sides) with the vehicle mounting bracket and secure the unit with screws (commercially available).
Use only the specified screws. Using wrong screws might damage the unit.
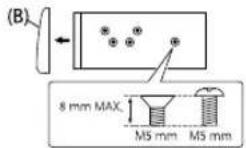
Removing the unit

Part list (supplied)
(A) Faceplate (× 1)
(B) Trimplate (× 1)
(C) Mounting sleeve (× 1)
(D) Wiring harness (× 1)
(E) Extraction key (× 2)
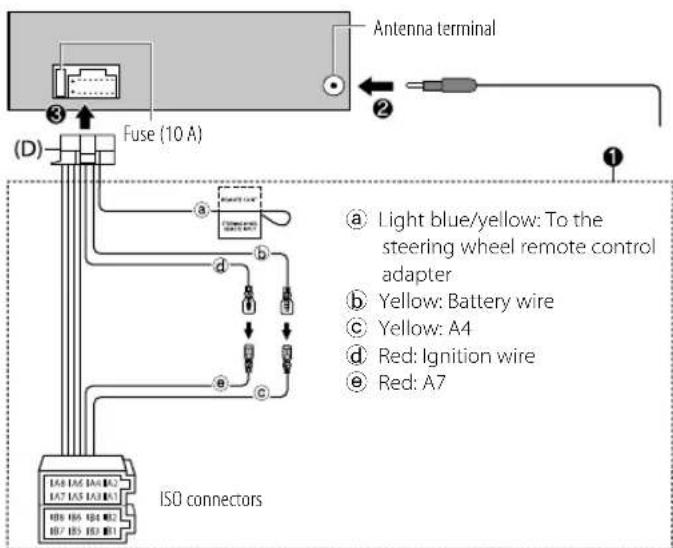
Wiring connection
Pin Color and function
| A4 Yellow: Battery | ||
| A5 Blue/White: Power control (12 V = 350 mA) | ||
| A6 Orange/white: Car light control switch | ||
| A7 Red: Ignition (ACC) | ||
| A8 Black: Earth (ground) connection | ||
| B1, B2 | Purple ⊕, Purple/black ⊙ | : Rear speaker (right) |
| B3, B4 | Gray ⊕, Gray/black ⊙ | : Front speaker (right) |
| B5, B6 | White ⊕, White/black ⊙ | : Front speaker (left) |
| B7, B8 | Green ⊕, Green/black ⊙ | : Rear speaker (left) |
Before Use
IMPORTANT
To ensure proper use, please read through this Guide before using this product. It is especially important that you read and observe Warnings and Cautions in this Guide.
- Please keep the Guide in a safe and accessible place for future reference.
WARNING
Do not operate any function that takes your attention away from safe driving.
CAUTION
Volume setting:
- Adjust the volume so that you can hear sounds outside the car to prevent accidents.
- Lower the volume before playing digital sources to avoid damaging the speakers by the sudden increase of the output level.
General:
- Avoid using the external device if it might hinder safe driving.
- Make sure all important data has been backed up. We shall bear no responsibility for any loss of recorded data.
- Never put or leave any metallic objects (such as coins or metal tools) inside the unit to prevent a short circuit.
Basics
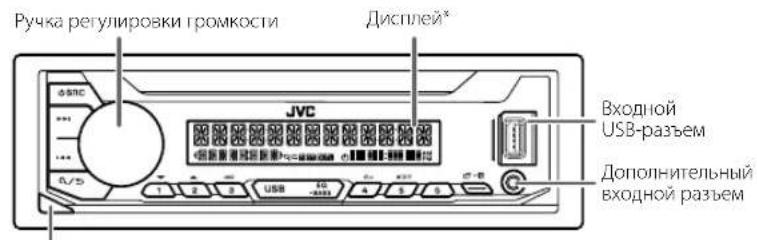
Faceplate
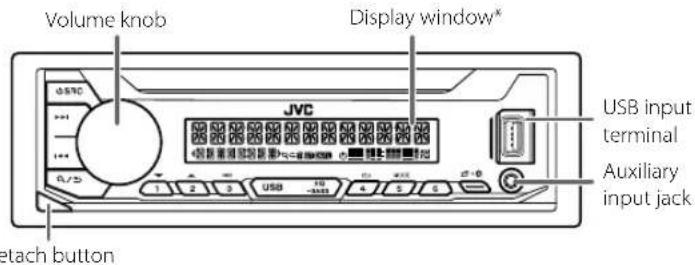
- Only for illustration purpose.
To On the faceplate
Turn on the power
Press SRC.
- Press and hold to turn off the power.
Adjust the volume Turn the volume knob.
Select a source
Press SRCrepeatedly.
Change the display information
Press repeatedly.
GettingStarted
1 Cancel the demonstration
When you turn on the power for the first time (or after you reset the unit), the display shows: "CANCEL DEMO" "PRESS" "VOLUME KNOB"
1 Press the volume knob. [YES] is selected for the initial setup.
2 Press the volume knob again. "DEMO OFF" appears.
2 Set the clock and date
1 Press and hold
2 Turn the volume knob to select [CLOCK], then press the knob.
To adjust the clock
3 Turn the volume knob to select [CLOCK ADJUST], then press the knob.
4 Turn the volume knob to make the settings, then press the knob. Set the time in the order of "Hour" "Minute".
5 Turn the volume knob to select [CLOCK FORMAT], then press the knob.
6 Turn the volume knob to select [12H] or [24H], then press the knob.
To set the date
7 Turn the volume knob to select [DATE SET], then press the knob.
8 Turn the volume knob to make the settings, then press the knob. Set the date in the order of "Day" "Month" "Year".
9 Press to exit.
To return to the previous setting item, press a/
3 Set the basic settings
1 Press and hold
2 Turn the volume knob to select an item (see the following table), then press the knob.
3 Repeat step 2 until the desired item is selected or activated.
4 Press to exit.
To return to the previous setting item, press / .
Default: [XX]
| [SYSTEM] | |
| [KEY BEEP] | [ON]: Activates the keypress tone.; [OFF]: Deactivates. |
| [CLOCK] | |
| [CLOCK DISPLAY] | [ON]: The clock time is shown on the display even when the unit is turned off.; [OFF]: Cancels. |
| [ENGLISH] | |
| [PYCCKIM] | Select the display language for menu and music information if applicable. By default, [ENGLISH] is selected. |
| [ESPANOL] | |
| [FRANCAIS] | |
Radio
Search for a station
1 Press SRC repeatedly to select FM or AM.
2 Press to search for a station automatically. (or)
Press and hold / until "M" flashes, then press repeatedly to search for a station manually.
Settings in memory
You can store up to 18 stations for FM and 6 stations for AM.
Store a station
While listening to a station...
Press and hold one of the number buttons (1 to 6).
(or)
1 Press and hold the volume knob until "PRESET MODE" flashes.
2 Turn the volume knob to select a preset number, then press the knob. "MEMORY" appears once the station is stored.
Select a stored station
Press one of the number buttons (1 to 6).
(or)
1 Press.
2 Turn the volume knob to select a preset number, then press the knob.
USB
Start playback
The source changes automatically and playback starts when you attach an USB device to the USB input terminal.
| To On the faceplate | |
| Reverse/Fast-forward | Press and hold ↓/▶. |
| Select a file | Press ↓/▶. |
| Select a folder | Press 2 ▲/1 ▼. |
| Repeat play | Press 4 repeatedly. |
| Random play | Press 3 ×× repeatedly. |
Menu Settings
1 Press and hold menu settings.
2 Turn the volume knob to select an item, then press the knob.
3 Repeat step 2 until the desired item is selected/activated.
4 Press to exit.
To return to the previous setting item, press Q/
Refer to the INSTRUCTION MANUAL on the following website for the detailed explanation of each item: http://www.jvc.net/cs/car/
The availability of each item vary depending on the model.
Menu items
[EQ SETTING]: Selects a preset equalizer or adjusts your own sound settings.
[AUDIO CONTROL]: Sets your preferred audio settings.
[DISPLAY]: Sets your preferred control for the display window.
TUNER SETTING: Settings for radio source.
[SYSTEM]: Settings for this unit.
[CLOCK]: Adjusts the clock.
[ENGLISH]: Selects language for the menu and music information.
[PyCCKN] : Selects language for the menu and music information.
[ESPANOL]: Selects language for the menu and music information.
[FRANCAIS]: Selects language for the menu and music information.
[DEMO MODE]: Activates or deactivates the display demonstration.
Examples of some well-used settings
Subwoofer Level Setting
1 Press and hold toexter menu settings.

2 Turn the volume knob clockwise to select [AUDIO CONTROL], then press the knob.

AUDIO CONTROL


3 Turn the volume knob clockwise to select [SUBWOOFER SET], then press the knob.

SUBWOOFER SET

4 Turn the volume knob clockwise to select [ON], then press the knob.

OFF/ON

5 Turn the volume knob clockwise to select [SUB.W LEVEL], then press the knob.

SUBU LEVEL

6 Press the volume knob if [PRE-OUT] is shown on the display.

PRE-OUT
7 Turn the volume knob to adjust the subwoofer level, then press the knob.

SU8U
+□→

Continued on the next page...
8 Press to exit the setting menu.

Note:
You need to set [SPK/PRE OUT] to [REAR/SUB.W] or [SUB.W/SUB.W] before you can make the subwoofer level settings.

Illumination Color Setting

1 Press and hold to enter menu settings.

2 Turn the volume knob clockwise to select [COLOR] then press the knob.

COLOR


3 Press the volume knob if [PRESET] is shown on the display.

PRESET
4 Turn the volume knob to choose a color, then press the knob.


-
[COLOR 01] to [COLOR 49]
-
USER: The color you have created for [DAY COLOR] or [NIGHT COLOR] is shown.
- [COLOR FLOW01] to [COLOR FLOW03]: Color changes at different speeds.
5 Press to exit.

Other Information
For playback operations of AUX source, refer to the INSTRUCTION MANUAL on the following website: http://www.jvc.net/cs/car/
The availability of each source vary depending on the model.
Note for specifications
Speaker Impedance:
4Ω—8Ω
Operating Voltage:
12 V DC car battery
A4GeelAccu
A5 Blauw/wit:Stroomregeling(12V (= = = = = = = = = = = = = = = = = = = = = = = = = = = = = = = = = = = = = = = = = = = = = = = = = = = = = =
A6 Oranje/wit: Autoverlichtingsschakelaar
A7 Rood: Contact (ACC)
A8 Zwart: Massaverbinding
B1,B2 Paars Paars/zwart : Achterluidspreker (rechts)
B3,B4 GrijsGrijs/zwart :Voorluidspreker (rechts)
B5,B6 Wit, Witt/zwart :Voorluidspreker (links)
B7,B8 Groen,Groen/zwart Achterluidspreker (links)
Alvorens gebruik
BELANGRIJK
IpeepnnaheB
KHOIIKaOTCOeINHeHHA
TolbkoBueJAXHaHnndHocTH.
3adaaHa nepedne npenei
BkKueHne nHTaHn
Haxmte KhoNky SRC
HaKMMte n ydepeXBAIte HAKATO, YTO6bOTKJKOUHTBITNAHHe.
HacTpoIka rpoMkoCTn NObepHTe pyuKy peYunIpObKn rpomKoCTn.
Bb6epntnactouHHK
HaxmTe KhoNkY SRC HeckoJIbKa pa3.
IaMeHeHne OTo6paKaemOn HnfoPmaUHaXMaTe KHOrkY HeckoNko pa3.
Hauano3Kcnpnyatau
1 Otmeha demOHcTpaunn
PnB KINIOHNEHN HINTAHNN BINEPBBE (NINIOOIE C6POCA YCPOIcTBa) HA JIMCIeNE OIO6paxaeTcIeYooaI INΦOpMaUN: "CANCEL DEMO" 一 ^ 一 PRESSVOLUME KNOB
1 Haxmte pyky perynpOBKn rpoMkoctn.
B KaueCTBe HaayJIbHOH HAcTpoN KIN BbIbpaHO 3HaueHHe [YES].
2 Haxmnte pyky perynnpOBkn rpomkoctn eue pa3.
OTo6paXaetcaHnncb"DEMO OFF".
2 UcTaHOBKa YacOB N daTbi
1 HaxMMTe u ydepKuBaBte HaxKaToi KOnKy
2 NObepHnTe pyKy perynipOBKn rPOMKOCTn dIa Bb6opa 3neMeHTa [CLOCK], a 3aTEM HAnMnTE ee.
YtobHaCtponTb Yacbl
3 NObepHnTe pyky perynupOBKn rPOMKocTn DnB Bb6opa 3JeMeHTa [CLOCK ADJUST], a 3aTEM HaxMNTE ee.
4 NopopaHnBaIe pyky pepynpOBKn rPOMKoCTN,HTO6bBb6paTb 3HaHeHN npAmePTPOB, a 3aTeM HAKMNTE ee. YCTAHOBITE BpEMB B nOPaRke "Lac" "MnHYta".
5 NObepHnTe pyKy perynpOBKn rPOMKocTn DnBb6opa 3neMeHTa [CLOCK FORMAT], a 3aTEM HaxMNte ee.
6 NOBEPHNTe pyky perynipOBKn rpoMKoCTn DnBb6opa [12H]nn [24H], a 3aTEM HAKMITE ee.
YTO6bIyCTaHOBnTb DaTy
7 NObepHnTe pyky peRyIuPOBKn rPoMkoCTn DnB BbIbOpa 3JIeMeHTa [DATE SET], a 3aTEM HaKMITE ee.
8IbOpaHnBaIe pyKy peYrIpOBKn rPOMKOCTN,HTo6bBb6paTb 3HaENHeNnapaMetPOB,a3aTeM HaxMNTe ee. YcTaHOBnE daty B nopAek "Deh" MeCAuOJ
9 Haxmnte 6bixOda.
IINB03Bpata KnpdeBdyuemyAlemEnyHaCtpoKNHaKMITEKHOIky
3 3aandaHne 6a30BbIX HacTpoeK
1 HaKMITE u ydepKnBaIte HaxaToI KHOkKy
2 UTo6bI Bb6paTb 3nEmeH, NOBepHnTe pyuKy peryNIpOBKn rPOMKoCTN (CM. CnEpyuOy To Ta6nHy), 3aTeM HxMnTE ee.
3 NOBTOPAIte DeCTBne 2do tex nop, noka He 6ydet Bb6paHnnn AKTMBPOBAH Heo6xOIMMbIeAEMEHT.
4 HaxMnTe 10bixOda.
IINB03Bpata K npebidyemmy 3nemHHTy HAcTpoKN HAnKMTEKONKyQ/
NoymoHaHnO: [XX]
CoxpaHHeHpe paHIOCTaHm
Pn npocnyBaHn paNocTahnn
Haxmte n yepknae Haxaon OHy n3 HymepoBaHHbx KHOOK (OT 1 do 6) (nnn)
1 HaxMnte yndePKnBaIte HaKaToI pyKy perynipOBKn rpoMKoCTn, noka He 3aMnaeT kct "PRESET MODE".
2 NopepHnne pykypeynpOOBKrpOMKcTnIyBbOpa3anporpAMMPOBaHORo HOpema, a3TeMaHaxMepyk. NocecoxpaAHHNCTaHmUOTobpaXaETcCo06EhJeNEMORY
Bb6op coxpaHnHou paduocTaHun
Haxmte OndHy n3 HymepoabAHbIX KHONOK (OT 1 Do 6). (nii)
1 Haxmte KhoNky.
2 NObepHnTe pyky perynpOBKn rpoMkOCTn nBb6opa 3a nporpaMMnpoBaHHoro Homepa, a 3aTeM hAmmte pyky.
USB
Haayao Bocnpoun3BedeHn
PnpnpncoeiHHeHHyycpOc1BaUSBKBxOHNMy USB-pa3bemy npocxoanat ABToMaTnuecka CMeHaNCTOuHnKa HauHnAeTC BOCIPoN3BeHeHne.
HaCtpoNka ypoBn Hn3KoYacToTHOrO nnHaMnKa
1 HaxmTe u depKnBaIte npeuTn MeHIO hAcIpoK.

2 NObepHnTe pyky perynipOBKn rPOMKoCTn NO yacOBoi CTpeKe dIy Bb6opa 3eMeNTa [AUDIO CONTROL], a 3aTEM HaxMnTE ee.

AUDIO CONTROL

3 NobePHTe pyky perynipOBKN rPOMKoCTn NO YacOBoi CTpeKe Iy Bb6opa 3Iementa [SUBW0OER SET], a3aTeM HaxMtTe ee.

SUBWOOFER SET

4 NObepHnTe pyky perynnpOBKn rPOMKoCTn No YacBOB CTpeKe Dn Bb6opa 3IeMeHTa [ON], a 3aTeM HaxMNte ee.

OFFON

5 Nobeprhne pyky perynipobkn rpmkocn no yacobon ctpenke nBb6opa 3nementa [SUB.W LEVEL], a3aTe m haxmnte ee.

SUBW LEVEL

6 HaxMMTEpykpepynnpOBKn rpoMkoCTn,ecnHa dncnnee oTo6paKaetc [PRE-OUT].

PRE-OUT
7 NOBEPHnTe pyky peyepynpOBKn rpoMkOCTnIa HAcTPOKn yPOBnHaN3KoYAcTOrTHOrO nnHAMnka, a 3aTEM Haxmnte ee.

SUB
+□→

PpOdoJIkeHHe HcIeHyoWcI cTpaHmUe...
8 HaxMMTE,HTO6bBbIMTN3 MEHIO HAcTPOEK.

PpmeaHne:
Ipeep TcK KAK Bb CMOKETe BBIIOHHTb HAcTPOIKN yPOBRA N3KOACTOTHOI UHAMKA, BAM NOTpe6yETcYCTAHOBHTb [SPK/PREOUT] Ha [REAR/SUB.W] HIN [SUB.W/SUB.W].

YctaHObKa Ubeta NoCDBETK
1 Haxmte u yepknaBaeTnepeu Tn MeHIO HaCTpoek.

2 NObepHnTe pyky perynnpOBKn rPOMKoCTn no yacobO nCTpeKe dIy BbIbopa 3aIeMaNTa [COLOR] a 3aTEM HaxMnte ee.

COLOR


3 HauMHTe pyuKy perynipOBKn rpoMKoCTn,ecn Ha dncnnee oTo6paKaetc [PRESET].

PRESSET
4 NOBEPHnTe pyky perynipOBKn rpoMKoCTn, qTO6bl BbIbpaTb cBeT, a 3aTEM Haxmte pyky.


-OT [COLOR 01]no [COLOR 49]
[DAY COLOR]u nn [NIGHT COLOR]
OT [COLOR FLOW01]NO [COLOR FLOW03]LBet N3MeHHeTcA
Cpa3HOHCKOPOCTbIO.
5 HaKMMTe
MbXoJa.


Дугая Информацья
3aHhOpMaueJeNo onepaunm Bocpon3beHnna HcToHHka AUX 06paauTecK NHCTPYKLIMI NIO XKTUYATALUM Ha cneyuquem Be6-caTe: http://www.jvc.net/cs/car/
- OctyTHOCTb KaJIOHO NCTOHNA OTINHAcOTINHAcTBAHNCIMOCNOTMOEJI.
3ameyHne no texnueckm XapakTepnKam
NoHoe cOnpoTnBneHne KaTyuKr rpoMkoROpuTeHa
4OM-8OM
Pa6ooye HanpXeHne:
AkkymyIaTOPHa CnCTema HAnpaXeHHem 12 B NoctoHHoro ToKa
JVC
© 2019 JVCKENWOOD Corporation
0719DTSDMTJEIN

- Information on Disposal of Old Electrical and Electronic Equipment and Batteries (applicable for countries that have adopted separate waste collection systems)
- Data n3roTOBHeHHaMea/ToHaxoHTcHa 3HTKeTKe yCTPOIcTBa.
- YcnoBuaXpaHeHnA:
- For Israel
- Manufacturer:
- English
- Français
- Article 1 General Provision
- Article 2 License
- Article 3 Conditions for Grant of License
- Article 4 Right pertaining to the Licensed Software
- Article 5 Indemnification of Licensee
- Article 6 Liability to Third Party
- Article 7 Confidentiality
- Article 8 Termination
- Article 9 Destruction of the Licensed Software
- Article 10 Protection of Copyright
- Article 11 Export Restriction
- Article 12 Miscellaneous
- Important Notice concerning the Software
- libFLAC
- -JSON
- Installation/Connection
- WARNING
- CAUTION
- Basic procedure
- Installing the unit (without mounting sleeve)
- Part list (supplied)
- Before Use
- IMPORTANT
- Volume setting:
- General:
- Basics
- Faceplate
- To On the faceplate
- GettingStarted
- Cancel the demonstration
- Set the clock and date
- To adjust the clock
- To set the date
- Press to exit.
- Set the basic settings
- Radio
- Search for a station
- Settings in memory
- Store a station
- Select a stored station
- USB
- Start playback
- Menu Settings
- Menu items
- Examples of some well-used settings
- Subwoofer Level Setting
- Note:
- Illumination Color Setting
- Other Information
- Note for specifications
- Alvorens gebruik
- BELANGRIJK
- Hauano3Kcnpnyatau
- Otmeha demOHcTpaunn
- UcTaHOBKa YacOB N daTbi
- YtobHaCtponTb Yacbl
- YTO6bIyCTaHOBnTb DaTy
- Haxmnte 6bixOda.
- 3aandaHne 6a30BbIX HacTpoeK
- CoxpaHHeHpe paHIOCTaHm
- Bb6op coxpaHnHou paduocTaHun
- Haayao Bocnpoun3BedeHn
- PpmeaHne:
- YctaHObKa Ubeta NoCDBETK
- Дугая Информацья
- 3ameyHne no texnueckm XapakTepnKam
- JVC
Brand : JVC
Model : KDX176
Category : Car stereo