0243060020000 - Blender Starfrit - Free user manual and instructions
Find the device manual for free 0243060020000 Starfrit in PDF.
User questions about 0243060020000 Starfrit
0 question about this device. Answer the ones you know or ask your own.
Ask a new question about this device
Download the instructions for your Blender in PDF format for free! Find your manual 0243060020000 - Starfrit and take your electronic device back in hand. On this page are published all the documents necessary for the use of your device. 0243060020000 by Starfrit.
USER MANUAL 0243060020000 Starfrit
OPERATING AND SAFETY INSTRUCTIONS
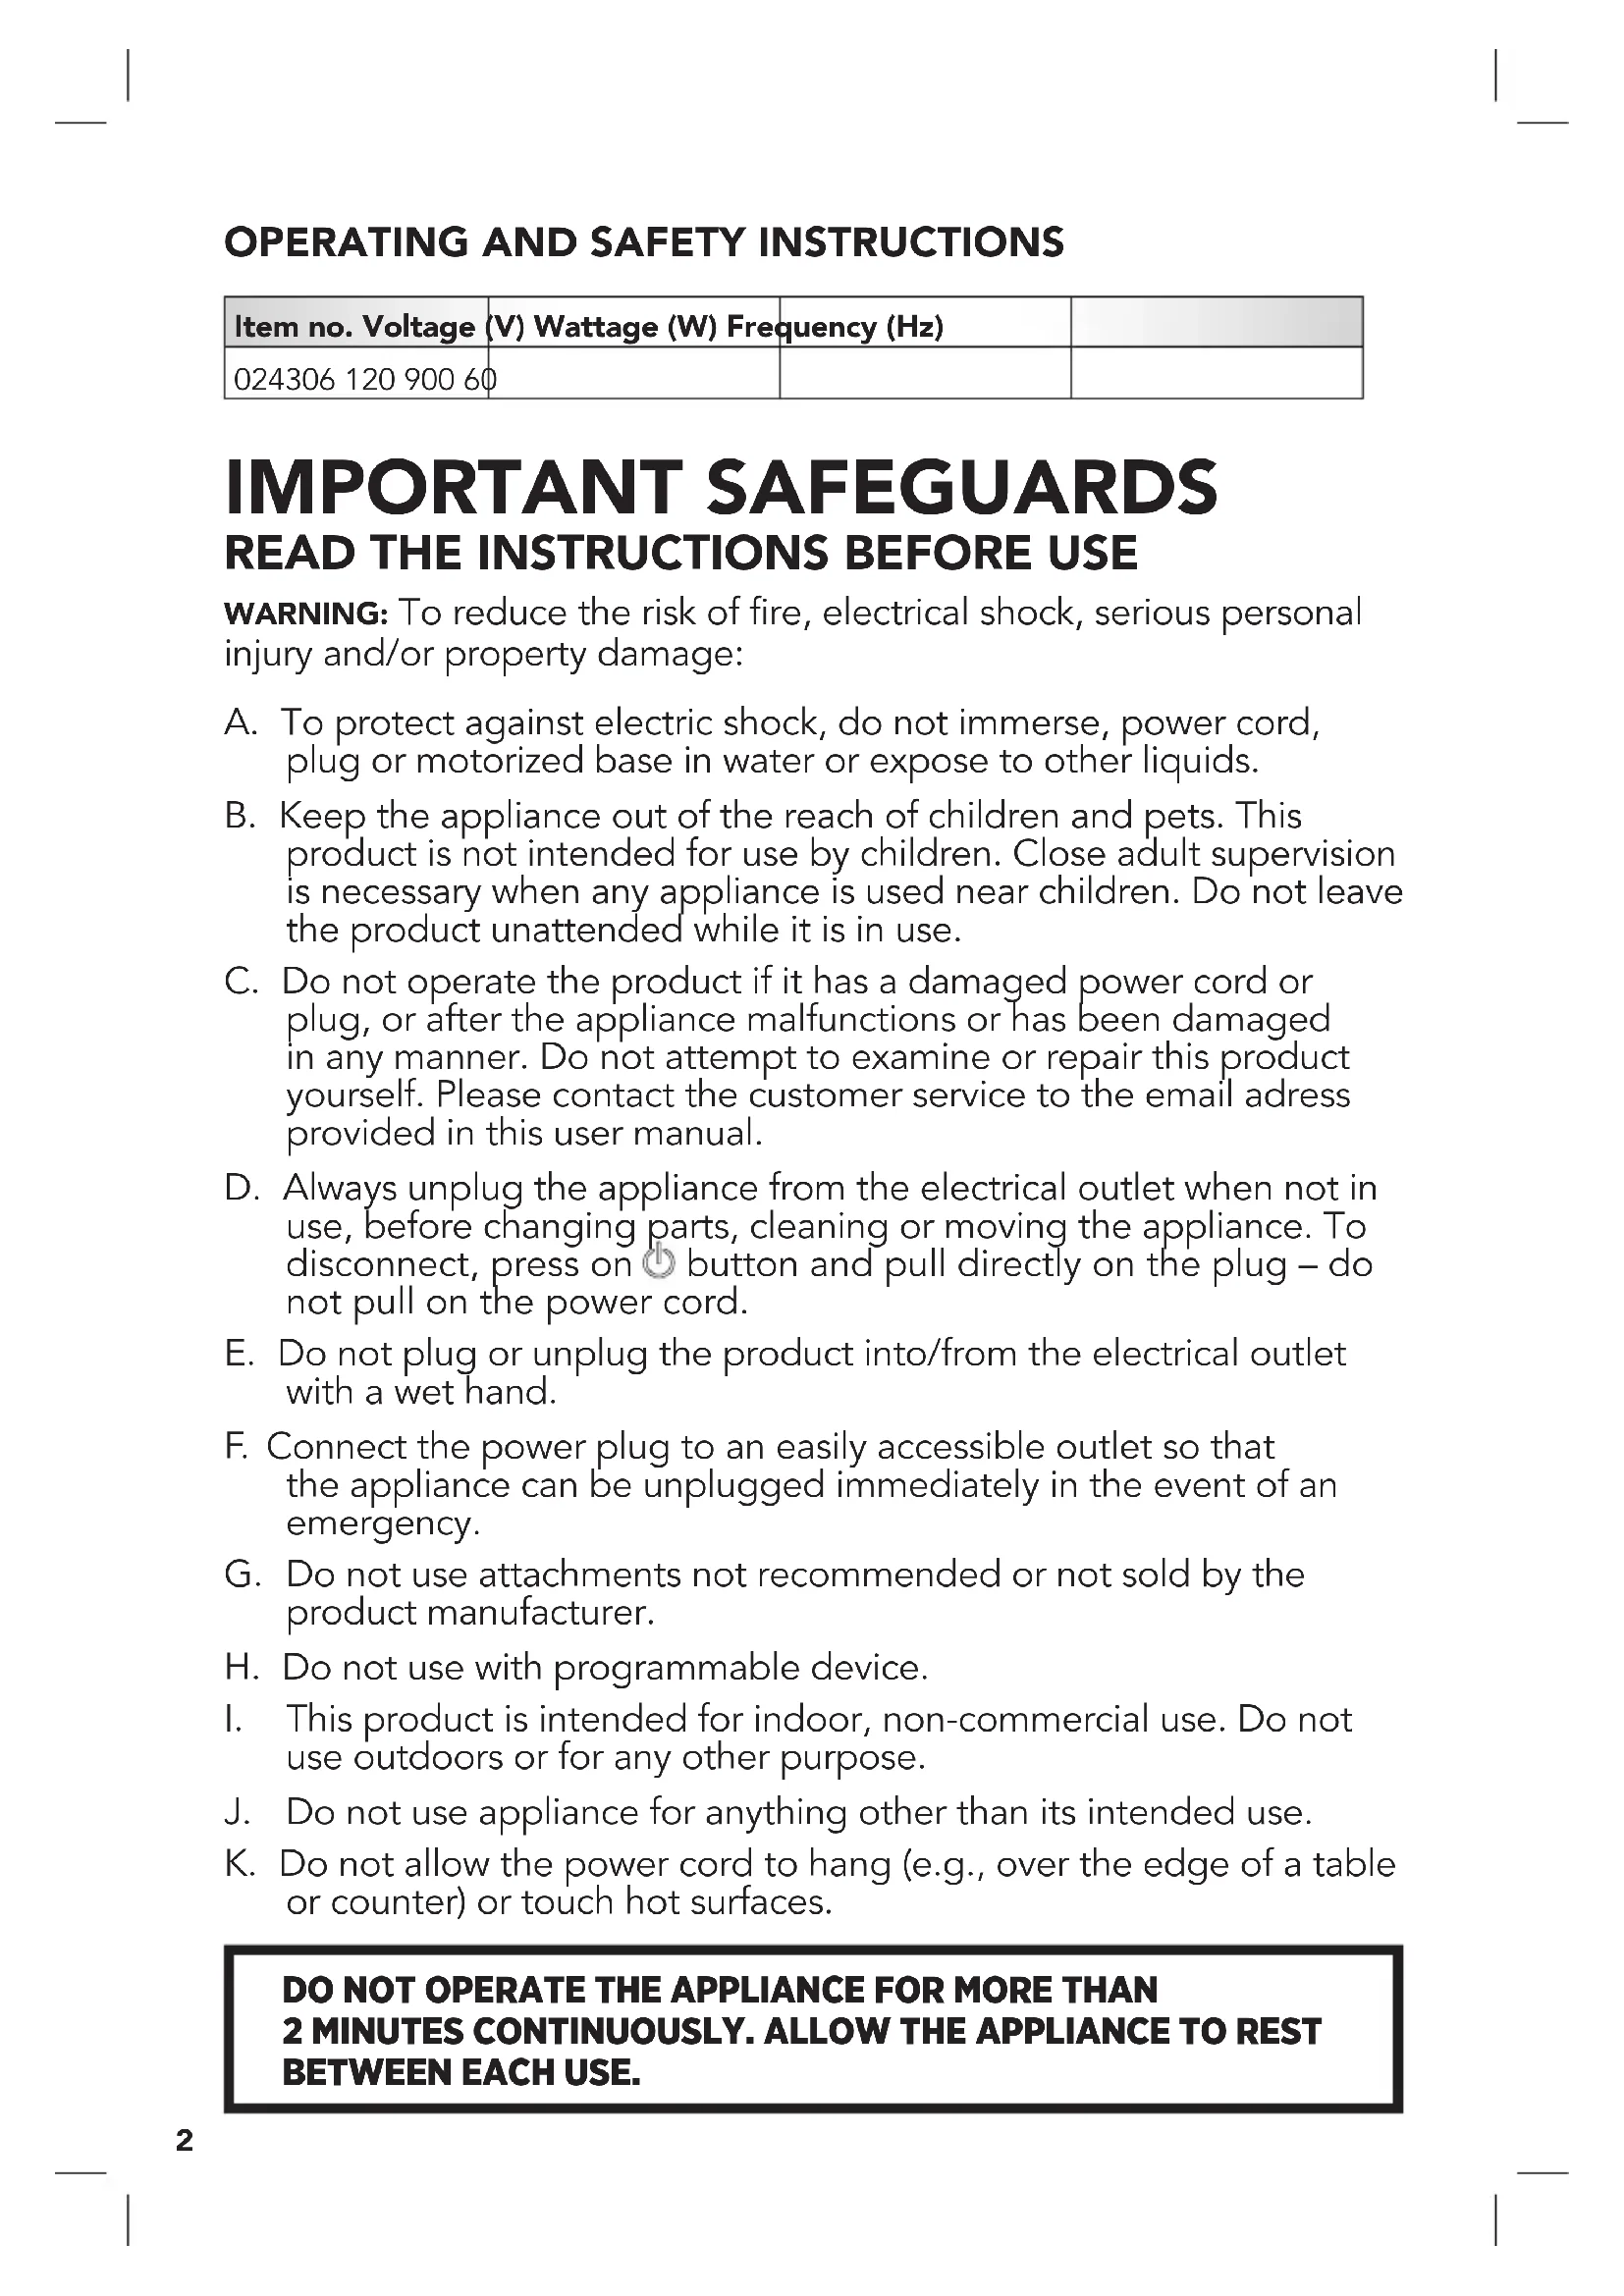
| Item no. Voltage (V) Wattage (W) Frequency (Hz) | |||
| 024306 120 900 60 |
IMPORTANT SAFEGUARDS
READ THE INSTRUCTIONS BEFORE USE
WARNING: To reduce the risk of fire, electrical shock, serious personal injury and/or property damage:
A. To protect against electric shock, do not immerse, power cord, plug or motorized base in water or expose to other liquids.
B. Keep the appliance out of the reach of children and pets. This product is not intended for use by children. Close adult supervision is necessary when any appliance is used near children. Do not leave the product unattended while it is in use.
C. Do not operate the product if it has a damaged power cord or plug, or after the appliance malfunctions or has been damaged in any manner. Do not attempt to examine or repair this product yourself. Please contact the customer service to the email adress provided in this user manual.
D. Always unplug the appliance from the electrical outlet when not in use, before changing parts, cleaning or moving the appliance. To disconnect, press on button and pull directly on the plug - do not pull on the power cord.
E. Do not plug or unplug the product into/from the electrical outlet with a wet hand.
F. Connect the power plug to an easily accessible outlet so that the appliance can be unplugged immediately in the event of an emergency.
G. Do not use attachments not recommended or not sold by the product manufacturer.
H. Do not use with programmable device.
I. This product is intended for indoor, non-commercial use. Do not use outdoors or for any other purpose.
J. Do not use appliance for anything other than its intended use.
K. Do not allow the power cord to hang (e.g., over the edge of a table or counter) or touch hot surfaces.
DO NOT OPERATE THE APPLIANCE FOR MORE THAN 2 MINUTES CONTINUOUSLY. ALLOW THE APPLIANCE TO REST BETWEEN EACH USE.
L. Do not place the product on or near a hot gas or electric burner, or in heated oven or microwave oven.
M. Always use the blender on a flat, level, stable surface. Do not move the blender while it is in use.
N. The blades are sharp, must handle with care.
O. Make sure the blade is securely attached to the cups or jar before locking into the base.
P. Do not attempt to remove the cup or the jar from the blade base while attached to the motor base. Do not remove the cup from the appliance while in use. Always operate the blender with the lid in place. Do not remove the lid while in use.
Q. Do not operate the appliance for more than 2 minutes continuously. Allow the appliance to rest between each use.
R. Do not operate the blender if empty. Do not store any material in this product when not in use.
S. Do not blend hot liquids, use as a meat grinder or a food processor (blend thick mixture).
T. To avoid injuries, do not place the blade assembly directly on the motorized base. Always place the cup or the jar with the blade assembly onto the motorized base.
U. To reduce the risk of severe injuries, keep hands and utensils out of the jar while blending. Always use the measuring cap to add ingredients while in use. Avoid contact with moving parts.
SAVE THESE INSTRUCTIONS FOR FUTURE REFERENCE
POLARIZED PLUG: This appliance is equipped with a polarized plug (one blade is wider than the other). As a safety feature to reduce the risk of electrical shock, this plug is intended to fit in a polarized outlet only one way. If the plug does not fit fully in the outlet, reverse the plug. If it still does not fit, contact a qualified electrician. Do not attempt to defeat this feature or modify the plug in any way. If the plug fits loosely into the AC outlet or if the AC outlet feels warm, do not use that outlet.
SPECIAL INSTRUCTIONS: A short power supply cord is provided to reduce the risk of becoming entangled in or tripping over a longer cord.
AN EXTENSION CORD MAY BE USED IF CARE IS EXERCISED IN THEIR USE:
- Minimize the risk of overheating by using the shortest UL or ETL listed cord possible.
- The marked electrical rating must be at least as great as that of the product.
- Never use a single extension cord to operate more than one appliance.
- Arrange the longer cord so that it will not drape over a countertop or tabletop where it can be tripped over, snagged, or pulled on unintentionally (especially by children).
- DO NOT alter the plug. DO NOT attempt to defeat the safety purpose of the polarized plug.
BEFORE FIRST USE
WARNING: Blades are sharp, handle with care. Do not plug the appliance into an electrical outlet before it's ready to be used.
NOTE: Remove all parts & accessories and dispose of packaging.
A. Unscrew the blade base from the cup and the jar and carefully remove the silicone gasket.
B. Wash all removable parts & accessories in hot soapy water and dry thoroughly on place in the top rack of the dishwasher.
NOTE: Do not immerse the motorized base or the power cord in water or any other liquids. Do not use abrasive cleaners to clean the product.
C. Wipe the motorized base with a damp cloth and dry thoroughly.
D. Insert the gasket back into the groove of the blade base. Ensure the gasket is securely in place by pressing all around.
TIPS AND RECOMMENDATIONS
NOTE: For best results read the following tips:
- Do not fill the cup or the jar passed the MAX line.
- Do not attempt to blend firm food such as potatoes, grind meat or mix dough.
- Do not process hot food or liquids.
- Cut fruits and vegetables into small pieces.
- Place ingredients in the following order: liquids, frozen ingredients, fresh ingredients.
- Fill the cup half way with liquids.
-
If the blade stops spinning, unplug the appliance immediately. Remove the cup and shake it to unblock the blade. Use a utensil to mix the ingredients in the jar. If the blade is still obstructed add some liquid or reduce the solid food.
-
For good results, it is helpful to start blending on the lowest speed and then increase to a higher speed, if necessary.
- When blending big pieces, use the PULSE button to break down the pieces first then use the continuous speeds to continue blending.
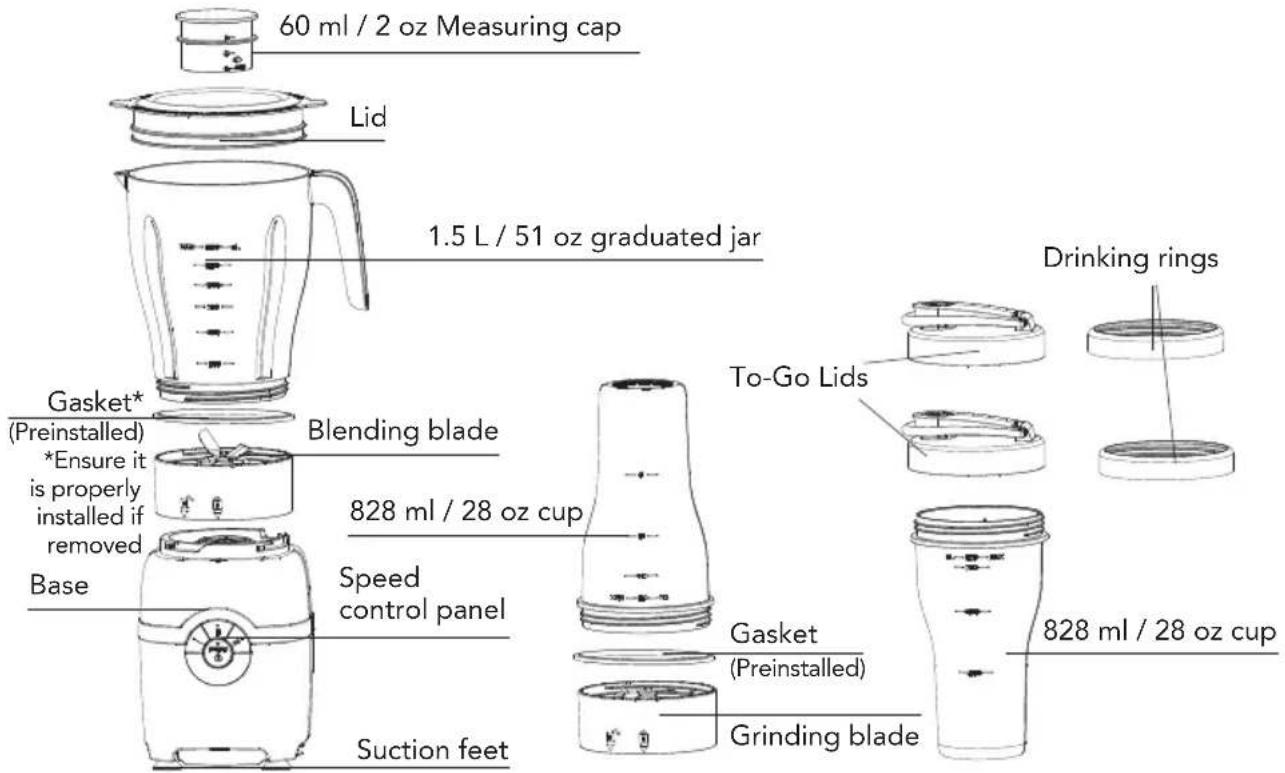
- Use the measuring cap to add ingredients while the blender is processing. The measuring cap can hold up to 60ml / 2oz .
SPEED CONTROL
- Press on the PULSE button to crush ice or frozen fruits into small pieces. Press on the PULSE button for short bursts. Then use the LOW "I", MED "II" or HIGH "III" buttons to obtain the desired consistency.
- Press on the PULSE button to grind coffee beans, nuts and whole spices.
- Press on LOW "l" button to obtain a thick, chunky texture.
- Press on MED "ll" button for a creamy, smooth texture.
- Press on HIGH "III" button for a silky texture
NOTE: The maximum operating time for each speed is 2 minutes, after which the appliance will automatically stop if another speed is not selected.
NOTE: Press a different button during operation to change the speed. To stop the appliance press on the button.
BLADES
- Use the blending blade for soups, smoothies, icy beverages, dips and spreads.
- Use the grinding blade to grind coffee beans, nuts, grains and whole spices.

BLENDING BLADE GRINDING BLADE
| BLADE TYPE | ||
| BLENDING BLADE GRINDING BLADE | ||
| COFFEE BEANS (Max 400 ml) | X | |
| WHOLE SPICES (Max 400 ml) | X | |
| NUTS (Max 500 ml) | X | |
| ICE CUBES* X | ||
| FROZEN FRUITS* X | ||
| FRESH FRUITS* X | ||
| VEGETABLES (CUT INTO PIECES)* | X | |
| LEAFY VEGETABLES* X | ||
*Always add liquid to blend
| MODE | ||
| CONTINUOUS BLEND PULSE | ||
| COFFEE BEANS (Max 400 ml) | X | |
| WHOLE SPICES (Max 400 ml) | X | |
| NUTS (Max 500 ml) | X | |
| ICE CUBES* X | ||
| FROZEN FRUITS* X | ||
| FRESH FRUITS* X | ||
| VEGETABLES (CUT INTO PIECES)* | X | |
| LEAFY VEGETABLES* X | ||
*Always add liquid to blend
TO USE
WARNING: Do not operate the appliance for more than two minutes continuously. Let the blender cool off for 60 seconds between each cycle.
TIP: For good results, it is helpful to start blending on the lowest speed and then increase to a higher speed, if necessary. When blending big pieces, use the PULSE button to break down the pieces first then use the continuous speeds to continue blending.
-
Pour the desired ingredients in the cup/jar until the MAX line is reached. NOTE: Cut the fruits/vegetables into small pieces.
-
Attach the desired blade base to the cup/jar. Ensure that the blade is securely tightened and the gasket is in place.
-
Place the cup/jar assembly onto the motorized base and align the symbol marked on the blade base with the symbol marked on the base and turn clockwise to align with the symbol. Make sure the cup/jar is securely locked before operating.
CAUTION: The appliance has a locking mechanism that prevents the appliance from operating or blade from turning if the cup/jar is not securely attached to the blade base.
- Place the lid if using the jar.
WARNING: To avoid injuries, make sure the lid is always on the jar while in use.
-
Plug the appliance into a standard 120-volt AC electrical outlet.
-
Turn ON the appliance by pressing the button.
-
Press on the desired speed control. Press on the PULSE button for short bursts if processing ice or frozen fruits/vegetables. For continuous blending, select the LOW speed "I", MED speed "II" or HIGH speed "III".
NOTE: Press a different button during operation to change the speed. To stop the appliance press on the button.
NOTE: Use the measuring cap to add ingredients while the blender is processing. The measuring cap can hold up to 60ml/2oz .
NOTE: The maximum operating time for each speed is 2 minutes, after which the appliance will automatically stop if another speed is not selected.
- To stop the appliance, press on the button once and unplug from electrical outlet when done blending.
NOTE: DO NOT keep your finger on the button to stop the appliance as the blender will continue blending. - Remove the cup/jar assembly from the motorized base.
- For immediate consumption, poor the preparation into the single serve cups and replace the blade base with a to-go lid or a drinking lid.
- Clean parts and accessories immediately after each use.
CLEANING & CARE
WARNING: Ensure the appliance is unplugged from the electrical outlet and the blade has stopped turning before handling or cleaning the appliance.
- Disassemble all parts & accessories.
NOTE: Remove the silicone gasket only if necessary.
- Wash in soapy, hot water or place in the top rack of the dishwasher. Wash after each use.
NOTE: Do not place the motorized base or cord in a dishwasher.
TIP: For quick cleanup, combine 1 cup hot water and a drop of liquid dish soap in the blending cup/jar and blend for about 1 minute on HIGH "III" speed.
- Dry all the parts & accessories thoroughly.
- Wipe the motorized base with a soft, damp cloth and dry thoroughly.
- Reassemble the blender for compact storage. Ensure the silicone gasket is properly in place.
- For safe storage, always store the blades with the cups.
WARNING: Blades are sharp handle with care while cleaning. Use a brush to clean the blades to avoid injuries. Do not touch blades with bare hands.
WARRANTY
1-YEAR LIMITED WARRANTY.
This warranty covers any defects in materials and workmanship for a period of one (1) year from the date of the original purchase. Please retain your original receipt as a proof of the purchase date. Any complaints must be registered within the warranty period. The product will be repaired, replaced (parts including blades or entire appliance) or refunded at our sole discretion. Shipping charges may apply.
This warranty does not cover normal wear of parts or damage resulting from any of the following:
Negligent use or misuse of the product including failure to clean the product regularly, use for commercial purposes, accident, use on improper voltage or current, and use contrary to the operating instructions, disassembly, repair or alteration by anyone other than a STARFRIT authorized service agent.
Decisions as to the cause of damage are the responsibility of Starfrit. All decisions will be final.
RECIPES
BANANA OATMEAL PANCAKES
BLADE: Blending blade
ATTACHMENT: Blending jar
SERVINGS: 10 pancakes
INGREDIENTS:
1 1/2 cups (375 ml) rolled oats
2 large ripe bananas (cut into pieces)
- 2 tbsp. (30 ml) maple syrup or honey (and more for serving)
1 egg
- 2 tsp (10 ml) baking powder
- 1 cup (250 ml) of milk
- 1 tsp (5 ml) vanilla
Pinch of salt
Butter for cooking

PREPARATION:
- Add all ingredients (except butter) into your Starfrit 12-pc HI-POWER 900W BLENDER and blend until smooth. If needed, add 1 tbsp. (15 ml) of milk to thin out the batter. Refer to the "TO USE" section.
- Let batter stand for at least five minutes at room temperature.
- Heat a large skillet over medium heat. Coat the skillet with butter and poor about 1/4 cup of batter per pancake and cook until there are no more bubbles.
- Top with maple syrup, nuts or your desired toppings and serve.
SWEET POTATO PIE
BLADE: Blending blade
ATTACHMENT: Blending jar
SERVINGS: 6 slices
INGREDIENTS:
- Pie crust (storebought)
- 2 medium sweet potatoes (peeled and diced)
1/4 cup (62 ml) maple syrup
1/4 cup (62 ml) brown sugar
1/2 cup (125 ml) almond milk (or any kind)
21/2 tbsp. (37.5 ml) cornstarch - 1 tsp (5 ml) ground cinnamon
1/4 tsp (1.25 ml) sea salt
1/4 tsp (1.25 ml) nutmeg - 1 tsp (5 ml) pure vanilla extract

PREPARATION:
- Bring a large pot to a boil and cook the sweet potatoes until soft.
- Preheat the oven to 350^
- Add the cooked sweet potatoes and all the ingredients into your Starfrit 12-pc HI-POWER 900W BLENDER and blend until smooth. If needed, add 1 tbsp. (15 ml) of almond milk at a time to adjust the consistency. Refer to the "TO USE" section.
- Pour the filling into the pie crust.
- Bake for about 60 minutes or until a knife inserted in the center comes out clean.
- Let it cool completely before serving.

ROASTED ROOT VEGETABLES SOUP
BLADE: Blending blade ATTACHMENT: Blending jar
SERVINGS: 4-5 servings
INGREDIENTS:
- 2 cups butternut squash (peeled and cut into pieces)
1 parsnip peeled (cut into pieces)
1 medium onion (cut into pieces) - 1 carrot (peeled and cut into pieces)
4 garlic cloves (finely chopped) - 2 tbsp. (30 ml) olive oil
- 1 tbsp. (15 ml) smoked paprika
- 1 tsp (5 ml) salt
- 1 tsp (5 ml) black pepper
- 2 tbsp. (30 ml) honey
1/2 cup (125 ml) plain yogurt - 2 cups (500 ml) chicken broth

PREPARATION:
- Preheat the oven to 425^ .
- Evenly coat the vegetables in oil and spices. Place into a single layer and roast until vegetables are tender, about 30-35 minutes.
- Add the vegetables, honey, chicken broth and yogurt into your Starfrit 12-pc HI-POWER 900W BLENDER and blend until smooth. If needed, add 1 tbsp. (15 ml) of water at a time to adjust the consistency. Refer to the "TO USE" section.
- Pour the mixture into a large cooking pot and heat over medium-high heat until warmed through.
BANANA ALMOND SMOOTHHIE
BLADE: Blending blade ATTACHMENT: Cup SERVINGS: 2-3 servings
INGREDIENTS:
- 2 large frozen bananas (cut into pieces)
1 1/2 cup (325 ml) almond milk
1 / 4 (62 ml) almonds - 1 tps (5 ml) vanilla
- 1/2 tps (2.5 ml) cinnamon
PREPARATION:
- Add all ingredients into your Starfrit 12-pc HI-POWER 900W BLENDER.
- Pulse for 30 seconds to break the big pieces and blend until smooth. Refer to the "TO USE" section.

MODE D'EMPLOI ET CONSIGNES DE SECURITÉ
| Item no. Tension (V) Puissance (W) Fréquence (Hz) | |||
| 024306 120 900 60 | |||
DIRECTIVES IMPORTANTES LIRE LES INSTRUCTIONS AVANT D'UTILISER L'APPAREIL
PORTIONS:4-5 portions
INGRÉDIENTS :
PORTIONS:2-3 portions
INGRÉDIENTS :
SUBSCRIBE TO THE NEWSLETTER TO LEARN MORE ABOUT OUR PROMOTIONS!
www. Starfrit.com
INSCRIVEZ-VOUS À L'INFOLETTRE POUR CONNAÎTRE NOS PROMOTIONS!

www.facebook.com/starfrit
FOR HOUSEHOLD USE ONLY
POUR UN USAGE DOMESTIQUE SEULEMENT
UNICAMENTE PARA USO DOMÉSTICO