0242210020000 - Blender Starfrit - Free user manual and instructions
Find the device manual for free 0242210020000 Starfrit in PDF.
User questions about 0242210020000 Starfrit
0 question about this device. Answer the ones you know or ask your own.
Ask a new question about this device
Download the instructions for your Blender in PDF format for free! Find your manual 0242210020000 - Starfrit and take your electronic device back in hand. On this page are published all the documents necessary for the use of your device. 0242210020000 by Starfrit.
USER MANUAL 0242210020000 Starfrit
INSTRUCTIONS FOR USE AND CARE P.2
OPERATING AND SAFETY INSTRUCTIONS
| Item no. Voltage (V) Wattage (W) Frequency (Hz) | |||
| 024221 | 120 250 60 | ||
IMPORTANT SAFEGUARDS
READ THE INSTRUCTIONS BEFORE USE
WARNING: To reduce the risk of fire, electrical shock, serious personal injury and/or property damage:
A. To protect against electric shock, DO NOT immerse, power cord, plug or motor body, power cord or plug in water or any other liquid. Only the blending arm and the whisk have been designed for submersion in water or other liquids. Never immerse any other pieces of this unit.
B. Keep the appliance out of the reach of children and person with reduced physical, sensory, or mental capabilities. Close adult supervision is necessary when any appliance is used near children.
C. Do not operate the product if it has a damaged power cord or plug, or after the appliance malfunctions or has been damaged in any manner. Do not attempt to examine or repair this product yourself. Please contact the customer service at the email address provided in this user manual.
D. Always unplug the appliance from the electrical outlet when not in use, before putting on or taking off parts, and before cleaning. Pull directly on the plug – do not pull on the power cord.
E. Do not plug or unplug the product into/from the electrical outlet with a wet hand.
F. Do not use attachments not recommended or not sold by the product manufacturer.
G. Connect the power plug to an easily accessible outlet so that the appliance can be unplugged immediately in the event of an emergency.
H. Do not allow the power cord to hang (e.g., over the edge of a table or counter) or touch hot surfaces.
I. This product is intended for indoor, non-commercial use. Do not use outdoors or for any other purpose.
J. Do not place the product on or near a hot gas or electric burner, or in heated oven or microwave oven. Always use the appliance on a flat, level, stable surface.
K. Do not use the appliance for anything other than its intended use. Do not use as a meat grinder. Do not crush ice. Do not blend hard or dry substance.
L. Do not attempt to slice food by hand. Keep hands and utensils out of container while blending.
M. The tip of the food pusher and the blades are sharp; handle with care.
N. Make sure the lid attachment is well in place before operating the appliance.
O. Always use the provided food pusher to push the food down the chute. Never use utensils or your fingers to insert the food. Always use the provided parts & accessories to avoid injuries. Avoid contact with moving parts to prevent personal injury or damage to the appliance.
P. To reduce the risk of injuries, always handle/clean the spiralizing blades by the safety tab. Make sure the blade is locked in place before placing the lid attachment on the graduated cup. Blades are SHARP. Handle with care when removing, inserting or cleaning.
Q. Do not operate the appliance for more than 1 minute continuously. Let the appliance cool off for 3 minutes between each cycle. Do not operate the hand blender when removing/placing food on the food pusher.
R. Make sure to release the speed controls and unplug the appliance before removing the lid attachment from the graduated cup. Make sure the spiralizing blades have stopped turning before removing the lid attachment.
S. When blending hot liquids, use a tall container or make small quantities at a time to reduce spillage, splattering and risk of burns.
T. DO NOT use the hand blender or the whisk attachment in a non-stick pot as the blade may damage the non-stick coating.
U. Remove the blending arm from the motor body before washing the blades.
V. Never wrap the cord tightly around the appliance, as this could place undue stress on the cord where it enters the appliance and cause it to fray and break.
W. NEVER press the speed control or turn the speed control dial if no attachment is properly locked into the motor body. Never insert foreign objects into the clutch slot at the bottom of the motor body.
DO NOT OPERATE THE APPLIANCE FOR MORE THAN 1 MINUTE CONTINUUSLY. ALLOW THE APPLIANCE TO REST FOR 3 MINUTES BETWEEN EACH USE.
SAVE THESE INSTRUCTIONS FOR FUTURE REFERENCE
POLARIZED PLUG: This appliance is equipped with a polarized plug (one blade is wider than the other). As a safety feature to reduce the risk of electrical shock, this plug is intended to fit in a polarized outlet only one way. If the plug does not fit fully in the outlet, reverse the plug. If it still does not fit, contact a qualified electrician. Do not attempt to defeat this feature or modify the plug in any way. If the plug fits loosely into the AC outlet or if the AC outlet feels warm, do not use that outlet.
SPECIAL INSTRUCTIONS: A short power supply cord is provided to reduce the risk of becoming entangled in or tripping over a longer cord.
AN EXTENSION CORD MAY BE USED IF CARE IS EXERCISED IN THEIR USE:
- Minimize the risk of overheating by using the shortest UL or ETL listed cord possible.
- The marked electrical rating must be at least as great as that of the product.
- Never use a single extension cord to operate more than one appliance.
- Arrange the longer cord so that it will not drape over a countertop or tabletop where it can be tripped over, snagged, or pulled on unintentionally (especially by children).
DO NOT alter the plug. DO NOT attempt to defeat the safety purpose of the polarized plug.
BEFORE FIRST USE
-
Remove all parts & accessories. Dispose of packaging.
-
Wipe motor body and lid attachment (including whisk adaptor) with a damp cloth and dry thoroughly.
NOTE: DO NOT immerse motor body, lid attachment (including whisk adaptor), power cord or plug in the any liquids or place in the dishwasher.
- Wash all other parts in hot soapy water (blending arm, food pusher, spiralizing blades, cup and whisk). Rinse and dry thoroughly.
NOTE: DO NOT use abrasive cleaners or scouring pads or any other object that could scratch. DO NOT place in the dishwasher. ALWAYS hand wash.
TO ASSEMBLE (Fig. 1)
(Read the instructions before first use)
WARNING: BLADES AND TIP OF THE FOOD PUSHER ARE SHARP, HANDLE WITH CARE. NEVER USE FINGERS OR UTENSILS TO PUSH DOWN THE FOOD, ALWAYS USE THE FOOD PUSHER PROVIDED.
- Place the lid attachment on the cup. Make sure it fits flat.
- Insert the whisk adaptor next to the food pusher and turn clockwise toward the icon to securely lock in place.
- Insert the motor body into the whisk adaptor and turn clockwise toward the con to lock in place.
- Insert the food pusher in the produce cutting chute.
USING HAND BLENDER
(Read the instructions before first use)
WARNING: BLADES AND TIP OF THE FOOD PUSHER ARE SHARP, HANDLE WITH CARE. ALWAYS HANDLE THE SPIRALIZING BLADES BY THE SAFETY TAB. NEVER USE FINGER OR UTENSILS TO PUSH DOWN THE FOOD, ALWAYS USE THE FOOD PUSHER PROVIDED.
NOTE: During first use of the appliance, smoke and/or a slight odor may occur from the appliance. This is normal and will quickly disappear. It will not recur after appliance has been used a few more times.
NOTE: Do not operate the appliance for more than 1 minute continuously. Let the appliance cool off for 3 minutes between each cycle.
- Insert the upper part of the blending arm into the motor body and turn counter clockwise until a click sound is heard to securely lock in place (Fig. 2).
NOTE: Turn the motor body counterclockwise to remove from the main unit (Refer to Fig. 6). - Plug the power cord into a 120V AC wall outlet.
- The hand blender can be used directly in a pot, a bowl or the graduated cup. To prevent splashing, do not turn the hand blender on until the blade is beneath the surface of the mixture.
NOTE: DO NOT use the hand blender in a non-stick pot as the blade may damage the non-stick coating. - Holding the rubberized handle firmly with one hand, press on the normal or TURBO speed to start blending.
NOTE: Adjust the blending speed by rotating the speed control dial on top of the hand blender clockwise. ONLY when using the normal speed.The speed control dial will have no effect when used with TURBO speed.(Fig.3). - When blending is complete release the speed control to stop the appliance.
- Unplug the power cord from the electrical outlet.

FIG. 1


FIG. 2
FIG. 3
HELPFUL TIPS FOR BLENDING
- DO NOT submerge the hand blender beyond the stem of the blending arm.
- DO NOT start the hand blender before submerging the blending arm beneath the mixture.
- To avoid splashing, do not pull the hand blender out of the mixture while in operation.
- Do not let the hand blender stand alone in a hot pot on stove while not in use.
- Do not attempt to blend fruit pits, bones or any other hard material into the blending mixture as these may damage the blades.
- Always remember that the level of mixture will rise when blending and can overflow.
- For recipes calling for ice, use crushed ice (not whole cubes) for best results.
- Using a gentle up-and-down motion is the best way to blend and incorporate ingredients uniformly.
- Use for smoothies, milk shake, soup, cooked vegetables/fruits.
- For better results, do not use frozen food.
USING SPIRALIZER
(Read the instructions before first use)
WARNING: BLADES AND TIP OF THE FOOD PUSHER ARE SHARP, HANDLE WITH CARE. ALWAYS HANDLE THE SPIRALIZING BLADES BY THE SAFETY TAB. NEVER USE FINGER OR UTENSILS TO PUSH DOWN THE FOOD, ALWAYS USE THE FOOD PUSHER PROVIDED.
NOTE: During first use of the appliance, smoke and/or a slight odor may occur from the appliance. This is normal and will quickly disappear. It will not recur after appliance has been used a few more times.
NOTE: Do not operate the appliance for more than 1 minute continuously. Let the appliance cool off for 3 minutes between each cycle. Do not operate the hand blender when removing/placing food on the food pusher.
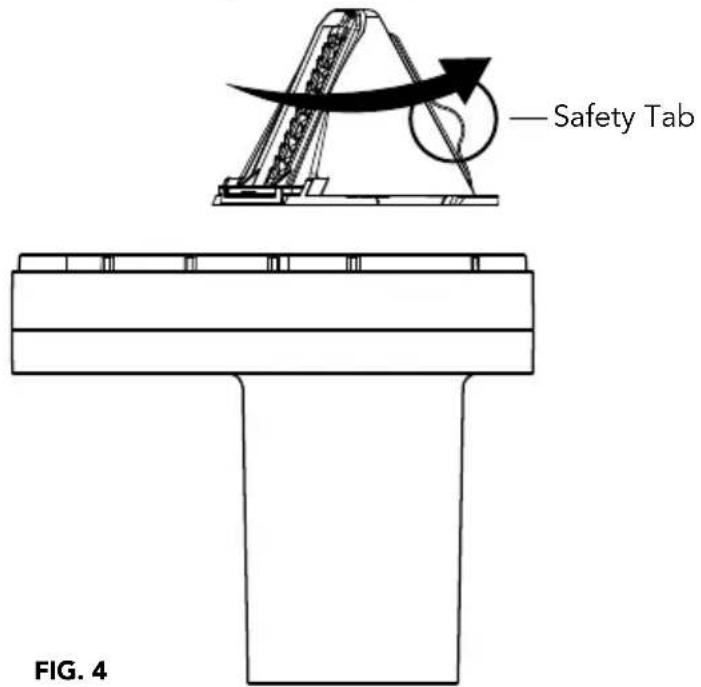
- Remove the lid attachment from the cup and turn upside down. With one hand hold the blade holding gear and with the other one insert the selected spiraling blade by the safety tab and turn counterclockwise toward the icon to securely lock into place until a click is heard. (Fig. 4). NOTE: To avoid injuries, always handle the spiraling blade by the safety tab (Fig.4). To remove the spiraling blade, hold the holding blade gear with one hand and with the other one grab the safety tab and turn it clockwise toward the icon.
- Place the lid attachment on the cup. Make sure it fits flat before operating the appliance (Fig. 1).
- Insert the whisk adaptor next to the food pusher and turn clockwise toward the icon to lock in place (Fig. 1).
- Insert the motor body into the whisk adaptor on the lid and turn clockwise toward the icon to securely lock in place (Fig. 1).
- Prep the vegetables/fruits by cutting the ends flat (refer to the tips and recommendations section).
-
Affix the food onto the food pusher and make sure it is not too loose. NOTE: If the food does not fit in the produce cutting chute, cut it in half or trim around to get the perfect size.
-
Insert the food pusher into the produce cutting chute (Fig. 1).
-
Plug the power cord into a standard 120-volt AC electrical outlet.
-
With one hand press on the speed control and with the other one start pushing the food down by applying gentle constant pressure.
NOTE: For best results, always place the speed control dial at low speed and use the normal speed when spiralizing.
- When done spiralizing the vegetable/fruit, release the speed control. Remove the food pusher and take out any remaining piece on the food pusher. Cut into small pieces and add to your meal.
- Unplug the power cord from the electrical outlet.
- Collect the processed food in the graduated cup.
HELPFUL TIPS & RECOMMENDED VEGETABLES/FRUITS
- Always use firm vegetables/fruits without seeds or pits.
- Do not use overripe or soft vegetables/fruits. Never use cooked vegetable/fruits.
- Always cut off the ends of the vegetable/fruit ensuring a flat surface to insert the food pusher. Uneven ends will cause poor result.
- Use food at least 5cm diameter.
- Small piece will remain on the food pusher. Cut into small pieces and add it to your recipe.
- For best results, always place the speed control dial at low speed and use the normal speed when spiralizing.
| RECOMMENDED VEGETABLES / FRUITS* | ||
| CUCUMBER PARSNIP BROCCOLI STEM | ||
| ZUCCHINI DAIKON BEET | ||
| CARROT PLANTAIN CELERAC | ||
| POTATO PEAR KOHLRABI | ||
| SWEET POTATO APPLE TURNIP | ||
- and many more!
USING WHISK ATTACHMENT
(Read the instructions before first use)
NOTE: During first use of the appliance, smoke and/or a slight odor may occur from the appliance. This is normal and will quickly disappear. It will not recur after appliance has been used a few more times.
NOTE: Do not operate the appliance for more than 1 minute continuously. Let the appliance cool off for 3 minutes between each cycle.
- Insert the whisk attachment into the whisk adaptor. Make sure to insert all the way in to securely lock in place (Fig. 5).
- Insert the whisk adaptor into the motor body and turn counterclockwise until a click is heard to lock in place (Fig. 5).
NOTE: Turn the main body and whisk adaptor counterclockwise to remove from the main unit (Refer to Fig. 1 in reverse order).
- Plug the power cord into a 120V AC wall outlet.
- The whisk can be used directly in a pot, a bowl or the graduated cup. To prevent splashing, do not turn on until the whisk is beneath the surface of the mixture.
NOTE: DO NOT use in a non-stick pot as the whisk may damage the non-stick coating.
- Holding the rubberized handle firmly with one hand, press on the normal orTURBO speed to start whisking.
NOTE: Adjust the speed by rotating the speed control dial on top of the hand blender clockwise. ONLY when using the normal speed. The speed control dial will have no effect when used with TURBO speed. (Fig. 3). - When whisking is complete, release the speed control to stop the appliance.
- Unplug the power cord from the electrical outlet.

FIG. 5
HELPFUL TIPS FOR WHISKING
DO NOT submerge the hand blender beyond the stem of the whisk.
DO NOT start the hand blender before submerging the whisk beneath the mixture.
- To avoid splashing, NEVER pull the hand blender out of the mixture while in operation.
- Always remember that the level of mixture will rise when whisking and can overflow.
- To whip air into a mixture, always hold the whisk just under the mixture surface.
- Use to whisk eggs, whip cream, mousse, vinaigrette/dressing and mayonnaise.
CLEANING & CARE
WARNING: BLADES AND TIP OF THE FOOD PUSHER ARE SHARP; HANDLE WITH CARE WHILE CLEANING. USE A BRUSH TO CLEAN THE BLADES TO AVOID INJURIES. DO NOT TOUCH BLADES WITH BARE HANDS. ALWAYS HANDLE THE SPIRALIZING BLADES BY THE SAFETY TAB.
WARNING: Ensure the appliance is unplugged from the electrical outlet and make sure the blade has stopped turning before handling or cleaning the appliance.
-
Disassemble all the parts (Fig. 6).
-
Wipe motor body and lid attachment (including whisk adaptor) with a damp cloth and dry thoroughly.
NOTE: DO NOT immerse motor body, lid attachment (including whisk adaptor), power cord or plug in the any liquids or place in the dishwasher.
- Wash all other parts in hot soapy water (blending arm, food pusher, spiralizing blades, cup and whisk). Rinse and dry thoroughly. Wash after each use.
NOTE: Do not use abrasive cleaners or scouring pads or any other object that could scratch. DO NOT place in the dishwasher. ALWAYS hand wash.
WARRANTY
1-YEAR LIMITED WARRANTY.
This warranty covers any defects in materials and workmanship for a period of one (1) year from the date of the original purchase. Please retain your original receipt as a proof of the purchase date. Any complaints must be registered within the warranty period. The product will be repaired, replaced (parts including blades or entire appliance) or refunded at our sole discretion. Shipping charges may apply.
This warranty does not cover normal wear of parts or damage resulting from any of the following:
Negligent use or misuse of the product including failure to clean the product regularly, use for commercial purposes, accident, use on improper voltage or current, and use contrary to the operating instructions, disassembly, repair or altercation by anyone other than a STARFRIT authorized service agent.
Stains, discoloration and minor scratches on the inside and outside of the utensil constitute normal use, do not affect performance, and are not covered by this warranty.
Decisions as to the cause of damage are the responsibility of STARFRIT. All decisions will be final.


RECIPES
CHICKEN ZUCCHINI PASTA WITH AVOCADO PESTO
BLADE: Fine spiral blade
SERVINGS: 2-3 servings
INGREDIENTS:
4 zucchini
2 ripe avocados
1 cup (250 ml) fresh basil leaves
3 garlic cloves, finely chopped
2 tbsp. (30 ml) lime juice
1 / 4 cup (60ml) grated parmesan
1 / 2 cup (125ml) water
Salt and pepper to taste
2 tbsp. (30 ml) of olive oil
2 chicken breasts
Serve with lemon wedges

PREPARATION:
- Prep and spiralize the zucchini using your 4-IN-1 Starfrit Hand Blender Set in spiralizer mode (Refer to the USING SPIRALIZER section). Remove all excess water with a paper towel.
- Heat a large skillet over medium-high heat. Add 1 tablespoon of olive oil. Cook the zucchini for 2-3 minutes. Season to taste and set aside. Do not overcook as the zucchini will get soggy.
- Cut the chicken into small pieces and cook using the same skillet. Season to taste.
- Add the avocado, basil, garlic, lime juice and parmesan in a food processor. Pulse all the ingredients to get a creamy texture. Add water as needed.
- In a large mixing bowl, add the zucchini pasta, the avocado pesto and chicken. Mix gently to avoid breaking the strands.
- Serve with lemon wedges and top it off with grated parmesan.
CARROT AND PEAR SOUP
ATTACHMENT : Blending arm
SERVINGS: 4 servings
INGREDIENTS:
6 large carrots (peeled and cut into bite-size pieces)
3 pears (peeled, cored and cut into small chunks)
1tbsp. (15ml) butter
1tbsp (15ml) brown sugar
3 cups (750 ml) vegetable broth
1 / 2 cup (125 ml) heavy cream
Salt and pepper to taste
PREPARATION:

- Add butter to saucepan. When it's melted, add sugar and stir until fully dissolved.
- Add pear pieces and stir until caramelized then add carrot pieces. Let it cook for about 5 min.
- Add vegetable broth and season with salt and pepper to taste.
- Let it simmer for about 15 - 20 min.
- Use your 4-IN-1 Starfrit Hand Blender Set with the blending arm to purée the soup. Add heavy cream to the mixture and stir (Refer to the USING BLENDER section).
POTATOES & SPINACH GRATIN
BLADE: Slicing blade
SERVINGS: 4 servings
INGREDIENTS:
114(60ml) butter
1 onion, finely chopped
2 garlic cloves, finely chopped
1/4 (60 ml) flour
3 cups (750 ml) milk
114 tbsp. (1ml) nutmeg
6 medium potatoes
3 cups (750ml) fresh spinach
2 cups (500ml) of grated mozzarella cheese
Salt and pepper to taste

PREPARATION:
- Preheat the oven to 350^ .
- Place a large skillet over medium-high heat. Add butter and brown the onion and garlic. Incorporate the flour and stir constantly until you get a thick paste. Add milk and stir continuously for about 2-3 minutes until the sauce thickens. Add nutmeg and set aside.
- Prep and spiralize the potatoes using your 4-IN-1 Starfrit Hand Blender Set in spiralizer mode. (Refer to the USING SPIRALIZER section).
- Butter the bottom of your baking dish. Layer half of the potatoes, pour half of milk mixture. Add spinach. Layer the rest of the potatoes and the milk mixture
- Top it off with grated cheese and place in the oven for 30 minutes.
- Serve with your favourite salad mix.
OLIVE TAPENADE
ATTACHMENT : Blending arm
SERVINGS: 2-3 servings
INGREDIENTS:
1 cup (250 ml) Kalamata olives, pitted
12 cup (125 ml) olive oil
2 garlic gloves, peeled
2 tbsp. (30 ml) lemon juice
1 tbsp. (15 ml) capers
Salt and black pepper to taste
PREPARATION:
- Add all ingredients into the graduated cup.
- Use your 4-IN-1 Starfrit Hand Blender Set with the blending arm attachment to blend the mixture (Refer to the USING HAND BLENDER section).
Add olive oil as needed.

SPINACH & ARTICHoke DIP
ATTACHMENT : Blending arm
SERVINGS: 2-3 servings
INGREDIENTS:
1 cup (250 ml) canned artichoke hearts, drained
1 cup (250 ml) frozen spinach, thawed and drained
1 cup (250 ml) cottage cheese
1 / 2 cup (125 ml) parmesan cheese
1 garlic glove, peeled
Salt and black pepper to taste
PREPARATION:
- Add all ingredients into the graduated cup.
- Use your 4-IN-1 Starfrit Hand Blender Set with the blending arm attachment to blend the mixture. (Refer to the USING HAND BLENDER section).

PINEAPPLE & BANANA SMOOTHIE
ATTACHMENT : Blending arm
SERVINGS: 1-2 servings
INGREDIENTS:
1 cup (250 ml) fresh pineapple
1 banana, peeled
1 cup (250 ml) soy milk
1 tsp. (5 ml) honey
1 tbsp. (15 ml) coconut flakes
PREPARATION:
- Add all ingredients into the graduated cup.
- Use your 4-IN-1 Starfrit Hand Blender Set with the blending arm attachment to blend the mixture.
(Refer to the USING HAND BLENDER section).

CHOCOLATE MOUSSE
ATTACHMENT : Blending arm
SERVINGS: 4-6 servings
INGREDIENTS:
120 g 70% dark chocolate, cut in chunks
2 tbsp. (30 ml) butter
4 eggs (whites and yolks divided)
1/4 cup (60 ml) sugar

PREPARATION:
- Melt chocolate and butter in a double boiler.
- Use your 4-in-1 Starfrit Hand Blender Set with the whisk attachment to whip the egg whites at TURBO speed until stiff peaks form (Refer to the USING WHISK ATTACHMENT section).
- In a separate bowl, beat the egg yolks and the sugar.
- Add melted chocolate to the second bowl and gently stir using a spatula.
- Incorporate the egg whites and delicately fold the mixture with a spatula.
- Pour the mousse into separate verrines. Refrigerate 2-3 hours before serving.
PORTIONS:2-3 portions
INGRÉDIENTS:
PORTIONS:2-3 portions
INGRÉDIENTS :
PORTIONS:4-6 portions
INGRÉDIENTS :
SUBSCRIBE TO THE NEWSLETTER TO LEARN MORE ABOUT OUR PROMOTIONS!
www. Starfrit.com
INSCRIVEZ-VOUS À L'INFOLETTRE POUR CONNAîtRE NOS PROMOTIONS !

www.facebook.com/starfrit