
PCGADDRW2 - Other computer accessories SONY - Free user manual and instructions
Find the device manual for free PCGADDRW2 SONY in PDF.
| Product type | External DVD±RW drive |
| Interface | i.LINK (IEEE 1394) S400 |
| Dimensions (W x H x D) | Approx. 144 x 21 x 154 mm |
| Weight | Approx. 410 g (main unit) |
| Power supply | AC adapter 100-240 V AC, 50/60 Hz; output 10 V DC, 1.5 A |
| Power consumption | Approx. 8 W (read/write) |
| Compatible discs | DVD+R/RW, DVD-R/RW, DVD-ROM, DVD-Video, CD-R/RW, CD-DA, CD Extra, CD TEXT, Photo CD |
| Max. reading speed | DVD-ROM 8x (10800 KB/s), CD-ROM 24x (3600 KB/s) |
| Max. writing speed | DVD+R 2.4x, DVD+RW 2.4x, DVD-R 4x, DVD-RW 2x, CD-R 16x, CD-RW 8x |
| Connectors | 2 x i.LINK (4-pin), 1 x DC IN, 1 x VAIO peripheral connector |
| Operating temperature | 5°C to 35°C |
| Operating humidity | 20% to 80% (no condensation) |
| Maintenance | Casing: soft dry cloth. Lens: if necessary, with care. Discs: from center to edges. |
| Safety | Do not expose to rain or moisture. Do not open the casing. Class 3B laser radiation when open. |
| Supplied accessories | Peripheral cable, i.LINK cable, AC adapter, power cord, manual eject pin, software CD-ROM, instruction manual, warranty card |
Frequently Asked Questions - PCGADDRW2 SONY
User questions about PCGADDRW2 SONY
0 question about this device. Answer the ones you know or ask your own.
Ask a new question about this device
Download the instructions for your Other computer accessories in PDF format for free! Find your manual PCGADDRW2 - SONY and take your electronic device back in hand. On this page are published all the documents necessary for the use of your device. PCGADDRW2 by SONY.
USER MANUAL PCGADDRW2 SONY
Dangerously high voltages are present inside the unit. Do not open the cabinet. Refer servicing to qualified personnel only.
CAUTION - CLASS 3B VISIBLE AND INVISIBLE LASER RADIATION WHEN OPEN. AVOID EXPOSURE TO THE BEAM.
- Use this product only with the supplied AC adapter.
- To disconnect this product completely from mains voltage, unplug the AC adapter.
- Make sure that the socket outlet is easily accessible.
For customers in the U.S.A. Owner's Record
The model number and the serial number are located on the bottom of the drive. Record the serial number in the space provided below. Refer to this number whenever you call your Sony dealer regarding this product.
Model No. PCGA-DDRW2
Serial No. ____
FCC Notice
This equipment has been tested and found to comply with the limits for a Class B digital device, pursuant to Part 15 of the FCC Rules. These limits are designed to provide reasonable protection against harmful interference in a residential installation. This equipment generates, uses, and can radiate radio frequency energy and, if not installed and used in accordance with the instructions, may cause harmful interference to radio communications. However, there is no guarantee that interference will not occur in a particular installation. If this equipment does cause harmful interference to radio or television reception, which can be determined by turning the equipment off and on, the user is encouraged to try to correct the interference using one or more of the following measures:
– Reorient or relocate the receiving antenna.
– Increase the separation between the equipment and receiver.
- Connect the equipment into an outlet on a circuit different from that to which the receiver is connected.
- Consult the dealer or an experienced radio/TV technician for help.
The shielded interface cable recommended in this manual must be used with this equipment in order to comply with the limits for a digital device pursuant to subpart B of Part 15 of FCC.
You are cautioned that any changes or modifications not expressly approved in this manual could void your authority to operate this equipment.
For questions regarding your product or for the Sony Customer Information Service Center nearest you, call 1-888-476-6972 in the United States or 1-800-961-7669 in Canada.
The number below is for FCC related matters only.
Declaration of Conformity
Trade Name: SONY
Model No.: PCGA-DDRW2
Responsible Party: Sony Electronics Inc.
Address: 16450 W. Bernard Dr,
San Diego,
CA 92127 U.S.A
Telephone No.: 858-942-2230
This device complies with Part 15 of the FCC Rules. Operation is subject to the following two conditions: (1) This device may not cause harmful interference, and (2) this device must accept any interference received, including interference that may cause undesired operation.
Caution
The use of optical instruments with this product will increase eye hazard.
As the laser beam used in this product is harmful to eyes, do not attempt to disassemble the cabinet. Refer servicing to qualified personnel only.
For customers in Canada
This Class B digital apparatus complies with Canadian ICES-003.
Before using the PCGA-DDRW2, be sure to read the End User Software License Agreement that accompanies it.
• Copyright laws prohibit reproducing the software or the manual accompanying it in whole or in part, or renting the software without the permission of the copyright holder.
- In no event will SONY be liable for any financial damages, or loss of profits, including claims made by third parties, arising out of the use of the software supplied with this drive.
- In the event a problem occurs with this product as a result of defective manufacturing, SONY will replace it. However, SONY bears no other responsibility.
- The software provided with this drive cannot be used with other drives.
- Please note that, due to continued efforts to improve quality, the software specifications may be changed without notice.
- Making copies of and using CD-ROMs, DVD-ROMs, DVD video discs, or music CDs may violate copyright laws or the terms of the End-user Licenses provided with such discs. Be sure to comply with copyright laws and the terms of the End User Software License when making or using original CDs and DVDs.
If you have any questions regarding copyright laws or the terms of the End-user Software License, please consult the appropriate legal experts. - Operation of this drive with software other than that provided is not covered by the warranty.
- VAIO, Click to DVD, CD TEXT logo, MICROMV, SonicStage, Jog Dial and Eco Info logo are trademarks of Sony Corporation.
- Microsoft and Windows are registered trademarks of Microsoft Corporation in the United States and/or other countries.
- i.LINK is a designation referring to IEEE 1394-1995 and IEEE 1394a-2000. i.LINK and the i.LINK logo “i” are trademarks of Sony Corporation.
- Copyright © 2001 DigiOn Inc. and Easy Systems Japan Ltd. All rights reserved. Drag'n Drop CD+DVD is a trademark of Easy Systems Japan Ltd and DigiOn Inc.
- Sony computers equipped with this drive incorporate copyright protection thechnology that is protected by U.S. patents and other intellectual property rights. Use of this copyright protection technology must be authorized by Macrovision and is intended for home and other limited viewing uses only unless otherwise authorized by Macrovision. Reverse engineering or disassembly is prohibited.
- Portions utilize Microsoft Windows Media Technologies. Copyright © 1999-2002 Microsoft Corporation. All Rights Reserved.
- All other names of systems, products, and services are trademarks of their respective owners.
- In the manual, the ^TM or marks are not specified.
In this manual, Microsoft® Windows® XP Home Edition, Microsoft® Windows® XP Professional, and Microsoft® Windows® XP Media Center Edition are referred to as Windows XP.
Table of Contents
Overview 5
Compatible computers...... 6
Compatible discs 7
Supplied Accessories 10
Locating the Controls and Connectors. 11
Connecting the Drive.... 12
Connecting the drive to your notebook with the supplied peripheral cable .... 14
Connecting the drive to your computer with the supplied i.LINK cable 16
Connecting a Digital Video Camera Recorder 18
Limitation (wrong connection example).... 23
Disconnecting the drive from the computer 23
Basic Operation 24
Power management information ... 24
Inserting a disc 24
Removing a disc 26
Installing the software 28
About the supplied software...... 28
Installing 29
Precautions before use 31
Precautions when writing data ..... 31
Playing an Audio CD.... 35
Playing a DVD video.... 35
Notes about playing DVD video ... 35
Notes about DVD video discs ..... 36
Performing a System Recovery on a Notebook.... 37
Precautions 38
Maintenance 39
Getting Help 40
Specifications 41
Troubleshooting.... 43
Overview
This product is a DVD±RW drive compatible with the i.LINK (IEEE 1394) interface. The drive has the following features:
- Supports 2.4· writing speed for DVD+R discs (3240 KB/s).
- Supports 2.4· writing speed for DVD+RW discs (3240 KB/s).
- Supports 4· writing speed for DVD-R discs (5400 KB/s).
- Supports 2· writing speed for DVD-RW discs (2700 KB/s).
- Supports 16- writing speed for CD-R discs (2400 KB/s).
- Supports 8· writing speed for CD-RW discs (1200 KB/s).
- Reads DVD+R, DVD+RW, DVD-R, DVD-RW, DVD-ROM, CD-R, CD-RW, and CD-ROM discs. DVD-ROM discs are read at a speed of 8·max. (10800 KB/s), and CD-ROM discs at a speed of 24·max. (3600 KB/s).
- If the notebook you are using comes equipped with a VAIO ^ notebook peripheral device DC OUT connector ^1 , by connecting the VAIO notebook peripheral cable (80 cm) ^2 you can use this drive with power supplied from the notebook (see page 12).
- Can create original DVD videos captured from a Digital Video Camera Recorder equipped with a DV terminal to the drive (using the supplied DVD video software)(see page 28).
- Can play back digital audio CD using the computer speakers, if the computer supports this function (see page 35).
- Can be used to easily reinstall the operating system on the notebook using a recovery disc, if the notebook supports this function (see page 37).
Note
This drive is only for use in the country of purchase.

What is i.LINK?
i.LINK is a digital serial interface supporting very high transfer rates. It facilitates the exchange of high-volume digital audio and video data between components equipped with an i.LINK connector and enables the control of other components. For details, refer to the manuals provided with your computer.
Compatible computers
You can use the drive with Sony VAIO computers* with the Microsoft® Windows® XP operating system preinstalled.
(As of May, 2004)
* Except those with a built-in DVD-RW or DVD±RW drive.
Notes
- This drive cannot be used with computers other than Sony VAIO computers.
- This drive does not support Microsoft ^ Windows ^ Millennium Edition, Microsoft ^ Windows ^ 2000 Professional, Microsoft ^ Windows ^ 98 Second Edition, or earlier versions of the Windows ^ operating system.
- This drive does not support DTLA copy protection. It cannot be used in conjunction with digital CS tuners, D-VHS recorders, or other equipment using the DTLA copy protection system.
- The connection method for this drive differs depending on the computer model. For details, see “Connecting the Drive” on page 12.
- This drive can be used for performing a system recovery on a notebook using a recovery disc. See “Performing a System Recovery on a Notebook” on page 37 for devices with which recovery is possible.
• DVD+R
Write-once discs for storing computer programs and data, video data, and audio data. Note that DVD+R and DVD-R are different types of discs. DVD+R discs can store up to 4.7 GB of data, roughly 7 times that of a CD-R.
• DVD+RW
Discs for storing computer programs and data, video data, and audio data. These discs can be erased and rewritten many times. Note that DVD+RW and DVD-RW are different types of discs. DVD+RW discs can store up to 4.7 GB of data, roughly 7 times that of a CD-RW.
• DVD-R
Write-once discs for storing computer programs and data, video data, and audio data. DVD-R discs can store up to 4.7 GB of data, roughly 7 times that of a CD-R.
• DVD-RW
Discs for storing computer programs and data, video data, and audio data. These discs can be erased and rewritten many times. DVD-RW discs can store up to 4.7 GB of data, roughly 7 times that of a CD-RW.
• DVD-ROM
Read-only discs with a high data capacity.
• CD-R
Write-once discs for storing computer programs and data. After having been written, data cannot be erased from these discs. Data may be added to them, however, depending on the writing method used and the amount of available space on the disc.
- CD-RW
Rewritable discs for storing computer programs and data. The contents of these discs can be erased and rewritten many times.
- CD-ROM
Read-only discs onto which you cannot write your data. Many computer programs, games, and other content, are delivered on CD-ROM discs.
With this drive, you can use the discs with any of the following icons.
| Disc type Icon | ||
| DVD+R *1 *3 *4 |  | |
| DVD+R | ||
| DVD+RW *1 *3 |  | |
| DVD+ReWritable | ||
| DVD-R *1 *2 *3 |  | |
| R | ||
| DVD-RW *1 *2 *3 |  | |
| RW | ||
| DVD-ROM |  | |
| ROM | ||
| DVD-Video |  | |
| VIDEO | ||
| CD-R |  |  |
| CD-RW *5 |  |  |
| CD-ROM |  | |
| Audio CD |  | |
| CD EXTRA |  |  |
| CD TEXT |  |  |
| Photo CD ———— | ||
*1 Playback may not be possible, depending on the disc, settings and system used.
*2 When using DVD-R discs, use DVD-R for General Ver. 2.0 or later. DVD-R for Authoring cannot be used.
When using DVD-RW discs, use DVD-RW Ver. 1.1 or DVD-RW Ver. 1.1/2. -SPEED DVD-RW Revision 1.0. DVD-RW Ver. 1.2/4X-SPEED DVD-RW Revision 2.0 cannot be used.
*3 Recording in DVD video format is possible. The Video Recording (VR) format is not supported.
*4 Recording to and reading from a DVD+R DL (Double Layer) disc is not supported.
*5 Ultra Speed CD-RW is not supported.
The following discs cannot be used in this drive:
- DVD-RAM
• Double Density CD-R/CD-RW (DDCD)
Notes
- Use only circular discs in this drive. Do not use discs with any other shape (star, heart, and so on), as they may damage the drive.
- Do not use scratched or damaged discs, as they may damage the drive.
- To use photo CDs, special front-end software to search or access such discs must be installed on the computer.
- Some types of CD players do not play music CDs created on CD-R discs. Music CDs created on CD-RW discs cannot be played in conventional CD players. To play these discs, use a drive that supports CD-RW.
- Compatibility with the playback software is required for playing each disc. For details, refer to the manual of the playback software.
- Some types of DVD players do not play DVD videos created on DVD+R, DVD+RW, DVD-R, or DVD-RW discs.
- This drive uses special software to play DVD video discs. Depending on the type of disc used, some operations or functions may be limited, and normal playback may not be possible.
- This drive does not support writing to 8-cm discs.
Supplied Accessories
After unpacking the unit, make sure that the accessories listed below are present. If anything is missing, contact the Sony dealer where you purchased this product or a Sony service representative in your area.
- DVD±RW drive (1) • Software CD-ROM (1)
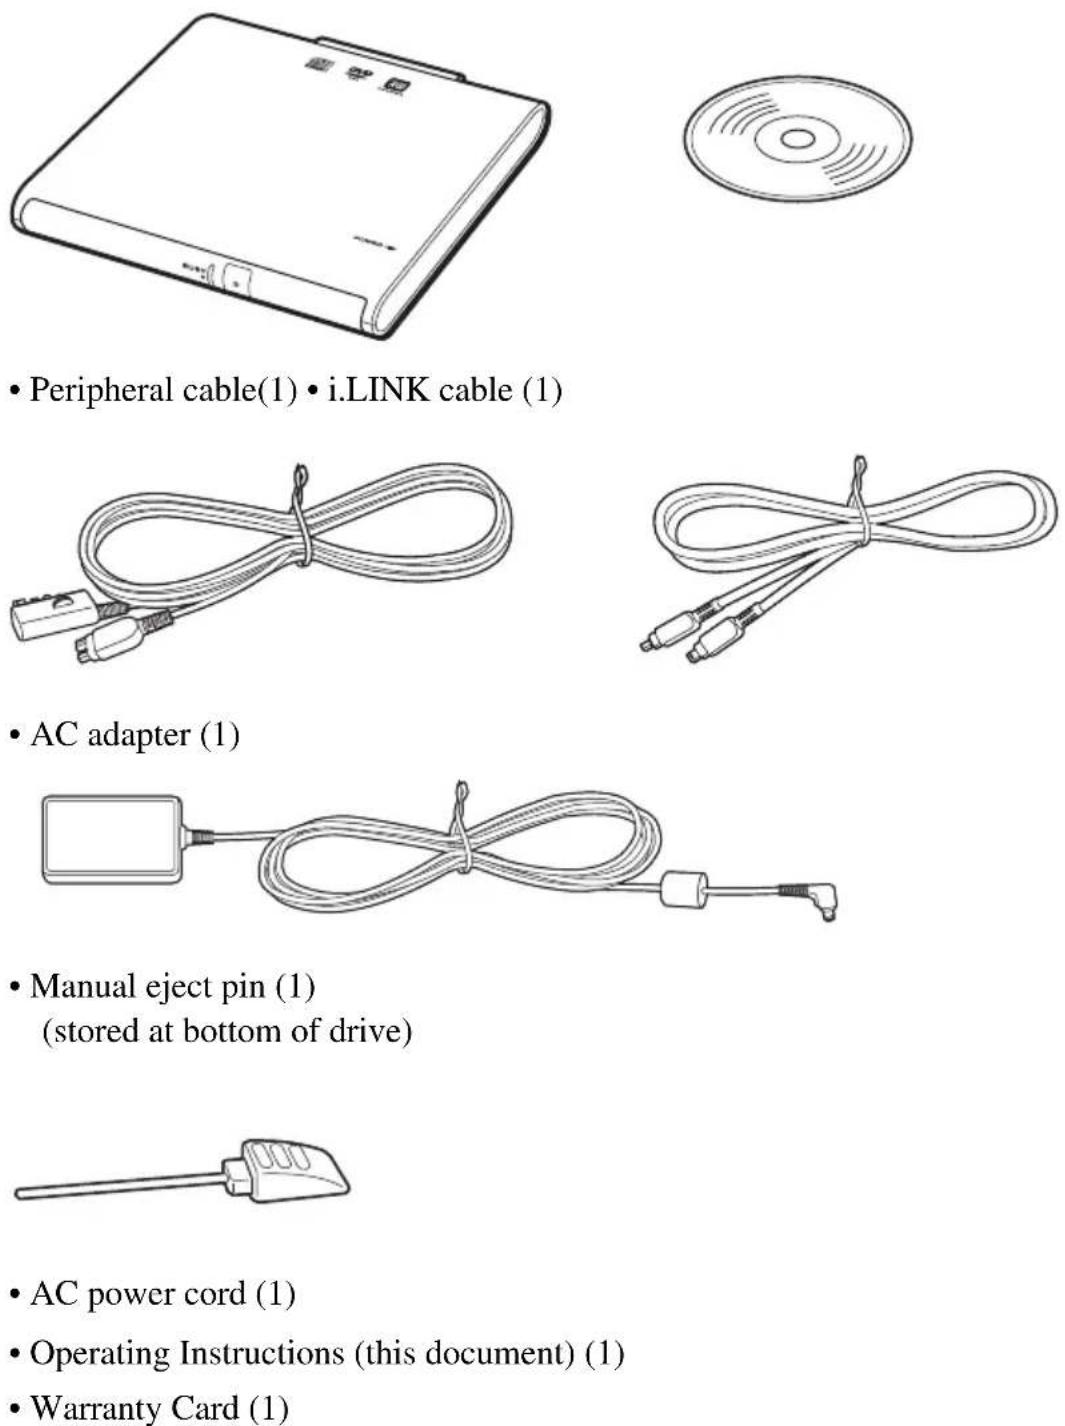
- Peripheral cable(1) • i.LINK cable (1)
- AC adapter (1)
- Manual eject pin (1) (stored at bottom of drive)
- AC power cord (1)
- Operating Instructions (this document) (1)
- Warranty Card (1)
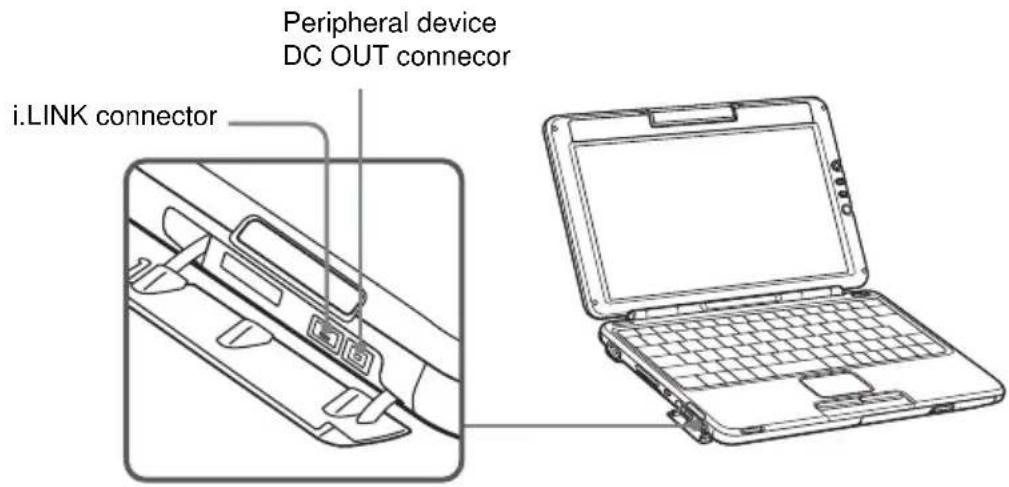
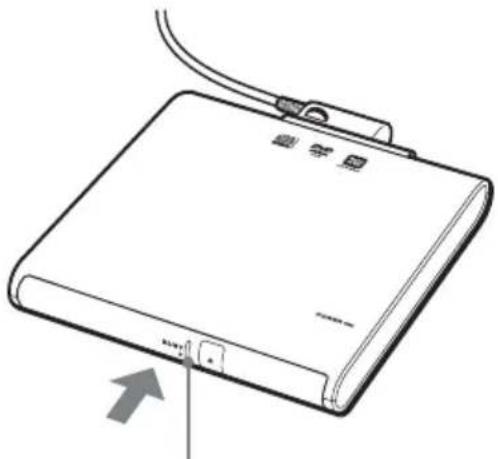
Locating the Controls and Connectors
Front
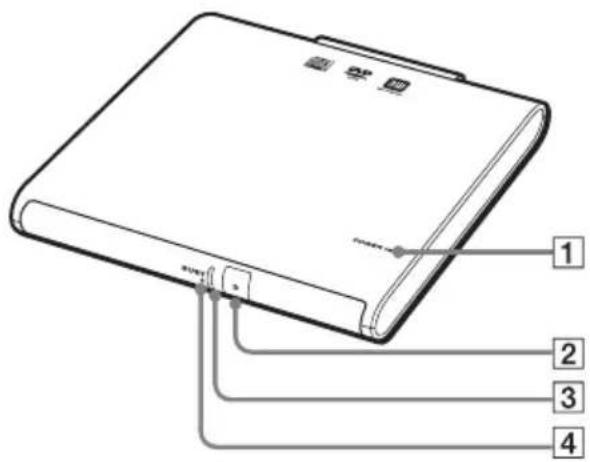
1 POWER indicator
②Eject button
3 BUSY indicator
4 Manual eject hole
Rear
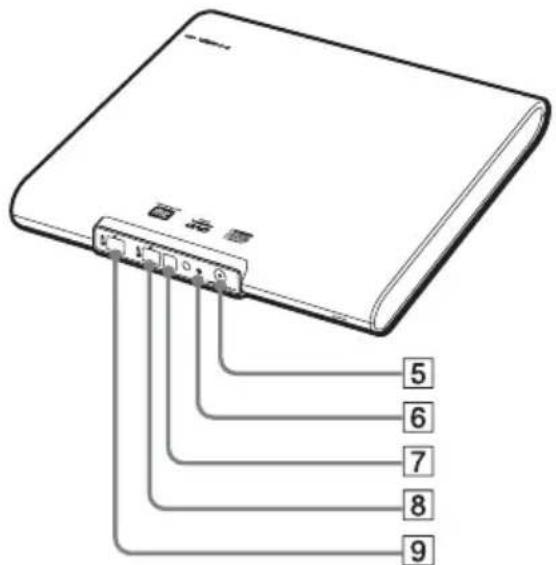
5 DC IN connector
6 Peripheral cable screw hole
7 Peripheral device DC IN connector
8i.LINK connector
9i.LINK connector
Bottom
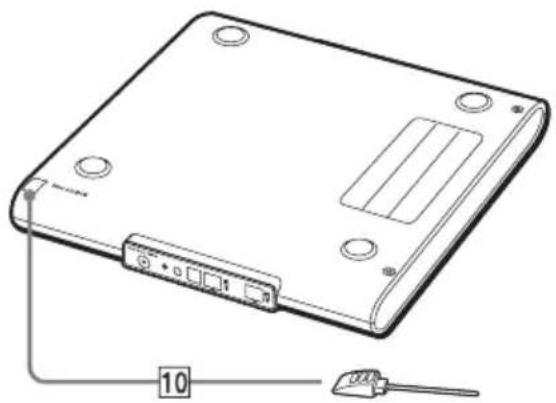
natural_image
Line drawing of a rectangular electronic device with ports and connectors, connected to a cable (no text or symbols)10 Manual eject pin (see page 27)
Connecting the Drive
The procedure for connecting this drive varies depending on the computer you are using.
- If the notebook is equipped with a peripheral device DC OUT connector (see page 14)
If the notebook is equipped with a peripheral device DC OUT connector, use the supplied peripheral cable to connect the drive to the notebook. If this method is used, power for the drive is supplied by the notebook, allowing you to use the drive in locations without a power outlet.
If you use a Digital Video Camera Recorder, you can connect it to the drive using the supplied i.LINK cable (see page 19).
- If the computer is not equipped with a peripheral device DC OUT connector (see page 16)
If your computer is not equipped with a peripheral device DC OUT connector, use the supplied i.LINK cable to connect the drive to the computer. In this case, the supplied AC adapter and AC power cord must be used.
If you use a Digital Video Camera Recorder, you can connect it to the drive using an i.LINK cable available separately (see page 21).
Notes
- If your computer is not equipped with a peripheral device DC OUT connector, use the supplied i.LINK cable to connect the drive to the computer. For details about this connection, see page 16.
- Whenever an i.LINK device is connected, disconnected, or powered on or off, the computer performs processing that is referred to as a “bus reset”. If this happens while data is being read or written, data could be erased or corrupted. Before connecting or disconnecting this drive, be sure to close any active applications.
- Use this drive on a level and stable surface.
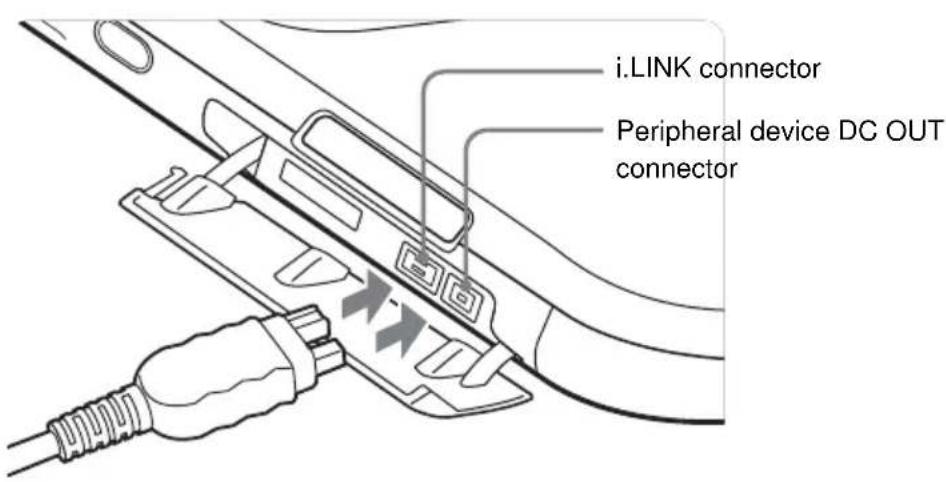
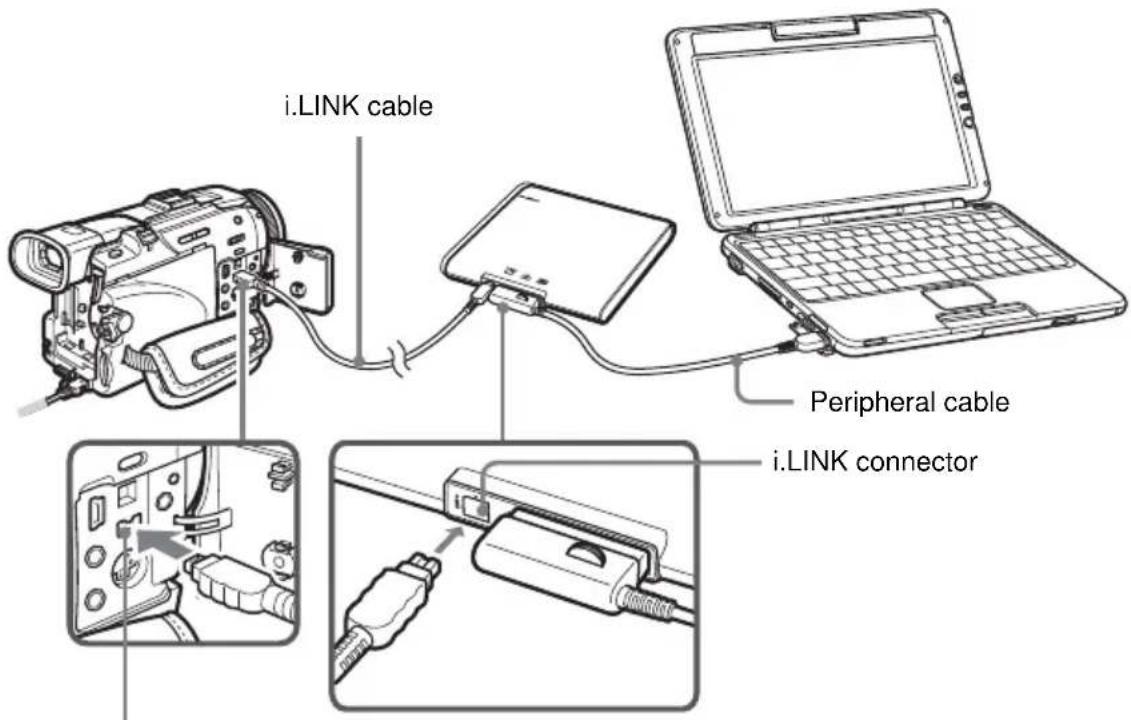
Connecting the drive to your notebook with the supplied peripheral cable
If your notebook has a peripheral device DC OUT connector, use the supplied peripheral cable to connect the drive to the notebook.
If your notebook is not equipped with a peripheral device DC OUT connector, use the supplied i.LINK cable to connect the drive to the notebook (see page 16).
If you use a Digital Video Camera Recorder, you can connect it to the drive using the supplied i.LINK cable (see page 19).
Note
When connecting this drive to a notebook that has multiple i.LINK connectors, do not connect other i.LINK devices together with this drive. Disconnect this drive before connecting any other i.LINK devices to your notebook.

Hint
Also refer to the manuals provided with your notebook.
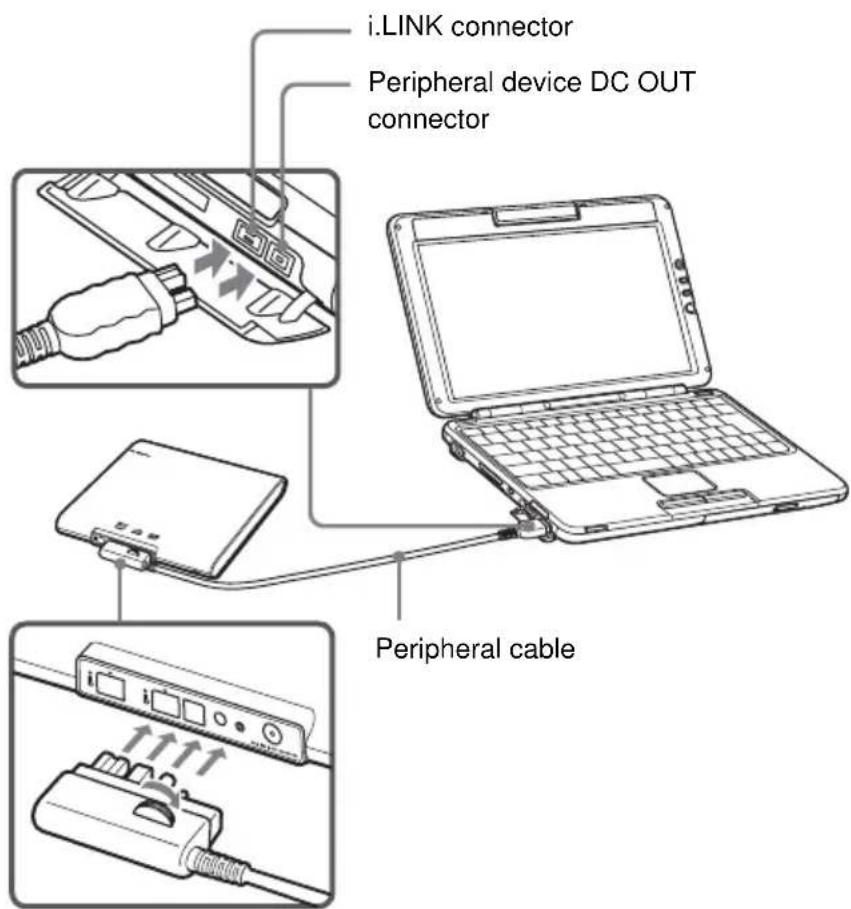
1 Turn on the notebook.
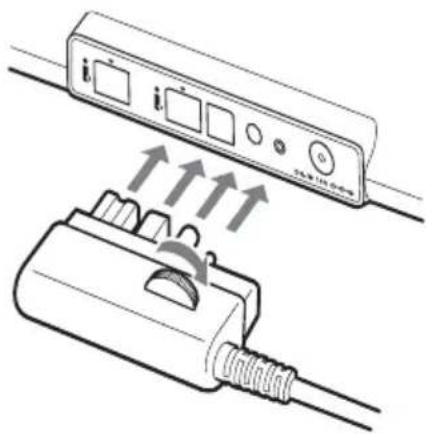
2 Insert the L-shaped plug of the supplied peripheral cable into the matching connector on the rear of the drive, and secure the plug with the screw.
Turn the screw until it fits snugly.
natural_image
Diagram showing two connected devices with arrows indicating signal flow or movement (no text or symbols present)3 Insert the straight plug of the supplied peripheral cable into the i.LINK connector on the notebook and into the peripheral device DC OUT connector.
The green POWER indicator of the drive lights up, and the drive is detected and identified by the notebook.
Hint
When this drive is connected to your notebook for the first time, it takes a moment for the notebook to detect the drive.
4 Click "Start", and then click "My Computer" to verify that (E: or other drive name) has been added in the "My Computer" window.

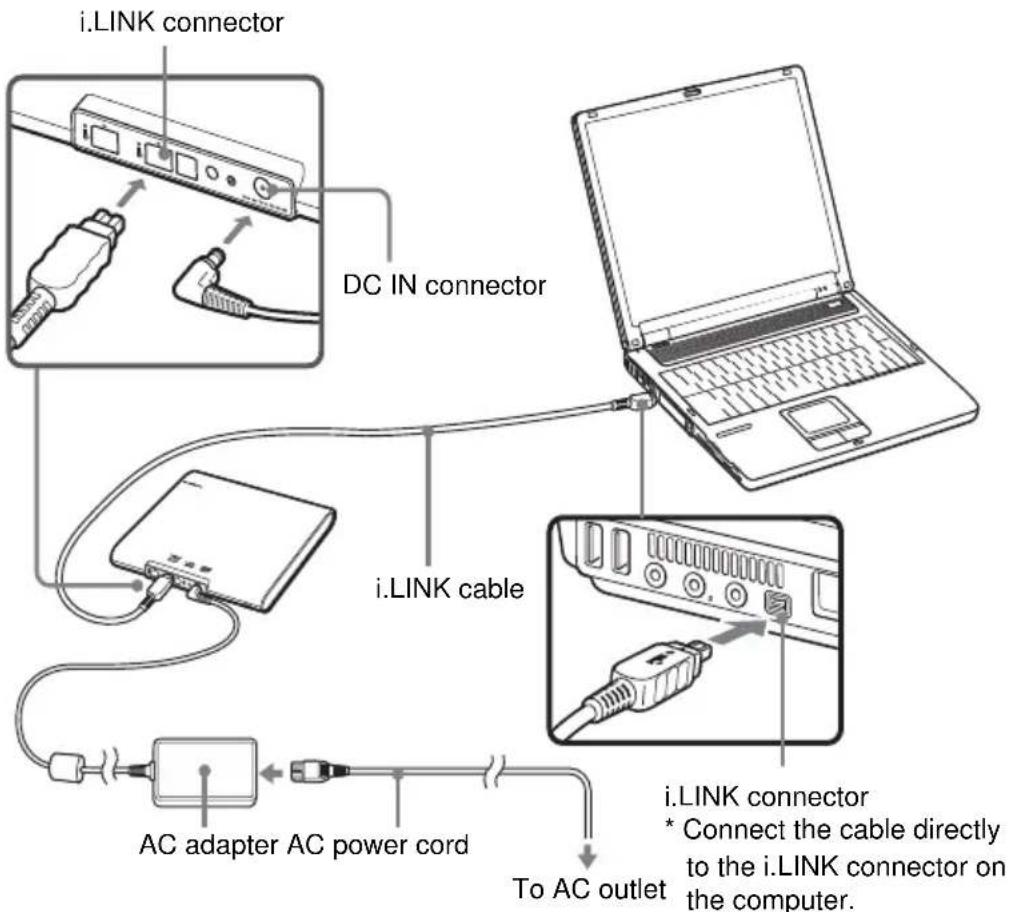
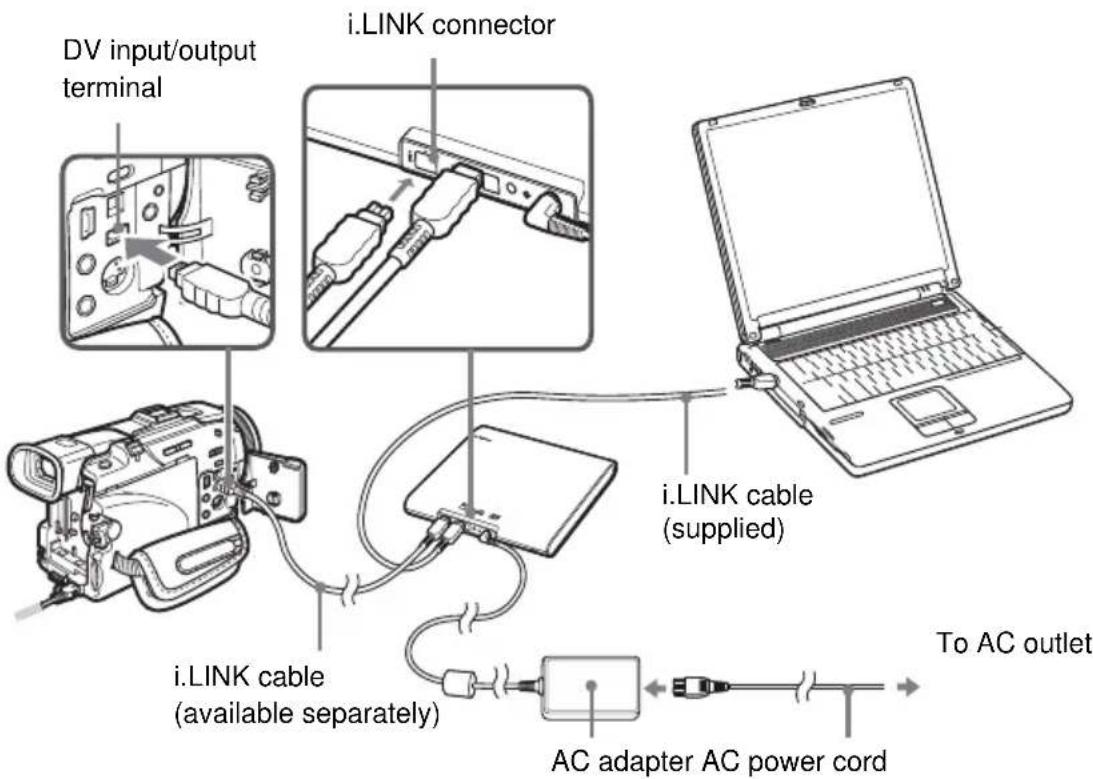
Connecting the drive to your computer with the supplied i.LINK cable
If your computer is not equipped with a peripheral device DC OUT connector use the supplied i.LINK cable to connect the drive to the computer.
If you use a Digital Video Camera Recorder, you can connect it to the drive using a separately sold i.LINK cable (see page 21).
Note
When connecting this drive to a computer that has multiple i.LINK connectors, do not connect other i.LINK devices together with this drive. Furthermore, disconnect this drive before connecting any other i.LINK devices to your computer.
1 Turn on the computer.
2 Connect the AC power cord to the supplied AC adapter, plug the AC power cord into an AC outlet, and then plug the cable of the adapter into the DC IN connector on the drive.
The green POWER indicator of the drive lights up.
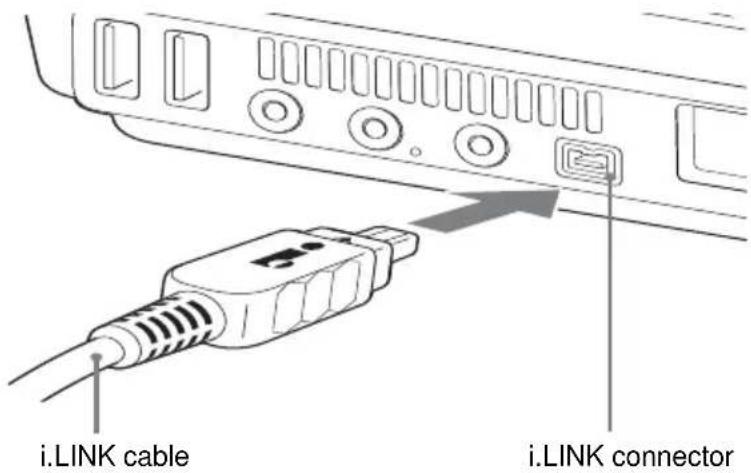
3 Connect the supplied i.LINK cable to the i.LINK connector on the rear of the drive.
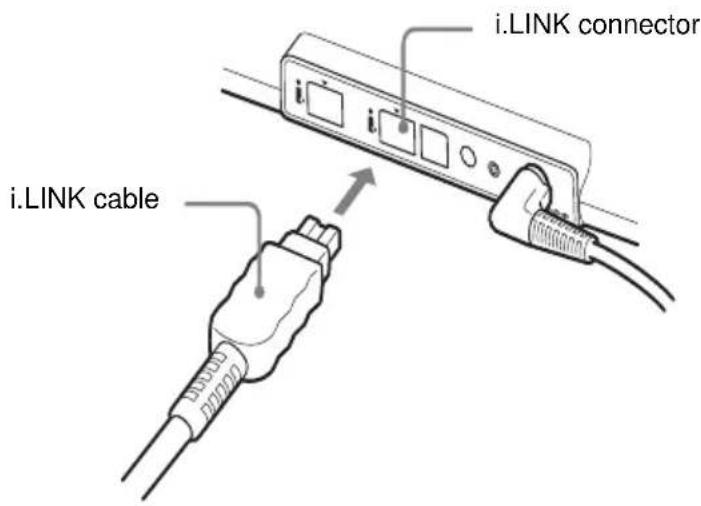
4 Connect the other end of the supplied i.LINK cable to the i.LINK connector on the computer.
The drive is detected and identified by the computer.
Hint
When this drive is connected to your computer for the first time, it takes a moment for the computer to detect the drive.
5 Click "Start", and then click "My Computer" to verify that (E: or other drive name) has been added in the "My Computer" window.
Connecting a Digital Video Camera Recorder
Using the Click to DVD ^TM software provided, you can connect a Digital Video Camera Recorder to the drive and use video from the Digital Video Camera Recorder to create DVD videos. The procedure for connecting a Digital Video Camera Recorder to the drive is different than that for connecting a Digital Video Camera Recorder to a computer.
The Digital Video Camera Recorder that you can connect to the drive must be a Sony Digital Video Camera Recorder that:
- Can record video in DV or MICROMV ^® format.
- Is equipped with a DV output terminal and can be connected to a computer using an i.LINK cable (also known as a DV cable).
Note
The drive does not support analog format and some types of Digital Video Camera Recorder formats.
The following models cannot be used (as of May, 2004):
- DCR-VX1000
- DCR-VX700 (versions with an upgraded DV terminal)
Use the supplied Click to DVD software to create DVD videos using the video captured with your Digital Video Camera Recorder. To install the supplied software, see “Installing the Software” (page 28).
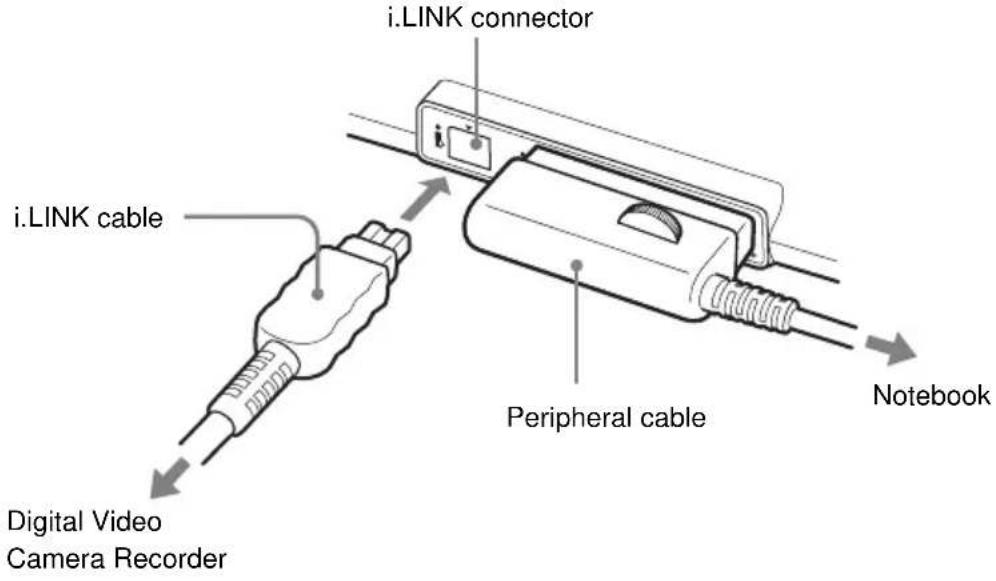
■ When connecting the drive to your notebook with the supplied peripheral cable
To use the supplied Click to DVD software with the drive connected to your notebook using the supplied peripheral cable, connect your Digital Video Camera Recorder to the drive's i.LINK connector using the supplied i.LINK cable, as shown below.
Notes
- Connect the drive to your notebook before connecting the Digital Video Camera Recorder (see page 14).
- When connecting a Digital Video Camera Recorder to the drive, connect the Digital Video Camera Recorder's AC adapter/charger to the Digital Video Camera Recorder and set the AC adapter/charger mode switch to "VCR/Camera/Player" before connecting the AC adapter/charger to a power outlet.

Hint
Also refer to the manual for the Digital Video Camera Recorder you want to connect.
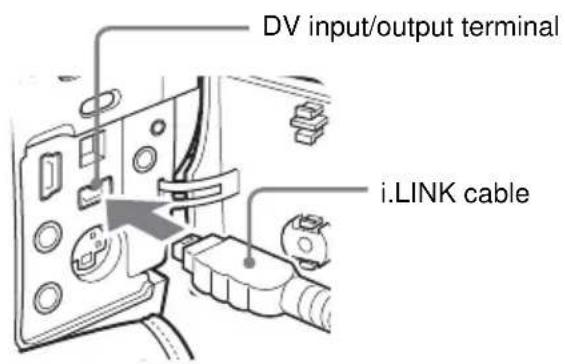
DV input/output terminal
* The connection diagram shows the DCR-TRV50 model Digital Video Camera Recorder as an example.
1 Turn on the Digital Video Camera Recorder, and set it to video playback mode.
For details of Digital Video Camera Recorder operations, refer to your Digital Video Camera Recorder manual.
2 Connect the supplied i.LINK cable to the DV input/output terminal on the Digital Video Camera Recorder.
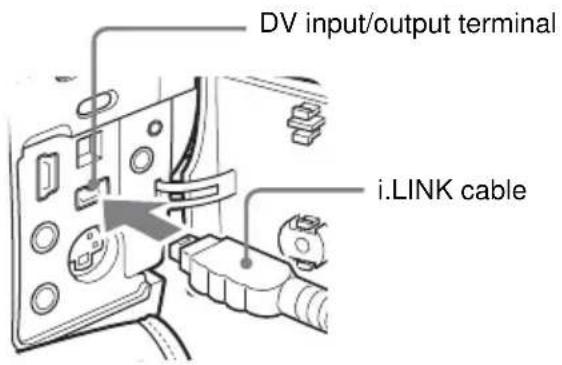
3 Connect the other end of the i.LINK cable to the i.LINK connector on the back of the drive.
Note
Do not connect any i.LINK equipment other than a Digital Video Camera Recorder to the i.LINK connector on the drive.
4 Click "Start", and then click "My Computer" to verify that (Sony DV camcorder or other equipment) has been added in the "My Computer" window.
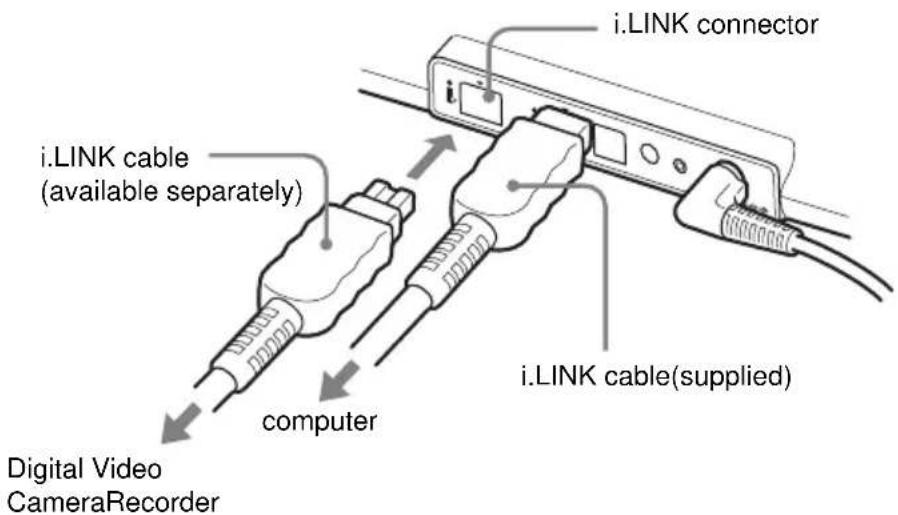
■ When connecting the drive to your computer with the supplied i.LINK cable
To use the supplied Click to DVD software with the drive connected to your computer using the supplied i.LINK cable, connect your Digital Video Camera Recorder to the drive's i.LINK connector using another i.LINK cable (available separately), as shown below.
Notes
- To connect your Digital Video Camera Recorder, purchase an i.LINK cable.
- Connect the drive to your computer before connecting the Digital Video Camera Recorder to the drive (see page 16).
- When connecting a Digital Video Camera Recorder to the drive, connect the Digital Video Camera Recorder's AC adapter/charger to the Digital Video Camera Recorder and set the AC adapter/charger mode switch to "VCR/Camera/Player" before connecting the AC adapter/charger to a power outlet.

Hint
Refer also to the manual for the Digital Video Camera Recorder you want to connect.
* The connection diagram shows the DCR-TRV50 model Digital Video Camera Recorder as an example.
1 Turn on the Digital Video Camera Recorder, and set it to video playback mode.
For details of Digital Video Camera Recorder operations, refer to the Digital Video Camera Recorder manual.
2 Connect the additional i.LINK cable (sold separately) to the DV input/output terminal on the Digital Video Camera Recorder.
3 Connect the other end of the i.LINK cable to the i.LINK connector on the back of the drive.
Note
Do not connect any i.LINK equipment other than a Digital Video Camera Recorder to the i.LINK connector on the drive.
4 Click "Start", and then click "My Computer" to verify that (Sony DV camcorder or other equipment) has been added in the "My Computer" window.
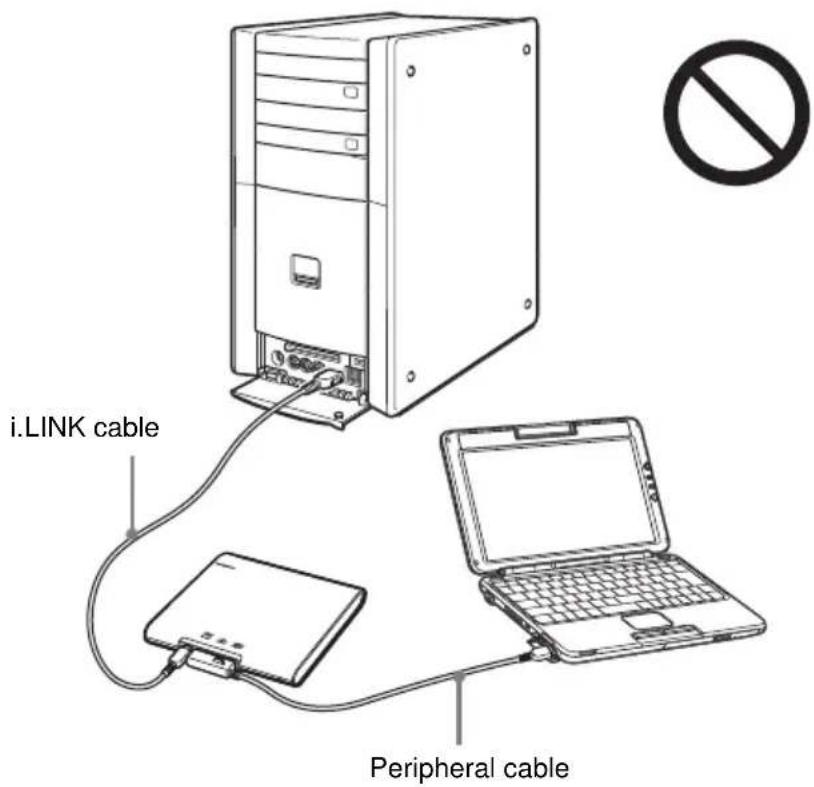
Limitation (wrong connection example)
Do not connect this drive to two computer as shown below.
Disconnecting the drive from the computer
With the Windows XP operating system, no special procedures are needed to disconnect the drive. Simply make sure that no application programs are active and that the drive's BUSY indicator is not on, and then disconnect the peripheral cable or i.LINK cable.
Notes
- Before disconnecting the drive, close any running software.
- When a Digital Video Camera Recorder is connected to the drive, disconnect the i.LINK cable from the Digital Video Camera Recorder before turning off the Digital Video Camera Recorder.

Hint
To use the drive again after disconnecting the peripheral cable or i.LINK cable, perform the steps described in the section “Connecting the Drive” on page 12. The drive will be detected automatically by your Windows operating system.
Basic Operation
Power management information
When using the power management features of your computer, observe the following points:
- Ensure that the power-saving modes will not be activated automatically while the BUSY indicator of the drive is flashing. For details, refer to the manuals provided with your computer.
- Before activating the power-saving modes of the computer, verify that the BUSY indicator of the drive is not on, and close all running software applications.
- While the computer is in a power-saving mode, do not connect or disconnect the peripheral cable, i.LINK cable, or AC adapter.
Inserting a disc
Turn on the computer, and connect this drive before inserting a disc.
1 Press the eject button.
The tray pops out.
2 Pull the tray out fully until it stops. While supporting the tray from the other side with your hand, place the disc on the hub in the center of the tray.
Make sure that the disc audibly clicks into place and is firmly seated.
Notes
- Do not touch the lens assembly in the tray or the metal section on the rear.
- If you close the tray while the disc is not properly seated, the disc may be damaged and the tray may jam.
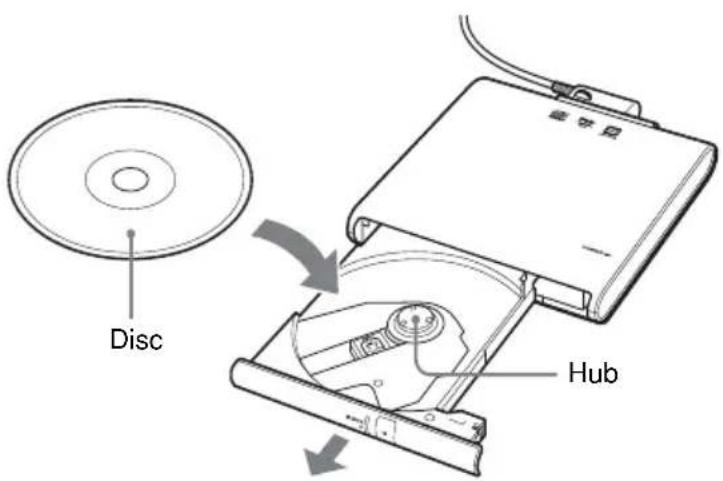
3 Close the disc tray by gently pushing it in.
While data is being read, the BUSY indicator flashes.
BUSY indicator
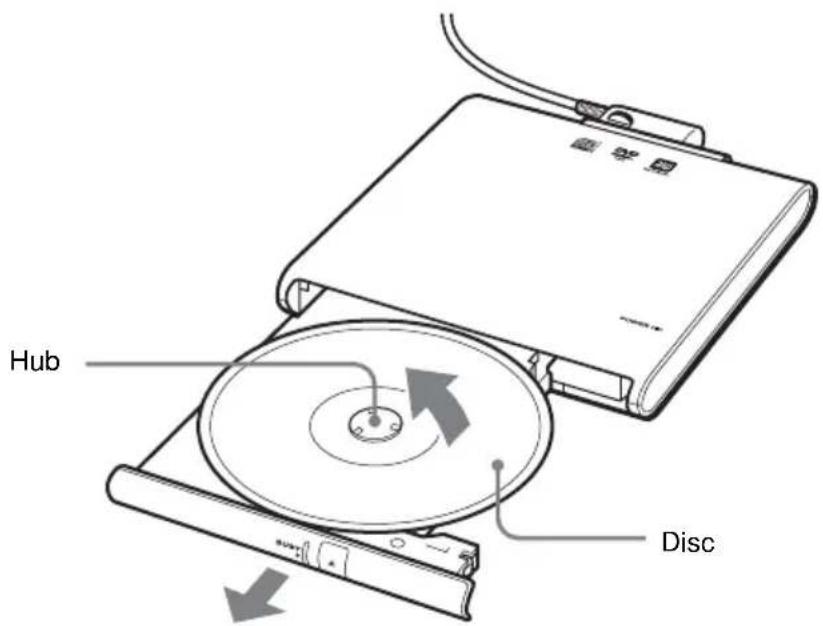
Removing a disc
1 Verify that the BUSY indicator is not flashing, and press the eject button.
The tray pops out.
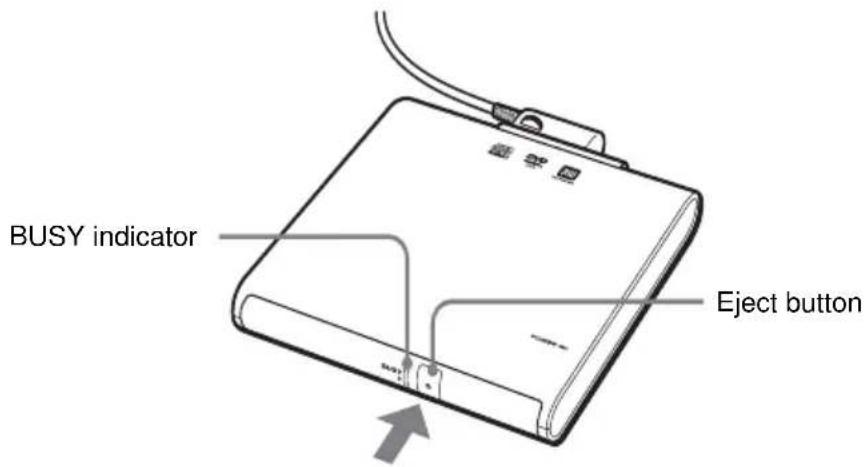
2 Pull the tray out fully until it stops. While supporting the tray with your hand, remove the disc.
To release the disc, push on the hub in the center.
Notes
- Do not touch the lens assembly in the tray or the metal section on the rear.
- When using writing software or DVD playback software, you may not be able to eject discs simply by pressing the eject button. For details, refer to Help or the Quick Reference manual provided with the writing software or DVD playback software.
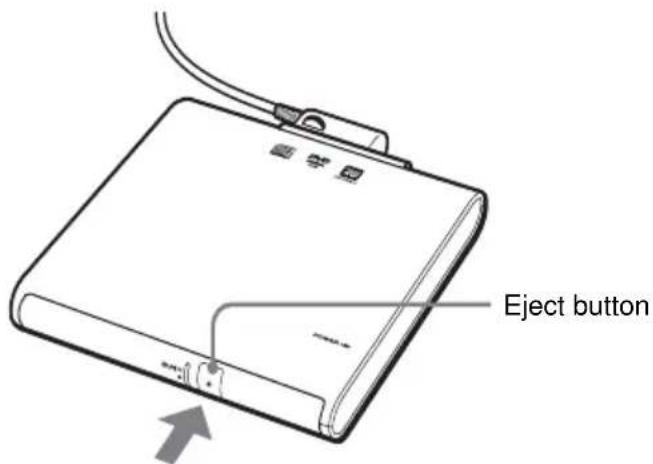
If the disc does not eject
1 Confirm that the BUSY indicator is not flashing.
2 Detach the manual eject pin from the holder at the bottom of the drive, and insert the pin into the manual eject hole.
The tray pops out, allowing you to remove the disc.
Manual eject pin Manual eject hole
Installing the software
About the supplied software
The software below is installed from the supplied CD-ROM.
■ Click to DVD
Use Click to DVD software to create your own original DVDs using video captured with a Digital Video Camera Recorder or pictures and videos stored on your computer.
■ Drag'n Drop CD+DVD
Use Drag'n Drop CD+DVD software to create data CDs/DVDs, music CDs, and CD/DVD backups.
Installing and using Drag'n Drop CD+DVD
This software must only be used in conjunction with the product with which this software is shipped.
If you attempt to use this software with other previously installed or add-on products, we cannot guarantee the performance of the software, nor provide support.
Before using this product, please first carefully read the software license agreement.
■ SonicStage Ver.1.x DVD±RW Drive Support Update Program
This software update allows you to create audio CD-R or CD-RW discs using SonicStage software and this drive.
Follow the procedure below to install the software.
Notes
- Log on to the computer using an account with administrator privileges before installing the software.
- In order to use Click to DVD software, you must first install Drag'n Drop CD+DVD software.
- The SonicStage Ver.1.x DVD±RW Drive Support Update Program can only be installed if Drag'n Drop CD+DVD software and the SonicStage CD-R Writing Module are already installed. The SonicStage CD-R Writing Module can be found on the Sony applications CD-ROM supplied with your computer.
- Shut down all other Windows applications before installing the software. Otherwise installation may not complete normally.
- During installation, the computer may seem to have stopped, but if the access indicator on the drive or the hard disk indicator of the computer is lit or flashing, the installation is still in progress. Do not attempt to stop the installation or shut down the computer. Otherwise it may become impossible to install the software the next time and a reinstallation of the operating system may become necessary.
- Before installing Drag'n Drop CD+DVD software on a computer where Drag'n Drop CD or Drag'n Drop CD+DVD software is already installed, you must uninstall Drag'n Drop CD or Drag'n Drop CD+DVD software first. To do this, proceed as follows. On the "Start" menu, click "Control Panel" and click "Add or Remove Programs". Select "Drag'n Drop CD" or "Drag'n Drop CD+DVD" from the list and click "Remove".
- Before installing Click to DVD software on a computer where Click to DVD software is already installed, you must uninstall Click to DVD software first. To do this, proceed as follows. On the “Start” menu, click “Control Panel”, and click “Add or Remove Programs”. Select “Click to DVD” from the list, and click “Remove”.
- The SonicStage Ver.1.x DVD±RW Drive Support Update Program will not be installed if the existing SonicStage software on the computer is a newer version.
- To use Click to DVD software, Windows Media Format 9 SDK Runtime and DirectX 9.0b need to be installed. Follow the installation procedure below.
1 Turn on the computer, and prepare the drive for installation as necessary.
To install the drive, see “Connecting the Drive” (page 12), and connect the drive to your computer.
2 Insert the supplied software CD-ROM into the drive.
3 On the "Start" menu, click "My Computer", double-click "Drive E*", open "Click to DVD", and then double-click "Setup.exe".
*Drive E may have a different name depending on the computer you are using.
Follow the on-screen instructions.
4 On the "Start" menu, click "My Computer", double-click "Drive E*", open "Click to DVD Menu Data", and then double-click "Setup.exe".
* Drive E may have a different name depending on the computer you are using.
Follow the on-screen instructions.
5 On the "Start" menu, click "My Computer", double-click "Drive E*", open "Drag'n Drop CD+DVD", and then double-click "Setup.exe".
* Drive E may have a different name depending on the computer you are using.
Follow the on-screen instructions.
6 Restart your computer after installing "Click to DVD", "Click to DVD Menu Data", and "Drag'n Drop CD+DVD" software.
7 On the "Start" menu, click "My Computer", double-click "Drive E*", open "SonicStage Update Program", and then double-click "Setup.exe".
* Drive E may have a different name depending on the computer you are using.
Follow the on-screen instructions.
8 On the "Start" menu, click "My Computer", double-click "Drive E*", open "Windows Media Format 9 SDK Runtime", and then double-click "wmfdist.exe".
* Drive E may have a different name depending on the computer you are using.
Follow the on-screen instructions.
9 On the "Start" menu, click "My Computer", double-click "Drive E*", open "DirectX9", and then double-click "dxsetup.exe".
* Drive E may have a different name depending on the computer you are using.
Follow the on-screen instructions.
10 Click the "Start" button, point to "All Programs" and check that "Click to DVD" and "Drag'n Drop CD+DVD" are displayed.
Precautions before use
Precautions when writing data
Please observe the following precautions when writing data to DVD+R, DVD+RW, DVD-R, DVD-RW, CD-R, or CD-RW discs.
- Be sure to power the computer from its AC adapter. Do not run the computer on battery power.
- When inserting discs, do not touch the recording surface. Dirt on the recording surface can impair data writing.
- While writing data and while inserting or removing discs, protect the drive and the computer from shocks and vibrations.
- Turn off the screen saver of the computer. If the screen saver is activated while data is being written, the data transfer rate will drop considerably, which can lead to loss of data.
- Make sure that your computer's power management function is not enabled during data writing. Otherwise, the data transfer rate will become extremely slow, resulting in data loss. For details of your computer's power management settings, refer to the manuals provided with your computer.
- Do not disconnect or manually operate any devices (such as a Digital Video Camera Recorder) connected to this drive while writing data to DVD+R, DVD+RW, DVD-R, or DVD-RW discs.
- Installing or updating the driver software for the drive while writing data can result in operating problems.
- Do not disconnect devices such as USB equipment or PC cards from the computer while writing data.
- Do not switch users while writing data. This may result in data loss.
- Avoid using any resident disc management utilities or utilities to speed up disc access as these can impair operation stability and cause data loss.
- Writing to a CD-R or CD-RW disc with an operating speed of 1· or 2· is not supported.
- Use CD-R discs that support a data writing speed of 8· or higher.
- Use CD-RW discs that support a data writing speed of 4· or higher.
- The use of High Speed CD-RW discs is supported.
- DVD+R, DVD+RW, DVD-R, DVD-RW, CD-R, or CD-RW discs formatted with packet writing software such as “DirectCD” (including commercially available preformatted discs) cannot be read in this drive.
- The use of Sony DVD+R, DVD+RW, DVD-R, DVD-RW, CD-R, or CD-RW discs is recommended.
Precautions for using Click to DVD software
- Recommended operating environment
- CPU: Intel Pentium III or Celeron 800 MHz or faster (exclude Transmeta Crusoe)
- Memory: 256MB or more
- Display: XGA (1024·768) 16-bit colors or more (Click to DVD software does not operate under SVGA.)
- Before using Click to DVD software, refer to the Click to DVD help to configure your computer. Depending on your computer's environment, recorded video quality may differ from the original, even if your computer is configured correctly. It is recommended that you store valuable source material data. Sony bears no responsibility for damage to recorded content, or incidental damages caused by either malfunctions in this drive or its discs, or by external factors.
- Close all other software (including software running in the background) before using Click to DVD software and Drag'n Drop CD+DVD software to write data.
- You should have at least 256 MB of RAM in your computer when using Click to DVD software to write data. For details on expanding memory, refer to the manuals provided with your computer.
- Data is written to DVD+R, DVD+RW, DVD-R, or DVD-RW discs, using the “Disc-at-once” format. Therefore, it is not possible to add data to the disc later. DVD+RW and DVD-RW discs can, however, be erased and reused.
- The time required to write DVD+R, DVD+RW, DVD-R, or DVD-RW discs can very from a few hours to several dozen hours, depending on your computer model and the amount of the source material being written.
- “Click to DVD Automatic Mode” temporarily stores data on your computer's hard disk drive, so there must be enough free space on the hard disk drive for using this mode. The values below provive a general guide for the amount of hard disk space required by “Click to DVD Automatic Mode” to create a DVD video of different lengths. “Click to DVD Automatic Mode” automatically adjusts the video bit rate (and, therefore, the image quality of the video) to accommodate different recording lengths. Shorter videos are recorded at higher bit rates, which offers better video image quality (when using only a video).
| Length of recording | Hard disk space used | Bit rate |
| 30 minutes | 6 GB | 9 Mbps |
| 60 minutes | 10.4 GB | 8 Mbps |
| 80 minutes | 10.4 GB | 6 Mbps |
| 120 minutes | 10.4 GB | 4 Mbps |
- With Click to DVD you can use the following file formats. For details, refer to the Click to DVD software online help.
Video files: DV-AVI, MPEG1, MPEG2, DVR-MS
Picture files: Bitmap, JPEG, TIFF
To display “Click to DVD” online help, click “Start”, point to “All Programs” and select “Click to DVD Help” from “Click to DVD”.
- Because data is temporarily stored on your computer's hard disk when using “Click to DVD” to create a DVD video, there must be enough free space on the hard disk. When using only a video, the amount of hard disk space required varies according to the length of the video and the video bit rate, as listed below. (The values listed are not applicable to “Click to DVD Automatic Mode”.)
When creating a DVD video from MPEG files
| Bit rate L Time (4.6 Mbps) (6.4 Mbps) (8.1 Mbps) | Long Play Standard Play High Quality | |
| 60 minutes 5 GB 7 GB 10 GB | ||
| 90 minutes 7 GB 10 GB – | ||
| 120 minutes 10 GB – – |
When creating a DVD video with video captured from a Digital Video Camera Recorder
| Bit rate L Time (4.6 Mbps) (6) | Long Play Standard Play High Quality 4 Mbps) (8.1 Mbps) | |
| 30 minutes 9.75 GB 1 | 1.4 GB 12.3 GB | |
| 60 minutes 19.5 GB 2 | 2.8 GB 24.6 GB | |
| 90 minutes 29.25 GB | 34.2 GB 36.9 GB |
- Generally, amount of video you can record on a single disc depends on the video bit rate, as shown below (when using only a video).
Bit rate Approximate maximum recording time
4 Mbps About 120 minutes
6 Mbps About 90 minutes
8 Mbps About 60 minutes
- When you want to use Click to DVD software on a PCG-C1MW, PCG-C1MHP, or PCG-C1MHP computer to record video from digital video (DV) device through an i.LINK or other type of cable, make sure that you change the PowerPanel® profile to “DV” as follows before proceeding with recording.
1 Right-click in the notification area of the Windows taskbar.
2 On the shortcut menu that appears, point to "Profile", then click "DV".
You can now record video from a DV device.

Hint
When you are done recording video from a DV device, return the Power Panel profile to its original setting.
Precautions for using Drag'n Drop CD+DVD software
- Close all other CD or DVD writing software before using Drag'n Drop CD+DVD software to write data.
- The boxes of the Drag'n Drop CD+DVD software become transparent and can no longer be seen after a DVD or CD is ejected from this drive, or when a certain amount of time elapses. To always display the boxes, right-click in the taskbar and add a check to [Shows Boxes].
- When using Drag'n Drop CD+DVD software to write data, you cannot use DVD+R, DVD+RW, DVD-R, DVD-RW, CD-R, or CD-RW discs preformatted with packet writing software such as DirectCD® (including commercially available preformatted discs). However, it is possible to use preformatted DVD+RW, DVD-RW, and CD-RW discs by deleting the format with the “Erase RW disc...” function in Drag'n Drop CD+DVD software. To use this function, right-click one of the “Drag'n Drop CD+DVD” boxes, and select “Erase RW disc...” from the menu that appears.
- When backing up rewritable DVD media, it is recommended that you use the same type of DVD media as the original disk. For details, refer to the Drag'n Drop CD+DVD online help or the website.
- To play music CDs created on CD-R or CD-RW disc, the playback equipment must support these types of media.
- It may be illegal to make copies of data, video, or audio whose copyright you do not own or for which you have not received permission from the copyright holder.

Registering Users
Follow the procedure below to register users in Drag'n Drop CD+DVD software. Registering users enables you to acquire more detailed product and support information.
1 Connect to the Internet.
Your computer must be connected to the Internet to register users.
2 Click “Start”, point to “All Programs”, point to “Drag’n Drop CD+DVD”, and select “User registration and Support”.
For more information about Drag'n Drop CD+DVD software, contact:
Easy System Japan Ltd.
Website: http://www.ddcd.jp/dd3e/sony/cd/
Playing an Audio CD
For users of computers with a built-in CD-ROM drive
Play the audio CD with the built-in drive of the computer. For details, refer to the manuals provided with your computer.
For users of computers without a built-in CD-ROM drive
Audio CDs can be played through the speakers or headphone jack of the computer simply by connecting this drive.
Playing a DVD video
Please refer to the manuals provided with your computer for how to play back DVD videos.
Notes about playing DVD video
- Compatibility with the wide range of DVDs in circulation cannot be guaranteed. Depending on the disc, there may be functional limitations, sound interruptions, or dropped frames. Some discs may not play at all.
-
During playback of DVD video discs, do not attempt to modify display settings such as the screen resolution or color quality. Doing so could destabilize the operation of the computer or make it impossible to modify settings. Always close the DVD playback software before modifying display settings.
-
During playback of some DVD video discs with high quality sound (20-bit or 24-bit sampling), noise during playback or other problems may occur. When playing such discs via the computer connected to an audio system, turn down the volume, and test for normal playback first to prevent the possibility of damage to the speakers.
- When a DVD video disc is inserted in the drive, you cannot use the Jog Dial™ control or the
key + or key combinations to toggle between the LCD and a television monitor or other type of display. - When using a Sony VAIO PCG-C1M series computer, a part of the image may be cut off with some DVD video discs.
- When playing back a DVD video disc, use the software that is preinstalled on the computer.
- Do not press the drive's eject button during playback of DVD video discs.
- Do not use a screen saver while playing a DVD video with DVD playback software.
Notes about DVD video discs
Region code of playable DVD videos
Region code indications such as 📄 are labeled on some DVD videos to indicate which type of drive or player can play the discs. If this regional code indication contains a number other than the one for your region or 📄, you cannot play the disc in this drive. If you try to do so, a message appears indicating that playback is prohibited due to area limitations.
Depending on the DVD video, there may be no region code indication printed on the label even though playing the DVD video is prohibited due to the area limits.
Note on playback operations of DVD videos
Some playback operations of DVD videos may be intentionally limited by software producers. Since this drive plays DVD videos according to the disc contents provided by the software producers, some playback features may not be available. Also refer to the instructions supplied with the DVD videos.
Symbols on DVD video discs
The following symbols are labeled on some DVD video discs or their packages. Each symbol provides information about the contents or features recorded on the disc.
Depending on the DVD video, there may be no symbols or indications printed on the label describing the disc's contents or features.
For more information about these marks, see the instructions on the DVD video discs.
| Mark Meaning | |
 | The number of audio tracks |
 | The number of subtitle tracks |
 | The number of angles |
 | The available aspect ratios |
 | Region code |
Performing a System Recovery on a Notebook
With the recovery disc, you can reset your notebook using the drive.
About notebooks that you can recover
Notebooks that can be reset using this drive are Sony notebooks with the Windows XP operating system preinstalled. However, if your notebook has an integrated drive, use that drive to reset the notebook. (As of May, 2004)
For more details about resetting your notebook, refer to the manuals provided with your notebook.
Notes
- Power the notebook from its AC adapter when performing a system recovery. Do not run the notebook on battery power.
- If your notebook cannot be recovered using the peripheral cable, connect the supplied i.LINK cable and AC adapter to the drive to recover the notebook. See page 15 for connection details.
- Disconnect all other peripherals from the notebook and the drive before performing a recovery.
Precautions
Usage and storage locations
Do not use or store this drive in locations subject to high humidity, high temperatures, strong vibrations, or direct sunlight.
Operation
- To avoid malfunction, do not move the drive during operation.
- Operate the drive on a level surface.
- Do not place any objects on top of the drive.
- Protect the drive from sudden temperature changes. Do not use the drive immediately after moving it from a cold to a warm location or after the ambient temperature has risen drastically. Otherwise, condensation inside the drive can occur. If the temperature changes drastically during operation, stop using the drive while keeping power to the drive turned on, and let it stand for about an hour. Then turn the power off.
Transportation
- When you transport the drive, use the original box and packing materials.
- Before moving the drive, make sure you remove the disc from the drive.
Bus Reset
The computer constantly monitors the i.LINK connection status. When an i.LINK compatible component is connected to or disconnected from the computer or when power to an i.LINK compatible component is turned on or off, the computer performs a bus reset to accommodate the new condition. If a bus reset occurs while data are being transferred to this drive, the data may be corrupted or lost. Be sure to avoid this condition.
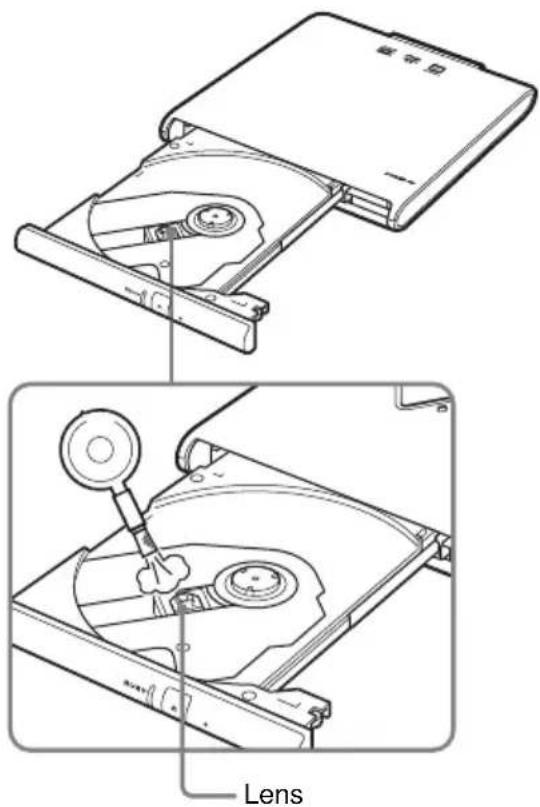
Lens
Do not touch the lens in this drive. Furthermore, to avoid dust sticking to the lens, do not open the tray other than to remove or insert a disc.
Notes on discs
Note the following in order to protect data stored on discs.
- Do not stick any labels on the disc nor scratch or otherwise damage the disc.
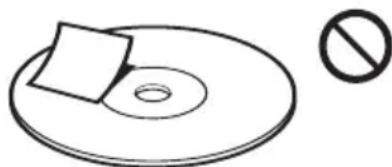
natural_image
Simple line drawing of a CD or DVD disc with a square slot and a prohibition symbol (no text or labels)- When using a disc with improperly attached label, the label edges may peel or the label may come off entirely inside the disc drive, leading to malfunction and damage of the drive. Before inserting a disc, make sure that the label is properly attached. In no event will Sony Corporation be liable for any damage or media loss caused by
improper labels. Carefully follow the instructions of any label printing software and label products. Use of such products occurs entirely at the risk of the user.
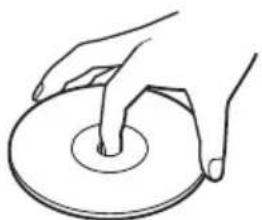
- Do not touch the data side of the disc (opposite the label), and hold the disc as shown below.
natural_image
Line drawing of a hand holding a circular object with a ring, no text or symbols present- If the edge of the label on the disc is off the disc surface or the label is not sticky enough to stay on the disc surface, the label may stick to the interior of the disc drive and cause a malfunction of your drive. Make sure that the label is properly fixed on the disc surface before using the disc.
Sony assumes no libility for any malfunction of your drive or damage to the media caused by improper labeling. Please thoroughly read instruction notes of your label software and label sheets.
- Do not store discs in locations subject to high humidity, high temperatures, direct sunlight, or high levels of dust.
• Take care not to spill any liquid on your discs.
- Return discs to their cases when not in use in order to prevent data damage.
- Use an oil-based felt pen when writing on a disc.
- Do not use a disc with tape, seals, or paste on it, as the disc may damage the drive.
Maintenance
Cleaning the cabinet
Wipe the outside of the drive with a soft, dry cloth. To remove stubborn stains, moisten the cloth with a mild, neutral detergent. Do not use solvents, cleaning alcohol, benzine, or other substances that may damage the finish.
Cleaning the lens
If you accidentally touch the lens with dirty fingers or if dust on the lens prevents the drive from operating properly, clean the lens.
Cleaning the disc
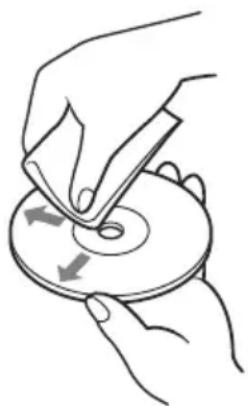
- Fingerprints and other contamination on the disc surface can lead to reading errors. Always keep the disc clean.
- To clean a disc, lightly wipe it from the center outwards.
natural_image
Illustration of hands using a tool to cut or rotate a CD into a circular component (no text or symbols)• To remove stubborn stains, lightly moisten the cloth before wiping the disc, and use a dry cloth afterwards.
- Do not use benzine, record cleaning liquid, antistatic fluids, or other substances that may damage the surface of the disc.
- Never use cleaners on an unused disc. Use specific CD cleaners to take off dust.
- You may not be able to write data to a disc if there are scratches or dust on the unrecorded area. Be careful not to damage the discs.
Getting Help
This section provides information on how to get help and support from Sony, and on troubleshooting tips for your DVD±RW drive.
About Sony's support options
Sony provides several support options for your DVD±RW drive. When you have questions about your DVD±RW drive or the software, refer to the following:
☐ This guide explains how to use your DVD±RW drive.
☐ Sony Online Support provides instant access to information on commonly encountered problems. Type a description of the problem and the Knowledge Database searches for the corresponding solutions online.
You can visit Sony Online Support at: http://www.sony.com/pcsupport.
☐ The Sony Customer Information Service Center offers information about your computer and other Sony products that work with your computer. To contact Sony Customer Information Service Center, call 1-888-4SONYPC (1-888-476-6972).
Specifications
Compatible discs
DVD+R
DVD+RW
DVD-R
DVD-RW
DVD-ROM
DVD-Video
CD-R
CD-RW (Ultra Speed CD-RW not supported)
CD-ROM
CD-DA (audio CD)
CD Extra (CD+)
CD TEXT
Photo CD
Disc diameter: 12 cm
8 cm (reading only)
Drive performance
Data transfer rate
Data read
DVD+R/DVD+RW: max. 4· speed
DVD-R/DVD-RW: max. 4· speed
DVD-ROM: max. 8· speed
CD-R/CD-ROM: max. 24· speed
Data write
DVD+R/DVD+RW: max. 2.4· speed
DVD-R: max. 4· speed
DVD-RW: max. 2· speed
CD-R: max. 16· speed
CD-RW: max. 8· speed
(DVD: 1· speed = 1350 KB/s, CD: 1· speed = 150 KB/s)
Multi-session supported, 12/8 cm tray type
Laser diode properties
Laser output CD: 180 ∝ W
DVD: 74.1 ∝ W
Wavelength CD: 785 nm
DVD: 658 nm
Connectors
i.LINK (IEEE 1394) S400 (4-pin) connector (2)
S400 = 400 Mbps
DC IN (1)
VAIO Notebook peripheral device DC IN (1)
Operating environment
Operating temperature
41^ to 95^ (5°C to 35°C)
(temperature gradient less than 18°F (10°C)/hour)
Operating humidity
20% to 80% (no condensation),
provided that humidity is less than 65% at 95°F (35°C)
(hygrometer reading of less than 84°F (29°C))
Storage temperature
-4^ to 140^ (-20^ to 60^)
(temperature gradient less than 18°F (10°C)/hour)
Storage humidity
10% to 90% (no condensation),
provided that humidity is less than 20% at 140°F (60°C)
(hygrometer reading of less than 95°F (35°C))
AC adapter\*
Power requirements
100-240 V AC, 50/60 Hz
Output voltage and current
10 V, 1.5 A (max.)
* Not included in some product configurations
Other specifications
Power consumption
Read/write: approx. 8 W
Dimensions
Approx. 5.7 · 0.9 · 6.1 inches
(Approx. 144 · 21 · 154 mm) (w · h · d)
(maximum dimensions including protruding parts)
Mass
Approx. 14.5 oz. (410 g) (main unit only)
Design and specifications are subject to change without notice.
Troubleshooting
If a problem occurs during operation of the unit, refer to the information provided in this section and in your Sony computer documentation. If the problem persists, consult your nearest Sony dealer. For contact information, see “Getting Help” on page 40. Also refer to the manuals provided with your computer.
| Symptom Cause/Remedy | |
| Tray does not open when the eject button on the unit is pressed. | →If the drive is connected with the peripheral cable, make sure that the cable is connected correctly to the connector on the notebook and that the notebook is turned on.→If the drive is connected with an i.LINK cable, make sure that the AC adapter and i.LINK cable are connected correctly, and that the computer is turned on.→In some cases, the tray does not open when the eject button is pressed. For information on how to remove the disc, see “Removing a disc” on page 26. |
| Tray does not open when the eject button in a software application is clicked. | →The software may be inhibiting disc access. For information on how to remove the disc, see “Removing a disc” on page 26. |
| Tray is not locked. | →Push tray in fully. |
| Tray locks and then opens again. | →Make sure that the disc is inserted with the label side facing up.→The disc or lens may be dirty. Clean as described on page 40.→The disc may be damaged. To confirm that the drive is not malfunctioning, insert another disc.→There may be condensation in the drive or on the disc. Remove the disc and allow the unit to stand for approximately one hour. |
| Drive is not detected by the computer. | →The drive may not be connected correctly to the computer via i.LINK cable. See “Connecting the Drive” on page 12. |
| →The operating system is not Windows XP. | |
| →To reset the i.LINK interface, shut down your Windows operating system, turn the computer off, disconnect the power cord, and then reconnect and turn the power back on. | |
| →If there are computers connected to both i.LINK connectors on the drive, the drive may not function properly, and data reading and writing may not be possible. Disconnect the unused computer from the drive, and reconnect correctly (see page 23). | |
| →Some computers cannot exchange data with the drive. For details, see “Compatible computers” (page 6) and the manuals provided with your computer. | |
| →Disconnect the i.LINK cable and then reconnect it. If there is still no communication with the drive, restart the computer. | |
| →Depending on network settings, communication with the drive may stop after the computer returns from sleep mode. If this happens, configure your computer so that it does not enter sleep mode. (For details, refer to the manuals provided with your computer.) | |
| No sound from an audio CD. | →The volume control of the computer may be set to “Mute”. (For details, refer to the manuals provided with your computer.) |
| →The volume control of the computer may be set too low. (For details, refer to the manuals provided with your Sony computer.) | |
| Sound skips during audio CD playback. | →The disc may be scratched or dirty. Clean the disc or use another disc (see page 40). |
| →Another application may be running. Shut down the other application. | |
| →The power management function of the computer may be active. Check the CPU speed setting. (For details, refer to the manuals provided with your computer.) | |
| Disc is inserted but sound skips or data cannot be read. | →Make sure that the disc is inserted with the label side facing up.→The type of disc may not be compatible with this drive.→The disc or lens may be dirty. Clean as described on page 40.→The disc may be damaged. To confirm that the drive is not malfunctioning, insert another disc.→The disc tray may be dirty.→There may be condensation in the drive or the disc.Remove the disc and allow the unit to stand for approximately one hour. |
| Data transfer rate is low. | →The power management function of the computer may be active.Check the CPU speed setting. (For details, refer to the manuals provided with your computer.) |
| Computer to which this drive is connected does not go into power saving mode. | →When the drive is operating, the computer may not go into power saving mode.To ensure a stable operation of the drive, set up the computer so that power saving modes will not be enabled. (For details, refer to the manuals provided with your computer.) |
| DVD+R, DVD+RW, DVD-R, DVD-RW, CD-R, or CD-RW data reading or data writing failure. | →See “Precautions when writing data” on page 31.→A bus reset may have occurred during the writing process. For information, see “Bus Reset” on page 38.→If writing fails due to a shortage of virtual memory on your computer, increase the amount of virtual memory, and then rewrite the data.To increase the amount of virtual memory, do the following:1 On the “Start” menu, click “Control Panel”, click “Performance and Maintenance”, and then click “System”.2 Click the “Advanced” tab, and then click “Settings” in “Performance”.3 Click the “Advanced” tab, and then click “Change” in “Virtual Memory”.4 Increase the value of “Custom size”.→Frames of video may be dropped if your hard disk is not optimized. If this happens, optimize your hard disk. To optimize your hard disk, do the following:1 Click the “Start” button, and then click “My Computer”.2 Right-click the icon for the drive you want to optimize, and then click “Properties”.3 Click the “Tools” tab, and click “Defragment now”.4 In the "Disk Defragmenter" window, click "Defragment". |
Symptom Cause/Remedy
| Cannot write data. | →If this drive has not been recognized correctly by the computer, normal read/write operation is not possible.See the section “Drive is not detected by the computer” on page 44.→If the supplied software has not been installed correctly, writing is not possible.→If the drive was brought from a cold to a warm location, condensation may have formed inside the drive. Allow the unit to stand for a while.→If a CD-R or CD-RW disc was written with “Drag’n Drop CD+DVD”, it is not disc possible to add data after:Creating a music CD with the “Music” box.Creating a DVD or CD backup with the “DISC Backup” box.Selecting “Close disc” in “DATA DISC Options”.→The DVD+R, DVD+RW, DVD-R, DVD-RW, CD-R, or CD-RW disc may already be full. If a disc is full, you cannot add data.→You cannot write data to DVD+RW, DVD-RW, or CD-R discs for which data writing ended in failure. Delete the data and then rewrite the disc.Follow the procedure below to delete data from DVD+RW, DVD-RW, or CD-RW discs. (Use “Drag’n Drop CD+DVD”.)1 Close all applications other than “Drag’n Drop CD”, and then insert the disc that you want to erase into the drive.2 Right-click over the “Drag’n Drop CD+DVD” box, and then select “Erase RW disc”.3 Select “Quick erase” or “Full erase”, and then click “OK”.→You cannot reuse DVD+R, DVD-R, or CD-R discs to which data writing ended in failure.→Make sure that the disc has been inserted correctly, with the side to be played facing down. |
| It takes a long time to read the CD-RW. | →As a rule, it takes more time to read a CD-RW than it does a CD-R or CD-ROM. There are also major difference between disc formats, which may also affect reading time. |
| Symptom Cause/Remedy | |
| Cannot play DVD-ROM or DVD video. | →The region code of the DVD does not match the region code of the drive. This drive is set to region code 1 (USA, Canada) at the factory. It can play only discs with the region codes “1” or “ALL”. For details, see “Notes about DVD video discs” on page 36.→If the DVD-ROM is dirty, carefully wipe it with a soft cloth. For information on disc maintenance, see “Cleaning the disc” on page 40. |
| Cannot perform notebook recovery. | →The notebook model may not support recovery of the operating system using this drive. For details, see “Performing a System Recovery on a Notebook” on page 37.→Make sure that the inserted disc is the recovery CD that came with the notebook. |
| Frames are dropped during DVD playback. | →The power management function of the computer may be active.Check the CPU speed setting. (For details, refer to the manuals provided with your computer.) |
| The video control button on the Digital Video Camera Recorder does not work. | →Set the power switch to “Video”. (For details, refer to the manual provided with your Digital Video Camera Recorder.) |
| Nothing happens even with the camera power switch set to “Video” or “Camera”. | →The AC adapter/charger may be unplugged from the power outlet. Confirm that the plug is correctly inserted into the power outlet.→Set the AC adapter/charger mode switch to “VCR/Camera/Player”. (For details, refer to the manual provided with your Digital Video Camera Recorder.)→There may be no battery in the camera, or the battery in the camera may have run out of power. Replace the battery with a fully charged one. |
| The Digital Video Camera Recorder 🔒 or 🔒cons flash, and nothing works except the cassette eject switch. | →There may be condensation in the Digital Video Camera Recorder. Remove the cassette, leave the Digital Video Camera Recorder for one hour, and then replace the cassette. |
Symptom Cause/Remedy
| The Digital Video Camera Recorder connected to this drive cannot be used, or a message appears on the computer indicating that the Digital Video Camera Recorder is either powered off or is not operating. | →Make sure the Digital Video Camera Recorder's power is turned on and the cables are properly connected. For details, see “Connecting a Digital Video Camera Recorder” (page 18) or the manuals provided with your computer.→The i.LINK interface is designed to support the connection of peripheral devices, but some devices can cause instability when there is more than one device connected. Turn off the power to all connected devices, unplug any unstable devices, check the cable connections, and then turn the power back on.→Disconnect the i.LINK cable, turn off the Digital Video Camera Recorder's power, and then turn the power back on. Preinstalled computer software may not recognize MICROMV format or analog type cameras. For details, see “Connecting a Digital Video Camera Recorder” (page 18) or the manuals provided with your computer. |
Click to DVD
| Symptom Cause/Remedy | |
| Cannot capture video from an external device. | →Make sure the device is properly connected to your computer. (For details, refer to the manuals provided with the device and your computer.) If a Digital Video Camera Recorder is connected to the drive, see “Connecting a Digital Video Camera Recorder” (page 18). |
| →Disconnect all devices, restart the computer, and then reconnect correctly. | |
| →Because video data captured from an external device with Click to DVD software is temporarily stored on your hard disk, capturing video data might not be possible if there is not enough free space on the hard disk. To avoid this, delete any unnecessary files from your hard disk. Also, change the Click to DVD software settings so that the temporary files are saved to a different location. Refer to Click to DVD software online help for details. | |
| Cannot use video files. | →With Click to DVD software you can only use the following video file formats: DV-AVI, MPEG1, MPEG2, DVR-MS. |
| →To read files in DVR-MS format, Windows XP Service Pack 1 and the editing program Q810243 is required. You can install both Windows XP Service Pack 1 and Q810243 from Windows Update. | |
| Cannot write to a DVD disc | →The DVD+R, DVD+RW, DVD-R, or DVD-RW disc you are using may already contain data. You cannot add data to such discs.→You should have at least 256 MB of RAM in your computer when using Click to DVD software to write data. For details on expanding memory, refer to the manuals provided with your computer.→You cannot add data to DVD+R, DVD+RW, DVD-R, or DVD-RW discs that already have data on them. |
| Music tracks on DVD discs you create will not play. | →If you create a DVD that contains only a small amount of video/picture data, the music tracks specified when you created the DVD may not play normally. |
| Frame drop occurs when playing a DVD that you have created. | →Frame drop can occur if there is too much workload on your computer. To solve the problem, do the following:·Disconnect all external devices except your Digital Video Camera Recorder.·Close all applications except Click to DVD or Drag'n Drop CD+DVD software.·Optimize (defragment) all available hard disk drives. For details, refer to Click to DVD software online help. |
| Cannot start Click to DVD. | →An old version of PxEngine (the burning engine) is being used. Please install Drag'n Drop CD+DVD in order to install an updated version of the engine. Windows Media Format 9 SDK Runtime and DirectX 9.0b may not have been installed properly. Check “Installing the software”(page 28) again. |
| Unable to install Click to DVD. | →PxEngine (the burning engine) is missing. Install Drag'n Drop CD+DVD software before installing Click to DVD software.→Windows Media Format 9 SDK Runtime and DirectX 9.0b may not have been installed properly. Check “Installing the software”(page 28) again. |
| Cannot capture video from a digital video camera. | →Depending on the camera model, there are cases when video cannot be captured from the Digital Video Camera. In these cases, install Windows XP Service Pack 1 and Windows Media Player 9. You can install both Windows XP Service Pack 1 and Windows Media Player 9 from Windows Update. |
AVERTISSEMENT
natural_image
Line drawing of a rectangular electronic device and a CD (no text or symbols)natural_image
Two types of cable connectors tied with straps, shown from different angles (no text or symbols)natural_image
Line drawing of a cable with connectors and a rectangular connector (no text or symbols)natural_image
Line drawing of a flat electronic device with a USB cable and connector, no text or symbols presentnatural_image
Diagram showing two connected devices with arrows indicating signal flow or movement (no text or symbols present)natural_image
Line drawing of a flat electronic device with cable and indicator lights, showing no text or symbols on the body (pure diagram)Témoin BUSY
Retrait d'un disque
Tige d'ejection manuelle Orifice d'éjection manuelle
natural_image
Simple line drawing of a CD or DVD disc with a square slot and a prohibition symbol (no text or labels)natural_image
Line drawing of a hand holding a circular object with a central hole (no text or symbols)natural_image
Illustration of hands holding a CD or DVD disc with arrows indicating rotation (no text or symbols)

- CAUTION - CLASS 3B VISIBLE AND INVISIBLE LASER RADIATION WHEN OPEN. AVOID EXPOSURE TO THE BEAM.
- For customers in the U.S.A. Owner's Record
- FCC Notice
- Declaration of Conformity
- Caution
- For customers in Canada
- Table of Contents
- Overview
- Note
- What is i.LINK?
- Compatible computers
- Notes
- • DVD+R
- • DVD+RW
- • DVD-R
- • DVD-RW
- • DVD-ROM
- • CD-R
- - CD-RW
- - CD-ROM
- Supplied Accessories
- Locating the Controls and Connectors
- Connecting the Drive
- - If the notebook is equipped with a peripheral device DC OUT connector (see page 14)
- - If the computer is not equipped with a peripheral device DC OUT connector (see page 16)
- Connecting the drive to your notebook with the supplied peripheral cable
- Hint
- Connecting the drive to your computer with the supplied i.LINK cable
- Click "Start", and then click "My Computer" to verify that (E: or other drive name) has been added in the "My Computer" window.
- Connecting a Digital Video Camera Recorder
- ■ When connecting the drive to your notebook with the supplied peripheral cable
- ■ When connecting the drive to your computer with the supplied i.LINK cable
- Limitation (wrong connection example)
- Disconnecting the drive from the computer
- Basic Operation
- Power management information
- Inserting a disc
- Removing a disc
- If the disc does not eject
- Installing the software
- About the supplied software
- ■ Click to DVD
- ■ Drag'n Drop CD+DVD
- Installing and using Drag'n Drop CD+DVD
- ■ SonicStage Ver.1.x DVD±RW Drive Support Update Program
- Precautions before use
- Precautions when writing data
- Precautions for using Click to DVD software
- Bit rate Approximate maximum recording time
- Precautions for using Drag'n Drop CD+DVD software
- Registering Users
- Playing an Audio CD
- For users of computers with a built-in CD-ROM drive
- For users of computers without a built-in CD-ROM drive
- Playing a DVD video
- Notes about playing DVD video
- Notes about DVD video discs
- Region code of playable DVD videos
- Note on playback operations of DVD videos
- Symbols on DVD video discs
- Performing a System Recovery on a Notebook
- About notebooks that you can recover
- Precautions
- Usage and storage locations
- Operation
- Transportation
- Bus Reset
- Lens
- Notes on discs
- Maintenance
- Cleaning the cabinet
- Cleaning the lens
- Cleaning the disc
- Getting Help
- About Sony's support options
- Specifications
- Compatible discs
- Drive performance
- Data transfer rate
- Laser diode properties
- Connectors
- Operating environment
- Operating temperature
- Operating humidity
- Storage temperature
- Storage humidity
- AC adapter\*
- Power requirements
- Output voltage and current
- Other specifications
- Power consumption
- Dimensions
- Mass
- Troubleshooting
- AVERTISSEMENT
- Retrait d'un disque
Brand : SONY
Model : PCGADDRW2
Category : Other computer accessories