
Vigilance DCS4614EK - Surveillance Camera D-LINK - Free user manual and instructions
Find the device manual for free Vigilance DCS4614EK D-LINK in PDF.
| Product Type | Outdoor Dome Surveillance Camera |
| Brand | D-Link |
| Model | Vigilance DCS4614EK |
| Power Supply | 12 V / 1.5 A (optional adapter) or PoE (Power over Ethernet) |
| Network Interface | Ethernet RJ-45 |
| Storage | microSD card slot |
| Night Vision | Built-in infrared LED |
| Lens Adjustment | Manually adjustable vertical and horizontal angle, zoom and focus via web interface |
| Mounting | Ceiling or wall, with mounting kit included |
| Weatherproofing | Waterproof Ethernet connector provided, waterproof tape recommended for other cables |
| System Requirements | Microsoft Windows, Internet Explorer 11 |
| Management Software | D-Link Setup Wizard and D-ViewCam (downloadable from dlink.com/support) |
| Factory Reset | Reset button (hold >5 seconds) |
| Box Contents | Camera, waterproof connector, mounting kit, Allen key, alignment sticker, documentation |
| Maintenance and Cleaning | Disconnect before cleaning, use a dry lint-free cloth |
| Safety | Do not repair or disassemble, avoid water exposure except outdoors, discharge static electricity before handling |
Frequently Asked Questions - Vigilance DCS4614EK D-LINK
User questions about Vigilance DCS4614EK D-LINK
0 question about this device. Answer the ones you know or ask your own.
Ask a new question about this device
Download the instructions for your Surveillance Camera in PDF format for free! Find your manual Vigilance DCS4614EK - D-LINK and take your electronic device back in hand. On this page are published all the documents necessary for the use of your device. Vigilance DCS4614EK by D-LINK.
USER MANUAL Vigilance DCS4614EK D-LINK
Quick Installation Guide
Vigilance Outdoor Dome Camera
DCS-4612EK
DCS-4614EK
DCS-4618EK
natural_image
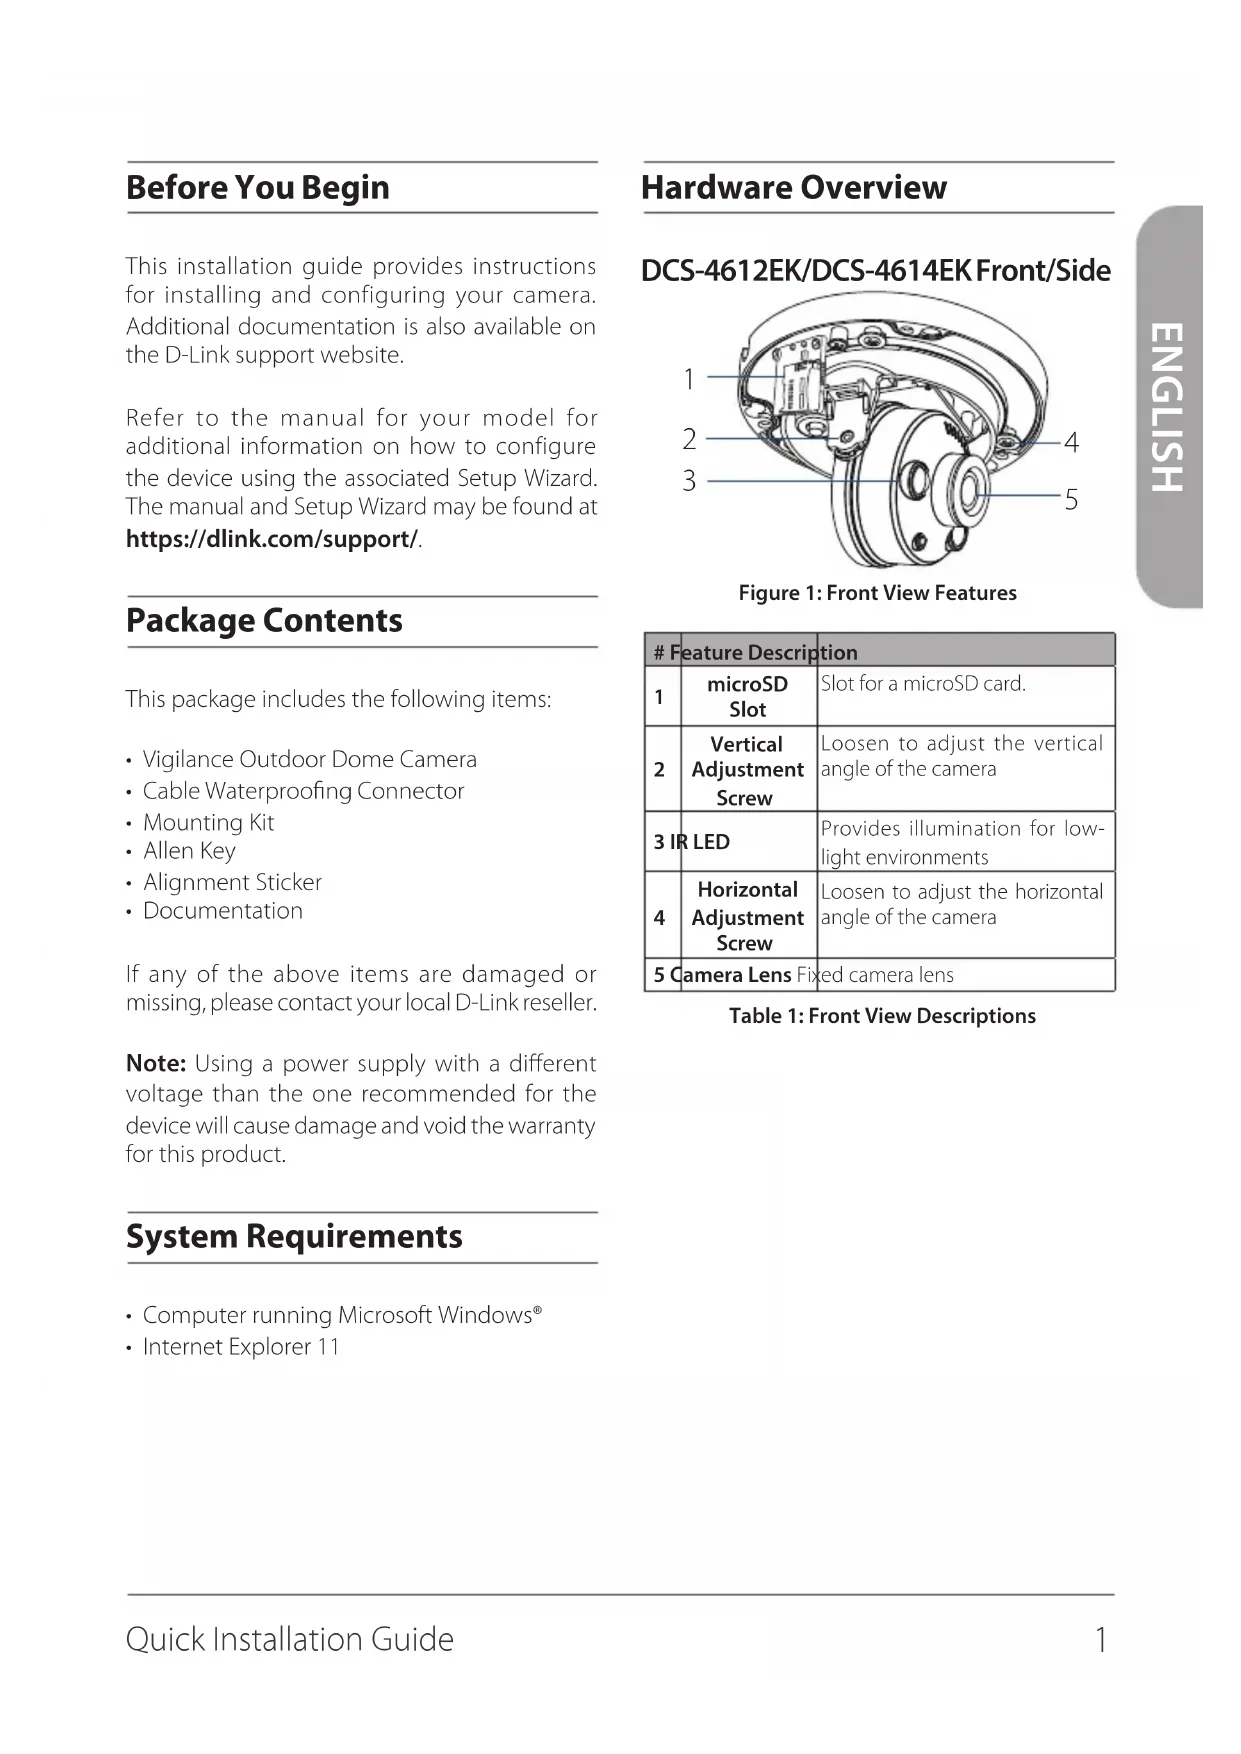
Line drawing of a helmet with a circular head and concentric rings (no text or symbols)Contents
ENGLISH 1
DEUTSCH 13
FRANÇAIS 25
ESPAÑOL 37
ITALIANO 49
РУССКИЙ 61
УКРАЇНСЬКА 76
Before You Begin
This installation guide provides instructions for installing and configuring your camera. Additional documentation is also available on the D-Link support website.
Refer to the manual for your model for additional information on how to configure the device using the associated Setup Wizard. The manual and Setup Wizard may be found at https://dlink.com/support/.
Package Contents
This package includes the following items:
• Vigilance Outdoor Dome Camera
• Cable Waterproofing Connector
- Mounting Kit
- Allen Key
- Alignment Sticker
- Documentation
If any of the above items are damaged or missing, please contact your local D-Link reseller.
Note: Using a power supply with a different voltage than the one recommended for the device will cause damage and void the warranty for this product.
System Requirements
• Computer running Microsoft Windows®
- Internet Explorer 11
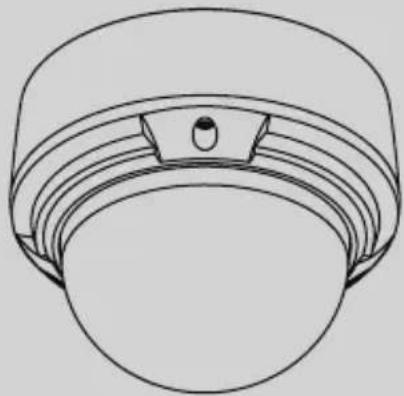
Hardware Overview
DCS-4612EK/DCS-4614EK Front/Side
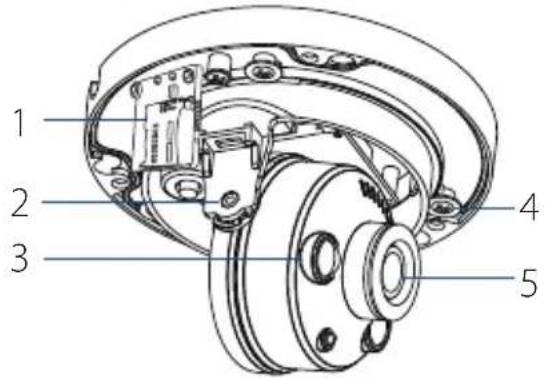
Figure 1: Front View Features
| # Feature Description | ||
| 1 | microSD Slot | Slot for a microSD card. |
| 2 | Vertical Adjustment Screw | Loosen to adjust the vertical angle of the camera |
| 3 IR LED | Provides illumination for low-light environments | |
| 4 | Horizontal Adjustment Screw | Loosen to adjust the horizontal angle of the camera |
| 5 Camera Lens Fixed camera lens | ||
Table 1: Front View Descriptions
DCS-4618EK Front/Side

Figure 2: Front View Features
| # Feature Description | ||
| 1 | Vertical Adjustment Screw | Loosen to adjust the vertical angle of the camera. |
| 2 | IR LED | Provides illumination for low-light environments |
| 3 | Camera Lens Motorized camera lens | |
| 4 | microSD Slot | Slot for microSD card. |
Table 2: Front View Descriptions
DCS-4612EK/DCS-4614EK/DCS-4618EK Cable Interfaces
Figure 3: Cable Interfaces
| # | Feature Description | |
| 1 | Ethernet Jack | RJ-45 connector for Ethernet. Can also be used to power the camera using Power over Ethernet (PoE) |
| 2 | Power Connector | Connects to an optional 12 V / 1.5 A power adapter (not included) |
| 3 | Reset Button | Press and hold for more than five seconds, then release to perform a factory reset |
Table 3: Cable Interface Descriptions
Management Options
To configure and manage your camera, it is recommended that you download the associated Setup Wizard and the D-ViewCam software suite, both of which are available from the D-Link website.
Installing the Setup Wizard
- Open a web browser, navigate to dlink.com/support/, and select your region.
- On the next screen, enter the model number of your camera in the search bar and click Search. Click the picture of your camera. On the product page, click the Download button next to Setup Wizard.
- Once the executable file has finished downloading, click it and follow the instructions to install the Setup Wizard.
Configuring the Camera
-
Ensure that your camera is plugged in (either using a 12 V 1.5 A power adapter or a PoE-enabled device) and connected to your computer with an Ethernet cable.
-
Open the Setup Wizard. It will display the MAC address and IP address of your camera. If you have a DHCP server on your network, this will be a dynamic IP address. If your network does not use a DHCP server, the network camera's default static IP 192.168.0.20 will be displayed. Select your camera, then click the Link button to continue.
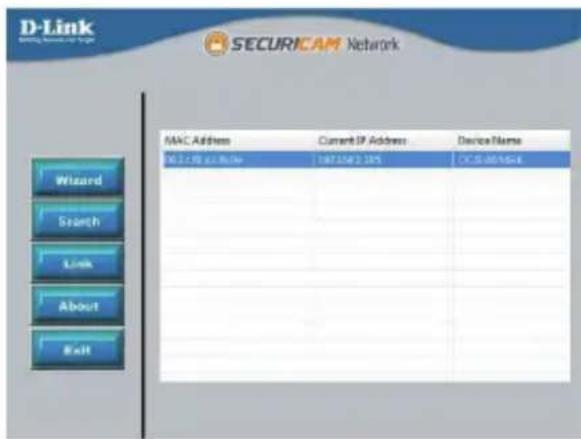
Figure 4: Launching the Setup Wizard
- If this is your first time logging in, you will be prompted to create a password, which must be between 8 and 30 characters and must contain both letters and numbers. Press OK.

Figure 5: Creating a Password
- To view the camera display, on the main screen of the Setup Wizard, click the Search button, then select your camera and click the Link button to open the camera's web UI. Alternatively, open a web browser and type the camera's IP address (displayed in step 2) into the URL bar and press Enter. Enter the password you created, and click Login to continue.

Figure 6: Authenticating
Installing D-ViewCam
- Open a web browser, navigate to dlink.com/support/, and select your region.
- On the next screen, click the D-ViewCam link and click the most recent version to download the D-ViewCam setup wizard (packaged as a zip file).
- Once the file has finished downloading, unzip it, and click the executable file SetupTool.exe. Follow the instructions to install the D-ViewCam software suite.
For advanced viewing options, refer to the D-ViewCam User Manual.
Mounting the Camera
Note: It is highly recommended that you configure and test your camera before mounting it.
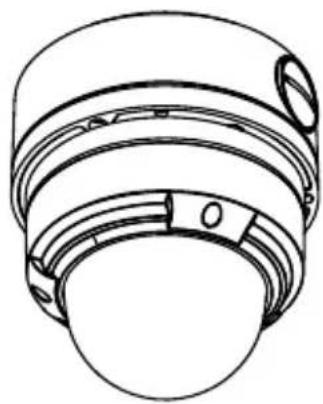
The DCS-4612EK, DCS-4614EK and DCS-4618EK can be installed on the ceiling or wall. The process is identical for both cameras.
Mounting the Camera
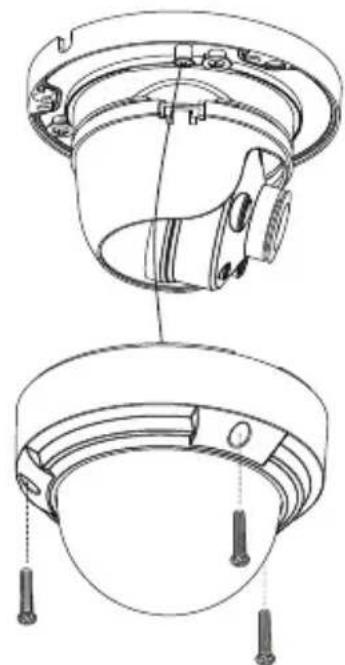
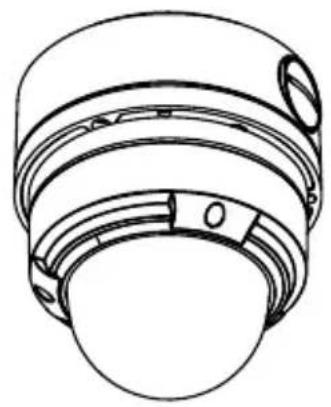
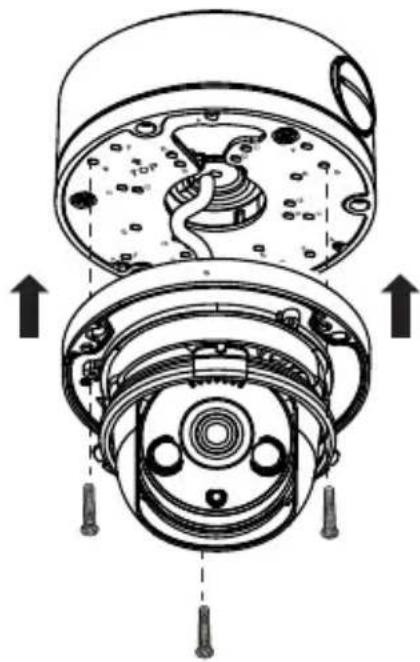
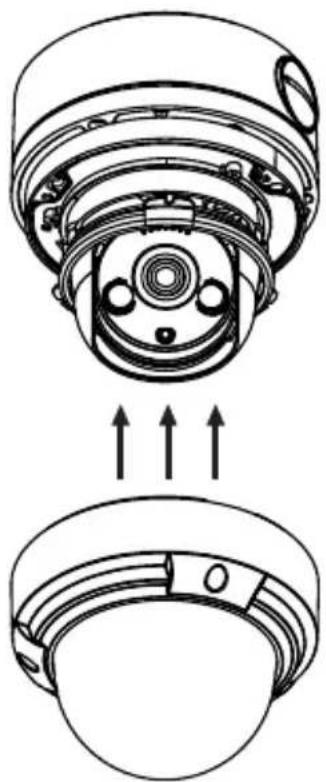
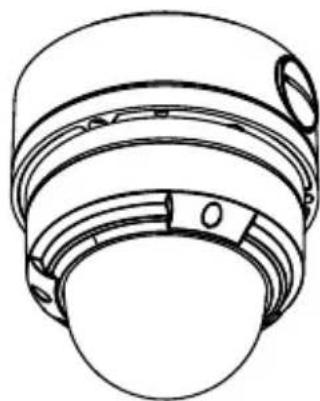
- Use the included T10 or T15 screwdriver to unscrew the three screws on the dome cover and remove it.
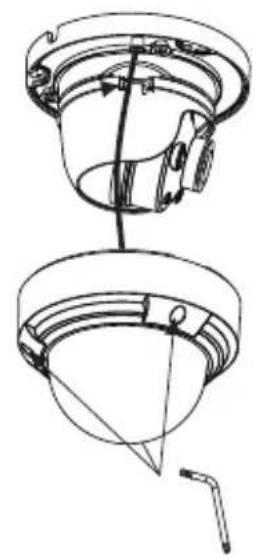
natural_image
Technical line drawing of a mechanical component with no visible text or symbolsFigure 7: Removing the Cover
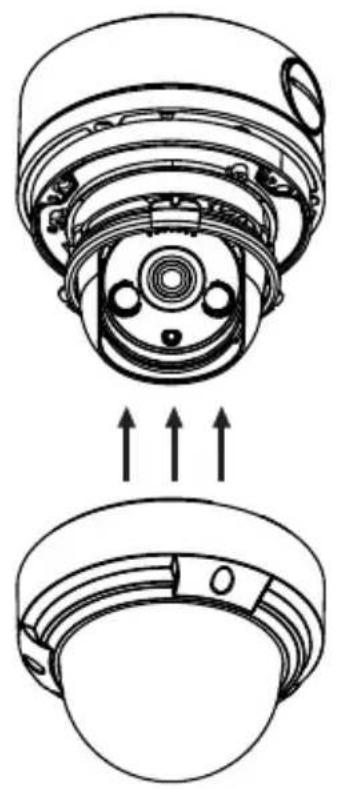
- Press the sides of the plastic lining and gently lift it to remove the lining from the camera.
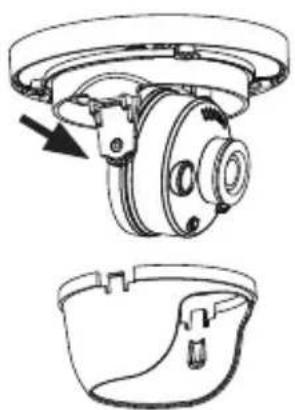
natural_image
Technical line drawing of a mechanical assembly with two views: top shows a circular component with a rotating arm, bottom shows a bowl-like structure (no text or symbols)Figure 8: Removing the Lining
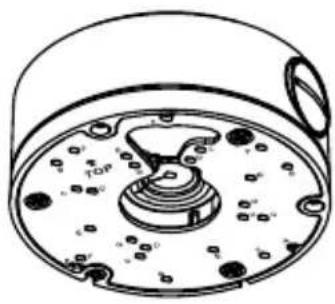
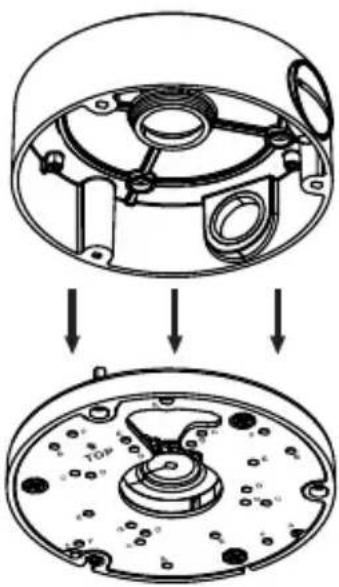
- Place the installation sticker on the ceiling or wall. Using a 4 mm drill bit, drill three holes 30 mm deep into the wall or ceiling. Drive the plastic wall anchors into the holes.
natural_image
Technical diagram of a mechanical assembly with clamps and gears (no text or labels)Figure 9: Attaching the Camera
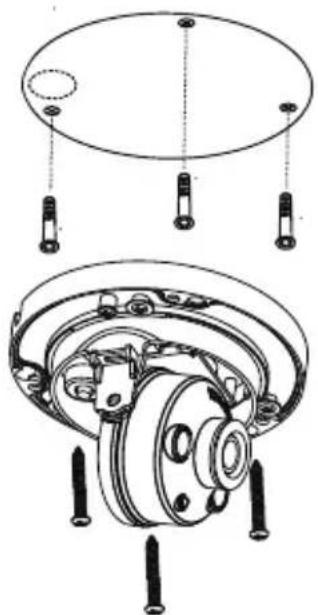
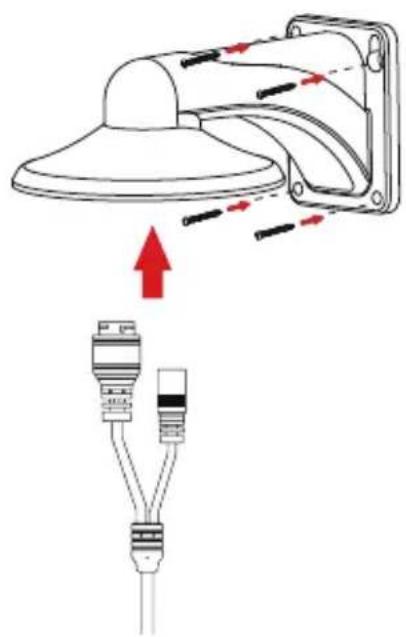
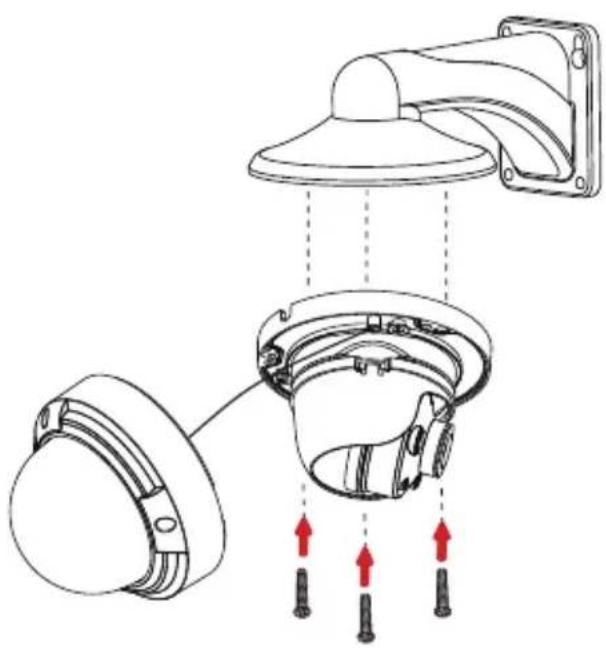
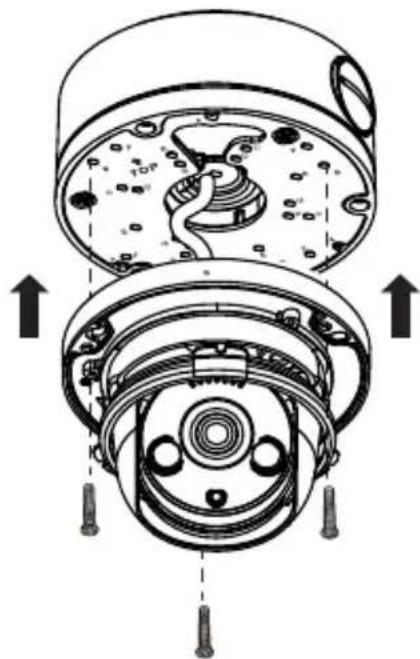
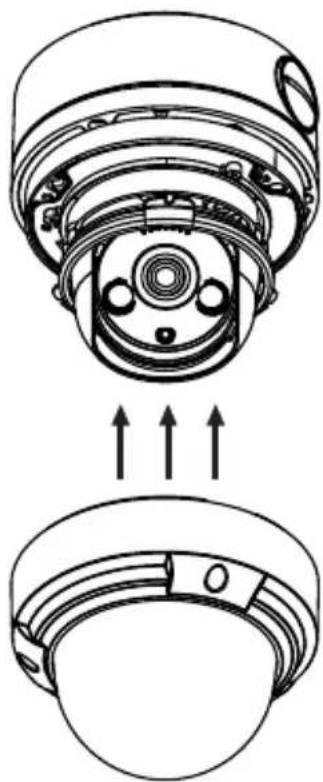
- Insert three mounting screws into the holes in the base of the device. Place the device against the mounting sticker and screw it in to attach it to the wall or ceiling.
Three screws with rubber gaskets are provided with DCS-4618EK. To ensure waterproofness you MUST mount the DCS-4618EK with all three of the provided screws.
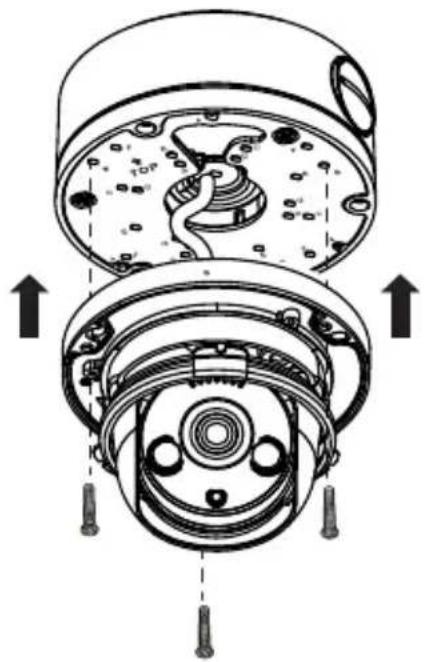
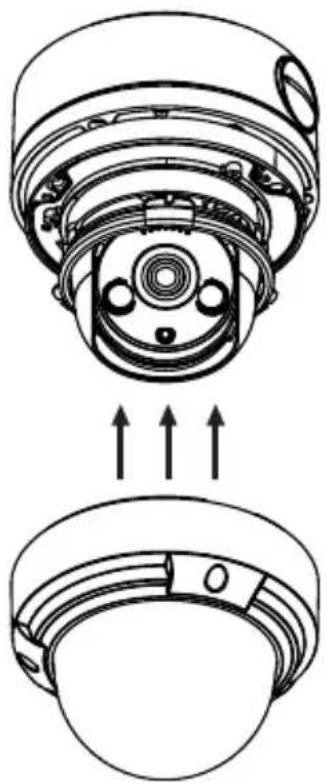
- Reattach the lining to the camera body by sliding it on until it clicks. Replace the dome cover and refasten the screws securing it in place.
natural_image
Technical line drawing of a mechanical component with two views (top and side), no text or symbols present.Figure 10: Replace the dome cover
Adjusting the Lens
The angle, zoom and focus of the lens can adjusted using the web UI. For information on how to do this, refer to the User Manual.
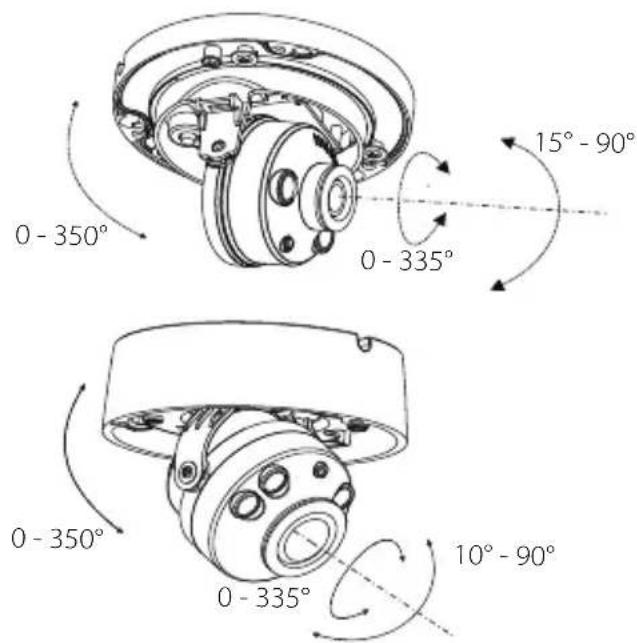
Figure 11: Positioning the Lens
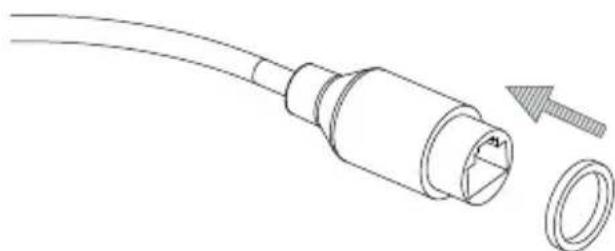
Waterproofing Your Installation
To waterproof your camera, follow the instructions below. A round Ethernet cable, a crimping tool, and RJ-45 plugs are required for this procedure.
- Place the washer around the base of the Ethernet connector as shown.
natural_image
Line drawing of a cable with a connector and a separate ring component (no text or symbols)Figure 12: Attaching the Washer Ring
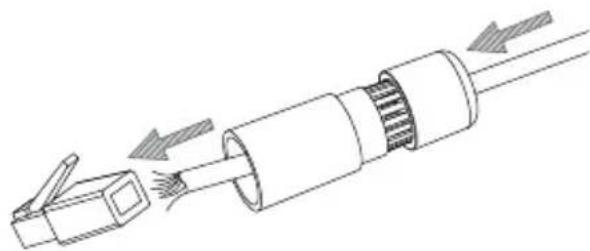
- Thread the bare Ethernet cable through the waterproof connector as shown.
natural_image
Diagram of a cable connector with internal components and directional arrows indicating movement (no text or symbols)Figure 13: Threading the Cable
- Attach an RJ-45 plug to the end of the cable using a crimping tool.
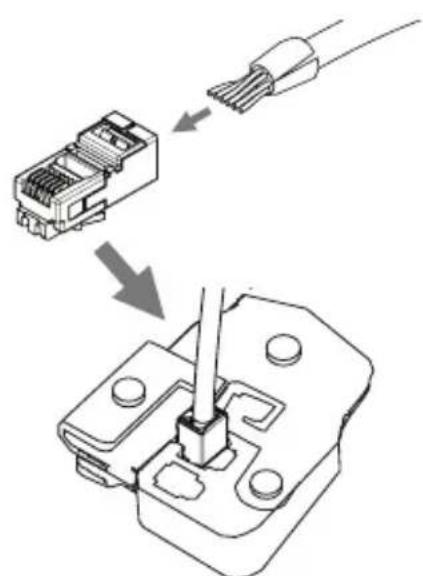
Figure 14: Attaching the RJ-45 Connector
- Connect the RJ-45 plug into the Ethernet connector, then screw the waterproof connector to the Ethernet connector by turning it clockwise about one half-turn.
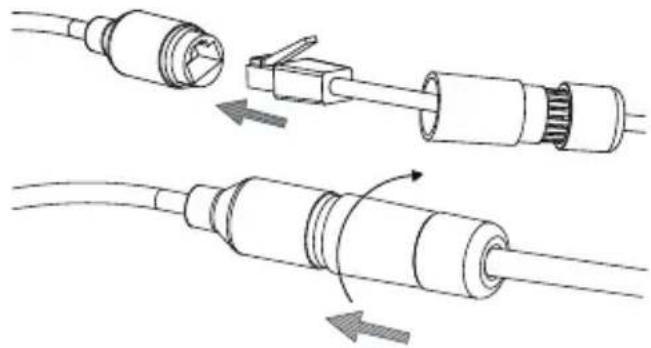
natural_image
Diagram showing two types of cable connectors with arrows indicating connection points (no text or symbols present)Figure 15: Attaching the Waterproof Connector
- Screw the back part of the waterproof connector clockwise until there is a tight seal around the Ethernet cable.

natural_image
Pure diagram of a cylindrical connector with a curved cable, no text or symbols presentFigure 16: Tightening the Connector
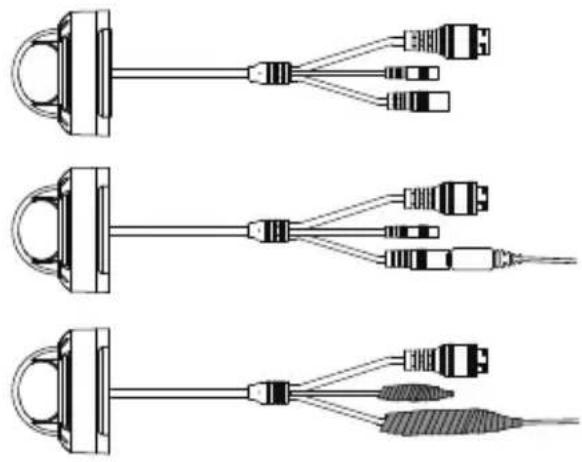
- The power connector and reset button cables are not waterproof. It is recommended to use waterproof tape to protect them. Wind the tape around each cable in an overlapping manner to cover them.
natural_image
Three schematic diagrams of cable connectors with various connector types, no text or symbols presentFigure 17: Wrapping the Power Connector and Reset Button
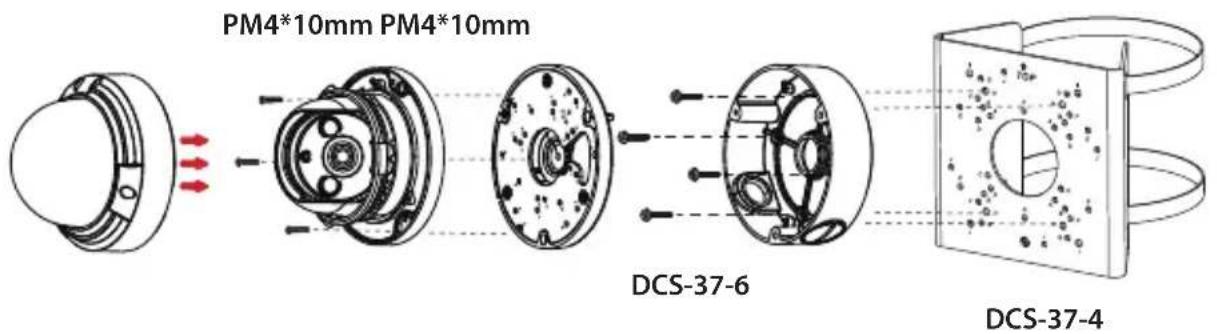
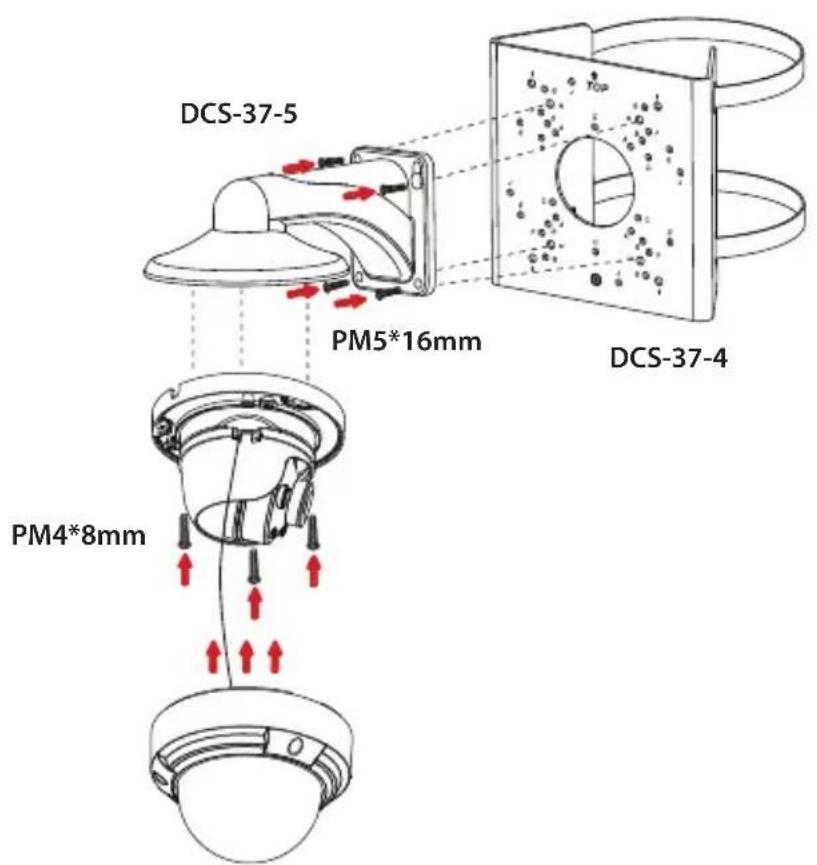
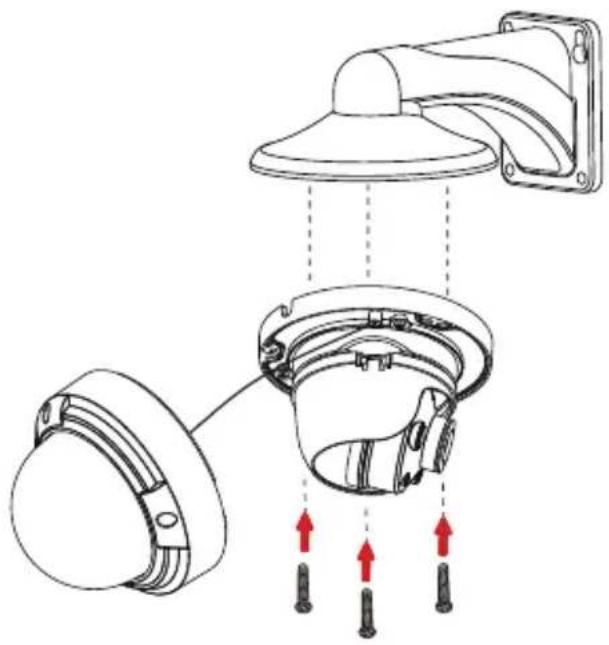
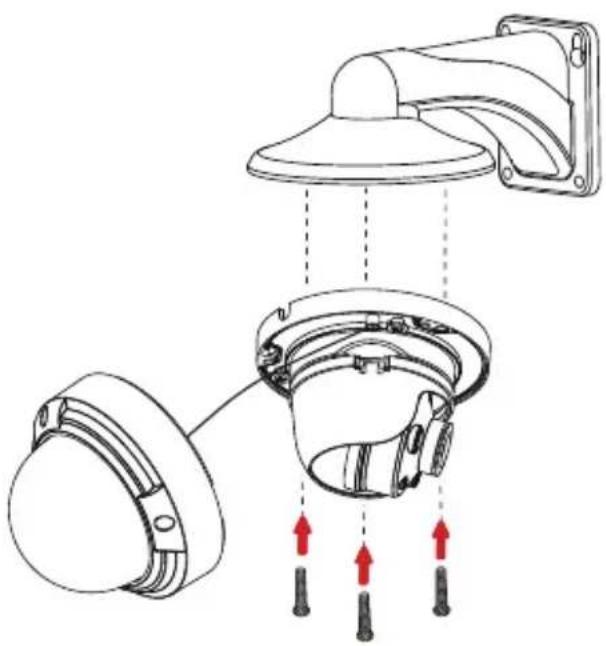
Using the DCS-37-5 Mount (optional)
1.
3.
natural_image
Diagram showing a lamp with red arrows indicating light or motion, and a separate plug assembly with two connectors (no text or symbols)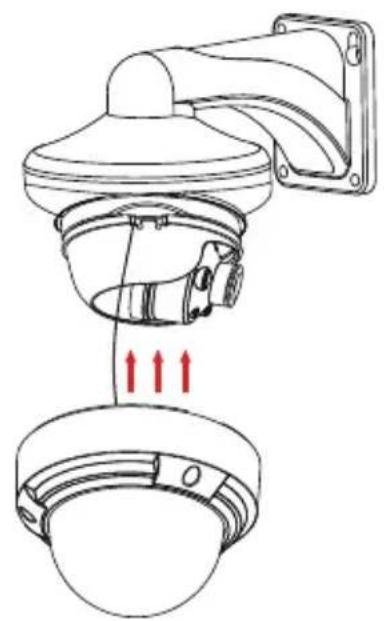
natural_image
Technical line drawing of a security camera with red directional arrows indicating movement or force (no text or symbols)2.
4.
natural_image
Technical diagram of a wall-mounted device with three components and red directional arrows indicating movement or force (no text or symbols present)
natural_image
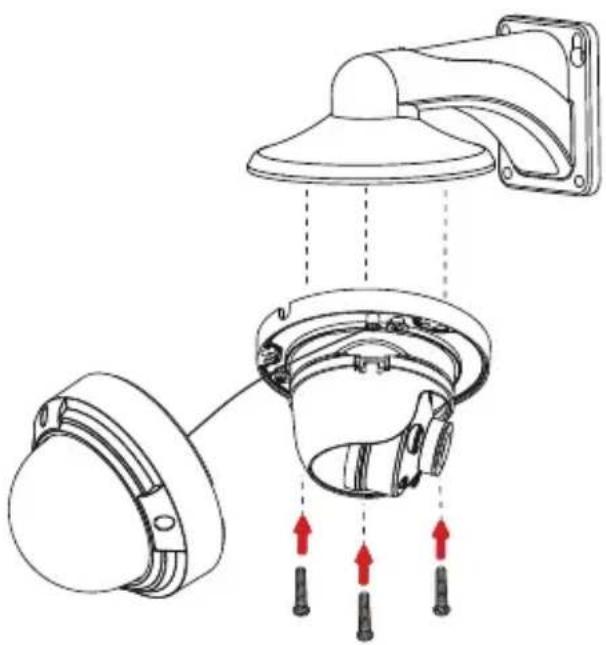
Line drawing of a security camera with mounted sensor array (no text or symbols)Using the DCS-37-6 Mount (optional)
1.
3.
natural_image
Technical line drawing of a mechanical component with no visible text or symbols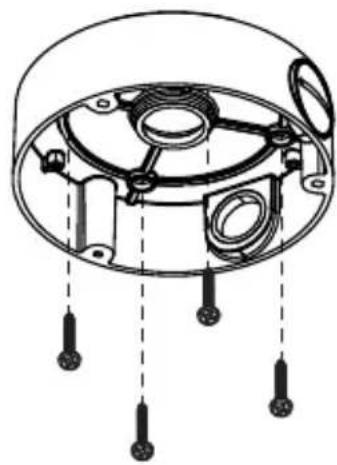
natural_image
Technical diagram of a mechanical component with no visible text or symbols2.
4.

natural_image
Technical diagram showing a mechanical assembly with two views of a circular component, no text or symbols present.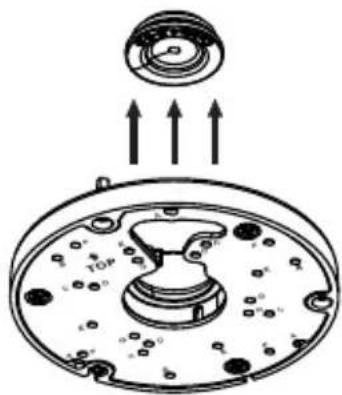
natural_image
Diagram of a mechanical component with arrows indicating upward motion, no text or symbols present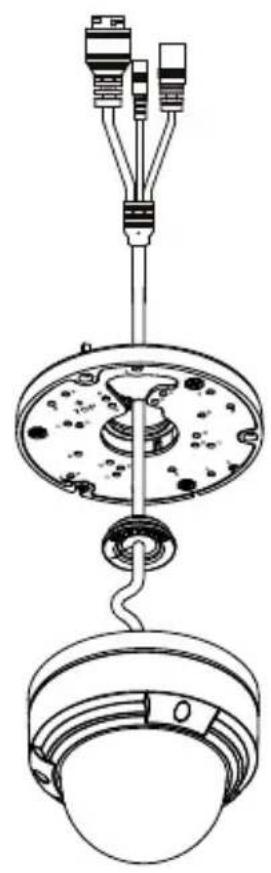
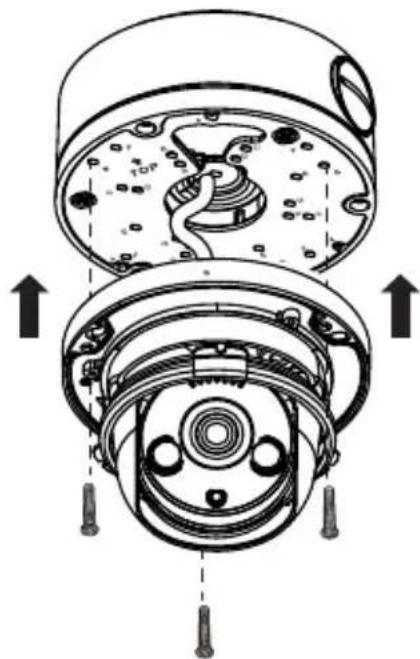
natural_image
Technical line drawing of a mechanical assembly with hanging components and wiring (no text or symbols)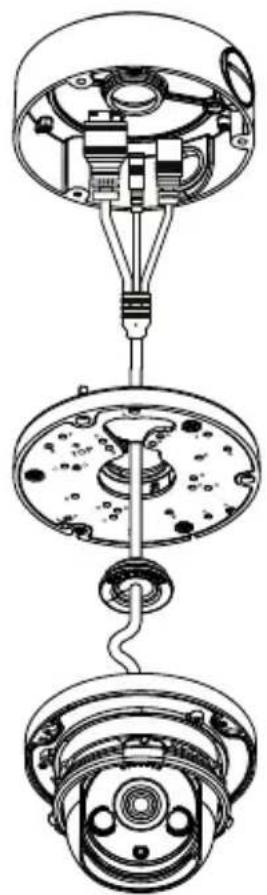
natural_image
Technical line drawing of a mechanical assembly with three views (top, middle, bottom) showing internal components and connections without any text or symbols.
natural_image
Technical line drawing of a mechanical assembly with no visible text or symbols
natural_image
Technical diagram of a mechanical assembly showing internal components and directional arrows (no text or labels)9.
natural_image
Cross-sectional diagram of a mechanical device showing internal components and assembly (no text or labels)11.
natural_image
Technical line drawing of a mechanical component with concentric layers and mounting holes (no text or symbols)10.
natural_image
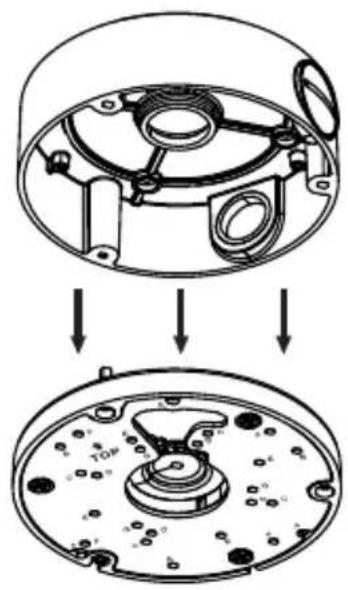
Technical line drawing of a mechanical component with internal channels and mounting holes (no text or symbols)Using the DCS-37-4 Mount (optional)
Installation Information
| Model no. | DCS-37-4 DCS-37-5 DCS-37-6 | |||||
| Screw hole Screw size Screw hole Screw hole Screw size | ||||||
| DCS-4612EK DCS-4614EK | -- B PM4*8mm B PM4*10mm | |||||
| DCS-4618EK -- G PM4*8mm A PM4*10mm | ||||||
| DCS-37-5 | H | PM5*16mm | - | - | - | - |
| DCS-37-6 | F | PM4*10mm | - | - | - | - |
Additional Information
If you are encountering problems setting up your network, please refer to the user manual.
Product specifications, size and shape are subject to change without notice, and actual product appearance may differ from that depicted on the packaging. Visit your local D-Link website for technical support details.
Additional help is available online. To find out more about D-Link products or marketing information, please visit the D-Link support website at http://dlink.com/support/.
Warranty Information
Please visit http://warranty.dlink.com/ for warranty information for your region.
TECHNICAL SUPPORT
dlink.com/support
natural_image
Technical line drawing of a mechanical component with no visible text or symbolsnatural_image
Technical line drawing of a mechanical assembly with no visible text or symbolsnatural_image
Technical diagram of a mechanical assembly with clamps and gears (no text or labels)natural_image
Technical line drawing of a mechanical component with two views (top and side), no text or symbols present.natural_image
Line drawing of a cable with a connector and a separate ring component (no text or symbols)natural_image
Diagram of a cable connector with internal components and airflow arrows (no text or symbols)natural_image
Diagram showing two types of electrical connectors with arrows indicating connection points (no text or symbols present)natural_image
Line drawing of a cylindrical cable with a looped end, showing internal components and an arrow indicating rotation (no text or symbols)natural_image
Three identical line drawings of electrical connectors with wires, no text or symbols presentnatural_image
Diagram showing a lamp with red arrows indicating light or motion, and a separate plug assembly with two connectors (no text or labels)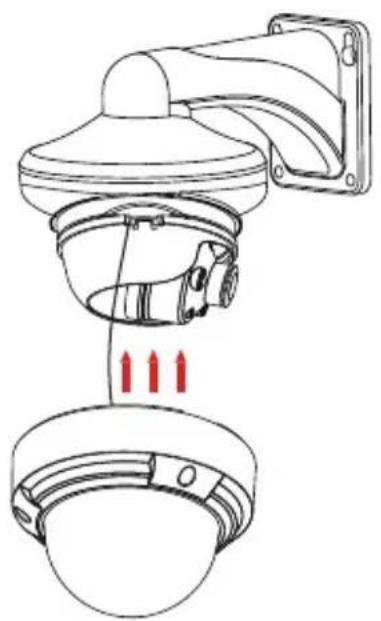
natural_image
Technical line drawing of a security camera with three red arrows indicating sensor placement (no text or symbols present)2.
4.

natural_image
Technical diagram of a wall-mounted device with mounting bracket and internal components, showing red directional arrows indicating movement or force (no text or symbols present)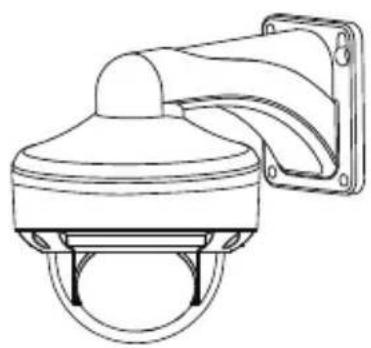
natural_image
Line drawing of a surveillance camera with mounted lens and wall (no text or symbols)natural_image
Technical line drawing of a mechanical component with no visible text or symbols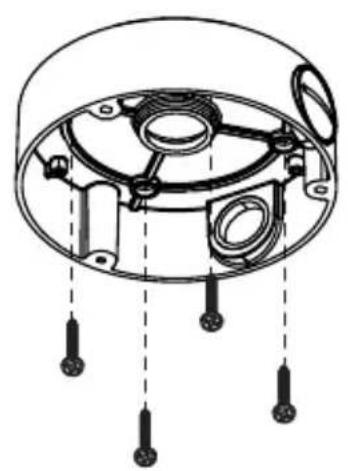
natural_image
Technical diagram of a mechanical component with internal parts and mounting holes (no text or labels)2.
4.
natural_image
Technical diagram showing a mechanical assembly with two views of a circular component, no text or symbols present.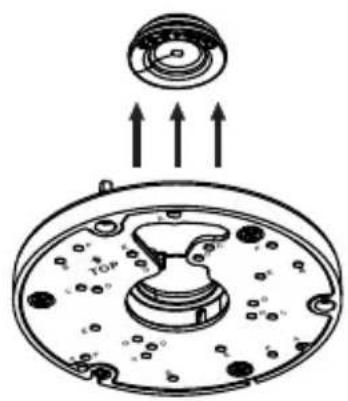
natural_image
Diagram of a mechanical component with arrows indicating upward motion, no text or symbols present
natural_image
Technical line drawing of a mechanical assembly with three connectors and a central hub (no text or symbols)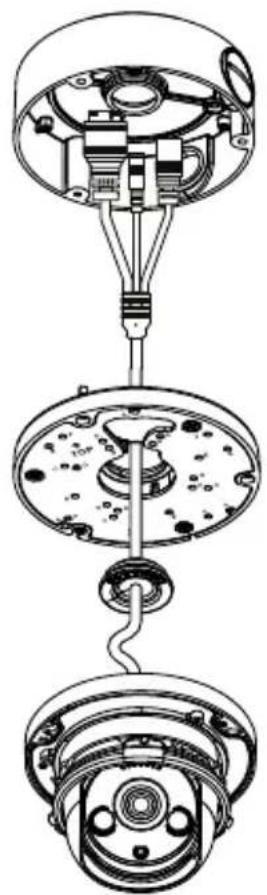
natural_image
Exploded view diagram of a mechanical assembly showing internal components and connections (no text or labels)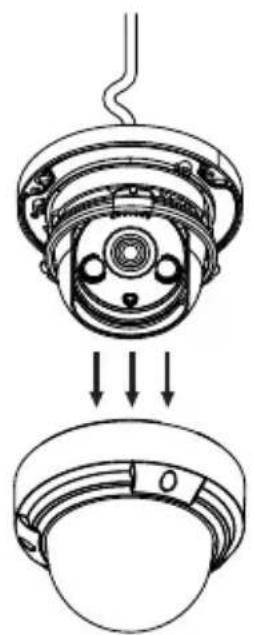
natural_image
Technical diagram of a mechanical assembly showing a top-down view of a component with internal parts and arrows indicating assembly direction (no text or symbols present)
natural_image
Technical diagram of a mechanical assembly showing internal components and directional arrows (no text or labels)9.
natural_image
Cross-sectional diagram of a mechanical device showing internal components and assembly (no text or labels)11.

natural_image
Technical line drawing of a mechanical component with layered structure (no text or symbols)10.

natural_image
Technical line drawing of a mechanical component with internal channels and mounting holes (no text or symbols)
Montageinformationen
eu.dlink.com/support
Avant de commencer
natural_image
Technical line drawing of a mechanical component with no visible text or symbolsnatural_image
Technical line drawing of a mechanical assembly with no visible text or symbolsFigure 8 : Retirer la garniture
natural_image
Technical line drawing of a mechanical assembly with clamps and gears (no text or symbols)natural_image
Technical line drawing of a mechanical component with two views (top and side), no text or symbols present.natural_image
Line drawing of a cable with a connector and a separate ring component (no text or symbols)natural_image
Diagram of a cable connector with internal components and directional arrows indicating movement (no text or symbols)natural_image
Diagram showing two types of cable connectors with arrows indicating connection points (no text or symbols present)natural_image
Diagram of a cable with a rotating shaft and arrow indicating direction (no text or symbols)natural_image
Three schematic diagrams of cable connectors with various connector types, no text or symbols presentnatural_image
Diagram showing a lamp with red arrows indicating airflow or movement, and a separate diagram of connected cables (no text or symbols)
natural_image
Technical line drawing of a security camera with two dome components and red directional arrows indicating movement (no text or symbols)2.
4.
natural_image
Technical diagram of a ceiling-mounted device with red arrows indicating assembly or force direction (no text or symbols present)
natural_image
Line drawing of a security camera with mounted sensor array (no text or symbols)natural_image
Technical line drawing of a mechanical component with no visible text or symbols
natural_image
Technical diagram of a mechanical component with internal parts and mounting holes (no text or labels)2.
4.

natural_image
Technical diagram showing a mechanical assembly with two views of a circular component, no text or symbols present.
natural_image
Diagram of a mechanical component with arrows indicating upward motion, no text or symbols present
natural_image
Technical line drawing of a mechanical assembly with hanging components and wiring (no text or symbols)
natural_image
Technical line drawing of a mechanical assembly with three views (top, middle, bottom) showing internal components and connections without any text or symbols.
natural_image
Technical diagram of a mechanical assembly showing a top-down view of a component with internal parts and a base view (no text or symbols)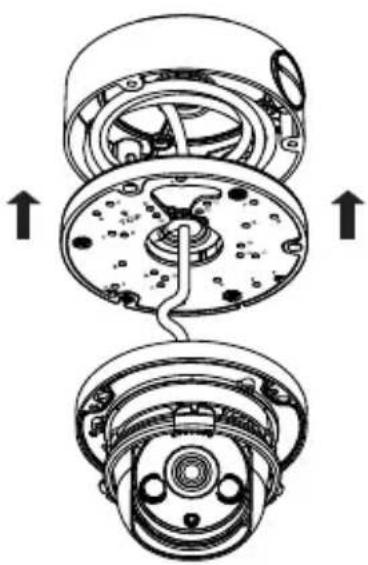
natural_image
Technical diagram of a mechanical assembly showing internal components and directional arrows (no text or labels)9.
natural_image
Cross-sectional diagram of a mechanical device showing internal components and directional arrows (no text or symbols)11.

natural_image
Technical line drawing of a mechanical component with concentric layers and a central circular feature (no text or symbols)10.
natural_image
Technical line drawing of a mechanical component with internal channels and directional arrows (no text or symbols)
eu.dlink.com/support
Antes de empezar
natural_image
Technical line drawing of a mechanical component with no visible text or symbolsnatural_image
Technical line drawing of a mechanical assembly with no visible text or symbolsnatural_image
Technical diagram of a mechanical assembly with clamps and components (no text or labels)natural_image
Technical line drawing of a mechanical component with no visible text or symbolsnatural_image
Line drawing of a cable with a connector and a separate ring component (no text or symbols)Figura 12: Acoplamiento de la arandela
natural_image
Diagram of a cable connector with arrows indicating internal components (no text or symbols)natural_image
Diagram showing two types of cable connectors with arrows indicating connection points (no text or symbols present)Figura 15: Acoplamiento del conector impermeable
natural_image
Pure line drawing of a cylindrical connector with a curved cable, no text or symbols presentFigura 16: Apriete del conector
natural_image
Three schematic diagrams of cable connectors with various connector types, no text or symbols presentnatural_image
Diagram showing a lamp with red arrows indicating airflow or movement, and a separate diagram of two connected electrical connectors (no text or symbols present)
natural_image
Technical line drawing of a security camera with two cameras and a bell, showing internal components and red directional arrows (no text or symbols)2.
4.
natural_image
Technical diagram of a wall-mounted device with mounting bracket and internal components, showing red arrows indicating assembly or movement (no text or symbols present)
natural_image
Line drawing of a surveillance camera with mounted sensor array (no text or symbols)natural_image
Technical line drawing of a mechanical component with no visible text or symbols
natural_image
Technical diagram of a mechanical component with internal parts and mounting holes (no text or labels)2.
4.

natural_image
Technical diagram showing a mechanical assembly with two views of a circular component, no text or symbols present.
natural_image
Diagram of a mechanical component with arrows indicating upward motion, no text or symbols present
natural_image
Technical line drawing of a mechanical assembly with suspended components (no text or symbols)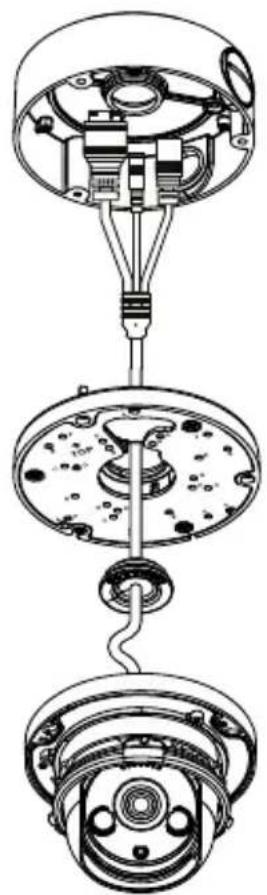
natural_image
Technical line drawing of a mechanical assembly with three views (top, middle, bottom) showing internal components and connections without any text or symbols.
natural_image
Technical diagram of a mechanical assembly showing a top-down view of a component with internal parts and arrows indicating assembly direction (no text or symbols present)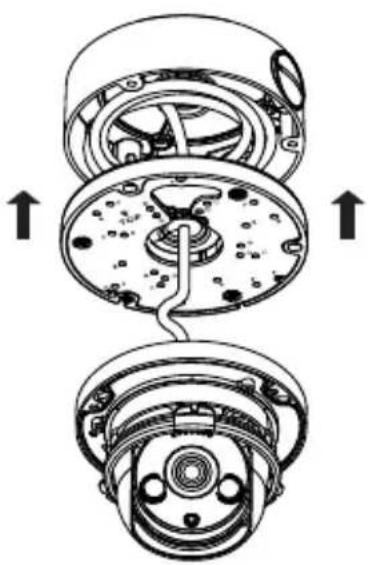
natural_image
Technical diagram of a mechanical assembly showing internal components and directional arrows (no text or labels)9.
natural_image
Technical diagram of a mechanical device showing internal components and directional arrows (no text or symbols)11.

natural_image
Technical line drawing of a mechanical component with layered structure (no text or symbols)10.
natural_image
Technical line drawing of a mechanical component with internal channels and mounting holes (no text or symbols)
eu.dlink.com/support
Prima di iniziare
natural_image
Technical line drawing of a mechanical component with two views (top and side), no text or symbols present.natural_image
Technical line drawing of a mechanical assembly with no visible text or symbolsnatural_image
Technical diagram of a mechanical assembly with clamps and gears (no text or labels)natural_image
Technical line drawing of a mechanical component with two views (top and side), no text or symbols present.natural_image
Line drawing of a cable with a connector and a separate ring component (no text or symbols)natural_image
Diagram of a cable connector with internal components and directional arrows indicating flow or movement (no text or symbols)natural_image
Diagram showing two types of cable connectors with arrows indicating movement or assembly (no text or symbols present)natural_image
Pure line drawing of a cylindrical connector with a curved cable, no text or symbols presentnatural_image
Three schematic diagrams of connected audio equipment cables, showing different connection types (no text or labels)natural_image
Diagram showing a lamp with red arrows indicating airflow or movement, and a separate electrical plug with wires (no text or symbols)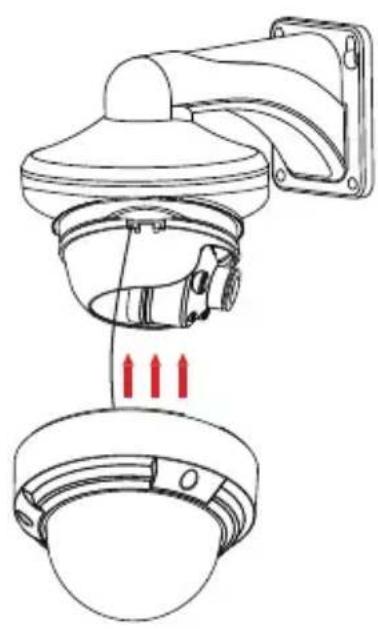
natural_image
Technical line drawing of a security camera with red arrows indicating sensor placement (no text or symbols)2.
4.

natural_image
Technical diagram of a wall-mounted device with mounting bracket and internal components, showing red arrows indicating movement or force (no text or symbols present)
natural_image
Line drawing of a surveillance camera with mounted lens and wall-mounted frame (no text or symbols)natural_image
Technical line drawing of a mechanical component with no visible text or symbols
natural_image
Technical diagram of a mechanical component with internal parts and mounting holes (no text or labels)2.
4.
natural_image
Technical diagram showing a mechanical assembly with two views of a circular component, no text or symbols present.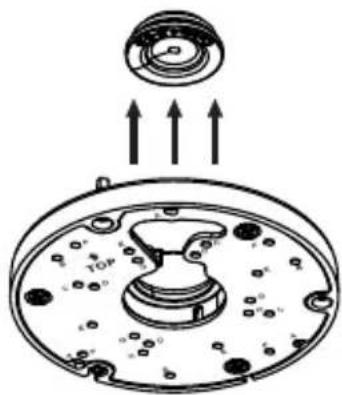
natural_image
Diagram of a mechanical component with arrows indicating upward motion, no text or symbols present
natural_image
Technical line drawing of a mechanical assembly with three connectors and a central hub (no text or symbols)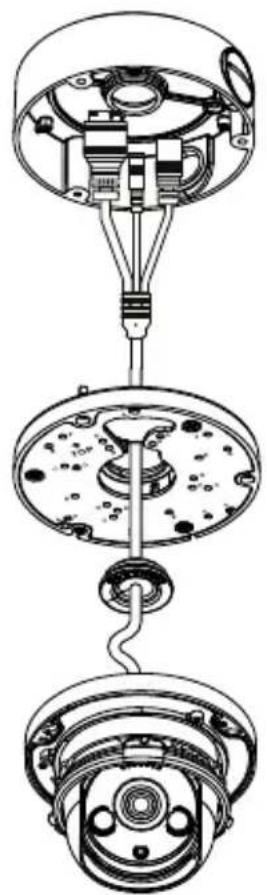
natural_image
Technical line drawing of a mechanical assembly with three views (top, middle, bottom) showing internal components and connections without any text or symbols.
natural_image
Technical diagram of a mechanical assembly showing a top-down view of a component with internal parts and arrows indicating assembly direction (no text or symbols present)
natural_image
Technical diagram of a mechanical assembly showing internal components and directional arrows (no text or labels)9.

natural_image
Cross-sectional diagram of a mechanical device showing internal components and directional arrows (no text or symbols)11.
natural_image
Technical line drawing of a mechanical component with layered structure (no text or symbols)10.

natural_image
Technical line drawing of a mechanical component with internal channels and directional arrows (no text or symbols)
eu.dlink.com/support
natural_image
Technical line drawing of a mechanical component with no visible text or symbolsnatural_image
Technical line drawing of a mechanical assembly with two views: top shows a circular component with a curved handle, bottom shows a bowl with a handle (no text or symbols)natural_image
Technical diagram of a mechanical assembly with two views: top shows top view of a circular component, bottom shows internal components with bolts and screws (no text or labels)natural_image
Technical line drawing of a mechanical component with two views (top and side), no text or symbols present.natural_image
Line drawing of a cable with a connector and a separate ring component (no text or symbols)natural_image
Diagram of a cable connector with internal components and directional arrows indicating movement (no text or symbols)natural_image
Diagram showing two types of electrical connectors with arrows indicating connection points (no text or symbols present)natural_image
Diagram of a cable with a rotating shaft and internal components (no text or symbols)natural_image
Three schematic diagrams of cable connectors with various connector types, no text or symbols presentnatural_image
Diagram showing a lamp with red arrows indicating airflow or movement, and a separate diagram of two connected electrical connectors (no text or symbols present)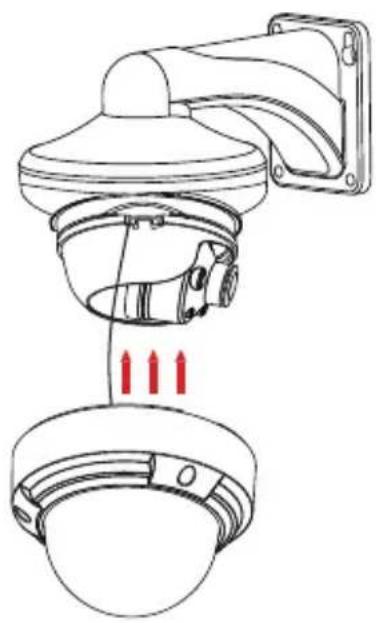
natural_image
Technical line drawing of a security camera with three red arrows indicating sensor placement (no text or symbols present)2.
4.
natural_image
Technical diagram of a wall-mounted device with three components and red directional arrows indicating motion (no text or symbols)
natural_image
Line drawing of a surveillance camera with mounted sensor array (no text or symbols)natural_image
Technical line drawing of a mechanical component with no visible text or symbols
natural_image
Technical diagram of a mechanical component with internal parts and mounting holes (no text or labels)2.
4.

natural_image
Technical diagram showing a mechanical assembly with two views of a circular component (no text or symbols present)
natural_image
Diagram of a mechanical component with arrows indicating upward motion, no text or symbols present
natural_image
Technical line drawing of a mechanical assembly with hanging components and wiring (no text or symbols)
natural_image
Technical line drawing of a mechanical assembly with three views (top, middle, bottom) showing internal components and connections without any text or symbols.
natural_image
Technical diagram of a mechanical assembly showing a top-down view of a component with internal parts and arrows indicating assembly direction (no text or symbols present)
natural_image
Technical diagram of a mechanical assembly showing internal components and directional arrows (no text or labels)9.

natural_image
Technical diagram of a mechanical device showing internal components and directional arrows (no text or symbols)11.
natural_image
Technical line drawing of a mechanical component with layered structure (no text or symbols)10.
natural_image
Technical line drawing of a mechanical component with two views showing internal structure and upward arrows indicating motion (no text or symbols)
Uphill Towers Residence A/99
Ataşehir /ISTANBUL
Tel: +90 (216) 492-99-99
Email: info.tr@dlink.com.tr
Regulatory Statements (Only for Class A product)
Federal Communication Commission Interference Statement
This equipment has been tested and found to comply with the limits for a Class A digital device, pursuant to part 15 of the FCC Rules. These limits are designed to provide reasonable protection against harmful interference when the equipment is operated in a commercial environment. This equipment generates, uses, and can radiate radio frequency energy and, if not installed and used in accordance with the instruction manual, may cause harmful interference to radio communications. Operation of this equipment in a residential area is likely to cause harmful interference in which case the user will be required to correct the interference at his own expense.
Non-modification Statement
Any changes or modifications not expressly approved by the party responsible for compliance could void the user's authority to operate the equipment.
Caution
This device complies with Part 15 of the FCC Rules. Operation is subject to the following two conditions:
(1) This device may not cause harmful interference, and (2) this device must accept any interference received, including interference that may cause undesired operation.
Innovation, Science and Economic Development Canada (ISED) Statement:
This Class A digital apparatus complies with Canadian ICES-003.
CE EMI Class A Warning
This equipment is compliant with Class A of EN 55032. In a residential environment this equipment may cause radio interference.
CE EMI CLASS A WARNING
This equipment is compliant with Class A of EN 55032. In a residential environment this equipment may cause radio interference.
English
CE EMI CLASS A WARNING
This equipment is compliant with Class A of EN 55032. In a residential environment this equipment may cause radio interference.
SAFETY INSTRUCTIONS
The following general safety guidelines are provided to help ensure your own personal safety and protect your product from potential damage. Remember to consult the product user instructions for more details.
- Static electricity can be harmful to electronic components. Discharge static electricity from your body (i.e. touching grounded bare metal) before touching the product.
- Do not attempt to service the product and never disassemble the product. For some products with a user replaceable battery, please read and follow the instructions in the user manual.
- Do not spill food or liquid on your product and never push any objects into the openings of your product.
- Do not use this product near water, areas with high humidity, or condensation unless the product is specifically rated for outdoor application.
- Keep the product away from radiators and other heat sources.
• Always unplug the product from mains power before cleaning and use a dry lint free cloth only.
DISPOSING AND RECYCLING YOUR PRODUCT
natural_image
Two symbols: a recycling symbol with a box and a crossed-out trash bin, both without any text or labels.This symbol on the product or packaging means that according to local laws and regulations this product should be not be disposed of in the household waste but sent for recycling. Please take it to a collection point designated by your local authorities once it has reached the end of its life, some will accept products for free. By recycling the product and its packaging in this manner you help to conserve the environment and protect human health.
natural_image
Two symbols: a recycling symbol and a crossed-out trash bin with no text or labels.natural_image
Two symbols: a recycling symbol with a recycling arrow and a crossed-out waste bin with no text or labels.natural_image
Two symbolic icons: a recycling symbol and a crossed-out waste bin with no text or labels.Ovaj simbol na pakiranju proizvoda znači da, sukladno lokalnim zakonima i propisima, ovaj proizvod ne treba odlagati u kućni otpad, nego ga treba poslati na recikliranje. Na kraju životnog vijeka proizvoda odnesite proizvod u sakupljalište otpada koji odrede vaše lokalne vlasti, neka sakupljališta besplatno preuzimaju proizvode. Recikliranjem proizvoda i njegovog pakiranja na ovaj način pomažete u očuvanju okoliša i zaštiti zdravlja ljudi.
Danish [Dansk]
CE EMI-KLASSE A-ADVARSEL
natural_image
Two symbols: a recycling symbol and a no-drawn trash bin with a crossed-out box (no text or labels)CE EMI KLASSE A-WAARSCHUWING
AFVALVERWERKING EN RECYCLING VAN UW PRODUCT

natural_image
Two symbols: a recycling symbol with three chasing arrows and a crossed-out trash can (no text or labels)natural_image
Two symbolic icons: a recycling symbol and a no-drawn trash can (no text or labels)MISE AU REBUT ET RECYCLAGE DE VOTRE PRODUIT

natural_image
Two symbols: a recycling symbol with no accompanying text or labels, and a crossed-out trash bin with no visible text or labels.natural_image
Two symbolic icons: a recycling symbol and a no-decorated trash bin (no text or labels)natural_image
Two symbols: a recycling symbol with a 'R' and a crossed-out trash bin, and a prohibition sign (no text or labels)natural_image
Two symbolic icons: a recycling symbol and a crossed-out trash bin with a horizontal line (no text or labels)VIDVÖRUN FYRIR CE EMI FLOKK A
natural_image
Two symbols: a recycling symbol and a no-smoking waste bin (no text or labels)natural_image
Two symbols: a recycling symbol with no accompanying text or labels, and a crossed-out trash bin with no visible text or labels.natural_image
Two symbols: a recycling symbol with paper cutouts and a crossed-out trash bin with no text or labels.Dan is-simbolu fuq il-prodott jew l-imballağğ ifisser li skont il-liğijiet u r-regolamenti lokali dan il-prodott m'ghandux jintrema fl-iskart domestiku imma jintbaghaf ghar-ričiklağğ. Jekk jogħgbok ħudu f'punt ta' ğbir magħżul mill-awtoritajiet lokali tiegħek ladarba ma jkunx jista' jibqa' jintuża, xi wħud jacċettaw prodotti b'xejn. Meta tirričikla l-prodott u l-ippakkjar tiegħu b'dan il-mod inti tghin biex tikkonserva l-ambjent u tipproteği s-saħħa tal-bniedem.
Norwegian [Norsk]
CE EMI KLASSE A ADVARSEL
Dette utstyret samsvarer med klasse A i EN 55032. Dette utstyret kan forårsake radioforstyrrelser i bostedsområder.
SIKKERHETSINSTRUKSJONER
natural_image
Two symbolic icons: a recycling symbol and a non-renewable waste bin with no text or labels.UTYLIZACJA I RECYKLING PRODUKTU

natural_image
Two symbols: a recycling symbol with a crossed-out box and a prohibition sign (no text or labels)natural_image
Two symbols: a recycling symbol with a diagonal line and a crossed-out trash bin, and a horizontal bar with a minus sign (no text or labels)natural_image
Two recycling symbols: one with a recycling symbol and the other with a no-decorated waste bin (no text or labels)natural_image
Two symbols: a recycling symbol and a no-decorated trash bin with a crossed-out box (no text or labels)Slovenian [Slovenski]
OPOZORILO CE EMI ZA RAZRED A
natural_image
Two symbols: a recycling symbol with a paper cut and a crossed-out waste bin with a horizontal line (no text or labels)DESECHAR Y RECICLAR EL PRODUCTO

natural_image
Two symbolic icons: a recycling symbol and a crossed-out trash bin with no text or labels.CE EMI KLASS A-VARNING
natural_image
Two symbols: a recycling symbol with arrows and a crossed-out waste bin, and a prohibition sign (no text or labels)This equipment is compliant with Class A of EN 55032. In a residential environment this equipment may cause radio interference.
SAFETY INSTRUCTIONS
The following general safety guidelines are provided to help ensure your own personal safety and protect your product from potential damage. Remember to consult the product user instructions for more details.
- Static electricity can be harmful to electronic components. Discharge static electricity from your body (i.e. touching grounded bare metal) before touching the product.
- Do not attempt to service the product and never disassemble the product. For some products with a user replaceable battery, please read and follow the instructions in the user manual.
- Do not spill food or liquid on your product and never push any objects into the openings of your product.
- Do not use this product near water, areas with high humidity, or condensation unless the product is specifically rated for outdoor application.
- Keep the product away from radiators and other heat sources.
• Always unplug the product from mains power before cleaning and use a dry lint free cloth only.
DISPOSING AND RECYCLING YOUR PRODUCT

natural_image
Two symbols: a recycling symbol with arrows and a no-smoking waste bin, both without any text or labels.This symbol on the product or packaging means that according to local laws and regulations this product should be not be disposed of in the household waste but sent for recycling. Please take it to a collection point designated by your local authorities once it has reached the end of its life, some will accept products for free. By recycling the product and its packaging in this manner you help to conserve the environment and protect human health.
GPL Code Statement
This D-Link product includes software code developed by third parties, including software code subject to the GNU General Public License ("GPL") or GNU Lesser General Public License ("LGPL"). As applicable, the terms of the GPL and LGPL, and information on obtaining access to the GPL code and LGPL code used in this product, are available to view the full GPL Code Statement at:
The GPL code and LGPL code used in this product is distributed WITHOUT ANY WARRANTY and is subject to the copyrights of one or more authors. For details, see the GPL code and the LGPL code for this product and the terms of the GPL and LGPL. Please take it to a collection point designated by your local authorities once it has reached the end of its life, some will accept products for free. By recycling the product and its packaging in this manner you help to conserve the environment and protect human health.
Written Offer for GPL and LGPL Source Code
Where such specific license terms entitle you to the source code of such software, D-Link will provide upon written request via email and/or traditional paper mail the applicable GPL and LGPLsource code files via CD-ROM for a nominal cost to cover shipping and media charges as allowed under the GPL and LGPL.
Please direct all inquiries to:
Email:
GPLCODE@dlink.com
Snail Mail:
Attn: GPLSOURCE REQUEST
D-Link Systems, Inc.
14420 Myford Road, Suite 100
Irvine, CA 92606
Notes
Notes
Notes
Notes
Notes
Notes
D-Link®
Building Networks for People

Ver. 1.10(WW)_90x130
2021/05/06
101-010-0215-02