BTB686SC - Guitar IBANEZ - Free user manual and instructions
Find the device manual for free BTB686SC IBANEZ in PDF.
| Product type | Electric bass guitar |
| Brand | Ibanez |
| Model | BTB686SC |
| Number of strings | 6 |
| Pickup type | Active (dual humbucker) |
| Power supply | 9V battery |
| Electronics | Active with equalizer |
| Bridge | Adjustable monorail (B200/B205 type) |
| Neck | Neck-through |
| Fretboard | Rosewood |
| Number of frets | 24 |
| Tuning machines | Locking, self-lubricating |
| Strings | Steel, specific gauges (factory installed) |
| Finish | Gloss |
| Maintenance | Clean after each use with polishing cloth, avoid solvents (benzene, thinner), store in case, control humidity |
| Safety | Do not disassemble yourself, watch out for sharp string ends, do not use rusty strings, replace batteries respecting polarity |
| Repairability | Entrust to an authorized Ibanez technician |
| Included accessories | Not specified (usually Allen key, manual) |
Frequently Asked Questions - BTB686SC IBANEZ
User questions about BTB686SC IBANEZ
0 question about this device. Answer the ones you know or ask your own.
Ask a new question about this device
Download the instructions for your Guitar in PDF format for free! Find your manual BTB686SC - IBANEZ and take your electronic device back in hand. On this page are published all the documents necessary for the use of your device. BTB686SC by IBANEZ.
USER MANUAL BTB686SC IBANEZ
Elixir® Strings gives you the same bright tone and punch of uncoated strings. NANOWEB® Coating prevents contamination and corrosion from invading the string's windings, allowing strings to last 3-5 longer than ordinary strings.
The followings complies with the requirements of the EMC Directive 2004/108/EC of the European Union.

©2014 Printed in Japan NOV13ITNB
INTRODUCTION
Our congratulations and deepest thanks on making Ibanez your choice of instrument. Ibanez standards are second to none. All Ibanez instruments are set up to our strict quality control standards before shipping. This manual explains how to maintain your instrument's finish and how to keep your bass at the same great level of playability and performance it had when it left our facilities.
INSTRUCTIONS AND SAFETY PRECAUTIONS
1) After each playing session, wipe the entire bass down, including strings, with a good polishing cloth. This will remove corrosive skin oils and acids, and protect the plating, finish, and strings. Gloss finish basses should be polished with polish formulated specifically for musical instruments. Do not wipe the instrument with volatile substances, such as benzene or thinner. Please ventilate the room fully when using an aerosol (spray) cleaner.
2) Keep your bass in an area that is not excessively dry or wet and, since temperature affects relative humidity, an area which is not excessively hot or cold. This will prevent damage and possible electric shock.
3) Unless you are trained in musical instrument repair, it is advisable not to attempt to dismantle or repair your instruments. Please seek professional advice through your authorized Ibanez bass dealer.
4) Because strings can break or snap and cause possible injury to your face (and especially eyes), it is recommended to keep a reasonable distance between the strings and your face when playing or when changing and adjusting the strings.
5) Because of atmospheric changes in humidity and temperature, it is normal for the fingerboard to shrink, which may leave the fret ends exposed. Please be aware that these fret ends can be sharp enough to cause injury.
6) It is advisable to change strings regularly. Old and tarnished strings will sound dull and lifeless and are more subject to breakage. Tuning strings too high will also break them. If you are not sure of a tuning note, it is better to start over and loosen the string and then tune up to the correct pitch rather than risk over-tuning.
7) Do not play a bass with rusty strings; this can cause injury to your fingers.
8) The cut or clipped end of a guitar or bass string is very sharp; please do not touch the end of a cut string directly with your fingers.
9) If you use a strap, make sure it is completely and securely attached to the strap buttons before playing your bass.
10) "Don't Try This At Home." Doing tricks and gymnastics with your bass such as throwing or twirling it (in imitation of stage tricks of some pro-bassists), can be dangerous to you and others as well as cause irreparable damage to your instrument, which is not covered under warranty.
11)To avoid injury, please be aware that some pickguards have sharp edges.
12) Always store your bass in a case or gig bag and avoid leaning it against chairs or tables as there is possibility of the bass tipping over which can result in severe damage to your instrument. On stage, always use a secure and stable instrument stand.
13) Before lifting your bass case or gig bag, make sure that the catches or zippers are secure-a bass can easily fall from an open case, causing damage.
14)The + (positive) and - (negative) contacts on the battery and contacts on the compartment or snap must match. If the battery is installed "backwards" (i.e. with reversed polarity), the electronics will not work and the battery will eventually overheat with the possibility of damage to the bass and even fire.
15) Always dispose of batteries properly. Never put batteries into a fire as they can explode and cause serious injury.
STRINGS
If strings become dirty, discolored, or produce a dull sound or buzz, replace the strings with new ones. For best results we recommend replacing one string at a time, this will help to avoid removing all the string tension from the neck. When replacing strings with different gauge strings, it may be necessary to adjust the truss rod tension. (We recommend only qualified technicians perform truss rod adjustments.) Ibanez basses are factory equipped with the following string gauges. Please follow the instructions below for your particular model.
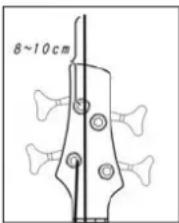
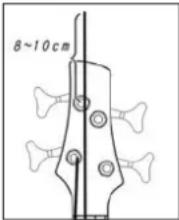
The strings should be tightly wound on to the tuning machines from top to bottom with 2 to 3 string wraps around the post. On tuning machines where the string ends are inserted into the posts, the string can be cut to length in advance using a pair of string cutters.
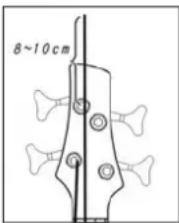

If the tuning machines are sealed gear units, they are self-lubricating types. The set screws for the tuning knob are adjustment screws that can be tightened with a small Phillips (+) head screwdriver to increase the tension.
*The use of coarse strings may lead to buzzing and sound distortion. Using strings that have twists or kinks may cause buzzing or decreased sustain. Make sure that the strings are smooth and free from any defects before installing.
To install the string on to the bridge, thread the new string through the string holes located on the back of the tailpiece and bring them up and over the saddle. For bridges that require special installation instructions, please see the appendix at the end of this manual.
| MODEL | STRING GAUGE |
| 4 String Basses | .045, .065, .085, .105" |
| 5 String Basses | .045, .065, .085, .105, .130" |
| 6 String Basses | .032, .045, .065, .085, .105, .130" |
NECK
Ibanez basses are equipped with adjustable truss rods. The purpose of a truss rod is to adjust the neck to counteract string tension. There are many reasons for truss rod adjustments. One of the most frequent reasons is changing string gauges or tuning pitch, which can affect string tension. String tension
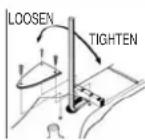
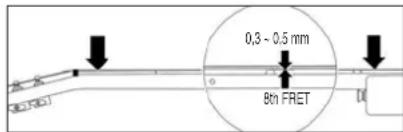
changes may affect the string height and cause fret buzz or incorrect notes. To adjust the truss rod, locate the truss rod nut and adjust it by inserting the correct wrench into the nut and tightening (clockwise) or loosening (counter clockwise) the rod. Truss rod tension can be measured by installing a capo at the first fret, holding the string down at the fret position where the neck joins the body. Insert a thickness gauge between the string and the fret at the 8th fret. There should be between 0.3 mm to 0.5 mm clearance. That clearance is referred to as "neck relief." Too much neck relief can cause the neck to have higher action in the middle of the neck causing poor intonation and uncomfortable playability. No neck relief can cause fret buzz.
*Appropriate care must be taken when adjusting the neck and we recommend only qualified technicians perform this procedure.
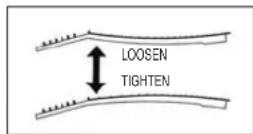
ACTION
Ibanez bass string action is set at the factory. However, there are many reasons that an instrument's string height can change. Instruments can be affected by changes in temperature and moisture. High string action can make basses difficult to play. If the string action is too low, fret buzz or unclear notes can occur. To remedy this, follow the instructions for the particular type of bridge installed. In the case of string action, make sure the bass is in tune

and the truss rod is adjusted properly. Ibanez action is set to 2.0mm for the treble side and 2.5mm for the bass side at the 12th fret. The action may also need to be readjusted after the neck is adjusted or strings are changed to a different gauge. Follow the instructions in the relevant bridge manual to make adjustments.
To raise or lower the string action, insert the correct Allen wrench into the screw at the saddle. To raise the saddle, turn the wrench clockwise and to lower the saddle, turn the wrench counter clockwise.
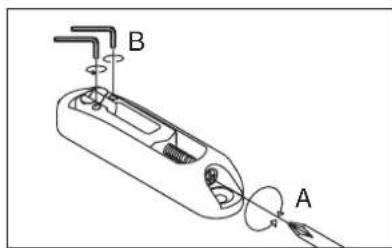
INTONATION
Intonation adjustment is the operation of adjusting the location of the string at the saddle to compensate for different tuning. Follow the instructions of the particular bridge intonation below. Intonation is properly set when the 12th fret
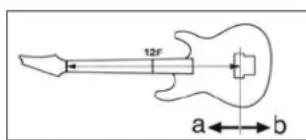
note and the 12th fret harmonic are exactly the same note. This is the center point of the scale and the most accurate way of setting a standard scale length. With the harmonic note as the standard, if the fretted note is flat, move the bridge saddle forward toward the headstock (a) to decrease the string length. If the fretted note is sharp, move it back away from the headstock (b) to increase the string length intonation adjustments.
*Please note that strings can be broken when the saddle is moved. so always loosen the strings before making any adjustments.
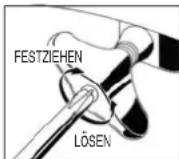
Intonation adjustment can be made by adjusting the intonation screws at the rear of the bridge clockwise to move the saddle back and counter clockwise to move the saddle forward.
ACOUSTIC BRIDGE POSITION
On a full hollow bass, the entire bridge is moved forward or back to adjust intonation. Based on the 12th fret harmonic, if the 12th fretted note is flat, move the bridge toward the headstock. If the note is sharp, move the bridge toward the tail piece (away from the headstock).
You need to loosen the strings to make adjustments, but this may cause the bridge to move too much. If this occurs, adjustment will be easier if you aim for a scale length of 770mm / 30.3'' between the nut (0 fret) and saddle of the first string. Once the adjustment is made, change strings one at a time to minimize saddle movement.
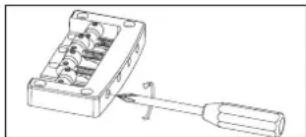
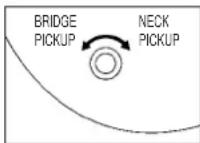
PICKUP
The output level of the instrument as well as the quality of the signal can be affected by the pickup height. Pickup height should be adjusted until the volume of neck and bridge pickups are almost equal with both volumes wide
open. The volume may drop drastically if the pickup height is too low. As the pickups are magnetic, fret buzzing and distortion may occur if the pickup is too close to the strings. Use a small screwdriver to make adjustments to raise or lower the pickup.
*Instruments that have adjustable pole pieces can be adjusted to balance the output of each string.
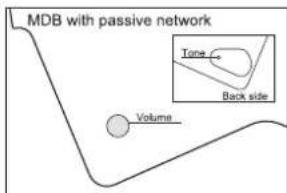
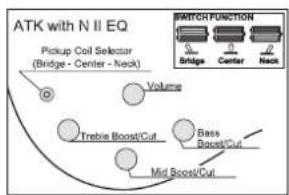
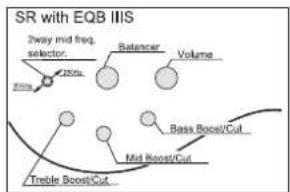
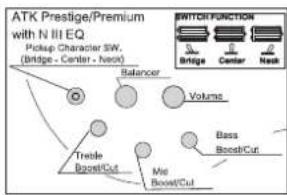
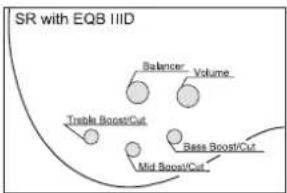
BASS CONTROLS
Pickup Balancer (on all two-pickup models.) The pickup balance control pot allows the user to blend between the front and rear pickups using a single pot. The center position of the pot has a de-tent which will set both pickups to equal output. Turning the knob clockwise increases the neck pickup while decreasing the output of the bridge pickup. Turning the knob to the neck pickup and increases the output of the bridge
*For the specific controls on your bass, please see the appendix at the end of this manual.
BATTERIES
On basses with active electronics (some basses do not require batteries) the battery is stored inside of a battery box or a control cavity. To avoid damage caused by leaking batteries, remove old batteries as soon as possible and do not store your bass for long periods of time with the batteries installed. Do not mix batteries - either older with new, or alkaline with non-alkaline, etc. - in basses that require two batteries.
Inserting a plug into the output jack activates the power supply. Unplug the instrument cable when bass is not in use in order to reduce drain on the battery.
はしだに
| MODEL | STRING GAUGE |
| 4 String Basses | .045, .065, .085, .105" |
| 5 String Basses | .045, .065, .085, .105, .130" |
| 6 String Basses | .032, .045, .065, .085, .105, .130" |
矛以今□
| MODEL | STRING GAUGE |
| 4 String Basses | .045, .065, .085, .105" |
| 5 String Basses | .045, .065, .085, .105, .130" |
| 6 String Basses | .032, .045, .065, .085, .105, .130" |
HALS
| MODEL | STRING GAUGE |
| 4 String Basses | .045, .065, .085, .105" |
| 5 String Basses | .045, .065, .085, .105, .130" |
| 6 String Basses | .032, .045, .065, .085, .105, .130" |
MASTIL
| MODEL | STRING GAUGE |
| 4 String Basses | .045, .065, .085, .105" |
| 5 String Basses | .045, .065, .085, .105, .130" |
| 6 String Basses | .032, .045, .065, .085, .105, .130" |

MANCHE
| MODEL | STRING GAUGE |
| 4 String Basses | .045, .065, .085, .105" |
| 5 String Basses | .045, .065, .085, .105, .130" |
| 6 String Basses | .032, .045, .065, .085, .105, .130" |
MANICO
| MODEL | STRING GAUGE |
| 4 String Basses | .045, .065, .085, .105" |
| 5 String Basses | .045, .065, .085, .105, .130" |
| 6 String Basses | .032, .045, .065, .085, .105, .130" |
琴颈
- Please check the contents of the shipment first. The shipment includes Guitar, Case, Instruction Manual (this document), and the following attachments.
•T!''$%&'(*)+,-./012345673869:/<=>
(本書)及保証他、右記の物付属い。
-itte uberprufen Sie zuerst den Inhalt der Lieferung. Zum Lieferumfang gehoren die Gitarre, der Koffer, die Anleitung (dieses Dokument) und das nachfolgend genannte Zubehor.
- En primer lugar, compruebe los contentidos del envio. El envio incluye la guitarra, lafundal/manualde instrucciones(thisdocumento)ylossiguientes accesorios.
- Avant toute chose, veuillez vérifi er le contenu de la livraison. La livraison inclut la gutare, un etul, un guide d'utilisation (le present document) et les accessoires suivants.
- Innanzitutto, controlling the contento della confazione. La confazione include chitarra, custodia, manuale di istruzioni (il presente documento) e gli accessori di seguito descritti.
·请先检查产品包装。包装内包括吉他、琴箱、使用手册(本书)以及下列附件。
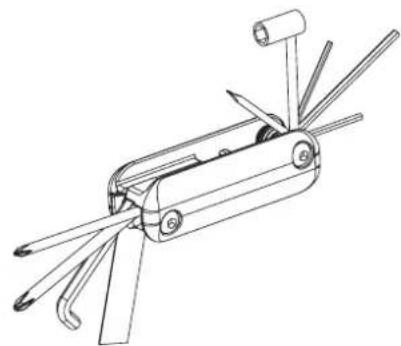
Multi-Tool
ルトル
Universalswerkzeug
SPECIAL NUT WRENCH (Grooveline only)
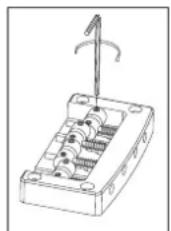
REEMPLACEMENT DES CORDES
CAMBIO DE CUERDAS
SOSTITUZIONE DI UNA CORDA
更换琴弦
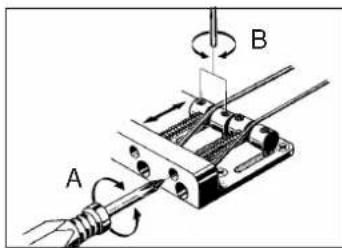
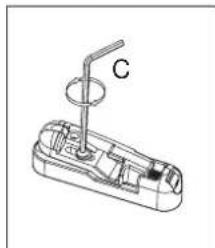
MR-2 (BTB)
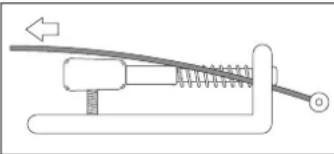
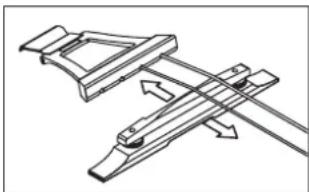
- Hook the ball end below the string catch at the rear of the bridge.
·比利德一後方の快に弦の木ル工卜を引掛る。
Haken Sie das Kugelende unter die Saiten-Catch hinten am Steg. - Attachez la boule de la corde sous l'attache cordes à l'arrête du chevalet.
- Enganche la bola del extremo bajo de la retenida de la cuerta en la parte posterior del puente.
- Ancorare l'estremita a sfera sotto il fermo-corda sulla parte posteriore del ponte.
- 将琴弦带球的一端钩在琴桥后面的弦孔下。
ATK
Install the string from the back of the instrument through the string grommets or thread through the holes in the bridge.
*Note: When replacing strings, check with the dealer to make sure the new strings are long enough for the full scale length of the bass.
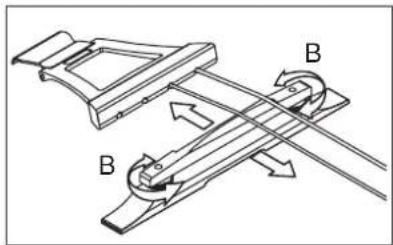
The B200/B205 bridges allow two styles of string installation.
TIGHT END BASS BRIDGE (Grooveline)
- Hook the ball end below the string catch at the bridge.
·比利ssle一卜後方のf和弦の朴一工卜都掛的 - Führer Sie die Salte in die Öffnung des Steges ein und haken Sie das Kugelende unter die Saitenhalterung am hinteren Ende des Steges fest.
- En passant les cordes à l'arrière du chevalet.
- Enganche la bola del extremo bajo de la retenida de la cuerta en la parte posterior del puente.
- Ancorare l'estremita a sfera sotto il fermo-corda sulla parte posteriore del ponte.
- 将琴弦带球的一端钩在琴桥后面的弦孔下。
BASS BRIDGE
一
BASS-STEG (BRIDGE) BASS-ST
CHEVALET DE GUITARE BASSECHE
PUENTEPUENTE
PONTE DEL BASSOPONTE DB
贝司琴桥
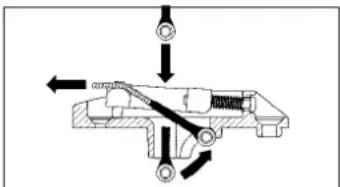
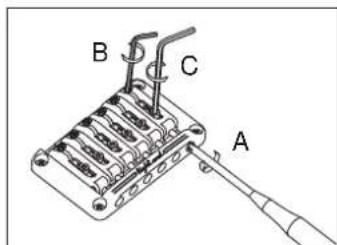
A: Intonation adjustment screw
不卜一子调節
C: Saddle lock screw
卡卜尔口夕
Reiter-Sperschraube
B: Saddle height adjustment screw
卜尔高之調節末
Acoustic bridge (AFB)
Standard bridge (K5, GWB, ATK)
MR-2 (BTB)
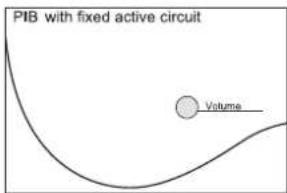
MR-4 (BTB, GVB, PIB, SDB, SR)
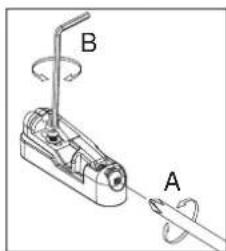
TIGHT END BASS BRIDGE (Grooveline)
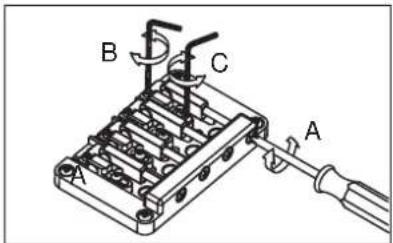
TIGHT END BRIDGE (SRC)
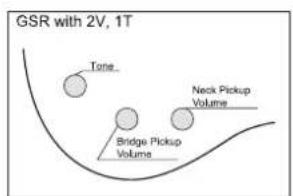
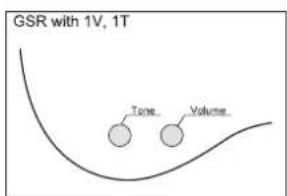
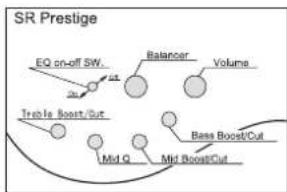
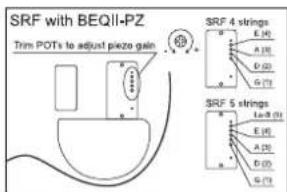
BASS CONTROLS
一
KLANGREGLER AM BASS
REGLAGES DE LA GUITARE BASSE
CONTROLES DEL BAJO
COMANDI DEL BASSO
贝司控制部分
Passive
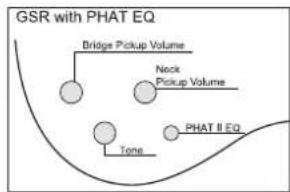
PHAT EQ
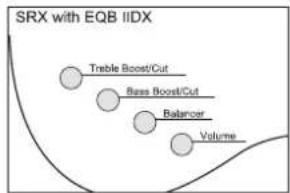
2BAND EQ
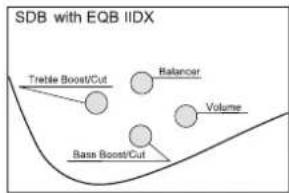
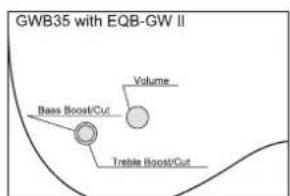
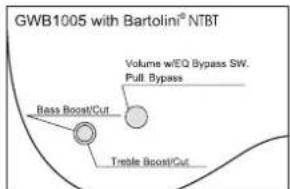
BARTOLINI EQ
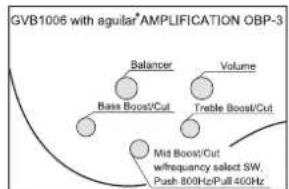
aguilar EQ
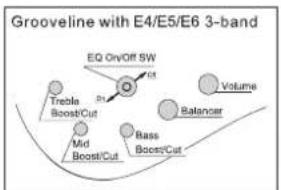
3BAND EQ
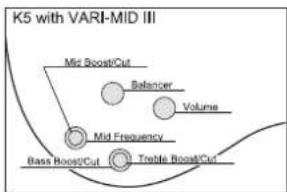
"VARI-MID"3BAND EQ
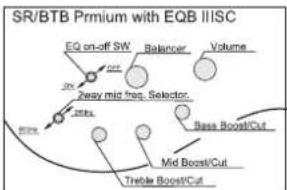
PWC III EQ
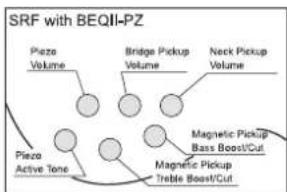
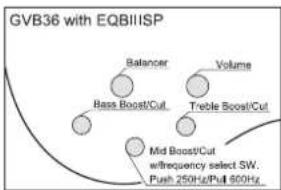
BEQII-PZ
OTHERS