PDU3XVN6G20 - Power strip Tripp Lite - Free user manual and instructions
Find the device manual for free PDU3XVN6G20 Tripp Lite in PDF.

User questions about PDU3XVN6G20 Tripp Lite
0 question about this device. Answer the ones you know or ask your own.
Ask a new question about this device
Download the instructions for your Power strip in PDF format for free! Find your manual PDU3XVN6G20 - Tripp Lite and take your electronic device back in hand. On this page are published all the documents necessary for the use of your device. PDU3XVN6G20 by Tripp Lite.
USER MANUAL PDU3XVN6G20 Tripp Lite
3-Phase Monitored OU Power Distribution Units
(Phase and Bank Measurements)
208V MODELS
PDU3VN6L2120
PDU3VN6L2130
PDU3VN6G30B
(Series Number: AG-00B8) (Series Number: AG-00B9) (Series Number: AG-00BA)
PDU3VN6L1530B
PDU3VN6L2130B
PDU3VN6H50B
(Series Number: AG-00BA)
(Series Number: AG-00BA)
(Series Number: AG-00BA)
PDU3VN6G60B
PDU3VN6G60C
(Series Number: AG-00BA)
(Series Number: AG-00BB)
400V MODEL
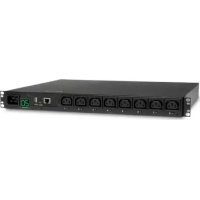
PDU3XVN6G20
(Series Number: AG-00BD)
Important Safety Instructions 2
Service 18
Installation
3 Warranty and 19
Digital Display 6
Product Registration
Using the Digital Display 9
Espanol 20
Features
16
Francais 39
Configuration and Operation 18
Pycckn 58
PROTECT YOUR INVESTMENT!
Register your product for quicker service and ultimate peace of mind.
You could also win an
ISOBAR6ULTRA surge protector—a $50 value!

www.triplite.com/warranty
TRIPP·LITE

Manufacturing Excellence.
1111 W. 35th Street, Chicago, IL 60609 USA • www.triplite.com/support
Copyright © 2014 Tripp Lite. All rights reserved.
Important Safety Instructions

SAVE THESE INSTRUCTIONS
This manual contains instructions and warnings that should be followed during the installation, operation, and storage of this product. Failure to heed these instructions and warnings may affect the product warranty.
- The PDU provides the convenience of multiple outlets, but DOES NOT provide surge or line noise protection for connected equipment.
- The PDU is designed for indoor use only, in a controlled environment, away from excess moisture, temperature extremes, conductive contaminants, dust or direct sunlight.
- Keep indoor ambient temperature between 32^ and 122^ (0^ and 50^)
- The PDU must be installed by a qualified technician only.
- Do not attempt to mount the PDU to an insecure or unstable surface.
- Install in accordance with National Electrical Code standards. Be sure to use the proper overcurrent protection for the installation, in accordance with the plug/equipment rating.
- Connect the PDU to an outlet that is in accordance with your local building codes and that is adequately protected against excess currents, short circuits and earth faults.
- The electrical outlets supplying power to the equipment should be installed near the equipment and easily accessible.
- Do not connect the PDU to an ungrounded outlet or to extension cords or adapters that eliminate the connection to ground.
- Be sure to provide a local disconnect device on any models that are permanently installed without a plug that is easily accessible.
- Never attempt to install electrical equipment during a thunderstorm.
- Individual equipment connected to the PDU should not draw more current than the individual PDU's outlet's rating.
- The total load connected to the PDU must not exceed the maximum load rating for the PDU.
- Do not attempt to modify the PDU, input plugs or power cables.
- Do not drill into or attempt to open any part of the PDU housing. There are no user-serviceable parts inside.
- Do not attempt to use the PDU if any part of it becomes damaged.
- Use of this equipment in life support applications where failure of this equipment can reasonably be expected to cause the failure of the life support equipment or to significantly affect its safety or effectiveness is not recommended. Do not use this equipment in the presence of a flammable anesthetic mixture with air, oxygen or nitrous oxide.
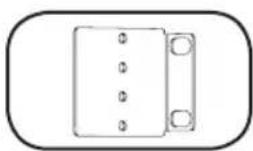
Installation
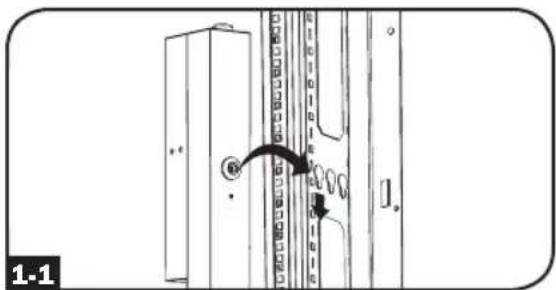
Mounting the PDU
Note: The illustrations may differ somewhat from your PDU model. Regardless of configuration, the user must determine the fitness of hardware and procedures before mounting. The PDU and included hardware are designed for common rack and rack enclosure types and may not be appropriate for all applications. Exact mounting configurations may vary. Screws for attaching the mounting brackets to the PDU are included. Use only the screws supplied by the manufacturer or their exact equivalent.
Note: Mounting buttons come preinstalled to the PDU for toolless mounting.

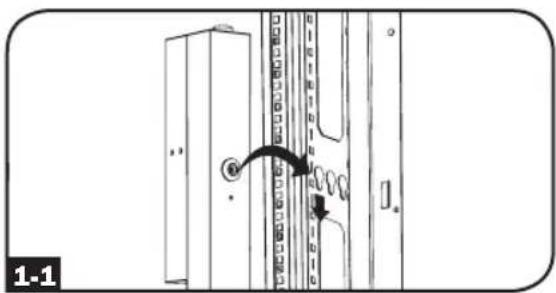
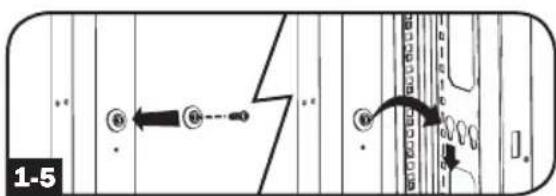
To mount the PDU using the pre-installed mounting buttons, position the PDU as desired in the rack enclosure, align the buttons with the rack mounting slots, and slide the PDU into position.

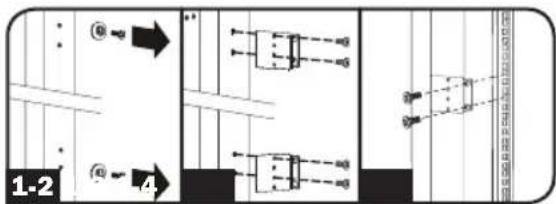
To attach the mounting brackets to the PDU, remove the mounting buttons.

Attach the mounting brackets to the PDU with the included screws.

Attach the PDU to a vertical rail in your rack or rack enclosure. (Use the mounting hardware that came with your rack or rack enclosure to attach the mounting brackets to the rail.)

To reinstall the mounting buttons for toolless mounting, remove the mounting brackets then install the mounting buttons onto the PDU.
Note: Be sure to insert the 2 buttons into either the upper hole at each end of the PDU or into the lower hole at each end of the PDU.

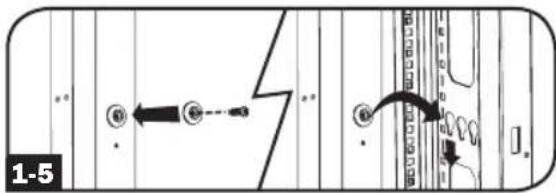
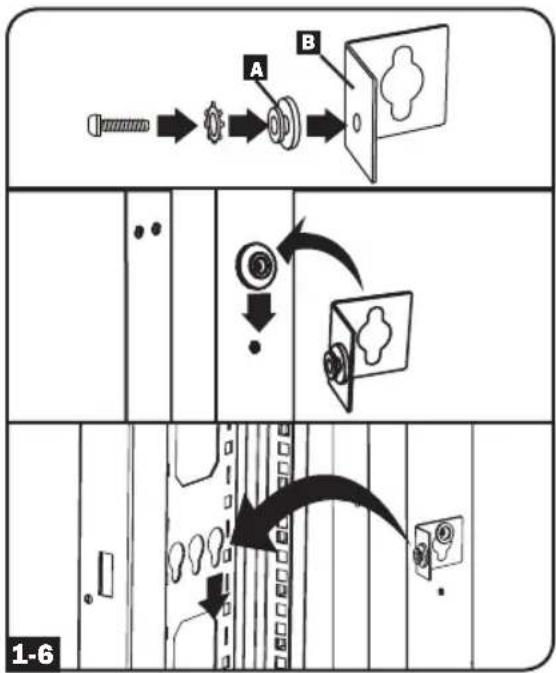
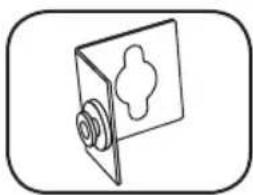
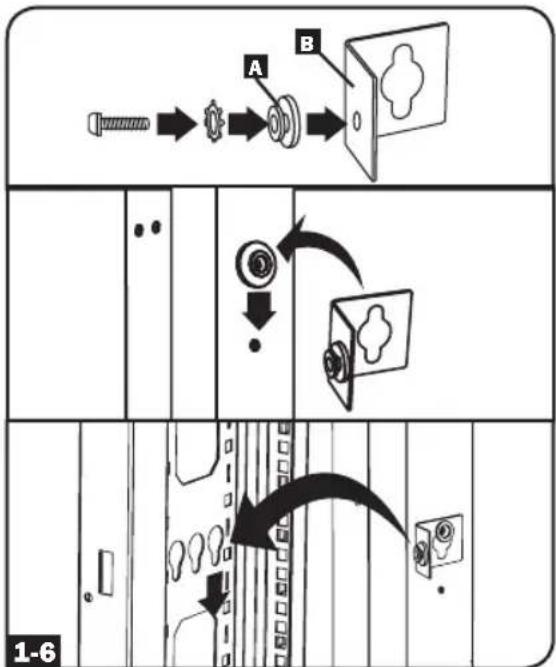
To install the PDU with its outlets facing the rear of the rack, use the included PDUMVROTATEBRKT accessory. First, attach the mounting button A to the V-shaped bracket B using the included screw and washer. Then, use the button-mount slot to attach the bracket to the PDU and the mounting button to attach the PDU to the rack. The bracket effectively repositions the mounting brackets allowing for the PDU outlets to face the rear of the rack.
Installation
Connecting the PDU
2-1 Each model is equipped with 1 of 7 different input plugs.


L21-20PL15E30P30P
20AHRRBBIEC309
CS8365C
3P+N+E
30A Blue IEC 309
3P+E
60A Blue IEC 309
3P+E
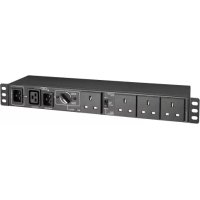
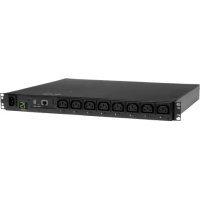
| Model Name Input Plug | Max InputAmps (Limitedby Input Cordand Plug) | InputVoltageRange | OutputVoltageRange Breakers | CordLength | Outlets |
| PDU3VN6L2120 L21-20P 16A 208V | 208V and120V (with5-15/20Routlets) | N/A | 45 Total: 3 Banks of (2) C19, (12)C13, and 3 Banks of (1) 5-15/20R | ||
| PDU3VN6L2130 L21-30P 24A 208V | 208V and120V (with5-15/20Routlets) | 3 x DoublePole, 20ABranch-Rated | 45 Total: 3 Banks of (2) C19, (12)C13, and 3 Banks of (1) 5-15/20R | ||
| PDU3VN6H50B | HUBBLECS8365C | 35A 200-240V 200-240V | 3 x DoublePole, 20ABranch-Rated | (1.8M) | 48 Total: 3 Banks of (2) C19 and (14) C13 |
| PDU3VN6G60B | 60A Blue IEC 3903P + E | 35A 200-240V 200-240V | 3 x DoublePole, 20ABranch-Rated | 48 Total: 3 Banks of (2) C19 and (14) C13 | |
| PDU3XVN6G20 | 16A Red IEC 3093P + N + E | 16A 360-415V 208-240V N/A | 48 Total: 3 Banks of (2) C19 and (14) C13 | ||
| PDU3VN6G30B | 30A Blue IEC 3093P + E | 24A 200-240V 200-240V | 3 x DoublePole, 20ABranch-Rated | 48 Total: 3 Banks of (2) C19 and (14) C13 | |
| PDU3VN6L2130B | L21-30P 24A 200-240V 200-240V | 3 x DoublePole, 20ABranch-Rated | 48 Total: 3 Banks of (2) C19 and (14) C13 | ||
| PDU3VN6L1530B | L15-30P 24A 200-240V 200-240V | 3 x DoublePole, 20ABranch-Rated | 48 Total: 3 Banks of (2) C19 and (14) C13 | ||
| PDU3VN6G60C | 60A Blue IEC 3093P + E | 45A 200-240V 200-240V | 6 x DoublePole, 20ABranch-Rated | 36 Total: 6 Banks of (6) C13 |
Installation

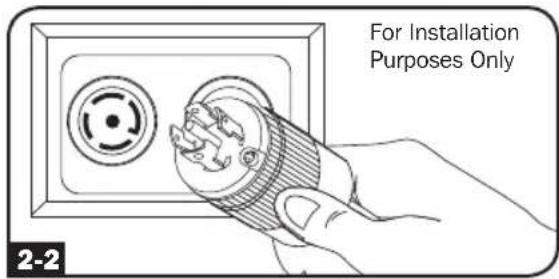
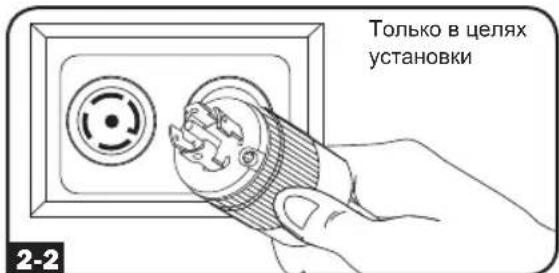
Connect the input plug to your facility's compatible AC power source.

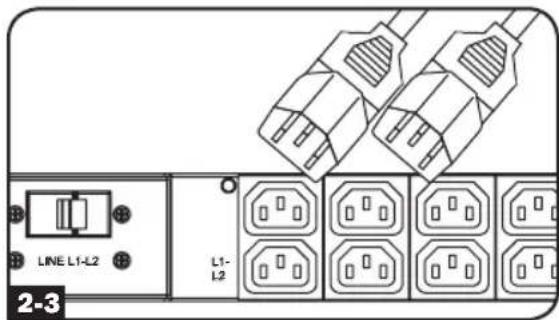
Connect your equipment's input plugs to the appropriate outlets on the PDU. The LED near each bank illuminates when the bank is ready to distribute live AC power.
Note: It is recommended that you do not connect a live load to the PDU. If the load you intend to connect has an ON/OFF switch, please turn the switch to OFF prior to connection.

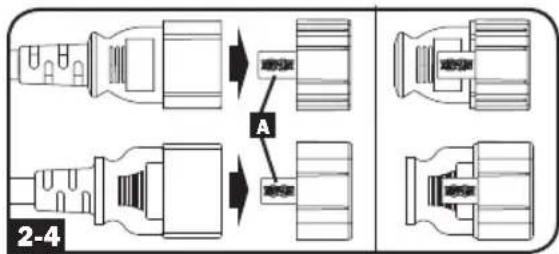
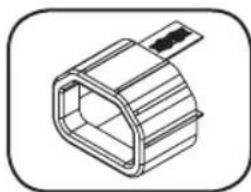
Optional Cord Retention Procedure
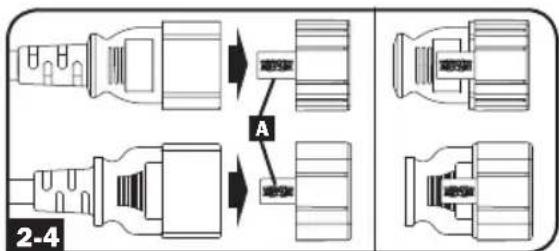
Use the included C14 and C20 plastic sleeves to secure plugs to receptacles. Attach the sleeve to the plug, making sure that the pull tabs A remain outside the plug and that the fit is secure. To unplug equipment properly, use the pull tabs to remove the plug and sleeve from the receptacle.
Networking the PDU
Your PDU can receive IP address assignments via DHCP server (dynamic) or static (manual) addressing methods. See the SNMPWEBCARD installation guide for an explanation of these methods. You can find the guide by going to www.triplite.com/support and typing "SNMPWEBCARD" in the search field. If you are uncertain which method to use, contact your network administrator for assistance before continuing the configuration process.
Note: The MAC address of the PDU (12-digit string in this format: 000667xxxxx) is printed on a label attached to the PDU enclosure. For static IP address assignments, use the RJ-45 to DB9 configuration cable (part number 73-1243) included with the PDU.
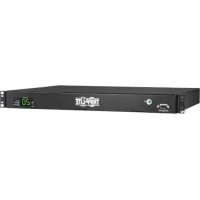
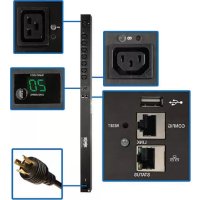
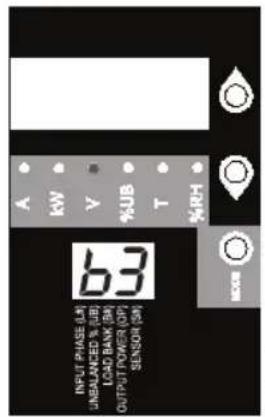
Digital Display
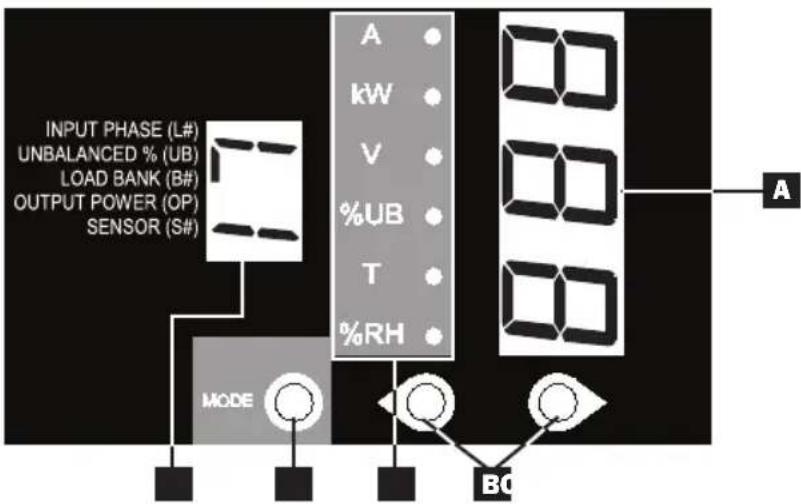
A 3-Digit Display: Shows measured or calculated values such as Amperage, Kilowatts, Voltage, Power Unbalance Percentage, Temperature and Humidity.
Arrow Buttons: Scroll through indicated Input, Bank, Power, Load Balance, Sensor and Display Brightness options using these buttons. A long press of the up or down arrow buttons allows the user to skip to the next sequential measurement category.
Mode Button: When a menu option is selected using the Arrow Buttons, the Mode Button scrolls through the sub-options within each category. Sub-options are shown by the Indicator LEDs.
D Indicator LEDs: Lit LED indicates which value is being displayed on the 3-digit screen.
Amps (A): When selected, the load on the selected Input Phase (L#) or Load Bank (B#) is displayed in amps.
Wattage (kW): When selected, the load on the selected Load Bank (B#) or Total Output Power (OP) is displayed in kW.
Voltage (V): Input Phase (L#) or Load Bank (B#) voltage is displayed.
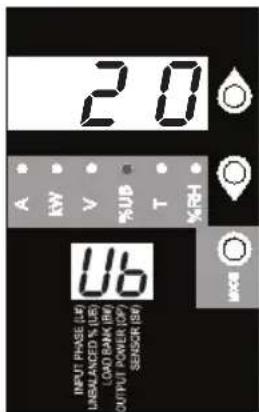
Unbalanced Load (%UB): When lit, the display shows the unbalanced load percentage deviance from the average measured value. A value that is zero or closest to zero is desirable.
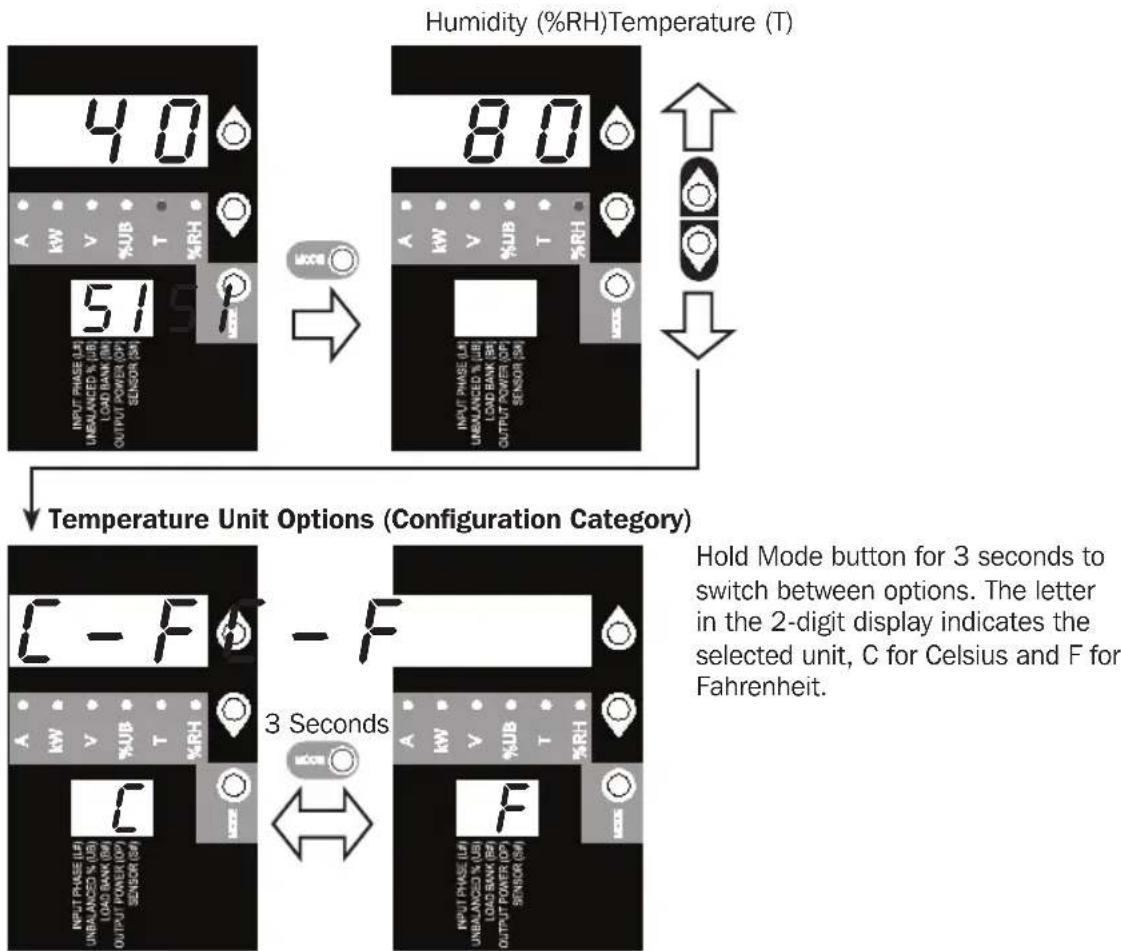
Temperature (T): If Tripp Lite ENVIROSENSE is connected, the ambient temperature will be displayed when this option is selected. The temperature is displayed in Celsius by default, but can be switched to Fahrenheit.
Relative Humidity (%RH): If Tripp Lite ENVIROSENSE is connected, the relative humidity percentage will be displayed when this option is selected.
2-Digit Display: This display indicates which Input Phase (L#), Load Unbalance (UB), Load Bank (B#), Output Power (OP) or Sensor (S#) option is selected.
Digital Display
Button Response Definitions:
| \(Configuration^{1}\) | Switch | Action | Control Function |
| Standard | Up Pushbutton | Depress \(1/2\)sec | Sequentially, moves up one selection in the menu. |
| Depress 3 sec | Advances up to the next measurement category. | ||
| Down Pushbutton | Depress \(1/2\)sec | Sequentially, moves down one selection in the menu. | |
| Depress 3 sec | Advances down to the next measurement category. | ||
| Mode Pushbutton | Depress \(1/2\)sec | Displays available options for a given measurement category. | |
| Depress 3 sec | Selects the chosen available option for a given configuration category. | ||
| Alternate | Up Pushbutton | Depress \(1/2\)sec | Sequentially, moves down one selection in the menu. |
| Depress 3 sec | Advances down to the next measurement category. | ||
| Down Pushbutton | Depress \(1/2\)sec | Sequentially, moves up one selection in the menu. | |
| Depress 3 sec | Advances up to the next measurement category. | ||
| Mode Pushbutton | Depress \(1/2\)sec | Displays available options for a given measurement category. | |
| Depress 3 sec | Selects the chosen available option for a given configuration category. |
1 Configured via Configuration Category item "Outlet Indicator LED Color Code Options".

Load Bank Receptacle Location and Display References

| MODELS | SILKSCREEN LABEL DESCRIPTION | 2-DIGIT DISPLAY REFERENCE |
| PDU3VN6L2120 | L1-L2 | B1 |
| PDU3VN6L2130 | L2-L3 | B2 |
| L3-L1 | B3 | |
| L1-N (Bank 4) | B4 | |
| L3-N (Bank 5) | B5 | |
| L2-N (Bank 6) | B6 |
Digital Display
Scrolling Through Input Phases and Options
(Measurement Category)
Press Mode button to toggle between options and data within a menu. A momentary press of the arrow buttons switches between menus. A long press skips between measurement categories. The scrolling pattern of the display is outlined below. Note: Three dashes will be shown in the 3-digit display when the input phase voltage is unknown, due to abnormal tripped breaker conditions.

Input Phase 1
Using the Digital Display
Press Mode button to toggle between options and data within a menu. A momentary press of the arrow buttons switches between menus. A long press skips between measurement categories. The scrolling pattern of the display is outlined below.
Unbalanced Load Detect (Measurement Category)
Phase Imbalance %

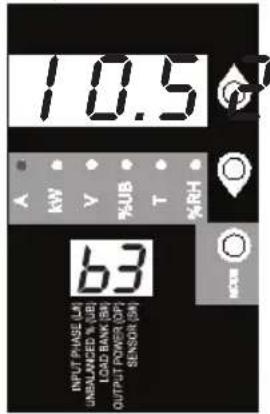
Scrolling Through Load Banks and Options (Measurement Category)
Scroll through the parameter display for each Load Bank using Mode and buttons.
*Note: For 208V models, voltages displayed are phase-to-phase voltages (i.e., b1 display will indicate L1-L2 voltage). Select models display phase-to-neutral voltages.

Using the Digital Display
Amps Kilowatts Volts*

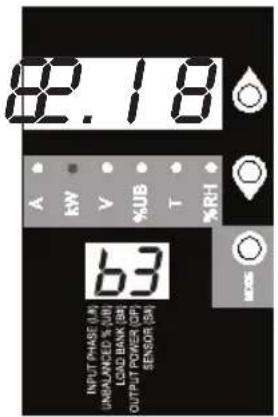


To Total Output Power
Note: Continue for Load Banks 4-6 for models PDU3VN6G60C, PDU3VN6L2120 and PDU3VN6L2130.
Press Mode button to toggle between options and data within a menu. A momentary press of the arrow buttons switches between menus. A long press skips between measurement categories. The scrolling pattern of the display is outlined below.
Total Output Power (Measurement Category)
Kilowatts
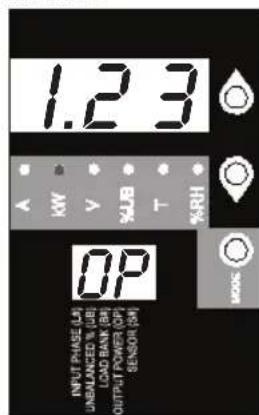

To Temperature Readings
Using the Digital Display
These options are only available when a sensor such as Tripp Lite's ENVIROSENSE is attached (sold separately). Press Mode button to toggle between options and data within a menu. A momentary press of the arrow buttons switches between menus. A long press skips between measurement categories. The scrolling pattern of the display is outlined below.
Scrolling Through Temperature Readings (Measurement Category)
Press Mode button to toggle between options and data within a menu. A momentary press of the arrow buttons switches between menus. A long press skips between measurement categories. The scrolling pattern of the display is outlined below.
Scroll Function Options (Configuration Category)

To LED Brightness
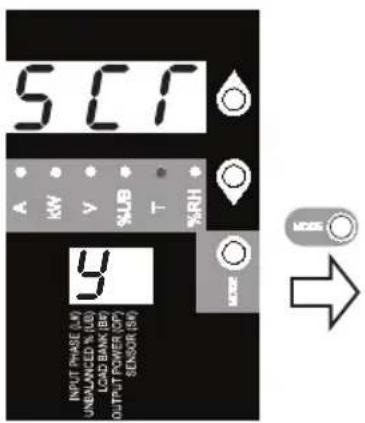
When enabled, the Auto Scroll function displays data for Input Phases, Load Unbalance and Load Banks in 4-second intervals. Y indicates the function is enabled; N indicates that it is disabled. Pressing any button interrupts the auto scroll function, allowing the user to navigate between menu options. If no button is pressed, there is a 10 second timeout.
Note: Hold Mode button for 3 seconds to switch between options. The letter in the 2-digit display indicates the selected option.
Using the Digital Display
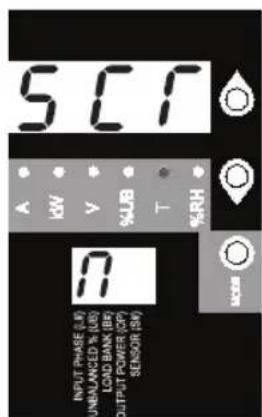
LED Brightness and Color Scheme (Configuration Category)
Hold the Mode button for 3 seconds to scroll through each option. The number in the 2-digit display is defined as: 1 = 25% ; 2 = 50% ; 3 = 75% ; 4 = 100%
Hold the Mode button for 3 seconds to switch between options. The number in the 2-digit display indicates the selected scheme. 1 = Standard, 2 = Alternate
Using the Digital Display
BANK INDICATOR LED DEFINITIONS:
| LED Configuration | LED Color Outlet Status Description | |
| Standard4 | Off Off Bank power is absent | |
| Green On Circuit breaker is on - Bank power is present | ||
| Yellow On | ||
| Red Off | ||
| Red Flashing Off Circuit breaker has tripped - Bank power is absent | ||
| Alternate | Off Off Bank power is absent | |
| Red On Circuit breaker is on - Bank power is present | ||
| Red Flashing On | ||
| Green Off Bank is disabled - Bank power is absent | ||
| Green Flashing Off Circuit breaker has tripped - Bank power is absent | ||
1 This is the default configuration.
Using the Digital Display
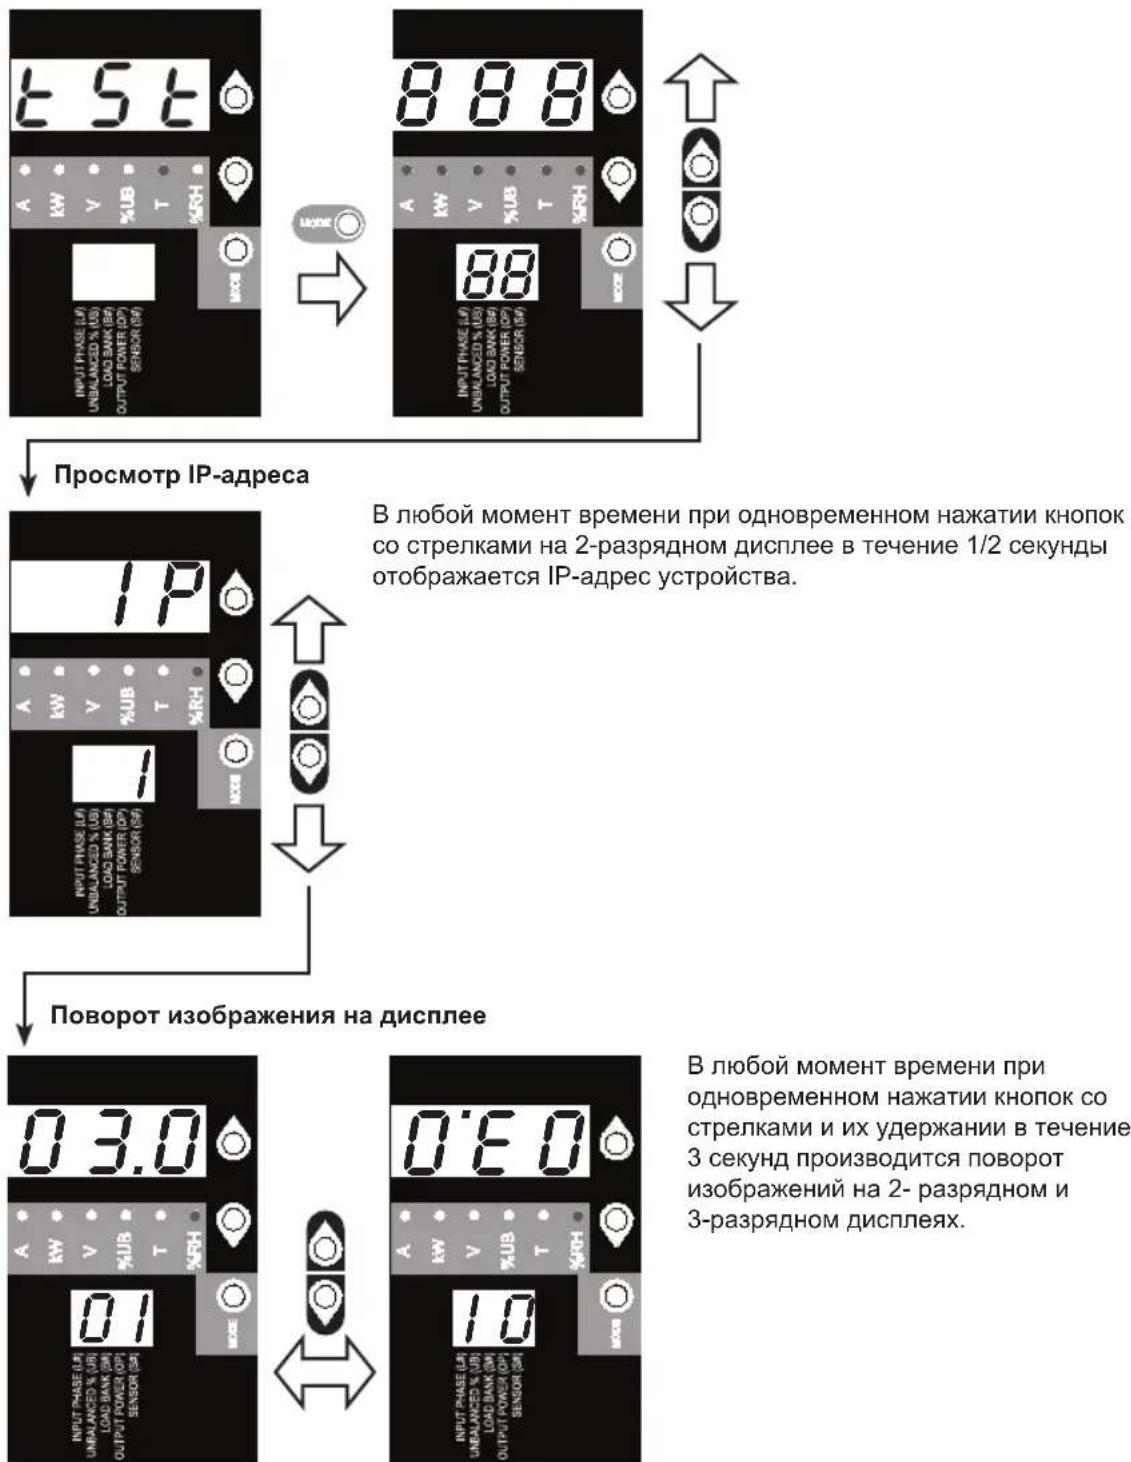
Display Options
LED Test
Hold the Mode button for 3 seconds to test the display. For 5 seconds, all LEDs and display segments will light green, while all Load Indicator LEDs will light yellow. Please visit www.triplite.com/support for issues with display segment or Indicator LED functionality.
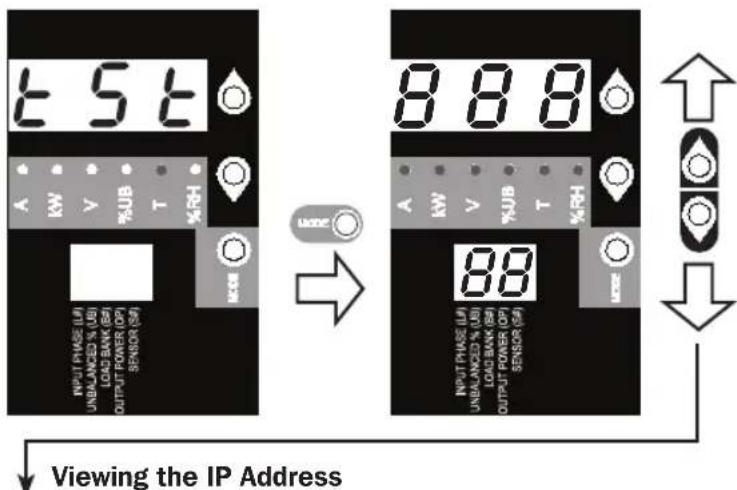
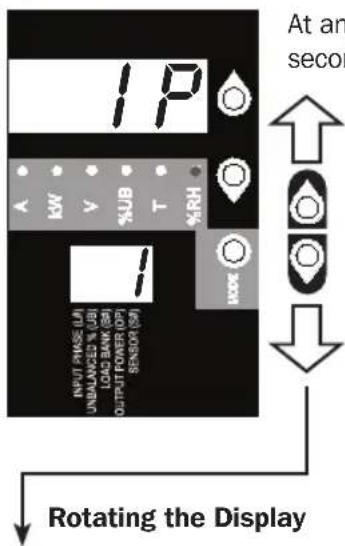
At any point, pressing both of the arrow buttons simultaneously for 1/2 second displays the unit's IP address in the 2-digit display.
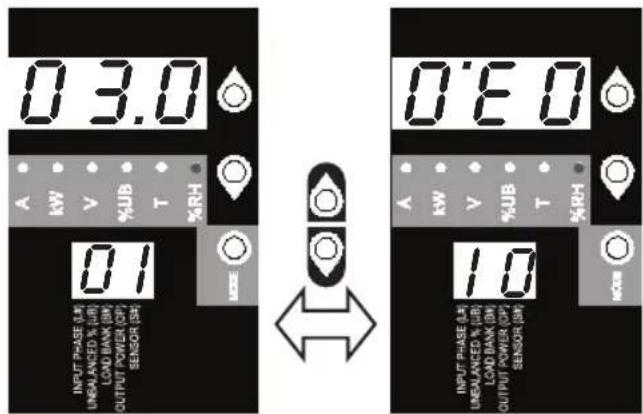
At any point, pressing both of the arrow buttons simultaneously and holding for 3 seconds rotates the 2-digit and 3-digit displays.
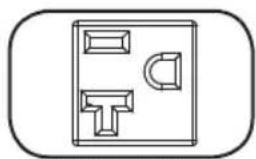
Features
C13 C19
NEMA 5-15/20R
Outlets: During normal operation, the outlets distribute AC power to connected equipment.
Note: PDU3VN6G60C does not include C19 receptacles.
Note: NEMA 5-15/20R receptacles are only included with the PDU3VN6L2120/PDU3VN6L2130 models.
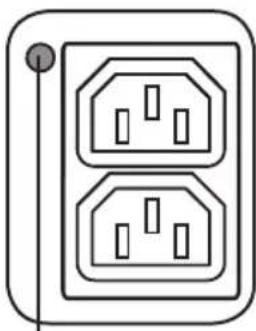
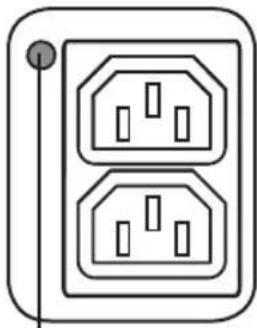
Bank Status LED
Bank Status LED: Once the unit is powered on, each Bank Status LED will illuminate when the associated bank is ready to distribute live AC power.
| LED Color LED | Status Comments | /Notes |
| Green On Norm | al operation. | |
| Yellow On Bank | 's current has | exceeded 80% of its current rating. |
| Red Off Bank's | voltage is below | the Low Voltage threshold. |
| Flashing Red Off | Circuit breaker for this bank has tripped. | |
| Off Off Bank is | powered off. |
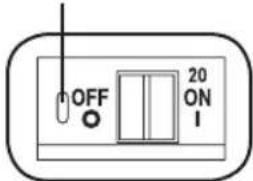
Push-to-Reset Guard
Note: Colors noted here reflect standard LED configuration. See chart on page 14 for full LED color definitions.
Circuit Breaker (Select Models): Each Load Bank is protected by a circuit breaker. If the connected equipment load exceeds the Maximum Load Rating for those banks of the PDU, the circuit breaker will trip. Disconnect excess load and reset the breaker.
Note: Each breaker comes equipped with a push-to-reset guard to prevent accidental breaker tripping. To turn off the breaker, insert a flathead screwdriver into the reset slot.
Note: PDU3VN6L2120 and PDU3XVN6G20 do not include breakers.
Mounting Brackets: Use these brackets as an alternate PDU mounting method.

Mounting Buttons: Come pre-installed on the back side of the PDU and are used for toolless mounting. Note: Four additional mounting buttons are included for alternate rack styles.
PDUMVROTATEBRKT Mounting Accessory: Use these V-shaped brackets to mount the PDU with its outlets facing the rear of the rack.
Features
C14 Plug Sleeve: (Optional) Use the included C14 plastic sleeves to secure plugs to receptacles. Attach the sleeve to the plug making sure that the pull tabs remain outside the plug and that the fit is secure. To unplug equipment properly, use the pull tabs to remove the plug and sleeve from the receptacle.

C20 Plug Sleeve: (Optional) Use the included C20 plastic sleeves to secure plugs to receptacles. Attach the sleeve to the plug making sure that the pull tabs remain outside the plug and that the fit is secure. To unplug equipment properly, use the pull tabs to remove the plug and sleeve from the receptacle.

Ground Screw: Use this to connect any equipment that requires a chassis ground.

SNMP Reset Button: Press the reset button for 3 seconds to reboot the PDU's network card. Rebooting the network card will not erase network settings or interrupt AC power. The reset button is recessed. Use a paper clip or other suitable object to press it.
PS/2 Port: Use this port to connect a Tripp Lite ENVIROSENSE environmental sensor to provide remote temperature/humidity monitoring and a dry contact interface to control and monitor alarm, security and telecom devices. Visit www.triplite.com for ordering information.
Note: Do not connect a keyboard or mouse to this port.
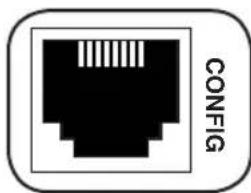
RJ-45 Configuration Port: Use this port to provide a direct terminal connection to a computer with a terminal emulation program. An RJ-45 to DB9 cable (part number 73-1243) is included with the PDU. If you need a replacement cable, visit www.triplite.com for ordering information.
Note: Configuration options can found in the SNMPWEBCARD installation guide. You can find the guide by going to www.triplite.com/support and typing "SNMPWEBCARD" in the search field.
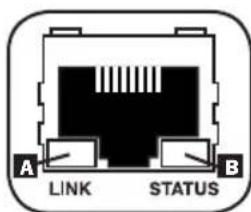
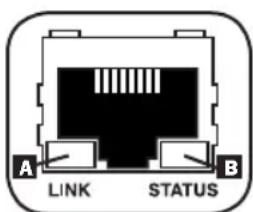
Ethernet Port: Use this RJ-45 jack to connect the PDU to the network with a standard Ethernet patch cable. The Link LED A and Status LED B indicate several operating conditions, as shown in the table below. This port is not compatible with PoE (Power Over Ethernet) applications.
| Network Operating Conditions | |
| A Link LED Color | |
| Off No Network Connection | |
| Flashing Amber 100 Mbps Network Connection | |
| Flashing Green 10 Mbps Network Connection | |
| B Status LED Color | |
| Off Card Not Initialized | |
| Steady or Flashing Green Card Initialized and Operational | |
| Steady Amber Error - Card Not Initialized | |
Configuration and Operation
Remote Monitoring
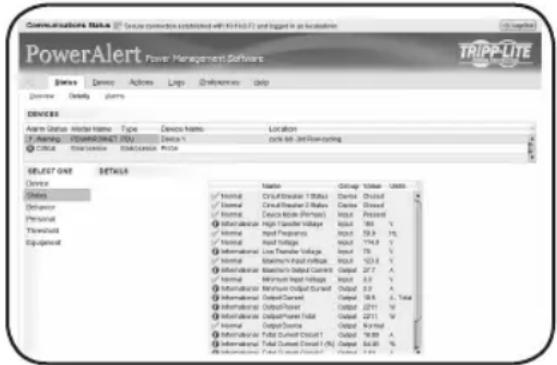
The PDU provides remote monitoring and more via Web browser, telnet and SNMP-based Network Management Systems. For more information about configuration and operation of the PDU via the PowerAlert Web browser interface, refer to the SNMPWEBCARD User's Guide. You can find the guide by going to www.triplite.com/support and typing "SNMPWEBCARD" in the search field.
Service
Your Tripp Lite product is covered by the warranty described in this manual. A variety of Extended Warranty and On-Site Service Programs are also available from Tripp Lite. For more information on service, visit www.triplite.com/support. Before returning your product for service, follow these steps:
- Review the installation and operation procedures in this manual to ensure that the service problem does not originate from a misreading of the instructions.
- If the problem continues, do not contact or return the product to the dealer. Instead, visit www.triplite.com/support.
- If the problem requires service, visit www.triplite.com/support and click the Product Returns link. From here you can request a Returned Material Authorization (RMA) number, which is required for service. This simple on-line form will ask for your unit's model and serial numbers, along with other general purchaser information. The RMA number, along with shipping instructions will be emailed to you. Any damages (direct, indirect, special or consequential) to the product incurred during shipment to Tripp Lite or an authorized Tripp Lite service center is not covered under warranty. Products shipped to Tripp Lite or an authorized Tripp Lite service center must have transportation charges prepaid. Mark the RMA number on the outside of the package. If the product is within its warranty period, enclose a copy of your sales receipt. Return the product for service using an insured carrier to the address given to you when you request the RMA.
Warranty and Product Registration
2- YEAR LIMITED WARRANTY
Seller warrants this product, if used in accordance with all applicable instructions, to be free from original defects in material and workmanship for a period of 2 years from the date of initial purchase. If the product should prove defective in material or workmanship within that period, Seller will repair or replace the product, in its sole discretion. Service under this Warranty can only be obtained by your delivering or shipping the product (with all shipping or delivery charges prepaid) to: Tripp Lite, 1111 W. 35th Street, Chicago, IL 60609 USA. Seller will pay return shipping charges. Visit www.triplite.com/support before sending any equipment back for repair.
THIS WARRANTY DOES NOT APPLY TO NORMAL WEAR OR TO DAMAGE RESULTING FROM ACCIDENT, MISUSE, ABUSE OR NEGLECT. SELLER MAKES NO EXPRESS WARRANTY OTHER THAN THE WARRANTY EXPRESSLY SET FORTH HEREIN. EXCEPT TO THE EXTENT PROHIBITED BY APPLICABLE LAW, ALL IMPLIED WARRANTYES, INCLUDING ALL WARRANTYES OF MERCHANTABILITY OR FITNESS, ARE LIMITED IN DURATION TO THE WARRANTY PERIOD SET FORTH ABOVE; AND THIS WARRANTY EXPRESSLY EXCUSES ALL INCIDENTAL AND CONSEQUENTIAL DAMAGES. (Some states do not allow limitations on how long an implied warranty lasts, and some states do not allow the exclusion or limitation of incidental or consequential damages, so the above limitations or exclusions may not apply to you. This Warranty gives you specific legal rights, and you may have other rights which vary from jurisdiction to jurisdiction).
WARNING: The individual user should take care to determine prior to use whether this device is suitable, adequate or safe for the use intended. Since individual applications are subject to great variation, the manufacturer makes no representation or warranty as to the suitability or fitness of these devices for any specific application.
PRODUCT REGISTRATION
Visit www.triplite.com/warranty today to register your new Tripp Lite product. You'll be automatically entered into a drawing for a chance to win a FREE Tripp Lite product!*
- No purchase necessary. Void where prohibited. Some restrictions apply. See website for details.
FCC Notice, Class A
This device complies with part 15 of the FCC Rules. Operation is subject to the following two conditions: (1) This device may not cause harmful interference, and (2) this device must accept any interference received, including interference that may cause undesired operation.
Note: This equipment has been tested and found to comply with the limits for a Class A digital device, pursuant to part 15 of the FCC Rules. These limits are designed to provide reasonable protection against harmful interference when the equipment is operated in a commercial environment. This equipment generates, uses, and can radiate radio frequency energy and, if not installed and used in accordance with the instruction manual, may cause harmful interference to radio communications. Operation of this equipment in a residential area is likely to cause harmful interference in which case the user will be required to correct the interference at his own expense. The user must use shielded cables and connectors with this equipment. Any changes or modifications to this equipment not expressly approved by Tripp Lite could void the user's authority to operate this equipment.
Regulatory Compliance Identification Numbers
For the purpose of regulatory compliance certifications and identification, your Tripp Lite product has been assigned a unique series number. The series number can be found on the product nameplate label, along with all required approval markings and information. When requesting compliance information for this product, always refer to the series number. The series number should not be confused with the marking name or model number of the product.
WEEE Compliance Information for Tripp Lite Customers and Recyclers (European Union)

Under the Waste Electrical and Electronic Equipment (WEEE) Directive and implementing regulations, when customers buy new electrical and electronic equipment from Tripp Lite they are entitled to:
- Send old equipment for recycling on a one-for-one, like-for-like basis (this varies depending on the country)
- Send the new equipment back for recycling when this ultimately becomes waste
The policy of Tripp Lite is one of continuous improvement. Specifications are subject to change without notice.


Manufacturing Excellence
1111 W. 35th Street, Chicago, IL 60609 USA • www.triplite.com/support
1111 W. 35th Street, Chicago, IL 60609 USA • www.triplite.com/support
1111 W. 35th Street, Chicago, IL 60609 USA • www.triplite.com/support
Manufacturing Excellence.
1111 W. 35th Street, Chicago, IL 60609 USA • www.triplite.com/support
1111 W. 35th Street, Chicago, IL 60609 USA • www.triplite.com/support
PykoBoDCTBO NOJIb3OBaTeJIA
Manufacturing Excellence.
1111 W. 35th Street, Chicago, IL 60609 USA • www.triplite.com/support
Oxpanyertca ABTopcIM npabom © 2014 Tripp Lite. Nepeneuatka zanpeuaetcra.
Baxhhie yka3aHnno texhNke 6e3onacHOCTn

COXPAHNTE HACTOUIUE YKA3AHNIA
B hactoIe m pyKOBoODCTBe codepKaTcYka3aHn IN npdeynpeXeHnN, KOToPbIE Heo6xoJIMo co6JIoDaTb B npoucece yctaHOBN, 3KcnnyatauIN xpaHeHn DaHHoro n3dEInn. IrhopnpOBaHne 3TNx Yka3aHn IN npdeynpeXeHn MoKeT npNBecTn K nOtepe rapaHTnn Ha n3dEInne.
-БлokpacnpedeJIeHnI\PaTHnI(PDU)yO6HOOCHaUeHHeCKoJIbKIMnpo3eTKaMn,HoHE o6ecneuBaET3auntyNOdkIIOueHHoroOBOpyIDOBAHnOTBbI6pocOB HAnpJxEHNrNtymOB B JINHm.
- 5nok pacnpedeeneHHa (PDU) npedha3HaueH ToIbKO IЯ nCNoIb3OBAHnB B 3akpbItbIX NOMeHEnx C perynupeMbIM MKNpOKNImaTOM BdAnOT NCTOCHNKOB NOBbIJIeHHoB BlaXHOCTN, 3KCTpeMaJIbHbIX TemnepaTyp, 3JNEKTponpoBOdHbIX 3arpa3HHTeJe, nbIIN npraMOrO COJIHeUHO CBeta.
-ПоджьайтtemпатуруВОЗдухаВнуtpиnomeшенвДираэоheOT 0^ do 50^
- UctaHOBka 6Ioka paacpeJeHEny nTahnra (PDU)doJXHa npOn3BOIDtbcra TOnbKO KBaINΦuNPOBaHHbIM TEXHueeCKM CneuaJIACTOM.
- He yctaHabnBaIte 6Iok paCpeJeHnna nITAHn (PDU) Ha He3akpeJIeHHoN nHn HeycToHbO NOBepxHOCTn.
- YctaHOBky CneDyET npOn3BOoNTb B COOTBeTCTBn C HaunOHaHbHbIMN 3JeKtpOTexHueCKMn HOpMaTINBaMn. O6raTeIbHo IcNoJIb3yIte NDOxOJaUe Ipy YcTaHaBaJNbAeMOI CnCTEmbl yCtpoiCTBa 3aUnTIb OT nepePpy30k NO TOKy B COOTBeTCTBn C HomHaJAmN, Yka3aHHbIMN Ha pa3bemax/O6opydoBaHnn.
- PódklouHTe 6IOK pacppeJeHEnn HNTaHn (PDU) K pO3eTke, COOTBeTcByUoSe npHnTbIM B BaIe CtpaHe CTponTeBhlm HopMaM n HaJdNexKaUm Opa3OM 3aUuIeHHoN OT N36bITOChbIX TOKOB, KOPOTKnx 3amblkAHn n 3amblkAHn Ha 3emNI.
3NeKtpnueckne po3eTKn, uepe3 KOtOpbIe OcyuecTBnIeTc3 3NeKtpoNTaHHe 606pyOBAHnA, DOnJXhbl 6bItb yCTaHOBJIeHb B NERKOIOCTyHOM MecTe B6N3H Hero.
- He nodknouaTe 6nok pacnpedeeneHHn (PDU) K he3aemHno po3eK, a taKke K ydnnHnTeJAM nI npexoDnKam, He IMeIoUIM 3a3emHeHH.
- O6raTeJIbHO Cha6kaIte IIO6bIe MoJeIIN, NOKJIIOUaEMbIe Hepa3bEmHbIM CnOCo6OM, JERKOIOCTyINbIM IOKaJIbHbIM yCTPOINCTBOM 3aUNTHORO OTKJIOUeHInr.
- Hn B Koem cnyae He npou3B0Dnte MoTax 3neKtpoo6OpyObaHn BO Bpem rpo3bl.
- Tok, notpe6nembl otdeIbHbIMn 3JeMeHTamn o6OpyObaHn, noKlIOaEMbIMn K 6NoKy pacnpedeHn nTaHn (PDU), He donxeH npebbIaTb HOMHaN COOTBeTCTByUx po3eTOk 6NoKa pacnpedeHn nTaHn (PDU).
Cymmapna Harpy3ka, co3daBaemn Notpe6nteMa, noKIOUeHHbIMN K 6IOKy pacnpedeHn HHTaHn (PDU), He donxHa npeBbIwAt b erO MaKcImaJIbHO dOnyCTMMyo Harpy3ky.
He BHOCHTe N3MeHEnB KOHCTpyKunO 6Joka paCnpedeJeHnA nITaHnA (PDU),BXoDhbx pa3bEmOB uIN Ka6eNei nITaHnA.
He BbICBepnBaIte OTBepCTn B Kopnyce 6noka pacnPpeJeHnna NITaHnra (PDU) n He nbTaIteCb BCKpbItb KakyIO-Jn6o erO yAcTb. BHyTpIn Hero HET DeTaeJe, o6cIyXnBaEmbIX NOb3OBaTeJeM.
He nCnoIb3yIe 6JIOka paCnpedeHnna PHTAHnA (PDU) B cIyuae noBpeKdHnna IIO6oN i3 erO qacteI.
- He pekomehyeteCnnoIb30BaT b daHoe o6opdyoBaHne B cncTeMax xN3Heo6eCeueHnB Tex cnuyax, kOra 3c0b C 60bW BepoTHocTbIO npuBeTeK c60IO o6OpdyoBaHnX3Heo6eCeueHn IIN 3HaHTeJbHOMy CHxKeHIO ero 6e3OnaCHOCTN IIN 3ΦΦeKTNBHOCTN. 3anpeaaetcNcNoIb30BaT b daHoe o6opdyoBaHne npn HAnuNN BOCnIaMeHryUHXc CmecenAHeCTNeuecknx ra3OB C BO3DyXOM, KICNOPoDM NIN 3aKnCbIO a3Ota.
yctahobka
MoHTax PDU
Ipumueaue. Ycmpoucmeo, u3obpaeknHoe Ha unllncmpauunx, moKem Heckonbko omnuambcg om eaeu Modenu PDU. He3abucumo om konphiaypuuu, noIb3oeamenb donken YcmaHOumb npuaodocmb ochmku npednonaaembix npouedeyp do hauana monmaxka. BIOK pacnpedeneu numaHra (PDU) u exoduae 8 e20 KOMNkM OCHACMKA npedha3nuehbl dner obbyhbx munoe ukafoe u moaym He nodxodumb dner ecex ueei npumehnur. Ycmanohoynbie konphiaypuauu moym pa3nuamcbc e demanr. B KomnkeM nocmaeku exodarm Euhmbdl nkrpenneHua MOmaxhblx kpohumeuHoe K PDU. NcnoIb3yime monko buhmbl, nocmaenmble npou3eodumenem, unu ux nonhlui aHaNo2.
PumueaHue. MoMaXbIe 3auenKU ycmHaBnuaIomc Ha PDU npednpuamEUMoBumem e cienx oecneueHue 603MOXHocMu 63bHcmpymHaMlbHOz MOHmka.

ДЯ MOHTAXA PDU c nCNoB3OBAHnEM 3aBOdCKNX MOHTaXhblx 3aUeJOK yCTaHObITE erO BHyTpN uKaΦa XeNaeMbIM o6pa3OM, COBMecTne 3aUeJIKN C yCTaHOBOuHbIMn Ipope3rMn B CTOnKe IN BDbINbTe PDU B erO uTaTHoe nIOJOKeHne.

IpynpKpeHn MOHTaXbIX KPOHtTeHOB K PDU CHMNTe C HrO MOHTaXHbIe 3aueKN.

PnKpEnTe MoTaxHbIe KPOHHTeHbIK PDU npN NOMOu BNHTOB, NOCTaBnEmbix B KOMJIeKTE C HIM.

PnKpEnIe PDU K BepTkaNbHoH HanpaBnaIOuSe BaWero uKaΦa.(ДЯ KpeJIeHnRA MOHTaXhBIX KPOHTeHOB K HanpaBnaIOUe NcNoJb3yNe MOHTaXHbIE npICnocO6JIeHnRA, BXoJzne B KOMnJIeKT BaWero uKaΦa.)

IyCTaHOBKn Ha MeCTO MOHTaXHbIX 3aueJOK,NCIOJIb3yeMbIX JIA 6e3bIHcTpyMeHTaJIbHOro MOHTaXa, CHIMITE MOHTaXHbIe KPOHUsTeINbI, a 3aTeM yCTaHOBITe MOHTaXHbIe 3aUeJKN 06paTHo Ha PDU.
PumueaHue.ObraameBho ecmabme 23auenku nabo8eepxhee omepcmue Ha KaKdoom KOHe PDU, nabo Huxhee omepcmue Ha KaKdoom KOHe PDU.

IyctaHOBKn PDU taKIM
6pa30m, YTo6bI erO po3eTKn 6blnn
6paueHbI K 3aDHeN CTOpHe WkaFpa,
NCIOJIb3yIte BXoJaUee B erO KOMnJIeKT
npncocO6JIeHne PDUMVROTATEBRKT.
ChauHa npHKpeNTe MOHTaxKHyU
3aJeKyA K V-6pa3Homy KpoHtEnHy
B npn NOMOu BNHTa N 7aIb6bl,
BXoJauNX B KOMnJIeKT. 3aTeM npKpeNTe
3OT KPOHtEIN K PDU, NCNoIb3yI
3aKpennHeHoe Ha 3aUeKe rHe3do,
noCne yero npKpeNTe PDU k cToiKe
c NOMOuBO MOHTaxKHO 3aUeJIKN.
3OT KPOHtEIN PhAKTueCeKN MeHReT
NOJIOKeHne MOHTaxKbIX 3aUeJIOK TAKIM
6pa3OM, YTo6bl po3eTKn PDU MoRIn 6blb
6paueHbI K 3aDHeN CTOpOHe WkaFpa.

PoiokJIoueHne PDU

KaKaJaMoJeBHeMeetO1do7BXoDhBixpa3bEmOBpa3HnHOroTnna.


L21-20PL15-L30P30P
20AHUBBIEC309
CS8365C
3P+N+E
30A Blue IEC 309
3P+E
60A Blue IEC 309
3P + E
| Нанменовные мodyдп | Вхонь разъем | Мас. Вхонь ТOK вампорax (огранчимаетс сechени ьхоногошура иразъем) | Диалазон Вхоньх наряжени | Диалazон Быхоньх наряжени | Прерьвател Тoka | Длина шура | Розтк |
| PDU3VN6L2120 | L21-20P 16A 208 B | 208 B и 120 B (c 5-15/20R ту Equ) | N/A | 1.8 m | Вcertо 45 sht.; 3 рурп no 2 sht. Тima C19, 12 sht. Тima C13, 3 рурп no 2 sht. Тima 5-15/20R | ||
| PDU3VN6L2130 | L21-30P 24A 208 B | 208 B и 120 B (c 5-15/20R ту Equ) | 3 x дыхлочьх, 20A, рурповьe | Вcertо 45 sht.; 3 рурп no 2 sht. Тima C19, 12 sht. Тima C13, 3 рурп no 2 sht. Тima 5-15/20R | |||
| PDU3VN6H50B | HUBBLE CS8365C | 35A 200-240 | B 200-240 B | 3 x дыхлочьх, 20A, рурповьe | Вcertо 48 sht.; 3 рурп no 2 sht. Тima C19 и 14 sht. Тima C13 | ||
| PDU3VN6G60B | 60A Blue IEC 390 3P + E | 35A 200-240 | B 200-240 B | 3 x дыхлочьх, 20A, рурповьe | Вcertо 48 sht.; 3 рурп no 2 sht. Тima C19 and 14 sht. Тima C13 | ||
| PDU3XVN6G20 | 16A Red IEC 309 3P + N + E | 16A 360-415 | B 208-240 B | N/A | Вcertо 48 sht.; 3 рурп no 2 sht. Тima C19 and 14 sht. Тima C13 | ||
| PDU3VN6G30B | 30A Blue IEC 309 3P + E | 24A 200-240 | B 200-240 B | 3 x дыхлочьх, 20A, рурповьe | Вcertо 48 sht.; 3 рурп no 2 sht. Тima C19 and 14 sht. Тima C13 | ||
| PDU3VN6L2130B | L21-30P 24A 200-240 | B 200-240 B | B 200-240 B | 3 x дыхлочьх, 20A, рурповьe | Вcertо 48 sht.; 3 рурп no 2 sht. Тima C19 and 14 sht. Тima C13 | ||
| PDU3VN6L1530B | L15-30P 24A 200-240 | B 200-240 B | B 200-240 B | 3 x дыхлочьх, 20A, рурповьe | Вcertо 48 sht.; 3 рурп no 2 sht. Тima C19 and 14 sht. Тima c13 | ||
| PDU3VN6G60C | 60A Blue IEC 309 3P + E | 45A 200-240 | B 200-240 B | 6 x дыхлочьх, 20A, рурповьe | Вcertо 36 sht.; 6 рурп no 6 sht. C13 |
yctahobka

IOnKJIOHHTe BXOHOpa3bem K COBMeCTUMOMY NCTOCHNY PtTaHnepemeHHoro TOKa Ha BaWEM O6BeKeT.

IOnKIOHcTe BXoHbIe pa3beMbI BaUero
O6OpyIOBaHnRA K COOTBETCTByIOzIM
BbIXoHNbIM po3eTKaM PDU.CBeueHne
HaxoJrEroCpRdOM C KaXdoi
po3eTKoB CBToDIOHO rNIDkATopa
yKa3bIBaET Ha ee rTOBHOCTb K
pacnPpeJeHnIO 3JIeKTPoNTaHnra
IpeMeHHoro TOKa, NOCTyNaIOUero OT
NCTOCHNka.
IpumueaHue.He pekomehoyemc npoknouamb K PDU nompebumenu, haxoduueces nohnapxehuem. Ecnu npoknouaembl nompebumenb cha6xeh ebiknouamenm On/off (BKn/BbIK), mo neped npoknouehuem nepeedume ezo e noloxehue OFF (BbIK).

OnuHaJIbHaj npoueDypa fKcaun Hhupa
3aФИКСИРУТpe pa3bEmblBpo3eTKaX
Pn NOMOUI BXODIUX B KOMNJIeKT
IIaCTMaCCOBbIX MyT NOd pa3bEmbl C14 nC20.PnKpeINTE MyfTy K
pa3bemy,y6eINBUnCbB TOM,HTO ee
Y3bIKN A OCTaHOTc 3a IpeDeJAMn
pa3bemaN IIIOTHO INpNIJIeAHO T K HeMy.
IJa IpaBnIbHOrO OTOeDInHeHn
OBopyIDoBaHnI CJIeDyET BbIHMaTb
pa3bEM C MyToI n3 Po3eTKN,ДePJAacb
3aЯ3bIuKn.


KpepynnpOBKe npKoCTn CBTeOIOndbIX INHdkaTOPOB
Pn BkHoueHn FyHKuHN
ABTOMaTneCKo npOKpyTKn Ha
DncJIee c 4-CEkyHdHbIM nHTepBaIOM
OTobpaKaIOc DaHHbIe O BXoHbIX
Faa3ax, Dnc6baNahce Harpy30K n
rpynnax Harpy30K. BykBa Y 03Haayet,
UTo DAHHa FyHKUra BkHIOyeHa; 6ykBa
N 03Haayet, UTo DAHHa FyHKUra
OTKIOUeHa. Pn Haxatm NIO6O
KHONKn PPONCXODNT OTKIOUeHne
FyHKUra ABtOMaTneCKo npOKpyTKn,
UTo I03BOJAre TNOB3OBaTeIIO
NEpeMeuaTbcMexdy ONzHMy
MeHIO. EcIn Hn OndHa n3 KHOJOK He
HAXIMAeTc, To NocJe npOKpyTKn
BCex ONiH NaCTyNaET 10-ceKyHDhbl
NepepbIB.
IpumueaHue.ДпяpekeHoueHuaMeKdy onuymu ydepkuBaume KhoNky ebopa pexuma (MODE) haxamou e meyeHue 3 cekyhd. Bykaea, omobpaXaMaHa Ha 2-pa3pOHOm duCnnee, coomBemcmye ebapahHOU onuu.
Popraok nCnoJIb3OBaHnI cIΦpOBOrO dNcPJIeR
Aρκοctb uCBetOBa MapKnpoBka CBeToNOHbIX NHdNKATOPOB (KOHΦnrypaunHOHHa KaTEROpn)
ДлгпpoКуТКи Каддо Onци удржИВаite KнОнky Bыбopa ржIMa (MODE) HabkaToB TteHne 3ceKHyI. LcФpa, OTObpaKaemЯ Ha 2-pa3pRdHom dncPJIee, O3Haayet cJeDyUOJIee: 1=25%; 2=50%; 3=75%; 4=100%
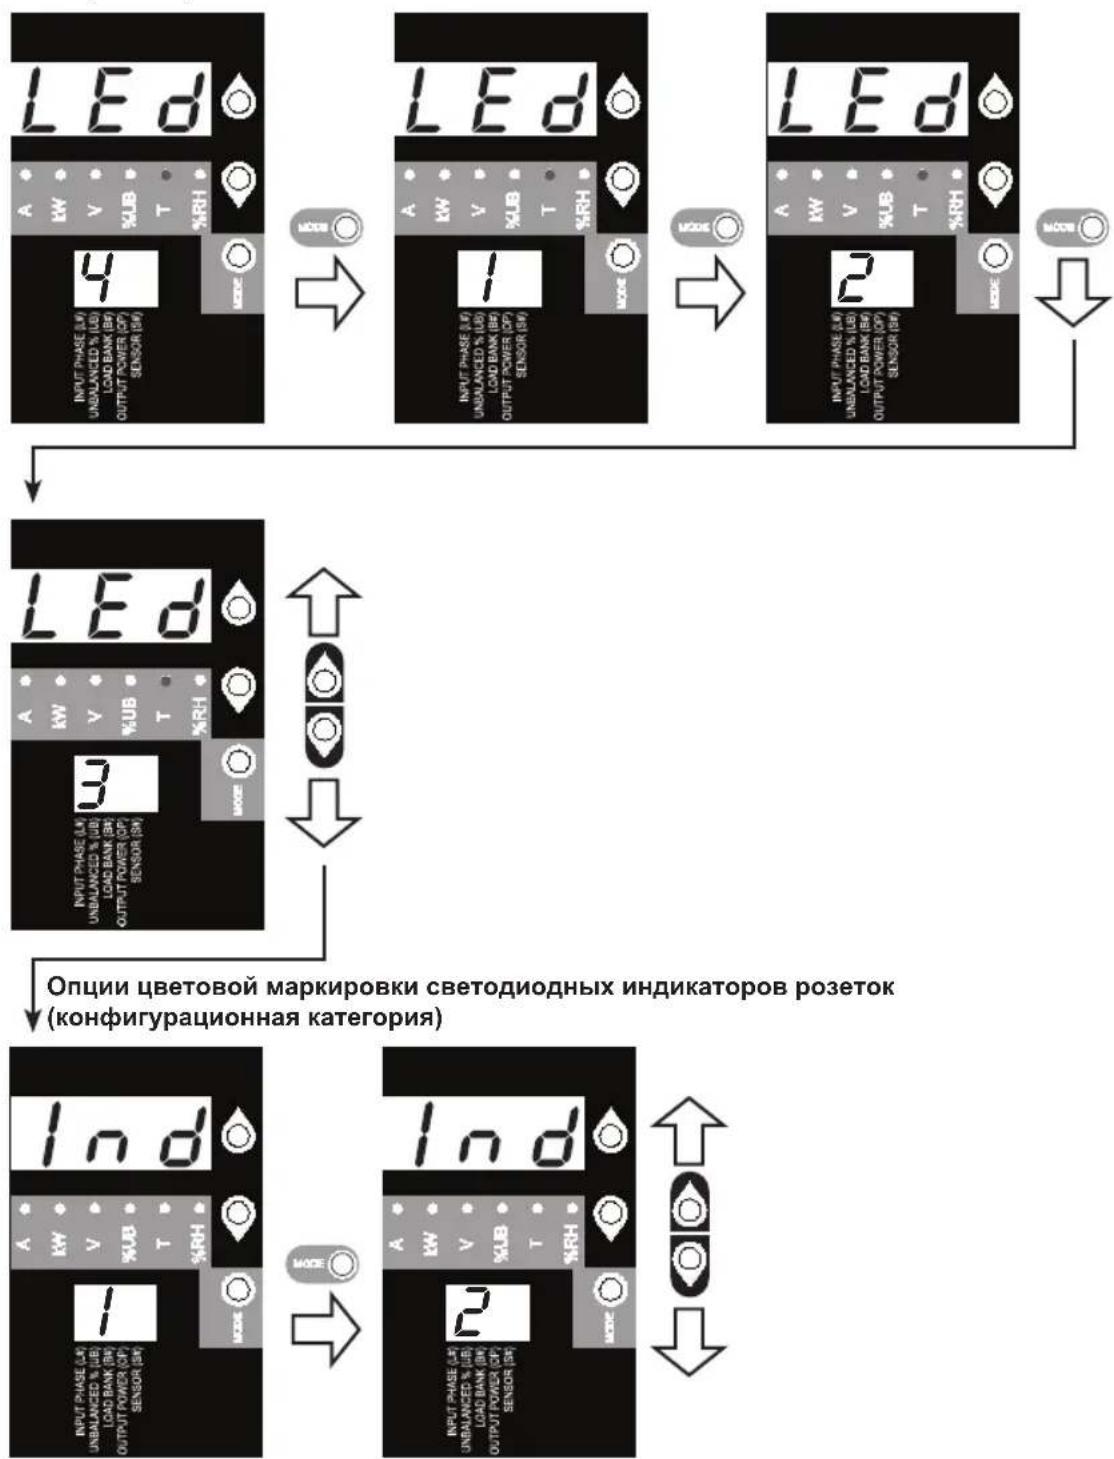
IJIpeKIOUeHmMeKdyOuCnMnYdePknBaIte KHOkny BbIbopa pexnma (MODE) HaxaToB TteHeHne 3 cekyHd. Lcnppa, OTO6pKaemar Ha 2-pa3pRiHOM dncnnee, O3Haayet Bbl6paHHbTIN MapKnpoBKn:1=CTaHdapTHaR,2=anbTePhatNBHa
Popraok nCnoJb3ObaHnI znpoBOrO dncnpe
NOKA3AHNA CBETOIOHbIX INHINKATOPOB rpynna
TecnpoBaHne CBeToaNoDhbIX INdkaTopoB
Дя TeCTnpoBaHnI yDexKnBaTe KhoNky Bb6opa pexnMa (MODE) haxaToB TteHne 3 ceKyH. B TeueHne 5 cekyHd BCE CBeTOAnOHDhie INHdkaTOpbl N cerMeHTbl Dncnpe 6ydyT ropeTB 3eJIeHbIM CBETOM, a BCE CBeTOAnOHDhie INHdkaTOpbl Harpy3KN - JeITbIM. B cnyae BO3HKnHOBeHn KaKnx-JIbIo npoBlem, CBz3aHHbIX C cyHKUHOHaJIbHOCTbIO CeMeHTOB Dncnpe IIN CBeTOAnOHDbIX INHdkaTOpOB, nocTeTte CTpaHnCy www.triplite.com/support.
Bo3MOxHocTn
C13 C19
NEMA 5-15/20R
Po3eTkn: B WtTaTHOM peKIme pa6oTbI po3eTKn pacnPpeJenHOT MOUHOCTb nepemeHHoro TOKa MExNy IIOKNIOUeHHbIMN K Hm 3JIeMeHTAmn O6OpyOBAHn.
Itpumeyaue. Moden PDU3VN6G60C He Umeem po3emok muna C19.
Ppumueaue. Po3emku muna NEMA 5-15/20R umeomcr moIbko e Moden PDU3VN6L2120/PDU3VN6L2130.
CBeToIOHbI INHdkatop cTaTyca rpynnbl
PpeOxpaHntb Bo3BpTa B INCXoDHOe NOJXKeHne
CBeToNoDhBn HmNkATOp CTaTyCa rpynnbI: pRn BKNIOUeHIN NITaHnY yCTPOyCTBa KaKDbI N3 CBeToNODhBIX NHMnKaTOpOB CTaTyCa rpynnbI 3aropaETcB MOMeHT RTOBHOCTN COOTBeTCTByIOSeI rpynnbl K pacnPdeJeHnIO NITaHnI NepemEHHorO Toka.
Ppumueaue. He noeknouaume K omomy npmy knaauamyp uu Mbub.
KoHpyauonHHI nopR RJ-45: nCNoB3yIe 3OTn oPp Tnna
obecneueHn npramoro TepmHaIbHOro NODKnIOUeHn K KombTopey C
nOMoubIO nporpaMMbI 3MyJIaun TepMHaHa. Ka6eJIc pa3beMaMn RJ-45
n DB9 (KaT.N73-1243) BxOuNT B KOMNKeT NoCTaBKn PDU.B CJNUAE
Heo6xoImocTN 3aMeHbI Ka6eJIc CM. INHOpMaUno O npraKe pa3MeueHn
3aka0B Ha cTpaHnCe www.triplite.com.
Пимачанue.ВарuaHmbi KOnfduypauu cemeoikapmbi SNMPWECARD u3noKeHbHa.BbMoKeme haum pykoedcmhoHa cmpaHue www.triplite.com/ support nymem eod a SNMPWECARD e none noucka.
Ethernet-nopr: nCnoj3yIte 3OT pa3bem Tnra RJ-45 nOdkIIOeHn PDU K CEtn C NOMOJbIO CTaHapTHoro CoeHNITbHoro Ka6eJIa Tnna Ethernet.CND Link (CB3b) A u CND Status (CTatyc) B nCnoj3yIOTc IIN o603HaueHn HeCKoJIbKnx pa6OuNX pexIMOB, KaK nokaHo B INpUBeDEHHo Hxke Ta6Nuce. 3mom npm He noodepxueaem nOdkIIOeHn no mexHOIo2u PoE (numaHue no ka6eIIO eumou napbl).
1111 W. 35th Street, Chicago, IL 60609 USA • www.triplite.com/support