B032VU1 - Switch Tripp Lite - Free user manual and instructions
Find the device manual for free B032VU1 Tripp Lite in PDF.
User questions about B032VU1 Tripp Lite
0 question about this device. Answer the ones you know or ask your own.
Ask a new question about this device
Download the instructions for your Switch in PDF format for free! Find your manual B032VU1 - Tripp Lite and take your electronic device back in hand. On this page are published all the documents necessary for the use of your device. B032VU1 by Tripp Lite.
USER MANUAL B032VU1 Tripp Lite
- Product Features 2
- System Requirements 2
- Package Contents 2
- Optional Accessories 2
- Installation 3
- Control Panel 4
6.1 Mouse Sync Modes 4
6.1.1 Automatic Mouse Synchronization ....4
6.1.2 Manual Mouse Synchronization 5
6.2 Control Panel Settings 5
6.2.1 Macros 6
6.2.1.1 Hotkeys 6
6.2.1.2 User Macros 7
6.2.1.3 Search 10
6.2.2 Video Settings 11
6.2.3 Zoom 12
6.2.4 Virtual Media 12
6.2.5 On-Screen Keyboard 14
6.2.5.1 Changing Languages 15
6.2.5.2 Selecting Platforms 15
6.2.5.3 Expanded Keyboard 15
6.2.6 Mouse Pointer 16
6.2.7 Configure Panel 16
6.2.8 Upgrade 17
- VSR Viewer 18
- Specifications 19
- Warranty and Product Registration ....20
Espanol 21
Francais 41
Pycckn 61
PROTECT YOUR INVESTMENT!
Register your product for quicker service and ultimate peace of mind.
You could also win an ISOBAR6ULTRA surge protector—a $100 value!
www.triplite.com/warranty


Manufacturing Excellence
1111 W. 35th Street, Chicago, IL 60609 USA • www.triplite.com/support
Copyright © 2017 Tripp Lite. All trademarks are the sole property of their respective owners.
1. Product Features
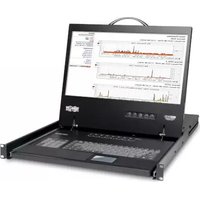
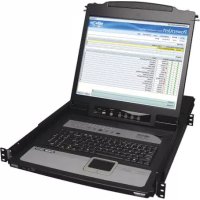
- USB Console Adapter provides direct laptop-to-computer desktop access
- Compact design with integrated cables makes it perfect for systems administrators on the move; no need for a bulky crash cart
Supports VGA video resolutions up to 1920 x 1200 @ 60 Hz
Bi-directional file transfers between local and remote computer - Virtual media enables file applications, OS patching, software installation and diagnostic testing
Video recording and image capture of remote desktop - Instant BIOS-level control
Automatic Mouse Sync synchronizes local and remote mouse pointers for optimal performance - Manual video settings allow you to adjust settings to optimize picture quality and performance
- Keyboard pass-through support
- On-screen keyboard with multi-language support
Supports macros for user-defined hotkeys - Desktop scaling allows you to adjust the size/resolution of the remote desktop window by size or ratio; no need to use scroll bars
Supports hot-plugging - Plug-and-play; no software to install
- Bus-powered; no external power required
- Firmware upgradeable
2. System Requirements
- Laptop with an available USB port
- Computer with an available VGA or DVI-I (requires a VGA to DVI adapter) monitor port and a USB port
Supports Windows XP and later
3. Package Contents
B032-VU1
USB 2.0 Mini-B Cable - 6 ft.
Quick Start Guide
4. Optional Accessories
- UR030-Series Reversible USB-A to Mini-B Cables
P120-000 VGA to DVI-A Adapter (M/F)
P561-Series DVI-D Single-Link Cables
5. Installation
- Connect the included USB Mini-B cable between the USB Mini-B port on the unit and an available USB-A port on the laptop.
- Connect the built-in USB cable to an available USB-A port on the computer you wish to access with the laptop.
- Connect the built-in VGA cable to an available VGA port on the computer you wish to access with the laptop.
- When a successful connection between the laptop and the connected computer is established, the blue LED will illuminate.
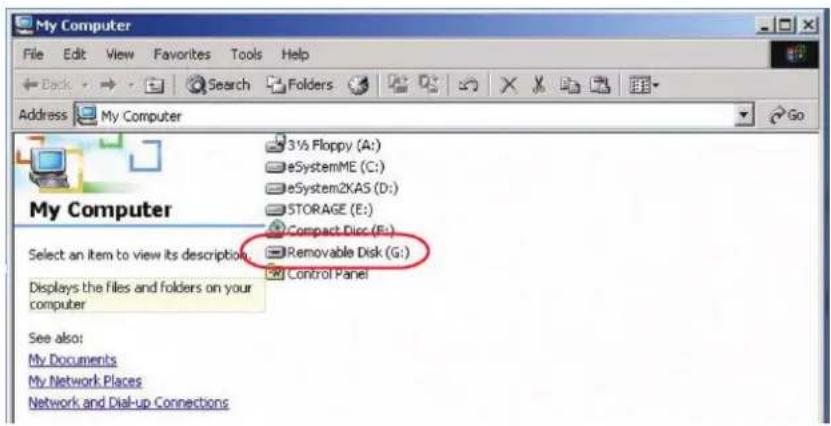
- Upon connection, generic drivers for the product automatically install, and it will be recognized as a removable disk drive. A prompt will appear asking if you wish to open it.
Note: If the prompt does not appear, go to your My Computer screen to access it.
- To establish a connection with the connected computer, open the drive folder. Upon opening, you will see two files, including a Windows Client. Open the Windows Client file.
Note: To ensure full functionality, you must run the Windows Client as an administrator.
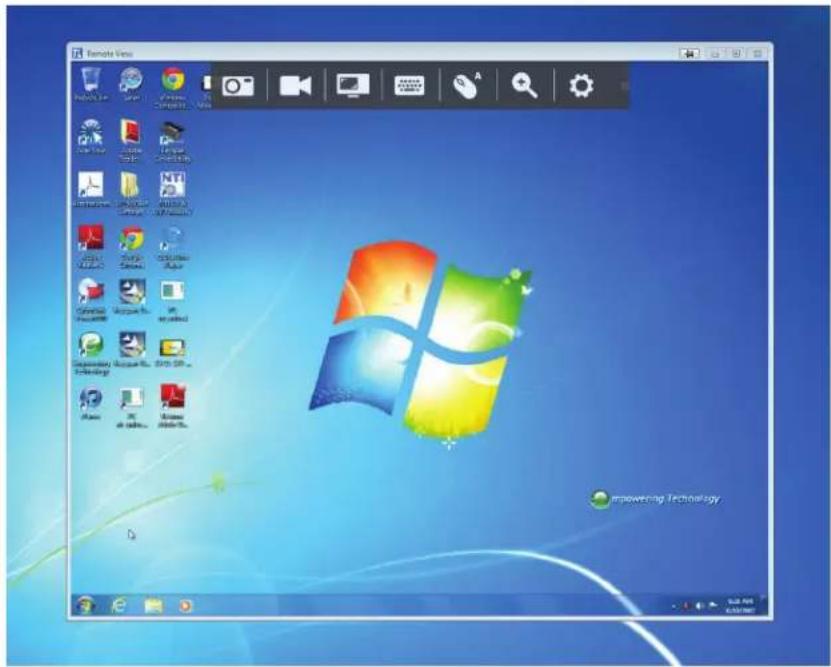
- The client will open a remote session with the connected computer, and the remote view window will appear.

Remote View Window
The Windows Client provides a remote view window with a Control Panel for accessing the connected computer. When the remote view window opens, the Control Panel is hidden. Access it by moving your mouse pointer over the top center of the screen. The Control Panel includes multiple functions and settings that allow you to manage and control your connection. It can be moved to the top left or top right side of the screen by clicking and dragging on the right side of the panel.
6. Control Panel
The following sections cover the Control Panel as it's seen in the Windows client.

1234567
| Icon Description | |
| Capture - Click to take a snapshot of the remote display. The snapshot image is saved in a directory selected in the Configure Panel screen of the Control Panel's Settings menu. See Section 6.2.7: Configure Panel for details. | |
| Record - Click to take a video of the remote display. The video file is saved in the same directory as the snapshot images taken with the Capture function. See Section 6.2.7: Configure Panel for details. For details on viewing video files, see Section 7: VSR Viewer. | |
| Video Sync - Click to perform a Video Sync on the remote screen. It detects the vertical and horizontal offset values of the remote screen and synchronizes them with the local screen. | |
| On-Screen Keyboard - Click to display the On-Screen Keyboard. See Section 6.2.5: On-Screen Keyboard for details on its use. | |
| Mouse Sync Modes - Click to toggle between Automatic and Manual mouse sync. When Automaticyncing is selected, an "A" will appear on the mouse icon. When manual, an "M" will appear. Automatic Mouse Sync automatically locks in and syncs the local and remote mouse pointers for you, eliminating the need for any manual resyncing. For Manual Mouse Sync, see Section 6.1.2: Manual Mouse Synchronization for details. | |
| + | Zoom - Click to zoom in or out on the remote screen. Options are 25%, 50%, 75%, 100%, 1:1 and Full Screen. See Section 6.2.3: Zoom for details. |
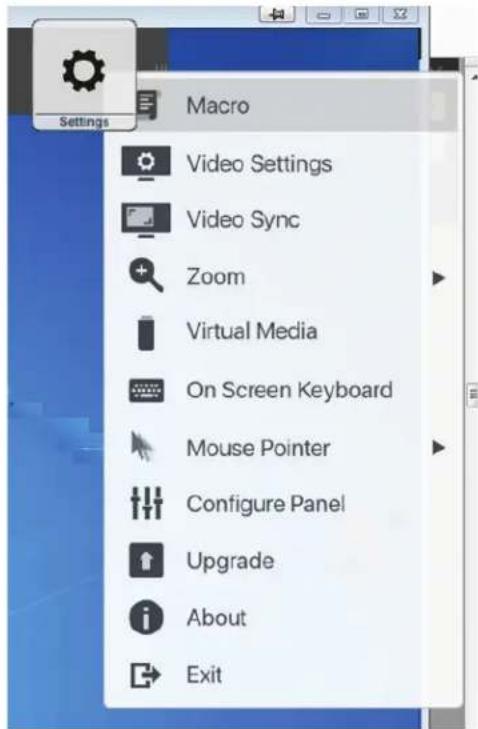
| Control Panel Settings - Click to open a menu that includes some of the same functions as the control panel (e.g. Video Sync and Zoom), as well as additional settings and functions for controlling the remote session and maintenance of the unit. See Section 6.2: Control Panel Settings for details. | |
6.1 Mouse Sync Modes
Synchronization of the local and remote mouse pointers is accomplished either automatically or manually.
6.1.1 Automatic Mouse Synchronization
Automatic Mouse Sync provides automatic locked-inyncing of the remote and local mouse pointers, eliminating the need to constantly resync the two movements.
The icon on the Control Panel indicates the synchronization mode status:
| Icon Description | |
| A | The "A" on this icon indicates Automatic Mouse Sync is available and enabled. This is the default setting when Mouse Sync is available. |
| M | The "M" on this icon indicates Automatic Mouse Sync is available but not enabled. |
When Automatic Mouse Sync is available, clicking the icon toggles its status between enabled and disabled. If you choose to disable Automatic Mouse Sync mode, you must use the manual synching procedures described in the following Manual Mouse Synchronization section.
6. Control Panel
6.1.2 Manual Mouse Synchronization
If the local mouse pointer goes out of sync with the remote system's mouse pointer, there are a number of methods to bring them back into sync.
Before trying any mouse synchronization procedures, go to your Mouse Properties Settings and set them according to the following instructions. The Mouse Properties Settings should be set on the computer attached to the B032-VU1, not the computer you are using to access it.
Note: For the local and remote mice to synchronize, you must use the generic mouse driver supplied with the MS operating system. If you have a third party driver installed, such as one supplied by the mouse manufacturer, you must remove it.
Windows XP and later:
- Open the Mouse Properties dialog box.
- Click the Pointer Options tab.
- Set the mouse speed to the middle position (6 units in from the left).
- Disable Enhance Pointer Precision.
If you are having syncing problems after adjusting the mouse properties, try the following methods to help synchronize the local and remote mouse pointers.
Note: Mouse synchronization may require several seconds to take effect. Wait 15 to 30 seconds to ensure the mouse has had enough time to sync.
- Perform a video and mouse auto sync by clicking the Video Sync icon in the Control Panel.
- Perform an Auto Sync in Video Settings (see Section 6.2.2: Video Settings).
- Invoke the Adjust Mouse function with the Adjust Mouse hotkeys (see Section 6.2.1.1: Hotkeys).
- Move the pointer into all four corners of the screen (in any order).
- Drag the Control Panel to a different position on the screen.
6.2 Control Panel Settings
Click the Control Panel Settings icon to open a menu that includes some of the same functions as the control panel (e.g. Video Sync and Zoom), as well as additional settings and functions for controlling remote sessions and maintenance of the unit. All functions and settings in this menu are described in this section.
6. Control Panel
6.2.1 Macros
The Macro icon opens up a screen that provides access to two tabs: Hotkeys and User Macros. Each function is described in the following sections.
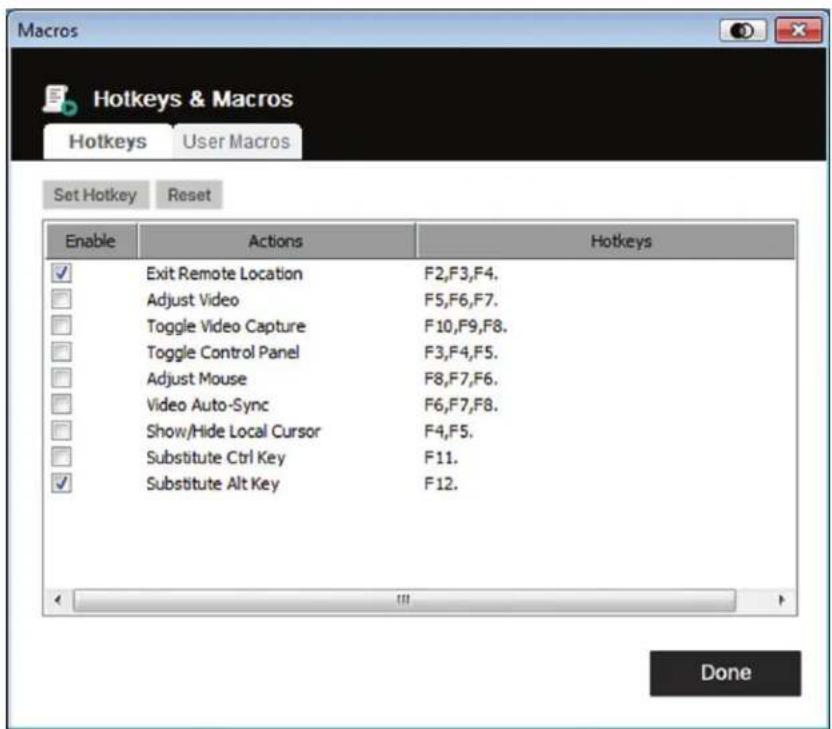
6.2.1.1 Hotkeys
Various actions related to manipulating the remote server can be accomplished via keyboard hotkey commands. The Hotkeys tab lets you configure which hotkeys perform which actions. Hotkeys that invoke an action are shown to the right of its name. Click the checkbox to the left of an action's name to enable or disable its hotkey.
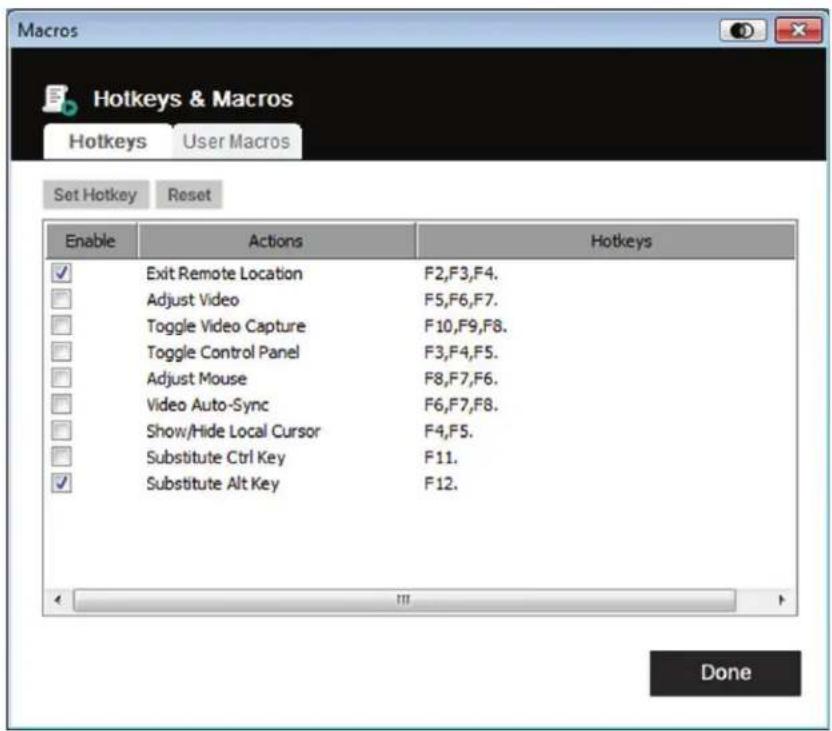
To change the hotkey for an action:
- Highlight the desired hotkey and click the Set Hotkey button.
- Press the combination of Function keys (one at a time) you want to use for the action. The Function key names appear in the Edit Hotkey field as you press them.
Note: You can use the same function keys for more than one action as long as the key sequence is not the same. To cancel setting a hotkey value, click Cancel. To clear an action's Hotkeys field, click Clear.
- When you have finished keying in your sequence, click Save.
To reset all hotkeys to their default values, click Reset.
6. Control Panel
An explanation of the Hotkey actions is in the table below:
| Action Description | |
| Exit Remote Location | Breaks the connection to the remote session and returns you to local client computer operation. This is equivalent to clicking the Exit icon on the Control Panel. Default keys: F2, F3, F4. |
| Adjust Video | Brings up the Video Settings dialog box. This is equivalent to clicking the Video Settings icon in the Control Panel Settings menu. Default keys: F5, F6, F7. |
| Toggle Video Capture | Toggles the Video Capture feature to start and stop recording a video of the remote display. Default keys: F10, F9, F8. |
| Toggle Control Panel Toggles the Control Panel off and on. Default keys: F3, F4, F5. | |
| Adjust Mouse Synchronizes local and remote mouse movements. Default keys: F8, F7, F6. | |
| Video Auto-Sync | Performs a Video auto-sync operation. It is equivalent to clicking the Video Sync icon on the Control Panel. Default keys: F6, F7, F8. |
| Show/Hide Local Cursor | Toggles off and on. Hides local cursor, locks mouse pointer and keyboard use within the Windows Client AP window and hides the control panel. This is equivalent to selecting the Single pointer type from the Mouse Pointer icon on the Control Panel Settings menu. Default keys: F4, F5. |
| Substitute Ctrl Key | If your local client computer captures Ctrl key combinations (preventing them from being sent to the remote server), you can implement their effects on the remote server by specifying a function key to substitute for the Ctrl key. For example, if you substitute the F11 key, pressing [F11] + [5] would appear to the remote server as [Ctrl] + [5]. Default key: F11. |
| Substitute Alt Key | Although all other keyboard input is captured and sent to the unit, [Alt] + [Tab] and [Ctrl] + [Alt] + [Del] work on your local client computer. To implement their effects on the remote server, another key may be substituted for the Alt key. For example, if you substitute the F12 key, you would use [F12] + [Tab] and [Ctrl] + [F12] + [Del]. Default key: F12. |
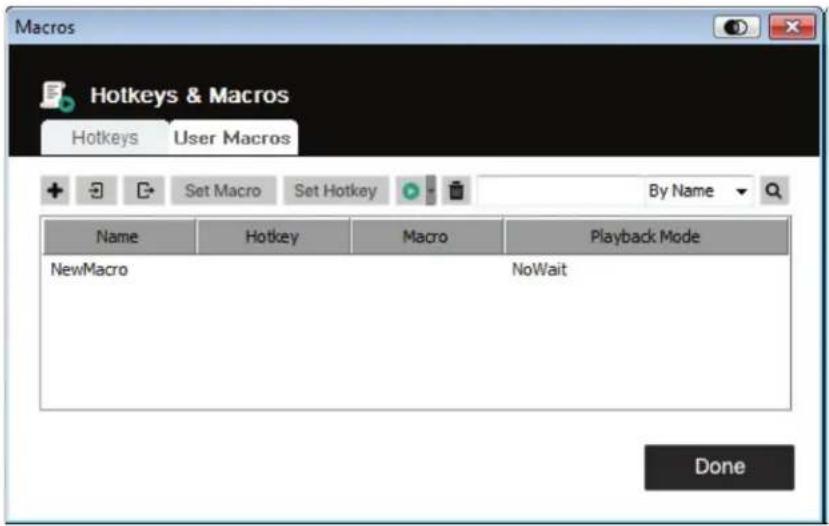
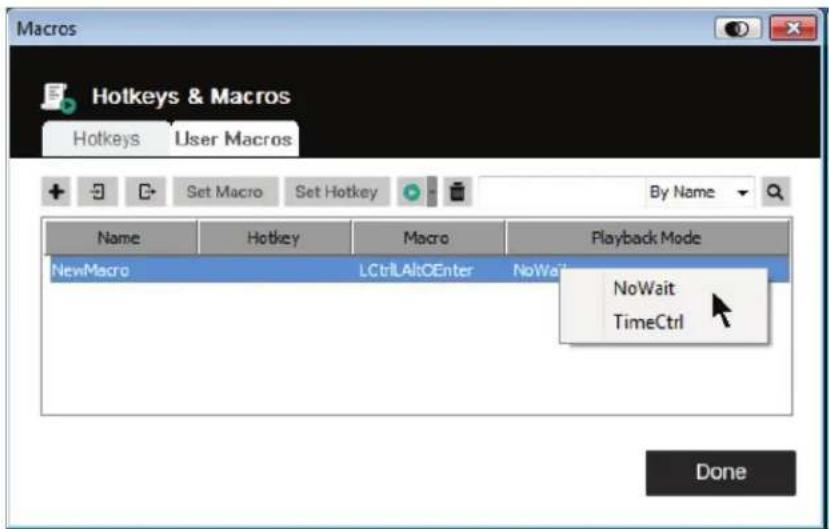
6.2.1.2 User Macros
User Macros are created to perform specific actions on the remote server. User Macros are stored on the Local Client computer. There is no limit to the number of macros, the size of the macro names, or makeup of the hotkey combinations that invoke them.
To create a macro:
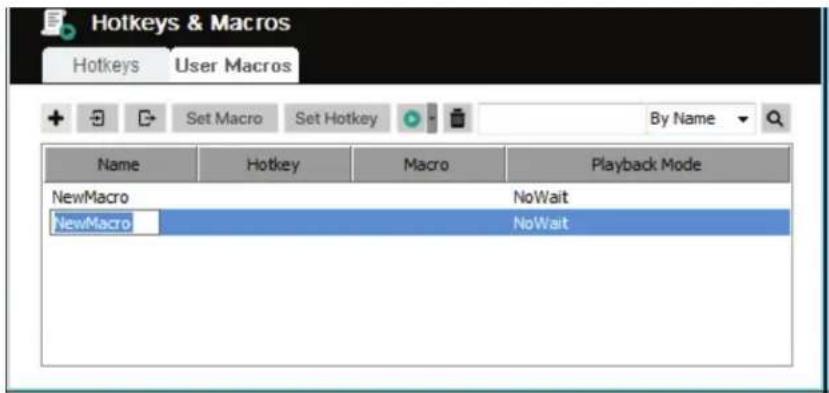
- Select User Macros, then click Add.
6. Control Panel
- In the dialog box that comes up, enter a name for the macro:
- Click Set Macro and then the red Record icon.
- Press the keys for the macro.
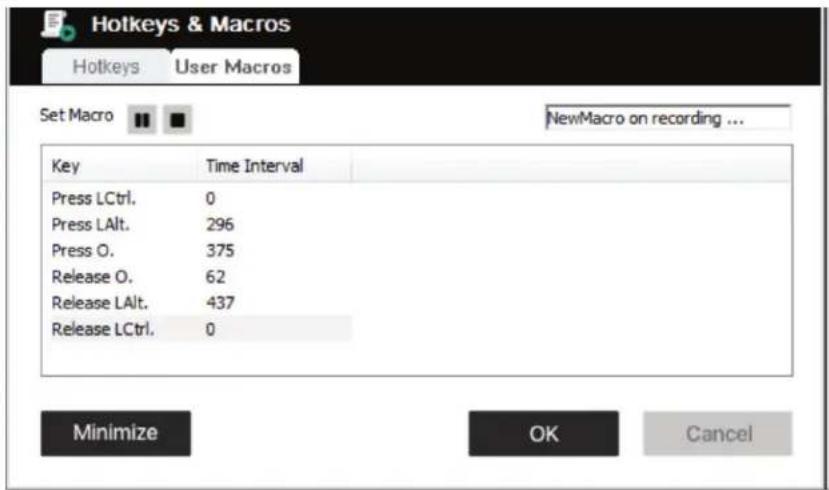
When recording Macro key commands:
The focus must be on the remote screen. It cannot be in the macro dialog box.
- Case is not considered; typing "A" or "a" has the same effect.
- Only the default keyboard characters may be used. Alternate characters cannot be used. Example: If the keyboard is Traditional Chinese and default character is "A", the alternate Chinese character obtained via keyboard switching is not recorded.
- Click the Pause icon to pause. To resume, click the Resume icon.
- When you click Minimize, the dialog box disappears and a small panel appears at the top left of the screen:

- Click Show Detail to return to the macro dialog box.
- Click Cancel to cancel all keystrokes.
- Click Stop or OK to end recording of Macro key commands.
6. Control Panel
- Upon finishing your Macro recording, the Macros screen reappears with the new Macro and its Macro key commands displayed. If you want to change any of the keystrokes for a macro, select the macro from the list and click Set Macro. This brings up a dialog box allowing you to change the content of your keystrokes, change their order, etc.
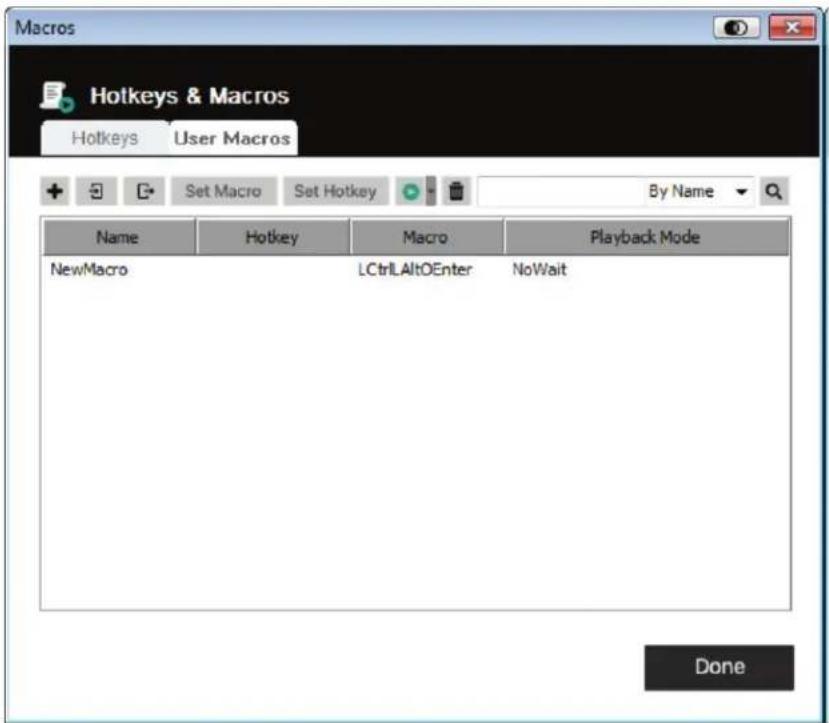
- Select a macro and click Set Hotkey to assign a hotkey to execute the macro.
- The complete Macro list can be imported/exported using the and icons on the top panel.
6. Control Panel
After creating your macros, you can run them in two ways:
- Use their hotkey command (if one was assigned).
- Open the Macros screen, select a Macro and click the Play icon. Click on the arrow next to the Play icon and you will be given two choices:
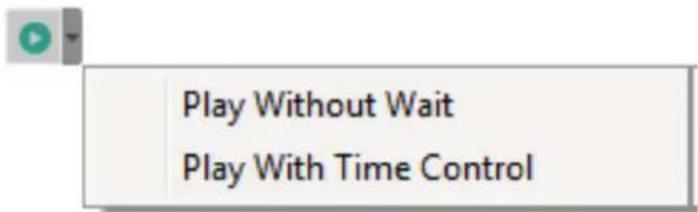
If you choose Play Without Wait, the macro runs the key presses one after another with no time delay between them.
If you choose Play With Time Control, the macro waits the amount of time you took between key presses when you created it.
If you click Play without opening the list, the macro runs with the choice shown in the Playback Mode column (NoWait or TimeCtrl). You can change this choice by clicking on the current choice and selecting the alternate choice.
6.2.1.3 Search
The Search icon in the top right of the Macros screen lets you filter the list of macros that appear in the large lower panel for you to play or edit. Click the drop-down menu to choose whether you want to search by name or key, enter a string for the search, then click the Search icon. All instances that match your search string appear in the upper panel.
6. Control Panel
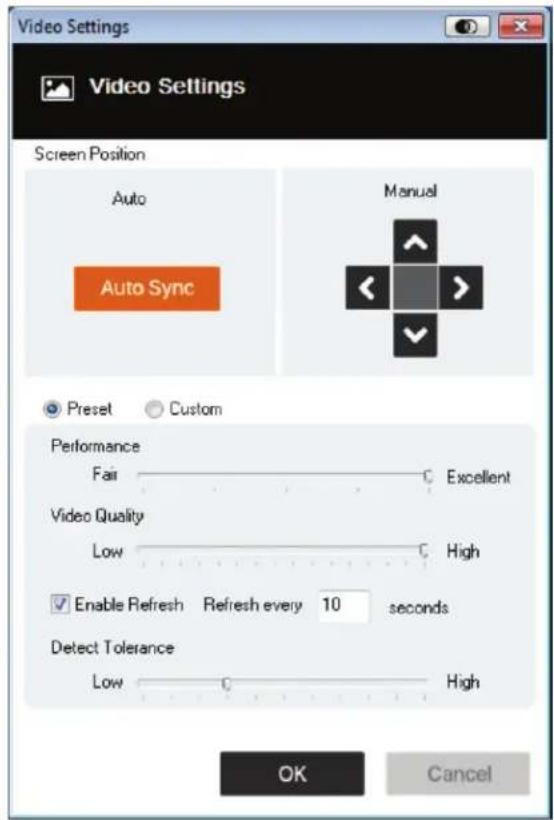
6.2.2 Video Settings
Clicking the Video Settings icon on the Control Panel Settings menu brings up the Video Settings dialog box. The options in the dialog box allow you to adjust the Screen Position, slide bar settings (Performance, Video Quality, Detect Tolerance) and Refresh settings, as shown below:
| Option Description | |
| Manual Manually | adjust the horizontal and vertical position of the remote server window by clicking the arrow buttons. |
| Auto-Sync | Click the Auto-Sync button to have the vertical and horizontal offset values of the remote screen automatically detected and synchronized with the local screen. Notes: • If the local and remote mouse pointers are out of sync, performing this function will bring them back into sync in most cases. • This function works best with a bright screen. • If you are not satisfied with the results, use the four arrow buttons to position the remote display manually. |
| Performance | The unit will use the value selected here to automatically adjust the Video Quality settings to allow for the desired level of keyboard and mouse performance. A larger value will reduce the Video Quality to improve remote operation responsiveness. |
| Video Quality | Drag the slider bar to adjust the overall Video Quality. A larger value will improve video quality, but will result in a larger amount of data being transmitted. This can affect remote operation responsiveness. |
| Enable Refresh | The unit can redraw the screen every 1 to 99 seconds, eliminating unwanted artifacts from the screen. Select the Enable Refresh checkbox and enter a number from 1 to 99. The unit will redraw the screen at the interval you specify. This feature is disabled by default. Notes: • The unit starts counting the time interval when mouse movement stops. • Enabling this feature increases the volume of video data transmitted. The lower the number specified, the more often the video data is transmitted. Setting the value too low may adversely affect overall operating responsiveness. |
| Detect Tolerance | This setting relates to video quality. It governs detecting or ignoring pixel changes. A high setting can result in a lower quality display due to less data transfer. A lower setting will result in better video quality. Setting the threshold too low may allow too much data to be transferred, negatively impacting performance. |
6. Control Panel
6.2.3 Zoom
The Zoom icon controls the zoom factor for the remote console window:
| Setting Description | |
| 25% Sizes and displays the remote view window at 25%. | |
| 50% Sizes and displays the remote view window at 50%. | |
| 75% Sizes and displays the remote view window at 75%. | |
| 100% Sizes and displays the remote view window at 100%. | |
| 1:1 | Sizes and displays the remote view window at 100%. The difference between this setting and the 100% setting is that when the remote view window is resized, its contents don't resize—they remain at the size they were. To see objects outside of the viewing area, move the mouse to the window edge and the screen will scroll. |
| Full Screen | Sizes and displays the remote console window at full screen. To exit, click Full Screen a second time. |
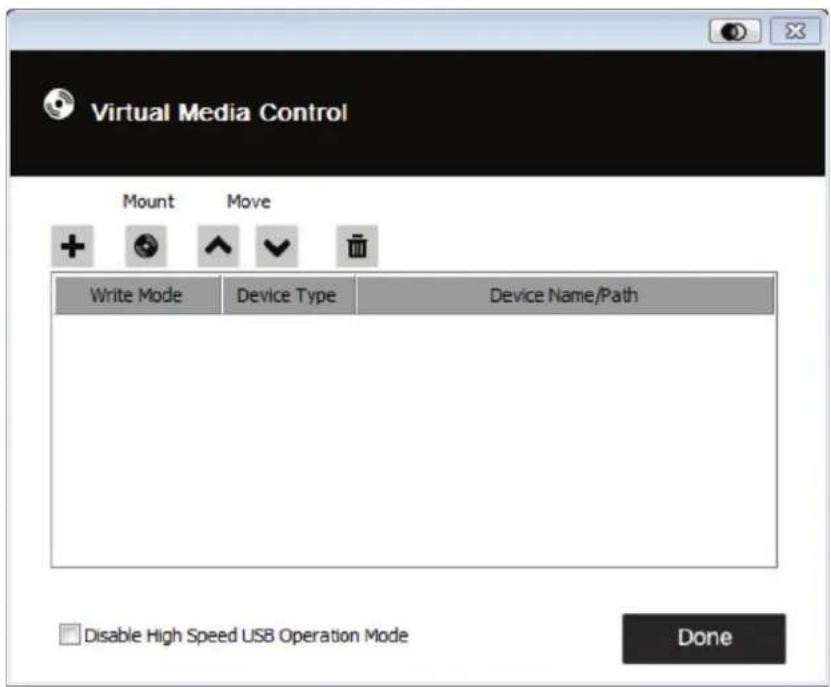
6.2.4 Virtual Media
The Virtual Media feature found on the Control Panel Settings menu allows a drive, ISO file, folder, removable disk or smart card reader on a user's system to appear and act as if it were installed on the remote server.
Mounting Virtual Media
To mount a virtual media device:
- Click the Virtual Media icon to bring up the Virtual Media Control dialog box:
6. Control Panel
- Click the plus icon + and then select the media source. Depending on your selection, additional dialog boxes appear to let you select the desired Drive, ISO File, Folder or Removable Disk.
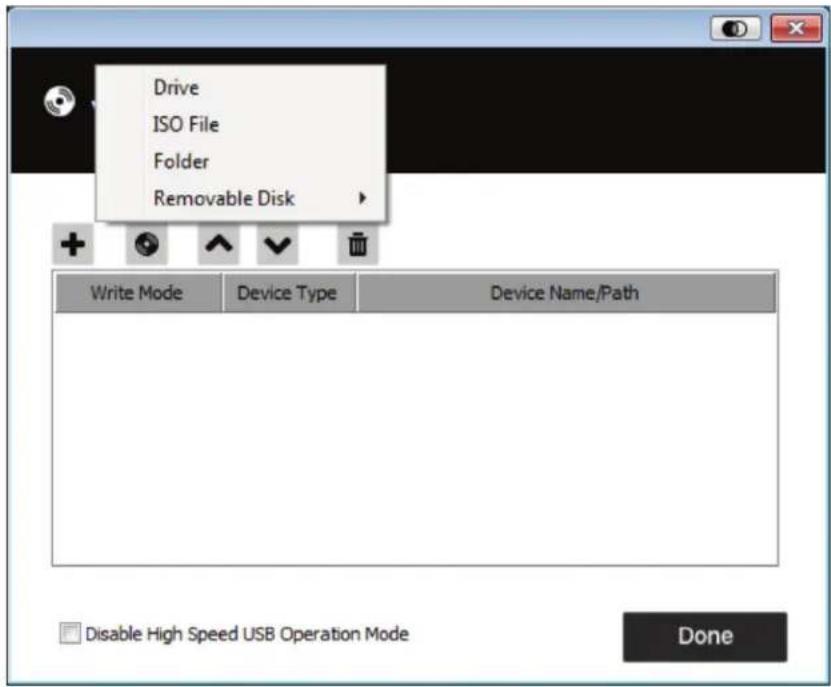
- If your device only supports full speed USB, click the Disable High Speed USB Operation Mode checkbox.
- To add additional media sources, repeat steps 2 and 3. You can select as many sources as you want, but you can only mount up to three at a time. The top three in the list are automatically selected when you click the Mount icon . To rearrange the selection order, highlight the device you want to move, then click the arrow icons to move it up or down the list.
- "Read" refers to the redirected device being able to send data to the remote server. "Write" refers to the redirected device being able to have data from the remote server written to it. For the redirected device to be readable, click the Enable Write checkbox:
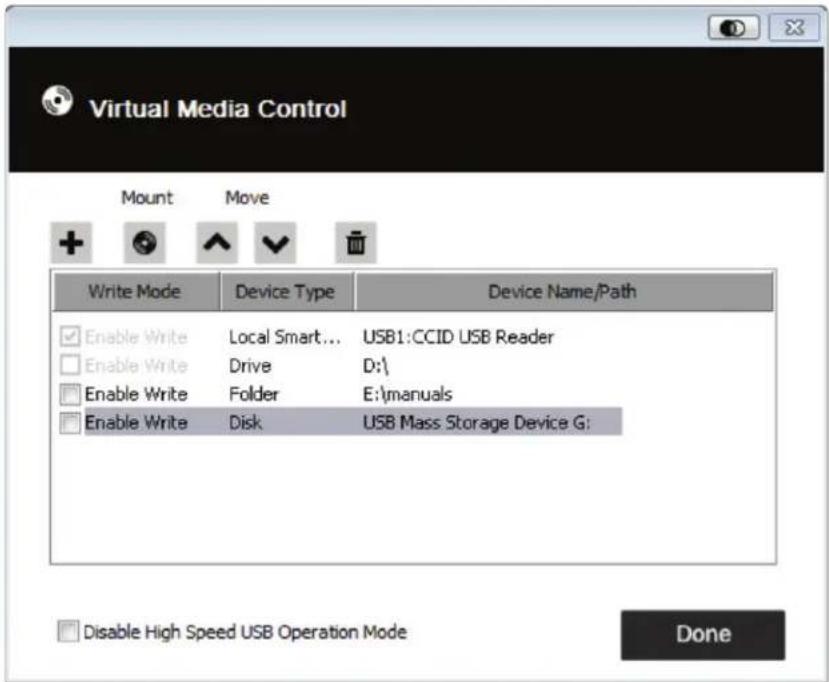
Note: If a redirected device cannot be written to, it appears in gray.
6. Control Panel
- To remove an entry from the list, select it and click the trash can icon
- After you have made your media source selections, click the Mount icon. The dialog box closes, and the virtual media device(s) you have selected are redirected to the remote server, showing up as drives, files, folders, etc. on the remote server's file system.
- Once mounted, you can treat the virtual media as though it really existed on the remote server (e.g. drag and drop files to/from it, open files on the remote server for editing and save them to the redirected media, etc.). Files you save to the redirected media will actually be saved on your local client computer's storage. Files you drag from the redirected media will actually come from your local client computer's storage.
- To end the redirection, bring up the Control Panel and click on the Virtual Media icon. All mounted devices are automatically unmounted.
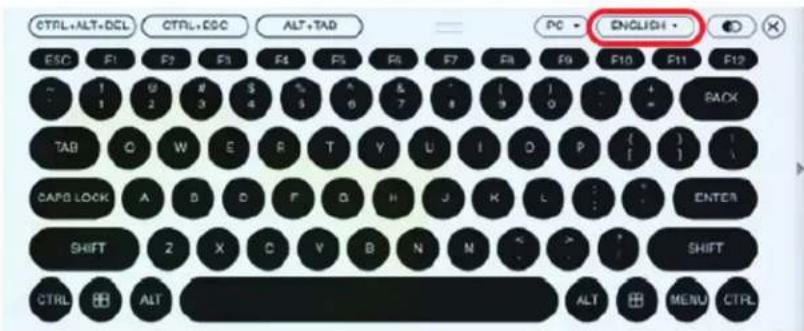
6.2.5 On-Screen Keyboard
The B032-VU1 supports an on-screen keyboard, available in multiple languages, with all the standard keys for each supported language. Click this icon to open the on-screen keyboard:
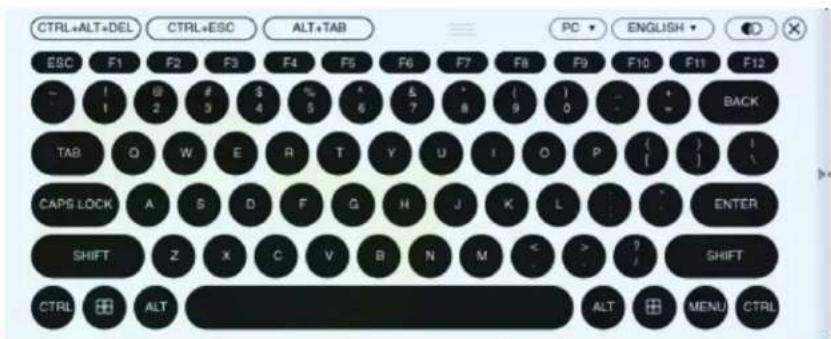
One of the advantages of the on-screen keyboard is that if the keyboard languages of the remote and local systems aren't the same, you don't have to change the settings for either system. Just bring up the on-screen keyboard, select the language and start typing. Note: You must use your mouse to click on the keys of the on-screen keyboard. You cannot use your actual keyboard.
6. Control Panel
6.2.5.1 Changing Languages
To change languages, click the down arrow next to the currently selected language in the top-right corner of the keyboard, and select the desired language.
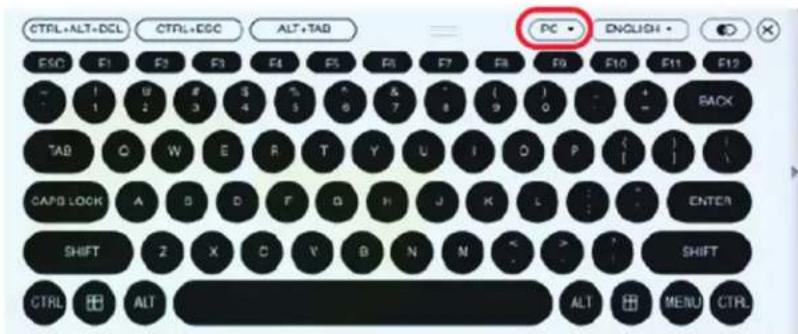
6.2.5.2 Selecting Platforms
The on-screen keyboard supports the Sun platform, as well as the PC. To select the platform, click the down arrow next to the currently selected platform in the top-right corner of the keyboard, and choose the desired platform.
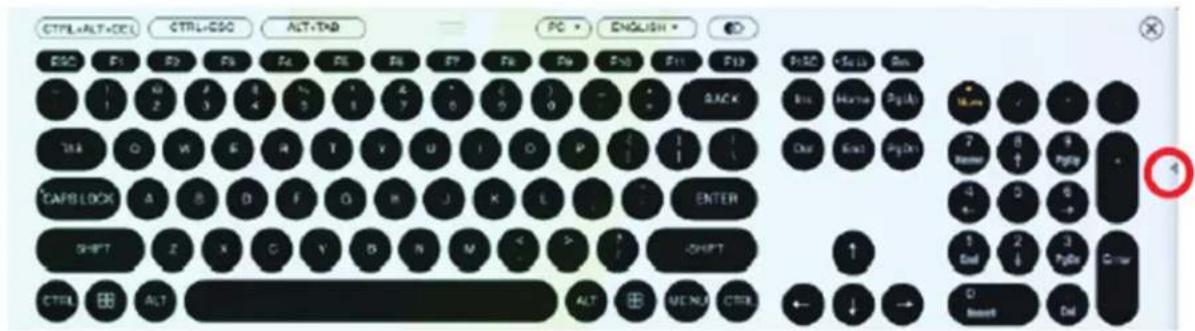
6.2.5.3 Expanded Keyboard
To display/hide the expanded keyboard keys, click the arrow on the right side of the keyboard.
6. Control Panel
6.2.6 Mouse Pointer
The control panel offers a number of mouse pointer options when working in the remote display. Click this icon to select from the available choices:
Notes:
- Clicking the Single pointer hides the local cursor and locks the mouse pointer and keyboard use within the Windows Client AP window. It also hides the control panel. To exit Single pointer mode, use the [F4] [F5] hotkey command.
- Selecting the Dot pointer has the same effect as the Adjust Mouse hotkey function.
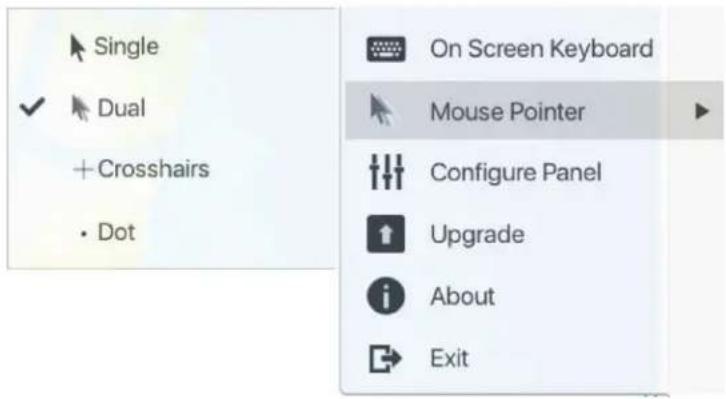
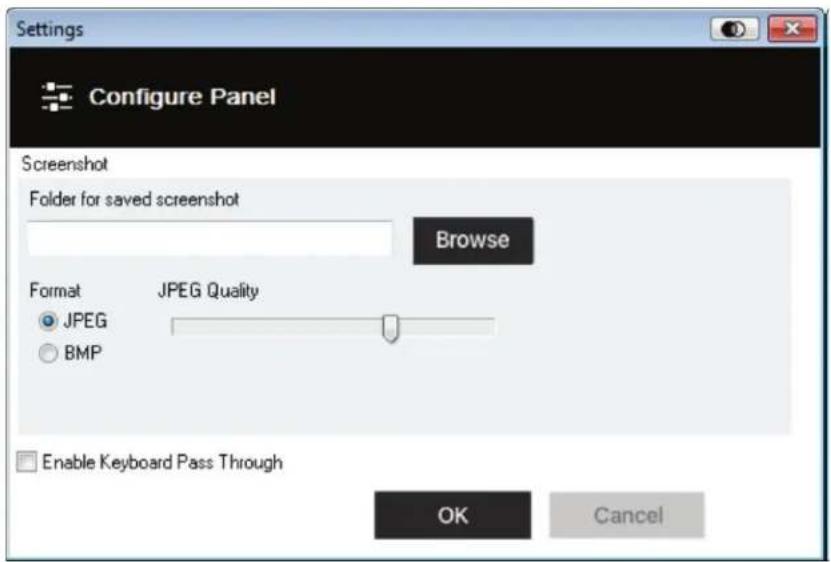
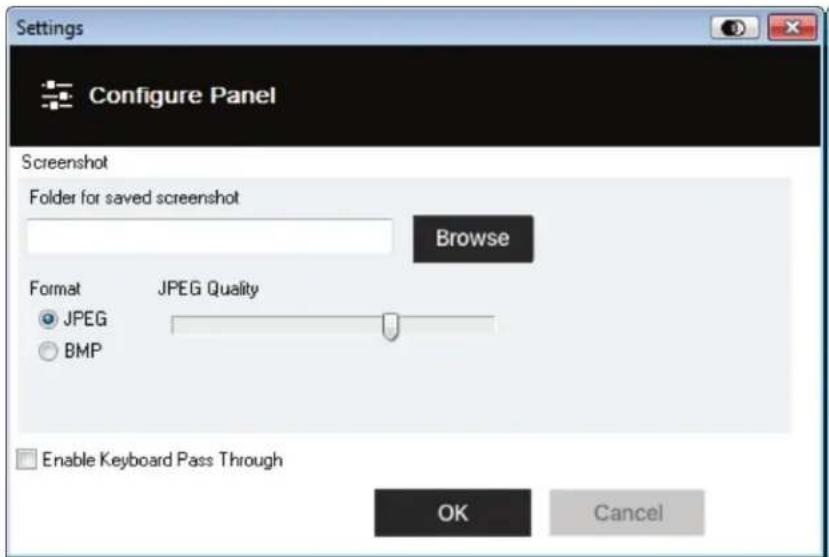
6.2.7 Configure Panel
Clicking the Configure Panel icon from the Control Panel Settings menu brings up a dialog box that allows you to configure snapshot and keyboard pass-through settings:
Configure Panel settings are described in the table below:
| Item Description | |
| Screenshot | These settings let the user configure the B032-VU1's screen capture parameters for when you use the Capture icon from the Control Panel: • To select a directory that captured screens and video files automatically get saved to, click Browse, navigate to the directory of your choice and then click OK. If you don't specify a directory here, the snapshot or video file is saved to your desktop. • Click a radio button to choose whether you want the captured screen to be saved as a JPEG (JPG) or BMP file. • If you choose JPEG, you can select the quality of the captured file with the slider bar. The higher the quality, the better looking the image, but the larger the file size. |
| Keyboard Pass-Through | When this is enabled, the Alt-Tab key press is passed to the remote server and affects that server. If it is not enabled, Alt-Tab acts on your local client computer. |
6. Control Panel
6.2.8 Upgrade
The Upgrade icon allows you to upgrade the product firmware.
To upgrade the firmware, do the following:
- Download the new firmware file from www.triplite.com/support.
- Run the Windows Client to open the remote view window. Click on the Control Panel Settings icon and select the option to Upgrade. The Firmware Upgrade window opens:
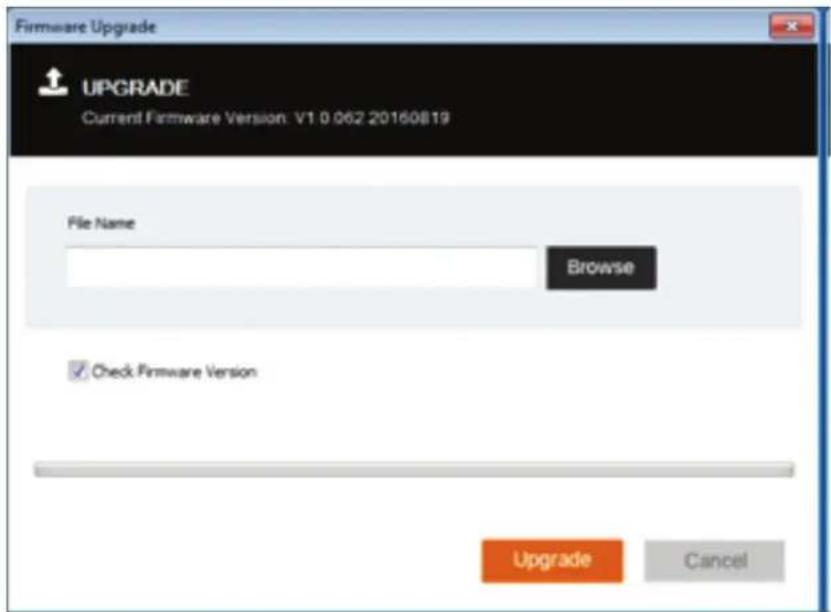
- Click Browse and navigate to the directory the new firmware file is in. Select the file.
- Click Upgrade to start the upgrade procedure.
If you enabled Check Firmware Version, the current firmware level is compared with that of the upgrade file. If the current version is equal to or higher than the upgrade version, a popup message appears informing you of the situation and stops the upgrade procedure.
- If you didn't enable Check Firmware Version, the upgrade file is installed without checking its level.
- As the upgrade proceeds, progress information is shown in the Progress bar.
- Once the upgrade completes successfully, the unit resets itself.
- Reconnect to the unit and check the firmware version to ensure it is the new one.
7. VSR Viewer
The B032-VU1 allows you to record a video of the remote display via the Video icon on the Control Panel. Clicking the Video icon starts and stops the recording. By default, videos are saved to the local computer's desktop. This location can be changed via the Configure Panel screen in the Control Panel Settings menu. Saved video files can be opened with the VSR Viewer. For security, the VSR Viewer is the only application that can open these video files.
To open a video file:
- Open an Explorer window and access the Removable Drive created for the B032-VU1. The Windows client is also found on the Removable Drive.
- Double-click the JavaVLS.jar file to launch the VSR Viewer:
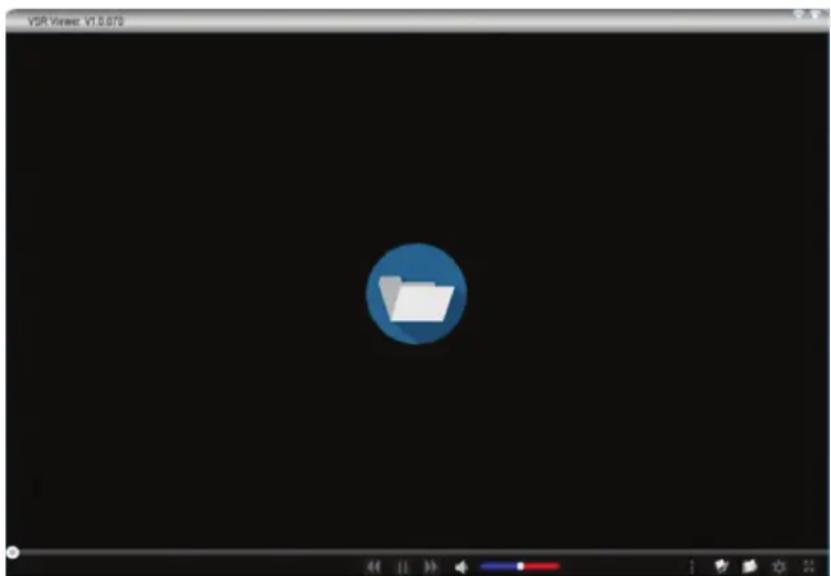
The following table describes the icons found in the VSR Viewer screen:
| Icon Description | |
| Opens a video file so it can be viewed. Click to browse for saved *.vIs files, select a file and then click Open. | |
| Drag the round button left or right across the playback bar to bring the video to a specific time or frame. Hover the mouse over the playback bar for detailed time and date information. | |
| Pauses the video while it's being played. | |
| Plays the video after it's been paused. | |
| Fast-forwards the video while it's being played. | |
| Reverses the video while it's being played. | |
| Mutes the audio. | |
| Drag the round button across the volume control bar to increase/decrease the volume. | |
| Opens the Settings Menu bar. See below. | |
7. VSR Viewer
| Icon Description | |
| Scale Mode Caption □ Repeat Play Language Encoding | Allows configuration of the following options: Scale Mode ·Keep Video Size - Keeps the video the same size regardless of how the window is adjusted. Parts of the desktop may not appear on the screen if the window is made too small. ·Scale Video to Window - Resizes the video to match the size of the window frame. ·Keep Video Ratio - Keeps the ratio of the video to window size regardless of how the frame is adjusted. |
| Caption Opens a window to adjust the text format for on-screen notifications. The caption feature displays text notifications when keystrokes and mouse clicks were performed on the remote computer. You can obtain detailed information about the text that was typed by opening the Control Panel (see the Control Panel icon later in this table). ·Caption Setting - Clicking the small icon at the top right corner toggles the caption feature on and off. ·Font - Selects the font type and size. ·User Key Strokes - Selects the text and outline color of the text representing the keys pressed on the keyboard when the user was accessing the computer. ·User Mouse Clicks - Selects the text and outline color of the text representing the mouse clicks pressed when the user was accessing the computer. ·Position - Click a box to select where the text will appear on the screen. ·Default - Click to revert the caption text back to the default settings. Repeat Play Puts the video in a continuous loop. Language Allows you to select the language for the VSR Viewer GUI. Encoding Allows you to select the video encoding for different regions. The default setting is USASCII. | |
| Saves the video file to a new location and/or with a new name. | |
| Opens a new video file. The VLS Viewer can only play video files with the *.vls extension. | |
| Opens the Control Panel window. The Control Panel displays information about every key pressed on the keyboard as the video was recording. | |
| Puts the VLS Viewer in Full Screen mode. To exit full screen mode, click the icon again. | |
8. Specifications
| Number of Computer Connections 1 | |
| Local Port Connectors USB Mini-B (Female) | |
| Computer Port Connectors HD15 (Male), USB-A (Male) | |
| Online LED Blue | |
| Max Video Resolution 1920 x 1200 @ 60 Hz | |
| Operating Temperature Range 32° to 104°F (0° to 40°C) | |
| Storage Temperature Range -4° to 140°F (-20° to 60°C) | |
| Relative Humidity 0 to 80% RH, Non-Condensing | |
| Housing Material Plastic | |
| Unit Weight 0.3 lbs (0.14 kg) | |
| Unit Dimensions | 1.875 x 2.125 x 2.875 in. (4.8 x 5.4 x 7.3 cm) |
9. Warranty and Product Registration
1-Year Limited Warranty
TRIPP LITE warrants its products to be free from defects in materials and workmanship for a period of one (1) year from the date of initial purchase. TRIPP LITE's obligation under this warranty is limited to repairing or replacing (at its sole option) any such defective products. To obtain service under this warranty, you must obtain a Returned Material Authorization (RMA) number from TRIPP LITE or an authorized TRIPP LITE service center. Products must be returned to TRIPP LITE or an authorized TRIPP LITE service center with transportation charges prepaid and must be accompanied by a brief description of the problem encountered and proof of date and place of purchase. This warranty does not apply to equipment, which has been damaged by accident, negligence or misapplication or has been altered or modified in any way.
EXCEPT AS PROVIDED HEREIN, TRIPP LITE MAKES NO WARRANTYES, EXPRESS OR IMPLIED, INCLUDING WARRANTYES OF MERCHANTABILITY AND FITNESS FOR A PARTICULAR PURPOSE.
Some states do not permit limitation or exclusion of implied warranties; therefore, the aforesaid limitation(s) or exclusion(s) may not apply to the purchaser. EXCEPT AS PROVIDED ABOVE, IN NO EVENT WILL TRIPP LITE BE LIABLE FOR DIRECT, INDIRECT, SPECIAL, INCIDENTAL OR CONSEQUENTIAL DAMAGES ARISING OUT OF THE USE OF THIS PRODUCT, EVEN IF ADVISED OF THE POSSIBILITY OF SUCH DAMAGE. Specifically, TRIPP LITE is not liable for any costs, such as lost profits or revenue, loss of equipment, loss of use of equipment, loss of software, loss of data, costs of substitutes, claims by third parties, or otherwise.
Product Registration
Visit www.triplite.com/warranty today to register your new Tripp Lite product. You'll be automatically entered into a drawing for a chance to win a FREE Tripp Lite product!*
- No purchase necessary. Void where prohibited. Some restrictions apply. See website for details.
FCC Notice, Class A
This device complies with part 15 of the FCC Rules. Operation is subject to the following two conditions: (1) This device may not cause harmful interference, and (2) this device must accept any interference received, including interference that may cause undesired operation.
Note: This equipment has been tested and found to comply with the limits for a Class A digital device, pursuant to part 15 of the FCC Rules. These limits are designed to provide reasonable protection against harmful interference when the equipment is operated in a commercial environment. This equipment generates, uses, and can radiate radio frequency energy and, if not installed and used in accordance with the instruction manual, may cause harmful interference to radio communications. Operation of this equipment in a residential area is likely to cause harmful interference in which case the user will be required to correct the interference at his own expense. The user must use shielded cables and connectors with this equipment. Any changes or modifications to this equipment not expressly approved by Tripp Lite could void the user's authority to operate this equipment.

WEEE Compliance Information for Tripp Lite Customers and Recyclers (European Union)
Under the Waste Electrical and Electronic Equipment (WEEE) Directive and implementing regulations, when customers buy new electrical and electronic equipment from Tripp Lite they are entitled to:
- Send old equipment for recycling on a one-for-one, like-for-like basis (this varies depending on the country)
- Send the new equipment back for recycling when this ultimately becomes waste
Use of this equipment in life support applications where failure of this equipment can reasonably be expected to cause the failure of the life support equipment or to significantly affect its safety or effectiveness is not recommended.
Tripp Lite has a policy of continuous improvement. Specifications are subject to change without notice.


1111 W. 35th Street, Chicago, IL 60609 USA www.triplite.com/support
Manufacturing Excellence.
1111 W. 35th Street, Chicago, IL 60609 USA • www.triplite.com/support
PykoBODCTBO N0Ib30BaTeJia
CepBnchbI KBM-aanTep c nHTeppeom USB 2.0 Дя поклю悔ня nopTaTINBHorO kOMnbIOTepa
Mодень: B032-VU1
CopepkaHne
- XapakTepeHCTnK npOyKta... 62
2.CnCTeMHbIe Tpe6oBaHnra 62
3.CoepxHmoe ynaKOBKn 62 - OniohoHaIbHbIe KOMnIeKToIouIe 62
5.YctaHOBka 63
6.Паньуправлия 64
6.1 Pekmbi cHxpoHHaun MbIe 64
6.1.1 AToMaTnuecka CnHxPOH3aZmaMbIeE 64
6.1.2 Puchan CunxpoHuaa Mbiuei 65
6.2 HacpoKn naneyn ynpaBneHna 65
6.2.1 MaKpoCbI 66
6.2.1.1 "Toprue" KlaBnIuI 66
6.2.1.2 Nolb3oBaTeNbckne MaKpocbl 67
6.2.1.3 Poinck 70
6.2.2 HacrpoKu Bmdeo 71
6.2.3 MacsttabopobAHne 72
6.2.4Функюнan Virtual Media.. 72
6.2.5 3KpaHna KnaBnataype 74
6.2.5.1 CmeHa Ra3bIKOB 75
6.2.5.2 BvBop nntfopm 75
6.2.5.3 PaunepHHa KnaBnAtya .75
6.2.6 Yka3aTeJIbMbIuIN 76
6.2.7 HacrpoKa paHeni 76
6.2.806noBneHne 77
7.Поррамma посмтра вдевоанисе VSR Viewer.....78
8.TexHueckne XapaKTepeNtIKn 79
9. rapaHTnHbIe 063aTeJbCTBa 80
English 1
Espanol 21
Francais 41


Manufacturing Excellence.
1111 W. 35th Street, Chicago, IL 60609 USA - www.triplite.com/support
OpaHReTcA ABTopcKHM npabOM 2017 Tripp Lite. Bce TropbBle 3aKaN ABnHOTc NCKHNOHTeBHO C6CBtBEHHOCBO CBOXn COOTBeCTByIOHN BnaIeNBUEB.
1. XapakTepeNknpoodyKta
Kohconbny USB-adaanTpE o6eueHbaet npmaoe noKnIOUeHneHOHT6yka K hactoBHomy KOMbnBoTepy
Blaorapra Coei KOMnAeTHOH KOHCTpykUcM CBMOHTPPOBaHHbIM KaBeIaMM OH IMeaJIbHO IOxOIT DnA CmCTeMHbIX aDMHNCTpaTOpOB, BByHyKeHHbIX MHORo NEpeMeuATbcr No obekTy, T.K. NCKIIHOaET Heo6XIOHMOCtB H cNtlo3BOAHIN rpoMo3IKo TEeKKn
Ipondepkka Bmdeopaepehenn CTanadpTa VGA do 1920 x 1200 npu cactote 60 Tc
B03MOKHOCTbDyCTOPOHHeNpepaHmФaHOBMeKJyIOKaJIbHbIMUydaNEHHbIMKOMbIOTepaMn
Texnoor Virtual Media oecneuBaet Bo3oMxHcTbOBAHm faHIOBbX CnCTeM, BHeceHm HcnpaJIeHm BOC, yTaHOKBn npOrpaMMHOrO oecneueHm H daHrOHTueckoro TectpoBaHm
Bmde03anbcn nojnuehne H06paXeHn C ydaenHOro hactOnbHorO PIK
- blyctpoTa ynpablenHa hypOBHe BIOS
PexMM Automatic Mouse Sync ("ABTomatuecka CnHxpoH3aun Mybse") oecneuWbaET cHxpoH3aun yka3aTeeMbIHa n loKanbHom u dyaneHOM PI c cebbl OTMIM3aun pa60t bCTembl
PyHnA HAcTpoKa BWDoe ObceNueBaet Bo3MOxHcOt bpeyHnPoBKn npaMeTPOB dIra ONTHM3aun KaueCTBa M3o6paKeHm N NObblweHm PpOu3BOUTeBHOCT
IopdepkKa cKB03HOro ynpaBneHnK CKnabNAtypb
3KpaHnHa KnaBnAtya CmHOra3bUHNO nOdoepxko
- Nopdepkka MaKpOca Ira 3aDaBaembIX noJIb3oBaTeMeKOMKbHauu" "TopyHx" KnaBn
MacuTbHOBAHn H36paKHeHn HAcToBnHO TIK no3BOaRt perynpobatb fOpMaT/pa3peHHeNc OKHa ydaenHHo HAcToBnHO TIK no pa3Mepy/co0THouHHeHc CTopoH, 1TO MckIooaet Heo6xOUMocTB nONb3OBAHn nonoc npokpyTK
Bo3MOKHOCTbIPOKIOUOeHnBPOUccePab0tB
IIOKIOHOUENHE NO TEXHOLOHIM Plug-and-Play 6e3 Heo6xOIMMOCTyctAHOBKNIPO
-ПитатимеОЛИНБI63 HeO6xOdMnOCTM NcOIOJIb3OBAHnB BHEuHreroN CTOUHnKa ПИТАнHA
B03MOKHOCTb 06HOBNEHnIPOUWBKN
2.Cntemhbte Tpe6oBaHn
- IopTaTINBHybIKOMNbIOpTeC O CBO6OdbHIM IopTom USB
KOMnbOTep c Cb6oDbHM noptom dIy noDkNIOUeHm MOHtOpa VGA nn DVI-1 (npn 63aTeBbHom hannnnn nepeXOnHka VGA-DVI) n optom USB
-Плдержк�OC Windows XPиболпоноднхьерсий
3. Codepexmmoe ynaKOBKn
- YcTpoHCTBO MoI. B032-VU1
Ka6eb USB 2.0 Mini-B (Динна 1,8 M)
KpatkoepykoBDCTBO noIb3oBateT
4. OnznoHaJIbHbIe KOMnJIeKtYuOuIe
Дустоюнма Кбени сеMuUR03c pa3beMaMm USB-A Mini-B
-ПекхоДИК VGA/DVI-A MoD.P120-000(штЕкр/ггЗдо)
- OdnokhaanbHbe Ka6eHN DVI-D cepMN P561
5. YcTaHOBka
- C nmoaio kao 6aeia n pa3bemama USB Mini-B (nKOMNIEKTa) coeHHHTE npOT USB Mini-B yctpoCTBa cBO6OdbHM NOPTOM USB-A npotaTMBHoro KOMNbIepe.a
- NIOKNIOHTME BMOHTPOBAHNNB USB-Ka6eBb K CBO6OHOHOMN NOPTY USB-A Ha KOMTBIOTepe, K KOtOPOMy 6yET npo3BOIDTBCr NIOKNIOUHMe C nOpTaTHBHOrO PIK.
- NIOKNIOHTE BMOHTNPOBAHbHbVGA-Ka6eBb K CBO6OHNOM NoPry VGA Ha KOIMNtpe, K KOtOpOMy 6ydt PnON3BOINbCnOKnIOUeHne c npotATNBHO rIK.
- Nocye ycnueho rno yctahOBHeHn coeHHHeHm Mekdy npotatmbbIM PK n noKIOuAembk H HeM KOMNbOtepom Ha ycptpoCTBe 3aRopaetcCBToHOdHm HmHkATop CnHero Zbeta.
- Pocne noKIOHueHN BblnoHaeTcYCTAHOBKa YHnBepcaIbHbIX dpaiBepoB DaHHoro H3dEINa, nocne yero OHO paCIOHaetcB KaueCTBe cEBMHO DmCKa. 3aTeMa HkpaHe IIOBnEe Tc DnaNOrOBoe OKHO C npednoKeHM eOKpbTy Ka3aHHbI dNck.
PnmuueHne. PnOTCYCTBm DnAnorBoTo OkHa DocTyN K ToMy Ncky Bo3MoKeH 13 OKHa My Computer ("MoiKoMnIbTeP").
6.ДЯустavenne coeHnHc nOdknoeHHbIM KOMMbTePOM OTKpoIte naKy dNcA.Пocne ee OTKpbITBa bYbUdIte dBa faJaIa, BKNIOaY Windows Client. OTKpoIte faJaI Windows Client.
PnmeHne. nnoeoh ykuohbochtynte WnOwS Client oMeHa aHHCTpatopa.
- KnneHtckan pnpamma OTKpbBaet ceaH ydaenHHoro doctyna K noKKnOHeHHOMy KOMnbTopey, a Ha 3kpahe noBraTeCA OKHO ydaenHHoro pOcMOTpa.
OKHOydaJIeHHOroIpoCoMToPa
Klment nWindows oecneHMaet Bb3OB OKa ydaenHoro npocMtpa (Remote View) c PAnenynpaBHeNn (Control Panel) nnaobcepeHHnOctyNA KnoeknOeHOMy Kommbotpy. Iocne otkbpHn OKa ydaenHoro npocMtpa (Remote View) PAnenbypaBHeNn (Control Panel) cbopaHbAeTc. dI nepeXoJa B Hee peMeCTte Yka3aTeJIb MbUH BepxHOu Cactb EkapHa no ceTpY. Ha PAnen HypapBHeNn IMeETc MHOeCTBO FHKm N HAcTaPbAeMbIX NapaMetPO, NOsBnAIOUXy ppaBnTb YcTAHOBHeHBM CoEHNHEEM. DIn e nepeMeueHn B JEBB BepxHMn IIIN ppabBn BepxHMn yron 3KpHa cneYET HaaTb Ha Hee MbUbO c npabO CTOpOHb H nepaTuNT b H yXHoE MeTo.
6. NaheB ynpaBneHna
B CnEyduox npaDax npmbBaetra PAneHb npabHe B TOM BINE, KaK OHa npedctabHe A B WInOWs-KlnHeTc.

1234567
IpeBbnoHHeMnIO6bIxipOeDpy CnHXPOHN3aUNMbUeNepeDNTBpa3dEeMous Properties Settings (HaCToPkiCBOCTMBuH) HAcTPOITEHXcNACHOHeKcJeDyoumYka3aHnA. NaCTPOKN CBOITCB MblHOnJXbHytCAtAHabINBaTcRa HOMKOMNbTepe,NOkKnIOeHHom KycTOCTBY B032-VU1,a He Ha Tom KOMNbTepe,KOTOpBnCnOJIb3yETraIdoCTynaKhemy.
PnmeHne. nCnXPOH3aunnoKabHO uDaneHHoMbuee cIeyETNCNOb30BaTbYHBepcAIBHy dpaBepMbHIN, NOCTABnREm BMECTe ConepaHNOHO CHTEMOM MS. Pn HauuH yctAHOBENHOrO npaeBep aDpyrTO NoCTaBUNka (HaNPmep, npdeocTabNEHORo pno3BOIDTeMeM MbHIN) erOhe6Omo ydaNTb.
ДЯ OC Windows XP 600ee no3dHxBepcui:
- Otkpoite DnaIorOboe okho Mouse Properties (CboiCTBaMbIIM)
- Haxmte Ha BknaKy Pointer Options (Iapametpy ykaataen).
3.YctahOBHTeCKOpOCTb nepemEueHnryka3aTeN MaBIM BcpeIDHe noIooKeHne (6- n03mua CnBa).
4.OTKJIIOHTI NOBbIeHHyTO THOCTbYcTAHOBKM yka3aTeIN.
Ecnnoe KoppKTHPOBKN CBOINCTB Mbln np6bnMbC CNHXPOHN3aueon CoxpaHANOT, nonpo6yIte DoCTNbCNHXPOHN3aun yka3aTeNe IokaJIbHO uYdaenHNO Mblne cJeNyIOUmm nOco6aAM.
PnmeaHne. nAaKtuecko CnHxpoHHaum MoKet notpe6oBaTc HecokBo KcekHy, NdoQmte 15-30 cekHy, yTo 6ydt AHTbCg DOCTaOHTbM BpEmeHem dIa CNHXPOHHaumMbHn.
BbINOHHTe ABOtOMaTHcEckyU CnHXPOH3aUIO BmDEOCIRHaJaC yka3aTeMeM MbIIM HauKaTHeMa H a 3HaOv KideoCINxPOH3aUHa Ha NaHEIn npabaneHm.
BbnoHHTte ABOMATUHeCKyO CnHXPOHN3aHIO B OKHe Video Settings (HaCtpoKn BnDeo) (CM. pa3JeI 6.2.2 "HaCtpoKn BnDeo").
Bb3OBHTe yHKmIO Adjust Mouse (KoppeKTHPOBA CBOITB MbH) n NOMOsbio "TopraHx" KnaBmKoPpeKTHPOBKn CBOHTB MbHn (cm. pa3dien 6.2.1.1 "Topyme KnaBmHn").
-ПелемechтейукадетьВОБЧETыручларa(BIO60mnpaJke)
-петаштete NaHelenb ynpablenenB nDpyoe MeToHa 3KpaHe.
6.2 HacptpoKn paHEn ynpaBleHna
HaKMMte Ha 3aHOK Control Panel Settings (HaTPOKn Naenm ynpabHeHn) DnBxOda B MeHO, BKnIOauOooB Ce6a KaONu, dybNpyouue HeKOTpble fHKnDocTNbIe CnHennynpaBHeHn (HanPMep, Video Sync/BrEoCnHXPOHN3aunn Zoom/MacSta6bpoBaHne), TAK N DOONHHTeNBHe HAcTPOKn n FyHKn Dn ynpabNeHHceAcmn YdaneHHOro DoCTyna n TexNHueckoro o6cnykBAHH yctPcTBa. Bce FyHKnn HAcTPOKn DaHHORo MeHO ONCaHbB DaHHOM pa3Dene.

6. Naheb ynpabneHna
6.2.1 Makpocbi
3aok Macro (MaKpoc) oKpbBaet 3kpan, o6ecneuBAUoiu doctyn K DByM Bklaqam: Hotkeys (Topyme KnaBuiu) u User Macros (Ponb3oBateIbckme MaKpoc). B cneyuux pa3denax npmbodtca onncanhe kackdo n 3Tnx ykykui.
6.2.1.1 "Topryne" Klaabuins
Pa3nHbIe dHcBnE cy npaBHe m ydaneHbM cpebpom, Moryt BblonHbTcN ocePeCTbOM KOMaH, 3daabaembx COOTBeCTByuHMMKoBmHaAMM "topaynx" knaBH. BknaKa Hotkeys (Topyne KNaBH) No3BOJET NaCTpMaBaTB KOM6HauHm "topaynx" KnaBH Ha JenaAeMbte DeCTBn. KOM6HauHm "topaynx" KnaBH, oecneBuHooaB bInONHe Hae KaKoro-Ni6 DeCTBn, OTo6paKaetc Cnpaba OT er HA3BAHn. DnBkIoueHn HnO kTIOUeHHaKoBHaun "topaynx" KnaBH, oecneHuBAOoue BblONHe Hae KaKOro-Ni6 DeCTBn, CJeYEt YCTaHOHTb Nn CHrTb fNakok B none, paONIOxEHHom CJIeBa OT er HA3BAHn.
IINMMeHnKOMbHaunn "TopaXn"KnabH, COOTBcTBcyuHmTOMy HnHOMy DeCTBHO:
- Bbdenme noCBetKoH yHyuO "TopaYoo KnabHsu H aKaMnTe Ha KaONky Set Hotkey (YctahOBHT "TopaYoo"KnabHsu).
- HaxMMTe KOMbHaAizHcFyHKUHOHaJIbHbIX KNaBnH (NooepedHO), KoTOpIe XeJAEte NcPONb3OaBt Dna BbINHeHn DaHHOrO DeCTBn. HaBaHnFAyHKUHOHaJIbHbIX KNaBnH noABnIOCTB n oIne Edit Hotkey (NImeHHe "TopuH" KNaBnH) npH aKATm HAHX.
PnmuueHne. Odn Hte Ke fhyHKuHaJIbHe KnaBmH MOrTy nCIOB3oBaTcI PnBblONHeHn 6Oone OndHOe JeCTBn npH yCObHn Hx HaxaTH B pAHOH NOCEOBaTeJIbHOCTN. IINOTMEhbyctAHOBHeHORo Ha3NaHcHHeH "Toprae"KnabHn HaxMITE Cale1 (OTMeHa). Dno OHCTKn NpO nn Dn BBoDA "ToprX"KnabH, COOTBETCBYIOXkakOMy-nloKdEChTBNO, HaxMITE Clear (OChTtB).
- Ito OKOHauHH BBOda KENaemoi NOcNEoBATEnbHOCTn KNaBHn HAKMTte Save (CoxpaHHTb).
ДявOCБТАнOBЛЕNHЯЗаданьхи NOуMONЧАИNOHACtpoek Bcex"rOрчnx"knabuHnHaxmnte Reset(C6poc).
6. Панень упраьени
Pa3bAcHeHneIeTbnB, BblonHnEMybcNcNoIb3oBaHnEe "TopaHX"Knabu, npmbOHTCB npeCTaBnHHO HmKe Ta6Hue:
6.2.6 Yka3aTeNb Mbln
Ha naheyn ynpabneHn npednaeraTc HecokBo KaBapnHOY kazatner Mblnn pnpaobote c ydaenHbM dncnneem. Haxmte Ha 30T hOy n BbOpa Ondho r npednarmaebix BapnHO
Примочан: Сл. 106
- Pn HaxaTH Ha OdnHApHbYkAsTeB (Single) npOnxOInCT KcbTHe NOKaHBOrO KypCopa, a TAKKc 6nokupOBKa McNoIb3oBAHm Yka3AteMa BmH IN KnaBAtpyB B OKhe Windows Client AP. PaHEnb ynpabHeHn Aakke cKpbBaetca. DnB bXoDa I3 peKIMa OdmHApHO Yka3AteN (Single) BoCnObnByTeCb KOMAnD, COOTBeTcByOuJe KOMbHaunr RopAHH [F4] [FS].
Bb6op ToueyHoro yka3aTeA daT ToJ pe3yIbTa, 10 n fynHKmKorpeKTnpOBKn CBOITMbHn (Adjust Mouse) c noMoUbIO rOpaXknaHII.

6.2.7 NaHemb HacTpoiKN
PnHaxaHnHa3auok Configure Panel (Naenb HacTPOKn) B MeHO Control Panel Settings (HactpoKn nAHeN ynpabEnH) BblbBaetcdaIanlorOoe OKo C npedIOKeHEmyCTaHOBt bHaCPOKn BblnoHEHMOMeHTaJIbHbX CHMkOB uCKBO3HOrO ynpabEnH cKlNAHAtpybl:
PapametpbnHnHaTPOINOnhCBIAOTC BnpCTaBHeHNO Hxke Tabmne: