PDUH32HV19 - Power strip Tripp Lite - Free user manual and instructions
Find the device manual for free PDUH32HV19 Tripp Lite in PDF.

User questions about PDUH32HV19 Tripp Lite
0 question about this device. Answer the ones you know or ask your own.
Ask a new question about this device
Download the instructions for your Power strip in PDF format for free! Find your manual PDUH32HV19 - Tripp Lite and take your electronic device back in hand. On this page are published all the documents necessary for the use of your device. PDUH32HV19 by Tripp Lite.
USER MANUAL PDUH32HV19 Tripp Lite
Important Safety Instructions 2
ImportantWarnings 2
Installation 3
Features 4
Warranty & Product Registration 4
Espanol 5
Français 9
Pycckn 13
Deutsch 17
PROTECT YOUR INVESTMENT!
Register your product for quicker service and ultimate peace of mind.
You could also win an ISOBAR6ULTRA surge protector—a $100 value!

www.triplite.com/warranty
TRIPP·LITE

Manufacturing Excellence.
1111 W. 35th Street, Chicago, IL 60609 USA • www.triplite.com/support
Copyright © 2019 Tripp Lite. All rights reserved.
Important Safety Instructions
SAVE THESE INSTRUCTIONS
This manual contains instructions and warnings that should be followed during the installation, operation and storage of this product. Failure to heed these instructions and warnings will void the product warranty.

CAUTION Only those who are properly trained or qualified to use this device should do so. Anyone who is not trained or qualified should not use this device unless it is under the supervision of someone who is properly trained or qualified to do so.
Children must be supervised to ensure that they do not use the device as a toy.
Never use the device if the cord and plug are damaged; if it is not working properly, or if it has been dropped or damaged, take it to an authorized service center for inspection and repair.
If the power cord is damaged, it must be replaced by the manufacturer, its authorized service agent, or by qualified personnel in order to avoid a danger.
ImportantWarnings
- The PDU provides the convenience of multiple outlets, but DOES NOT provide surge or line noise protection for connected equipment.
- The PDU is designed for indoor use only, in a controlled environment, away from excess moisture, temperature extremes, conductive contaminants, dust or direct sunlight.
- Keep indoor ambient temperature between 32^ and 104^ (0^ and 40^)
- The PDU must be installed by a qualified technician only.
- Do not attempt to mount the PDU to an insecure or unstable surface.
- Install in accordance with National Electrical Code standards. Be sure to use the proper overcurrent protection for the installation, in accordance with the plug/equipment rating.
- Connect the PDU to an outlet that is in accordance with your local building codes and that is adequately protected against excess currents, short circuits and earth faults.
- The electrical outlets supplying power to the equipment should be installed near the equipment and easily accessible.
- Do not connect the PDU to an ungrounded outlet or to extension cords or adapters that eliminate the connection to ground.
- Be sure to provide a local disconnect device on any models that are permanently installed without a plug that is easily accessible.
- Never attempt to install electrical equipment during a thunderstorm.
- Individual equipment connected to the PDU should not draw more current than the individual PDU's outlet's rating.
- The total load connected to the PDU must not exceed the maximum load rating for the PDU.
- Do not attempt to modify the PDU, input plugs or power cables.
- Do not drill into or attempt to open any part of the PDU housing. There are no user-serviceable parts inside.
- Do not attempt to use the PDU if any part of it becomes damaged.
- Use of this equipment in life support applications where failure of this equipment can reasonably be expected to cause the failure of the life support equipment or to significantly affect its safety or effectiveness is not recommended. Do not use this equipment in the presence of a flammable anesthetic mixture with air, oxygen or nitrous oxide.
Installation
Note: The illustrations may differ somewhat from your PDU model.
1 Determine Installation Configuration. The PDU supports four primary installation configurations: 1U Rack, 0U Rack, Wall and Under-Counter. Choose a configuration and follow the installation instructions in the appropriate section of Step 1 before proceeding to Step 2.
Note: Regardless of installation configuration, the user must determine the fitness of hardware and procedures before mounting. The PDU and included hardware are designed for common rack and rack enclosure types and may not be appropriate for all applications. Exact mounting configurations may vary.
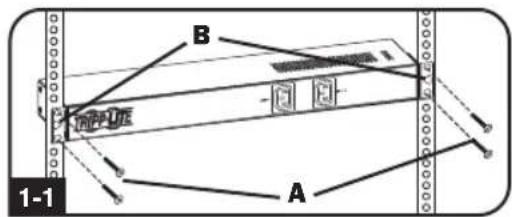
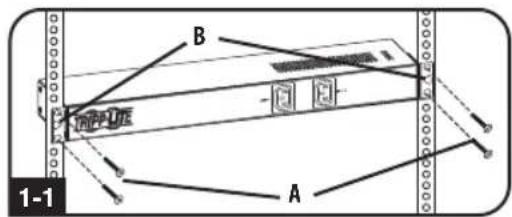
1-1 1U Rack Installation. Attach the PDU to the rack by inserting four user-supplied screws (A) through the PDU mounting brackets (B) and into the mounting holes of the rack rail as shown.
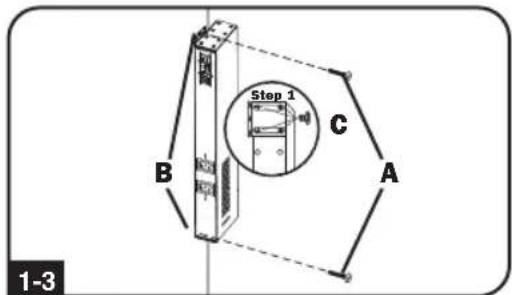
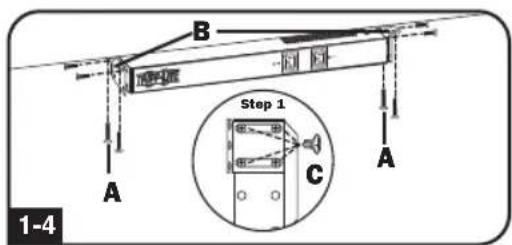
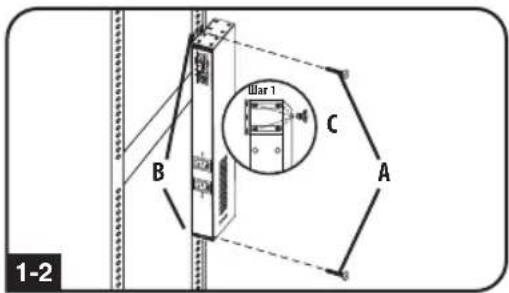
1-2 OU Rack Installation. Part 1: Remove the screws (C) attaching the mounting brackets to the PDU, change the orientation of the brackets as shown and reattach the brackets. Use only the screws supplied by the manufacturer or their exact equivalent (#6-32, 1 / 4 flat head). Part 2: Attach the PDU vertically by inserting two or more user-supplied screws (A) through the PDU mounting brackets (B) and into mounting points in the rack or rack enclosure.
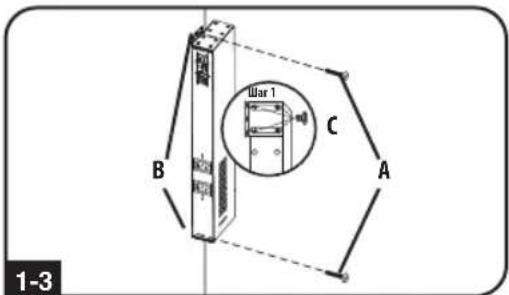
1-3 Wall Installation. After repeating Part 1 above, attach the PDU to a stable mounting surface by inserting two or more user-supplied screws (A) through the PDU mounting brackets (B) and into secure mounting points on the mounting surface.
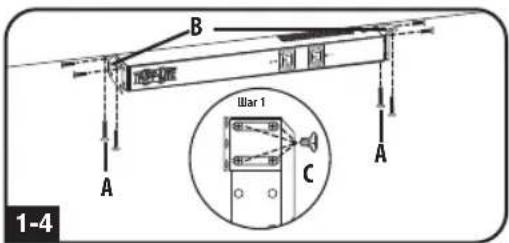
1-4 Under-Counter Installation. After repeating Part 1 above, attach the PDU to a stable mounting surface by inserting four user-supplied screws (A) through the PDU mounting brackets (B) and into secure mounting points on the mounting surface.
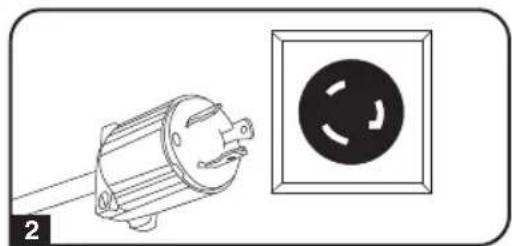
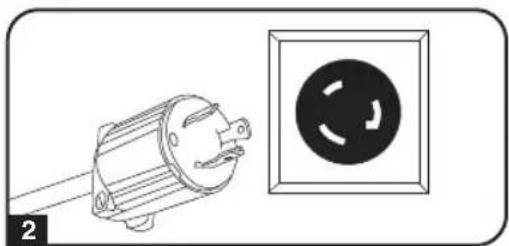
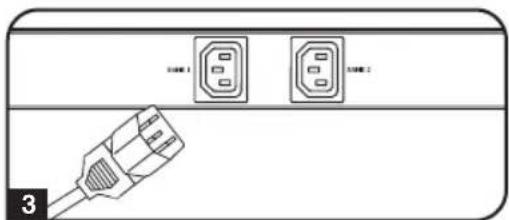
2 Attach the input plug of the PDU to a grounded outlet. Insert the plug directly into a grounded outlet that does not share a circuit with a heavy electrical load (such as an air conditioner or refrigerator).
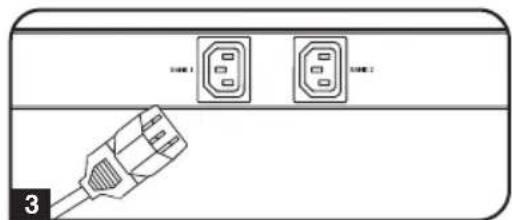
3 Attach equipment to the PDU. Do not exceed the load rating of the PDU. The total electrical current used by the PDU will be displayed on the digital meter in amperes.

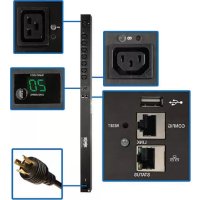
Features
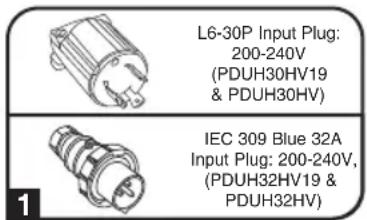
1 Input Plug (Varies by Model)
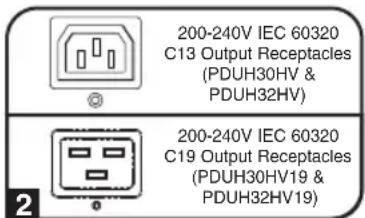
2 Outlets (Vary by Model): During normal operation, the outlets distribute AC power to connected equipment.
3 Circuit Breaker: If the current drawn by the equipment connected to the PDU exceeds the Maximum Current Rating, the circuit breaker will trip to prevent possible damage. When a circuit breaker trips, its rocker will pop up. Disconnect excess equipment and allow the breaker to cool at least one minute before depressing the rocker to reset the breaker.
4 Grounding Lug: Use this terminal to connect any equipment that requires a chassis ground.
Warranty & Product Registration
LIMITED WARRANTY
Seller warrants this product, if used in accordance with all applicable instructions, to be free from original defects in material and workmanship for a period of 5 years (except internal UPS system batteries outside USA and Canada, 1 year) from the date of initial purchase. If the product should prove defective in material or workmanship within that period, Seller will repair or replace the product, in its sole discretion. Service under this Warranty can only be obtained by your delivering or shipping the product (with all shipping or delivery charges prepaid) to: Tripp Lite, 1111 W. 35th Street, Chicago, IL 60609 USA. Seller will pay return shipping charges. Visit www.triplite.com/support before sending any equipment back for repair.
THIS WARRANTY DOES NOT APPLY TO NORMAL WEAR OR TO DAMAGE RESULTING FROM ACCIDENT, MISUSE, ABUSE OR NEGLECT. SELLER MAKES NO EXPRESS WARRANTY OTHER THAN THE WARRANTY EXPRESSLY SET FORTH HEREIN. EXCEPT TO THE EXTENT PROHIBITED BY APPLICABLE LAW, ALL IMPLIED WARRANTYES, INCLUDING ALL WARRANTYES OF MERCHANTABILITY OR FITNESS, ARE LIMITED IN DURATION TO THE WARRANTY PERIOD SET FORTH ABOVE; THIS WARRANTY EXPRESSLY EXCUSES ALL INCIDENTAL AND CONSEQUENTIAL DAMAGES. (Some states do not allow limitations on how long an implied warranty lasts, and some states do not allow the exclusion or limitation of incidental or consequential damages, so the above limitations or exclusions may not apply to you. This Warranty gives you specific legal rights, and you may have other rights which vary from jurisdiction to jurisdiction).
WARNING: The individual user should take care to determine prior to use whether this device is suitable, adequate or safe for the use intended. Since individual applications are subject to great variation, the manufacturer makes no representation or warranty as to the suitability or fitness of these devices for any specific application.
PRODUCT REGISTRATION
Visit www.triplite.com/warranty today to register your new Tripp Lite product. You'll be automatically entered into a drawing for a chance to win a FREE Tripp Lite product!*
- No purchase necessary. Void where prohibited. Some restrictions apply. See website for details.
Regulatory Compliance Identification Numbers
For the purpose of regulatory compliance certifications and identification, your Tripp Lite product has been assigned a unique series number. The series number can be found on the product nameplate label, along with all required approval markings and information. When requesting compliance information for this product, always refer to the series number. The series number should not be confused with the marking name or model number of the product.
The policy of Tripp Lite is one of continuous improvement. Specifications are subject to change without notice.


1111 W. 35th Street, Chicago, IL 60609 USA • www.triplite.com/support
21-03-409 93-33BC RevC
1111 W. 35th Street, Chicago, IL 60609 USA • www.triplite.com/support
1111 W. 35th Street, Chicago, IL 60609 USA • www.triplite.com/support
21-03-409 93-33BC_ReVC
1111 W. 35th Street, Chicago, IL 60609 USA • www.triplite.com/support
1111 W. 35th Street, Chicago, IL 60609 USA • www.triplite.com/support
21-03-409 93-33BC RevC
PykoBODCTBO N0lb30BaTeJia
Ba30BbI cToeHbI PDU
PDUH30HV19
(Homep cepn: AG-00E6)
PDUH30HV
(Homep cepin: AG-00E6)
PDUH32HV19
(Homep cepin: AG-00E5)
PDUH32HV
(Homep cepn: AG-00E5)
Baxkhble yka3aHnno texHnke 6e3onacHocTn 2
Baxhble npedynpekdeHn 2
YcTaHOBka 3
ФункционьнBLE B03MOXHOCTN 4
TapaHTnHbIe 06a3aTeJbCTBa 4
English 1
Espanol 5
Français 9
Deutsch 17
EAC


1111 W. 35th Street, Chicago, IL 60609 USA · www.triplite.com/support
OxpanaHTcA ABTOpcnM npabOM © 2019 Tripp Lite. NpepeuATka zanpeaaetca.
Baxhblc yka3aHnno TeXnke 6e30naCHOCTN
COXPAHNTE HACTOUIUE YKA3AHNA
B Hactoem pykoOCTBe coepKaTcYka3aHn INpeynpeKdHn, KOtOpbHeo6xOIMO co6HIOaTB B npouceCe yctaHOBKn, 3Kcnnyatauun IN XpaHEnn DaHHoro N3dEHN.
HrhoppoBaHne 3THX Yka3aHn INpeynpeXeHn MOKe TnpBecTu K notepe rapaHTn Ha n3dEne.

Baxhblie npedynpekdeHna
-5bokpacnpedeeneHHIHTAHN(PDU)OCHaueH HeCKoJIbKIMn yIO6bIMn PO3ETKaMn,HO HE o6ecneuHaet 3auNTy NOkHoueHHoro 06OpdyOBaHnOT Bb6pocOB HaprrKeHn I WymOB B NHNm.
- PDU npEHa3aueH ToIbKo IINcNoIb3OBAHnB 3aKpbIbX NOMEeHnX C peryNpyEmbIM MKNPKoHMAOM BdAIN OT MCTOHHOB NOBbIeHHoB BnAAxHOCTN, EKTpeMaJIbHbIX TEMnpaTpy, 3NEKTPponpOBOHDhX 3aRpa3HNTeJIe, Nblnn INPpMOrO CONHeYHO CBETA.
-Подержьаite Tempepatур B03dYxa BHTpynomeшmaBДиana3Ohe ot 0°Cdo 40°C.
- YctahOBKa PDU dONKHa pON3BOaNTbCra TOnBko KBaHmOuHPOBaHHbIM TEXHmecKHM cneMaJInCTOM.
- He yctaHaBnBaTe PDU Ha He3aKpeHnHOm Hm HeVcTouHBOI NOBepxHOCTM.
- YctaHOky CnEyET PpO3BOJTH B COOTBETCTBm C Tpe6oBAHmHaAUHOHaBbIX 3NEKPTeXHueCKHX HOPMaTINOB.06aTeNBHO nCNOJByTE NOxOJaIe IJe YCTaHABNAeMoI CNCTeMbYCTPOCTBa 3aUNbI OT NepePpy3OK NTO KONY B COOTBETCTBm C HOMNHJAMN, VKa3aHHBMn HA pa3bEmax/06OvDyOBAHm.
- P0dkIIOUHTe PDU K PO3ETKE, COOTBETCTBYIOE II INHARbIM BAaIE CTpaHE CTpOteJIbHbIM HOpMaM HAIDNeXaIUM 06pa3OM 3aIIuueHHoN OT M36bIToOHbIX TKOB. KODOTKHX 3aMbIKAH N 3aMbIKAH H A3EMNI.
3NeKtpueeckne p03eTK, uee3 KOtOpbIe OcyuieCTBnEeTc3 NeKtpoNTaHHe 6OpyoBOHaH, dONXhbl 6bItb yCTAHOBJIeHb B JERKOIOCTYINOM MecTe BOH3N Hero.
He noKJIOaHTe PDU K He3a3eMneHHo pO3eTke, a TaKxKe K YdNHHTeJAM NnpeXoHNKam. He MeHoum 3a3eMneHna
- IIO6bIe MoDJIe, yCTaHabNtBaEMbIe Ha NOCTOHHo OCHOBe 6e3 IerKOIOcTynHO rTeNCeBHorO pa3beMa, dONKbI B o6aTeNBOM NOPAKe OCHaUaTBcA JOKaJIbHbIM YCTPOINCTBOM 3aUNTHORO OTKNIOHEHIA.
HnB KOEM CNYae He IPOUN3BOJNTe MOHTaX 3JIeKTPO06OpYOBaHn BO BPEM rPO3bl.
- Tok,Notpe6nembOtDenbHIMN3neMeHTaMnOBOpyObaHn,NOKJIIOuAeMbIMNK PDU,He DoJXeH npeBbIaTb HOMHaCoOTBeCTByUHX03ETOK PDU.
CymmaHar npTeJe, nOKnHueHHbIX K PDU, He oJnKHa npeBbIaT b ero MaKcMaJIbHO DoIyCTMMyHO Harp3ky.
He BHOCHTe M3MeHmB KOHCTyKmHO PDU.BXoHNbIX pa3beMOB nn Ka6eNeI mTaHnA.
He BbCBePnBaaTe OTBepCTn B KOpNcpe PDU Hne NpTaIaTecb BCKpbITb KaKyIO-NIO6o erO cAcb. BHyTpH HeTo HET dTeaJIe, 06CnVxuBaEMbIX NoJIb3ObaTeIeM.
He nponbvyte PDU B cnvyae nobpejdeHna no6o n3 erO yacte.
He peKOMeHnyETcN cIOb3OBAHnE daHORo 6OpDyOBaHnB B CHTeMaX JN3HeO6ecneueHn, rIe ERO BByxOuN 3CTPO npEnIOIOXHTeBHO MoKeT pInBeCTN K Ipe6oBm B pa60Te 6OpDyOBaHnJ XN3HeO6ecneueHn JIN B 3HaHTeBHO Mepe CHN3NTb erO 6e3ONaCHOCt b NIN 3ΦeKtNBHocTb. He ICNoB3yIte DaHoe 6OpDyOBaHn B nPcYCTBnBBOcNlMaEHIOeCa aHEcTeTNUeCKo CMECU CBO3dyXOM, KICNOPoDM OIN 3aKNCbO a3OTa.
yCTaHOBka
Ipumueaue. Ycmpoucmeo, 306paekehnoe Ha unllocmpauux, moxem Heckobko omnuamcbc oB auei modenu PDU.
1 Onpeidenenye yctahoBOOHOH KOHpyaun.PDU
noDpeKnBaet YeTbpe OChOBhix Tnna yCTaHOBOUHoi KOHpyrauM: MOHTax B CToiKy (BbICota 1U), MOHTAX B CToiKy (BbICota 0U), HAcTeHHbIM MOHTax M MoHTax NpIpaBkOM. Bb6epitoeOnH n3 TnOB KOHpyrauN nCleNyIte yKa3aHnM no yCTaHOBke B COOTBcTcByoUeM pa3dene Iara 1, nocne Yero nepexOJte K Wary 2.
IpuMueaHue. He3aBucMo om muna ycmaHOBOuHO
KoHphiypauu, noIb3Oaemnb doJxhen ycmaHOmb npUdoHocmb ochamku u npednonaaeMbx npouedeyp do hauana MoHaMa. PDU u exoduaaB e20 KOMnnekm ochmka npedha3naeHbI dIra obuHbIX munOB uKaΦoB u MoZym He nodxodum bIra bcex ueene npumeHenua. YcmaHOBOHbIe KOHphiypauu Mozym pa3nuaambcB de mannx.
1-1 YctahOBka B WkaΦ BbICOTOn 1U. NpKpeNTe PDU K WkaΦy nyTeM BBepTbIbAHnA YeTbIpex BuHTOB (A) (He BXoJAAux B KOMNKeT NoCTaBKN)Yepe3 MoTaNkHbI KePOHtEINHbI PDU (B) MOHTaXHbI OTBepCTn HAnpaBIAIOJIe WkaΦa, KaK NOKa3aHO Ha PNCYHKe.
1-2BepTnKaJIbHaayUCTaHOBaBtkaΦ(0U).YacTb 1.
BbBepHnTe BnHtBi (C), o6ceueuBaIOUme KpeIeHne MOHTaXhBx KpOHteHOB K PDU, n3MeHnTe IonoJKeHne KPOHtEHHo, KaN pOKa3aHO Ha pcyHke, N npKpeHnTe KPOHtEHHb HA npExHee MeTo. NcNoJIb3yTe TOnbKO BnHTb, NOCTaBnEmbIe npOn3BODnteMe, Mnn INx NOnHbI aHaIor (#6-32, 1/4" c NotaHoi rOIOBko). YAcTb 2. PnpKpeHnTe PDU BePTNaJIbHo C NOMOuBIO DByX mN 60Je e BnHTob (A) (He BXoDAuNX B KomnKeT NoCTaBKn), BBeptbBaEMbIX Chee3 MOHTaXHbIe KpOHteHbI (B) B MoHTaXHbIe OTBepCTra CToKN mN uKaΦa.
1-3 HacteHHb MOHTaX. Nocne noBTopeHn DeiCTbN,
OncaHbIX BblIe B 4actn1, npKpeNtPe PDU k yctouuBOO MOHTaXHOIOBepxHOCTN NytEm BBepTbIBaHnB DByx nn60onee BHTOB(A) (He BXoJauNX B KOMJIeKT NOCTABKN) Upe3 MOHTaXHbIE KPOHHTeHbI PDU (B) B OTBepCTnA, paCNOIOKeHHbIe B MOHTaXHbIX TOUkax Ha MOHTaXHOIOBepxHOCTN.
1-4 MoTaux noD npnabKom. Iocne noBTopeHn deIeCTbN,
OncaHHbIX BbIe B CaTn 1, npKpeNte PDU KycToHcBOI MOtAAHNOBepxHOCTn NyTe MBBepTBiBaHmY cTeBipEx BuHTOB (A) (He BXoJauNX B KOMJIeKT NoCTabKn) Upe3 MOtAAHbIe KPOHUsTeHbI PDU (B) B OTBepCTn, paCnonOKeHHbIe B MOtAAHbIX ToqKaX Ha MoTAAHNOBepxHOCTn.
2 BkIIOHTe WTeTcBbHb pa3bEM BXoHOrO Ka6eN PDU B 3a3emHeHHy0 p03eTKy 3neKtpuecko cTe. Pa3beM
CneNyET BCTaBnTb HEnOcpeIcTBHeHb 3a3eMneHHyIO p03eTKy, He HaxoJMyuOcR B 6bUeM KOtType c 6bIoJ OJIeKTPnueckoN
Harpy3kOa (TaKo KaK KOHmIoHOep Hnn XoNoIbHNK).
3 IopKnIouHte 06OpdyobAHne K PDU.He npBbIaIe HOMHaJIbHyIO harpy3Ky PDU.CymMaphBn JNeKtpueckm TK,
notpe6nemby PDU, BbcBueBaetca Ha HnDkaTope ufoepoBoro 3MepuTea B ampepax.
1111 W. 35th Street, Chicago, IL 60609 USA - www.triplite.com/support
21-03-409 93-33BC RevC
Benutzerhandbuch
Einfache Rack-PDU
PDUH30HV19
1111 W. 35th Street, Chicago, IL 60609 USA • www.triplite.com/support
BESCHRANKTE GARANTIE
1111 W. 35th Street, Chicago, IL 60609 USA • www.triplite.com/support
21-03-409 93-33BC RevC