
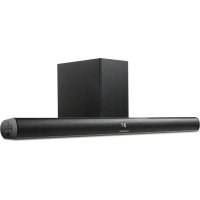
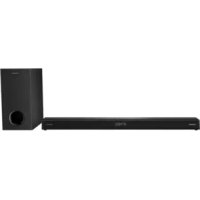
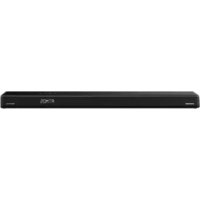
DSB 970 - Soundbar GRUNDIG - Free user manual and instructions
Find the device manual for free DSB 970 GRUNDIG in PDF.
| Product Type | Soundbar |
| Brand | Grundig |
| Model | DSB 970 |
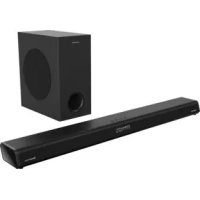
| Dimensions (W x H x D) | 1000 x 60 x 113 mm |
| Net Weight | 2.9 kg |
| Power Supply | AC 220-240 V~ 50/60 Hz |
| Power Consumption | 25 W (standby < 0.5 W) |
| Total Max Power | 120 W |
| Frequency Response | 60 Hz - 20 kHz |
| Bluetooth Connectivity | Version 4.2, profiles A2DP and AVRCP |
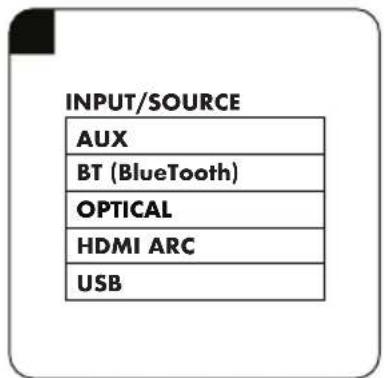
| Audio Inputs | HDMI ARC, optical, AUX (3.5 mm), USB |
| USB Playback Formats | MP3, up to 64 GB (FAT32/FAT16) |
| Equalizer (EQ) Modes | Movie, Music, News |
| ARC Function | Yes, via HDMI (requires compatible TV) |
| Wall Mounting | Yes, wall mount included |
| Remote Control | Yes, range 6 m, angle 30°, AAA batteries (2 x 1.5 V) |
| Care and Cleaning | Dry cloth only, no chemical solvents |
| Safety | Double insulation, do not open, do not expose to water, minimum ventilation 5 cm |
| Spare Parts and Repairability | Repairs by qualified personnel only; no user-replaceable parts |
| Compliance | WEEE, RoHS, CE, Bluetooth SIG, HDMI Licensing |
Frequently Asked Questions - DSB 970 GRUNDIG
User questions about DSB 970 GRUNDIG
0 question about this device. Answer the ones you know or ask your own.
Ask a new question about this device
Download the instructions for your Soundbar in PDF format for free! Find your manual DSB 970 - GRUNDIG and take your electronic device back in hand. On this page are published all the documents necessary for the use of your device. DSB 970 by GRUNDIG.
USER MANUAL DSB 970 GRUNDIG
natural_image
Black musical note symbol on white background (no text or numbers)GSB 910 S - DSB 970
B
C
natural_image
Line drawing of a soldering iron with a terminal plug and wire (no text or symbols)D
natural_image
Coiled electrical cable with two connectors (no text or symbols visible)E
natural_image
Line drawing of a multi-pin cable with two connectors and a connector pin (no text or symbols)F
natural_image
Technical line drawing of two metal bracket components with screws and fasteners (no text or symbols)G
natural_image
Line drawing of a remote control device with battery and two cylindrical batteries (no text or symbols)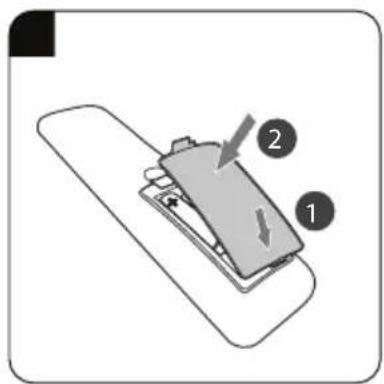


 |  |  |  |  | |
| DE | MONTAGE ANSCHLÜSSE BETRIEB BLUETOOTH USB | ||||
| EN | MOUNTING CONNECTIONS OPERATION BLUETOOTH USB | ||||
| FR | MONTAGE CONNEXIONS FONCTIONNEMENT BLUETOOTH USB | ||||
| PL | MONTAZ PODŁĄCZENIE STEROWANIE BLUETOOTH USB | ||||
| ES | MONTAJE CONEXIONES FUNCIONAMIENTO BLUETOOTH USB | ||||
| TR | MONTAJ | BAĞLANTILAR | KULLANIM | BLUETOOTH | USB |
Please read this user manual first!
Dear Valued Customer,
Thank you for preferring this Grundig appliance. We hope that you get the best results from your appliance which has been manufactured with high quality and state-of-the-art technology. For this reason, please read this entire user manual and all other accompanying documents carefully before using the appliance and keep it as a reference for future use. If you handover the appliance to someone else, give the user manual as well. Follow the instructions by paying attention to all the information and warnings in the user manual.
Remember that this user manual may also apply to other models. Differences between models are explicitly described in the manual.
Meanings of the Symbols
Following symbols are used in various sections of this user manual:

Important information and useful hints about usage.

WARNING: Warnings against dangerous situations concerning the security of life and property.
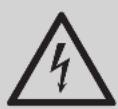
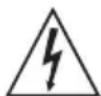
WARNING: Warning for electric shock.

Protection class for electric shock.
CAUTION
RISK OF ELECTRIC SHOCK DO NOT OPEN
CAUTION: TO REDUCE THE RISK OF ELECTRIC SHOCK, DO NOT REMOVE COVER (OR BACK). NO USER-SERVICEABLE PARTS INSIDE. REFER SERVICING TO QUALIFIED SERVICE PERSONNEL.
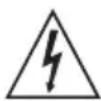
The lightning flash with arrowhead symbol, within an equilateral triangle, is intended to alert the user to the presence of uninsulated “dangerous voltage” within the product’s enclosure that may be of sufficient magnitude as to constitute a risk of electric shock to persons.
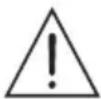
The exclamation point within an equilateral triangle is intended to alert the user to the presence of important operating and maintenance (servicing) instructions in the literature accompanying the appliance.
Safety:
- Read these instructions – All the safety and operating instructions should be read before this product is operated.
- Keep these instructions – The
safety and operating instructions should be retained for future reference.
- Heed all warnings – All warnings on the appliance and in the operating instructions should be adhered to.
- Follow all instructions – All operating and usage instructions should be followed.
- Do not use this apparatus near water – The appliance should not be used near water or moisture – for example, in a wet basement or near a swimming pool and the like
- Clean only with a dry cloth.
- Do not block any ventilation openings. Install in accordance with the manufacturer's instructions.
- Do not install near any heat sources such as radiators, heaters, stoves, or other apparatus (including amplifiers) that produce heat.
- Do not defeat the safety purpose of the polarized or grounding plug. A polarized plug has two blades with one wider than
the other. A grounding plug has two blades and a third grounding prong. The wide blade or the third prong is provided for your safety. If the provided plug does not fit into your outlet, consult an electrician for replacement of the obsolete outlet.
- Protect the power cord from being walked on or pinched particularly at plugs, convenience receptacles, and the point where they exit from the apparatus.
- Only use attachments/accessories specified by the manufacturer.
• Only with the cart, stand, tripod, bracket or table specified by the manufacturer, or sold with the apparatus. When a cart or rack is used, use caution when moving the cart/apparatus combination to avoid injury from tip-over.
- Unplug the apparatus during lightning storms or when unused for long periods of time.
• Refer all servicing to qualified
personnel. Servicing is required when the apparatus has been damaged in any way, such as power supply cord or plug is damaged, liquid has been spilled or objects have fallen into the apparatus, the unit has been exposed to rain or moisture, does not operate normally, or has been dropped.
This equipment is a Class II or double insulated electrical appliance. It has been designed in such a way that it does not require a safety connection to electrical earth.
- The apparatus shall not be exposed to dripping or splashing. No objects filled with liquids, such as vases, shall be placed on the apparatus.
- Minimum distance around the apparatus for sufficient ventilation is 5cm.
- The ventilation should not be impeded by covering the ventilation openings with items, such as newspapers, tablecloths, curtains, etc...
- No naked flame sources, such
as lighted candles, should be placed on the apparatus.
- Batteries should be recycled or disposed of as per state and local guidelines.
- The use of apparatus in moderate or tropical climates.
Caution:
- Use of controls or adjustments or performance of procedures other than those described herein, may result in hazardous radiation exposure or other unsafe operation.
- To reduce the risk of fire or electric shock, do not expose this apparatus to rain or moisture. The apparatus must not be exposed to dripping or splashing and objects filled with liquids, such as vases, must not be placed on apparatus.
- The mains plug/appliance coupler is used as the disconnect device, the disconnect device must remain readily operable.
- Danger of explosion if battery is incorrectly replaced. Replace only with the same or equiva-
lent type.
Warning
- The battery (batteries or battery pack) shall not be exposed to excessive heat such as sunshine, fire or the like.
- Before operating this system, check the voltage of this system to see if it is identical to the voltage of your local power supply.
- Do not place this unit close to strong magnetic fields.
- Do not place this unit on the amplifier or receiver.
- Do not place this unit close to damp areas as the moisture will affect the life of the laser head.
- If any solid object or liquid falls into the system, unplug the system and have it checked by qualified personnel before operating it any further.
- Do not attempt to clean the unit with chemical solvents as this may damage the finish. Use a clean, dry or slightly damp cloth.
- When removing the power plug from the wall outlet, always pull
directly on the plug, never yank on the cord..
- Changes or modifications to this unit not expressly approved by the party responsible for compliance will void the user's authority to operate the equipment.
- The rating label is pasted on the bottom or back of the equipment.
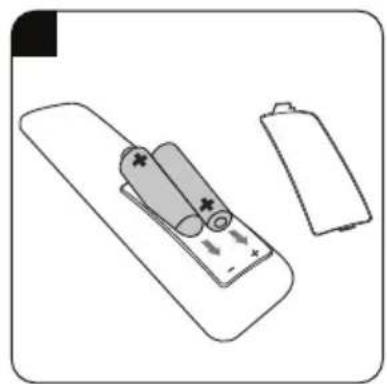
Battery usage CAUTION
To prevent battery leakage which may result in bodily injury, property damage, or damage to the apparatus:
- Install all batteries correctly, + and - as marked on the apparatus.
- Do not mix old and new batteries.
- Do not mix alkaline, standard (Carbon-Zinc) or rechargeable (Ni-Cd, Ni-MH, etc.) batteries.
- Remove batteries when the unit is not used for a long time.
Bluetooth®
The Bluetooth ^® word mark and logos are registered trademarks owned by Bluetooth SIG, Inc.
HDMI
HIGH DEFINITION MULTIMEDIA INTERFACE
The terms HDMI and HDMI High-Definition Multimedia Interface, and the HDMI Logo are trademarks or registered trademarks of HDMI Licensing Administrator, Inc.
Controls and parts
See the figure on page 3.
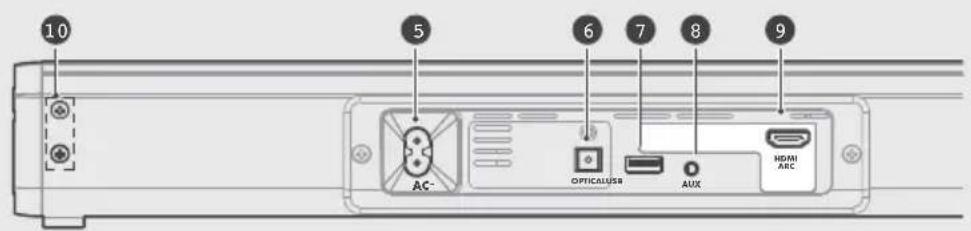
A Main Unit
- LED-Indicator
- Remote Control Sensor
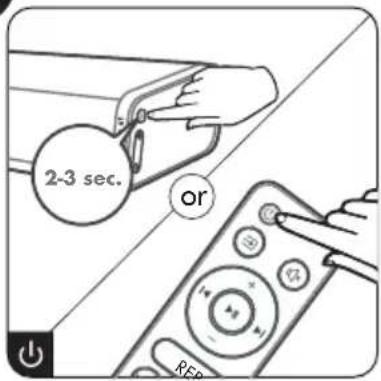
- ⏻Button
- Buttons +/-
- AC Socket
- OPTICAL Socket
- USB Socket
- AUX Socket
- HDMI ARC Socket
- Wall bracket screws
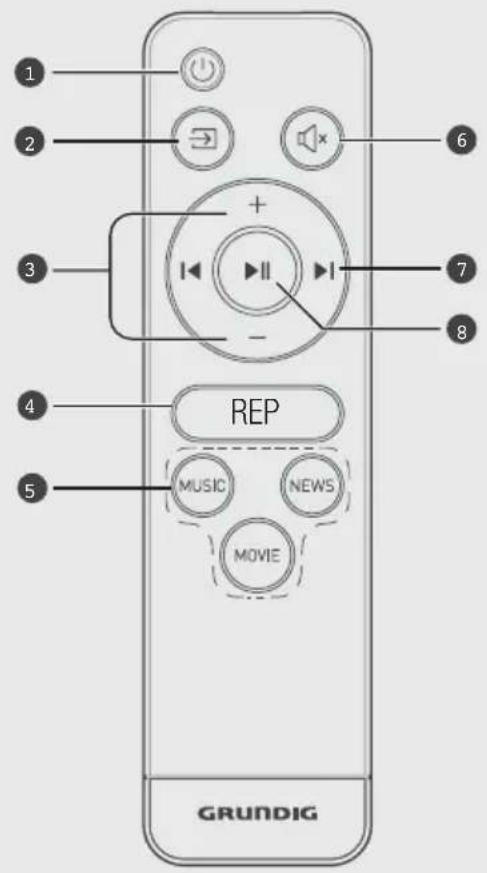
B Remote Control
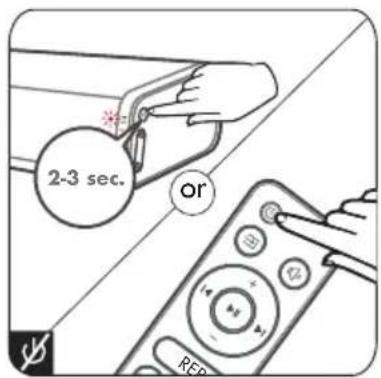
- Switch the unit between ON and STANDBY mode.
- → Select the play function.
- +/- Increase/decrease the volume level.
- REP In USB mode: Select repeat/shuffle play modes.
- EQ Select Equalizer (EQ) Effect.
- Mute or resume the sound.
- Skip to previous/next track in BT/USB mode.
- Play/pause/resume playback in BT/USB mode.
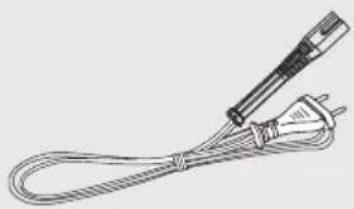
C AC Power Cord
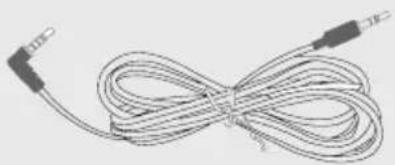
D Audio Cabel
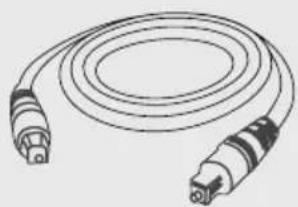
E Optical Cable
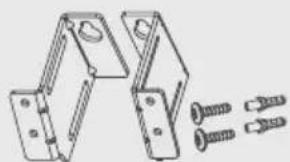
F Wall Bracket
Screws/Gum Cover
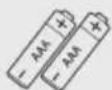
G AAA Batteries x2
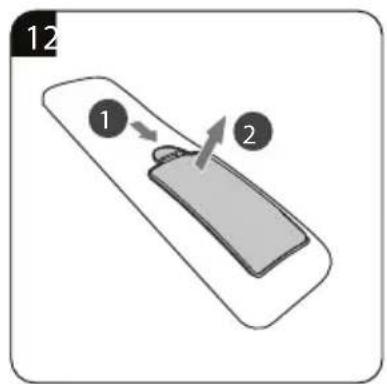
Prepare the Remote Control
- The provided Remote Control allows the unit to be operated from a distance.
- Even if the Remote Control is operated within the effective range 19.7 feet (6m), remote control operation may be impossible if there are any obstacles between the unit and the remote control.
- If the Remote Control is operated near other products which generate infrared rays, or if other remote control devices using infra-red rays are used near the unit, it may operate incorrectly. Conversely, the other products may operate incorrectly.
Precautions Concerning Batteries
- Be sure to insert the batteries with correct positive
- “” and negative “-” polarities.
- Use batteries of the same type. Never use different types of batteries together.
-
Either rechargeable or non-rechargeable batteries can be used. Refer to the precautions on their labels.
-
Be aware of your fingernails when removing the battery cover and the battery.
- Do not drop the remote control.
- Do not allow anything to impact the remote control.
- Do not spill water or any liquid on the remote control.
- Do not place the remote control on a wet object.
- Do not place the remote control under direct sunlight or near sources of excessive heat.
- Remove the battery from the remote control when not in use for a long period of time, as corrosion or battery leakage may occur and result in physical injury, and/or property damage, and/or fire.
- Do not use any batteries other than those specified.
- Do not mix new batteries with old ones.
- Never recharge a battery unless it is confirmed to be a rechargeable type.
PLACEMENT AND MOUNTING
Normal Placement (place Soundbar on leveled surface
in front of TV)
Wall Mounting (option-B)
Note:
- Installation must be carried out by qualified personnel only. Incorrect assembly can result in severe personal injury and property damage (if you intend to install this product yourself, you must check for installations such as elec-
trical wiring and plumbing that may be buried inside the wall). It is the installer's responsibility to verify that the wall will safely support the total load of the unit and wall brackets.
- Additional tools (not included) are required for the installation.
- Do not overtighten screws.
- Keep this instruction manual for future reference.
- Use an electronic stud finder to check the wall type before drilling and mounting.
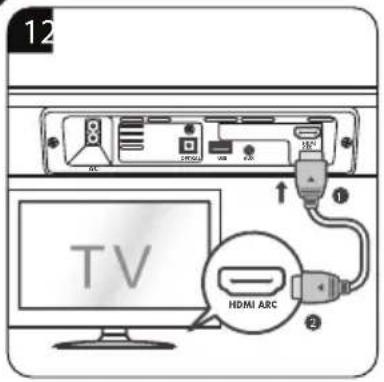
Use the HDMI (ARC) Socket
ARC (Audio Return Channel)
- The ARC (Audio Return Channel) function allows you to send audio from your ARC-compliant TV to your sound bar through a single HDMI connection. To enjoy the ARC function, please ensure your TV is both HDMI-CEC and ARC compliant and set up accordingly. When correctly set up, you can use your TV remote control to adjust the volume output (VOL +/- and MUTE) of the sound bar.
- Connect the HDMI cable (not included) from unit's HDMI (ARC) socket to the HDMI (ARC) socket on your ARC compliant TV. Then press the remote control to select HDMI ARC mode.
Note:
- Your TV must support the HDMI-CEC and ARC and the HDMI-CEC and ARC must be set to On.
- The setting method of HDMI-CEC and ARC may dier depending on the TV. For details about ARC function, please refer to the owner's manual.
- Ensure that you use an HDMI cables that can support the ARC function.
- HDMI-CEC will be called dierent names by dierent manufacturers – please refer to your owner's manual for details on setting up HDMI-CEC and ARC.
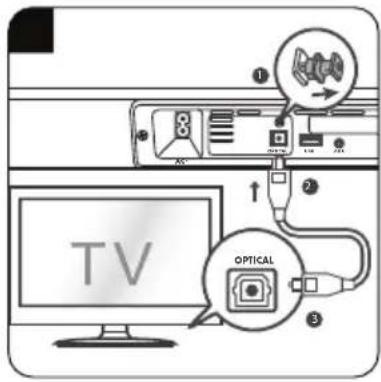
Use the OPTICAL Socket
- Remove the protective cap of the OPTICAL socket, then connect an OPTICAL cable (included) to the TV's OPTICAL OUT socket and the OPTICAL socket on the unit.
- Tip: While in HDMI ARC, OPTICAL mode, if there's no sound output from the unit and the status indicator flashes quickly, you may need to activate PCM signal output on your source device (eg. TV, DVD or Blu-ray player).
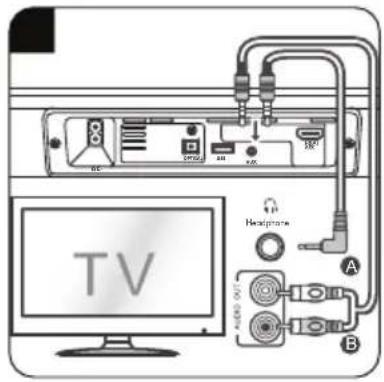
Use the AUX Socket
- A.; Use a 3.5mm to 3.5mm audio cable (included) to connect the TV's or external audio device headphone socket to the AUX socket on the unit. - B.; Use a RCA to 3.5mm audio cable (not included) to connect the TV's audio output sockets to the AUX socket on the unit.
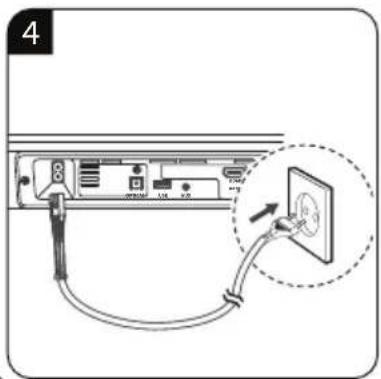
Connect Power
Risk of product damage!
- Ensure that the power supply voltage corresponds to the voltage printed on the back or the underside of the unit.
- Before connecting the AC power cord, ensure you have completed all other connections.
- Connect the mains plug of the main unit to a mains socket.
Note:
- If there is no power, ensure the power cord and plug are fully inserted and the power is turned on.
While playing, press the MOVIE / MUSIC / NEWS buttons on the remote control to select MOVIE / MUSIC / NEWS desired preset equalizers: MOVIE (recommended for viewing movies), MUSIC (recommended for listening to music), NEWS (recommended for listening to NEWS).
BLUETOOTH OPERATION
Tips:
- Enter „0000“ for the password if necessary.
- If no other Bluetooth device pairs with this player within two minutes, the player will recover its previous connection.
- The player will also be disconnected when your device is moved beyond the operational range.
- If you want to reconnect your device to this player, place it within the operational range.
- If the device is moved beyond the operational range, when it is brought back, please check if the device is still connected to the player.
- If the connection is lost, follow the instructions above to pair your device to the player again.
Listen to Music from Bluetooth
Device
- If the connected Bluetooth device supports Advanced Audio Distribution Profile (A2DP), you can listen to the music stored on the device through the player.
-
If the device also supports Audio Video Remote Control Profile (AVRCP), you can use the player's remote control to play music stored on the device.
-
Pair your device with the player.
-
Play music via your device (if it supports A2DP).
-
Use supplied remote control to control play (if it supports AVRCP).
-
To pause/resume play, press the ▶II« button on the remote control.
- To skip to the previous/next track, press the ◀ / ▶ buttons on the remote control or press and hold the VOL+/VOL- buttons on the unit.
Select Repeat/Random Play Options
During play, press the REP button on the remote control repeatedly to select a REPEAT/SHUFFLE option play mode.
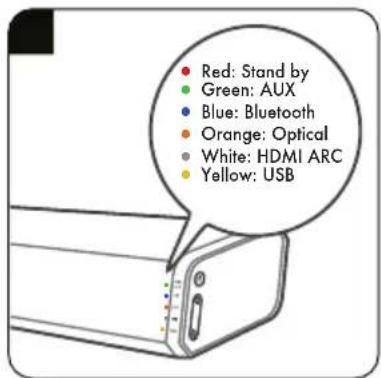
Repeat one : Green LED indicator flash twice
Repeat folder : Blue LED indicator flash twice (if there are multiple folders)
Repeat all : Orange LED indicator flash twice
Shuffle Play : White LED indicator flash twice
Repeat off : Green/Blue/Orange/White LED indicators flash twice together
Tips:
- The unit can support USB devices with up to 64 GB of memory.
- This unit can play MP3.
- USB file system should be FAT32 or FLAT16
TROUBLESHOOTING
To keep the warranty valid, never try to repair the system yourself. If you encounter problems when using this unit, check the following points before requesting service.
| Problem Solution | |
| No power • Ensure that the AC cord of the apparatus is properly connected. • Ensure that there is power at the AC outlet. • Press standby button to turn the unit on. | |
| Remote control does not work | • Before you press any playback control button, first select the correct source. • Reduce the distance between the remote control and the unit. • Insert the battery with its polarities (+/-) aligned as indicated. • Replace the battery. • Aim the remote control directly at the sensor on the front of the unit. |
| I can’t find the Bluetooth name of this unit on my Bluetooth device for Bluetooth pairing | • Ensure the Bluetooth function is activated on your Bluetooth device. • Ensure you have paired the unit with your Bluetooth device. |
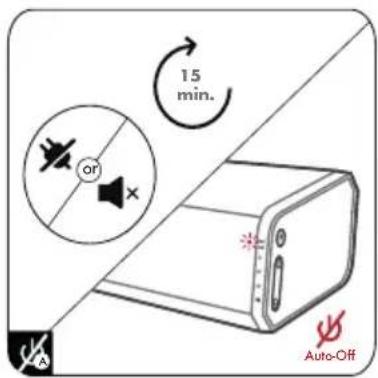
| This is a 15 mins power off function, one of the ERPII standard requirement for saving power | • When the unit’s external input signal level is too low, the unit will be turned off automatically in 15 minutes. Please increase the volume level of your external device. |
| Soundbar | |
| Power Supply AC 220-240V~ 50/60Hz | |
| Power Consumption 25 W / < 0,5 W (Standby) | |
| Total maximum power 120 W | |
| Frequency Response 60Hz - 20KHz | |
| Impedance 8 Ω x 2+ 4 Ω | |
| Total harmonic distortion 1 % (1 kHz, 1 W) | |
| Audio input sensitivity 250 mV | |
| Dimension (W x H x D) 1000 x 60 x 113 mm | |
| Net Weight 2.9 kg | |
| USB port for playback 5 V 500 mA | --- |
| USB Compatibility Hi-Speed-USB (2.0) | |
| USB Playback support / file formats 64 G (max.), MP3 | |
| Bluetooth | |
| Specification A2DP, AVRCP | |
| Version V 4.2 | |
| Maximum power transmitted | 5 dBm |
| Frequency bands | 2402 MHz ~ 2480 MHz |
| Remote Control | |
| Distance | 6 m |
| Angle | 30° |
| Battery type | AAA (1,5 V x 2) |
Design and specifications are subject to change without notice.
Compliance with the WEEE Directive and Disposing of the Waste Product:
This product complies with EU WEEE Directive (2012/19/EU). This product bears a classification symbol for waste electrical and electronic equipment (WEEE).
This symbol indicates that this product shall not be disposed with other household wastes at the end of its service life. Used device must be returned to official collection point for recycling of electrical and electronic devices. To find these collection systems please contact to your local authorities or retailer where the product was purchased. Each household performs important role in recovering and recycling of old appliance. Appropriate disposal of used appliance helps prevent potential negative consequences for the environment and human health.
Compliance with RoHS Directive
The product you have purchased complies with EU RoHS Directive (2011/65/EU). It does not contain harmful and prohibited materials specified in the Directive.
Package Information

Packaging materials of the product are manufactured from recyclable materials in accordance with our National Environment Regulations. Do not dispose of the packaging materials together with the domestic or other wastes. Take them to the packaging material collection points designated by the local authorities.
Technical data
This device is noise-suppressed according to the applicable EU directives.
This product fulfils the European directives 2014/53/EU, 2009/125/EC and 2011/65/EU.
Never open the device casing. The manufacturer will not accept any liability for damage resulting from improper handling.
You can find the CE declaration of conformity for the device in the form of a pdf file on the Grundig Homepage www.grundig.com/downloads/doc.
The type plate is located on the bottom of the device
ARC (Audio Return Channel)
PAPEL RECICLADO Y RECIBLABLE

- Please read this user manual first!
- Meanings of the Symbols
- CAUTION
- Safety:
- Caution:
- Warning
- Battery usage CAUTION
- Bluetooth®
- HDMI
- Controls and parts
- Prepare the Remote Control
- Precautions Concerning Batteries
- PLACEMENT AND MOUNTING
- Wall Mounting (option-B)
- Note:
- Use the HDMI (ARC) Socket
- ARC (Audio Return Channel)
- Use the OPTICAL Socket
- Use the AUX Socket
- Connect Power
- Risk of product damage!
- BLUETOOTH OPERATION
- Tips:
- Listen to Music from Bluetooth
- Device
- Select Repeat/Random Play Options
- TROUBLESHOOTING
- Compliance with the WEEE Directive and Disposing of the Waste Product:
- Compliance with RoHS Directive
- Package Information
- Technical data
Brand : GRUNDIG
Model : DSB 970
Category : Soundbar