
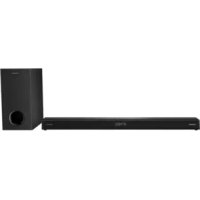
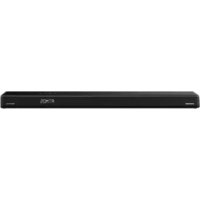
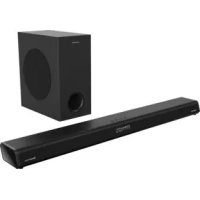
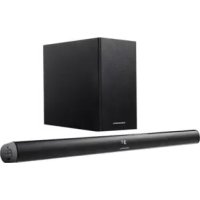
GSB 910 SW - Soundbar GRUNDIG - Free user manual and instructions
Find the device manual for free GSB 910 SW GRUNDIG in PDF.

| Product type | Soundbar with wireless subwoofer |
| Brand | Grundig |
| Model | GSB 910 SW |
| Bar dimensions (W × H × D) | 88 × 6.2 × 8 cm |
| Bar weight | 1.88 kg |
| Subwoofer weight | 3.0 kg |
| Power supply | 100–240 V ~ 50/60 Hz |
| Power consumption (bar) | 20 W max, standby ≤ 0.5 W |
| Power consumption (subwoofer) | 25 W max, standby ≤ 2 W |
| Output power (bar) | 2 × 20 W (DIN 45324, 10% THD) |
| Output power (subwoofer) | 1 × 40 W (DIN 45324, 10% THD) |
| Frequency response | 20 Hz – 20 kHz |
| Signal-to-noise ratio | ≥ 70 dB |
| Bluetooth connectivity | Yes, range 10 m, frequency 2402 – 2480 MHz |
| Bluetooth power | 7.2 dBm |
| Inputs | HDMI ARC, optical, AUX IN (RCA), LINE IN (3.5 mm jack), USB |
| Main functions | Bluetooth, USB playback, remote control, wall-mountable |
| Care and cleaning | Clean with a dry, clean cloth, no detergents |
| Safety | Do not expose to moisture, excessive heat or ignition sources; do not open the device |
| Spare parts and repairability | Not specified by the manufacturer; prefer recycling at end of life |
| General information | Compliant with EU directives 2014/53/EU, 2009/125/EC, 2011/65/EU (RoHS) and WEEE |
Frequently Asked Questions - GSB 910 SW GRUNDIG
User questions about GSB 910 SW GRUNDIG
0 question about this device. Answer the ones you know or ask your own.
Ask a new question about this device
Download the instructions for your Soundbar in PDF format for free! Find your manual GSB 910 SW - GRUNDIG and take your electronic device back in hand. On this page are published all the documents necessary for the use of your device. GSB 910 SW by GRUNDIG.
USER MANUAL GSB 910 SW GRUNDIG
natural_image
Black musical note symbol on white background (no text or numbers)DSB 990
GSB 910 SW
natural_image
Line drawing of two speakers with speaker chamber and display panel (no text or symbols)natural_image
Diagram of a brick wall with two separate screw-like components below (no text or symbols)(Abbildung 2)
natural_image
Diagram of two wooden posts mounted on a brick wall, with no text or symbols present.(Abbildung 4)
AUX IN/LINE IN
natural_image
Illustration of a remote control device with a scroll wheel and indicator lights, shown in 3D rendering (no text or symbols)natural_image
Diagram of a remote control device showing battery and casing with an arrow indicating rotation (no text or symbols)natural_image
Diagram of a remote control device with a highlighted internal component and an arrow indicating rotation (no text or symbols)Hinweis:
Please read this user manual first!
Dear Valued Customer,
Thank you for preferring this Grundig appliance. We hope that you get the best results from your appliance which has been manufactured with high quality and state-of-the-art technology. For this reason, please read this entire user manual and all other accompanying documents carefully before using the appliance and keep it as a reference for future use. If you handover the appliance to someone else, give the user manual as well. Follow the instructions by paying attention to all the information and warnings in the user manual.
Remember that this user manual may also apply to other models. Differences between models are explicitly described in the manual.
Meanings of the Symbols
Following symbols are used in various sections of this user manual:

Important information and useful hints about usage.

WARNING: Warnings against dangerous situations concerning the security of life and property.
WARNING: Warning for electric shock.

Protection class for electric shock.
Please read the following instructions before assembly:
■ The Soundbar is designed for audio playback. All other uses are expressly excluded.
If you want to set up the Soundbar on shelving units, in cupboards, etc., please ensure that there is adequate ventilation. There must be a free area of at least 10 cm on either side and above the Soundbar.
- Do not cover the Soundbar with newspapers, tablecloths, curtains, etc.
- When setting up the Soundbar, please note that furniture surfaces may be covered with various finishes or synthetic materials that often contain chemical substances. These substances can attack the material of the unit base among other things. This can leave residues on the furniture surface, which may be difficult or impossible to remove.
If the Soundbar is subjected to big variations in temperature, for example when transported from a cold to a warm place, do not use the Soundbar for at least two hours.
■ The Soundbar is designed to be used in dry rooms. Should you nevertheless decide to operate it outdoors, you must ensure that it is protected from moisture (dripping or splashing water).
■ Only use the Soundbar in a temperate climate.
- Do not place the Soundbar close to a radiator or in direct sunlight; this can affect the cooling system.
- Do not place any containers with liquids inside (e.g. vases) on top of the Soundbar.
- Do not place any open sources of fire (e.g. candles) on top of the Soundbar.
- Do not use any cleaning agents; these may damage the casing. Cleanse the device using a clean and dry cloth.
- Do not expose the battery to extreme heat, such as for example sunlight, radiators, fire, etc.
■ The remote control contains a button cell. Please always keep the remote control and the button cell out of reach of children.
If the button cell is accidentally swallowed, it can lead to burns and even death within two hours. You should therefore see a doctor immediately.
- Keep new and used batteries out of reach of children. If the battery compartment cannot be closed safely, do not continue to use the device and keep out of reach of children.
■ Remove the battery if used up or if you do not use the device for a long time. We do not assume liability for damage caused by leaked batteries.
The batteries, even those free from heavy metals, must not be disposed of as domestic waste. Used batteries must be discarded in used battery collection containers found at commercial or public waste management services.
■ You must never open the Soundbar. In case of damage due to improper tampering, any claims for guarantee are lost.
■ Storms are a danger to any electronic device. Even if the Soundbar is switched off, it may still become damaged as a result of lightning striking the mains. In case of a storm, you must always pull the mains plug.
Notes:
- Do not connect any devices when your device is switched on. Also switch the other devices off before connecting them!
- Do not plug the mains plug of your device into the socket until all external devices have been connected!
Please ensure that the mains plug is freely accessible!
RF Exposure Warning
This equipment must be installed and operated in accordance with provided manual. The device comprised a built-in antenna, and must not be co-located or operating in conjunction with any other antenna or transmitter.
See the figure on page 3.
Front panel
DISPLAY SCREEN
REMOTE SENSOR
Rear panel
HDMI
AUX INPUT
OPTICAL DIGITAL AUDIO INPUT
Side panel
Switches the device on from standby mode and back off again.
Switches in between the play back sources
USB port for playback and software update
Volume down
+ Volume up
LINE IN Selects the source device connected to the »LINE IN« jack.
Remote control buttons
Switches the device on from standby mode and back off again.
+ Volume up
◀◀ Selects the previous track.
▶II Starts playback mode and switches between play/pause.
Volume down
ARC Audio return channel
MUTE Mutes the Soundbar speakers and unmutes them again.
SOURCE Press briefly to select the source device "Bluetooth", "USB", "LINE IN", "AUX IN", "OPTICAL IN" or "ARC".
▶▶ Selects the next track.
REP Repeats the last played song.
STOP Stops the playing music.
Preparation
Activate the remote control battery
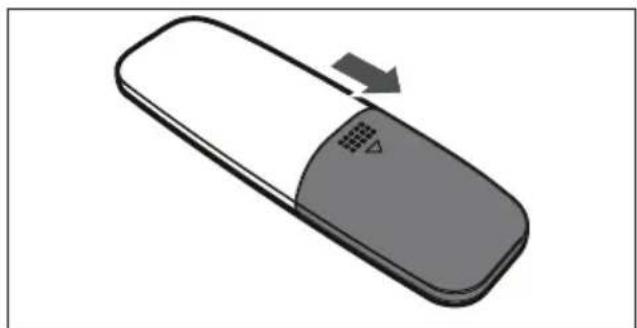
1 Remove protection film from the battery compartment.
- The remote control is now functional.
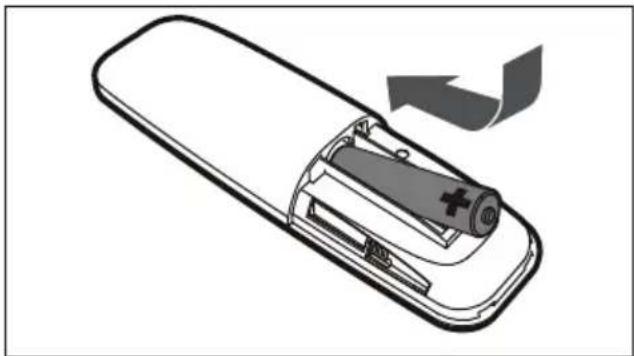
Change remote control batteries (TYPE AAA)
Note:
If your device no longer responds to the remote control commands, the battery may be dead. It is imperative that dead batteries be removed. We do not assume liability for damage caused by leaked batteries.
Caution:
■ Danger of explosion if battery is incorrectly replaced. Replace only with the same or equivalent type.
1 Hold the remote control with the back side facing up.
2 Push the detent of the battery holder to the right and remove battery holder.
3 Remove used battery and insert new battery into the battery holder, positive pole facing upward.
4 Push battery holder into the remote control until it clicks into place.
Connecting
Connect Soundbar to the LCD TV
1 Connect a standard audio lead to the »AUX INPUT« jacks of the Soundbar.
- Please be aware of the left and right channels when doing so (white = left channel, red = right channel).
2 Connect audio lead to the audio output jacks of the LCD TV.
Connect external device
An external device, such as a MP3-Player for example, can be connected to the »AUX IN« jack.
1 Connect a standard audio lead to the »AUX IN« jack of the Soundbar.
2 Connect adapter cable to the external device.
Note:
■ The LCD TV can also be connected via the »AUX IN« jack if it is not equipped with audio output jacks. In such cases please use the headphone jack.
Connect mains cable
Check that the mains voltage indicated on the type label (on the back of the device) corresponds to the local mains voltage. If this is not the case, please consult your specialist dealer.
1 Plug mains cable plug into the socket (100 - 240V\~ 50/60Hz).
Caution:
■ The Soundbar is connected to the mains via the mains cable. If you want to disconnect the Soundbar from the mains completely, you must pull the mains plug.
■ Please ensure that the mains cable is freely accessible during operation and is not obstructed by any other objects.
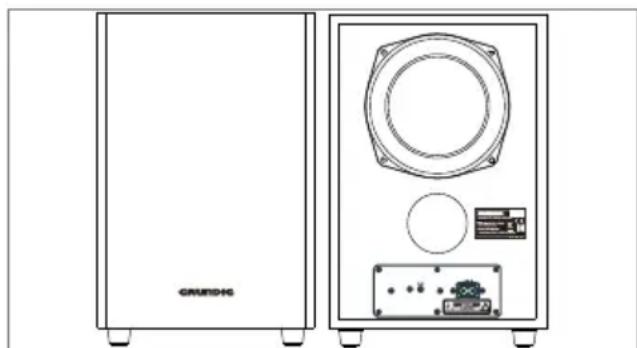
Subwoofer Connection
1 Make sure the AC power cord is connected to a power supply securely.
2 Subwoofer have the wireless bluetooth to receive the audio signal from the sound bar. When the blue indicator flashing, the subwoofer is in searching bluetooth signal status, the blue indicator keeps lighting means bluetooth was connected, if the subwoofer can not connect with the soundbase automatically, please press pair button on the rear panel of subwoofer to reconnect.
3 The subwoofer will memories the sound bar and repaired automatically when you power off the subwoofer then power on.
natural_image
Line drawing of two speakers with front and back views, showing speaker chamber, speaker grille, and electronic components (no text or symbols)In order to prevent injuries, the sound base device must be securely fasten to the wall in accordance with the below installation instructions.
Caution:
■ The ground must be firm and capable of handling the load.
■ Use mountings that are appropriate for the weight of the device.
■ For wooden or hollow wall structures use suitable plugs and screws. Seek advice from a specialist dealer.
Warning:
In order to prevent injuries, the device must be securely fastened to the wall in accordance with the installation instructions.
Note:
■ Installation of the Soundbar GSB 910 SW for professional use (e.g. in a bistro) must only be carried out by an electrically qualified person, in accordance with the applicable construction regulations as per VDE 0100.
1 Drill the two holes (about 6mm diameter) in the wall and keep the distance between drill holes of the sound bar is 500mm (Diagram 1).
(Diagram 1)
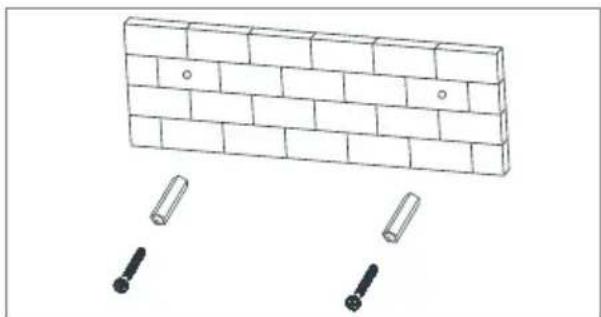
2 Insert the two plugs supplied into two drilled holes and then insert two screws supplied into two holes and tighten (Diagram 2).
natural_image
Diagram of a brick wall with two separate cylindrical components, no text or symbols present(Diagram 2)
3 Take care to leave 4 mm between the screw heads and wall (Diagram 3).
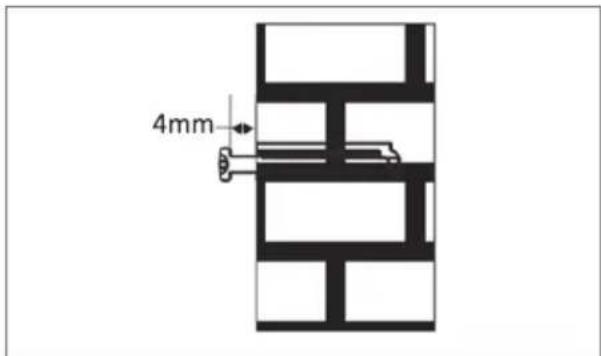
(Diagram 3)
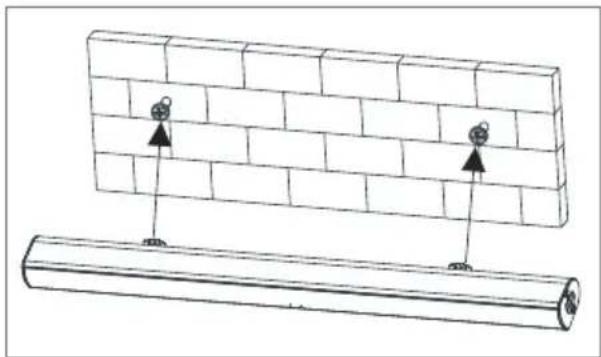
4 Use the assembled sound bar to hang on the setscrews on the wall (Diagram 4).
natural_image
Diagram showing two cylindrical objects with arrows pointing to a brick wall, no text or symbols present(Diagram 4)
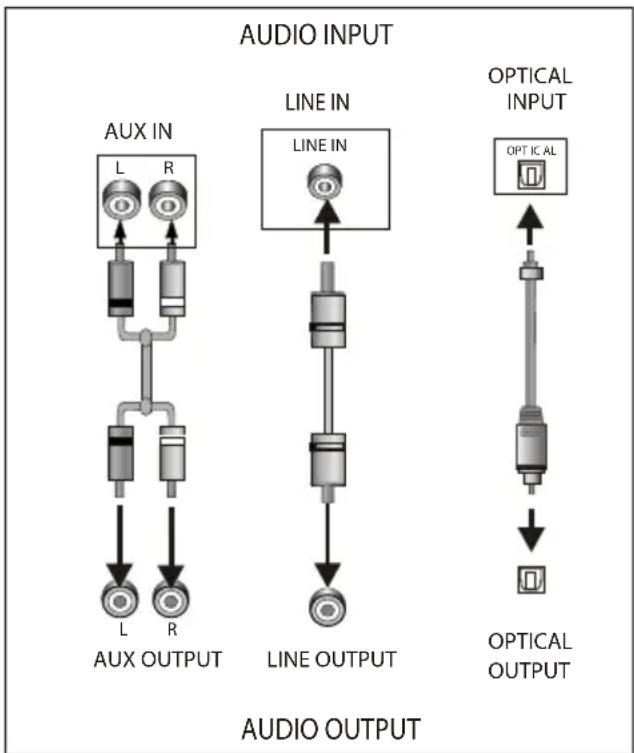
AUX IN/LINE IN
This sound base have two extra groups of audio input terminals. You can input the analogue stereo audio signals from extra devices such as VCD, CD, VCR, DVD player, etc.
Use the audio cable to connect the stereo audio output terminals of a VCD, CD, VCR, DVD player to the stereo input terminals AUX IN/LINE IN of this sound base.
Its corresponding signal source is AUX IN/LINE IN which can be available by pressing [SOURCE] on the remote control.
Optical Input
Soundbar Connect LCD TV (digital Signal)
1 Connect a commercially available optical cable to the »OPTICAL« jack of the Soundbar.
2 Connect the optical cable to the sound output socket of the LCD TV (optical, PCM signal).
Note:
■ The TV audio output must be set to PCM.
Soundbar Connect LCD TV (analoge Signal)
1 Connect a commercially audio cable to the »R - AUX IN - L« jack of soundbar left and right channel. (white = left channel, red = right channel)
2 Connect the audio cable to the sound output socket of the LCD TV
Note:
- Choose appropriate analoge audio output on TV.
ARC(AUDIO RETURN CHANNEL)
ARC is audio return channel function, it is used in digital audio output of liquid crystal display television in order to get the optimal synchronous sound quality.
Use the HDMI cable to connect the HDMI-ARC input port of this sound base to the ARC output port of the liquid-crystal display television.
flowchart
graph TD
    A["AUX IN"] --> B["L"]
    A --> C["R"]
    B --> D["Line IN"]
    C --> D
    D --> E["OPTICAL INPUT"]
    E --> F["OPTICAL OUTPUT"]
    G["AUX OUTPUT"] --> H["L"]
    G --> I["R"]
    H --> J["Line OUTPUT"]
    I --> J
    J --> K["OPTICAL OUTPUT"]
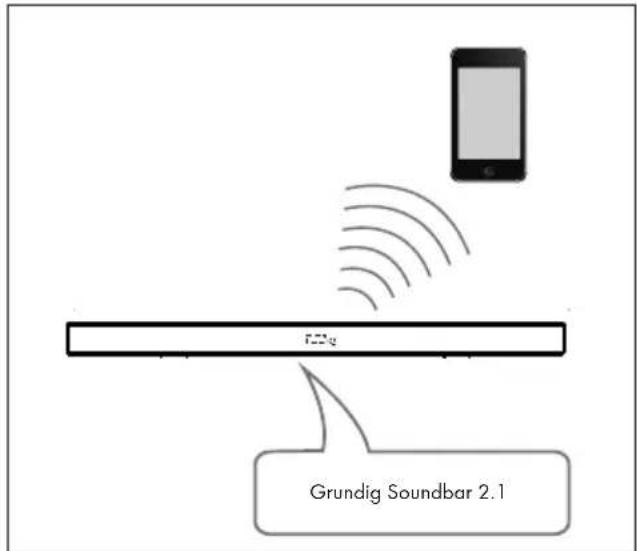
Bluetooth mode

Bluetooth®
Your device can be paired with all current, Bluetooth-enabled devices applying to smartphones, laptops and tablet PCs for example.
1 Press standby button » ⏻ « to power on the sound base.
2 Press source button » « to switch the corresponding bluetooth mode.
-The bt will be flashing quickly in the display . screen.
3 The sound base is in searching bluetooth signa status.
4 Use your smart phone to search the bluetooth signal of the sound base.
5 Select "Grundig Soundbar 2.1" on your list.
6 The sound base will synchronize to play songs on your mobile phone while the bt keep solid light in the display screen means to be connected successfully.
7 Disconnected the bluetooth on the smart phone to switched off the bluetooth connection.
Note:
■ Bluetooth connection range in 10 meters
■ The model "Grundig Soundbar 2.1" in your device was not deleted.
In bluetooth mode, »▶||«, »▶▶«, »|◀◀«, »+«, »—« etc. are also active.
Remote control operation
1 Insert the batteries into the remote control.
2 Point the remote control at the remote sensor on the front panel.
3 The sound base is in searching bluetooth signal status.
4 The remote control works within a distance of about 8 metres from the sensor and within an angle of about 30 degrees from the left and right side.
Battery installation
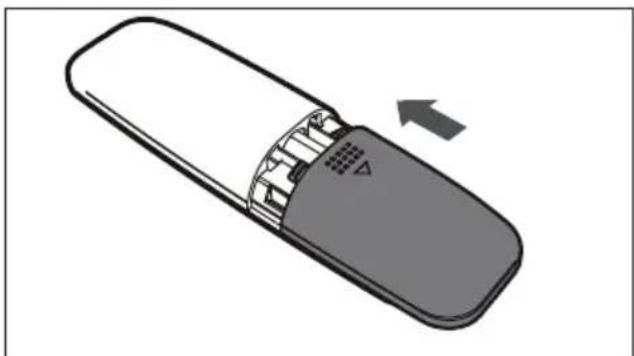
1 Remove the battery compartment cover on the back of the remote control.
natural_image
Illustration of a remote control device with a scroll wheel and indicator lights, showing no text or symbols.2 Load one AAA/1.5V battery into the battery compartment making sure that the battery have been inserted with the correct polarities matching the symbols +, - as indicated inside the battery compartment.
natural_image
Diagram of a remote control device with battery and arrow indicating rotation (no text or symbols)3 Replace the cover.
natural_image
Illustration of a remote control device with a scroll wheel and indicator lights, showing internal components (no text or symbols)Note:
■ Remove the battery when you do not intend to use the remote control for a long time.
■ Weak batteries can leak and severely damage the remote control.
■ The battery must not be exposed to excessive heat source, such as sunshine, fire or any other things like that.
■ Be environmentally friendly and dispose of batteries according to your government regulations.
Technical Information
This device is noise-suppressed according to the applicable EU directives. This product fulfils the European directives 2014/53/EU, 2009/125/EC and 2011/65/EU.
You can find the CE declaration of conformity for the device in the form of a pdf file on the Grundig Homepage www.grundig.com/downloads/doc.
Power supply:
100-240V\~50/60Hz
Max. power input:
Power consumption: 20W, Standby ≤ 0.5 W
Power output:
DIN 45324, 10% THD 2 x 20 W
Frequency response:
20 Hz - 20 kHz
BT frequency : 2402 - 2480 MHz
BT maximum output power: 7.2 dBm
S/N ratio:
≥ 70 dB
Separation:
≥ 45 dB
Dimensions and weight:
W x H x D 88 x 6.2 x 8 cm
Weight approx. 1.88 kg
Subwoofer
Power supply:
100-240V\~50/60Hz
Max. power input:
Power consumption 25 W,
Networked Standby ≤ 2 W
Power output:
DIN 45324, 10%THD 1x40W
Dimensions and weight:
W x H x D: 20.0 x 32.0 x 23.0 cm
Weight approx.: 3.0 kg
Technical and design modifications reserved!
Compliance with the WEEE Directive and Disposing of the Waste Product:
This product complies with EU WEEE Directive (2012/19/EU). This product bears a classification symbol for waste electrical and electronic equipment (WEEE).
This symbol indicates that this product shall not be disposed with other household wastes at the end of its service life. Used device must be returned to official collection point for recycling of electrical and electronic devices. To find these collection systems please contact to your local authorities or retailer where the product was purchased. Each household performs important role in recovering and recycling of old appliance. Appropriate disposal of used appliance helps prevent potential negative consequences for the environment and human health.
Compliance with RoHS Directive
The product you have purchased complies with EU RoHS Directive (2011/65/EU). It does not contain harmful and prohibited materials specified in the Directive.
Package Information

Packaging materials of the product are manufactured from recyclable materials in accordance with our National Environment Regulations. Do not dispose of the packaging materials together with the domestic or other wastes. Take them to the packaging material collection points designated by the local authorities.
natural_image
Line drawing of two speakers with speaker chamber and control panel (no text or symbols)natural_image
Diagram of a brick wall with two separate bolts, no text or symbols present(Diagramme 2)
natural_image
Diagram showing two cylindrical objects with arrows pointing to a brick wall, no text or symbols present(Diagramme 4)
AUX IN / LINE IN
natural_image
Illustration of a remote control device with a scroll wheel and directional arrow (no text or symbols)natural_image
Diagram of a remote control device with battery and arrow indicating rotation (no text or symbols)natural_image
Diagram of a remote control device showing internal components and an arrow indicating rotation (no text or symbols)Remarque :
I x h x p : 20,0 x 32,0 x 23,0 cm
natural_image
Line drawing of two speakers with speaker chamber and display unit (no text or symbols)natural_image
Diagram of a brick wall with two bolt holes and two separate cylindrical components (no text or symbols)(Diagramma 2)
natural_image
Diagram showing two brick wall panels with arrows pointing to each panel, and a separate cylindrical object below (no text or symbols)(Diagramma 4)
AUX IN/LINE IN
natural_image
Illustration of a remote control device with a scroll wheel and directional arrow (no text or symbols)natural_image
Diagram of a remote control device with battery and arrow indicating rotation (no text or symbols)natural_image
Illustration of a remote control device with a scroll wheel and ventilation slots, showing an arrow indicating left motion (no text or symbols present)Nota:
Stand-by in rete ≤ 2 W
Uscita potenza:
DIN 45324, 10%THD 1x40W
Dimensioni e peso:
L x A x P: 20,0 x 32,0 x 23,0 cm
Peso: 3,0 kg circa
natural_image
Line drawing of two speakers with speaker chamber and display unit (no text or symbols)natural_image
Diagram of a brick wall with two separate cylindrical components below (no text or symbols)(Diagrama 2)
natural_image
Diagram showing two brick wall panels with upward arrows pointing to a cylindrical object below (no text or symbols)(Diagrama 4)
AUX IN/LINE IN (ENTRADA AUXILIAR/ENTRADA DE LINEA)
natural_image
Illustration of a remote control device with a scroll wheel and directional arrow (no text or symbols)natural_image
Diagram of a remote control casing with battery and arrow indicating rotation (no text or symbols)natural_image
Illustration of a remote control device with a scroll wheel and ventilation slots, showing an arrow indicating direction (no text or symbols)Nota:
20,0 × 32,0 × 23,0 cm
Peso aprox.: 3,0 kg
OPTISK DIGITAL LYDINNGANG
Sidepanel
natural_image
Line drawing of two speakers with speaker chamber and control panel (no text or symbols)natural_image
Diagram of a brick wall with two separate cylindrical objects below (no text or symbols)(Skjema 2)
natural_image
Diagram of two cylindrical objects with arrows pointing to their top positions on a brick wall (no text or symbols)(Skjema 4)
AUX IN/LINE IN
natural_image
Illustration of a remote control device with a scroll wheel and indicator lights, no text or symbols presentnatural_image
Diagram of a remote control device showing battery and casing with an arrow indicating rotation (no text or symbols)natural_image
Diagram of a remote control device showing internal components and an arrow indicating rotation (no text or symbols)Obs!
■ Ta ut batteriet hvis fjernkontrollen ikke skal brukes på en lang stund.
■ Nesten utladede batterier kan lekke og føre til store skader på fjernkontrollen.
- Batteriet må ikke eksponeres for sterke varmekilder som sollys, brann eller lignende.
Vær miljøvennlig, og kast batteriene i henhold til lokale forskrifter.
Teknisk informasjon
Denne enheten er støyredusert i henhold til de EU-direktivene som er relevante. Dette produktet oppfyller de europeiske direktivene 2014/53/EU, 2009/125/EC og 2011/65/EU.
Du kan finne CE-samsvarserklæringen for enheten i form av en pdf-fil på Grundigs hjemmeside www.grundig.com/downloads/doc.
Strømtilførsel:
100-240V\~ 50/60Hz
Maks. inngangsspenning:
B x H x D: 20,0 x 32,0 x 23,0 cm
Vekt omtrent: 3,0 kg
natural_image
Line drawing of two speakers with speaker chamber and control panel (no text or symbols)natural_image
Diagram of a brick wall with two separate bolt holes, no text or symbols present(Kaavio 2)
natural_image
Diagram showing two cylindrical objects with arrows pointing to them, one on a brick wall and the other on a wooden log (no text or symbols)(Kaavio 4)
AUX IN/LINE IN
natural_image
Illustration of a remote control device with a scroll wheel and indicator lights, showing no text or symbols.natural_image
Diagram of a remote control device showing battery and casing with an arrow indicating rotation (no text or symbols)natural_image
Illustration of a remote control device with a scroll wheel and ventilation slots, showing internal circuitry (no text or symbols)Huomautus:
W × H × D: 20.0 × 32.0 × 23.0 cm
Paino n.: 3.0 kg
natural_image
Front and back views of a speaker or audio device with speaker grille, control panel, and electronic components (no text or symbols visible)MONTAŻ NA ŚCIANIE
natural_image
Diagram of a brick wall with two separate screw fasteners (no text or symbols)(schemat 2)
natural_image
Diagram showing two cylindrical objects with arrows pointing to a brick wall, no text or symbols present(schemat 4)
AUX IN / LINE IN
natural_image
Illustration of a remote control device with a scroll wheel and directional arrow (no text or symbols)natural_image
Diagram of a remote control device with battery and arrow indicating rotation (no text or symbols)natural_image
Illustration of a remote control device with a scroll wheel and indicator lights, showing internal components (no text or symbols)Uwaga:
natural_image
Front and back view of a speaker chamber with speaker grille, buttons, and display (no text or symbols visible)natural_image
Diagram of a brick wall with two separate cylindrical objects below (no text or symbols)(Şema 2)
natural_image
Diagram showing two brick wall panels with upward arrows pointing to a cylindrical object (no text or symbols)(Şema 4)
AUX IN/LINE IN
natural_image
Illustration of a remote control device with a scroll wheel and indicator lights, showing no text or symbols.natural_image
Diagram of a remote control casing with battery and arrow indicating rotation (no text or symbols)natural_image
Illustration of a remote control device with a scroll wheel and ventilation slots, showing an arrow indicating motion (no text or symbols present)Not:
G x Y x D: 20,0 x 32,0 x 23,0 cm

- AUX IN/LINE IN
- Hinweis:
- Please read this user manual first!
- Meanings of the Symbols
- Notes:
- RF Exposure Warning
- Front panel
- DISPLAY SCREEN
- REMOTE SENSOR
- Rear panel
- HDMI
- AUX INPUT
- OPTICAL DIGITAL AUDIO INPUT
- Side panel
- Remote control buttons
- Preparation
- Activate the remote control battery
- Change remote control batteries (TYPE AAA)
- Note:
- Caution:
- Connecting
- Connect Soundbar to the LCD TV
- Connect external device
- Connect mains cable
- Subwoofer Connection
- Warning:
- Optical Input
- Soundbar Connect LCD TV (digital Signal)
- Soundbar Connect LCD TV (analoge Signal)
- ARC(AUDIO RETURN CHANNEL)
- Bluetooth mode
- Bluetooth®
- Remote control operation
- Battery installation
- Technical Information
- Power supply:
- Max. power input:
- Power output:
- Frequency response:
- S/N ratio:
- Separation:
- Dimensions and weight:
- Subwoofer
- Compliance with the WEEE Directive and Disposing of the Waste Product:
- Compliance with RoHS Directive
- Package Information
- AUX IN / LINE IN
- Remarque :
- Nota:
- Uscita potenza:
- Dimensioni e peso:
- AUX IN/LINE IN (ENTRADA AUXILIAR/ENTRADA DE LINEA)
- OPTISK DIGITAL LYDINNGANG
- Sidepanel
- Obs!
- Teknisk informasjon
- Strømtilførsel:
- Maks. inngangsspenning:
- Huomautus:
- MONTAŻ NA ŚCIANIE
- Uwaga:
- Not:
Brand : GRUNDIG
Model : GSB 910 SW
Category : Soundbar